- Preface
- New and Changed Information
- Overview
- Using the Cisco NX-OS Setup Utility
- Using PowerOn Auto Provisioning
- Understanding the Command-Line Interface
- Configuring Terminal Settings and Sessions
- Basic Device Management
- Using the Device File Systems, Directories, and Files
- Working with Configuration Files
- Configuring CDP
- Configuring NTP
- Managing System Hardware
- Managing Modules
- Index
Contents
- Configuring NTP
- Information About NTP
- NTP
- NTP Configuration Distribution Using CFS
- High Availability for NTP
- Prerequisites for NTP
- Guidelines and Limitations for NTP
- Configuring NTP
- Enabling or Disabling the NTP Protocol
- Configuring an NTP Server and Peer
- Displaying and Clearing NTP Statistics
- Distributing the NTP Configuration Using CFS
- Enabling NTP Configuration Distribution
- Committing NTP Configuration Changes
- Discarding NTP Configuration Changes
- Releasing Fabric Session Lock on the NTP Configuration
- Verifying NTP Configuration
- NTP Example Configuration
- Default Settings for NTP
Configuring NTP
This chapter describes how to configure the Network Time Protocol (NTP) on CIsco MDS 9000 Family switches.
- Information About NTP
- Prerequisites for NTP
- Guidelines and Limitations for NTP
- Configuring NTP
- Verifying NTP Configuration
- NTP Example Configuration
- Default Settings for NTP
Information About NTP
This section describes information about NTP.
NTP
In a large enterprise network, having one time standard for all network devices is critical for management reporting and event logging functions when trying to correlate interacting events logged across multiple devices. Many enterprise customers with extremely mission-critical networks maintain their own stratum-1 NTP source.
Time synchronization occurs when several frames are exchanged between clients and servers. The switches in client mode know the address of one or more NTP servers. The servers act as the time source and receive client synchronization requests.
By configuring an IP address as a peer, the Cisco NX-OS device will obtain and provide time as required. The peer is capable of providing time on its own and is capable of having a server configured. If both of these instances point to different time servers, your NTP service is more reliable. Even if the active server link is lost, you can still maintain the correct time due to the presence of the peer.
If an active server fails, a configured peer helps in providing the NTP time. To ensure backup support if the active server fails, provide a direct NTP server association and configure a peer.
If you only configure a peer, the most accurate peer takes on the role of the NTP server and the other peer acts as a peer. Both devices end at the correct time if they have the correct time source or if they point to the correct NTP source.
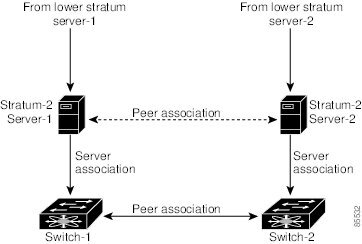
In this configuration, the switches were configured as follows:
NTP Configuration Distribution Using CFS
You can enable NTP fabric distribution for all Cisco MDS switches in the fabric. When you perform NTP configurations, and distribution is enabled, the entire server and peer configuration is distributed to all the switches in the fabric.
You automatically acquire a fabric-wide lock when you issue the first configuration command after you enabled distribution in a switch. The NTP application uses the effective and pending database model to store or commit the commands based on your configuration.
High Availability for NTP
The Cisco NX-OS software supports stateless restarts for NTP. After a reboot or a supervisor switchover, the running configuration is applied. For more information on high availability, see the Cisco MDS 9000 Family NX-OS High Availability and Redundancy Configuration Guide.
 Note | You can configure NTP peers to provide redundancy in case an NTP server fails. |
Prerequisites for NTP
NTP has the following prerequisite:
Guidelines and Limitations for NTP
NTP has the following configuration guidelines and limitations:
You should have a peer association with another device only when you are sure that your clock is reliable (which means that you are a client of a reliable NTP server).
A peer configured alone takes on the role of a server and should be used as a backup. If you have two servers, you can configure several devices to point to one server and the remaining devices to point to the other server. You can then configure a peer association between these two servers to create a more reliable NTP configuration.
If you only have one server, you should configure all the devices as clients to that server.
You can configure up to 64 NTP entities (servers and peers).
Configuring NTP
This section describes how to configure NTP.
- Enabling or Disabling the NTP Protocol
- Configuring an NTP Server and Peer
- Displaying and Clearing NTP Statistics
- Distributing the NTP Configuration Using CFS
Enabling or Disabling the NTP Protocol
NTP is enabled on the device by default. You can disable NTP on the device and then reenable it.
1.
configure terminal
2.
ntp enable
3.
(Optional)
copy running-config startup-config
DETAILED STEPS
Configuring an NTP Server and Peer
You can configure NTP using IPv4 addresses, IPv6 addresses, or domain name server (DNS) names.
1.
configure terminal
2.
ntp server {ip-address |
ipv6-address |
dns-name}
3.
ntp peer {ip-address |
ipv6-address |
dns-name}
4.
(Optional)
show ntp peers
5.
(Optional)
copy running-config startup-config
DETAILED STEPS
Displaying and Clearing NTP Statistics
NTP generates statistics that you can display and clear as needed.
1.
display ntp statistics {peer |
io |
local |
memory}
2.
clear ntp statistics {peer |
io |
local |
memory}
DETAILED STEPS
| Command or Action | Purpose | |
|---|---|---|
| Step 1 |
display ntp statistics {peer |
io |
local |
memory}
Example: switch# show ntp statistics peers |
|
| Step 2 |
clear ntp statistics {peer |
io |
local |
memory}
Example: switch# clear ntp statistics peers |
Clears the NTP statistics. |
Distributing the NTP Configuration Using CFS
You can distribute the NTP configuration changes to the fabric using CFS.
- Enabling NTP Configuration Distribution
- Committing NTP Configuration Changes
- Discarding NTP Configuration Changes
- Releasing Fabric Session Lock on the NTP Configuration
Enabling NTP Configuration Distribution
You can enable NTP configuration distribution using CFS.
Ensure that CFS is enabled.
Ensure that NTP is enabled.
1.
configure terminal
2.
ntp distribute
3.
(Optional) show ntp status
4.
(Optional)
copy running-config startup-config
DETAILED STEPS
| Command or Action | Purpose | |
|---|---|---|
| Step 1 |
configure terminal
Example: switch# configure terminal switch(config)# |
Enters global configuration mode. |
| Step 2 | ntp distribute
Example: swtich(config)# ntp distribute |
Enables NTP configuration distribution to all switches in the fabric. Acquires a fabric lock and stores all future configuration changes in the pending database. Use the no form of the command to disable NTP configuration distribution. The default is disabled. |
| Step 3 | show ntp status
Example: swtich(config)# show ntp status | (Optional)
Displays the NTP configuration distribution status. |
| Step 4 |
copy running-config startup-config
Example: swtich(config)# copy running-config startup-config | (Optional)
Copies the running configuration to the startup configuration. |
Committing NTP Configuration Changes
When you commit the NTP configuration changes, the Cisco NX-OS software applies the pending changes to the running configuration on the local Cisco MDS switch and to all the Cisco MDS switches in the fabric that can receive NTP configuration distributions. When you commit the NTP configuration changes without implementing the CFS session feature, the NTP configurations are distributed to all the switches in the fabric that have NTP distribution enabled.
Enable NTP configuration distribution on other Cisco MDS switches in the fabric.
1.
configure terminal
2.
ntp commit
3.
(Optional) show ntp session status
4.
(Optional)
copy running-config startup-config
DETAILED STEPS
| Command or Action | Purpose | |
|---|---|---|
| Step 1 |
configure terminal
Example: switch# configure terminal switch(config)# |
Enters global configuration mode. |
| Step 2 | ntp commit
Example: swtich(config)# ntp commit |
Distributes the pending NTP configuration changes to running configuration files on the local Cisco MDS switch and to all Cisco MDS switches in the fabric that can receive NTP configuration distribution and releases the lock on the NTP configuration. |
| Step 3 | show ntp session status
Example: swtich(config)# show ntp session status | (Optional)
Displays the NTP configuration distribution session status information. |
| Step 4 |
copy running-config startup-config
Example: swtich(config)# copy running-config startup-config fabric | (Optional)
Copies the running configuration to the startup configuration on the local switch and on all CFS-enabled switches in the fabric. |
Discarding NTP Configuration Changes
After making the configuration changes, you can choose to discard the changes. This action releases the lock on the NTP configuration in the fabric.
1.
configure terminal
2.
ntp abort
3.
(Optional) show ntp session status
DETAILED STEPS
| Command or Action | Purpose | |
|---|---|---|
| Step 1 |
configure terminal
Example: switch# configure terminal switch(config)# |
Enters global configuration mode. |
| Step 2 | ntp abort
Example: swtich(config)# ntp abort |
Discards the NTP configuration changes in the pending database and releases the fabric lock. |
| Step 3 | show ntp session status
Example: swtich(config)# show ntp session status | (Optional)
Displays the NTP configuration distribution session status information. |
Releasing Fabric Session Lock on the NTP Configuration
If you have performed an NTP fabric task and have forgotten to release the lock by either committing or discarding the changes, an administrator can release the lock from any switch in the fabric. If the administrator performs this task, your changes to the pending database are discarded and the fabric lock is released.
 Tip | The changes are only available in the volatile directory and are subject to being discarded if the switch is restarted. |
To use administrative privileges and release a locked NTP session, use the clear ntp session command.
switch# clear ntp session
Verifying NTP Configuration
Use the following commands to display the NTP configuration:
|
Command |
Purpose |
|---|---|
| show ntp peer-status |
Displays the status for all NTP servers and peers. |
| show ntp peers |
Displays all the NTP peers. |
| show ntp pending peers |
Displays the temporary CFS database for NTP. |
| show ntp pending-diff |
Displays the difference between the pending CFS database and the current NTP configuration. |
| show ntp session status |
Displays the NTP session information. |
| show ntp statistics { io | local | memory | peer {ipv4-address | ipv6-address | dns-name} |
Displays the NTP statistics. |
| show ntp status |
Displays the NTP distribution status. |
| show ntp timestamp status |
Displays if the timestamp check is enabled. |
NTP Example Configuration
This example configures an NTP server:
configure terminal
ntp server 192.0.2.10
Default Settings for NTP
|
NTP |
Disabled |