- Preface
- New and Changed Information
- Overview
- Using the Cisco NX-OS Setup Utility
- Using PowerOn Auto Provisioning
- Understanding the Command-Line Interface
- Configuring Terminal Settings and Sessions
- Basic Device Management
- Using the Device File Systems, Directories, and Files
- Working with Configuration Files
- Configuring CDP
- Configuring NTP
- Managing System Hardware
- Managing Modules
- Index
Using the Cisco NX-OS Setup Utility
This chapter contains the following sections:
- Information About the Cisco NX-OS Setup Utility
- Prerequisites for the Setup Utility
- Initial Setup Routine
- Where to Go Next
Information About the Cisco NX-OS Setup Utility
The Cisco NX-OS setup utility is an interactive command-line interface (CLI) mode that guides you through a basic (also called a startup) configuration of the system. The setup utility allows you to configure only enough connectivity for system management.
The setup utility allows you to build an initial configuration file using the System Configuration Dialog. The setup starts automatically when a device has no configuration file in NVRAM. The dialog guides you through initial configuration. After the file is created, you can use the CLI to perform additional configuration.
You can press Ctrl-C at any prompt to skip the remaining configuration options and proceed with what you have configured up to that point, except for the administrator password. If you want to skip answers to any questions, press Enter. If a default answer is not available (for example, the device hostname), the device uses what was previously configured and skips to the next question.
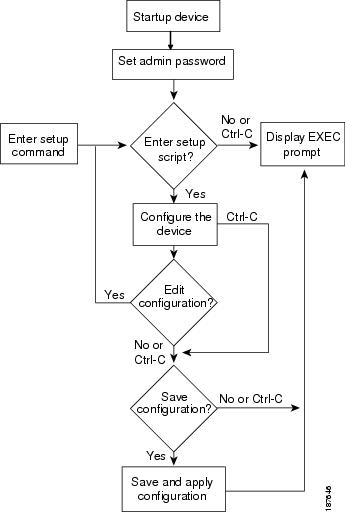
You use the setup utility mainly for configuring the system initially, when no configuration is present. However, you can use the setup utility at any time for basic device configuration. The setup utility keeps the configured values when you skip steps in the script. For example, if you have already configured the mgmt0 interface, the setup utility does not change that configuration if you skip that step. However, if there is a default value for the step, the setup utility changes to the configuration using that default, not the configured value. Be sure to carefully check the configuration changes before you save the configuration.
 Note | Be sure to configure the IPv4 route, the default network IPv4 address, and the default gateway IPv4 address to enable SNMP access. If you enable IPv4 routing, the device uses the IPv4 route and the default network IPv4 address. If IPv4 routing is disabled, the device uses the default gateway IPv4 address. |
Note | The setup script only supports IPv4. |
Prerequisites for the Setup Utility
The setup utility has the following prerequisites:
-
Have a password strategy for your network environment.
-
Connect the console port on the supervisor module to the network. If you have dual supervisor modules, connect the console ports on both supervisor modules to the network.
-
Connect the Ethernet management port on the supervisor module to the network. If you have dual supervisor modules, connect the Ethernet management ports on both supervisor modules to the network.
-
Enable the licensing grace period, if applicable. For detailed information about licensing, see the Cisco MDS 9000 Family NX-OS Software Licensing Guide.
Initial Setup Routine
The first time that you access a switch in the Cisco MDS 9000 Family, it runs a setup program that prompts you for the IP address and other configuration information necessary for the switch to communicate over the supervisor module Ethernet interface. This information is required to configure and manage the switch.
The IP address can only be configured from the CLI. When you power up the switch for the first time assign the IP address. After you perform this step, the Cisco MDS 9000 Family Fabric Manager can reach the switch through the console port.
Configuring Out-of-Band Management
You can configure out-of-band management on the mgmt 0 interface.
Note | You can configure both in-band and out-of-band configuration together by entering Yes in both Step 12c and Step 12d in the following procedure. |
Configuring In-Band Management
The in-band management logical interface is VSAN 1. This management interface uses the Fibre Channel infrastructure to transport IP traffic. An interface for VSAN 1 is created on every switch in the fabric. Each switch should have its VSAN 1 interface configured with either an IPv4 address or an IPv6 address in the same subnetwork. A default route that points to the switch providing access to the IP network should be configured on every switch in the Fibre Channel fabric.
Note | You can configure both in-band and out-of-band configuration together by entering Yes in both Step 10c and Step 10d in the following procedure. |
1. Power on the switch. Switches in the Cisco MDS 9000 Family boot automatically.
2. Enter the new password for the administrator.
3. Enter yes to enter the setup mode.
4. Enter yes (yes is the default) to enable secure password standard
5. Enter no (no is the default) if you do not wish to create additional accounts.
6. Configure the read-only or read-write SNMP community string.
7. Enter a name for the switch.
8. Enter no (yes is the default) at the configuration prompt to configure out-of-band management.
9. Enter yes (yes is the default) to configure the default gateway.
10. Enter yes (no is the default) to configure advanced IP options such as in-band management, static routes, default network, DNS, and domain name.
11. Enter no (no is the default) to disable the Telnet service.
12. Enter yes (yes is the default) to enable the SSH service.
13. Enter the SSH key type.
14. Enter the number of key bits within the specified range.
15. Enter no (no is the default) to configure the NTP server.
16. Enter shut (shut is the default) to configure the default switch port interface to the shut (disabled) state.
17. Enter auto (off is the default) to configure the switch port trunk mode.
18. Enter yes (yes is the default) to configure the switchport mode F.
19. Enter off (off is the default) to configure the PortChannel auto-create state.
20. Enter deny (deny is the default) to deny a default zone policy configuration.
21. Enter no (no is the default) to disable a full zone set distribution.
22. Enter enhanced (basic is the default) to configure default-zone mode as enhanced.
23. Enter no (no is the default) if you are satisfied with the configuration.
24. Enter yes (yes is default) to use and save this configuration.
DETAILED STEPS
| Step 1 | Power on the switch. Switches in the Cisco MDS 9000 Family boot automatically. | ||||
| Step 2 | Enter the new password for the administrator.
Enter the password for admin: 2004asdf*lkjh18
| ||||
| Step 3 | Enter
yes to enter the setup mode.
This setup utility will guide you through the basic configuration of
the system. Setup configures only enough connectivity for management
of the system.

*Note: setup is mainly used for configuring the system initially,
when no configuration is present. So setup always assumes system
defaults and not the current system configuration values.

Press Enter at anytime to skip a dialog. Use ctrl-c at anytime
to skip the remaining dialogs.

Would you like to enter the basic configuration dialog (yes/no): yes
The setup utility guides you through the basic configuration process. Press Ctrl-C at any prompt to end the configuration process. | ||||
| Step 4 | Enter
yes (yes is the default) to enable secure
password standard
Do you want to enforce secure password standard (yes/no): yes
| ||||
| Step 5 | Enter
no (no is the default) if you do not wish to
create additional accounts.
Create another login account (yes/no) [no]: no | ||||
| Step 6 | Configure the read-only or read-write SNMP community string.
| ||||
| Step 7 | Enter a name for the switch.
Enter the switch name: switch_name | ||||
| Step 8 | Enter
no (yes is the default) at the configuration
prompt to configure out-of-band management.
Continue with Out-of-band (mgmt0) management configuration? [yes/no]: no | ||||
| Step 9 | Enter
yes (yes is the default) to configure the
default gateway.
Configure the default-gateway: (yes/no) [y]: yes | ||||
| Step 10 | Enter
yes (no is the default)
to configure advanced IP options such as in-band management, static routes,
default network, DNS, and domain name.
Configure Advanced IP options (yes/no)? [n]: yes | ||||
| Step 11 | Enter
no (no is the default)
to disable the Telnet service.
Enable the telnet service? (yes/no) [y]: no | ||||
| Step 12 | Enter
yes (yes is the
default) to enable the SSH service.
Enabled SSH service? (yes/no) [n]: yes | ||||
| Step 13 | Enter the SSH key type.
Type the SSH key you would like to generate (dsa/rsa)? rsa | ||||
| Step 14 | Enter the number of key bits within the specified range.
Enter the number of key bits? (768 to 2048): 2048 | ||||
| Step 15 | Enter
no (no is the default)
to configure the NTP server.
Configure NTP server? (yes/no) [n]: no | ||||
| Step 16 | Enter
shut (shut is the
default) to configure the default switch port interface to the shut (disabled)
state.
Configure default switchport interface state (shut/noshut) [shut]: shut
| ||||
| Step 17 | Enter
auto (off is the
default) to configure the switch port trunk mode.
Configure default switchport trunk mode (on/off/auto) [off]: auto | ||||
| Step 18 | Enter
yes (yes is the
default) to configure the switchport mode F.
Configure default switchport mode F (yes/no) [n]: y | ||||
| Step 19 | Enter
off (off is the
default) to configure the PortChannel auto-create state.
Configure default port-channel auto-create state (on/off) [off]: off | ||||
| Step 20 | Enter
deny (deny is the
default) to deny a default zone policy configuration.
Configure default zone policy (permit/deny) [deny]: deny Denies traffic flow to all members of the default zone.
| ||||
| Step 21 | Enter
no (no is the default)
to disable a full zone set distribution.
Enable full zoneset distribution (yes/no) [n]: no Disables the switch-wide default for the full zone set distribution feature. You see the new configuration. Review and edit the configuration that you have just entered.
| ||||
| Step 22 | Enter
enhanced (basic is the
default) to configure default-zone mode as enhanced.
Configure default zone mode (basic/enhanced) [basic]: enhanced Overrides the switch-wide default zone mode as enhanced.
| ||||
| Step 23 | Enter
no (no is the default)
if you are satisfied with the configuration.
The following configuration will be applied:
  username admin password admin_pass role network-admin
  snmp-server community snmp_community rw
  switchname switch
  interface vsan1
    ip address ip_address subnet_mask
    no shutdownip default-gateway default_gateway
  no telnet server disable
  ssh key rsa 2048 forcessh server enablesystem default switchport shutdown
  system default switchport trunk mode
  autosystem default switchport mode F
  no zone default-zone permit vsan 1-4093
  no zoneset distribute full vsan 1-4093
  system default zone mode enhanced
Would you like to edit the configuration? (yes/no) [n]: n
| ||||
| Step 24 | Enter
yes (yes is default) to
use and save this configuration.
Use this configuration and save it? (yes/no) [y]: yes
|
Where to Go Next
To become more familiar with the CLI, continue to .
 Feedback