Product Overview
The Cisco CGS 2520 switches, also referred to as the switch, are Ethernet switches that you can connect devices such as Intelligent Electronic Devices (IEDs), distributed controllers, substation routers, Cisco IP Phones, Cisco Wireless Access Points, and other network devices such as redundant substation switches.
This section contains the following topics:
■![]() LEDs
LEDs
Switch Models
Note: The information in this document regarding China switches (part numbers ending with -C, for example, PWR-RGD-AC-DC-C) are identical to the non-China switches, except where specified.
Cable Side
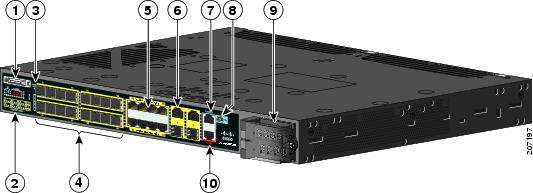
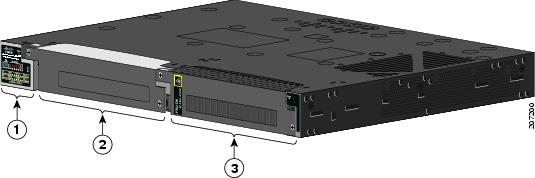
The 10/100BASE-T ports in Figure 1 are grouped in pairs. The first member of the pair (port 1) is above the second member (port 2) on the left. Port 3 is above port 4, and so on. The dual-purpose ports are numbered 1 and 2.
Figure 1 Cisco CGS-2520-24TC Cable-Side View

|
|
SD1 flash memory card slot |
|
|
|
|
|
||
|
|
|
||
|
|
|
||
|
|
|
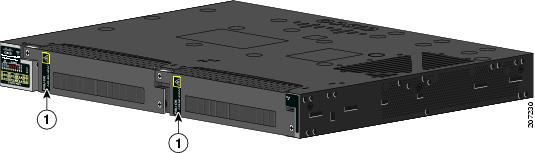
The100 Mb/s SFP ports and the 10/100BASE-T PoE+ ports are grouped in pairs. The first member of the pair (port 1) is above the second member (port 2) on the left. Port 3 is above port 4, and so on. The dual-purpose ports are numbered 1 and 2.
Figure 2 Cisco CGS-2520-16S-8PC Cable-Side View
|
|
|
||
|
|
|
||
|
|
|
||
|
|
|
||
|
|
|
Ports
■![]() Dual-Purpose Gigabit Ethernet Ports
Dual-Purpose Gigabit Ethernet Ports
10/100BASE-T Ports
You can set the 10/100BASE-T ports on the switch to operate in any combination of half duplex, full duplex, or 10 or 100 Mb/s. You can set the ports for speed and duplex auto-negotiation. The default setting is auto-negotiate.
When set for auto-negotiation, the switch determines the speed and duplex settings of the attached device, and advertises its own capabilities. If the connected device also supports auto-negotiation, the switch negotiates the best connection (the fastest line speed that both devices support and full-duplex transmission if the attached device supports it), and configures itself accordingly. In all cases, the attached device must be within 328 feet (100 meters).
The 10/100BASE-T ports use RJ-45 connectors with Ethernet pinouts. The maximum cable length is 328 feet (100 meters). The 100BASE-T traffic requires Category 5, Category 5e, or Category 6 unshielded twisted pair (UTP) cable. The 10BASE-T traffic can use Category 3 or Category 4 UTP cable.
PoE and PoE+ Ports
Warning: Voltages that present a shock hazard may exist on Power over Ethernet (PoE) circuits if interconnections are made using uninsulated exposed metal contacts, conductors, or terminals. Avoid using such interconnection methods, unless the exposed metal parts are located within a restricted access location and users and service people who are authorized within the restricted access location are made aware of the hazard. A restricted access area can be accessed only through the use of a special tool, lock and key or other means of security. Statement 1072
The 10/100BASE-T PoE+ ports on the Cisco CGS-2520-16S-8PC and Cisco CGS-2520-16S-8PC-C models provide:
■![]() Support for IEEE 802.3af-compliant powered devices (up to 15.4 W PoE per port) and support for IEEE 802.3at-compliant powered devices (up to 30 W PoE+ per port).
Support for IEEE 802.3af-compliant powered devices (up to 15.4 W PoE per port) and support for IEEE 802.3at-compliant powered devices (up to 30 W PoE+ per port).
■![]() Support for prestandard Cisco powered devices.
Support for prestandard Cisco powered devices.
■![]() Configurable support for Cisco intelligent power management, including:
Configurable support for Cisco intelligent power management, including:
Each power supply module can support an equivalent PoE load of two PoE+ ports or four PoE ports. When both power supply modules are installed, the system has enough power to support four PoE+ ports, or eight PoE ports.
If ports are designated as high priority and low priority PoE or PoE+ ports at the command line interface (CLI), and one power supply module fails or is removed, power to the high priority ports is maintained, and power to the low priority ports is dropped. When assigning priority to PoE or PoE+ ports, it is important to assign priorities on the basis of power supply capacity.
For information about configuring and monitoring PoE ports, see the CGS 2520 Switch Software Configuration Guide on Cisco.com.
For information about port connections and port specifications, see Connecting Devices to the Ethernet Ports and the Connector and Cable Specifications.
Note: The output of the PoE+ circuit has been evaluated as a Limited Power Source (LPS) per IEC 60950-1.
Dual-Purpose Gigabit Ethernet Ports
You can configure the dual-purpose ports on the switch as either 10/100/1000 ports or as SFP module ports. You can set the 10/100/1000 ports to autonegotiate, or you can configure them as fixed 10, 100, or 1000 Mb/s (Gigabit) Ethernet ports.
By default, the switch selects the medium for each dual-purpose port (10/100/1000BASE-T or SFP). When a link is achieved on one media type, the switch disables the other media type until the active link goes down. If links are active on both media, the SFP module port has priority, but you can use the media-type interface configuration command to manually designate the port as an RJ-45 port or an SFP port.
You can configure the speed and duplex settings consistent with the selected media type. For information on configuring interfaces, see the CGS 2520 Switch Software Configuration Guide on Cisco.com.
SFP Modules
The switch Ethernet SFP modules provide connections to other devices. These field-replaceable transceiver modules provide the uplink interfaces. Local connectors (LCs) provide the fiber-optic connection. RJ-45 connectors allow copper connections. You can use any combination of the supported SFP modules listed in Table 2.
|
|
|
|---|---|
For minimum software requirements, refer to the Release Notes for your platform.
For the most up-to-date list of supported SFP models for Cisco Industrial Ethernet switches, see http://www.cisco.com/en/US/docs/interfaces_modules/transceiver_modules/compatibility/matrix/OL_6981.html#wp138176
For information about SFP modules, see your SFP module documentation and the Installing and Removing SFP Modules. For cable specifications, see SFP Module Cables.
SFP Module Patch Cable
The switch uses an SFP module patch cable, a 0.5-meter, copper, passive cable with SFP module connectors at each end (see Figure 3). The patch cable connects two switches in a cascaded configuration.
Figure 3 SFP Module Patch Cable

For information about using the SFP module patch cable, see Inserting and Removing the SFP Module Patch Cable. You can order this cable (part number CAB-SFP-50CM=).
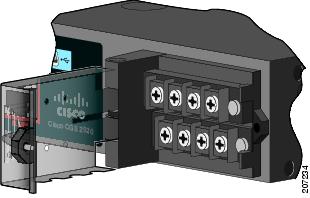
Power-Input Terminal
The power-input terminal provides screw terminals for the AC and DC power connections. The switch can operate with one or two power supplies. If one of the power sources fail, the other continues to power the switch. For more information, see Power Supply Installation.
Alarm Ports
The switch has four alarm inputs and one alarm output. The alarm setting is open or closed.
■![]() Open means that the normal condition has current flowing through the contact (referred to as a normally closed contact). The alarm is generated when the current stops.
Open means that the normal condition has current flowing through the contact (referred to as a normally closed contact). The alarm is generated when the current stops.
■![]() Closed means that no current flows through the contact (referred to as a normally open contact). The alarm is generated when the current flows.
Closed means that no current flows through the contact (referred to as a normally open contact). The alarm is generated when the current flows.
Alarm Input
The alarm input is a dry-contact alarm port. You can connect up to four alarm inputs from devices, such as a door, a temperature gauge, or a fire alarm, to the alarm port. You can use the CLI to set the alarm severity to minor, major, or critical. An alarm generates a system message and turns on an LED. See Alarm LEDs for the LED descriptions.
Alarm Output
The alarm output can be configured as a minor or major alarm. Output alarms often control an external alarm, such as a bell or a light. To connect an external alarm device to the relay, connect two relay contact wires to complete the electrical circuit. See Alarm Ports for information on the alarm pinouts.
Management Ports
You can connect the switch to a PC running Microsoft Windows or to a terminal server through either the RJ-45 console port or the USB console port.
■![]() RJ-45 console port. The RJ-45 connection uses an RJ-45-to-DB-9 female cable
RJ-45 console port. The RJ-45 connection uses an RJ-45-to-DB-9 female cable
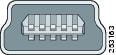
■![]() USB mini-Type B console port (5-pin connector); the USB connection uses a USB Type A-to-5-pin mini-Type B cable
USB mini-Type B console port (5-pin connector); the USB connection uses a USB Type A-to-5-pin mini-Type B cable
The USB console interface speeds are the same as the RJ-45 console interface speeds.
To use the USB console port, you must install the Cisco Windows USB device driver on the device that is connected to the USB console port (device running with Microsoft Windows).
Note: For information about downloading the Cisco USB device driver, see Installing the Cisco Microsoft Windows USB Device Drivers.
With the Cisco Windows USB device driver, connecting and disconnecting the USB cable from the console port does not affect Windows HyperTerminal operations. Mac OS X or Linux require no special drivers.
Note: The 5-pin mini-Type B connectors resemble the 4-pin mini-Type B connectors. They are not compatible. Use only the 5-pin mini-Type B. See Figure 5.
The configurable inactivity timeout reactivates the RJ-45 console port if the USB console port is activated, but no input activity occurs on it for a specified time period. When the USB console port deactivates due to a timeout, you can restore its operation by disconnecting and reconnecting the USB cable. For information on using the CLI to configure the USB console interface, see the switch software guide.
LEDs
You can use the switch system and port LEDs to monitor switch activity and performance.
The information in this section includes:
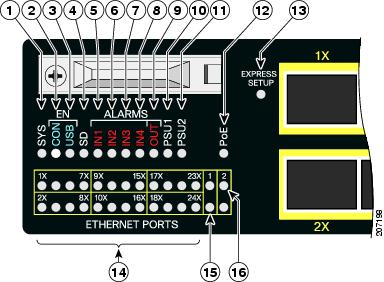
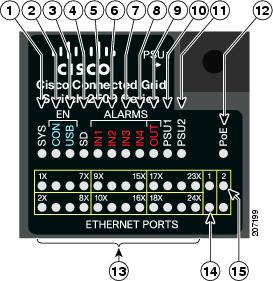
Switch Panel LEDs
Figure 6 Switch LEDs (Cable Side)
|
|
|
||
|
|
|
||
|
|
|
||
|
|
|
PoE2 |
|
|
|
|
||
|
|
|
||
|
|
|
||
|
|
|
System LED
|
|
|
|---|---|
POST3 is in progress |
|
|
|
Power Supply Module LEDs
The switch power supply module LEDs are labeled PSU1 and PSU2 (on the switch) and PSU OK (on the power supply module). They show whether power supply modules 1 and 2 are receiving power. See Figure 6 and Figure 9.
|
|
|
|---|---|
Valid input is present, and the output is within the operating range |
|
Valid input is present, and the output is outside the operating range or is not present |
|
Alarm LEDs
|
|
|
|---|---|
|
|
|
|---|---|
Console LEDs
The console LEDs show which console port is in use. See Figure 6 and Figure 9 for the LED locations.
If you connect a cable to a console port, the switch automatically uses that port for console communication. If you connect two console cables, the USB console port has priority.
|
|
|
|
|---|---|---|
Port LEDs
RJ-45 ports and SFP module slots have port LEDs. Port LEDs, as a group or individually, provide information about the switch and about the individual ports.
PoE LED
|
|
|
|---|---|
PoE/PoE+ enabled but power is disconnected or has failed on a low-priority port |
|
PoE/PoE+ enabled but power is disconnected or has failed on a high-priority port |
|
Dual-Purpose Port LEDs
The dual-purpose port LEDs identify the connection as either a copper-based connector or an SFP module. The ports can autonegotiate, or you can manually configure each dual-purpose port as either 10/100/1000 with copper connectors or as an SFP module port, but not as both types at the same time. See Table 8 for LED descriptions.
SD Flash Memory Card LED
|
|
|
|---|---|
Not present (slow blinking); unsupported SD flash memory card is detected (fast blinking) |
|
Error accessing the SD flash memory card; Cisco IOS boot image cannot be found |
|
SD Flash Memory Card
The switch ships with the Secure Digital (SD) flash memory card installed. See Figure 1 and Figure 2. You can remove the card from a failed switch and install it in a replacement switch. You do not have to reconfigure the new switch. See Replacing the SD Flash Memory Card for information.
Warning: Be aware that the SD card contains sensitive and security relevant information, including but not limited to full device configuration information, public and private keys used for SSH and SSL (if those protocols are enabled), device passwords and others. Access to SD cards for any Cisco CGS switch should be limited to authorized personnel.
Power Supply Side
The power supply side has the LED panel and two power supply slots for the removable power supplies. See Figure 7 and Figure 8.
This section has information about:
Figure 7 Switch with One Power Supply Module
|
|
|
|
Figure 8 Switch with Both Power Supply Modules
|
|
|
For a description of the PSU OK LED, see Table 4.
Power Supply-Side LEDs
|
|
|
||
|
|
|
||
|
|
|
||
|
|
|
PoE4 |
|
|
|
|
||
|
|
|
||
|
|
|
||
|
|
|
Power Supply Features
The switch has two slots for power supply modules:
■![]() PWR-RGD-LOW-DC: low-voltage DC (for voltage information, see Table 19)
PWR-RGD-LOW-DC: low-voltage DC (for voltage information, see Table 19)
■![]() PWR-RGD-AC-DC: high-voltage AC or DC (for voltage information, see Table 18)
PWR-RGD-AC-DC: high-voltage AC or DC (for voltage information, see Table 18)
■![]() PWR-RGD-AC-DC-C: high-voltage AC or DC for China
PWR-RGD-AC-DC-C: high-voltage AC or DC for China
The switch supports these power supply module combinations:
■![]() One high-voltage AC or DC and one low-voltage DC
One high-voltage AC or DC and one low-voltage DC
For information on installing the power supply modules, see Power Supply Installation
See Table 4 for information on the power supply LEDs.
Management Options
You can use the device manager in the switch memory to manage standalone switches. For information, see the switch getting started guide and the device manager online help.
You can configure and monitor the switch from the CLI. Connect your management station to the switch console port or use Telnet from a remote management station. See the switch command reference on Cisco.com for information.
The CiscoWorks LAN Management Solution (LMS) is a suite of management tools that simplify the configuration, administration, monitoring, and troubleshooting of Cisco networks. See the LMS documentation for information: http://www.cisco.com/en/US/products/ps7198/tsd_products_support_series_home.html
The CiscoView device-management application displays a switch image that you can use to view switch status and performance information and to set configuration parameters. The CiscoView application (sold separately) can be a standalone application or part of a Simple Network Management Protocol (SNMP) platform. For information, see the CiscoView documentation: http://www.cisco.com/en/US/products/sw/cscowork/ps4565/tsd_products_support_series_home.html
The Cisco Configuration Engine automates initial configurations and configuration updates. It generates device-specific configuration changes, sends them to the device, executes the configuration changes, and logs the results. For information about Cisco Configuration Engine, see the software configuration guide on Cisco.com.
You can manage switches from a Simple Network Management Protocol (SNMP)-compatible management station that is running platforms such as HP OpenView or SunNet Manager. The switch supports a comprehensive set of Management Information Base (MIB) extensions and four Remote Monitoring (RMON) groups. See the switch software configuration guide on Cisco.com and the documentation that came with your SNMP application for information.
■![]() Cisco Configuration Professional
Cisco Configuration Professional
Configuration Professional is a software program that you download from Cisco.com and run on your PC. It offers advanced options for configuring and monitoring multiple devices, including the Cisco CGS 2520 switches. Configuration Professional is available at no cost:
http://www.cisco.com/en/US/products/ps9422/index.html
See the Configuration Professional getting started guide and online help for more information.
Cisco Security Manager (Security Manager) manages security policies on Cisco security devices. It supports integrated provisioning of firewall, IPS, and VPN (site-to-site, remote access, and SSL) services across devices. For information, see the Cisco Security Manager 3.2.2 User Guide.
The Smart Install feature provides a single point of management (director) in a network. You can use it to provide a zero touch image and configuration upgrade of newly deployed switches and image and configuration downloads for any client switches. For information, see the Cisco Smart Install Configuration Guide on Cisco.com.
The Smartports feature provides user-defined and Cisco-default macros for creating custom switch configurations to simplify deployment. For information about configuring Smartports, see the switch software configuration guide on Cisco.com.
Network Configurations
See the CGS 2520 Switch Software Configuration Guide on Cisco.com for an explanation of network configuration concepts. The software configuration guide also provides network configuration examples for creating dedicated network segments that are interconnected through Ethernet connections.
 Feedback