- Deploy Secure Workload Software Appliance in VMware vSphere
- Deploy Secure Workload Software Appliance in VMware vSphere
- End-to-End deployment workflow
- Prepare for deployment
- VMware vSphere Configuration Settings
Deploy Secure Workload Software Appliance in VMware vSphere
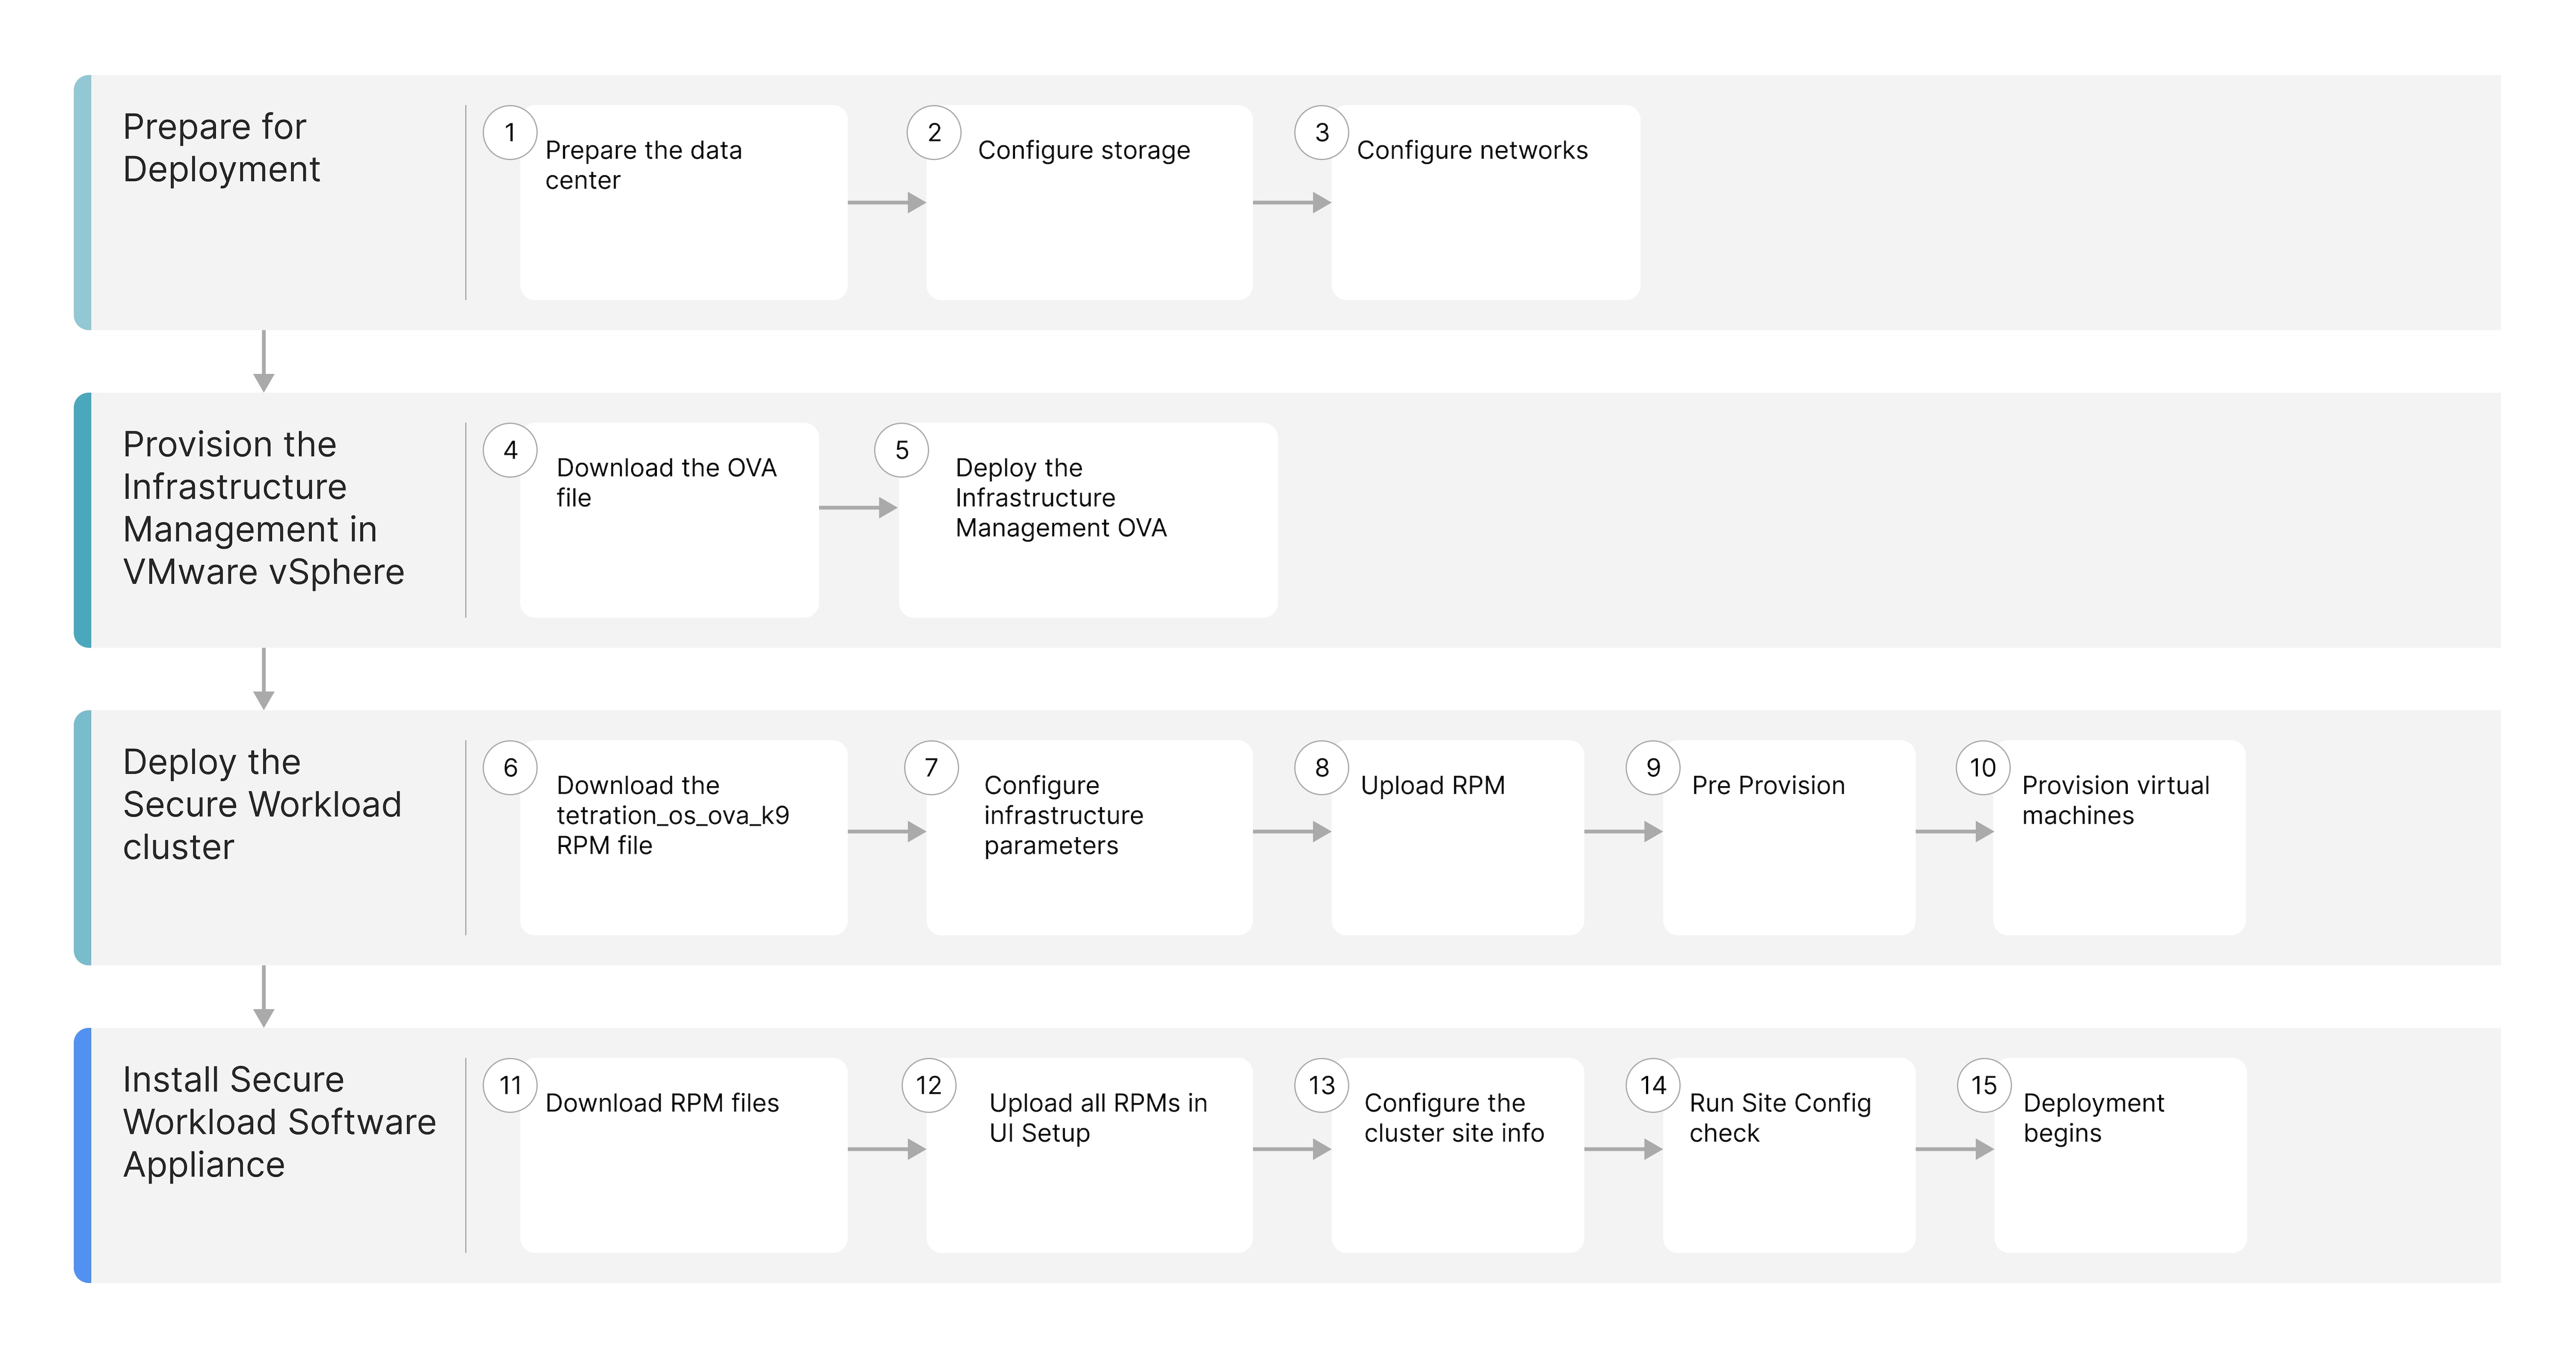
End-to-End deployment workflow
The workflow illustrates the process for deploying the Secure Workload Software Appliance in VMware vSphere.
|
Workflow Steps |
Description |
|---|---|
|
Prepare the datacenter, configure storage, and networks |
|
|
Download the Infrastructure Management Open Virtual Appliance (OVA) package available from Cisco.com and deploy the OVA using the VMware vSphere web interface. |
|
|
Deploy the Secure Workload cluster through the Infrastructure Management interface. |
|
|
Deploy the Secure Workload software Appliance through the Infrastructure Management interface. |
Prepare for deployment
System requirements
Hypervisor
-
VMware vSphere version 7.0 and 8.0.
-
Download the Secure Workload Software Appliance installation OVA file for VMware vSphere from the Secure Workload Downloads page.
Software Appliance resource specifications
|
Resource Specification |
Workloads <= 20,000 |
Workloads <= 40,000 |
Comments |
|---|---|---|---|
| Total vCPU | 590 | 814 |
all non–end-of-support (EOS) x86-64 CPUs since calendar year 2020 |
| Total Memory | 4996 Gib | 6852Gib | preferred DDR4 or higher memory |
| Total Usable Storage | 78101 GB | 118101GB | 35k+ IOPs @4K Payload (Read), 25k+ IOPs @4k Payload (Write) and Thin Provisioning), supports iSCSI, FC storages and internal storage |
|
Network |
3 (10Gb) |
3 (10Gb) |
|
|
Total number of Hosts |
Min 3, Preferred 6 |
Min 3, Preferred 6 |
|
|
Hypervisor |
VMware ESXi |
VMware ESXi |
|
|
SPECint_rate2017 |
Minimum 1,526 |
Minimum 2,092 |
For references, see Cisco Secure Workload Datasheet.
 Note |
Secure Workload supports all non–end-of-support (EOS) CPUs released from calendar year 2020 onward. |
Network specifications
All hosts in the cluster must be equipped with at least 10 Gigabit Ethernet (GbE) interfaces and have the following three virtual networks available for Secure Workload operations.
Management network
The management network (virtual network) is designed specifically for management and administrative purposes. It facilitates secure access for system administrators to perform routine management tasks and critical operations. This network provides a secure and isolated channel for infrastructure configuration, deployment, ongoing management, and decommissioning activities.
Public network
Dedicated or shared public network for external cluster traffic that must be reachable from sensors and clients and have access to the vCenter. This network is used for Secure Workload application access. You must specify a minimum subnet of /28 for 20,000 scale factor and /27 for 40,000 scale factor. If the external network is dedicated with the full range of IP addresses being available, then eight IP addresses are automatically consumed as shown in the following tables.
Note |
If the public network is shared, you must define specific available addresses. |
|
IP Address |
Description |
|---|---|
|
1st |
Gateway |
|
2nd and 3rd |
Reserved |
|
4th |
Web UI Virtual IP |
|
5th |
Sensor Management Virtual IP |
|
6th |
Collector-1 |
|
7th |
Collector-2 |
|
8th |
Collector-3 |
|
9th |
Collector-4 |
|
10th |
Collector-5 |
|
11th |
Collector-6 |
|
12th |
Application Interface -1 |
|
13th |
Application Interface -2 |
|
14th |
Adhoc-Kafka |
|
30th |
Orchestrator-publicIP |
|
IP Address |
Description |
|---|---|
|
1st |
Gateway |
|
2nd and 3rd |
Reserved |
|
4th |
Web UI Virtual IP |
|
5th |
Sensor Management Virtual IP |
|
6th |
Collector-1 |
|
7th |
Collector-2 |
|
8th |
Collector-3 |
|
9th |
Collector-4 |
|
10th |
Collector-5 |
|
11th |
Collector-6 |
|
12th |
Collector-7 |
|
13th |
Collector-8 |
|
14th |
Application Interface -1 |
|
15th |
Application Interface -2 |
|
16th |
Adhoc-Kafka |
|
30th |
Orchestrator-publicIP |
Private network
Set up a dedicated private network for internal cluster communication. Make sure your network is not routable or shared. You must use a subnet of /16 (255.255.0.0) for your dedicated network.
VMware vSphere Configuration Settings
Recommendations for VMware vSphere configuration.
-
Enable the VMware vSphere Distributed Resource Scheduler (DRS), vSphere high availability (HA) for host failure, and vMotion on the cluster where Secure Workload will be deployed. This will help provide availability and performance for instances in the Secure Workload cluster.
-
Ensure datastores are highly available and durable so that they store data redundantly and resist hardware failure.
VMware vSphere Permissions
This section defines what actions a user or service can perform within the vSphere environment. We recommend creating a dedicated user account for the Secure Workload installer and assigning only the minimum required permissions needed for installation.
The following permissions are commonly assigned for Secure Workload installation:
-
Content library
-
Datastore
-
Folder/create folder
-
Network\assign network
-
Resource and tasks
-
Virtual Machine
-
dvPort Group
-
vApp
-
vSphere Tagging (Labeling)
VMware vSphere Objects and Permissions
|
vSphere Objects |
Permissions |
|---|---|
|
Content Library |
Add or delete library item |
|
Datastore |
|
|
Folder |
|
|
vSphere Tagging |
Assign or Unassign vSphere Tag on Object |
|
Network |
|
|
Resource |
|
|
Scheduled task |
|
|
Profile-driven storage |
|
|
Tasks |
|
|
vApp |
Import |
|
Virtual machine |
|
Infrastructure Management parameters
The table list and describe key parameters required for Secure Workload Infrastructure Manager operation in a VMware vSphere environment.
|
Field |
Description |
|---|---|
|
CSW Cluster Name |
The Cluster Name refers to the folder you create in VMware vSphere to organize your deployment. It must follow these naming rules:
Additionally, ensure that the password does not contain the '@' character. |
|
vSphere Port |
The port used to connect to the vSphere host. This field is optional and defaults to 443. |
|
vSphere Host |
The IP address or hostname of the VMware vCenter server. |
|
vSphere User |
The username for the VMware vSphere account that has the necessary roles to upload files and create virtual machines. |
|
vSphere Password |
The password for the VMware vSphere account. |
|
vSphere Datacenter |
The name of target VMware vSphere datacenter. |
|
vSphere Cluster |
The cluster where Secure Workload virtual machines will be placed. |
|
vSphere VM Folder Name |
The folder where Secure Workload virtual machines will be placed. (nested folders not supported). |
|
vSphere Datastore Folder Name |
The datastore folder where disk images and state files are stored. |
|
vSphere Datastore |
The datastore for virtual machine storage allocation. |
|
vSphere Disk Mode |
Determines how a virtual machine's virtual disk space (thick or thin) is allocated and managed on the datastore. |
|
vSphere Management Network |
The network dedicated to the administrative plane of vSphere environment. |
|
vSphere Private Network |
The internal network for communication among Secure Workload virtual machines. |
|
vSphere Public Network |
The network that clients, sensors, and other external systems uses to communicate with the Secure Workload cluster. |
|
DNS Servers |
The IP addresses of the Domain Name System servers that the Secure Workload cluster uses to resolve hostnames to IP addresses for internal and external communication. |
|
Private IP Subnet |
The IP address range designated for the internal, private network communication among the virtual machines within the Secure Workload cluster. |
|
Max Scale |
Select the scale factor from 20,000 or 40,000. |
Configuration for Software Appliance setup UI
Site Information
Site Information refers to the comprehensive collection of network, vSphere environment, and optional advanced configuration parameters that the Cisco Secure Workload Infrastructure Manager requires to successfully deploy and integrate the Secure Workload cluster.
Network tab
The Network tab configures the Secure Workload cluster's external network. The external network defines the subnet used for external communication. This subnet must be according to the scale factor.
If you do not configure external IP addresses manually in the Advanced tab, the system uses automatic assignment with the following rules:
-
IP addresses are allocated automatically.
-
The first and last three IP addresses in the subnet are skipped.
-
Usable IP addresses start from the fourth IP address and go up to the 4th-to-last IP address.
-
The first usable IP address in the subnet is always used as the gateway.
Example:
If you specify the subnet 192.168.1.0/28:
-
192.168.1.1will be used as the gateway. -
IP addresses based on subnet will be assigned automatically.
Advanced tab
The Advanced tab allows you to manually configure external IP addresses for the deployment instead of relying on automatic assignment. This is useful when using a shared subnet for the public network and you need precise control over which IP addresses are allocated.
Note |
The Advanced Tab is optional. If not configured, the system will automatically assign external IP addresses based on the rules defined in the Network Tab. |
Deploy the Infrastructure Management OVA
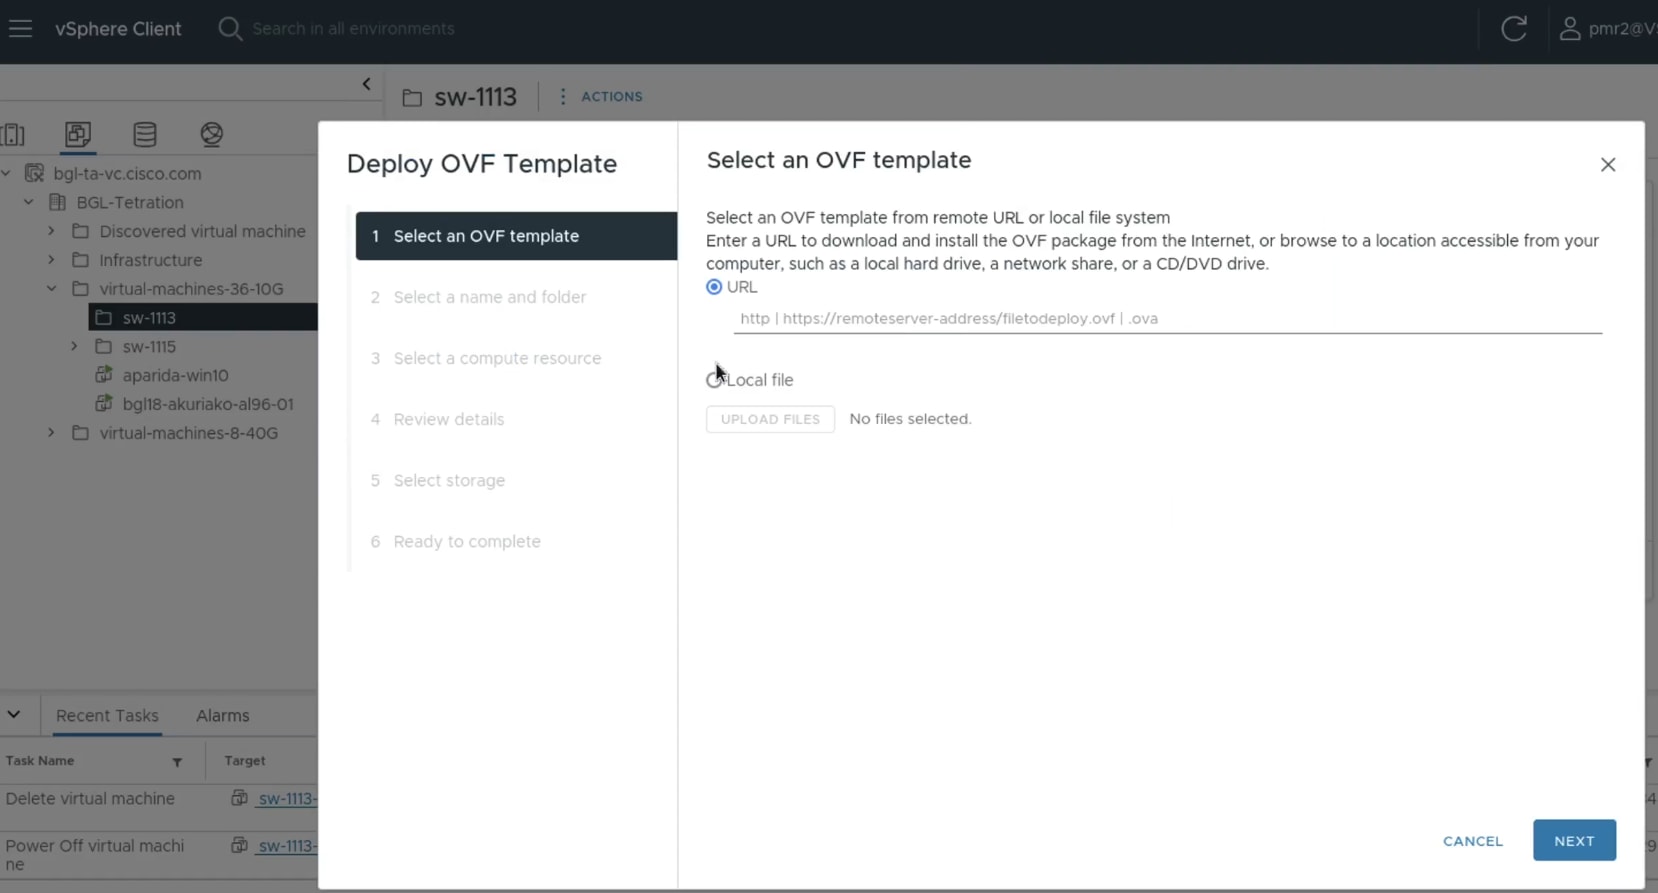
Use this procedure to deploy the Infrastructure Management Open Virtual Appliance (OVA), a single-file package based on the Open Virtualization Format (OVF) template, using the VMware vSphere web interface.
Before you begin
Procedure
|
Step 1 |
Log in to the VMware vSphere web interface. |
||
|
Step 2 |
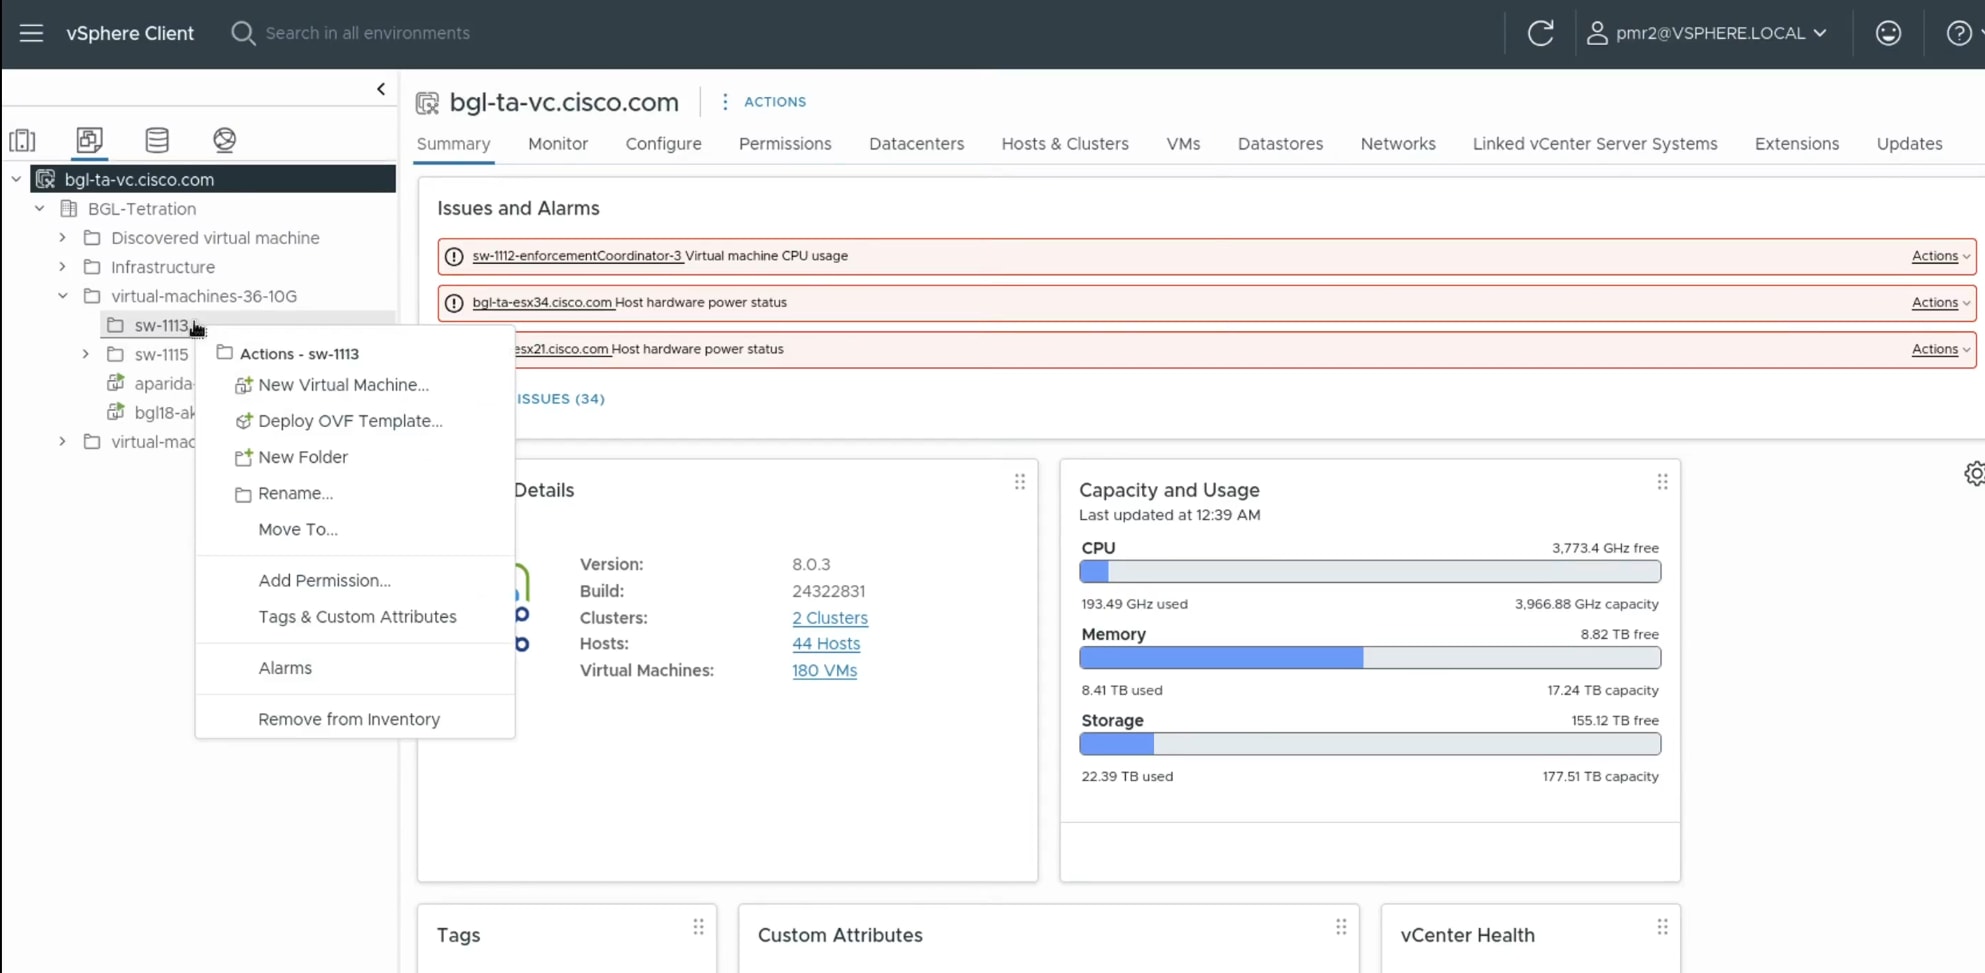
Create a new folder with the intended site name of the cluster to organize your deployment. |
||
|
Step 3 |
Initiate the OVF Template deployment.
 |
||
|
Step 4 |
Perform these steps in the Deploy OVF Template wizard.
|
||
|
Step 5 |
Power on the deployed Secure Workload Infrastructure Management virtual machine.
|
||
|
Step 6 |
Access the Secure Workload Infrastructure Management interface.
|

The Cisco Secure Workload Infrastructure Management Setup page appears.
What to do next
Provision the Infrastructure Manager for Cisco Secure Workload cluster
Before you begin
Procedure
|
Step 1 |
In a browser enter the Infrastrcture Management IP address using the format The Cisco Secure Workload Infrastructure Management Setup page appears. |
||
|
Step 2 |
Configure Infrastructure Parameters. Define and set all necessary vSphere configuration parameters for the cluster infrastructure, specifying where the cluster will be provisioned. For more information on each parameter, see Configuration Parameters for the Infrastructure Maanger. 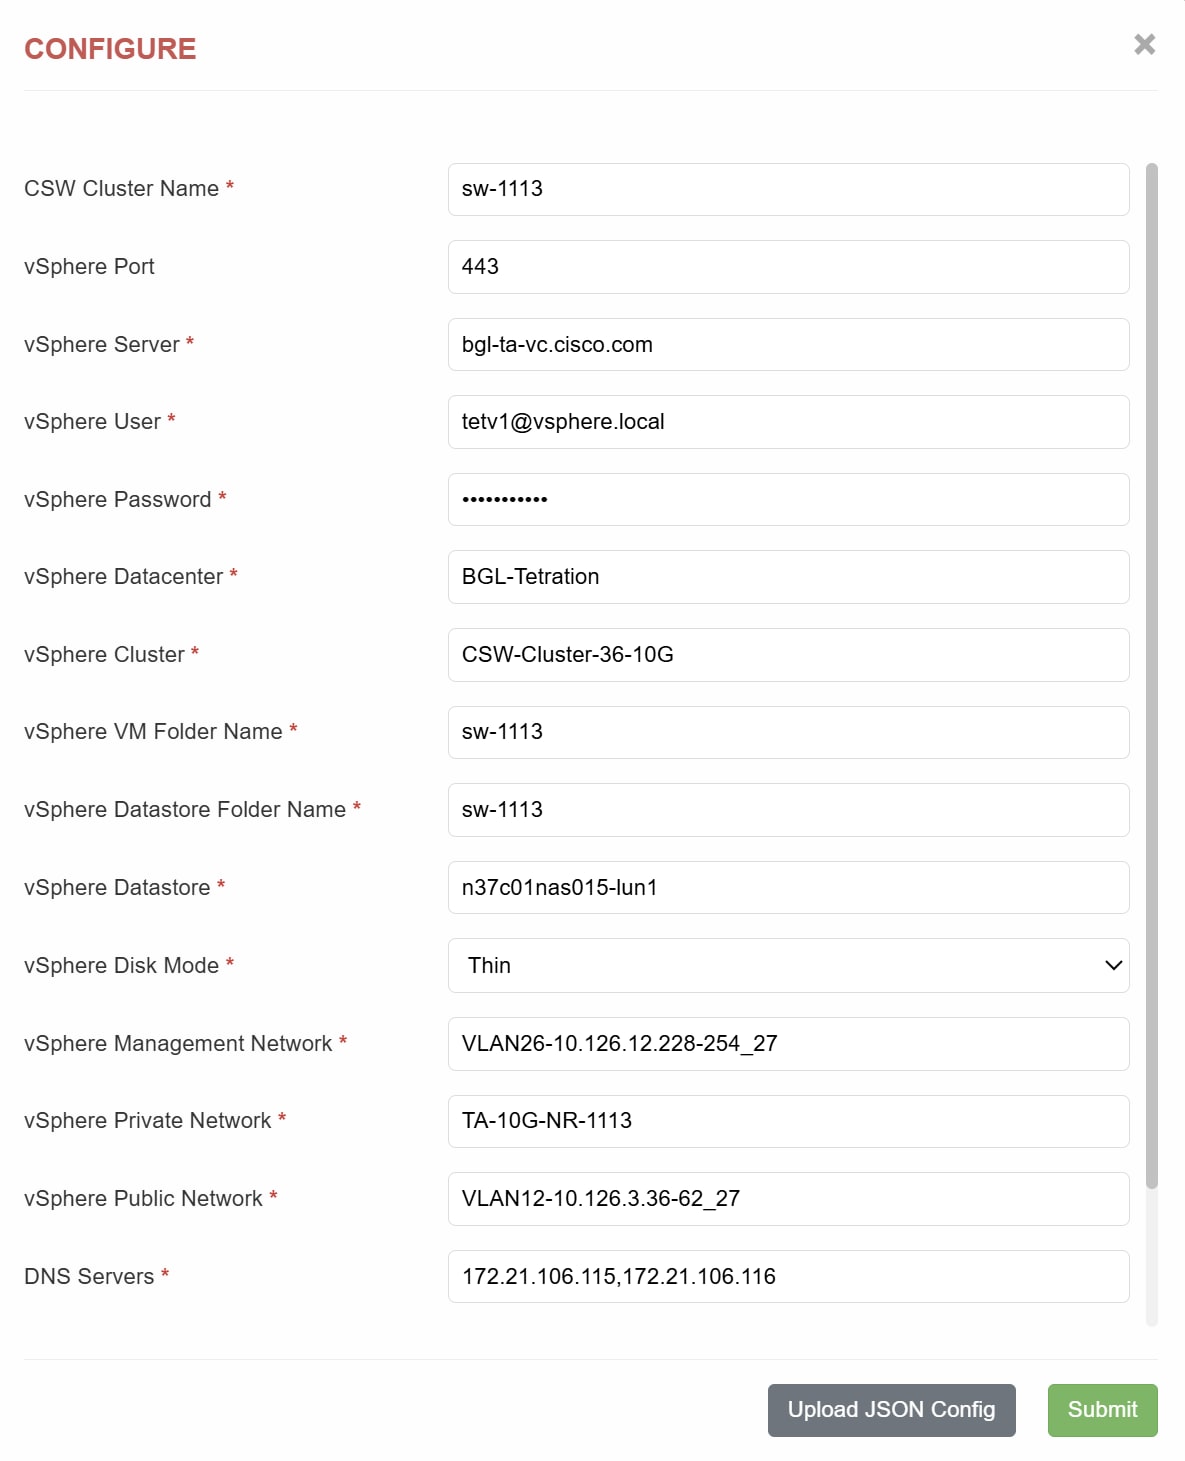 |
||
|
Step 3 |
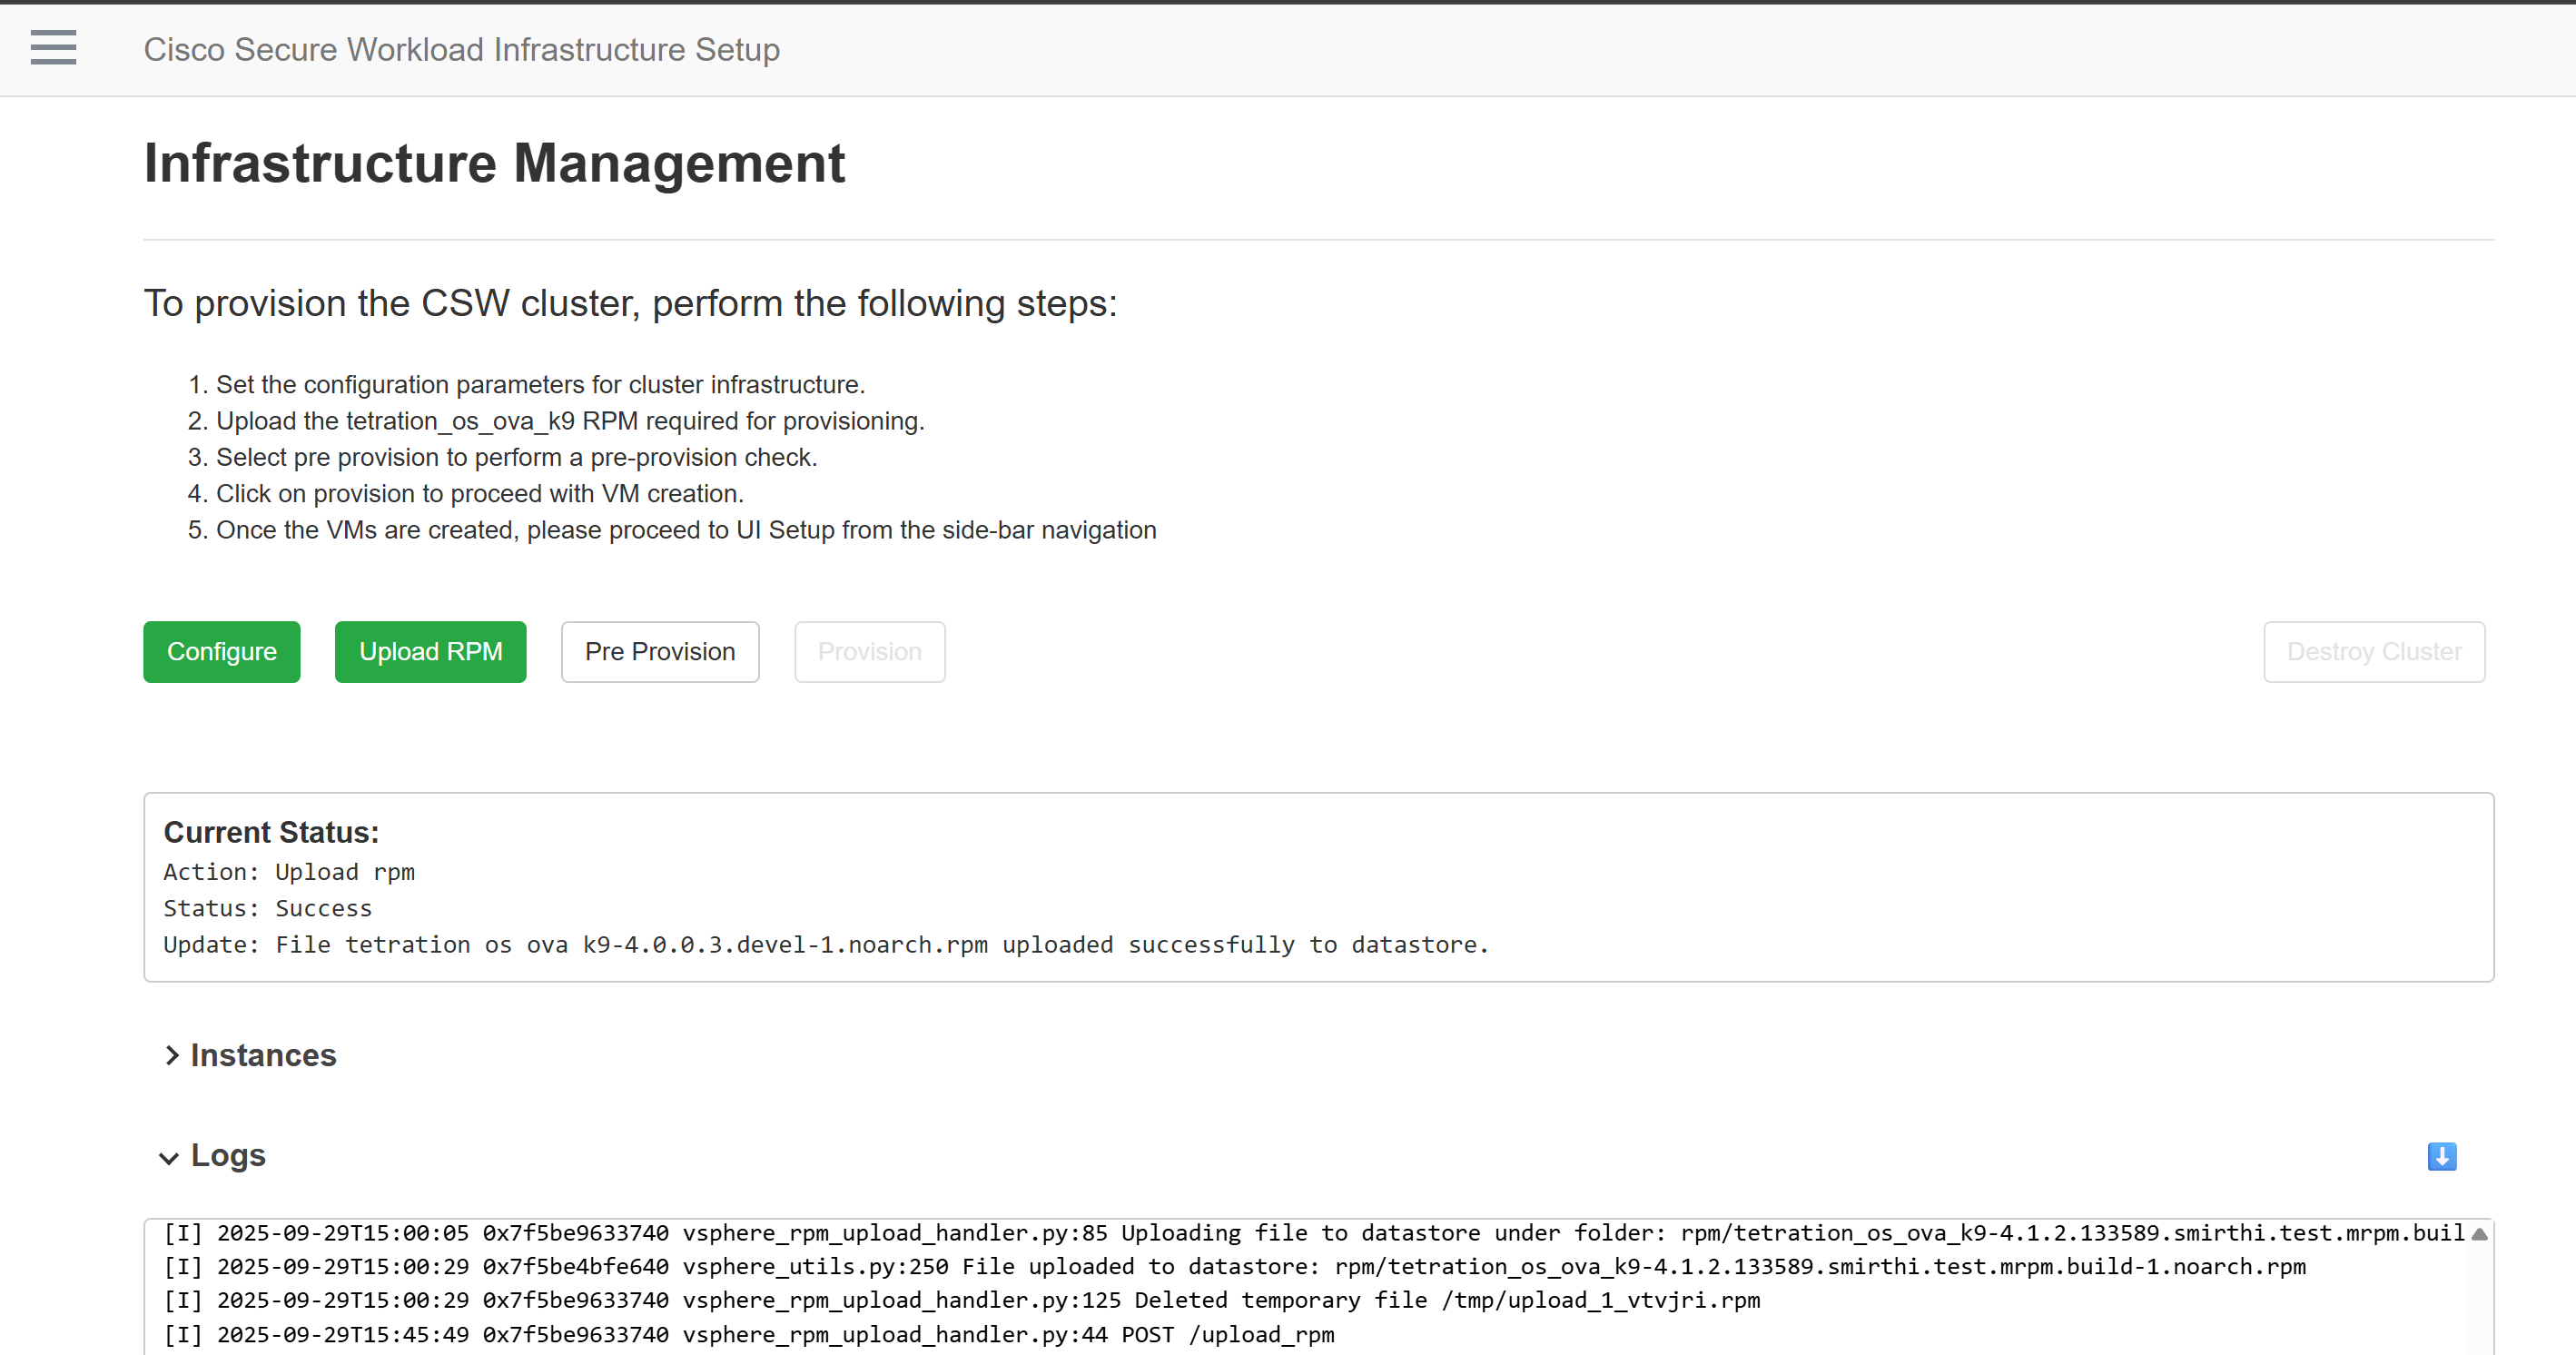
Upload the |
||
|
Step 4 |
Perform Pre Provision validations. Select Pre Provision to run a validation check. This ensures that all the prerequisites are met before deployment. |
||
|
Step 5 |
Initiate Cluster Deployment. Select Provision to begin cluster provisioning and deployment. This action creates the virtual machines for the cluster.
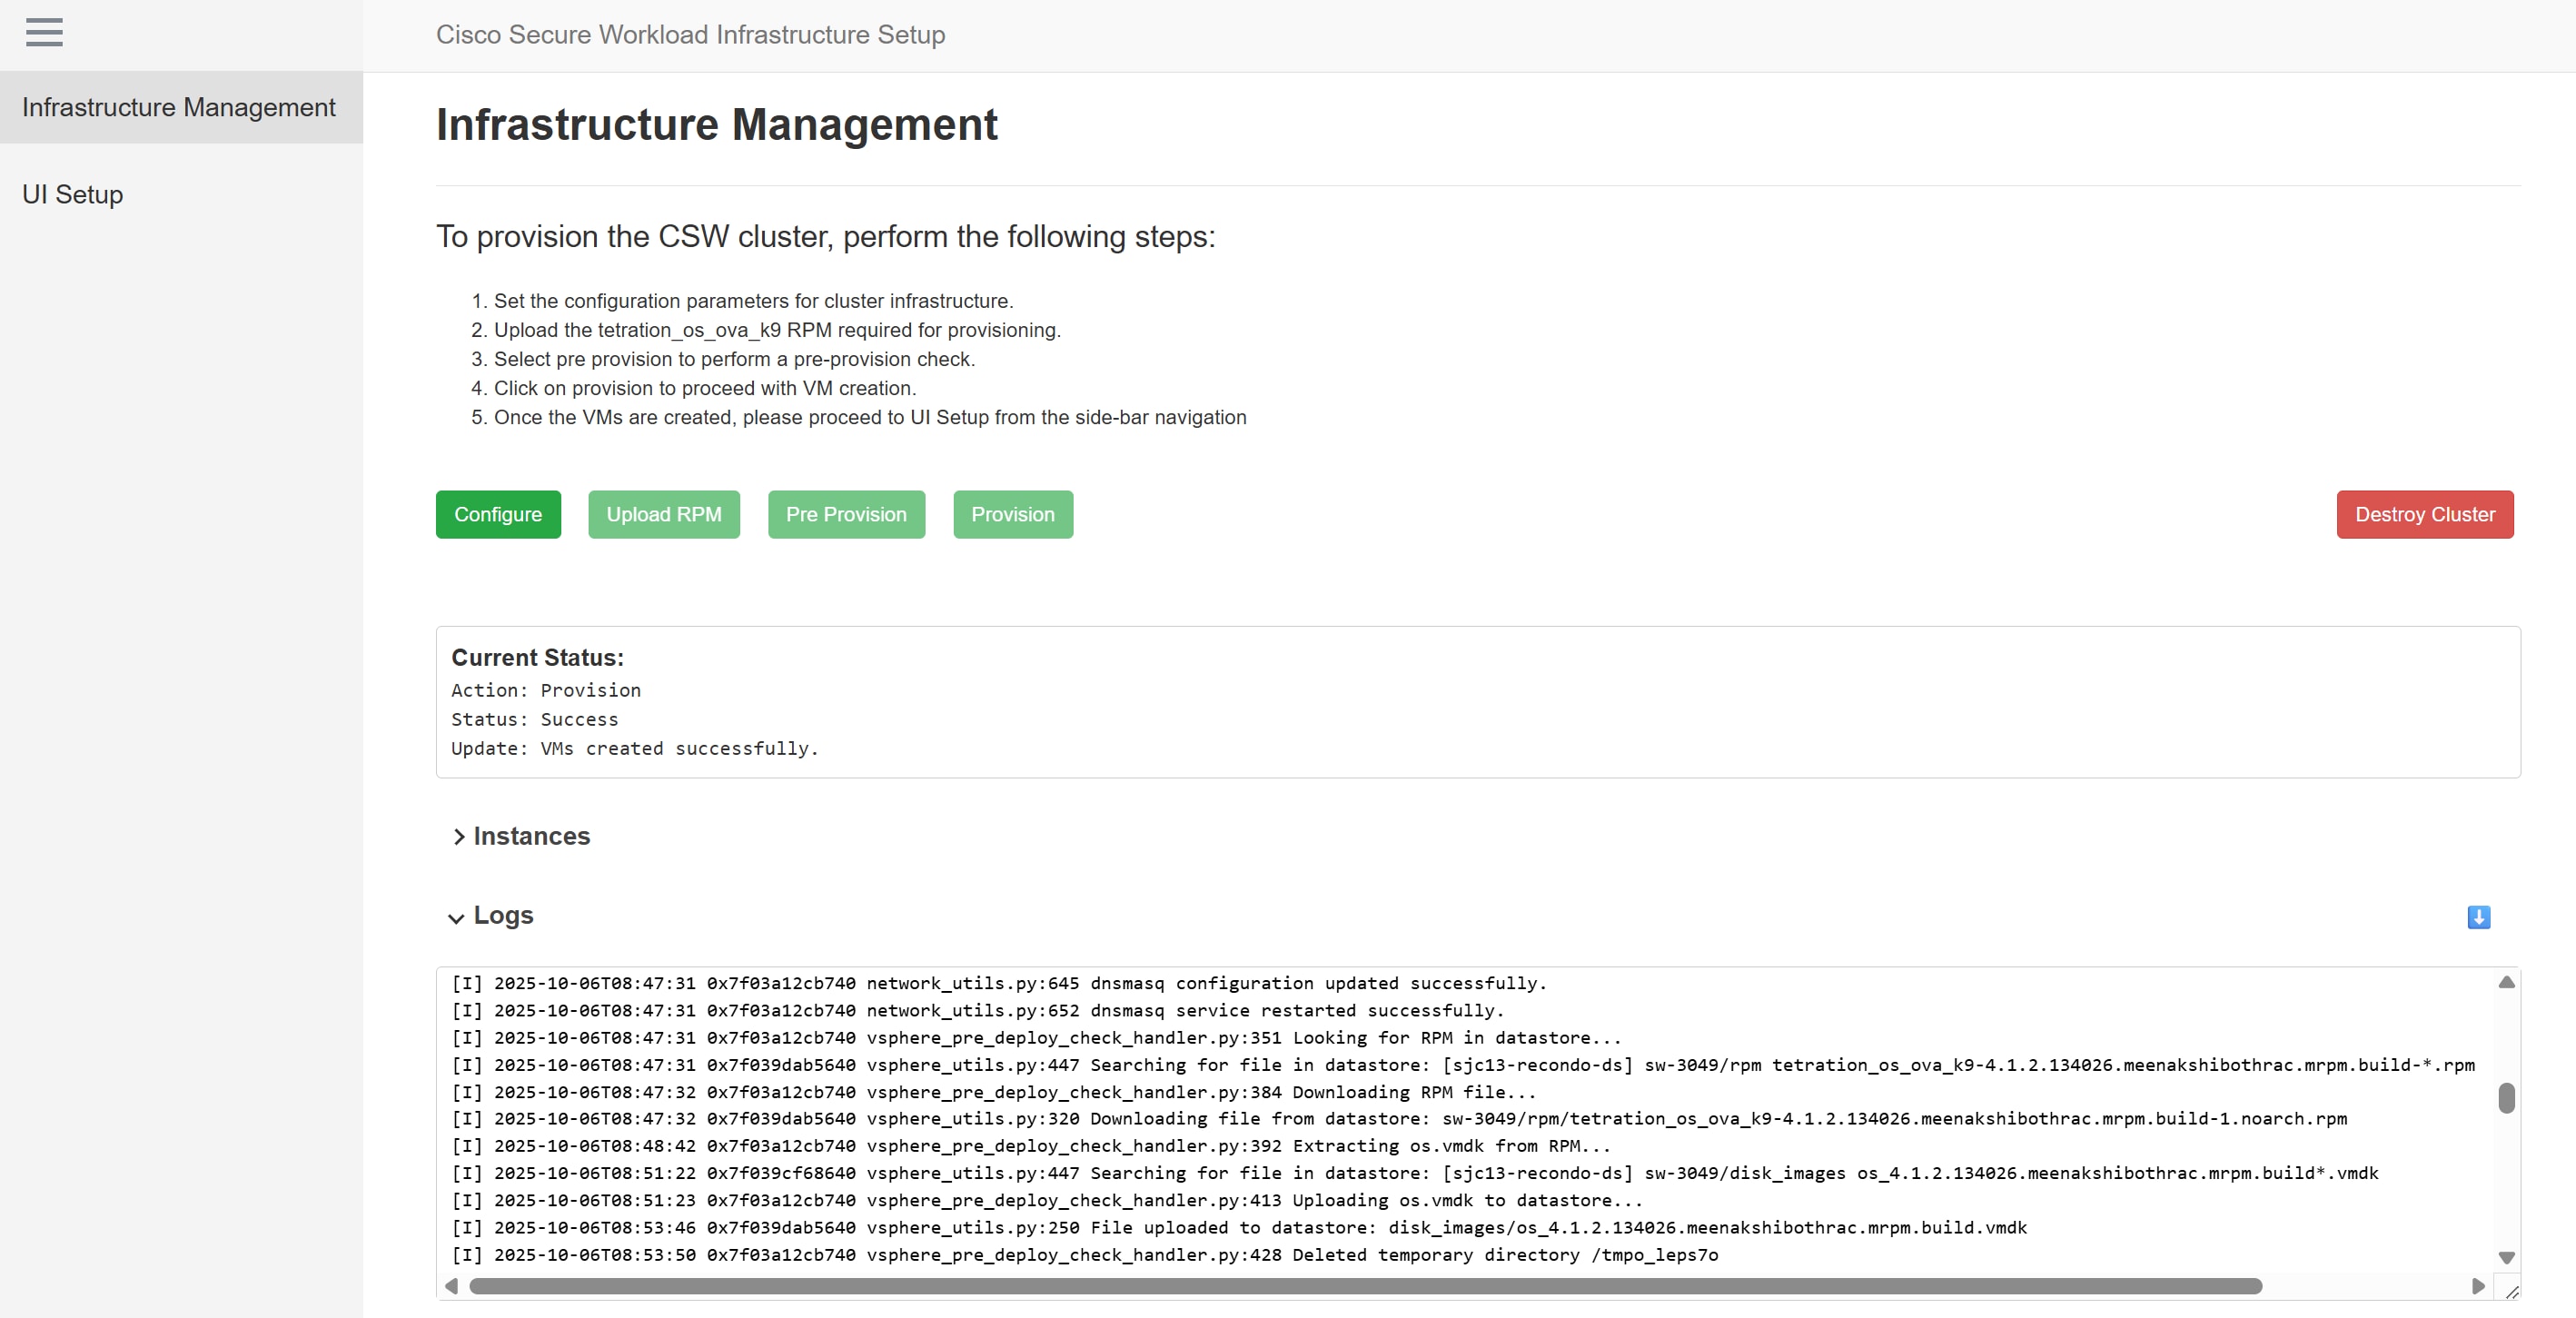 |
The cluster is deployed and virtual machines are created in the VMware vSphere.
What to do next
Install Secure Workload Software Appliance on the virtual machines.
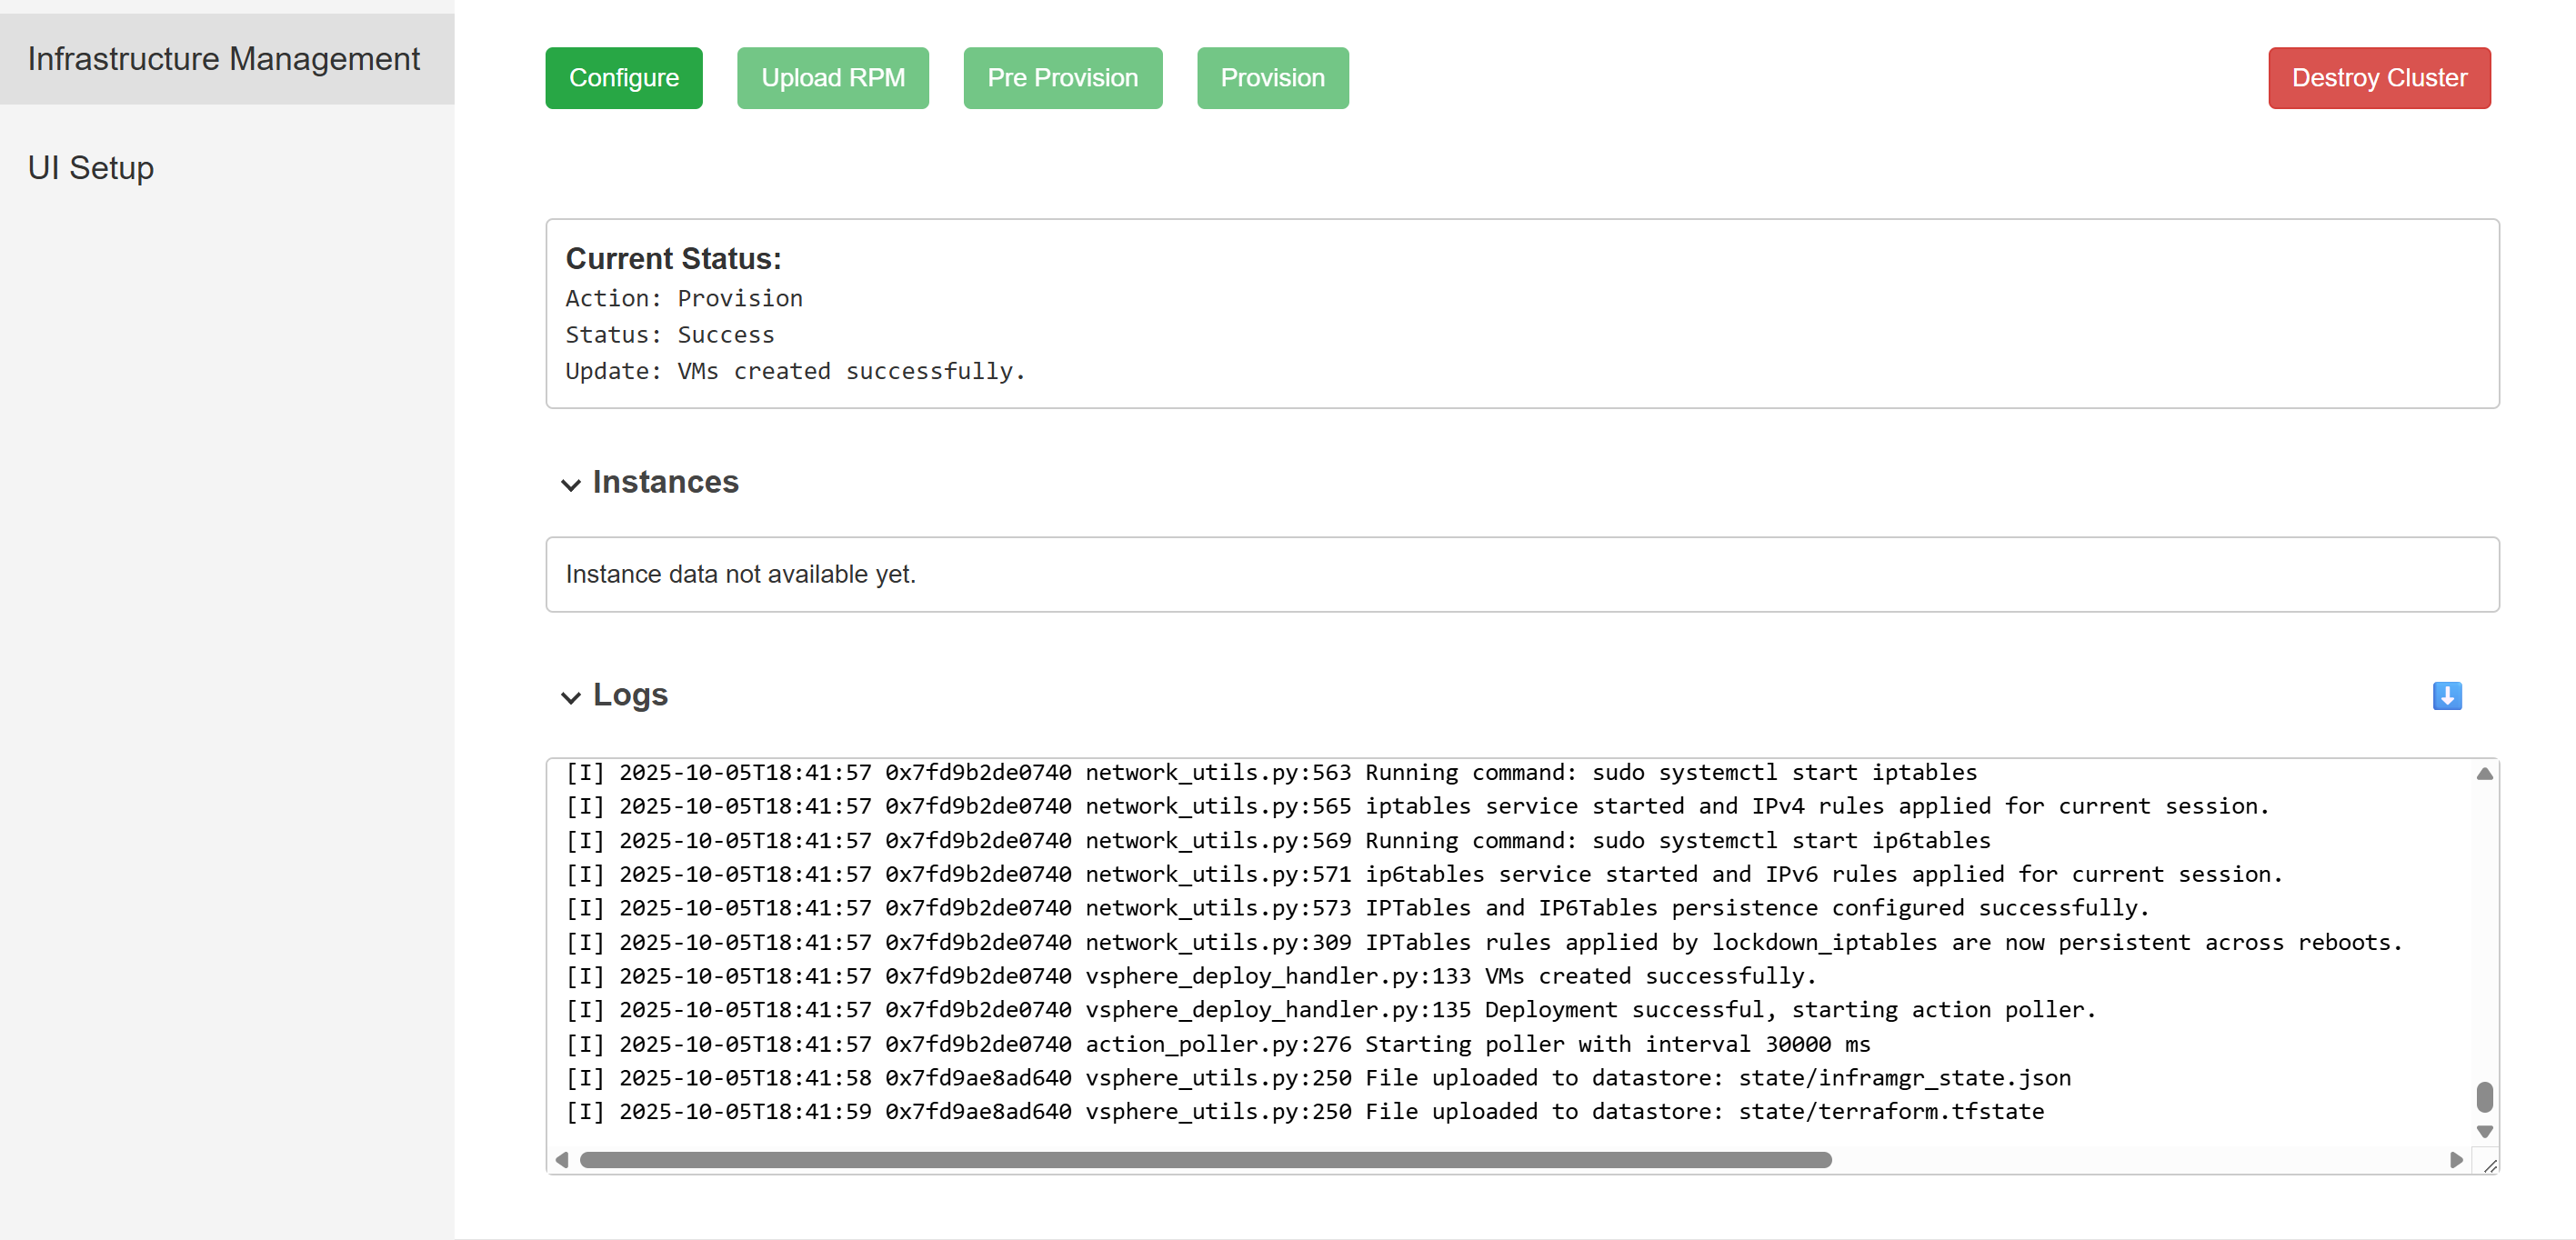
Cluster provisioning Status panels
During and after the cluster provisioning, you can monitor its progress and details in the status panels.
-
Current Status: Provides real-time feedback on the active provisioning action, its current state, and the specific progress being made. For example, VMs created successfully.
-
Instances: Displays comprehensive details of all virtual machine instances provisioned as part of the Secure Workload cluster.
-
Logs: Offers detailed operational logs that provide granular, step-by-step information and events related to the entire provisioning process.
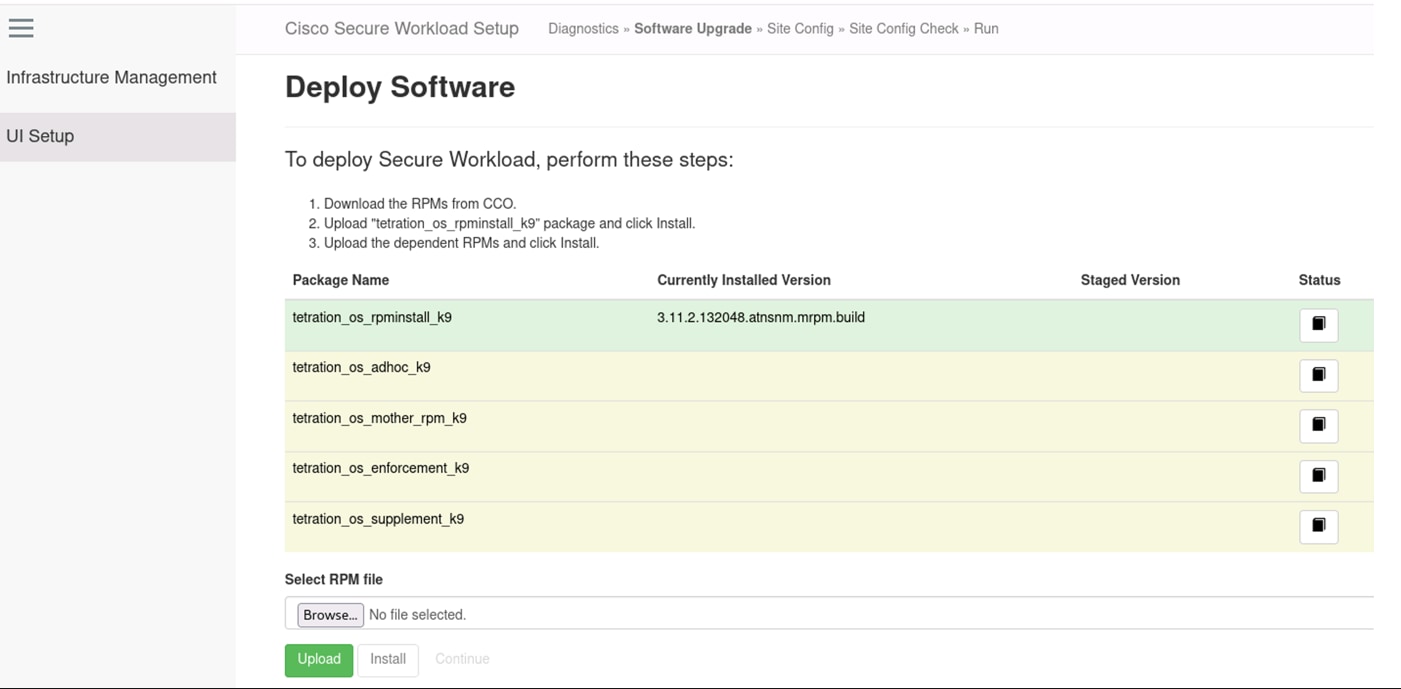
Install Secure Workload Software Appliance
Before you begin
-
Ensure that Secure Workload cluster is deployed.
-
Download the below RPM package files.
-
tetration_os_rpminstall_k9
-
tetration_os_adhoc_k9
-
tetration_os_enforcement_k9
-
tetration_os_mother_rpm_k9
-
tetration_os_supplement_k9
-
Procedure
|
Step 1 |
In a browser enter the Infrastructure Management IP address using the format The Cisco Secure Workload Infrastructure Management Setup page appears. |
|
Step 2 |
From the menu, choose UI Setup. |
|
Step 3 |
Upload the five RPMs individually. Ensure each upload completes successfully before you proceed. Click Continue after all the RPMs are uploaded and installed. |
|
Step 4 |
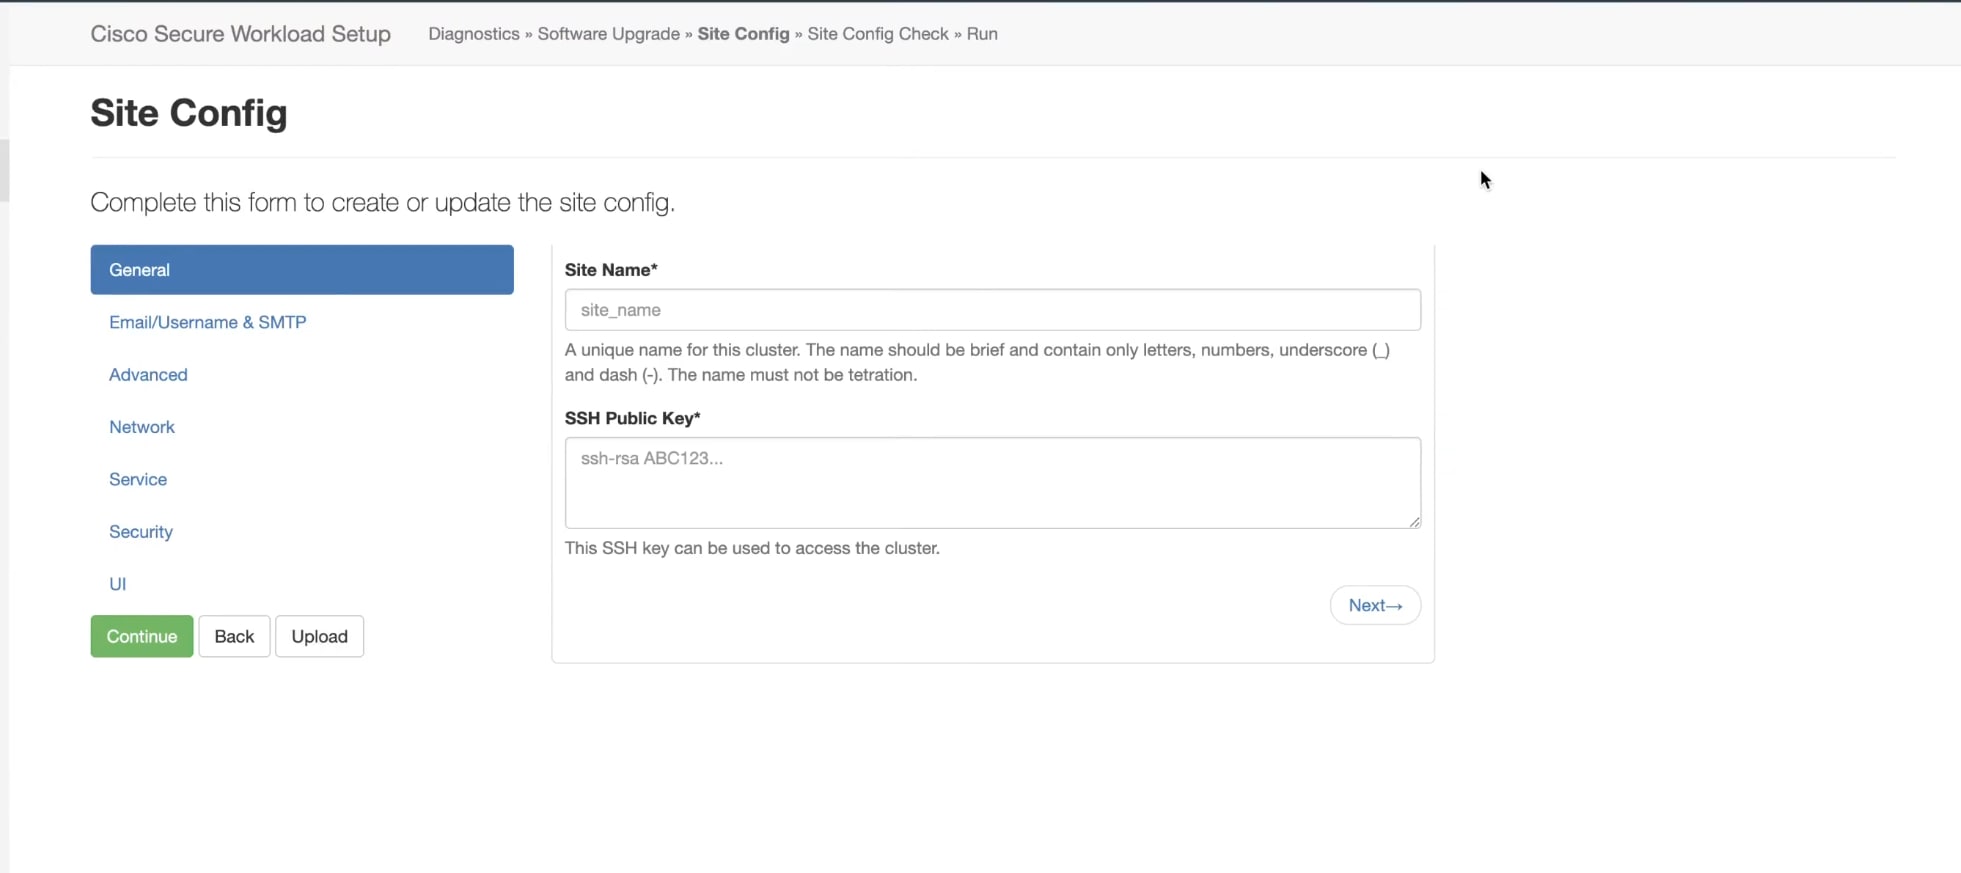
Configure the cluster site.
|
|
Step 5 |
In Pre Deploy Config, the system runs a validation check. Click Continue. |
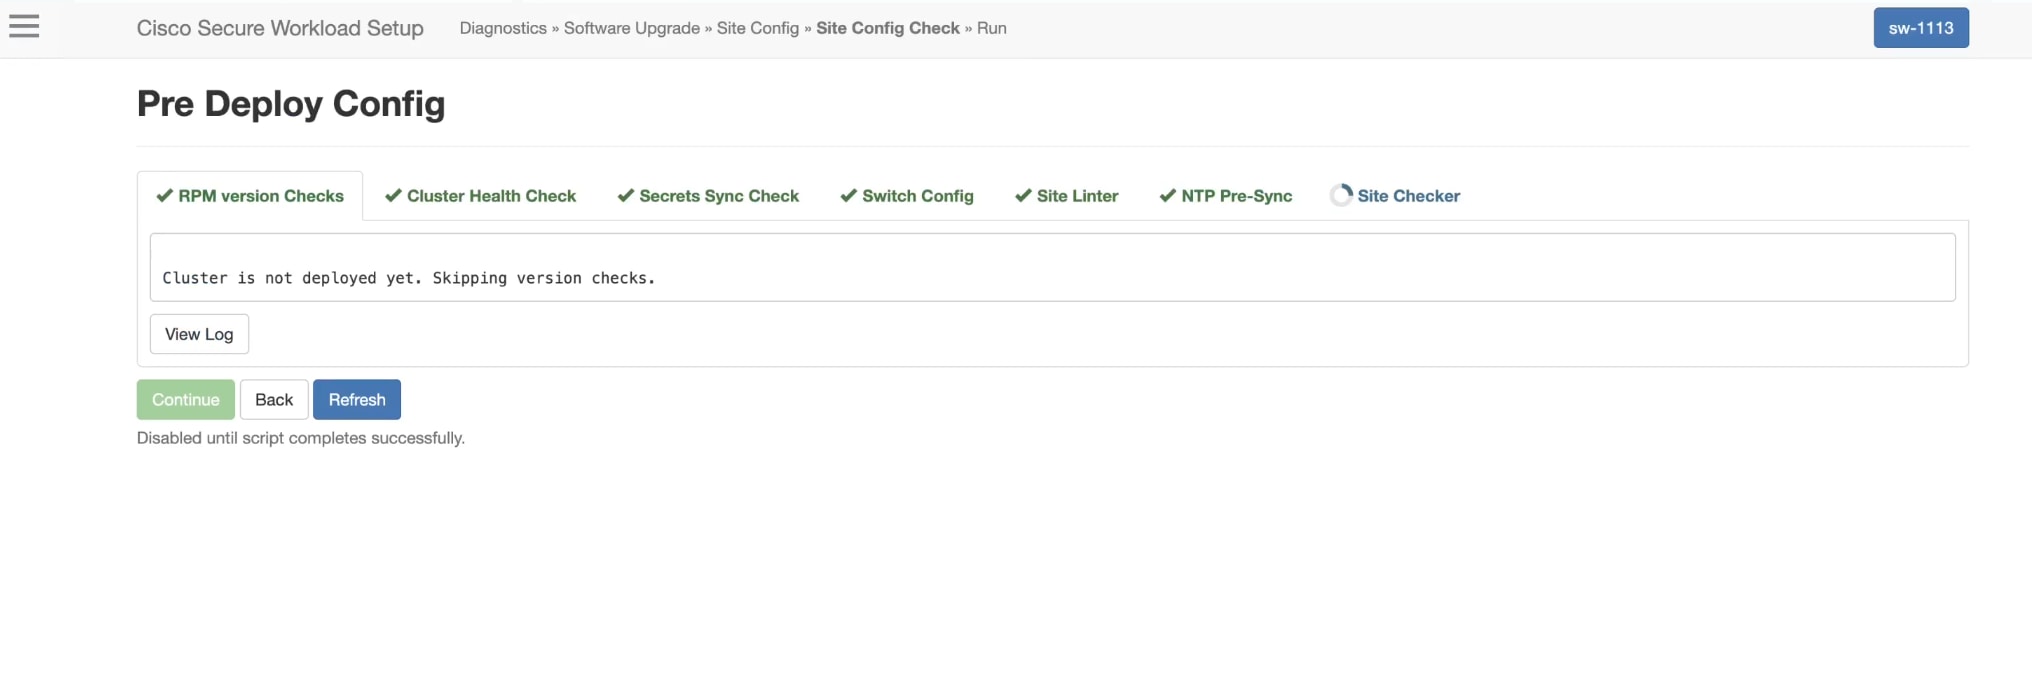
The Secure Workload software appliance is installed on the virtual machines that were created on VMware vSphere.

Note |
It takes a few hours to deploy the Secure Workload software appliance on all the virtual machines. |
 Feedback