Global User Account Settings
Available Languages
Table Of Contents
Adding Your Users to the System
Using Batch Commands to Add Users
Global User Account Settings
The settings below can be configured depending on your business email security policy.
Adding Your Users to the System
This is the most important activity that is required to utilize the ScanSafe Email Control service fully.
By default, virus blocking is enabled for all users within your domain (whether registered or not) once your MX records have been changed successfully.
However, the filtering of messages and quarantine services require users to be added to the system.
There are two features that can be used to auto create users. These can be found within "General Settings" mentioned in the previous section and are called:
•
SmartCreate - Turn on to have user accounts created automatically. Read Help for detail
•
However, these functions create individual accounts for all users and User Aliases which will be add to your total seat count. Any accounts over the number of users that has been contracted for will be charged at a per user basis. Please contact ScanSafe Support if you have any further questions.
In addition users can be added using the Batch command to import large numbers of users and individual addresses.
Add, Delete, and Move Users
Step 1
Step 2
Step 3

Step 4
Separate each address with a comma or line break. Each user should already have an
email account on your server.

Tip
a.
b.
This sends users a Welcome notification email right away. Otherwise, users are welcomed later, during off-peak hours (for example, early morning in Pacific Standard Time). This notification won't be sent if you chose not to enable Notifications when you initially signed up for service.c.
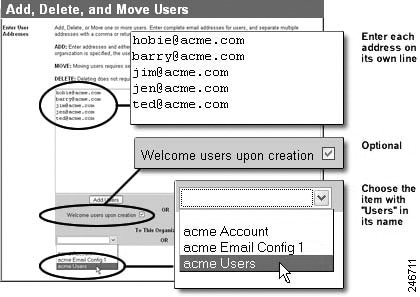
Add Users Form
Step 1
Step 2
Step 3
Once user email addresses are entered click add user button. The default user setting will be used as the template settings for any users created. The only exception to this rule is if the users are being created within a custom Org with different settings configured for that Org.
The same steps as above applied when using this interface to move and delete users.
Congratulations! Email Control is now activated for all users entered above.
Using Batch Commands to Add Users
Step 1
Step 2
Step 3
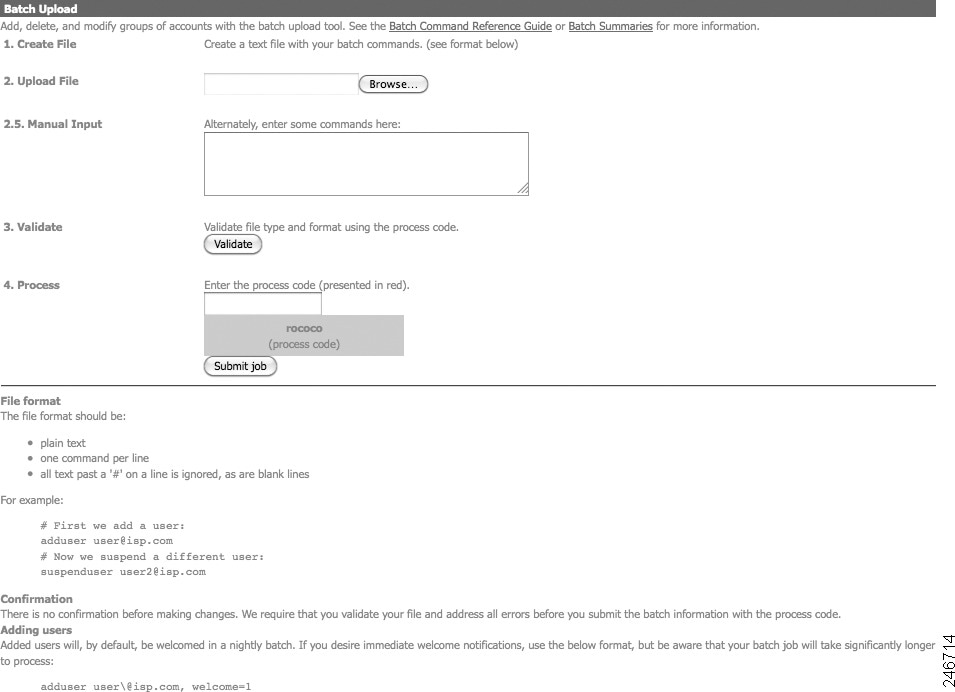
Step 4
Step 5
What Next?
Now that Email Control is working for the users you added in one domain, you should:
•
•
•
•


 Feedback
Contact Cisco
- Open a Support Case

- (Requires a Cisco Service Contract)
This Document Applies to These Products
- Collaboration Endpoints - Retired Products
- Conferencing - Retired Products
- Contact Center - Retired Products
- Optical Networking - Retired Products
- Routers - Retired Products
- Security - Retired Products
- Servers - Unified Computing (UCS) Retired Products
- Storage Networking Retired Products
- Switches - Retired Products
- Video - Retired Products
- Wireless - Retired Products