Block a URL Using Management Center
Is this Guide for You?
This guide is for network administrators who manage Cisco Secure Firewall Threat Defense devices using Cisco Secure Firewall Management Center, where the inspection engine is configured to use Snort 3. It provides detailed steps to block access to specific URLs for users on your network.
This guide covers URL blocking for:
-
Plain-text traffic (HTTP)
-
Encrypted traffic (HTTPS/SSL/TLS)
Depending on your environment and enforcement requirements, you may block URLs using URL conditions, Security Intelligence feeds, or SSL/TLS decryption for deeper visibility.
Overview
You can block access to a website by configuring an access control policy rule that matches the URL and sets the rule action to Block.
Snort 3 identifies URL information using:
-
HTTP request headers (Host and URI)
-
TLS handshake metadata (Server Name Indication (SNI))
-
SSL or TLS decryption (if configured)
Blocking can be implemented using:
-
URL condition in access control rules
-
URL categories
-
Security Intelligence (domain or IP reputation-based blocking)
URL Blocking for plain-text traffic (HTTP)
When users access a URL over HTTP, the device can typically see the full URL request in clear text. Blocking is straightforward using a URL-based rule.
URL Blocking for SSL/TLS-based traffic (HTTPS)
When users access a URL over HTTPS, the traffic is encrypted. URL visibility may be limited unless one or more of these methods is used:
-
Blocking based on TLS Server Name Indication (SNI) (domain-level visibility)
-
Blocking based on Security Intelligence (IP or domain reputation-based blocking)
-
Blocking using SSL/TLS decryption (full URL visibility, most control)

Important
Without SSL/TLS decryption, you may be able to block domains, but not always specific URL paths (for example, blocking
example.com/loginbut allowingexample.com).
Sample scenario
Alex is a network administrator at an enterprise that uses Management Center to manage multiple Threat Defense devices running Snort 3. Users are accessing restricted websites during work hours.
Alex must block:
-
http://example.com -
https://example.com -
(Optional) a specific page such as
https://example.com/videos
Alex creates URL blocking rules in the access control policy and deploys them to managed devices. After deployment, he validates the block using connection events and user testing.
System Requirements
The following table lists the platforms and versions for this use case.
|
Product |
Version |
Version used in this document |
|---|---|---|
|
Cisco Secure Firewall Threat Defense (formerly Firepower Threat Defense/FTD) |
6.2.3 or later |
7.6 |
|
Cisco Secure Firewall Management Center (formerly Firepower Management Center/FMC) |
6.2.3 or later |
7.6 |
Prerequisites
-
Ensure that the Threat Defense device is managed by Management Center and is online.
-
Ensure that the Threat Defense device is running Snort 3.
-
Ensure that you have the required permissions to edit and deploy policies in Management Center.
-
Identify what you want to block:
-
A full URL (for example,
http://example.com/path) -
A domain (for example,
example.com) -
A category (for example, gambling)
-
-
Determine whether the website uses HTTP, HTTPS, or both.
-
Decide whether you need:
-
Domain-level block, or
-
Full URL path blocking (often requires SSL/TLS decryption)
-
Guidelines
-
Rule order: Access control policy rules are processed from top to bottom. Ensure that the block rules are placed above any allow rules for the same scope.
-
Prefer domain objects: Use domain or URL objects for consistency across policies.
-
Enable logging: Logging simplifies validation and troubleshooting.
-
HTTPS limitations: To enforce the full URL path, SSL/TLS decryption is usually required.
-
Use exceptions carefully: If you block a category, add explicit allow rules for required business sites above the block rule.
-
Test before wider customer rollout: Start with a pilot group or a limited subnet before enforcing the rule for a wider user base.
Block a URL for plain-text traffic
Confirm Snort 3 is enabled
Before you begin
Ensure that you review Prerequisites.
Procedure
|
Step 1 |
Choose Devices > Device Management. |
|
Step 2 |
Select the Threat Defense device. |
|
Step 3 |
In the Device tab, confirm the Inspection Engine is set to Snort 3. 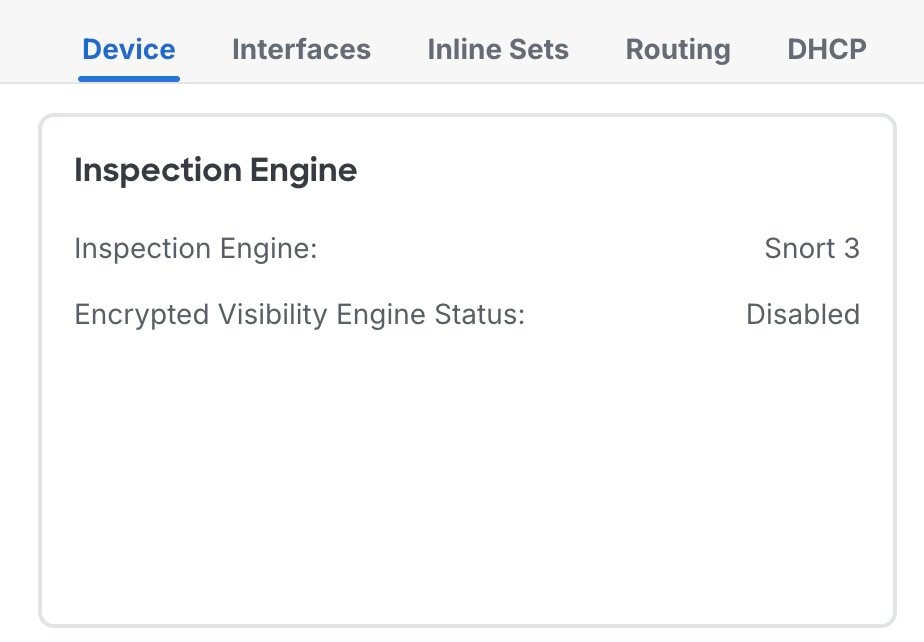 |
Open the access control policy
Before you begin
Ensure that you review Prerequisites.
Procedure
|
Step 1 |
Choose Policies > Access Control. |
||
|
Step 2 |
Click the edit icon for the policy applied to the device on which you want to enforce the block. If you have not created a policy, see Creating a basic access control policy for steps on how to create one.
|
Create a new rule to block the URL
Procedure
|
Step 1 |
Choose Policies > Access Control. |
|
Step 2 |
Click the edit icon for the policy applied to the device on which you want to enforce the block. |
|
Step 3 |
In the Policy Editor, click Add Rule. |
|
Step 4 |
In the Name field, enter a meaningful rule name. For example: |
|
Step 5 |
Choose where you want the rule placed. We recommend placing block rules at the top. |
|
Step 6 |
Choose Block from the Action dropdown list.  |
Configure URL blocking conditions
Procedure
|
Step 1 |
Choose the URLs tab and click on the URLs tab under it. |
||
|
Step 2 |
Enter the URL that you want to block in the Manually Enter URL field. For example, |
||
|
Step 3 |
Click Add URL. |
||
|
Step 4 |
Click Apply.
|
(Optional) Restrict the scope of the rule
To avoid unintended impact, narrow down where the block applies.
Restrict by source (recommended)
Procedure
|
Step 1 |
In the Policy Editor window, click the edit icon for the rule that you created. |
|
Step 2 |
In the Editing Rule window, go to Networks. |
|
Step 3 |
In the Networks window, select the user subnets or hosts where the URL must be blocked. Example: |
|
Step 4 |
Click Add Source Network. |
Restrict by destination
To avoid unintended impact, narrow down where the block applies.
Procedure
|
Step 1 |
In the Networks window, select the destination servers or subnets if the application uses known destination ranges. |
|
Step 2 |
Click Add Destination Network. |
|
Step 3 |
Click Apply. |
Restrict by security zones
To avoid unintended impact, narrow down where the block applies.
Procedure
|
Step 1 |
In the Zones window, to add a source zone, select the zone, and click Add Source Zone. |
|
Step 2 |
In the Zones window, to add a destination zone, select the zone, and click Add Destination Zone. |
|
Step 3 |
Click Apply. |
Restrict by user
To avoid unintended impact, narrow down where the block applies.
Procedure
|
Step 1 |
Choose the Users tab. |
|
Step 2 |
Select the users or groups to which the block applies. |
|
Step 3 |
Click Add User. |
|
Step 4 |
Click Apply. |
(Optional) Enable logging
Procedure
|
Step 1 |
In the Editing Rule window, enable Logging and choose Log at beginning of connection. 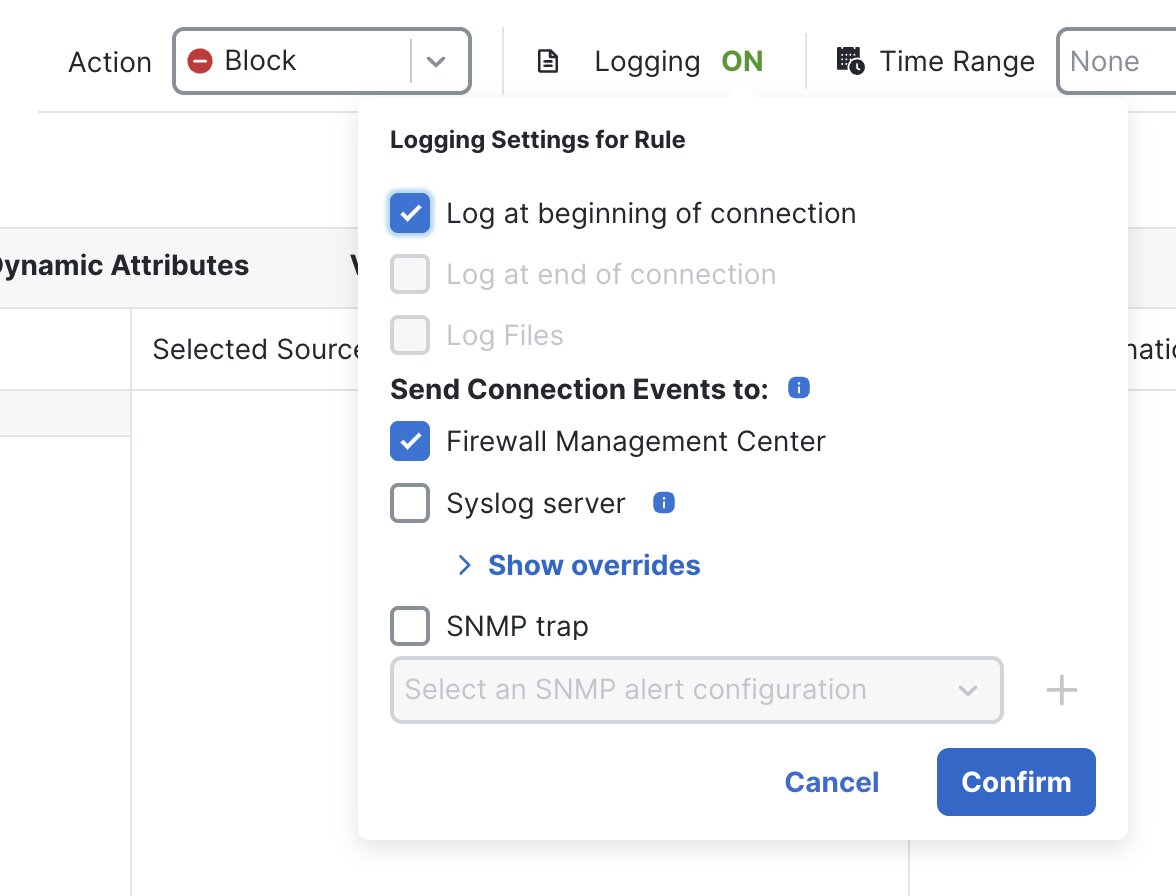 |
||
|
Step 2 |
Click Confirm.
|
Confirm and verify rule addition and order
Procedure
|
Step 1 |
Confirm that the rule appears in the Policy Editor under the Access Control tab. |
|
Step 2 |
Verify the rule order. Ensure that the block rule is placed above any allow rule that might match the same traffic. |
|
Step 3 |
Click Save. |
Deploy the configuration
Procedure
|
Step 1 |
In the Access Control window, click Deploy. |
|
Step 2 |
In the deployment window, select the devices on which the policy applies. 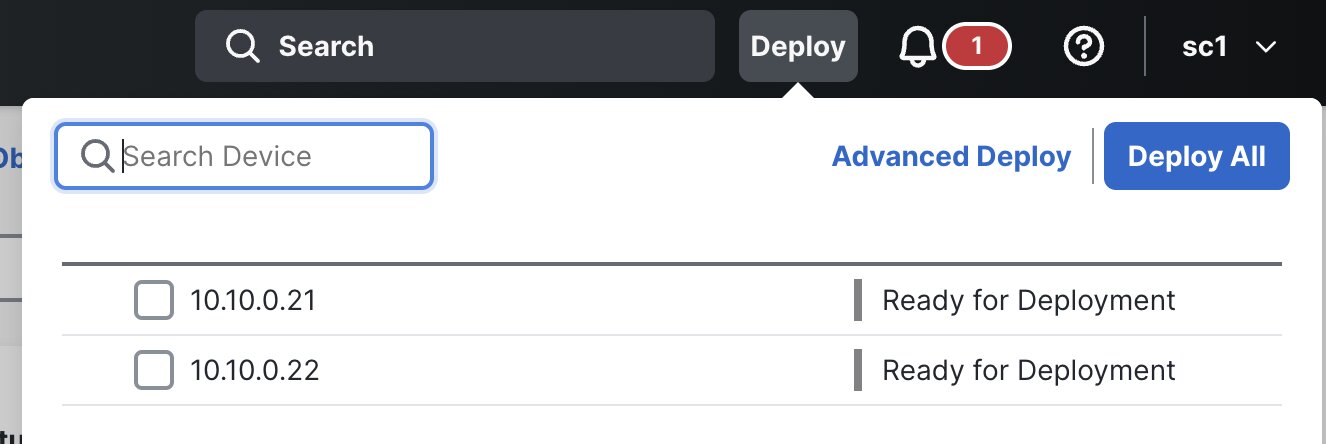 |
|
Step 3 |
Click Deploy. |
|
Step 4 |
Wait until the deployment completes successfully. |
Block a URL for SSL/TLS-based traffic (HTTPS)
There are multiple ways to block HTTPS websites. Choose the option that fits your requirement.
Option A: Block HTTPS using URL conditions (domain-level match)
Use this method when:
-
You want to block a domain (example:
example.com) -
Full path-based control is not required
Confirm Snort 3 is enabled
Before you begin
Ensure that you review Prerequisites.
Procedure
|
Step 1 |
Choose Devices > Device Management. |
|
Step 2 |
Select the Threat Defense device. |
|
Step 3 |
In the Device tab, confirm the Inspection Engine is set to Snort 3. |
Open the access control policy
Before you begin
Ensure that you review Prerequisites.
Procedure
|
Step 1 |
Choose Policies > Access Control. |
||
|
Step 2 |
Click the edit icon for the policy applied to the device on which you want to enforce the block. If you have not created a policy, see Creating a basic access control policy for steps on how to create one.
|
Create a new rule to block the URL
Procedure
|
Step 1 |
Choose Policies > Access Control. |
|
Step 2 |
Click the edit icon for the policy applied to the device on which you want to enforce the block. |
|
Step 3 |
In the Policy Editor, click Add Rule. |
|
Step 4 |
In the Name field, enter a meaningful rule name. For example: |
|
Step 5 |
Choose where you want the rule placed. We recommend placing block rules at the top. |
|
Step 6 |
Choose Block from the Action dropdown list. |
Configure URL blocking conditions
Procedure
|
Step 1 |
Choose the URLs tab and click on the URLs tab under it. |
||
|
Step 2 |
Enter the URL that you want to block in the Manually Enter URL field. For example, |
||
|
Step 3 |
Click Add URL. |
||
|
Step 4 |
Click Apply.
|
(Optional) Restrict the scope of the rule
To avoid unintended impact, narrow down where the block applies.
Restrict by source (recommended)
Procedure
|
Step 1 |
In the Policy Editor window, click the edit icon for the rule that you created. |
|
Step 2 |
In the Editing Rule window, go to Networks. |
|
Step 3 |
In the Networks window, select the user subnets or hosts where the URL must be blocked. Example: |
|
Step 4 |
Click Add Source Network. |
Restrict by destination
To avoid unintended impact, narrow down where the block applies.
Procedure
|
Step 1 |
In the Networks window, select the destination servers or subnets if the application uses known destination ranges. |
|
Step 2 |
Click Add Destination Network. |
|
Step 3 |
Click Apply. |
Restrict by security zones
To avoid unintended impact, narrow down where the block applies.
Procedure
|
Step 1 |
In the Zones window, to add a source zone, select the zone, and click Add Source Zone. |
|
Step 2 |
In the Zones window, to add a destination zone, select the zone, and click Add Destination Zone. |
|
Step 3 |
Click Apply. |
Restrict by user
To avoid unintended impact, narrow down where the block applies.
Procedure
|
Step 1 |
Choose the Users tab. |
|
Step 2 |
Select the users or groups to which the block applies. |
|
Step 3 |
Click Add User. |
|
Step 4 |
Click Apply. |
(Optional) Enable logging
Procedure
|
Step 1 |
In the Editing Rule window, enable Logging and choose Log at beginning of connection. |
||
|
Step 2 |
Click Confirm.
|
Confirm and verify rule addition and order
Procedure
|
Step 1 |
Confirm that the rule appears in the Policy Editor under the Access Control tab. |
|
Step 2 |
Verify the rule order. Ensure that the block rule is placed above any allow rule that might match the same traffic. |
|
Step 3 |
Click Save. |
Deploy the configuration
Procedure
|
Step 1 |
In the Access Control window, click Deploy. |
|
Step 2 |
In the deployment window, select the devices on which the policy applies. |
|
Step 3 |
Click Deploy. |
|
Step 4 |
Wait until the deployment completes successfully. |
Option B: Block HTTPS Using Security Intelligence
Use this method when:
-
You want quick domain/IP-based blocking.
-
You want the block to occur early (before full session setup).
There are 3 common ways to block HTTPS using Security Intelligence:
Method 1: Block by destination IP address or network object
Use this method when the website has a stable IP address range or you already know the IP address.
Create an object (if you do not have one)
Procedure
|
Step 1 |
Choose Objects > Object Management. |
|
Step 2 |
Choose Network > Add Network > Add Object. |
|
Step 3 |
Enter a Name: |
|
Step 4 |
Choose Host and enter an IP address: |
|
Step 5 |
Click Save. 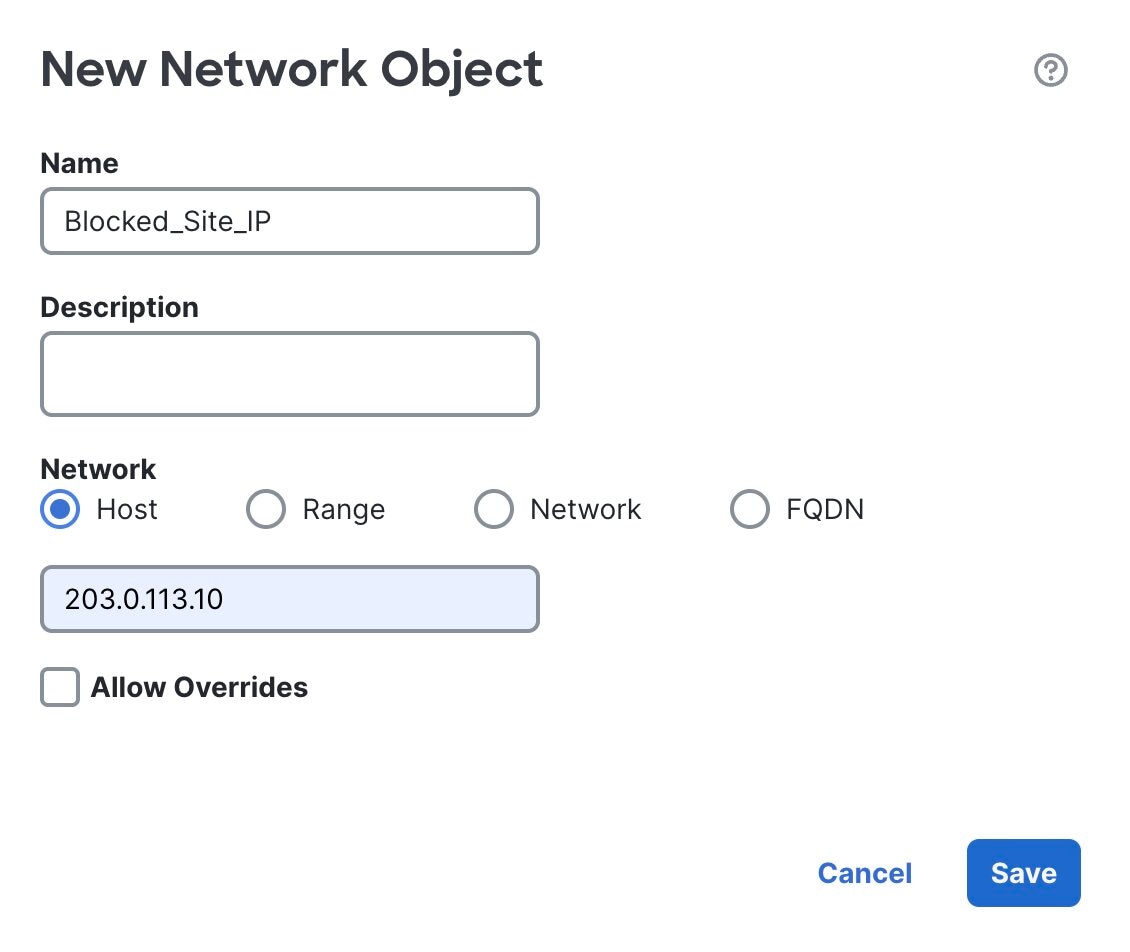 |
Add this object to SI block list
Procedure
|
Step 1 |
Choose Policies > Access Control. |
|
Step 2 |
Click the edit icon for the policy applied to the device on which you want to enforce the block. |
|
Step 3 |
Click Security Intelligence. |
|
Step 4 |
Under the Networks section, select the host or network object that you created. |
|
Step 5 |
Click Add to Block List. |
|
Step 6 |
Click Save. |
Method 2: Block by URL / Domain (HTTPS sites)
This method is appropriate for the “block example.com” use case.
Create an object (if you do not have one)
Procedure
|
Step 1 |
Choose Objects > Object Management. |
|
Step 2 |
Choose URL > Add URL > Add Object. |
|
Step 3 |
Enter a Name: |
|
Step 4 |
Enter the URL to be blocked, such as |
|
Step 5 |
Click Save. 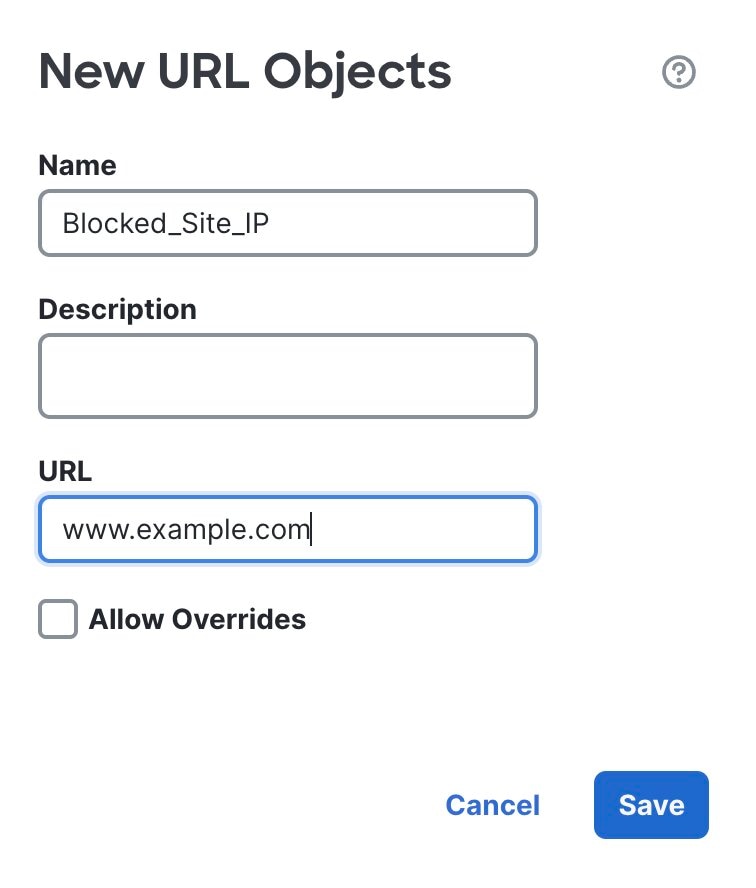 |
Add this object to SI block list
Procedure
|
Step 1 |
Choose Policies > Access Control. |
||
|
Step 2 |
Click the edit icon for the policy applied to the device on which you want to enforce the block. |
||
|
Step 3 |
Click Security Intelligence. |
||
|
Step 4 |
Under the Networks section, select the host or network object that you created. |
||
|
Step 5 |
Click Add to Block List. |
||
|
Step 6 |
Click Save.
|
Method 3: Block using a feed
This method is recommended when you want to maintain a list externally:
-
Threat intel feeds
-
Custom company block feed (managed by SOC)
Create a security intelligence feed
Procedure
|
Step 1 |
Choose Objects > Object Management. |
|
Step 2 |
Choose Security Intelligence > URL Lists and Feeds > Add URL Lists and Feeds. |
|
Step 3 |
Enter a Name: |
|
Step 4 |
Choose Feed from the Type dropdown list. |
|
Step 5 |
Enter the Feed URL. |
|
Step 6 |
Choose an Update Frequency time. |
|
Step 7 |
Click Save. |
|
Step 8 |
Click Update Feeds (or wait for auto-refresh). |
Add feed to SI block list in the access control policy
Procedure
|
Step 1 |
Choose Policies > Access Control. |
|
Step 2 |
Click the edit icon for the policy applied to the device on which you want to enforce the block. |
|
Step 3 |
Click Security Intelligence. |
|
Step 4 |
In the URLs tab, select the feed that you created. |
|
Step 5 |
Click Add to Block List. |
|
Step 6 |
Click Save. |
Validating the configuration
After deployment, validate that the URL block is working as expected.
Procedure
|
Step 1 |
Generate test traffic. |
||
|
Step 2 |
Confirm behavior. Expected outcomes include the following:
|
||
|
Step 3 |
Confirm events in Management Center. |
||
|
Step 4 |
Confirm rule hit count.
|
Troubleshooting
The URL is still accessible
-
Confirm that the deployment succeeded and was pushed to the correct device.
-
Confirm rule order (block rule must be above allow rules).
-
Confirm the rule conditions match the test traffic (zones, networks, users).
-
If the traffic is HTTPS:
-
You may only be seeing the domain, not the full URL path.
-
Consider SSL/TLS decryption for path-based enforcement.
-
No events appear in Management Center
-
Confirm logging is enabled on the rule.
-
Confirm traffic is passing through the Threat Defense device.
-
Validate the time range and filters.
HTTPS sites reveal limited URL details
-
This is expected without SSL/TLS decryption.
-
Use SNI or domain-based blocking, or configure decryption for full visibility.
 Feedback