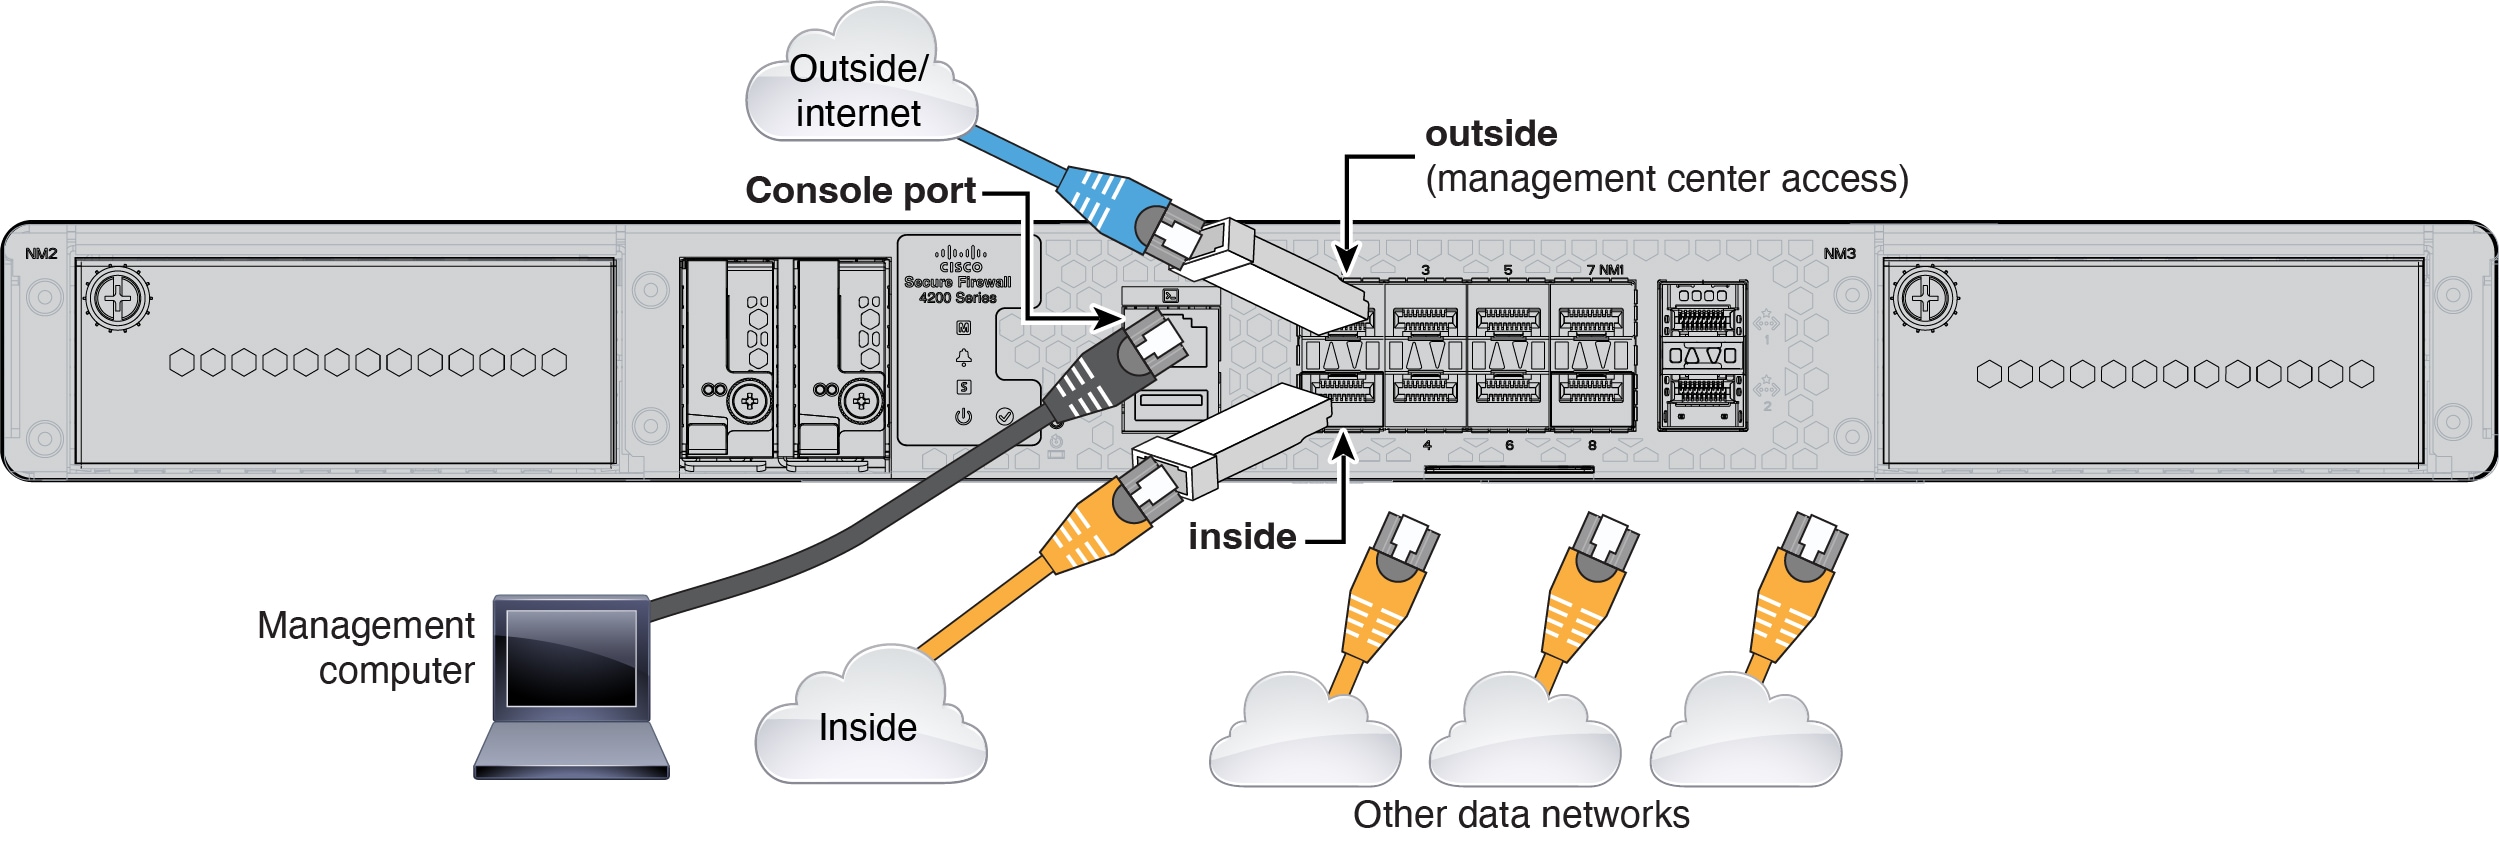
Cable and Register the Firewall

Cable the firewall and then register the firewall to the Firewall Management Center.

Cable the Firewall

  • Obtain a console cable—The firewall does not ship with a console cable by default, so you will need to buy a third-party USB-to-RJ-45 serial cable, for example.

  • Install SFPs into the data interface ports—The built-in ports are 1/10/25-Gb SFP28 ports that require SFP/SFP+/SFP28 modules.

  • See the hardware installation guide for more information.

Cabling for a Management Center at a Central Headquarters

Perform Initial Configuration

Set the dedicated Management IP address, gateway, and other basic networking settings using the CLI setup script.

Procedure


Connect to the console port and access the Firewall Threat Defense CLI. See Access the Firewall Threat Defense CLI.


Register the Firewall with the Firewall Management Center

Register the firewall to the Firewall Management Center.

Procedure


Step 1

Log into the Firewall Management Center.

  1. Enter the following URL.

    https://fmc_ip_address

  2. Enter your username and password.

  3. Click Log In.

Step 2

Choose Devices > Device Management.

Step 3

From the Add drop-down menu, choose Device.

Step 4

Click Registration Key, click Basic, and then click Next.

Figure 1. Device Registration Method
Device Registration Method

Step 5

Configure the device details and click Next.

Figure 2. Device Details
Domain
  • Domain—In a multidomain environment, choose the leaf domain.

  • Device group—In a single domain environment, add the device to a Device group.

  • Hostname or IP address—Enter the IP address or the hostname of the device you want to add. Leave this field blank if you don't know the device IP address (for example, it's behind NAT).

  • Display name—Enter a name for the device as you want it to display in the Firewall Management Center. You cannot change this name later.

  • Registration key—Enter the same registration key from your initial configuration.

  • Unique NAT ID—Enter the same ID from your initial configuration.

  • Analytics-only management centerLeave this unchecked.

Step 6

Configure the initial device configuration.

Figure 3. Initial Device Configuration
Initial Device Configuration
  • Access control policy—Choose an initial policy to deploy to the device at registration, or create a new policy. Unless you already have a customized policy you know you need to use, choose Add (add icon), and choose Block all traffic. You can change this later to allow traffic; see Configure an Access Control Rule.

  • Smart licensing—Choose your licenses.

    • Is this device physical or virtual?—Choose Physical device

    • License type—Check each license type to assign to the device.

    You can also apply licenses after you add the device.

  • Transfer packets—Enable this option so that for each intrusion event, the device transfers the packet to the Firewall Management Center for inspection.

    For each intrusion event, the device sends event information and the packet that triggered the event to the Firewall Management Center for inspection. If you disable it, only event information will be sent to the Firewall Management Center; the packet will not be sent.

Step 7

Click Add device.

It may take up to two minutes for the Firewall Management Center to verify the device’s heartbeat and establish communication. If the registration succeeds, the device is added to the list. If it fails, you will see an error message. If the device fails to register, check the following items:

  • Ping—Access the device CLI, and ping the Firewall Management Center IP address using the following command:

    ping system ip_address

    If the ping is not successful, check your network settings using the show network command. If you need to change the device IP address, use the configure network {ipv4 | ipv6} manual command.

  • Registration key, NAT ID, and Firewall Management Center IP address—Make sure you are using the same registration key, and if used, NAT ID, on both devices. You can set the registration key and NAT ID on the device using the configure manager add command.

For more troubleshooting information, see https://cisco.com/go/fmc-reg-error.