Deploy the Firewall Threat Defense Virtual on OCI

You can deploy the Firewall Threat Defense Virtual on the Oracle Cloud Infrastructure (OCI), a public cloud computing service that enables you to run your applications in a highly-available, hosted environment offered by Oracle.

The following procedures describe how to prepare your OCI environment and launch the Firewall Threat Defense Virtual instance. You log into the OCI portal, search the OCI Marketplace for the Cisco Firepower NGFW virtual firewall (NGFWv) offering, and launch the compute instance. After launching the Firewall Threat Defense Virtual, you must configure route tables to direct traffic to the firewall depending on the traffic’s source and destination.

Overview

The Cisco Secure Firewall Threat Defense Virtual runs the same software as physical Cisco Firewall Threat Defense to deliver proven security functionality in a virtual form factor. The Firewall Threat Defense Virtual can be deployed in the public OCI. It can then be configured to protect virtual and physical data center workloads that expand, contract, or shift their location over time.

OCI Compute Shapes

A shape is a template that determines the number of CPUs, amount of memory, and other resources that are allocated to an instance. The Firewall Threat Defense Virtual support the following OCI shape types:

Table 1. Supported Compute Shapes for Firewall Threat Defense Virtual

OCI Shape

Supported Threat Defense Virtual version

Attributes

Interfaces

oCPUs

RAM (GB)

Intel VM.Standard2.4

7.1, 7.2.x, and 7.3.x

4

60

Minimum 4, Maximum 4

Intel VM.Standard2.8

7.1, 7.2.x, and 7.3.x

8

120

Minimum 4, Maximum 8

  • *SR-IOV mode is supported with Flex shapes from Version 7.4.x and later.

  • In OCI, 1 oCPU is equal to 2 vCPU.

  • The Firewall Threat Defense Virtual requires a minimum of 4 interfaces.

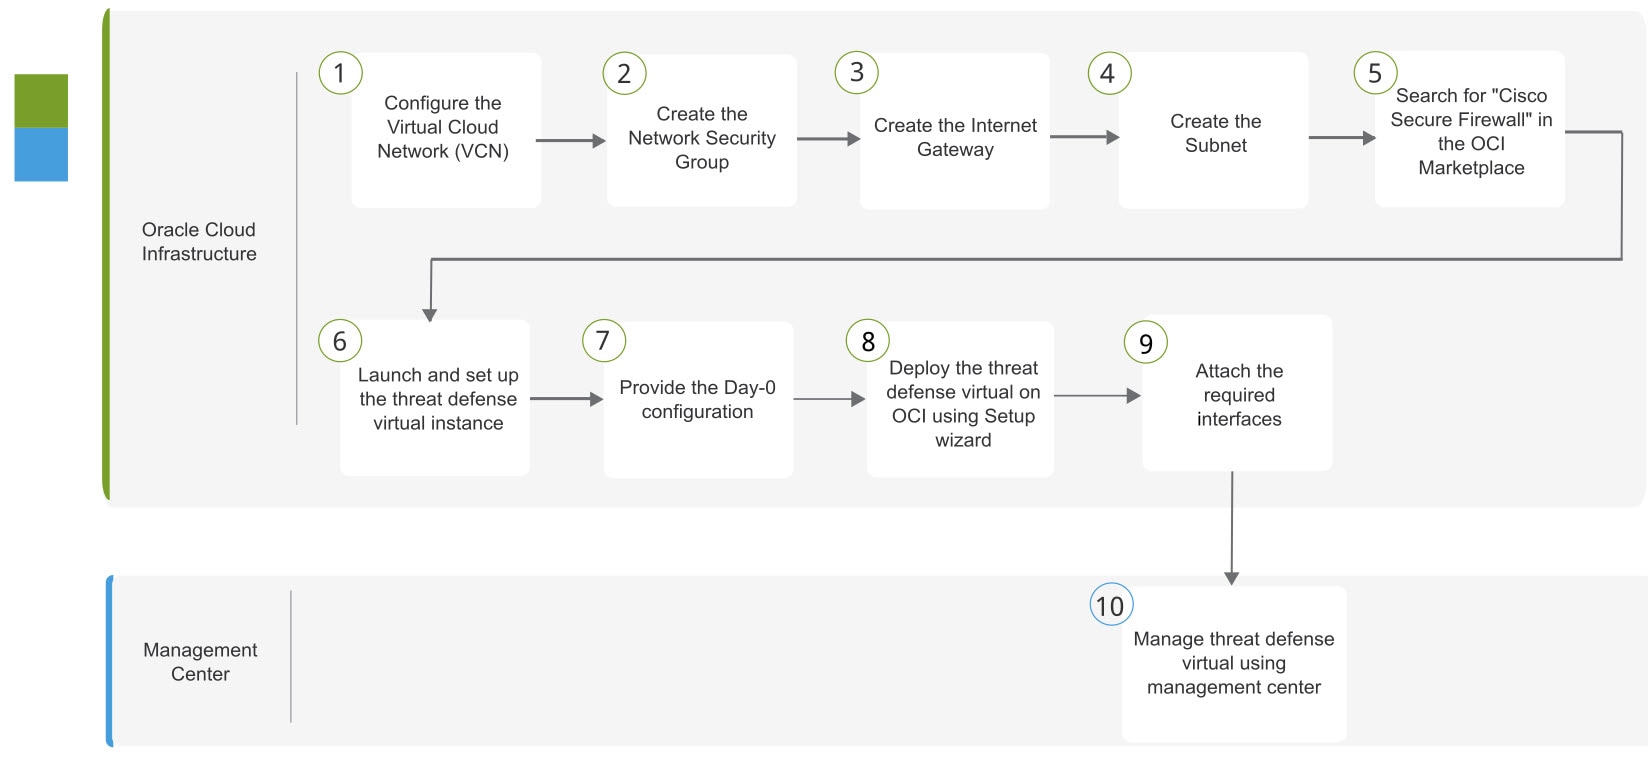
You create an account on OCI, launch a compute instance using the Cisco Firepower NGFW virtual firewall (NGFWv) offering on the Oracle Cloud Marketplace, and choose an OCI shape.

End-to-End Procedure

The following flowchart illustrates the workflow for deploying Threat Defense Virtual on Oracle Cloud Infrastructure.

Workspace

Steps

Oracle Cloud Infrastructure

Deploy the Threat Defense virtual on OCI: Configure the Virtual Cloud Network (VCN) (Networking > Virtual Cloud Networks > CIDR block > Create VCN.

Oracle Cloud Infrastructure

Deploy the Threat Defense virtual on OCI: Create the Network Security Group. (Networking > Virtual Cloud Networks > Virtual Cloud Network Details > Network Security Groups > Create Network Security Group.

Oracle Cloud Infrastructure

Deploy the Threat Defense Virtual on OCI: Create the Internet Gateway. Networking > Virtual Cloud Networks > Virtual Cloud Network Details > Internet Gateways > Create Internet Gateway.

Oracle Cloud Infrastructure

Deploy the Threat Defense Virtual on OCI: Create the Subnet. Networking > Virtual Cloud Networks > Virtual Cloud Network Details > Subnets > Create Subnet.

Oracle Cloud Infrastructure

Deploy the Threat Defense Virtual on OCI: Search for “Cisco Secure Firewall” in the OCI Marketplace.

Oracle Cloud Infrastructure

Deploy the Threat Defense Virtual on OCI: Launch and set up the threat defense virtual instance.

Oracle Cloud Infrastructure

Deploy the Threat Defense Virtual on OCI: Provide the Day-0 configuration.

Oracle Cloud Infrastructure

Deploy the Threat Defense Virtual on OCI: Deploy the threat defense virtual on OCI using setup wizard.

Oracle Cloud Infrastructure

Deploy the Threat Defense Virtual on OCI: Attach the Interfaces.Compute > Instances > Instance Details > Attached VNICs.

Management Center

Manage the Firewall Threat Defense Virtual by using the Management Center

Prerequisites

  • Create an OCI account at https://www.oracle.com/cloud/.

  • A Cisco Smart Account. You can create one at Cisco Software Central (https://software.cisco.com/).

  • License the Firewall Threat Defense Virtual.

    • Configure all license entitlements for the security services from the Firewall Management Center.

    • See “Licensing” in the Cisco Secure Firewall Management Center Admin Guide for more information about how to manage licenses.

  • Interface requirements:

    • Management interfaces (2) — One used to connect the Firewall Threat Defense Virtual to the Firewall Management Center, second used for diagnostics; cannot be used for through traffic.

    • Traffic interfaces (2) — Used to connect the Firewall Threat Defense Virtual to inside hosts and to the public network.

  • Communications paths:

    • Public IPs for access into the Firewall Threat Defense Virtual.

  • For Firewall Threat Defense Virtual system requirements, see Cisco Secure Firewall Threat Defense Compatibility Guide.

Guidelines and Limitations

Supported Features

  • Deployment in the OCI Virtual Cloud Network (VCN)

  • Routed mode (default)

  • Licensing – Only BYOL is supported

  • Firewall Management Center support only.

  • Single Root I/O Virtualization (SR-IOV) is supported.

Performance Tiers for FTDv Smart Licensing

The Firewall Threat Defense Virtual supports performance-tiered licensing that provides different throughput levels and VPN connection limits based on deployment requirements.

Table 2. Firewall Threat Defense Virtual Licensed Feature Limits Based on Entitlement

Performance Tier

Device Specifications (Core/RAM)

Rate Limit

RA VPN Session Limit

FTDv5, 100Mbps

4 core/8 GB

100Mbps

50

FTDv10, 1Gbps

4 core/8 GB

1Gbps

250

FTDv20, 3Gbps

4 core/8 GB

3Gbps

250

FTDv30, 5Gbps

8 core/16 GB

5Gbps

250

FTDv50, 10Gbps

12 core/24 GB

10Gbps

750

FTDv100, 16Gbps

16 core/32 GB

16Gbps

10,000

See the "Licensing" chapter in the Cisco Secure Firewall Management Center Admin Guide for guidelines when licensing your Firewall Threat Defense Virtual device.


Note


To change the vCPU/memory values, you must first power off the Firewall Threat Defense Virtual device.


Performance Optimizations

To achieve the best performance out of the Firewall Threat Defense Virtual, you can make adjustments to the both the VM and the host. See Virtualization Tuning and Optimization on OCI for more information.

Receive Side Scaling—The Firewall Threat Defense Virtual supports Receive Side Scaling (RSS), which is a technology utilized by network adapters to distribute network receive traffic to multiple processor cores. Supported on Version 7.0 and later. See Multiple RX Queues for Receive Side Scaling (RSS) for more information.

Snort

  • If you are observing abnormal behavior such as Snort taking a long time to shut down, or the VM being slow in general or when a certain process is executed, collect logs from the Firewall Threat Defense Virtual and the VM host. Collection of overall CPU usage, memory, I/O usage, and read/write speed logs will help troubleshoot the issues.

  • High CPU and I/O usage is observed when Snort is shutting down. If a number of Firewall Threat Defense Virtual instances have been created on a single host with insufficient memory and no dedicated CPU, Snort will take a long time to shut down which will result in the creation of Snort cores.

Unsupported Features

  • Local management support via Firewall Device Manager.

  • Firewall Threat Defense Virtual native HA

  • Autoscale on version 7.0 and earlier.

  • Transparent/inline/passive modes

  • Data Interface configuration via DHCP

  • IPv6

Limitations

  • Firewall Threat Defense Virtual deployment on OCI does not support Mellanox 5 as vNICs in the SR-IOV mode.

  • Separate routing rules required for Firewall Threat Defense Virtual for both static and DHCP configuration.

Sample Network Topology

The following figure shows the recommended topology for the Firewall Threat Defense Virtual in Routed Firewall Mode with 4 subnets configured in OCI for the Firewall Threat Defense Virtual (management, diagnostic, inside, and outside).

Figure 1. Sample Firewall Threat Defense Virtual on OCI Deployment with subnets in four VCNs
Figure 2. Sample Firewall Threat Defense Virtual on OCI Deployment with four subnets in a VCN

Note


When you are using four subnets in a single VCN, the routes specific to a subnet must be added to the route table associated with the subnet.


How to Manage Secure Firewall Threat Defense Virtual Device

You have two options to manage your Secure Firewall Threat Defense Virtual.

Secure Firewall Management Center

If you are managing large numbers of devices, or if you want to use the more complex features and configurations that the Firewall Threat Defense allows, use the Firewall Management Center to configure your devices instead of the integrated Firewall Device Manager.


Important


You cannot use both the Firewall Device Manager and the Firewall Management Center to manage the Firewall Threat Defense device. Once the Firewall Device Manager integrated management is enabled, it won't be possible to use the Firewall Management Center to manage the Firewall Threat Defense device, unless you disable the local management and re-configure the management to use the Firewall Management Center. On the other hand, when you register the Firewall Threat Defense device to the Firewall Management Center, the Firewall Device Manager onboard management service is disabled.


Caution


Currently, Cisco does not have an option to migrate your Firewall Device Manager configuration to the Firewall Management Center and vice-versa. Take this into consideration when you choose what type of management you configure for the Firewall Threat Defense device.


Secure Firewall Device Manager

The Firewall Device Manager is a web interface included on most Firewall Threat Defense devices. It lets you configure the basic features of the software that are most commonly used for small networks. It is especially designed for networks that include a single device or just a few, where you do not want to use a high-powered multiple-device manager to control a large network with many devices.


Note


See the Cisco Secure Firewall Threat Defense Compatibility Guide for list of devices that support the Firewall Device Manager.


Configure OCI Environment

You can configure the Virtual Cloud Network (VCN) for your threat defense virtual deployment as follows:

  • Multiple VCNs - At a minimum, you need four VCNs, one for each interface of the Firewall Threat Defense Virtual. This allows for isolated traffic inspection between different networks.

  • Single VCN with Subnets - Alternatively, you can configure a single VCN with four subnets, one for each interface of the threat defense virtual. In this configuration, traffic between subnets within the same VCN can be inspected and controlled by the firewall using associated route tables. This allows you to manage inter-subnet traffic effectively while using a single VCN.

You can continue with the following procedures to complete the Management VCN. Then you return to Networking to create VCNs for the diagnostic, inside, and outside interfaces.

Procedure


Step 1

Log into OCI and choose your region.

OCI is divided into multiple regions that are isolated from each other. The region is displayed in the upper right corner of your screen. Resources in one region do not appear in another region. Check periodically to make sure you are in the intended region.

Step 2

Choose Networking > Virtual Cloud Networks and click Create VCN.

Step 3

Enter a descriptive Name for your VCN, for example, FTDv-Management.

Step 4

Enter a CIDR block for your VCN.

  1. An IPv4 CIDR block of IP addresses. CIDR (Classless Inter-Domain Routing) notation is a compact representation of an IP address and its associated routing prefix. For example, 10.0.0.0/24.

    Note


    Use DNS hostnames in this VCN.

Step 5

Click Create VCN.


What to do next

Continue with the following procedures to complete the Management VCN. When you complete the management VCN you'll create VCNs for the diagnostic, inside, and outside interfaces.


Note


After you select a service from the navigation menu, the menu on the left includes the compartments list. Compartments help you organize resources to make it easier to control access to them. Your root compartment is created for you by Oracle when your tenancy is provisioned. An administrator can create more compartments in the root compartment and then add the access rules to control which users can see and take action in them. See the Oracle document Managing Compartments for more information.


Create the Network Security Group

A network security group consists of a set of vNICs and a set of security rules that apply to those vNICs.

Procedure


Step 1

Choose Networking > Virtual Cloud Networks > Virtual Cloud Network Details > Network Security Groups, and click Create Network Security Group.

Step 2

Enter a descriptive Name for your Network Security Group, for example, FTDv-Mgmt-Allow-22-8305.

Step 3

Click Next.

Step 4

Add your security rules:

  1. Add a rule to allow TCP port 22 for SSH access.

  2. Add a rule to allow TCP port 8305 for HTTPS access.

    The Firewall Threat Defense Virtual can be managed via the Firewall Management Center, which requires port 8305 to be opened for HTTPS connections.

Note


You apply these security rules to the management interface/VCN.

Step 5

Click Create.


Create the Internet Gateway

An Internet gateway is required to make your management subnet publicly accessible.

Procedure


Step 1

Choose Networking > Virtual Cloud Networks > Virtual Cloud Network Details > Internet Gateways, and click Create Internet Gateway.

Step 2

Enter a descriptive Name for your Internet gateway, for example, FTDv-IG.

Step 3

Click Create Internet Gateway.

Step 4

Add the route to the Internet Gateway:

  1. Choose Networking > Virtual Cloud Networks > Virtual Cloud Network Details > Route Tables.

  2. Click on the link for your default route table to add route rules.

  3. Click Add Route Rules.

  4. From the Target Type drop-down, select Internet Gateway.

  5. Enter the Destination IPv4 CIDR Block, for example 0.0.0.0/0.

  6. From the Target Internet Gateway drop-down, select the gateway you created.

  7. Click Add Route Rules.


Create the Subnet

Each VCN will have one subnet, at a minimum. You’ll create a Management subnet for the Management VCN. You’ll also need a Diagnostic subnet for the Diagnostic VCN, need an Inside subnet for the Inside VCN, and an Outside subnet for the Outside VCN.

If you are using one VCN, then you will create Management subnet, Diagnostic subnet, Inside subnet, and Outside subnet within the VCN.

Procedure


Step 1

Choose Networking > Virtual Cloud Networks > Virtual Cloud Network Details > Subnets, and click Create Subnet.

Step 2

Enter a descriptive Name for your subnet, for example Management.

Step 3

Select a Subnet Type (leave the recommended default of Regional).

Step 4

Enter a CIDR Block, for example, 10.10.0.0/24. The internal (non-public) IP address for the subnet is taken from this CIDR block.

Step 5

Select one of the route tables you created previously from the Route Table drop-down.

Step 6

Select the Subnet Access for your subnet.

For the Management subnet, this must be Public Subnet.

Step 7

Select the DHCP Option.

Step 8

Select a Security List that you created previously.

Step 9

Click Create Subnet.


What to do next

After you configure your VCNs (Management, Diagnostic, Inside, Outside), you are ready to launch the Firewall Threat Defense Virtual. See the following figure for an example of the Firewall Threat Defense Virtual VCN configuration.

Figure 3. Firewall Threat Defense Virtual Virtual Cloud Networks

Deploy the Threat Defense Virtual on OCI

Deploy the Firewall Threat Defense Virtual on OCI via a Compute instance using the Cisco Firepower NGFW virtual firewall (NGFWv) offering on the Oracle Cloud Marketplace. Select the most appropriate machine shape based on characteristics such as the number of CPUs, amount of memory, and network resources.

Procedure


Step 1

Log into the OCI portal.

The region is displayed in the upper right corner of your screen. Make sure you are in the intended region.

Step 2

Choose Marketplace > Applications.

Step 3

Search Marketplace for “Cisco Firepower NGFW virtual firewall (NGFWv)” and choose the offering.

Step 4

Review the Terms and Conditions, and check the I have reviewed and accept the Oracle Terms of Use and the Partner terms and conditions.check box.

Step 5

Click Launch Instance.

Step 6

Enter a descriptive Name for your instance, for example FTDv-6-7.

Step 7

Click Change Shape and select the shape with the number of CPUs, amount of RAM, and number of interfaces required for the Firewall Threat Defense Virtual, for example VM.Standard2.4 (see Overview).

Step 8

From the Virtual Cloud Network drop-down, choose the Management VCN.

Step 9

From the Subnet drop-down, choose the Management subnet if it's not autopopulated.

Step 10

Check Use Network Security Groups to Control Traffic and choose the security group you configured for the Management VCN.

Step 11

Click the Assign a Public Ip Address radio button.

Step 12

Under Add SSH keys, click the Paste Public Keys radio button and paste the SSH key.

Linux-based instances use an SSH key pair instead of a password to authenticate remote users. A key pair consists of a private key and public key. You keep the private key on your computer and provide the public key when you create an instance. See Managing Key Pairs on Linux Instances for guidelines.

Step 13

Click the Show Advanced Options link to expand the options.

Step 14

Under Initialization Script, click the Paste Cloud-Init Script radio button to provide the day0 configuration for your Firewall Threat Defense Virtual. The day0 configuration is applied during the firstboot of the Firewall Threat Defense Virtual.

The following example shows a sample day0 configuration you can copy and paste in the Cloud-Init Script field:

{
"Hostname": "ftdv-oci",
"AdminPassword": "myPassword@123456",
"FirewallMode": "routed",
"IPv4Mode": "dhcp",
"ManageLocally":"No",
"FmcIp": "1.2.3.4",
"FmcRegKey": "cisco123reg",
"FmcNatId": "cisco123nat"
}
  • FmcRegKey ― This is a one-time-use registration key used to register registering the device to a Firewall Management Center. The registration key is any user-defined alphanumeric value up to 37 characters in length.

  • FmcNatId ― This is a unique one-time-use string (user-defined). If the device and the Firewall Management Center are separated by a NAT device, you must enter a unique NAT ID, along with the unique registration key.

Step 15

Click Create.


What to do next

Monitor the Firewall Threat Defense Virtual instance, which shows the state as Provisioning after you click the Create button.


Important


It’s important to monitor the status. As soon as the Firewall Threat Defense Virtual instance goes from Provisioning to Running state, you need to attach the VNICs as required before the Firewall Threat Defense Virtual boot completes.


Attach the Interfaces

The Firewall Threat Defense Virtual enters the Running state with one VNIC attached (see Compute > Instances > Instance Details > Attached VNICs). This is referred to as the Primary VNIC, and maps to the Management VCN. Before the Firewall Threat Defense Virtual completes the first boot, you need to attach the VNICs for the other VCN subnets you created previously (diagnostic, inside, outside) so that the VNICs are correctly detected on the Firewall Threat Defense Virtual.

Procedure


Step 1

Select your newly launched Firewall Threat Defense Virtual instance.

Step 2

Choose Attached VNICs > Create VNIC.

Step 3

Enter a descriptive Name for your VNIC, for example, Inside.

Step 4

Select the VCN from the Virtual Cloud Network drop-down.

Step 5

Select your subnet from the Subnet drop-down.

Step 6

Check Use Network Security Groups to Control Traffic and choose the security group you configured for the selected VCN.

Step 7

Check Skip Source Destination Check Network Security Groups to Control Traffic.

Step 8

(Optional) Specify a Private IP Address. This is only required if you want to choose a particular IP for the VNIC.

If you do not specify an IP, OCI will assign an IP address from the CIDR block you assigned to the subnet.

Step 9

Click Save Changes to create the VNIC.

Step 10

Repeat this procedure for each VNIC your deployment requires.


Add Route Rules for the Attached VNICs

Add route table rules to the diagnostic, inside, and outside route tables.

Procedure


Step 1

Choose Networking > Virtual Cloud Networks and click the default route table associated with the VCN (inside or outside).

Step 2

Click Add Route Rules.

Step 3

From the Target Type drop-down, select Private IP.

Step 4

From the Destination Type drop-down, select CIDR Block.

Step 5

Enter the Destination CIDR Block, for example 0.0.0.0/0.

Step 6

Enter the private IP address of the VNIC in the Target Selection field.

If you did not explicitly assign an IP address to the VNIC, you can find the auto-assigned IP address from the VNIC details (Compute > Instances > Instance Details > Attached VNICs).

Step 7

Click Add Route Rules.

Step 8

Repeat this procedure for each VNIC your deployment requires.


Connect to the Firewall Threat Defense Virtual Instance Using SSH

To connect to the Firewall Threat Defense Virtual instance from a Unix-style system, log in to the instance using SSH.

Procedure


Step 1

Use the following command to set the file permissions so that only you can read the file:

$ chmod 400 <private_key>

Where:

<private_key> is the full path and name of the file that contains the private key associated with the instance you want to access.

Step 2

Use the following SSH command to access the instance:

$ ssh –i <private_key> <username>@<public-ip-address>

<private_key> is the full path and name of the file that contains the private key associated with the instance you want to access.

<username> is the username for the Firewall Threat Defense Virtual instance.

<public-ip-address> is your instance IP address that you retrieved from the console.


Connect to the Firewall Threat Defense Virtual Instance Using OpenSSH

To connect to the Firewall Threat Defense Virtual instance from a Windows system, log in to the instance using OpenSSH.

Procedure


Step 1

If this is the first time you are using this key pair, you must set the file permissions so that only you can read the file.

Do the following:

  1. In Windows Explorer, navigate to the private key file, right-click the file, and then click Properties.

  2. On the Security tab, click Advanced.

  3. Ensure that the Owner is your user account.

  4. Click Disable Inheritance, and then select Convert inherited permissions into explicit permissions on this object.

  5. Select each permission entry that is not your user account and click Remove.

  6. Ensure that the access permission for your user account is Full control.

  7. Save your changes.

Step 2

To connect to the instance, open Windows PowerShell and run the following command:

$ ssh –i <private_key> <username>@<public-ip-address>

Where:

<private_key> is the full path and name of the file that contains the private key associated with the instance you want to access.

<username> is the username for the Firewall Threat Defense Virtual instance.

<public-ip-address> is your instance IP address that you retrieved from the Console.


Connect to the Firewall Threat Defense Virtual Instance Using PuTTY

To connect to the Firewall Threat Defense Virtual instance from a Windows system using PuTTY:

Procedure


Step 1

Open PuTTY.

Step 2

In the Category pane, select Session and enter the following:

  • Host Name (or IP address):

    <username>@<public-ip-address>

    Where:

    <username> is the username for the Firewall Threat Defense Virtual instance.

    <public-ip-address> is your instance public IP address that you retrieved from the Console.

  • Port: 22

  • Connection type: SSH

Step 3

In the Category pane, expand Window, and then select Translation.

Step 4

In the Remote character set drop-down list, select UTF-8.

The default locale setting on Linux-based instances is UTF-8, and this configures PuTTY to use the same locale.

Step 5

In the Category pane, expand Connection, expand SSH, and then click Auth.

Step 6

Click Browse, and then select your private key.

Step 7

Click Open to start the session.

If this is your first time connecting to the instance, you might see a message that the server's host key is not cached in the registry. Click Yes to continue the connection.