Overview
The Secure Firewall Threat Defense Virtual is integrated into the Microsoft Azure marketplace and supports the following VM sizes:
|
Azure VM Size |
Attributes |
vNICs |
Threat Defense Virtual Version |
|
|---|---|---|---|---|
|
vCPUs |
Memory (GB) |
|||
|
Standard_D3 |
4 |
14 |
4 |
7.7 or below |
|
Standard_D3_v2 |
4 |
14 |
4 |
7.7 or below |
|
Standard_D4_v2 |
8 |
28 |
8 |
6.5 to 7.7 |
|
Standard_D5_v2 |
16 |
56 |
8 |
6.5 to 7.7 |
|
Standard_D8s_v3 |
8 |
32 |
4 |
7.1 or above |
|
Standard_D16s_v3 |
16 |
64 |
8 |
7.1 or above |
|
Standard_F8s_v2 |
8 |
16 |
4 |
7.1 or above |
|
Standard_F16s_v2 |
16 |
32 |
4 |
7.1 or above |
|
Standard_D8_v4 |
8 |
32 |
4 |
7.7 or above |
|
Standard_D16_v4 |
16 |
64 |
8 |
7.7 or above |
|
Standard_D8s_v4 |
8 |
32 |
4 |
7.7 or above |
|
Standard_D16s_v4 |
16 |
64 |
8 |
7.7 or above |
|
Standard_D8_v5 |
8 |
32 |
4 |
7.7 or above |
|
Standard_D16_v5 |
16 |
64 |
8 |
7.7 or above |
|
Standard_D8s_v5 |
8 |
32 |
4 |
7.7 or above |
|
Standard_D16s_v5 |
16 |
64 |
8 |
7.7 or above |
 Note |
|
Support for Deployment of Threat Defense Virtual without Diagnostic Interface on Azure
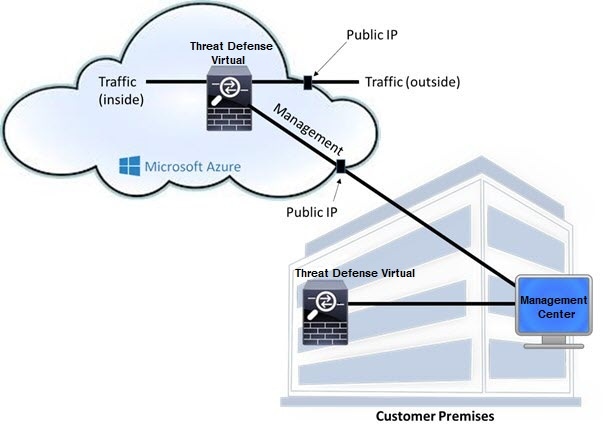
From Secure Firewall version 7.4.1, by default, the Threat Defense Virtual is deployed on Azure with 4 interfaces – 1 management, and 3 data interfaces. As the maximum number of supported interfaces is 8, you can add up to 4 more interfaces after deploying the Threat Defense Virtual to have a maximum of 8 interfaces. For example, on a Standard D4_v2 VM instance, you can deploy Threat Defense Virtual with 1 management, and 7 data interfaces.
Note |
The diagnostic interface is removed only on new deployments of Threat Defense Virtual instances on Azure. |

 Feedback