Deploy the ASA Container in a Kubernetes Environment

You can deploy the ASA container (ASAc) in an open source Kubernetes environment running on any cloud platform.

Overview

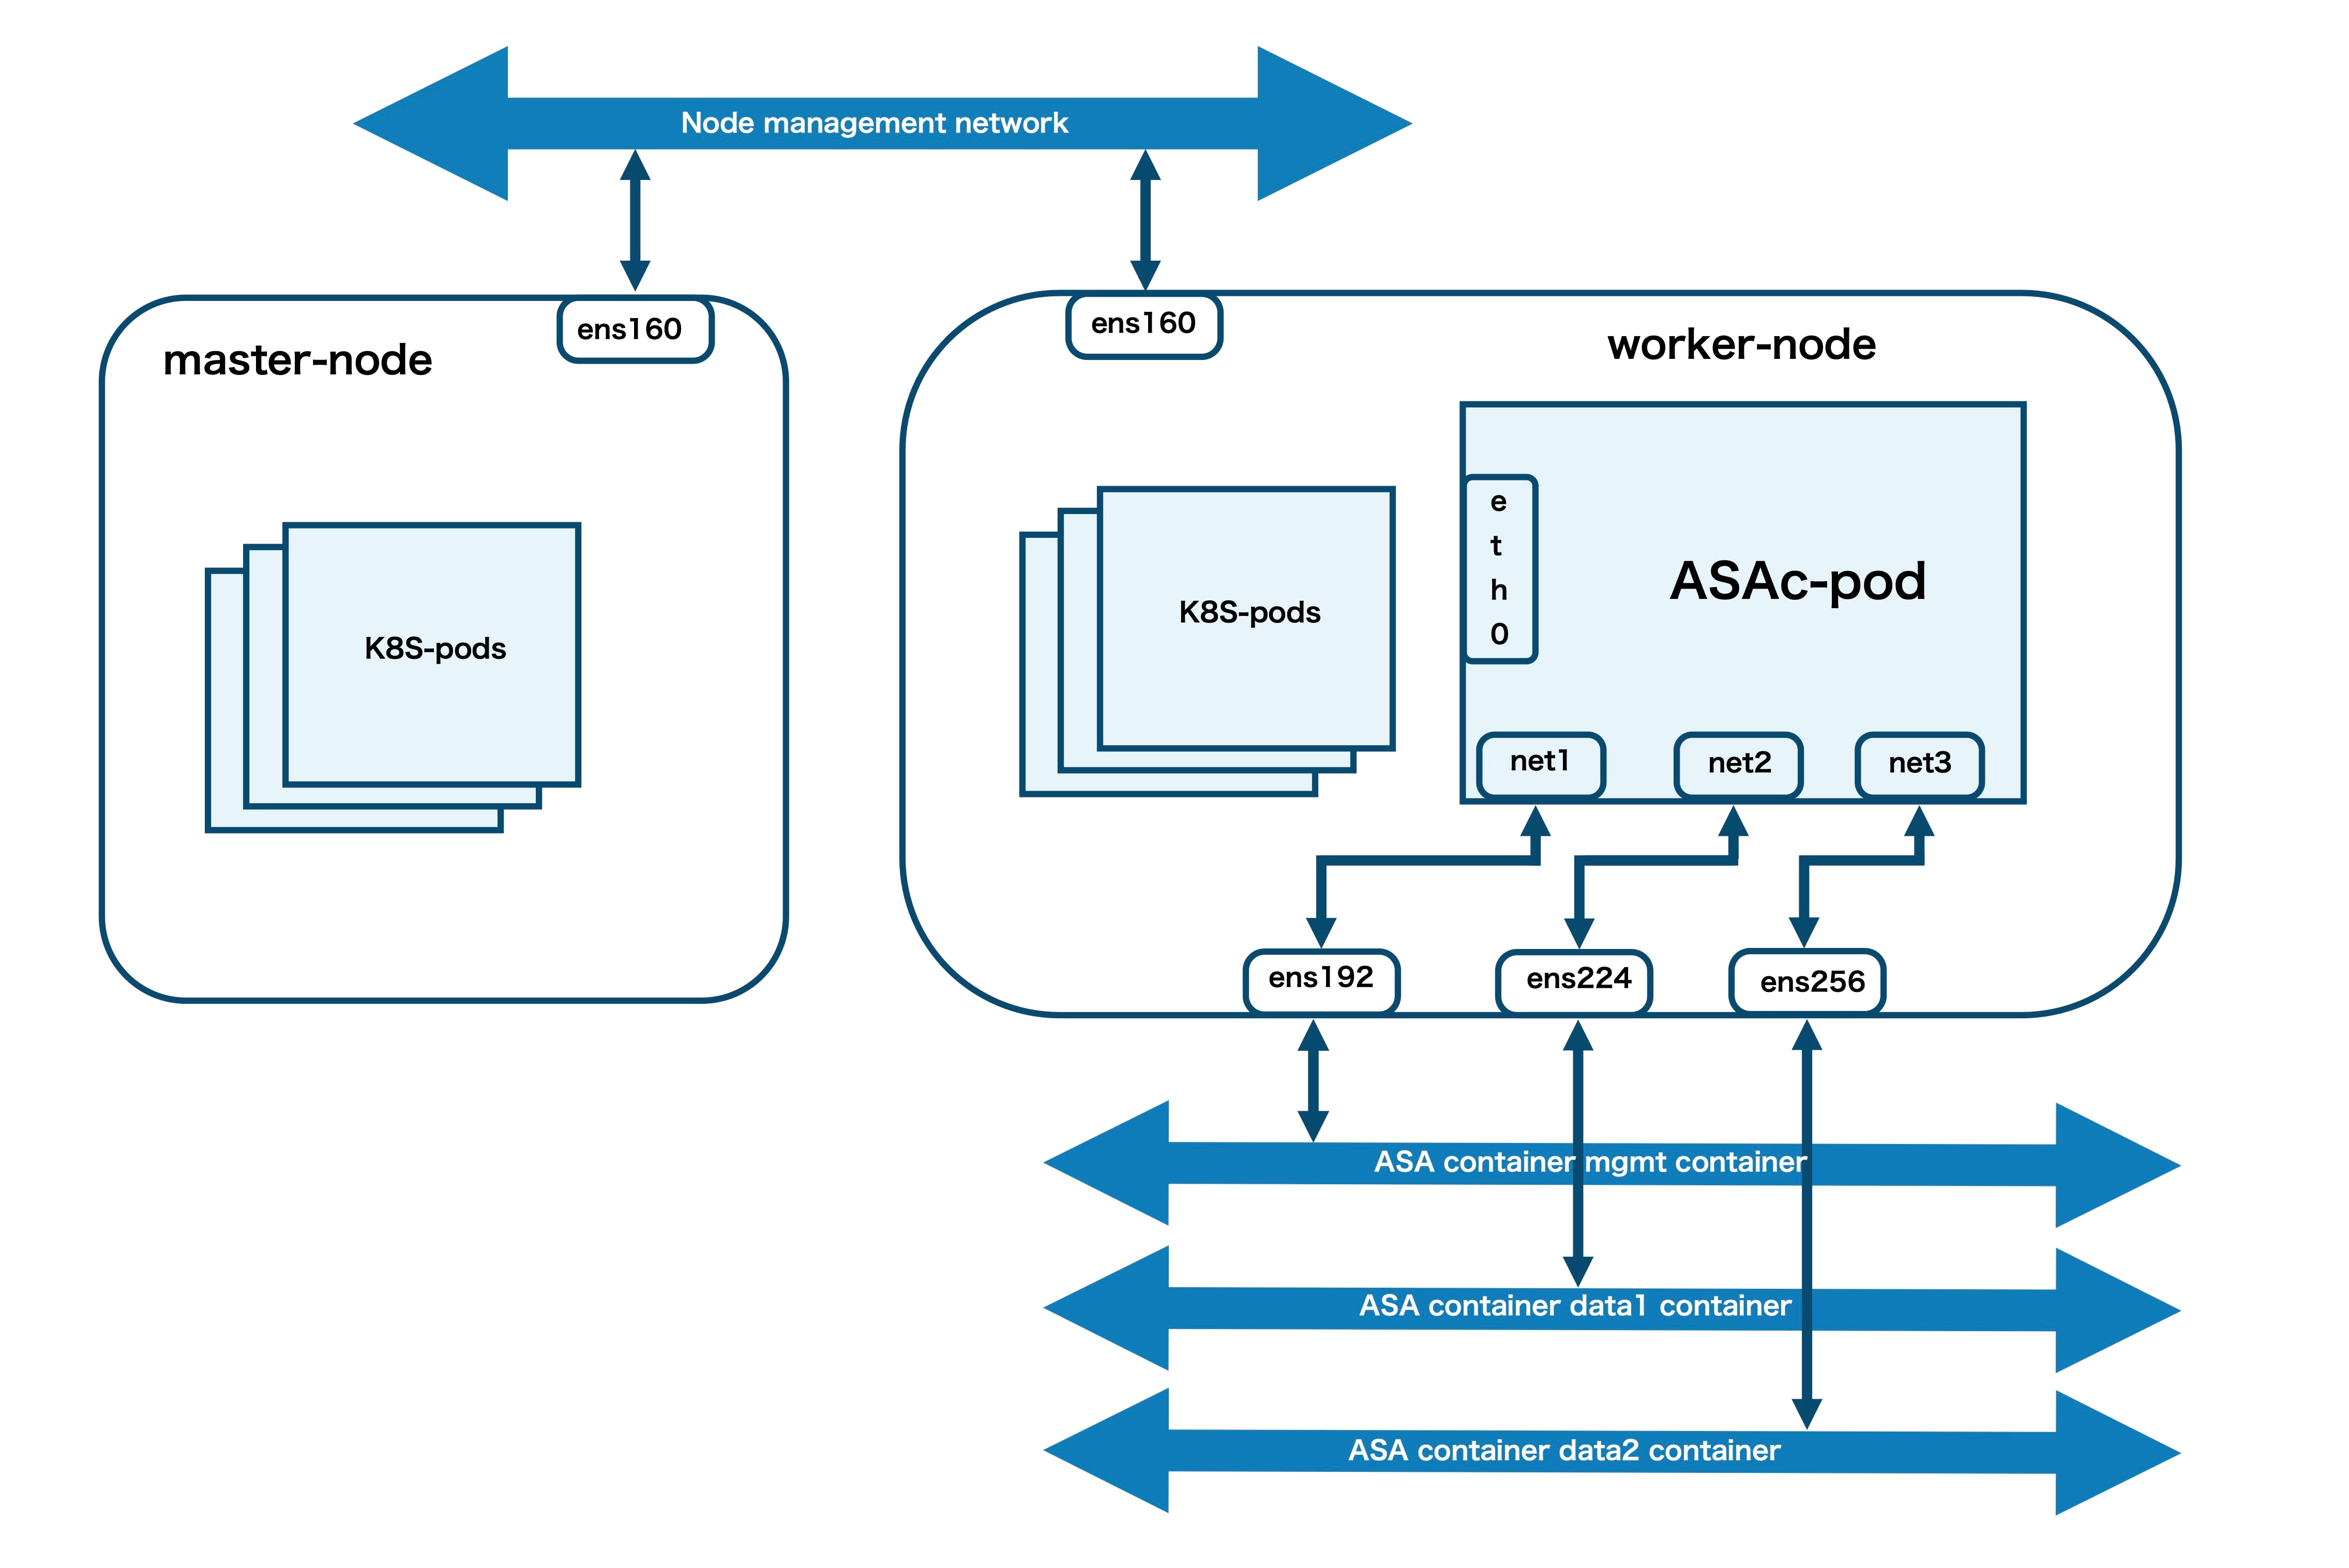
A container is a software package that bundles up code and associated requirements such as system libraries, system tools, default settings, runtime, and so on, to ensure that the application runs successfully in a computing environment. From Secure Firewall ASA version 9.22, you can deploy the ASAc in an open-source Kubernetes environment. In this solution, the ASAc is integrated with the Container Network Interface (CNI) and is deployed as an Infrastructure-as-Code (IaC) solution. The integration with CNI provides improved flexibility in deployment of network infrastructure.

Guidelines and Limitations to Deploy ASA Container in Kubernetes Environment

  • The ASA container solution is validated on open-source Kubernetes and Docker environments only.

  • Upgrade will be performed as a rolling upgrade using a new container image.

  • Rebooting the ASA container is not supported.

  • The following features are not validated:

    • Cluster

    • Transparent mode

    • Subinterfaces

Licenses to Deploy ASA Container in Kubernetes Environment

Use one of the following licenses to enable deployment of ASA container on Kubernetes:


Note


ASA Virtual license entitlement can also be used for ASAc licensing.


  • ASAc5 - 1 vCPU, 2 GB RAM, and 100 Mbps rate limit

  • ASAc10 - 1 vCPU, 2 GB RAM, and 1 Gbps rate limit

  • ASAc30 - 4 vCPU, 4 GB RAM, and 2 Gbps rate limit

  • ASAc50 - 8 vCPU, 16 GB RAM, and 10 Gbps rate limit

  • ASAc100 - 16 vCPU, 32 GB RAM, and 20 Gbps rate limit


Note


The SR-IOV CNI with the vfio-pci driver is required to achieve throughput greater than 1 Gbps.


Components of Solution to Deploy ASA Container in Kubernetes Environment

  • Operating system

    • Ubuntu 20.04.6

    • Kubernetes version v1.31

    • Helm version v3.19

  • Kubernetes cluster nodes – master and worker nodes

  • Kubernetes CNI

    • POD management CNI - Calico

    • ASAc data network CNI - Multus macvlan

    • ASAc data network CNI - Multus SRIOV

  • Helm charts provided as yaml files are used to set up Infrastructure-as-Code (IaC)

Sample Topology to Deploy ASA Container in Kubernetes Environment

In this sample topology, the ASA container (ASAc) pod has three virtual network interfaces – net1, net2, and net3, that are connected to the following worker node interfaces – ens192, ens224, and ens256. The worker node interfaces are mapped to the ASAc mgmt, data1, and data2 networks. The interface ens160 is the node management interface. The interface eth0 is derived from the Calico CNI. The interfaces net1, net2, and net3, are derived from the multus macvlan CNI.

Prerequisites to Deploy ASA Container in Kubernetes Environment

  • Ensure that Ubuntu 20.04.6 LTS is installed on both master and worker nodes.

  • Allocate three virtual interfaces on the worker node for ASA container (ASAc) operations.

  • Set up the worker node’s management interface to be used for ssh access to the worker node.

  • Enable Hugepages on the worker node.

  • Set up the Calico CNI to be used as POD management.

  • Set up Multus with macvlan or SRIOV CNI to be used for managing ASAc interfaces.

For more information on general Kubernetes operations mentioned in these prerequisites, see Kubernetes documentation.

Deploy ASA Container in Kubernetes Environment

Perform the procedure given below to deploy ASA container (ASAc) in Kubernetes environment.

Procedure


Step 1

Set up the requirements mentioned in the Prerequisites.

Step 2

Run the kubectl get nodes , kubectl get pods , and kubectl get all commands, to display the status of all nodes, pods, and all resources, respectively. Ensure that the Kubernetes pods and nodes are in ready state.

Note


The outputs given below are sample outputs only.

$ kubectl get nodes
NAME          STATUS   ROLES           AGE    VERSION
k8s-master    Ready    control-plane   138d   v1.31.13
k8s-worker1   Ready    <none>          138d   v1.31.13
k8s-worker2   Ready    <none>          138d   v1.31.13
$ kubectl get pods -A -o wide
NAMESPACE          NAME                                       READY   STATUS    RESTARTS       AGE    IP               NODE          NOMINATED NODE   READINESS GATES
calico-apiserver   calico-apiserver-7c9fddf79f-nvm9l          1/1     Running   3 (110d ago)   132d   10.244.194.95    k8s-worker1   <none>           <none>
calico-apiserver   calico-apiserver-7c9fddf79f-xx67g          1/1     Running   2 (116d ago)   132d   10.244.126.20    k8s-worker2   <none>           <none>
calico-system      calico-kube-controllers-846b6c6c8c-4scqw   1/1     Running   5 (98d ago)    132d   10.244.126.19    k8s-worker2   <none>           <none>
calico-system      calico-node-ssqcq                          1/1     Running   2 (116d ago)   138d   10.10.3.3        k8s-master    <none>           <none>
calico-system      calico-node-xp558                          1/1     Running   4 (32d ago)    138d   10.10.3.5        k8s-worker2   <none>           <none>
calico-system      calico-node-z2t59                          1/1     Running   5 (33d ago)    138d   10.10.3.4        k8s-worker1   <none>           <none>
calico-system      calico-typha-cf46c44c5-flqxr               1/1     Running   5 (33d ago)    138d   10.10.3.4        k8s-worker1   <none>           <none>
calico-system      calico-typha-cf46c44c5-xdx9s               1/1     Running   2 (116d ago)   138d   10.10.3.3        k8s-master    <none>           <none>
calico-system      csi-node-driver-5ffr7                      2/2     Running   2 (116d ago)   132d   10.244.235.200   k8s-master    <none>           <none>
calico-system      csi-node-driver-5gglq                      2/2     Running   6 (116d ago)   138d   10.244.126.21    k8s-worker2   <none>           <none>
calico-system      csi-node-driver-j4jn4                      2/2     Running   8 (110d ago)   138d   10.244.194.97    k8s-worker1   <none>           <none>
kube-system        coredns-7c65d6cfc9-c6vdg                   1/1     Running   2 (116d ago)   132d   10.244.126.17    k8s-worker2   <none>           <none>
kube-system        coredns-7c65d6cfc9-xf88h                   1/1     Running   3 (110d ago)   132d   10.244.194.94    k8s-worker1   <none>           <none>
kube-system        etcd-k8s-master                            1/1     Running   2 (116d ago)   138d   10.10.3.3        k8s-master    <none>           <none>
kube-system        kube-apiserver-k8s-master                  1/1     Running   4 (98d ago)    138d   10.10.3.3        k8s-master    <none>           <none>
kube-system        kube-controller-manager-k8s-master         1/1     Running   3 (98d ago)    138d   10.10.3.3        k8s-master    <none>           <none>
kube-system        kube-multus-ds-bft7n                       1/1     Running   4 (33d ago)    132d   10.10.3.4        k8s-worker1   <none>           <none>
kube-system        kube-multus-ds-kdnnd                       1/1     Running   4 (32d ago)    132d   10.10.3.5        k8s-worker2   <none>           <none>
kube-system        kube-multus-ds-wjqj8                       1/1     Running   1 (116d ago)   132d   10.10.3.3        k8s-master    <none>           <none>
kube-system        kube-proxy-kt9nk                           1/1     Running   4 (32d ago)    138d   10.10.3.5        k8s-worker2   <none>           <none>
kube-system        kube-proxy-stxjs                           1/1     Running   2 (116d ago)   138d   10.10.3.3        k8s-master    <none>           <none>
kube-system        kube-proxy-vdgrn                           1/1     Running   5 (33d ago)    138d   10.10.3.4        k8s-worker1   <none>           <none>
kube-system        kube-scheduler-k8s-master                  1/1     Running   3 (98d ago)    138d   10.10.3.3        k8s-master    <none>           <none>
tigera-operator    tigera-operator-6847585ccf-cc2j6           1/1     Running   3 (98d ago)    138d   10.10.3.3        k8s-master    <none>           <none>

Step 3

Run the ifconfig command to verify the network interface configuration. In this example, ens160 is the node’s management interface. The nodes ens192, ens224, and ens256, are mapped to the ASAc interfaces.

$ ifconfig 
ens160: flags=4163<UP,BROADCAST,RUNNING,MULTICAST>  mtu 1500
        inet6 fe80::250:56ff:fe9d:6125  prefixlen 64  scopeid 0x20<link>
        ether 00:50:56:9d:61:25  txqueuelen 1000  (Ethernet)
        RX packets 317297807  bytes 447854277676 (447.8 GB)
        RX errors 0  dropped 2100  overruns 0  frame 0
        TX packets 5517880  bytes 378756756 (378.7 MB)
        TX errors 0  dropped 0 overruns 0  carrier 0  collisions 0

ens192: flags=4163<UP,BROADCAST,RUNNING,MULTICAST>  mtu 1500
        inet 10.10.3.4  netmask 255.255.255.224  broadcast 10.10.3.31
        inet6 fe80::250:56ff:fe9d:fa1c  prefixlen 64  scopeid 0x20<link>
        ether 00:50:56:9d:fa:1c  txqueuelen 1000  (Ethernet)
        RX packets 70324790  bytes 30189381762 (30.1 GB)
        RX errors 0  dropped 2437  overruns 0  frame 0
        TX packets 60676399  bytes 16108954006 (16.1 GB)
        TX errors 0  dropped 0 overruns 0  carrier 0  collisions 0

ens224: flags=4163<UP,BROADCAST,RUNNING,MULTICAST>  mtu 1500
        inet6 fe80::250:56ff:fe9d:2cbe  prefixlen 64  scopeid 0x20<link>
        ether 00:50:56:9d:2c:be  txqueuelen 1000  (Ethernet)
        RX packets 489699  bytes 41669463 (41.6 MB)
        RX errors 0  dropped 1969  overruns 0  frame 0
        TX packets 285031  bytes 23421780 (23.4 MB)
        TX errors 0  dropped 0 overruns 0  carrier 0  collisions 0

ens256: flags=4163<UP,BROADCAST,RUNNING,MULTICAST>  mtu 1500
        inet6 fe80::250:56ff:fe9d:92ba  prefixlen 64  scopeid 0x20<link>
        ether 00:50:56:9d:92:ba  txqueuelen 1000  (Ethernet)
        RX packets 7023252  bytes 8223100366 (8.2 GB)
        RX errors 0  dropped 2145  overruns 0  frame 0
        TX packets 31481074  bytes 44913129384 (44.9 GB)
        TX errors 0  dropped 0 overruns 0  carrier 0  collisions 0

Step 4

Run the cat command given below to verify hugepage configuration.

$ cat /proc/meminfo | grep -E 'HugePages_Total|HugePages_Free'
HugePages_Total:    1024
HugePages_Free:      1024

Step 5

Download the ASA docker tar bundle that includes the ASA container image from software.cisco.com to the local docker registry.

Step 6

Load the downloaded ASA container image into the local docker registry.

Step 7

Download the templates and other files from the helm folder in the ASAc GitHub repository.

Step 8

Enter the required parameter values in the values.yaml file.


# Default values for asac-helm.
This is a YAML-formatted file.
Declare variables to be passed into your templates.

asac:
  repository: "localhost:5000/asac_9.22.2.115"
  app_name: "asac"
  cpus: 2
  # Memory in MB
  memory: 4096
  # enable only for HA case and with minimum of two worker nodes
  enable_ha: "false"
  # enable only for SRIOV case
  enable_sriov: "false"

worker_nodes:
  # Network interface configuration
  asacMgmtInterface: "ens224"
  asacData1Interface: "ens256"
  asacData2Interface: "ens161"

  # update fail over interface only for HA case
  asacFoverInterface: "ens193"

  # update below section only for SRIOV case
  asacData1NetAttDef: "sriov-net-ens7f0"
  asacData2NetAttDef: "sriov-net-ens7f1"
  sriovPF1: "intel.com/intel_sriov_ens7f0"
  sriovPF2: "intel.com/intel_sriov_ens7f1"

# Persistent Volume Configuration
persistence:
  # Lina persistent volume for pod private data
  lina:
    enabled: true
    storageClass: "lina-storage"
    size: "1Gi"
    # Host path on worker nodes - must exist or be creatable
    hostPath: "/home/ubuntu/lina-path"
    accessMode: "ReadWriteMany"

The parameter names along with descriptions for the parameters in the values.yaml file are given below.

Variable Name

Description

repository

ASAc image path from the local docker registry.

cpus

Number of CPU’s for ASAc container.

memory

RAM in MB for ASAc container.

enable_ha

Enable this flag to deploy ASAc primary and secondary pod, and configure HA between these pods.

enable_sriov

Enable this flag for SRIOV CNI to be used for ASAc data interfaces.

asacMgmtInterface

Name of the worker node interface that is used as the ASAc management interface.

asacData1Interface

Name of the worker node interface that is used as the ASAc data1 interface.

asacData2Interface

Name of the worker node interface that is used as the ASAc data2 interface.

hostPath

Host path on worker node where persistence volume can be created.

Applicable only when enable_ha is true.

asacFoverInterface

Name of the worker node interface that is used as the ASAc failover interface.

Applicable only when enable_sriov is true.

asacData1NetAttDef

Name of the SRIOV network attachment definition created for the Node’s data1 physical NIC that is used as the ASAc data1 interfaces.

asacData2NetAttDef

Name of the SRIOV network attachment definition created for the Node’s data2 physical NIC that is used as the ASAc data2 interfaces.

sriovPF1

Name of the SR-IOV Virtual Function resources exposed by the node for data1 physical NIC.

sriovPF2

Name of the SR-IOV Virtual Function resources exposed by the node for data2 physical NIC.

Step 9

Verify the default parameter values present in the day0-config file. You can also update these values as per your requirement.

Step 10

Run the helm install command to deploy the helm charts and deploy ASAc in the Kubernetes framework.


$ helm install asac helm/
NAME: asac
LAST DEPLOYED: Wed Mar  4 07:36:22 2026
NAMESPACE: default
STATUS: deployed
REVISION: 1
TEST SUITE: None

Step 11

Run the helm list -all command to list the deployed resources and check the status of the ASAc deployment.

$ helm list --all
NAME    NAMESPACE       REVISION        UPDATED                                 STATUS          CHART           APP VERSION
asac    default         1               2026-03-04 07:36:22.86029862 +0000 UTC  deployed        asac-helm-0.1.0 1.16.0

High Availability (HA) and SR-IOV in Kubernetes Environment

The detailed steps for configuring ASAc High Availability (HA) and SR-IOV in a Kubernetes environment are provided in the Helm charts README.md file.

Validate ASA Container Deployment in Kubernetes Environment

Validate successful ASA container (ASAc) deployment by checking the status of the helm chart, ASAc pod, and by going through the pod events.


$ helm status asac
NAME: asac
LAST DEPLOYED: Wed Mar  4 07:36:22 2026
NAMESPACE: default
STATUS: deployed
REVISION: 1
TEST SUITE: None


$ kubectl get pod
NAME                   READY   STATUS    RESTARTS   AGE
asac-585744f74-fwsh5   1/1     Running   0          77s


$ kubectl events asac-585744f74-fwsh5
LAST SEEN               TYPE      REASON               OBJECT                                   MESSAGE
117s                    Normal    SuccessfulCreate     ReplicaSet/asac-585744f74                Created pod: asac-585744f74-fwsh5
117s                    Normal    Scheduled            Pod/asac-585744f74-fwsh5                 Successfully assigned default/asac-585744f74-fwsh5 to k8s-worker1
113s                    Normal    AddedInterface       Pod/asac-585744f74-fwsh5                 Add net2 [] from default/macvlan-data1-bridge
113s                    Normal    AddedInterface       Pod/asac-585744f74-fwsh5                 Add net3 [] from default/macvlan-data2-bridge
113s                    Normal    AddedInterface       Pod/asac-585744f74-fwsh5                 Add net1 [] from default/macvlan-mgmt-bridge
113s                    Normal    AddedInterface       Pod/asac-585744f74-fwsh5                 Add eth0 [10.244.194.105/32] from k8s-pod-network
112s                    Normal    Pulling              Pod/asac-585744f74-fwsh5                 Pulling image "localhost:5000/asac_99.25.0.118"
112s                    Normal    Started              Pod/asac-585744f74-fwsh5                 Started container asac
112s                    Normal    Pulled               Pod/asac-585744f74-fwsh5                 Successfully pulled image "localhost:5000/asac_99.25.0.118" in 23ms (23ms including waiting). Image size: 377034067 bytes.
112s                    Normal    Created              Pod/asac-585744f74-fwsh5                 Created container: asac

Access ASA Container Deployment Logs in Kubernetes Environment

Check the pod logs and container logs for troubleshooting any issues that may occur.

To display pod logs:
$ kubectl describe pod asac-585744f74-fwsh5
To display container logs:
$ kubectl logs asac-585744f74-fwsh5

Access the ASA Container Pod in Kubernetes Environment

Run the kubectl attach command to access the CLI of the ASA container (ASAc) pod and obtain required outputs. In this example, we access the CLI of the ASAc pod and run the show version command.


Note


You can also use ASDM to access ASAc in a Kubernetes environment.


$ kubectl attach -it asac-585744f74-fwsh5
If you don't see a command prompt, try pressing enter.
ciscoasa> show version 
Cisco Adaptive Security Appliance Software Version 99.25(0)118 
SSP Operating System Version 82.19(0.143i)
Compiled on Sun 08-Feb-26 16:53 GMT by builders
System image file is "Unknown, monitor mode tftp booted image"
Config file at boot was "startup-config"
ciscoasa up 4 mins 38 secs
Start-up time 39 secs
Hardware:   ASAc, 4096 MB RAM, CPU Xeon E5 series 2100 MHz, 1 CPU (2 cores)
BIOS Flash Firmware Hub @ 0x1, 0KB

 0: Ext: Management0/0       : address is 9a9d.12b4.0e98, irq 0
 1: Ext: GigabitEthernet0/0  : address is 7a6f.16e5.a500, irq 0
 2: Ext: GigabitEthernet0/1  : address is c6c3.4497.6421, irq 0
 3: Int: Internal-Data0/0    : address is 0000.0100.0001, irq 0
License mode: Smart Licensing
ASAv Platform License State: Unlicensed
No active entitlement: no feature tier and no throughput level configured
Firewall throughput limited to 100 Kbps