HDLC Support for SCATS

This chapter contains the following sections:

HDLC Support for SCATS Overview

The Sydney Coordinated Adaptive Traffic System (SCATS), is an intelligent transportation system that manages the dynamic (on-line, real-time) timing of signal phases at traffic signals, meaning that it tries to find the best phasing (i.e. cycle times, phase splits and offsets) for a traffic situation (for individual intersections as well as for the whole network). SCATS is based on the automatic plan selection from a library in response to the data derived from loop detectors or other road traffic sensors. SCATS uses sensors at each traffic signal to detect vehicle presence in each lane and pedestrians waiting to cross at the local site. The vehicle sensors are generally inductive loops installed within the road pavement. The pedestrian sensors are usually push buttons. Various other types of sensors can be used for vehicle presence detection, provided that a similar and consistent output is achieved. Information collected from the vehicle sensors allows SCATS to calculate and adapt the timing of traffic signals in the network.

High-Level Data Link Control (HDLC) is a group of data link (Layer 2) protocols used to transmit synchronous data packets between point-to-point nodes. Data is organized into addressable frames. This format has been used for other multipoint-to-multipoint protocols, and inspired the HDLC-like framing protocol described in RFC 1662. HDLC uses a zero-insertion/deletion process (bit stuffing) to ensure that the bit pattern of the delimiter flag does not occur in the fields between flags. The HDLC frame is synchronous and therefore relies on the physical layer (Layer 1) to clock and synchronize frame transmission and reception.

This feature is being developed as an IOx app which integrates with the existing virtualization layers available in IOS XE based IoT routers. The intended application is to have a SCATS controller connected to the router via serial cable. The SCATs protocol the app will follow is documented in specification TSI-SP-068.

The following figure is an example of a typical SCATS traffic control network application:

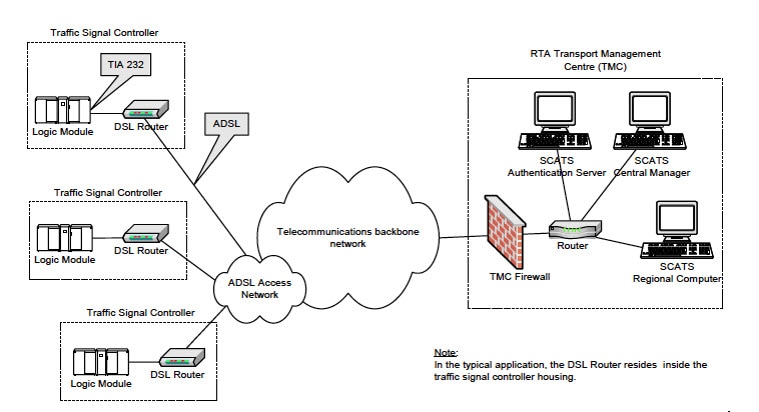
In the above figure, an IR1101 plays the role of the DSL Router to which the Traffic Signal Controller (TSC) is connected via a serial interface. Upon connection to the TSC, the router obtains a Site ID from the controller, which it will then forward to the SCATs Authentication Server. The authentication servers will be provided to the IOx app through a JSON file including IP and port and there can be up to three authentication servers that the IOx app can cycle through.

Once the Authentication Server has received the Site ID, it will reply to the router with the corresponding SCATs regional computer IP and port that matches that Site ID. All further communication is then done transparently from TSC to Regional Computer.

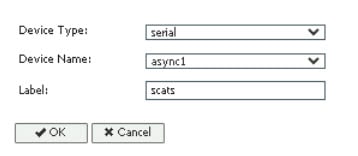
The router will use two modes to communicate with the TSC (HDLC and non-HDLC). There are four available serial configurations, and the user can select which configurations will be used by enabling or disabling them through a second JSON file provided to the app.

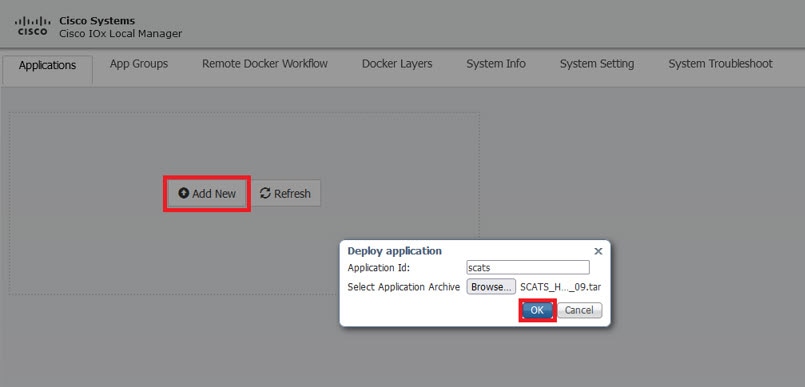
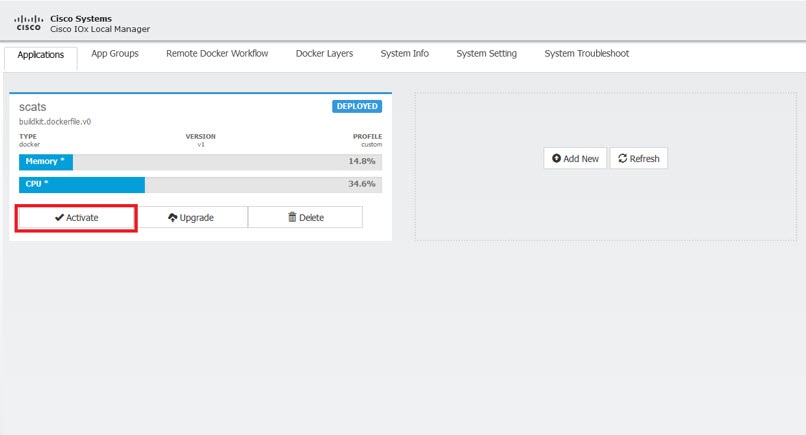
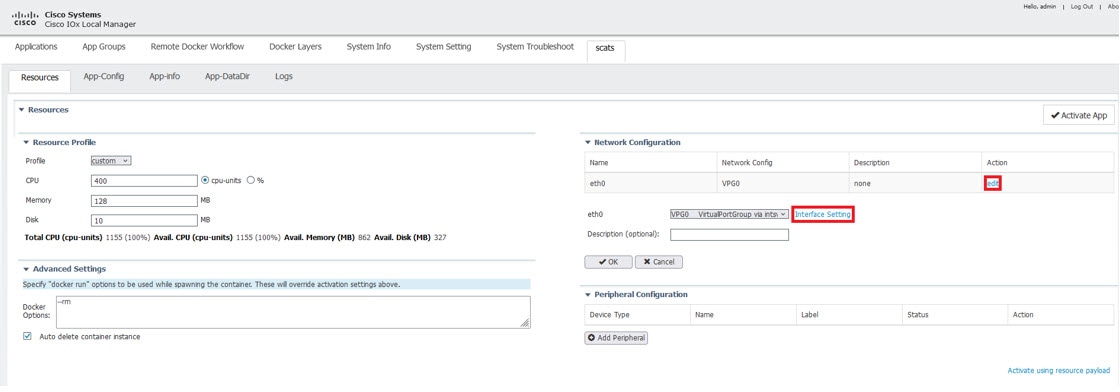
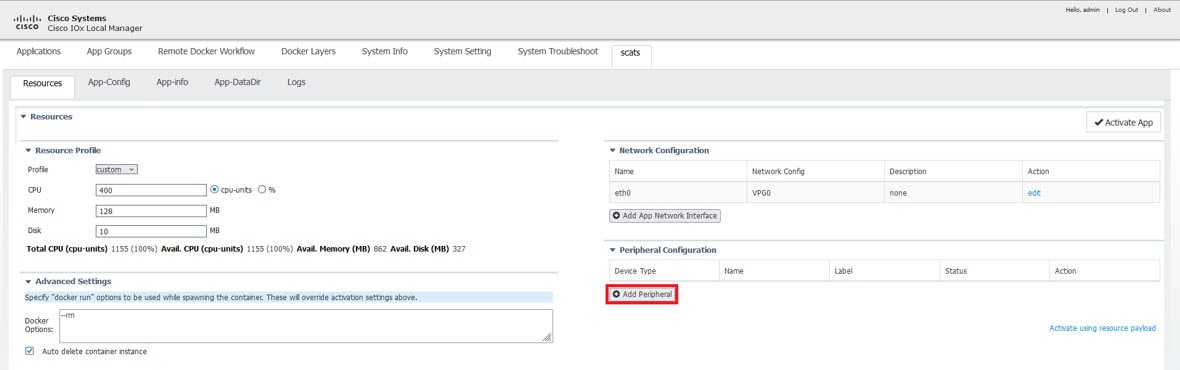
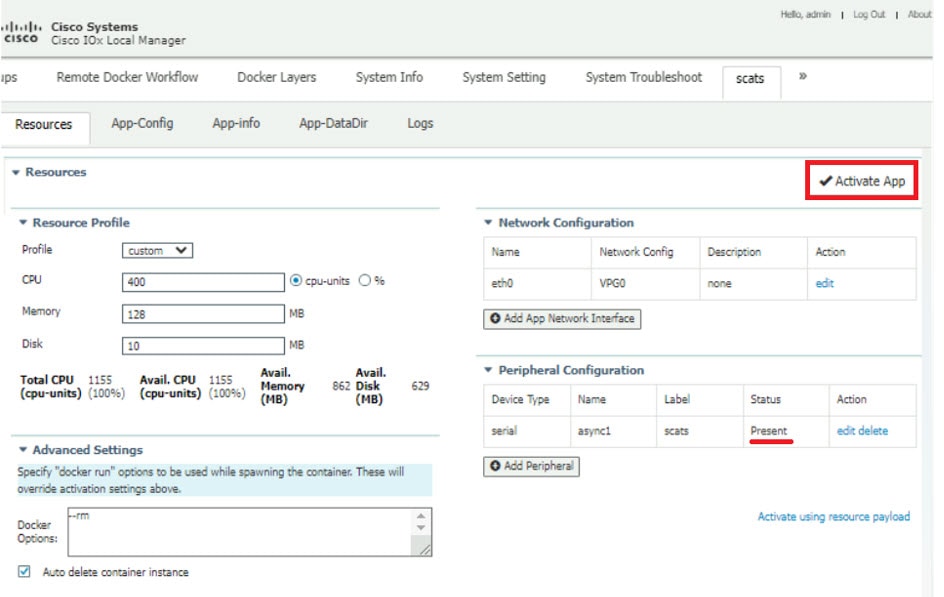
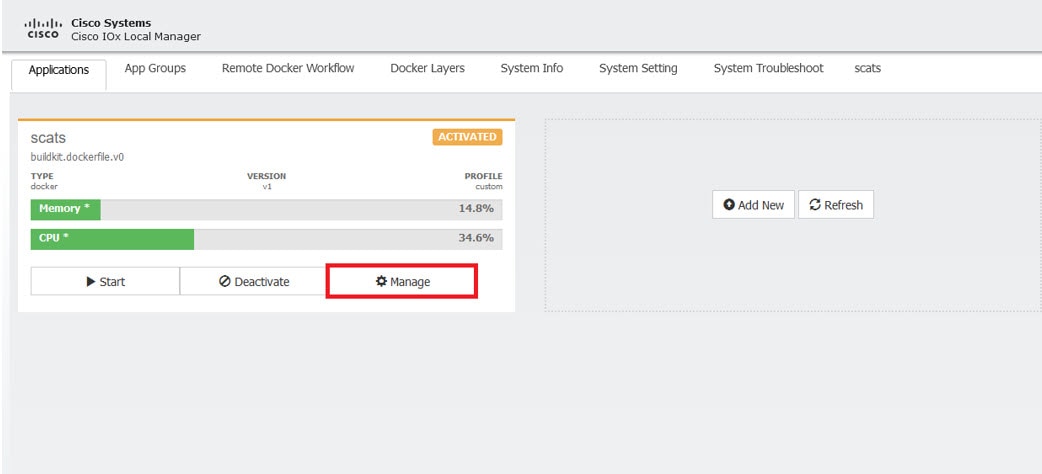
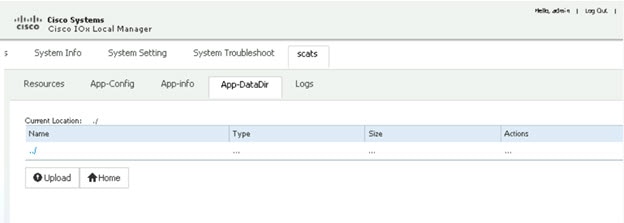
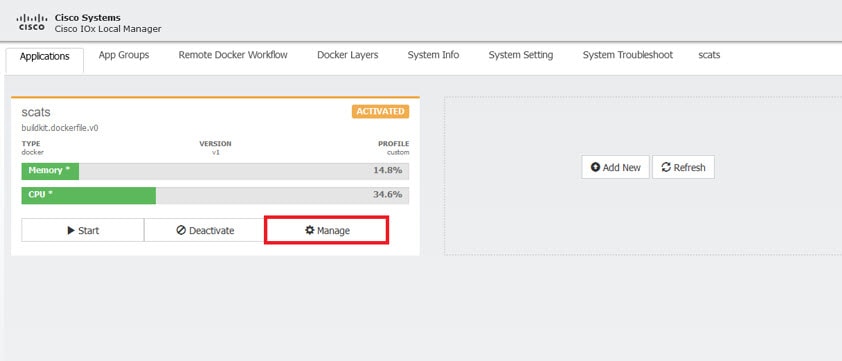
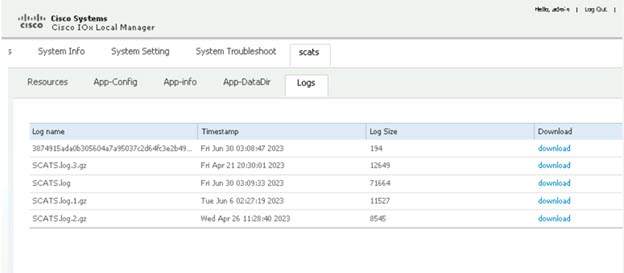
Since this is an IOx app, the feature can be disabled by stopping, deactivating, or uninstalling the app. The application will mainly be deployed using Local Manager. App size is about 50 MB, CPU is 400 units and memory is 128 MB.

Configure IOx Application

Perform this task to enable access to the IOx Local Manager. The IOx Local Manager provides a web-based user interface that you can use to manage, administer, monitor, and troubleshoot apps on the host system, and to perform a variety of related activities.


Important


The SCATs IOX application does not configure and enable a VPN for the connections. If a VPN is necessary for operations, please configure the VPN through IOS XE on the IR1101 outside of the application.

Note


In the steps that follow, IP HTTP commands do not enable IOx, but allow the user to access the WebUI to connect the IOx Local Manager.

Enable IOx

Perform the following steps:

Procedure

  Command or Action Purpose

Step 1

enable

Example:

Device>enable

Enables privileged EXEC mode.

Enter your password if prompted.

Step 2

configure terminal

Example:

Device#configure terminal

Enters global configuration mode.

Step 3

iox

Example:

Device(config)#iox

Enables IOx

Step 4

ip http server

Example:

Device(config)#ip http server

Enables the HTTP server on your IP or IPv6 system.

Step 5

ip http secure-server

Example:

Device(config)#ip http secure-server

Enables a secure HTTP (HTTPS) server.

Step 6

username name privilege level password {0 | 7 | user-password }encrypted-password

Example:

username admin privilege 15 password 0 admin

Establishes a username-based authentication system and privilege level for the user.

The username privilege level must be configured as 15.

Step 7

end

Example:

Device(config-if)#end

Exits interface configuration mode and returns to privileged EXEC mode.

Configure a VirtualPortGroup to a Layer 3 Data Port

Multiple Layer 3 data ports can be routed to one or more VirtualPortGroups or containers. VirutalPortGroups and Layer 3 data ports must be on different subnets.

Procedure

  Command or Action Purpose

Step 1

enable

Example:

Device>enable

Enables privileged EXEC mode.

Enter your password if prompted.

Step 2

configure terminal

Example:

Device#configure terminal

Enters global configuration mode.

Step 3

interface type number

Example:

Device(config)#interface virtualportgroup 0

Configures an interface and enters interface configuration mode.

Step 4

ip address ip-address mask

Example:

Device(config-if)#ip address 192.168.0.1 255.255.255.0

Configures an IP address for the interface.

Step 5

end

Example:

Device(config-if)#end

Exits interface configuration mode and returns to privileged EXEC mode.

Configure Serial Port for IOx Communication

Use the following steps to configure the serial port.

Procedure

  Command or Action Purpose

Step 1

enable

Example:

Device>enable

Enables privileged EXEC mode.

Enter your password if prompted.

Step 2

configure terminal

Example:

Device#configure terminal

Enters global configuration mode.

Step 3

interface async number

Example:

Device(config)#interface async 0/3/0

Configures an async interface and enters interface configuration mode.

Step 4

encapsulation relay-line

Example:

Device(config-if)#encapsulation relay-line

Configure the async interface as a relay-line.

Step 5

end

Example:

Device(config-if)#end

Exits interface configuration mode and returns to privileged EXEC mode.

Step 6

relay-line slot/subslot/port for modems

Example:

Device(config)#relay-line 0/0/1 0/3/0

Configure the relay line between async interface and IOx app.

Step 7

end

Example:

Device(config)#end

Exits interface configuration mode and returns to privileged EXEC mode.

Deploy SCATs Application

There are two methods to deploy the SCATs application on the IR1101. Either through the Local Manager (Graphical UI) or through IOS-XE (On-device CLI).

Deploy SCATs Application via Local Manager

If you have gone through the procedure to enable the webserver and to add a user, you should be able to access the IR1101 web interface using the SVI IP-address. using https://<svi ip>/ (eg: https://192.168.0.30/) and then log in using the user created earlier.

Procedure


Step 1

https://<svi ip>/

The WebUI login appears:

Step 2

Navigate to the IOx page through Configuration > Services > IOx. See the following image:

Step 3

Use the same user credentials to enter Cisco IOx Local Manager. (For direct access, use the following URL: https://<svi ip>/iox/login)

Step 4

Deploy the application by clicking Add New. Assign a name to the Application Id, and select the SCATs application package for the Application Archive.

Step 5

After selecting OK, the application will be uploaded and installed into the IR1101.

Step 6

Click on Activate.

Step 7

Under the Network Configuration section, the VirtualPortGroup0 configuration from above can be seen. Click on edit and then click Interface Setting.

Step 8

Configure the IP addresses for the interface.

Step 9

Click OK on both windows to finalize the network configuration.

Step 10

Under the Peripheral Configuration section, select serial for the Device Type.

Step 11

For Device Name, select the async interface the serial relay line was mapped to. Label the peripheral and click OK

Step 12

The Status should say Present for the peripheral. Click on Activate App in the top right corner, and then select Applications in the top bar to return to the main page.

Step 13

The application will now be activated. Click Manage to be brought back to the Resources Page.

Step 14

From the Resources tab, click App-DataDir.

SCATs requires two files to operate, authserver.json and serialconfig.json, to notify the application of the available authentication servers and which of the four serial configurations for SCATs to enable.

Example of authserver.json file (1-3 auth servers allowed)
{
    "auth_servers":[
        {"ip":"10.0.1.13", "port":2012},
        {"ip":"10.0.1.1", "port":2012}
    ]
}

Example of serialconfig.json file
{
    "serial_configurations":[
        {"serial_config":"enabled"},
        {"serial_config":"disabled"},
        {"serial_config":"disabled"},
        {"serial_config":"disabled"}
    ]
}

Step 15

Click on Upload and choose the files to be uploaded into the App-DataDir.

Note

 
The paths must be authserver.json and serialconfig.json.

Step 16

Click OK to select.

Step 17

Verify the two json files are present and then click Upload.

Step 18

Select Applications to return to the main application page. Click on Start to start the application. It will show as running now.

Step 19

Click on Start to start the application.

The status shows the application is activated, and you should see Memory and CPU details.

Step 20

To troubleshoot any issues, click on Manage and then click on the Logs tab.

Step 21

Logs from the application will be stored under SCATS.log* and can be downloaded from the Local Manager.

To stop and delete the app, click Stop, then Deactivate and Delete.


Deploy SCATs Application Using the IOS-XE CLI

Use the following steps:

Procedure

  Command or Action Purpose

Step 1

enable

Example:

Device>enable

Enables privileged EXEC mode.

Enter your password if prompted.

Step 2

configure terminal

Example:

Device#configure terminal

Enters global configuration mode.

Step 3

app-hosting appid app-name

Example:

Device(config)#app-hosting appid scats

Configures the SCATS application and enters the application configuration mode.

Step 4

app-vnic gateway-number virtualportgroup number guest-interface number

Example:

Device(config-app-hosting)#app-vnic gateway0 virtualportgroup 0 guest-interface 0

Configures the application interface and the gateway of the application.

Step 5

guest-ipaddress ip-address netmask mask

Example:

Device(config-app-hosting-gateway0)#guest-ipaddress 192.168.0.6 netmask 255.255.255.0

Configures the application Ethernet interface ip address.

Step 6

app-default-gateway ip-address guest-interface number

Example:

Device(config-app-hosting-gateway0)#app-default-gateway 192.168.0.1 guest-interface 0

Configures the application default gateway ip address.

Step 7

app-hosting docker

Example:

Device(config-app-hosting)#app-hosting docker

Enter the configuration mode for docker options.

Step 8

run-opts option-number “-- device host-serial:container-serial

Example:

Device (config-app-hosting-docker)#run-opts 1 “--device /dev/ttySerial1:/dev/ttySerial1”

Match the async interface to the container interface.

Note

 
The serial port must match what the relay line was set to. In the example, async 0/3/0 was set to async 1, so the corresponding serial is /dev/ttySerial1.

Step 9

end

Example:

Device(config-app-hosting-docker)#end

Exits docker options configuration mode and returns to privileged EXEC configuration mode.

Step 10

app-hosting install appid application-name package package-path

Example:

Device#app-hosting install appid scats package flash:SCATS_HDLC_signed_05_09.tar

Installs the SCATS app from the specified location.

The app can be installed from any local storage location such as, flash, bootflash, and usbflash0.

Step 11

app-hosting activate appid application-name

Example:

Device#app-hosting activate appid scats

Activates the SCATS application.

Activates the SCATS application. This command validates all application resource requests, and if all resources are available the application is activated; if not, the activation fails.

Step 12

app-hosting data appid application-name copy authserver.json-path

Example:

Device#app-hosting data appid scats copy flash:authserver.json

Copy the authserver.json file into the IOx App-Data dir.

Step 13

app-hosting data appid application-name copy serialconfig.json-path

Example:

Device# app-hosting data appid scats copy flash:serialconfig.json

Copy the serialconfig.json file into the IOx App-Data dir.

Step 14

app-hosting start appid application-name

Example:

Device#app-hosting start appid scats

Starts the SCATs application.

Application start-up scripts are activated.

Troubleshooting

To troubleshoot the app, perform the following:

Start a session within the IOx app, for example:

app-hosting connect appid application-name session

For example:

Device#app-hosting connect appid scats session

Logs can be viewed in /iox_data/logs under SCATS.log*.

Stop and Delete the Application

To stop and delete the app, do the following steps:

Step

Command

Purpose

1

app-hosting stop appid application-name

Device#app-hosting stop appid scats

Stops the application.

2

app-hosting deactivate appid application-name

Device#app-hosting deactivate appid scats

Deactivates all resources allocated for the application.

3

app-hosting uninstall appid application-name

Device#app-hosting uninstall appid scats

Uninstalls the application.

Uninstalls all packaging and images stored.

All changes and updates to the application are also removed.