Ethernet Switch Ports

This chapter contains the following sections:

Configuring VLANs

A VLAN is a switched network that is logically segmented by function or application, without regard to the physical locations of the users. VLANs have the same attributes as physical LANs. However, you can group end-stations even if they are not physically located on the same LAN segment. Any device port can belong to a VLAN, unicast, broadcast, and multicast packets are forwarded and flooded only to end-stations in the VLAN. Each VLAN is considered a logical network, and packets destined for stations that do not belong to the VLAN must be forwarded through a router or a device supporting fallback bridging. In a device stack, VLANs can be formed with ports across the stack. Because a VLAN is considered a separate logical network, it contains its own bridge Management Information Base (MIB) information and can support its own implementation of spanning tree.

VLANs are often associated with IP subnetworks. For example, all the end stations in a particular IP subnet belong to the same VLAN. Interface VLAN membership on the device is assigned manually on an interface-by-interface basis. When you assign device interfaces to VLANs by using this method, it is known as interface-based, or static, VLAN membership.

The device can route traffic between VLANs by using device virtual interfaces (SVIs). An SVI must be explicitly configured and assigned an IP address to route traffic between VLANs.


Note


IR1101/IR8340 routers have reserved a set of VLANs (2350 to 2449) for additional usage. It is not allowed to add the reserved VLANs. You must ensure that these VLANs are not used in the network.


Access Ports

An access port belongs to and carries the traffic of only one VLAN (unless it is configured as a voice VLAN port). Traffic is received and sent in native formats with no VLAN tagging. Traffic arriving on an access port is assumed to belong to the VLAN assigned to the port. If an access port receives a tagged packet IEEE 802.1Q tagged), the packet is dropped, and the source address is not learned.

Trunk Ports

A trunk port carries the traffic of multiple VLANs and by default is a member of all VLANs in the VLAN database. These trunk port types are supported:

  • An IEEE 802.1Q trunk port supports simultaneous tagged and untagged traffic. An IEEE 802.1Q trunk port is assigned a default port VLAN ID (PVID), and all untagged traffic travels on the port default PVID. All untagged traffic and tagged traffic with a NULL VLAN ID are assumed to belong to the port default PVID. A packet with a VLAN ID equal to the outgoing port default PVID is sent untagged. All other traffic is sent with a VLAN tag.

Although by default, a trunk port is a member of every VLAN known to the VTP, you can limit VLAN membership by configuring an allowed list of VLANs for each trunk port. The list of allowed VLANs does not affect any other port but the associated trunk port. By default, all possible VLANs (VLAN ID 1 to 4094) are in the allowed list. A trunk port can become a member of a VLAN only if VTP knows of the VLAN and if the VLAN is in the enabled state. If VTP learns of a new, enabled VLAN and the VLAN is in the allowed list for a trunk port, the trunk port automatically becomes a member of that VLAN and traffic is forwarded to and from the trunk port for that VLAN. If VTP learns of a new, enabled VLAN that is not in the allowed list for a trunk port, the port does not become a member of the VLAN, and no traffic for the VLAN is forwarded to or from the port.

For more information on VLANs, see VLAN Configuration Guide, Cisco IOS XE Gibraltar 16.10.x.
VLAN Trunking Protocol (VTP)

VTP is a Layer 2 messaging protocol that maintains VLAN configuration consistency by managing the addition, deletion, and renaming of VLANs on a network-wide basis. VTP minimizes misconfigurations and configuration inconsistencies that can cause several problems, such as duplicate VLAN names, incorrect VLAN-type specifications, and security violations.

Before you create VLANs, you must decide whether to use VTP in your network. Using VTP, you can make configuration changes centrally on one or more switches and have those changes automatically communicated to all the other switches in the network. Without VTP, you cannot send information about VLANs to other switches.VTP is designed to work in an environment where updates are made on a single switch and are sent through VTP to other switches in the domain. It does not work well in a situation where multiple updates to the VLAN database occur simultaneously on switches in the same domain, which would result in an inconsistency in the VLAN database.

Further information about configuring VTP can be found in Configure VLAN Trunk Protocol (VTP).

Configuring IEEE 802.1X Port-Based Authentication

IEEE 802.1X port-based authentication is configured on a device to prevent unauthorized devices (supplicants) from gaining access to the network. The device can combine the function of a router, switch, and access point, depending on the fixed configuration or installed modules. The switch functions are provided by either built-in switch ports or a plug-in module with switch ports. This feature supports both access ports and trunk ports. For more information on 802.1X port-based authentication, see the Configuring IEEE 802.1X Port-Based Authentication Guide.

Configuring Spanning Tree Protocol

Spanning Tree Protocol (STP) is a Layer 2 link management protocol that provides path redundancy while preventing loops in the network. For a Layer 2 Ethernet network to function properly, only one active path can exist between any two stations. Multiple active paths among end stations cause loops in the network. If a loop exists in the network, end stations might receive duplicate messages. Switches might also learn end-station MAC addresses on multiple Layer 2 interfaces. These conditions result in an unstable network. Spanning-tree operation is transparent to end stations, which cannot detect whether they are connected to a single LAN segment or a switched LAN of multiple segments.

The STP uses a spanning-tree algorithm to select one switch of a redundantly connected network as the root of the spanning tree. The algorithm calculates the best loop-free path through a switched Layer 2 network by assigning a role to each port based on the role of the port in the active topology:

  • Root—A forwarding port elected for the spanning-tree topology

  • Designated—A forwarding port elected for every switched LAN segment

  • Alternate—A blocked port providing an alternate path to the root bridge in the spanning tree

  • Backup—A blocked port in a loopback configuration

The switch that has all of its ports as the designated role or as the backup role is the root switch. The switch that has at least one of its ports in the designated role is called the designated switch. Spanning tree forces redundant data paths into a standby (blocked) state. If a network segment in the spanning tree fails and a redundant path exists, the spanning-tree algorithm recalculates the spanning-tree topology and activates the standby path. Switches send and receive spanning-tree frames, called bridge protocol data units (BPDUs), at regular intervals. The switches do not forward these frames but use them to construct a loop-free path. BPDUs contain information about the sending switch and its ports, including switch and MAC addresses, switch priority, port priority, and path cost. Spanning tree uses this information to elect the root switch and root port for the switched network and the root port and designated port for each switched segment.

When two ports on a switch are part of a loop, the spanning-tree port priority and path cost settings control which port is put in the forwarding state and which is put in the blocking state. The spanning-tree port priority value represents the location of a port in the network topology and how well it is located to pass traffic. The path cost value represents the media speed.

For detailed configuration information on STP see the following link:

http://www.cisco.com/c/en/us/td/docs/routers/access/interfaces/NIM/software/configuration/guide/4_8PortGENIM.html#pgfId-1079138

Example: Spanning Tree Protocol Configuration

The following example shows configuring spanning-tree port priority of a Gigabit Ethernet interface. If a loop occurs, spanning tree uses the port priority when selecting an interface to put in the forwarding state.

Router# configure terminal 
Router(config)# interface FastEthernet 0/0/1
Router(config-if)# spanning-tree vlan 1 port-priority 64 
Router(config-if)# end 

The following example shows how to change the spanning-tree port cost of a Gigabit Ethernet interface. If a loop occurs, spanning tree uses cost when selecting an interface to put in the forwarding state.

Router#configure terminal 
Router(config)# interface FastEthernet 0/0/1
Router(config-if)# spanning-tree cost 18 
Router(config-if)# end 

The following example shows configuring the bridge priority of VLAN 10 to 33792:

Router# configure terminal 
Router(config)# spanning-tree vlan 10 priority 33792 
Router(config)# end 

The following example shows configuring the hello time for VLAN 10 being configured to 7 seconds. The hello time is the interval between the generation of configuration messages by the root switch.

Router# configure terminal 
Router(config)# spanning-tree vlan 10 hello-time 7
Router(config)# end

The following example shows configuring forward delay time. The forward delay is the number of seconds an interface waits before changing from its spanning-tree learning and listening states to the forwarding state.

Router# configure terminal 
Router(config)# spanning-tree vlan 10 forward-time 21 
Router(config)# end

The following example shows configuring maximum age interval for the spanning tree. The maximum-aging time is the number of seconds a switch waits without receiving spanning-tree configuration messages before attempting a reconfiguration.

Router# configure terminal 
Router(config)# spanning-tree vlan 20 max-age 36 
Router(config)# end 

The following example shows the switch being configured as the root bridge for VLAN 10, with a network diameter of 4.

Router# configure terminal 
Router(config)# spanning-tree vlan 10 root primary diameter 4 
Router(config)# exit

Configuring MAC Address Table Manipulation

The MAC address table contains address information that the switch uses to forward traffic between ports. All MAC addresses in the address table are associated with one or more ports. The address table includes these types of addresses:

  • Dynamic address: a source MAC address that the switch learns and then drops when it is not in use. You can use the aging time setting to define how long the switch retains unseen addresses in the table.

  • Static address: a manually entered unicast address that does not age and that is not lost when the switch resets.

The address table lists the destination MAC address, the associated VLAN ID, and port associated with the address and the type (static or dynamic).

See the “Example: MAC Address Table Manipulation” for sample configurations for enabling secure MAC address, creating a statc entry, set the maximum number of secure MAC addresses and set the aging time.

For detailed configuration information on MAC address table manipulation see the following link:

http://www.cisco.com/c/en/us/td/docs/routers/access/interfaces/software/feature/guide/geshwic_cfg.html#wp1048223

Example: MAC Address Table Manipulation

The following example shows creating a static entry in the MAC address table.

Router# configure terminal
Router(config)# mac address-table static 0002.0003.0004 interface FastEthernet 0/0/1 vlan 3
Router(config)# end

The following example shows setting the aging timer.

Router#configure terminal
Router(config)# mac address-table aging-time 300
Router(config)# end

L2 Sticky Secure MAC Addresses

This is a new feature for the IR1101, however, it been present in IOS-XE for some time.

You can configure an interface to convert the dynamic MAC addresses to sticky secure MAC addresses and to add them to the running configuration by enabling sticky learning. The interface converts all the dynamic secure MAC addresses, including those that were dynamically learned before sticky learning was enabled, to sticky secure MAC addresses. All sticky secure MAC addresses are added to the running configuration.

The sticky secure MAC addresses do not automatically become part of the configuration file, which is the startup configuration used each time the switch restarts. If you save the sticky secure MAC addresses in the configuration file, when the switch restarts, the interface does not need to relearn these addresses. If you do not save the sticky secure addresses, they are lost.

Configuring Switch Port Analyzer

The Cisco IR1101 supports local SPAN only, and up to one SPAN session. You can analyze network traffic passing through ports by using SPAN to send a copy of the traffic to another port on the switch or on another switch that has been connected to a network analyzer or other monitoring or security device. SPAN copies (or mirrors) traffic received or sent (or both) on source ports to a destination port for analysis. SPAN does not affect the switching of network traffic on the source ports. You must dedicate the destination port for SPAN use. Except for traffic that is required for the SPAN or RSPAN session, destination ports do not receive or forward traffic.

Only traffic that enters or leaves source ports or traffic that enters or leaves source can be monitored by using SPAN; traffic routed to a source cannot be monitored. For example, if incoming traffic is being monitored, traffic that gets routed from another source cannot be monitored; however, traffic that is received on the source and routed to another can be monitored.

For detailed information on how to configure a switched port analyzer (SPAN) session, see the following web link:

http://www.cisco.com/c/en/us/td/docs/switches/lan/catalyst3750/software/release/15-0_2_se/configuration/guide/scg3750/swspan.html

Example: SPAN Configuration

The following example shows how to configure a SPAN session to monitor bidirectional traffic from a Gigabit Ethernet source interface:

Router# configure terminal 
Router(config)# monitor session 1 source FastEthernet 0/0/1
Router(config)# end

The following example shows how to configure a gigabit ethernet interface as the destination for a SPAN session:

Router# configure terminal
Router(config)# monitor session 1 destination FastEthernet 0/0/1
Router(config)# end

The following example shows how to remove gigabit ethernet as a SPAN source for SPAN session 1:

Router# configure terminal
Router(config)# no monitor session 1 source FastEthernet 0/0/1
Router(config)# end

IGMP Snooping for IPv4

IGMP snooping allows switches to examine IGMP packets and make forwarding decisions based on their content. You can configure the switch to use IGMP snooping in subnets that receive IGMP queries from either IGMP or the IGMP snooping querier. IGMP snooping constrains IPv4 multicast traffic at Layer 2 by configuring Layer 2 LAN ports dynamically to forward IPv4 multicast traffic only to those ports that want to receive it.

Layer 2 switches can use IGMP snooping to constrain the flooding of multicast traffic by dynamically configuring Layer 2 interfaces so that multicast traffic is forwarded to only those interfaces associated with IP multicast devices. As the name implies, IGMP snooping requires the LAN switch to snoop on the IGMP transmissions between the host and the router and to keep track of multicast groups and member ports. When the switch receives an IGMP report from a host for a particular multicast group, the switch adds the host port number to the forwarding table entry; when it receives an IGMP Leave Group message from a host, it removes the host port from the table entry. It also periodically deletes entries if it does not receive IGMP membership reports from the multicast clients. For more information on this feature, see https://www.cisco.com/c/en/us/td/docs/routers/7600/ios/15S/configuration/guide/7600_15_0s_book/snooigmp.html.

Multi-Homing Configuration in BGP EVPN VXLAN Fabric

Ethernet Virtual Private Network (EVPN) has gained prominence in contemporary networking due to its capacity to deliver scalable, flexible, and efficient Layer 2 and Layer 3 VPN services over an IP/MPLS backbone. EVPN is commonly integrated with Virtual Extensible LAN (VXLAN), a widely-used network virtualization overlay protocol that significantly enhances the Layer 2 network address space.

EVPN-VXLAN operates as an open standards technology addressing the constraints of traditional VLAN-based networks. It establishes network fabric that extends Layer 2 connectivity as an overlay on existing physical networks.

Why Multi-Homing?

Multi-homing is critical for effectively implementing the combined two-stage VLAN and Bridge Domain (BD) model in routing platforms. A traditional single-model procedure for EVPN is designed exclusively for either BD-only or VLAN-only configurations. Additionally, there are limited numbers of routing ports available, which means that switchports must be utilized to enable effective Multi-homing deployments.

By configuring EVPN Ethernet Segments on switchports and associating them with VLANs which are mapped to Switched Virtual Interfaces (SVIs) under the EVPN BD, multi-homing facilitates increased resilience and optimized network resource utilization. The Multi-Homing (MH) All-Active Ethernet Segment feature offers redundancy for connections between hosts or Layer 2 switches and the EVPN VXLAN network

Significance of DF Election and Split-Horizon in Multi-Homing Deployments

Designated Forwarder (DF) election and split-horizon techniques are essential in multi-homing deployments to prevent traffic loops and duplication. In scenarios where multiple switchports are configured as members of a multi-homing VLAN, ambiguity arises regarding the intended traffic destination. To maintain network stability, only one switchport can be actively supported to handle traffic within the multi-homing VLAN, while local switching is disabled.

The switchport functions as the access interface for the EVPN Ethernet Segment, while the associated SVI Ethernet Forwarding Port (EFP) represents the member pseudoport of the EVPN Ethernet Virtual Instance (EVI) or BD linked to the EVPN Ethernet Segment.

The implementation of DF election and split-horizon at the SVI EFP level ensures that traffic is efficiently managed, significantly reducing the risk of loops and optimizing network performance in multi-homing configurations.

Configuring Multi-Homing in a BGP EVPN VXLAN Fabric

To configure multi-homing with all-active redundancy in a BGP EVPN VXLAN fabric, perform the following set of procedures:

  1. Configure Ethernet Segment and Redundancy in the Ethernet Segment

  2. Configure Multi-homing VLAN and Associate EVPN Ethernet-Segment

    • Access Mode

    • Trunk Mode

  3. Configure SVI Service Instance

  4. Configure EVPN-Instance

    • Profile based Configuration

    • Manual Configuration

  5. Apply the configuration on a Bridge-Domain

Removing a Multi-homing VLAN

Unconfiguring the EVPN Ethernet-segment on the switchport will remove the corresponding multihoming VLANs.

Configure Ethernet Segment and Redundancy in the Ethernet Segment

Follow these steps to configure redundancy on an ethernet segment on your router.

Procedure

Step 1

Enter the privileged EXEC mode and enter the password, if prompted.

Example:
Router#enable

Step 2

Enter the Global Configuration Mode.

Example:
Router#configure terminal

Step 3

Enter the Layer 2 VPN EVPN ethernet segment configuration mode.

Example:
Router(config)#l2vpn evpn ethernet-segment 1

Step 4

Configure the ethernet segment identifier type (ESI) and value for the ethernet segment.

Example:
Router(config-evpn-es)#l2vpn evpn ethernet-segment 1

The following ESI types are supported:

  • Type 0 : This type indicates an arbitrary 9-octet ESI value. The format is 00 + 9-octets of ESI value

  • Type 3 : This type indicates a MAC-based ESI Value. The format is 03 + system-mac (6 bytes) + value of MAC address (3 bytes).

Step 5

Configure the redundancy type for the ethernet segment.

Example:
Router(config-evpn-es)#redundancy all-active

Step 6

Exit the Layer 2 VPN EVPN ethernet segment configuration mode and enter privileged EXEC mode.

Example:
Router(config-evpn-es)#end

Configure Multi-Homing VLAN and Associate EVPN Ethernet-Segment

You can add a multi-homing VLAN through two modes:

  • Access Mode: The switchport must be the only port in the Access VLAN.

    If the switchport is not the only port in the access VLAN, the command line interface (CLI) request to configure EVPN Ethernet-segment will be rejected.

  • Trunk Mode: The switchport must be the only port for all the VLANs which are allowed on the trunk switchport.

    If the switchport is not the only port associated with the VLANs which are allowed on the trunk, the CLI request to configure EVPN Ethernet-segment will be rejected.

Follow these steps to add a VLAN to switchport.

Procedure

Step 1

Enter privileged EXEC mode and enter password, if prompted.

Example:
Router#enable

Step 2

Enter Global Configuration Mode.

Example:
Router#configure terminal

Step 3

Specify the interface, and enter interface configuration mode.

Example:
Router(config)#interface FastEthernet0/0/1

Step 4

Select the switchport mode and add the multi-homing VLAN.

Example:

For Access mode:

Router(config-if)#switchport mode access
Router(config-if)#switchport access vlan 200

For Trunk mode:

Router(config-if)#switchport mode trunk
Router(config-if)#switchport trunk allowed vlan 200

Step 5

Associate the specified Ethernet segment with the interface. Each Ethernet segment is represented by a unique Ethernet segment ID.

Example:
Router(config-if)#evpn ethernet-segment 1

Note


Ensure that you configure a unique Ethernet segment ID on any interface. Ensure that you configure the same segment ID on the link that connects the second VTEP (Virtual Tunnel Endpoint) and the dual-homed device (the second link through the Ethernet segment).

Step 6

Exit the interface configuration mode and enter the privileged EXEC mode.

Example:
Router(config-if)#end

Configure SVI Service Instance

This task configures the SVI service instance.

Procedure

Step 1

Enter the Global Configuration Mode.

Example:
Router#configure terminal

Step 2

Configure the VLAN interface and enter the interface configuration mode.

Example:
Router(config)#interface Vlan200

Step 3

Disable the IP processing on the interface.

Example:
Router(config-if)#no ip address

Step 4

Specify the SVI service instance for the ethernet.

Example:
Router(config-if)#service instance 200 ethernet

Step 5

Configure the encapsulation type.

Example:
Router(config-if-svi-efp)#encapsulation dot1q 200

Configure EVPN-Instance

There are two methods to configure evpn-instance:

  • Profile based configuration

  • Manual configuration

Procedure

Step 1

Enter privileged EXEC mode and enter password, if prompted.

Example:
Router#enable

Step 2

Enter the Global Configuration Mode.

Example:
Router#configure terminal

Step 3

For profile method: Configure an EVPN profile instance.

Router(config)#l2vpn evpn profile <profile-name> <service-type>
Example:
Router(config)#l2vpn evpn profile evpn_va vlan-aware

Step 4

For manual method: Configure an EVPN instance.

Example:
Router(config)#l2vpn evpn instance 1 vlan-aware

Step 5

Configures the encapsulation type to VXLAN.

Example:
Router(config-evpn-evi)#encapsulation vxlan

Apply the Configuration on the Bridge-Domain

Follow these steps to apply the configuration on a bridge-domain.

Procedure

Step 1

Apply the configuration to the specified bridge domain.

Example:
Router(config)#bridge-domain 200

Step 2

Specify the service instance EFP to the bridge domain.

Example:
Router(config-bdomain)#member Vlan200 service-instance 200

Step 3

For profile based configuration: Add an EVPN instance to the bridge-domain.

Example:
Router(config-bdomain)#member evpn-instance profile evpn_va

Step 4

For manual configuration: Add an EVPN instance to the bridge-domain.

Example:
Router(config-bdomain)#member evpn-instance 1 vni 20011 ethernet-tag 20011

Note


For more information on different replication types, on the nve , see Configure Ingress Replication and Configure Static Replication


Configuration Example

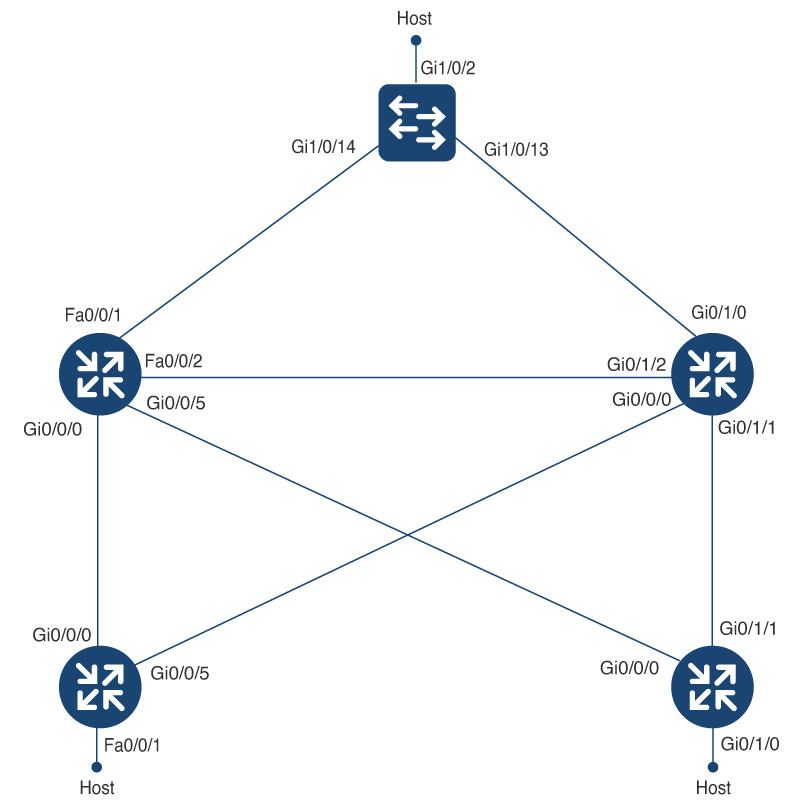
Here is an example of configuring the Multi-Homing feature over BGP EVPN VXLAN in a network topology with four routers (R1, R2, R3, and R4) as the VTEPs (Virtual Tunnel Endpoint). The R1 and R2 are the VTEPs with Multi-Homing VLANs as shown in the figure.

Figure 1. Configuration example of 4 router and 1 switch topology

Running Configuration for Router 1 (R1)

l2vpn evpn ethernet-segment 1
 identifier type 3 system-mac 0012.0012.0012
 redundancy all-active
 df-election wait-time 1
!
l2vpn evpn
 replication-type ingress
!
l2vpn evpn profile evpn_va vlan-aware
 evi-id 3
 l2vni-base 50000
 ethernet-tag auto-vni
!
bridge-domain 200 
 member Vlan200 service-instance 200
 member evpn-instance profile evpn_va
!
interface Loopback0
 ip address 1.1.1.1 255.255.255.255
 ip ospf network point-to-point
 ip ospf 1 area 0
!
interface Loopback1
 ip address 1.1.1.2 255.255.255.255
 ip ospf network point-to-point
 ip ospf 1 area 0
!
interface GigabitEthernet0/0/0
ip address 10.1.3.1 255.255.255.0
 ip ospf network point-to-point
 ip ospf bfd
 ip ospf 1 area 0
 media-type rj45
 bfd interval 50 min_rx 50 multiplier 3
!
interface FastEthernet0/0/1
 switchport trunk allowed vlan 200
 switchport mode trunk
evpn ethernet-segment 1
!
interface FastEthernet0/0/2
 switchport access vlan 12
 switchport mode access
!
interface GigabitEthernet0/0/5
 no switchport
ip address 10.1.4.1 255.255.255.0
ip ospf network point-to-point
 ip ospf bfd
 ip ospf 1 area 0
 bfd interval 50 min_rx 50 multiplier 3
!
interface Vlan12
 ip address 10.1.2.1 255.255.255.0
 ip ospf network point-to-point
 ip ospf bfd
 ip ospf 1 area 0
 bfd interval 999 min_rx 999 multiplier 3
!
interface Vlan200
 no ip address
 service instance 200 ethernet
  encapsulation dot1q 200
 !
!
interface nve1
 no ip address
 source-interface Loopback1
 host-reachability protocol bgp
 member vni 30000 ingress-replication
!
router ospf 1
 router-id 1.1.1.1
!
router bgp 65001
 bgp log-neighbor-changes
 neighbor 2.2.2.1 remote-as 65001
 neighbor 2.2.2.1 update-source Loopback0
 neighbor 2.2.2.1 fall-over bfd
 neighbor 3.3.3.1 remote-as 65001
 neighbor 3.3.3.1 update-source Loopback0
 neighbor 3.3.3.1 fall-over bfd
 neighbor 3.3.3.1 route-reflector-client
 neighbor 4.4.4.1 remote-as 65001
neighbor 4.4.4.1 update-source Loopback0
 neighbor 4.4.4.1 fall-over bfd
 neighbor 4.4.4.1 route-reflector-client
 !
address-family l2vpn evpn
  neighbor 2.2.2.1 activate
  neighbor 2.2.2.1 send-community both
  neighbor 3.3.3.1 activate
  neighbor 3.3.3.1 send-community both
  neighbor 3.3.3.1 route-reflector-client
  neighbor 4.4.4.1 activate
  neighbor 4.4.4.1 send-community both
  neighbor 4.4.4.1 route-reflector-client
 exit-address-family
!

Running Configuration for Router 2 (R2)

l2vpn evpn ethernet-segment 1
 identifier type 3 system-mac 0012.0012.0012
 redundancy all-active
 df-election wait-time 1
!
l2vpn evpn
 replication-type ingress
!
l2vpn evpn profile evpn_va vlan-aware
 evi-id 3
 l2vni-base 50000
 ethernet-tag auto-vni
!
bridge-domain 200 
 member Vlan200 service-instance 200
 member evpn-instance profile evpn_va
!
interface Loopback0
 ip address 2.2.2.1 255.255.255.255
 ip ospf network point-to-point
 ip ospf 1 area 0
!
interface Loopback1
 ip address 2.2.2.2 255.255.255.255
 ip ospf network point-to-point
 ip ospf 1 area 0
!
interface GigabitEthernet0/0/0
ip address 10.2.3.2 255.255.255.0
 ip ospf network point-to-point
 ip ospf bfd
 ip ospf 1 area 0
 media-type rj45
 negotiation auto
 bfd interval 50
!
interface GigabitEthernet0/1/0
 switchport trunk allowed vlan 200
 switchport mode trunk
 evpn ethernet-segment 1
!
interface GigabitEthernet0/1/1
switchport access vlan 24
 switchport mode access
!
interface GigabitEthernet0/1/2
 switchport access vlan 12
 switchport mode access
!
interface Vlan12
 ip address 10.1.2.2 255.255.255.0
 ip ospf network point-to-point
 ip ospf bfd
 ip ospf 1 area 0
 bfd interval 999 min_rx 999 multiplier 3
!
interface Vlan24
ip address 10.2.4.2 255.255.255.0
 ip ospf network point-to-point
 ip ospf bfd
 ip ospf 1 area 0
 bfd interval 999 min_rx 999 multiplier 3
!
interface Vlan200
 no ip address
 service instance 200 ethernet
  encapsulation dot1q 200
 !
interface nve1
 no ip address
 source-interface Loopback1
 host-reachability protocol bgp
 member vni 30000 ingress-replication
!
router ospf 1
 router-id 2.2.2.1
!
router bgp 65001
 bgp log-neighbor-changes
 neighbor 1.1.1.1 remote-as 65001
 neighbor 1.1.1.1 update-source Loopback0
 neighbor 1.1.1.1 fall-over bfd
 neighbor 3.3.3.1 remote-as 65001
 neighbor 3.3.3.1 update-source Loopback0
 neighbor 3.3.3.1 fall-over bfd
 neighbor 3.3.3.1 route-reflector-client
 neighbor 4.4.4.1 remote-as 65001
 neighbor 4.4.4.1 update-source Loopback0
 neighbor 4.4.4.1 fall-over bfd
 neighbor 4.4.4.1 route-reflector-client
 !
 address-family l2vpn evpn
  neighbor 1.1.1.1 activate
  neighbor 1.1.1.1 send-community both
  neighbor 3.3.3.1 activate
  neighbor 3.3.3.1 send-community both
  neighbor 3.3.3.1 route-reflector-client
  neighbor 4.4.4.1 activate
  neighbor 4.4.4.1 send-community both
  neighbor 4.4.4.1 route-reflector-client
exit-address-family
!

Running Configuration for Router 3 (R3)

l2vpn evpn
 replication-type ingress
!
l2vpn evpn profile evpn_va vlan-aware
 evi-id 3
 l2vni-base 50000
 ethernet-tag auto-vni
!
bridge-domain 200 
 member Vlan200 service-instance 200
 member evpn-instance profile evpn_va
!
interface Loopback0
 ip address 3.3.3.1 255.255.255.255
 ip ospf network point-to-point
 ip ospf 1 area 0
!
interface Loopback1
 ip address 3.3.3.2 255.255.255.255
 ip ospf network point-to-point
 ip ospf 1 area 0
!
interface GigabitEthernet0/0/0
ip address 10.1.3.3 255.255.255.0
 ip ospf network point-to-point
 ip ospf bfd
 ip ospf 1 area 0
 media-type rj45
 bfd interval 50 min_rx 50 multiplier 3
!
interface FastEthernet0/0/1
 switchport trunk allowed vlan 200
 switchport mode trunk
!
interface GigabitEthernet0/0/5
 no switchport
ip address 10.2.3.3 255.255.255.0
 ip ospf network point-to-point
 ip ospf bfd
 ip ospf 1 area 0
 bfd interval 50 min_rx 50 multiplier 3
!
interface Vlan200
no ip address
 service instance 200 ethernet
  encapsulation dot1q 200
 !
!
interface nve1
 no ip address
 source-interface Loopback1
 host-reachability protocol bgp
member vni 30000 ingress-replication
!
router ospf 1
 router-id 3.3.3.1
!
router bgp 65001
 bgp log-neighbor-changes
 neighbor 1.1.1.1 remote-as 65001
 neighbor 1.1.1.1 update-source Loopback0
 neighbor 1.1.1.1 fall-over bfd
 neighbor 2.2.2.1 remote-as 65001
 neighbor 2.2.2.1 update-source Loopback0
 neighbor 2.2.2.1 fall-over bfd
 !
 address-family l2vpn evpn
  neighbor 1.1.1.1 activate
  neighbor 1.1.1.1 send-community both
  neighbor 2.2.2.1 activate
  neighbor 2.2.2.1 send-community both
 exit-address-family
!

Running Configuration for Router 4 (R4)

l2vpn evpn
 replication-type ingress
!
l2vpn evpn profile evpn_va vlan-aware
 evi-id 3
 l2vni-base 50000
 ethernet-tag auto-vni
!
bridge-domain 200 
 member Vlan200 service-instance 200
 member evpn-instance profile evpn_va
!
interface Loopback0
 ip address 4.4.4.1 255.255.255.255
 ip ospf network point-to-point
 ip ospf 1 area 0
!
interface Loopback1
 ip address 4.4.4.2 255.255.255.255
 ip ospf network point-to-point
 ip ospf 1 area 0
!
interface GigabitEthernet0/0/0
 ip address 10.1.4.4 255.255.255.0
 ip ospf network point-to-point
 ip ospf bfd
 ip ospf 1 area 0
 media-type rj45
 negotiation auto
 bfd interval 50 min_rx 50 multiplier 3
!
interface GigabitEthernet0/1/0
 switchport trunk allowed vlan 200
 switchport mode trunk
!
interface GigabitEthernet0/1/1
 switchport access vlan 24
 switchport mode access
!
interface Vlan24
ip address 10.2.4.4 255.255.255.0
 ip ospf network point-to-point
 ip ospf bfd
 ip ospf 1 area 0
 bfd interval 999 min_rx 999 multiplier 3
!
interface Vlan200
 no ip address
 service instance 200 ethernet
  encapsulation dot1q 200
 !
!
interface nve1
 no ip address
 source-interface Loopback1
 host-reachability protocol bgp
 member vni 30000 ingress-replication
!
router ospf 1
 router-id 4.4.4.1
!
router bgp 65001
 bgp log-neighbor-changes
 neighbor 1.1.1.1 remote-as 65001
 neighbor 1.1.1.1 update-source Loopback0
 neighbor 1.1.1.1 fall-over bfd
 neighbor 2.2.2.1 remote-as 65001
 neighbor 2.2.2.1 update-source Loopback0
 neighbor 2.2.2.1 fall-over bfd
 !
address-family l2vpn evpn
  neighbor 1.1.1.1 activate
  neighbor 1.1.1.1 send-community both
  neighbor 2.2.2.1 activate
  neighbor 2.2.2.1 send-community both
 exit-address-family
!

Running Configuration for Switch

interface GigabitEthernet1/0/13
 switchport trunk allowed vlan 200
 switchport mode trunk
 carrier-delay 0
 speed 100
 channel-group 1 mode on
end
!
interface GigabitEthernet1/0/14
 switchport access vlan 500
 switchport trunk allowed vlan 200
 switchport mode trunk
 carrier-delay 0
 channel-group 1 mode on
end
!
interface Port-channel1
 switchport trunk allowed vlan 200
 switchport mode trunk
end
!

Verify the Multi-Homing Configuration

Verify the Configuration on Router 1 (R1)

Use the show l2vpn evpn evi detail command to verify the configuration of the EVI and bridge-domain, and to ensure the ethernet-tag value is configured

Router1#show l2vpn evpn evi detail
EVPN instance:          3 (VLAN Aware)
  Profile:              evpn_va
  RD:                   1.1.1.1:32770 (auto)
  Import-RTs:           65001:3 
  Export-RTs:           65001:3 
  Per-EVI Label:        none
  State:                Established
  Replication Type:     Ingress (profile)
  Encapsulation:        vxlan (profile)
  IP Local Learn:       Enabled (global)
  Adv. Def. Gateway:    Disabled (global)
  Re-originate RT5:     Disabled (profile)
  AR Flood Suppress:    Enabled (global)
  Bridge Domain:        200
    Ethernet-Tag:       50200
    State:              Established
    Flood Suppress:     Attached
    Core If:            
    Access If:          
    NVE If:             nve1
    RMAC:               0000.0000.0000
    Core BD:            0
    L2 VNI:             50200
    L3 VNI:             0
    VTEP IP:            1.1.1.2
    Originating Router: 1.1.1.1
    Pseudoports:
      Vlan200 service instance 200 (DF state: forwarding)
        Routes: 1 MAC, 0 MAC/IP
        ESI: 0300.1200.1200.1200.0001
    Peers:
      2.2.2.2
        Routes: 1 MAC, 0 MAC/IP, 1 IMET, 1 EAD
      3.3.3.2
        Routes: 1 MAC, 0 MAC/IP, 1 IMET, 0 EAD
      4.4.4.2
        Routes: 1 MAC, 0 MAC/IP, 1 IMET, 0 EAD

Use the show ip bgp l2vpn evpn all command to verify the configuration.

Router1#show ip bgp l2vpn evpn all
BGP table version is 53, local router ID is 1.1.1.1
Status codes: s suppressed, d damped, h history, * valid, > best, i - internal, 
              r RIB-failure, S Stale, m multipath, b backup-path, f RT-Filter, 
              x best-external, a additional-path, c RIB-compressed, 
              t secondary path, L long-lived-stale,
Origin codes: i - IGP, e - EGP, ? - incomplete
RPKI validation codes: V valid, I invalid, N Not found

     Network          Next Hop            Metric LocPrf Weight Path
Route Distinguisher: 1.1.1.1:32770
 *>   [1][1.1.1.1:32770][03001200120012000001][50200]/23
                      0.0.0.0                            32768 ?
 *mi                   2.2.2.2                  0    100      0 ?
Route Distinguisher: 10.1.2.2:2
 *>i  [1][10.1.2.2:2][03001200120012000001][4294967295]/23
                      2.2.2.2                  0    100      0 ?
Route Distinguisher: 10.1.2.2:32770
 *>i  [1][10.1.2.2:32770][03001200120012000001][50200]/23
                      2.2.2.2                  0    100      0 ?
Route Distinguisher: 100.109.165.27:8
 *>   [1][100.109.165.27:8][03001200120012000001][4294967295]/23
                      0.0.0.0                            32768 ?
Route Distinguisher: 1.1.1.1:32770
 *>   [2][1.1.1.1:32770][50200][48][001101000001][0][*]/20
                      0.0.0.0                            32768 ?
 *>i  [2][1.1.1.1:32770][50200][48][001101000002][0][*]/20
                      2.2.2.2                  0    100      0 ?
 *>i  [2][1.1.1.1:32770][50200][48][001201000001][0][*]/20
                      3.3.3.2                  0    100      0 ?
 *>i  [2][1.1.1.1:32770][50200][48][001301000001][0][*]/20
                      4.4.4.2                  0    100      0 ?
Route Distinguisher: 3.3.3.1:32770
 * i  [2][3.3.3.1:32770][50200][48][001201000001][0][*]/20
                      3.3.3.2                  0    100      0 ?
 *>i                   3.3.3.2                  0    100      0 ?
Route Distinguisher: 10.1.2.2:32770
 *>i  [2][10.1.2.2:32770][50200][48][001101000002][0][*]/20
                      2.2.2.2                  0    100      0 ?
Route Distinguisher: 10.1.4.4:32770
 * i  [2][10.1.4.4:32770][50200][48][001301000001][0][*]/20
                      4.4.4.2                  0    100      0 ?
 *>i                   4.4.4.2                  0    100      0 ?
Route Distinguisher: 1.1.1.1:32770
 *>   [3][1.1.1.1:32770][50200][32][1.1.1.1]/17
                      0.0.0.0                            32768 ?
 *>i  [3][1.1.1.1:32770][50200][32][3.3.3.1]/17
                      3.3.3.2                  0    100      0 ?
 *>i  [3][1.1.1.1:32770][50200][32][10.1.2.2]/17
                      2.2.2.2                  0    100      0 ?
 *>i  [3][1.1.1.1:32770][50200][32][10.1.4.4]/17
                      4.4.4.2                  0    100      0 ?
Route Distinguisher: 3.3.3.1:32770
 * i  [3][3.3.3.1:32770][50200][32][3.3.3.1]/17
                      3.3.3.2                  0    100      0 ?
 *>i                   3.3.3.2                  0    100      0 ?
Route Distinguisher: 10.1.2.2:32770
 *>i  [3][10.1.2.2:32770][50200][32][10.1.2.2]/17
                      2.2.2.2                  0    100      0 ?
Route Distinguisher: 10.1.4.4:32770
 * i  [3][10.1.4.4:32770][50200][32][10.1.4.4]/17
                      4.4.4.2                  0    100      0 ?
 *>i                   4.4.4.2                  0    100      0 ?
Route Distinguisher: 1.1.1.1:1
 *>   [4][1.1.1.1:1][03001200120012000001][32][1.1.1.1]/23
                      0.0.0.0                            32768 ?
Route Distinguisher: 2.2.2.1:1
 *>i  [4][2.2.2.1:1][03001200120012000001][32][10.1.2.2]/23
                      2.2.2.2                  0    100      0 ?

Use the show nve peers command to verify the configuration.

Router1#show nve peers
'M' - MAC entry download flag  'A' - Adjacency download flag
'4' - IPv4 flag  '6' - IPv6 flag

Interface  VNI      Type Peer-IP          RMAC/Num_RTs   eVNI     state flags UP time
nve1       50200    L2CP 2.2.2.2          3              50200      UP   N/A  00:19:17
nve1       50200    L2CP 3.3.3.2          2              50200      UP   N/A  00:06:09
nve1       50200    L2CP 4.4.4.2          2              50200      UP   N/A  00:06:08

Use the show l2vpn evpn mac command to verify the configuration.

Router1#show l2vpn evpn mac
MAC Address    EVI   BD    ESI                      Ether Tag  Next Hop(s)
-------------- ----- ----- ------------------------ ---------- ---------------
0011.0100.0001 3     200   0300.1200.1200.1200.0001 50200      Vl200:200
0011.0100.0002 3     200   0300.1200.1200.1200.0001 50200      2.2.2.2
0012.0100.0001 3     200   0000.0000.0000.0000.0000 50200      3.3.3.2
0013.0100.0001 3     200   0000.0000.0000.0000.0000 50200      4.4.4.2

Verify the Configuration on Router 2 (R2)

Use the show l2vpn evpn evi detail command to verify the configuration of the EVI and bridge-domain, and to ensure the ethernet-tag value is configured

Router2#show l2vpn evpn evi detail
EVPN instance:          3 (VLAN Aware)
  Profile:              evpn_va
  RD:                   10.1.2.2:32770 (auto)
  Import-RTs:           65001:3 
  Export-RTs:           65001:3 
  Per-EVI Label:        none
  State:                Established
  Replication Type:     Ingress (profile)
  Encapsulation:        vxlan (profile)
  IP Local Learn:       Enabled (global)
  Adv. Def. Gateway:    Disabled (global)
  Re-originate RT5:     Disabled (profile)
  AR Flood Suppress:    Enabled (global)
  Bridge Domain:        200
    Ethernet-Tag:       50200
    State:              Established
    Flood Suppress:     Attached
    Core If:            
    Access If:          
    NVE If:             nve1
    RMAC:               0000.0000.0000
    Core BD:            0
    L2 VNI:             50200
    L3 VNI:             0
    VTEP IP:            2.2.2.2
    Originating Router: 10.1.2.2
    Pseudoports:
      Vlan200 service instance 200 (DF state: PE-to-CE BUM blocked)
        Routes: 1 MAC, 0 MAC/IP
        ESI: 0300.1200.1200.1200.0001
    Peers:
      1.1.1.2
        Routes: 1 MAC, 0 MAC/IP, 1 IMET, 1 EAD
      3.3.3.2
        Routes: 1 MAC, 0 MAC/IP, 1 IMET, 0 EAD
      4.4.4.2
        Routes: 1 MAC, 0 MAC/IP, 1 IMET, 0 EAD

Use the show ip bgp l2vpn evpn all command to verify the configuration.

Router2#show ip bgp l2vpn evpn all 
BGP table version is 67, local router ID is 2.2.2.2
Status codes: s suppressed, d damped, h history, * valid, > best, i - internal, 
              r RIB-failure, S Stale, m multipath, b backup-path, f RT-Filter, 
              x best-external, a additional-path, c RIB-compressed, 
              t secondary path, L long-lived-stale,
Origin codes: i - IGP, e - EGP, ? - incomplete
RPKI validation codes: V valid, I invalid, N Not found

     Network          Next Hop            Metric LocPrf Weight Path
Route Distinguisher: 1.1.1.1:11
 *>i  [1][1.1.1.1:11][03001200120012000001][4294967295]/23
                      1.1.1.1                  0    100      0 ?
Route Distinguisher: 1.1.1.1:32770
 *>i  [1][1.1.1.1:32770][03001200120012000001][50200]/23
                      1.1.1.1                  0    100      0 ?
Route Distinguisher: 2.2.2.1:4
 *>   [1][2.2.2.1:4][03001200120012000001][4294967295]/23
                      0.0.0.0                            32768 ?
Route Distinguisher: 2.2.2.1:32770
 *>   [1][2.2.2.1:32770][03001200120012000001][50200]/23
                      0.0.0.0                            32768 ?
 *mi                   1.1.1.1                  0    100      0 ?
Route Distinguisher: 1.1.1.1:32770
 *>i  [2][1.1.1.1:32770][50200][48][001101000001][0][*]/20
                      1.1.1.1                  0    100      0 ?
 *>i  [2][1.1.1.1:32770][50200][48][001101000002][0][*]/20
                      1.1.1.1                  0    100      0 ?
Route Distinguisher: 2.2.2.1:32770
 *>i  [2][2.2.2.1:32770][50200][48][001101000001][0][*]/20
                      1.1.1.1                  0    100      0 ?
 *>i  [2][2.2.2.1:32770][50200][48][001101000002][0][*]/20
                      1.1.1.1                  0    100      0 ?
 *>i  [2][2.2.2.1:32770][50200][48][001201000001][0][*]/20
                      3.3.3.1                  0    100      0 ?
 *>i  [2][2.2.2.1:32770][50200][48][001301000001][0][*]/20
                      4.4.4.1                  0    100      0 ?
Route Distinguisher: 3.3.3.1:32770
 *>i  [2][3.3.3.1:32770][50200][48][001201000001][0][*]/20
                      3.3.3.1                  0    100      0 ?
Route Distinguisher: 4.4.4.1:32770
 *>i  [2][4.4.4.1:32770][50200][48][001301000001][0][*]/20
                      4.4.4.1                  0    100      0 ?
Route Distinguisher: 1.1.1.1:32770
 *>i  [3][1.1.1.1:32770][50200][32][1.1.1.1]/17
                      1.1.1.1                  0    100      0 ?
Route Distinguisher: 2.2.2.1:32770
 *>i  [3][2.2.2.1:32770][50200][32][1.1.1.1]/17
                      1.1.1.1                  0    100      0 ?
 *>   [3][2.2.2.1:32770][50200][32][2.2.2.1]/17
                      0.0.0.0                            32768 ?
 *>i  [3][2.2.2.1:32770][50200][32][3.3.3.1]/17
                      3.3.3.1                  0    100      0 ?
 *>i  [3][2.2.2.1:32770][50200][32][4.4.4.1]/17
                      4.4.4.1                  0    100      0 ?
Route Distinguisher: 3.3.3.1:32770
 *>i  [3][3.3.3.1:32770][50200][32][3.3.3.1]/17
                      3.3.3.1                  0    100      0 ?
Route Distinguisher: 4.4.4.1:32770
 *>i  [3][4.4.4.1:32770][50200][32][4.4.4.1]/17
                      4.4.4.1                  0    100      0 ?
Route Distinguisher: 1.1.1.1:1
 *>i  [4][1.1.1.1:1][03001200120012000001][32][1.1.1.1]/23
                      1.1.1.1                  0    100      0 ?
Route Distinguisher: 2.2.2.2:1
 *>   [4][2.2.2.2:1][03001200120012000001][32][2.2.2.1]/23
                      0.0.0.0                            32768 ?

Use the show nve peers command to verify the configuration.

Router2#show nve peers 
'M' - MAC entry download flag  'A' - Adjacency download flag
'4' - IPv4 flag  '6' - IPv6 flag

Interface  VNI      Type Peer-IP          RMAC/Num_RTs   eVNI     state flags UP time
nve1       50200    L2CP 1.1.1.1          4              50200      UP   N/A  00:02:42
nve1       50200    L2CP 3.3.3.1          2              50200      UP   N/A  00:02:28
nve1       50200    L2CP 4.4.4.1          2              50200      UP   N/A  00:02:37

Use the show l2vpn evpn mac command to verify the configuration.

Router2#show l2vpn evpn mac
MAC Address    EVI   BD    ESI                      Ether Tag  Next Hop(s)
-------------- ----- ----- ------------------------ ---------- ---------------
0011.0100.0001 3     200   0300.1200.1200.1200.0001 50200      1.1.1.1
0011.0100.0002 3     200   0300.1200.1200.1200.0001 50200      1.1.1.1
0012.0100.0001 3     200   0000.0000.0000.0000.0000 50200      3.3.3.1
0013.0100.0001 3     200   0000.0000.0000.0000.0000 50200      4.4.4.1

Verify the Configuration on Router 3 (R3)

Use the show l2vpn evpn evi detail command to verify the configuration of the EVI and bridge-domain, and to ensure the ethernet-tag value is configured

Router3#show l2vpn evpn evi detail
EVPN instance:          3 (VLAN Aware)
  Profile:              evpn_va
  RD:                   3.3.3.1:32770 (auto)
  Import-RTs:           1:3 
  Export-RTs:           1:3 
  Per-EVI Label:        none
  State:                Established
  Replication Type:     Ingress (profile)
  Encapsulation:        vxlan (profile)
  IP Local Learn:       Enabled (global)
  Adv. Def. Gateway:    Disabled (global)
  Re-originate RT5:     Disabled (profile)
  AR Flood Suppress:    Enabled (global)
  Bridge Domain:        200
    Ethernet-Tag:       50200
    State:              Established
    Flood Suppress:     Attached
    Core If:            
    Access If:          
    NVE If:             nve1
    RMAC:               0000.0000.0000
    Core BD:            0
    L2 VNI:             50200
    L3 VNI:             0
    VTEP IP:            3.3.3.1
    Originating Router: 3.3.3.1
    Pseudoports:
      Vlan200 service instance 200
        Routes: 1 MAC, 0 MAC/IP
    Peers:
      1.1.1.1
        Routes: 2 MAC, 0 MAC/IP, 1 IMET, 1 EAD
      2.2.2.1
        Routes: 0 MAC, 0 MAC/IP, 1 IMET, 1 EAD

Use the show ip bgp l2vpn evpn all command to verify the configuration.

Router3#show ip bgp l2vpn evpn all
BGP table version is 62, local router ID is 3.3.3.3
Status codes: s suppressed, d damped, h history, * valid, > best, i - internal, 
              r RIB-failure, S Stale, m multipath, b backup-path, f RT-Filter, 
              x best-external, a additional-path, c RIB-compressed, 
              t secondary path, L long-lived-stale,
Origin codes: i - IGP, e - EGP, ? - incomplete
RPKI validation codes: V valid, I invalid, N Not found

     Network          Next Hop            Metric LocPrf Weight Path
Route Distinguisher: 1.1.1.1:11
 * i  [1][1.1.1.1:11][03001200120012000001][4294967295]/23
                      1.1.1.1                  0    100      0 ?
 *>i                   1.1.1.1                  0    100      0 ?
Route Distinguisher: 1.1.1.1:32770
 * i  [1][1.1.1.1:32770][03001200120012000001][50200]/23
                      1.1.1.1                  0    100      0 ?
 *>i                   1.1.1.1                  0    100      0 ?
Route Distinguisher: 2.2.2.1:4
 * i  [1][2.2.2.1:4][03001200120012000001][4294967295]/23
                      2.2.2.1                  0    100      0 ?
 *>i                   2.2.2.1                  0    100      0 ?
Route Distinguisher: 2.2.2.1:32770
 * i  [1][2.2.2.1:32770][03001200120012000001][50200]/23
                      2.2.2.1                  0    100      0 ?
 *>i                   2.2.2.1                  0    100      0 ?
Route Distinguisher: 3.3.3.1:32770
 *mi  [1][3.3.3.1:32770][03001200120012000001][50200]/23
                      2.2.2.1                  0    100      0 ?
 *>i                   1.1.1.1                  0    100      0 ?
Route Distinguisher: 1.1.1.1:32770
 * i  [2][1.1.1.1:32770][50200][48][001101000001][0][*]/20
                      1.1.1.1                  0    100      0 ?
 *>i                   1.1.1.1                  0    100      0 ?
 * i  [2][1.1.1.1:32770][50200][48][001101000002][0][*]/20
                      1.1.1.1                  0    100      0 ?
 *>i                   1.1.1.1                  0    100      0 ?
Route Distinguisher: 3.3.3.1:32770
 *>i  [2][3.3.3.1:32770][50200][48][001101000001][0][*]/20
                      1.1.1.1                  0    100      0 ?
 *>i  [2][3.3.3.1:32770][50200][48][001101000002][0][*]/20
                      1.1.1.1                  0    100      0 ?
 *>   [2][3.3.3.1:32770][50200][48][001201000001][0][*]/20
                      0.0.0.0                            32768 ?
Route Distinguisher: 1.1.1.1:32770
 * i  [3][1.1.1.1:32770][50200][32][1.1.1.1]/17
                      1.1.1.1                  0    100      0 ?
 *>i                   1.1.1.1                  0    100      0 ?
Route Distinguisher: 2.2.2.1:32770
 * i  [3][2.2.2.1:32770][50200][32][2.2.2.1]/17
                      2.2.2.1                  0    100      0 ?
 *>i                   2.2.2.1                  0    100      0 ?
Route Distinguisher: 3.3.3.1:32770
 *>i  [3][3.3.3.1:32770][50200][32][1.1.1.1]/17
                      1.1.1.1                  0    100      0 ?
 *>i  [3][3.3.3.1:32770][50200][32][2.2.2.1]/17
                      2.2.2.1                  0    100      0 ?
 *>   [3][3.3.3.1:32770][50200][32][3.3.3.1]/17
                      0.0.0.0                            32768 ?

Use the show nve peers command to verify the configuration.

Router3#show nve peers
'M' - MAC entry download flag  'A' - Adjacency download flag
'4' - IPv4 flag  '6' - IPv6 flag

Interface  VNI      Type Peer-IP          RMAC/Num_RTs   eVNI     state flags UP time
nve1       50200    L2CP 1.1.1.1          4              50200      UP   N/A  00:03:10
nve1       50200    L2CP 2.2.2.1          2              50200      UP   N/A  00:02:24

Use the show l2vpn evpn mac command to verify the configuration.

Router3#show l2vpn evpn mac
MAC Address    EVI   BD    ESI                      Ether Tag  Next Hop(s)
-------------- ----- ----- ------------------------ ---------- ---------------
0011.0100.0001 3     200   0300.1200.1200.1200.0001 50200      1.1.1.1
0011.0100.0002 3     200   0300.1200.1200.1200.0001 50200      1.1.1.1
0012.0100.0001 3     200   0000.0000.0000.0000.0000 50200      Vl200:200

Verify the Configuration on Router 4 (R4)

Use the show l2vpn evpn evi detail command to verify the configuration of the EVI and bridge-domain, and to ensure the ethernet-tag value is configured

Router4#show l2vpn evpn evi detail
EVPN instance:          3 (VLAN Aware)
  Profile:              evpn_va
  RD:                   4.4.4.1:32770 (auto)
  Import-RTs:           1:3 
  Export-RTs:           1:3 
  Per-EVI Label:        none
  State:                Established
  Replication Type:     Ingress (profile)
  Encapsulation:        vxlan (profile)
  IP Local Learn:       Enabled (global)
  Adv. Def. Gateway:    Disabled (global)
  Re-originate RT5:     Disabled (profile)
  AR Flood Suppress:    Enabled (global)
  Bridge Domain:        200
    Ethernet-Tag:       50200
    State:              Established
    Flood Suppress:     Attached
    Core If:            
    Access If:          
    NVE If:             nve1
    RMAC:               0000.0000.0000
    Core BD:            0
    L2 VNI:             50200
    L3 VNI:             0
    VTEP IP:            4.4.4.1
    Originating Router: 4.4.4.1
    Pseudoports:
      Vlan200 service instance 200
        Routes: 1 MAC, 0 MAC/IP
    Peers:
      1.1.1.1
        Routes: 2 MAC, 0 MAC/IP, 1 IMET, 1 EAD
      2.2.2.1
        Routes: 0 MAC, 0 MAC/IP, 1 IMET, 1 EAD

Use the show ip bgp l2vpn evpn all command to verify the configuration.

Router4#show ip bgp l2vpn evpn all
BGP table version is 25, local router ID is 4.4.4.4
Status codes: s suppressed, d damped, h history, * valid, > best, i - internal, 
              r RIB-failure, S Stale, m multipath, b backup-path, f RT-Filter, 
              x best-external, a additional-path, c RIB-compressed, 
              t secondary path, L long-lived-stale,
Origin codes: i - IGP, e - EGP, ? - incomplete
RPKI validation codes: V valid, I invalid, N Not found

     Network          Next Hop            Metric LocPrf Weight Path
Route Distinguisher: 1.1.1.1:11
 * i  [1][1.1.1.1:11][03001200120012000001][4294967295]/23
                      1.1.1.1                  0    100      0 ?
 *>i                   1.1.1.1                  0    100      0 ?
Route Distinguisher: 1.1.1.1:32770
 * i  [1][1.1.1.1:32770][03001200120012000001][50200]/23
                      1.1.1.1                  0    100      0 ?
 *>i                   1.1.1.1                  0    100      0 ?
Route Distinguisher: 2.2.2.1:4
 * i  [1][2.2.2.1:4][03001200120012000001][4294967295]/23
                      2.2.2.1                  0    100      0 ?
 *>i                   2.2.2.1                  0    100      0 ?
Route Distinguisher: 2.2.2.1:32770
 * i  [1][2.2.2.1:32770][03001200120012000001][50200]/23
                      2.2.2.1                  0    100      0 ?
 *>i                   2.2.2.1                  0    100      0 ?
Route Distinguisher: 4.4.4.1:32770
 *mi  [1][4.4.4.1:32770][03001200120012000001][50200]/23
                      2.2.2.1                  0    100      0 ?
 *>i                   1.1.1.1                  0    100      0 ?
Route Distinguisher: 1.1.1.1:32770
 * i  [2][1.1.1.1:32770][50200][48][001101000001][0][*]/20
                      1.1.1.1                  0    100      0 ?
 *>i                   1.1.1.1                  0    100      0 ?
 * i  [2][1.1.1.1:32770][50200][48][001101000002][0][*]/20
                      1.1.1.1                  0    100      0 ?
 *>i                   1.1.1.1                  0    100      0 ?
Route Distinguisher: 4.4.4.1:32770
 *>i  [2][4.4.4.1:32770][50200][48][001101000001][0][*]/20
                      1.1.1.1                  0    100      0 ?
 *>i  [2][4.4.4.1:32770][50200][48][001101000002][0][*]/20
                      1.1.1.1                  0    100      0 ?
 *>   [2][4.4.4.1:32770][50200][48][001301000001][0][*]/20
                      0.0.0.0                            32768 ?
Route Distinguisher: 1.1.1.1:32770
 * i  [3][1.1.1.1:32770][50200][32][1.1.1.1]/17
                      1.1.1.1                  0    100      0 ?
 *>i                   1.1.1.1                  0    100      0 ?
Route Distinguisher: 2.2.2.1:32770
 * i  [3][2.2.2.1:32770][50200][32][2.2.2.1]/17
                      2.2.2.1                  0    100      0 ?
 *>i                   2.2.2.1                  0    100      0 ?
Route Distinguisher: 4.4.4.1:32770
 *>i  [3][4.4.4.1:32770][50200][32][1.1.1.1]/17
                      1.1.1.1                  0    100      0 ?
 *>i  [3][4.4.4.1:32770][50200][32][2.2.2.1]/17
                      2.2.2.1                  0    100      0 ?
 *>   [3][4.4.4.1:32770][50200][32][4.4.4.1]/17
                      0.0.0.0                            32768 ?

Use the show nve peers command to verify the configuration.

Router4#show nve peers
'M' - MAC entry download flag  'A' - Adjacency download flag
'4' - IPv4 flag  '6' - IPv6 flag

Interface  VNI      Type Peer-IP          RMAC/Num_RTs   eVNI     state flags UP time
nve1       50200    L2CP 1.1.1.1          4              50200      UP   N/A  00:04:52
nve1       50200    L2CP 2.2.2.1          2              50200      UP   N/A  00:03:33

Use the show l2vpn evpn mac command to verify the configuration.

Router4#show l2vpn evpn mac
MAC Address    EVI   BD    ESI                      Ether Tag  Next Hop(s)
-------------- ----- ----- ------------------------ ---------- ---------------
0011.0100.0001 3     200   0300.1200.1200.1200.0001 50200      1.1.1.1
0011.0100.0002 3     200   0300.1200.1200.1200.0001 50200      1.1.1.1
0013.0100.0001 3     200   0000.0000.0000.0000.0000 50200      Vl200:200

Misconfiguration of Multihoming VLANs

If a second switchport is added to a multihoming VLAN, traffic flow can be disrupted, especially for Broadcast, Unknown Unicast, and Multicast (BUM) traffic. This can lead to unpredictable internal states within the EVPN Ethernet Segment, ultimately requiring correction for proper functionality.

Misconfigurations can occur by:

  • adding a single-homed switchport to a multihoming VLAN.

  • adding a multi-homed switchport to a multihoming VLAN.

In such cases, an error message is logged, indicating the violation of the multihoming VLAN prerequisites.


Note


Ensure that only one switch port is configured per multihoming VLAN to prevent traffic loss.


Adding Another Switchport to Multihoming VLAN

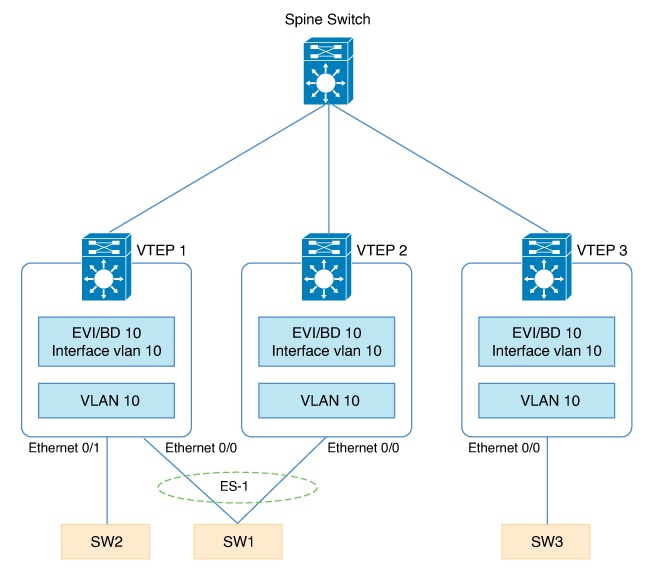
Configuring a MH VLAN 10, then set up EVPN ES-1 on Ethernet0/0, and then add a new switch port, Ethernet0/1, to VLAN 10.

The following image illustrates the first secenario for misconfiguration.

Figure 2. Add Single-Homed Switchport to MH VLAN

The traffic disruption is illustrated below:

Unicast traffic

  • SW1 to SW2:

    SW1 to VTEP1 to SW2: Local switching on VTEP1 VLAN 10

    SW1 to VTEP2 to VTEP1 to SW2: Forwarded by EVPN EVI/BD 10

  • SW2 to SW1:

    SW1 to VTEP1 to SW2: Local switching on VTEP1 VLAN 10

  • SW1 to SW3:

    Forwarded through EVPN BD 10

  • SW3 to SW1:

    Forwarded through EVPN BD 10

  • SW3 to SW2:

    Forwarded through EVPN BD 10

BUM traffic

  • SW1 BUM: Traffic Loss

    Split horizon is performed on SVI EFP member, SW2 may not receive the BUM traffic, if SW1’s traffic is hashed to VTEP2.

  • SW2 BUM: No Impact

    Split horizon is performed on SVI EFP member, but SW1 will receive the local switched traffic

  • SW3 BUM: Traffic Loss

    DF election is performed on SVI EFP member, SW2 may not receive the BUM traffic, if VTEP1 is act as non-DF.

If a Port-channel is used for All-Active multihoming and if it is connected to a multihoming VLAN on a non-designated forwarder (DF) VTEP, the BUM) traffic to a single-homed client switch may be lost.

Adding Another ES Switchport to Multihoming VLAN

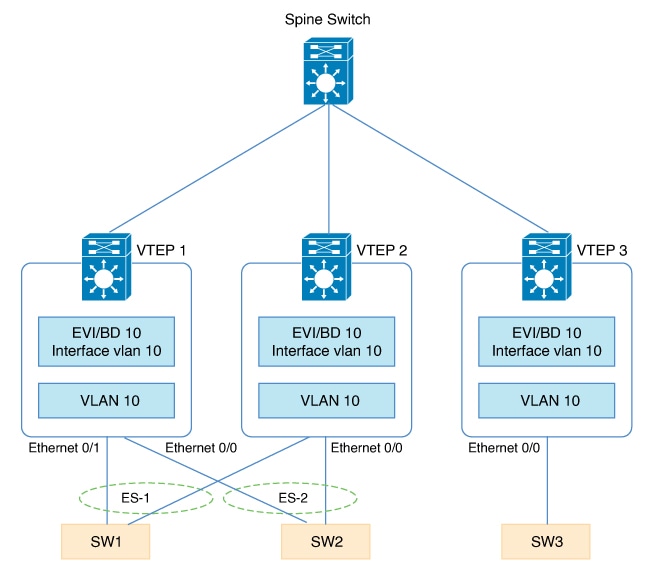
Configure a MH VLAN 10, then set up EVPN ES-1 on Ethernet0/0 and EVPN ES-2 on Ethernet0/1. Additionally, add the new allowed VLAN on Ethernet0/1.

The following image illustrates the second secenario for misconfiguration.

Figure 3. Add Another ES Switchport to MH VLAN
Add  Another ES Switchport to MH VLAN

The traffic disruption is illustrated below:

Unicast traffic

  • SW1 to SW2:

    Local switching on VTEP1/VTEP2 VLAN 10

  • SW2 to SW1:

    Local switching on VTEP1/VTEP2 VLAN 10

  • SW1 to SW3:

    Forwarded through EVPN BD 10

  • SW3 to SW1:

    Forwarded through EVPN BD 10

BUM traffic

  • SW1 BUM:

    SW2 receives local switched traffic from VTEP1/VTEP2.

    SW3 receives the BUM traffic forward from EVPN BD 10

  • SW3 BUM:

    SW1 receives BUM traffic forward from EVPN BD 10 on DF VTEP1 only.

    SW2 receives the BUM traffic forward from EVPN BD 10 on DF VTEP1 only.

Although most traffic may continue to operate if the multihoming VLAN is misconfigured, its performance will not meet expectations. The internal state of the EVPN Ethernet segment becomes unpredictable, rendering it unsupported. This issue must be resolved to ensure proper functionality.