Web User Interface (WebUI)

This chapter contains the following sections:

Introduction to the Web User Interface

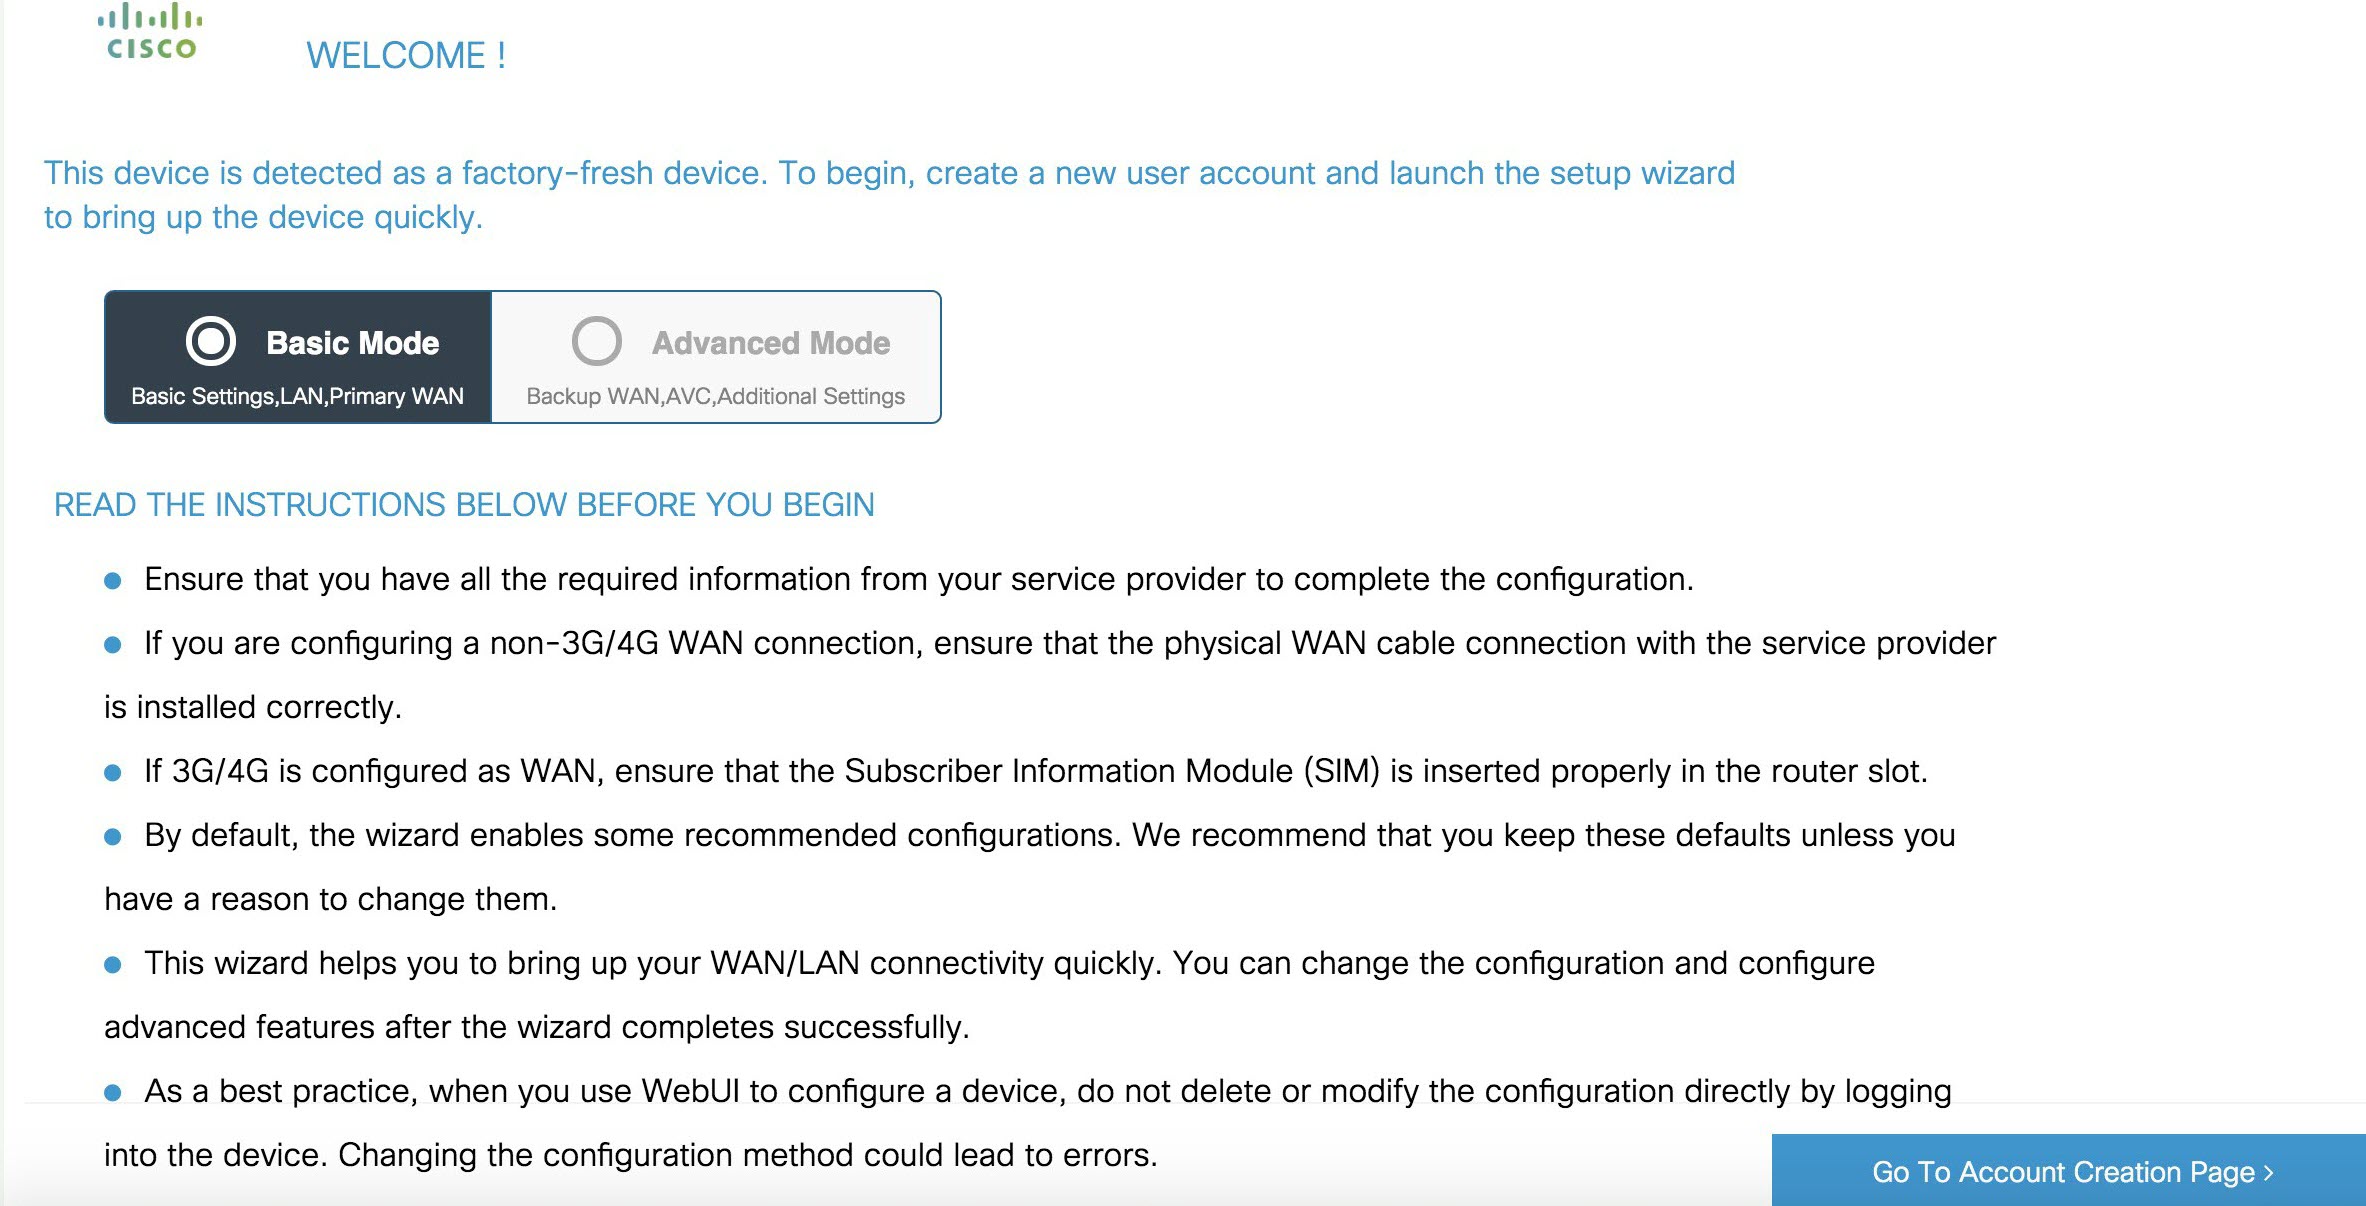
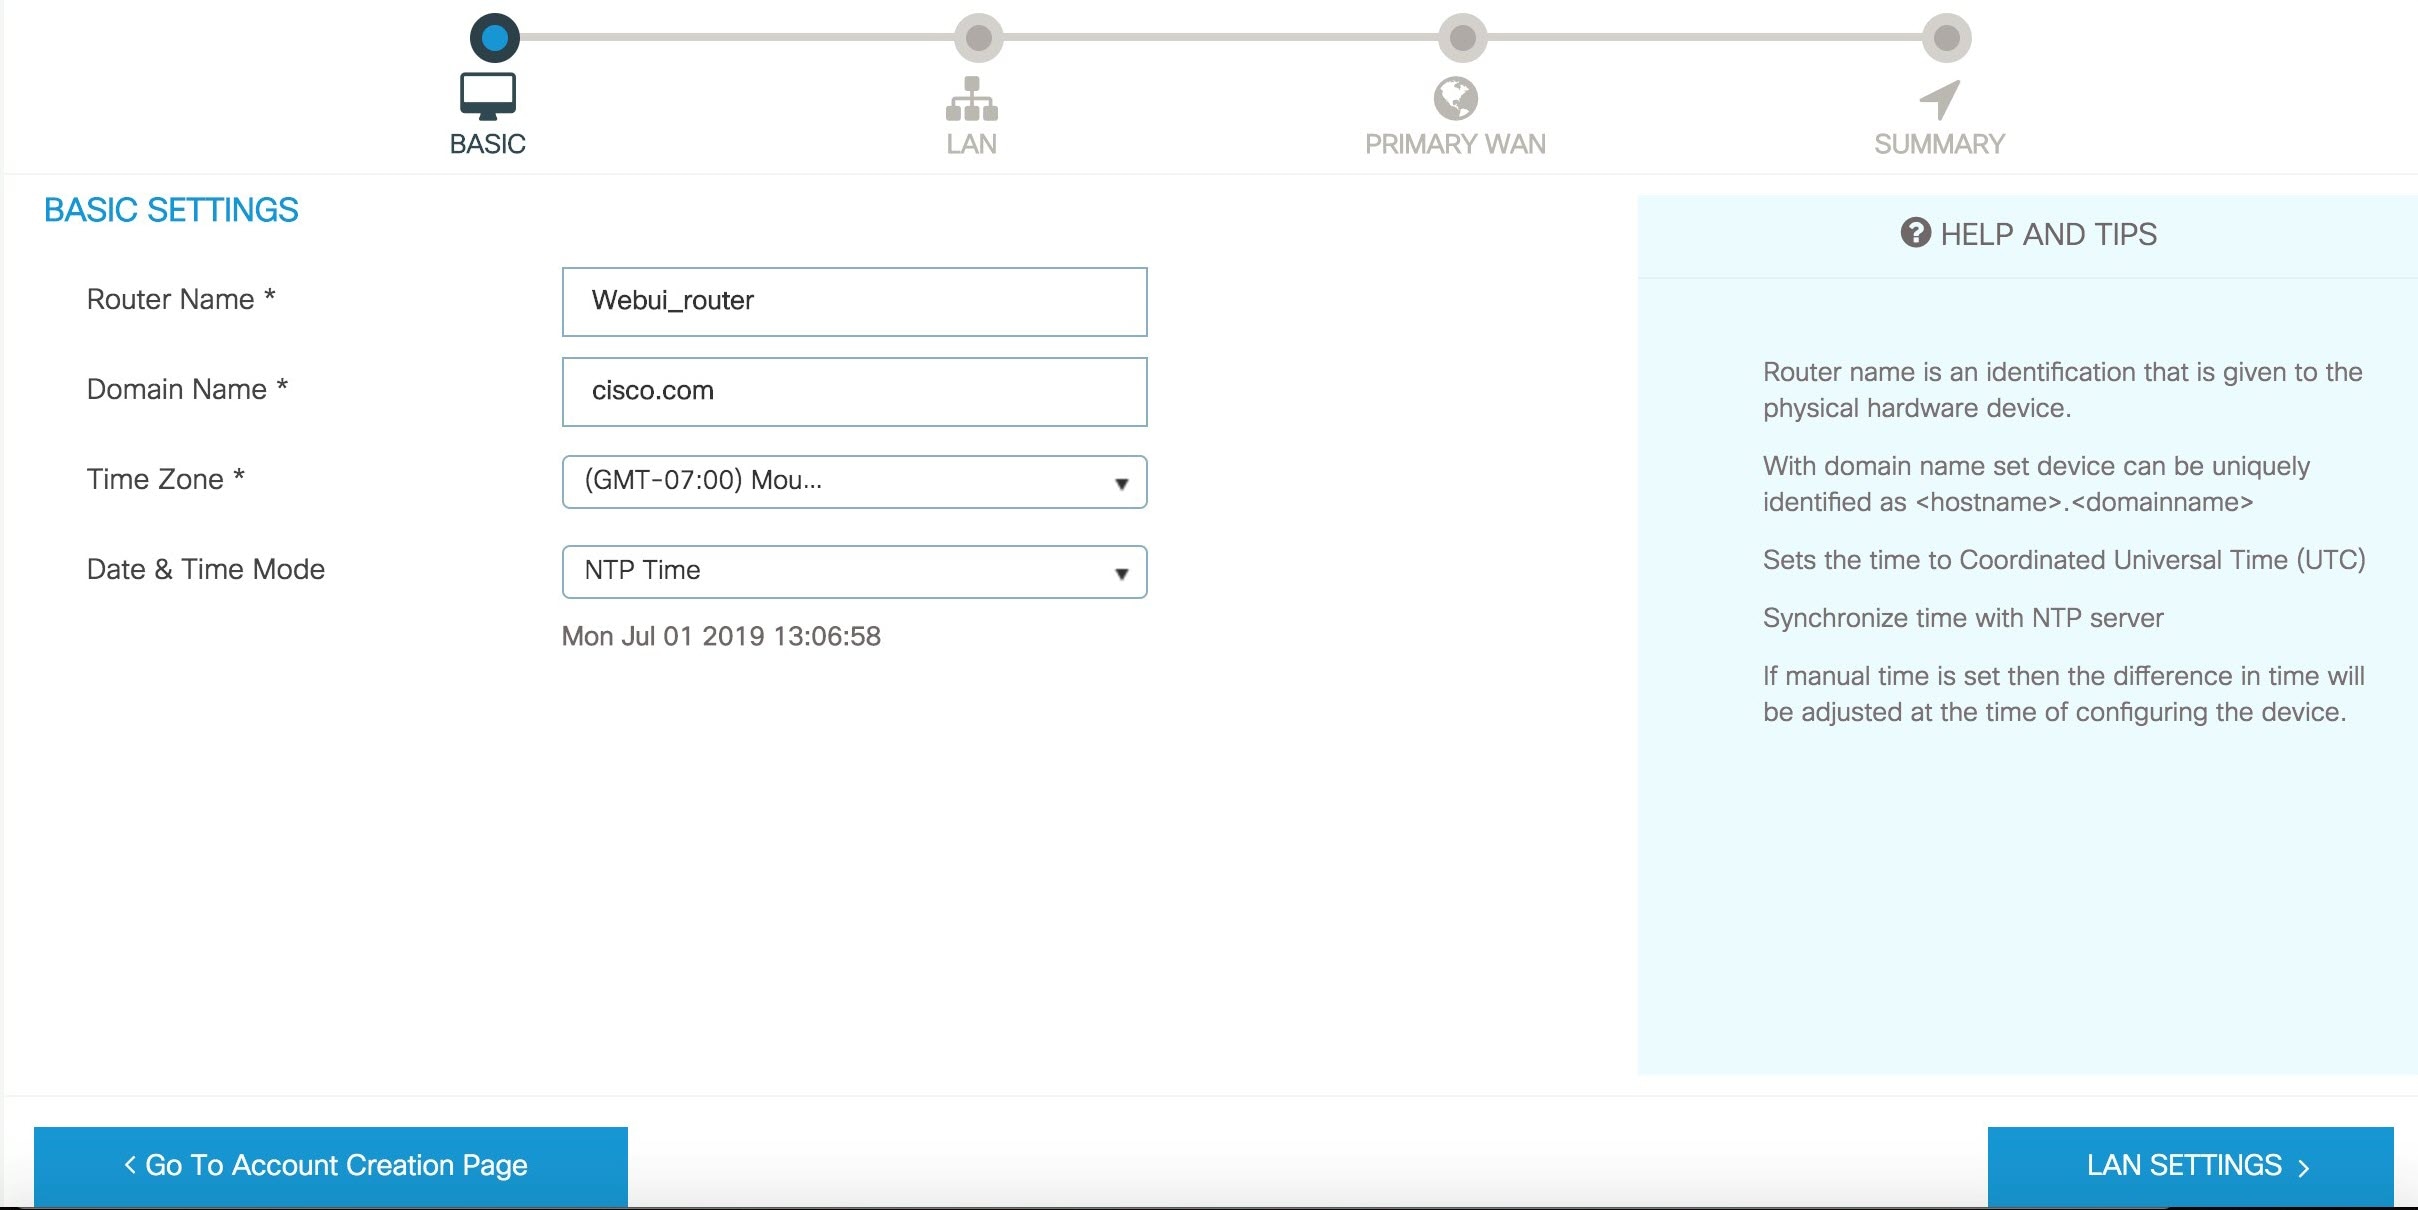
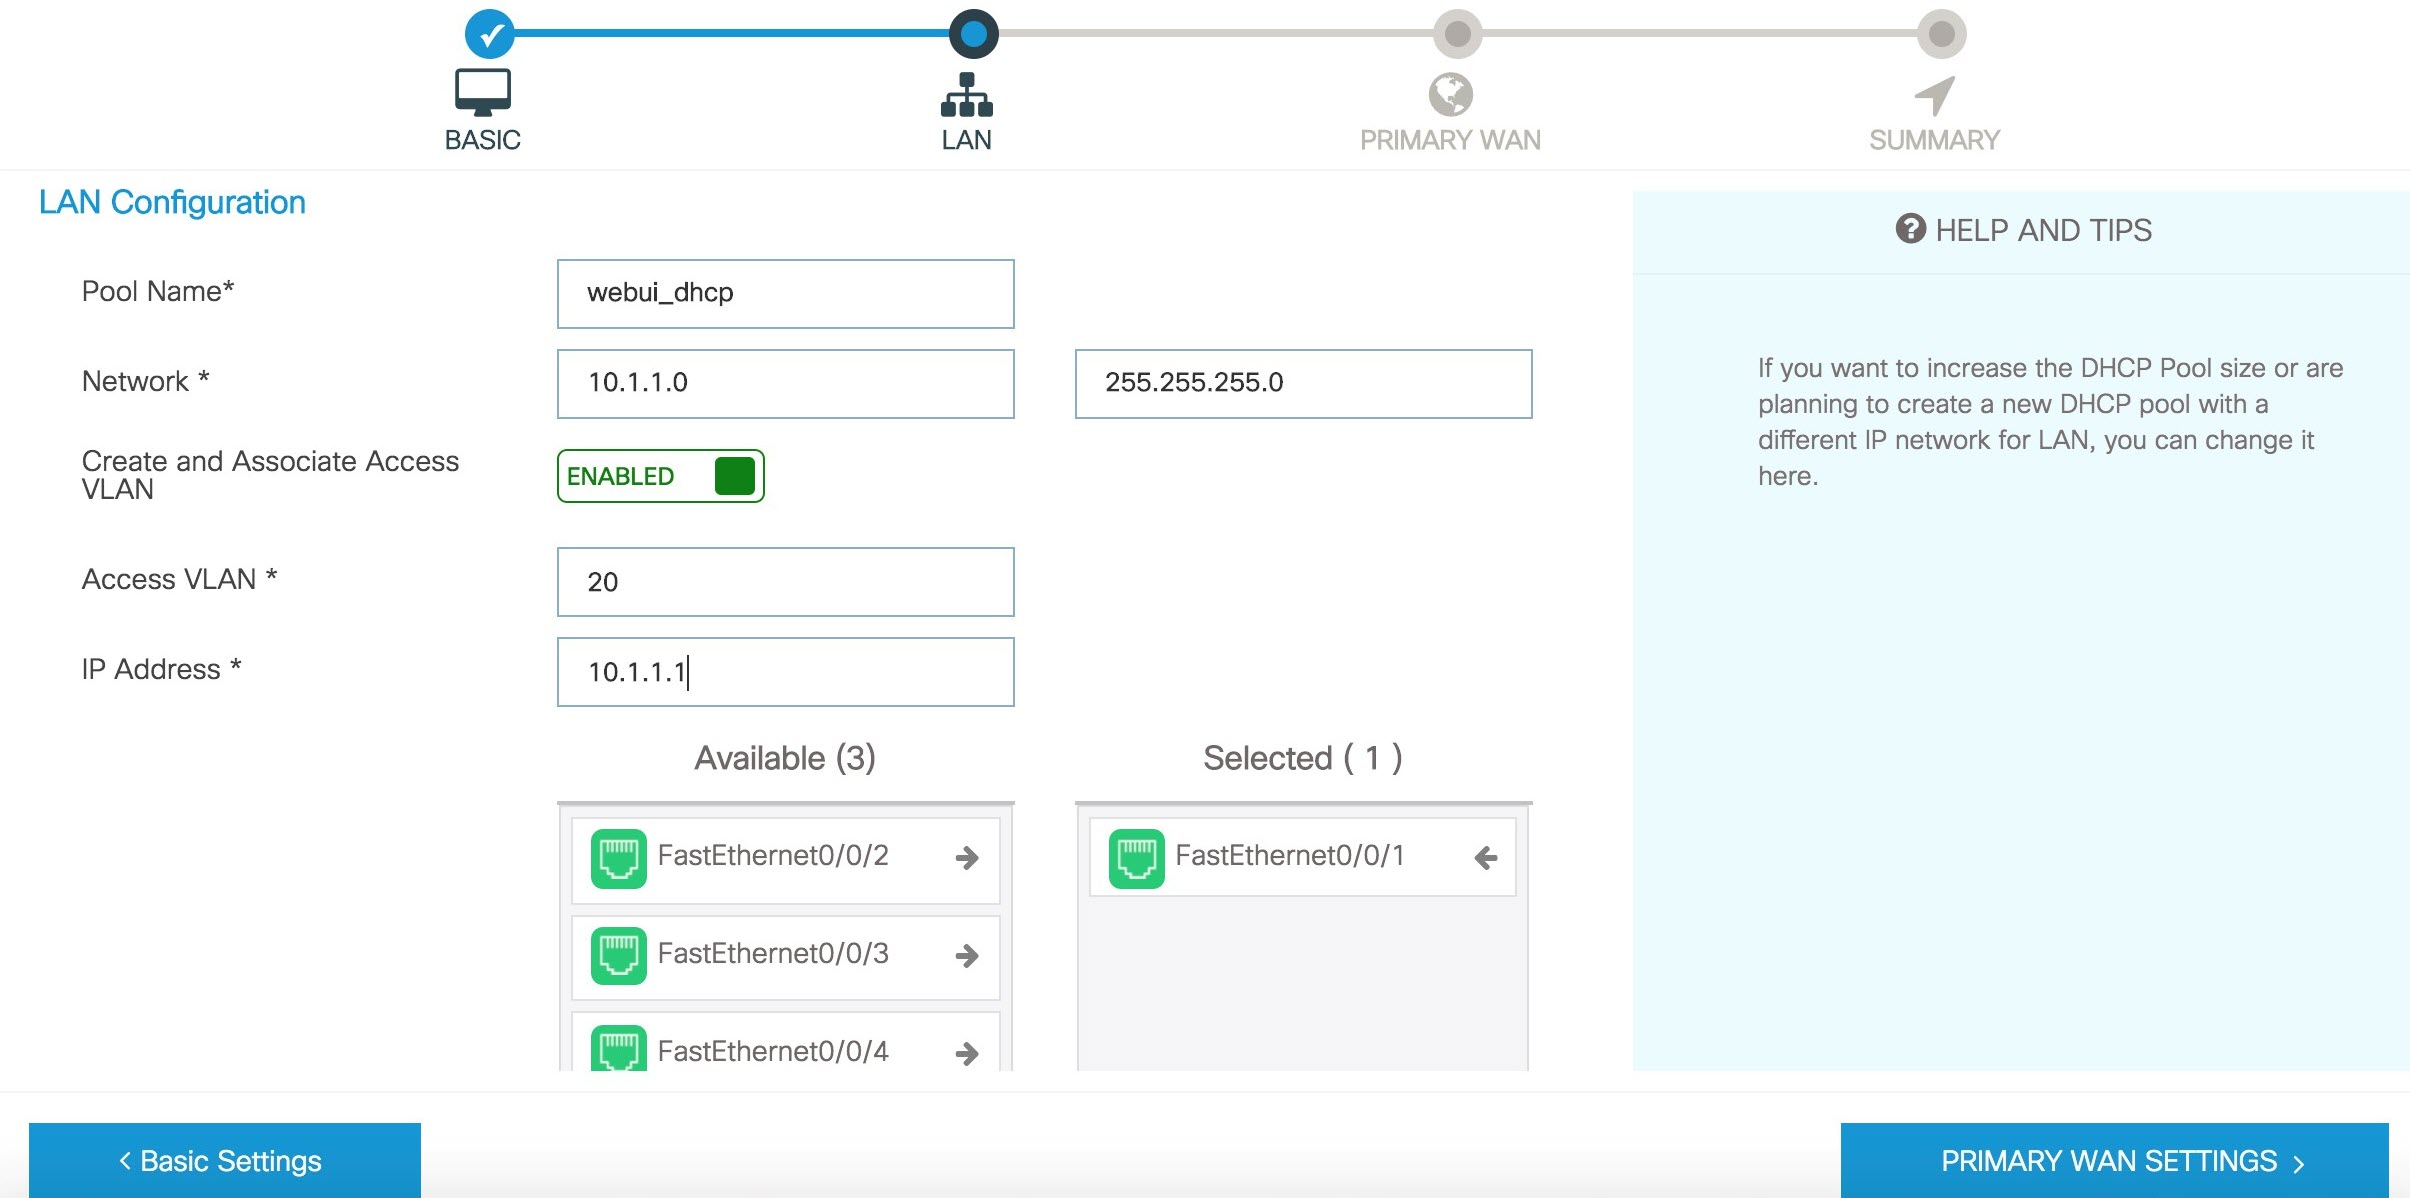
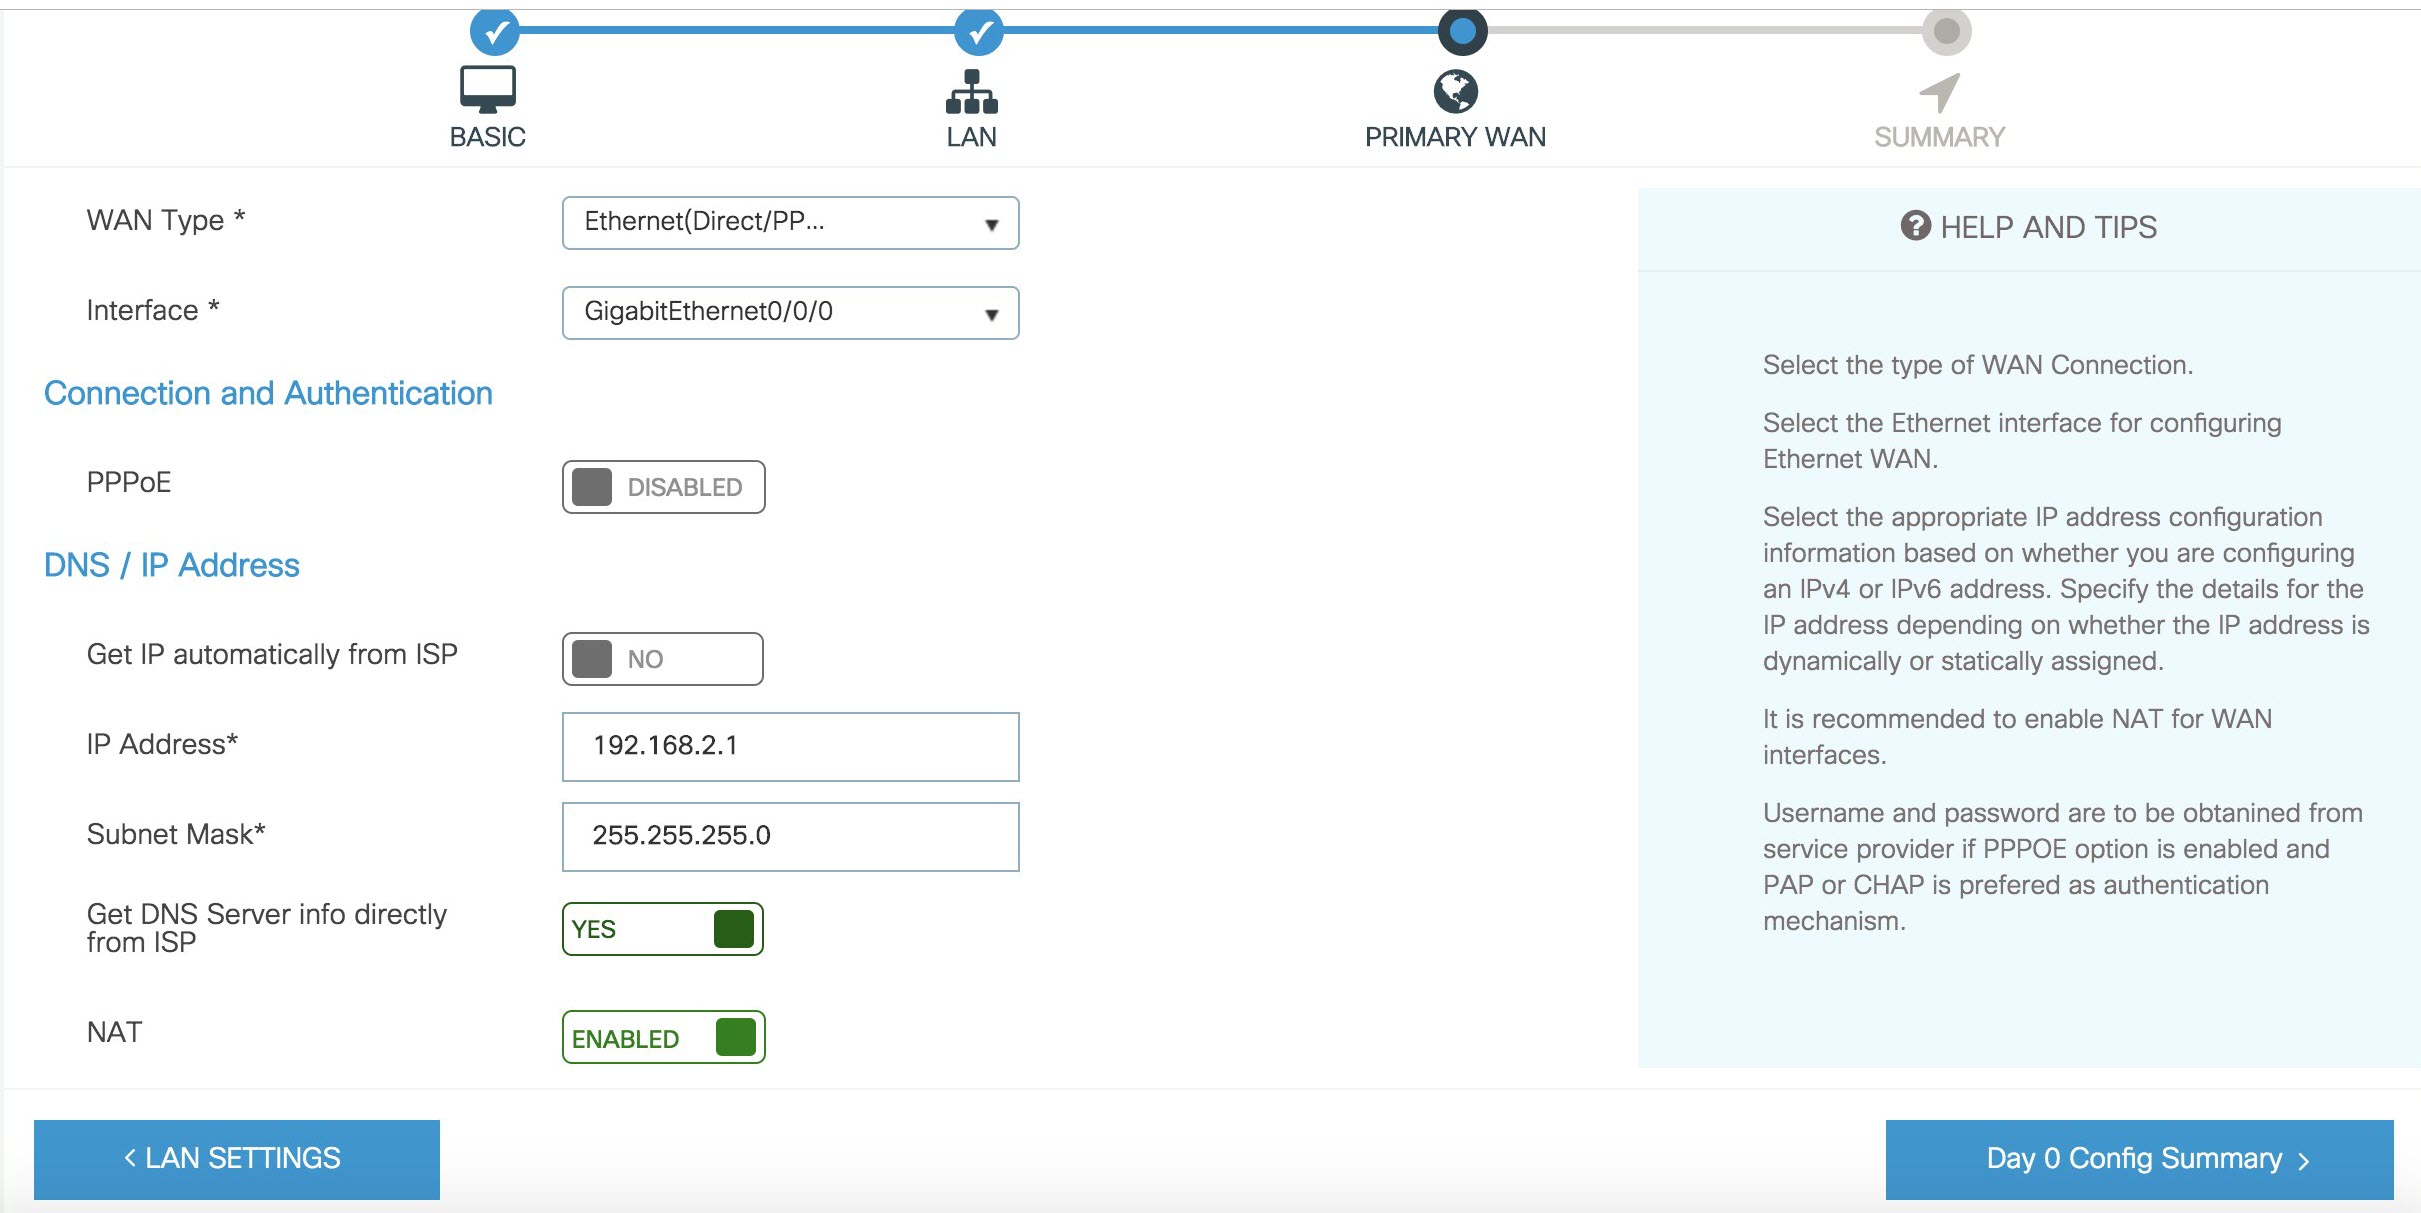
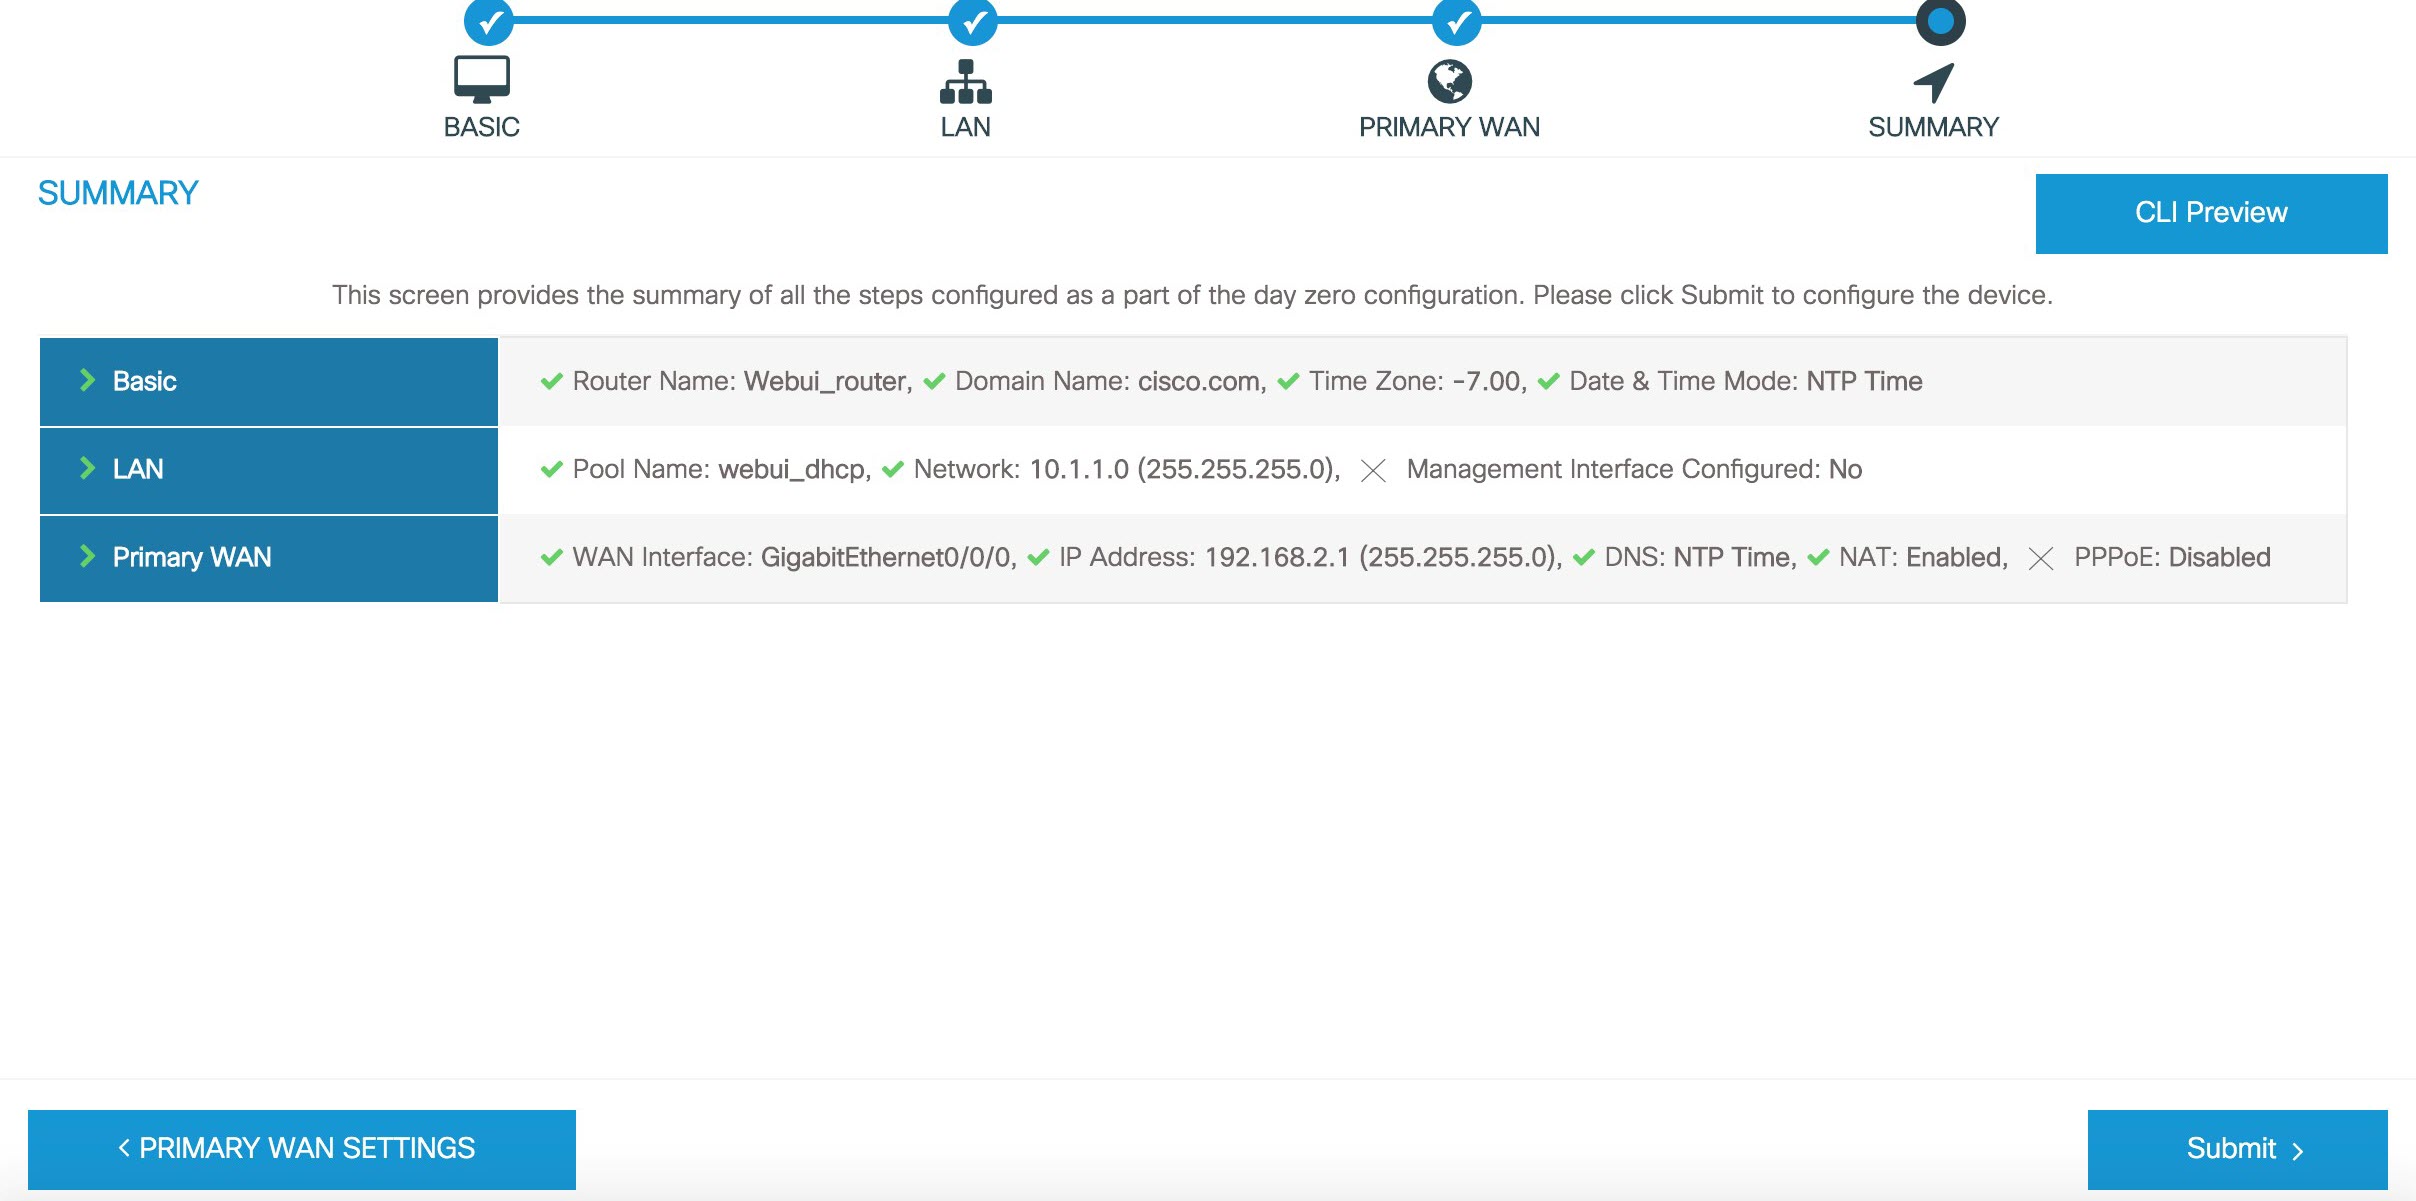
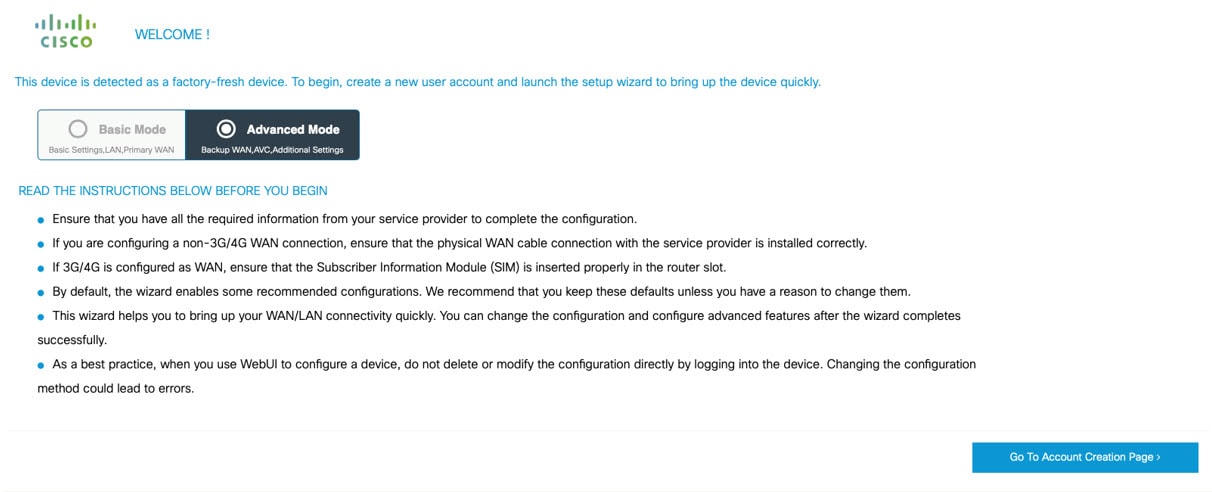
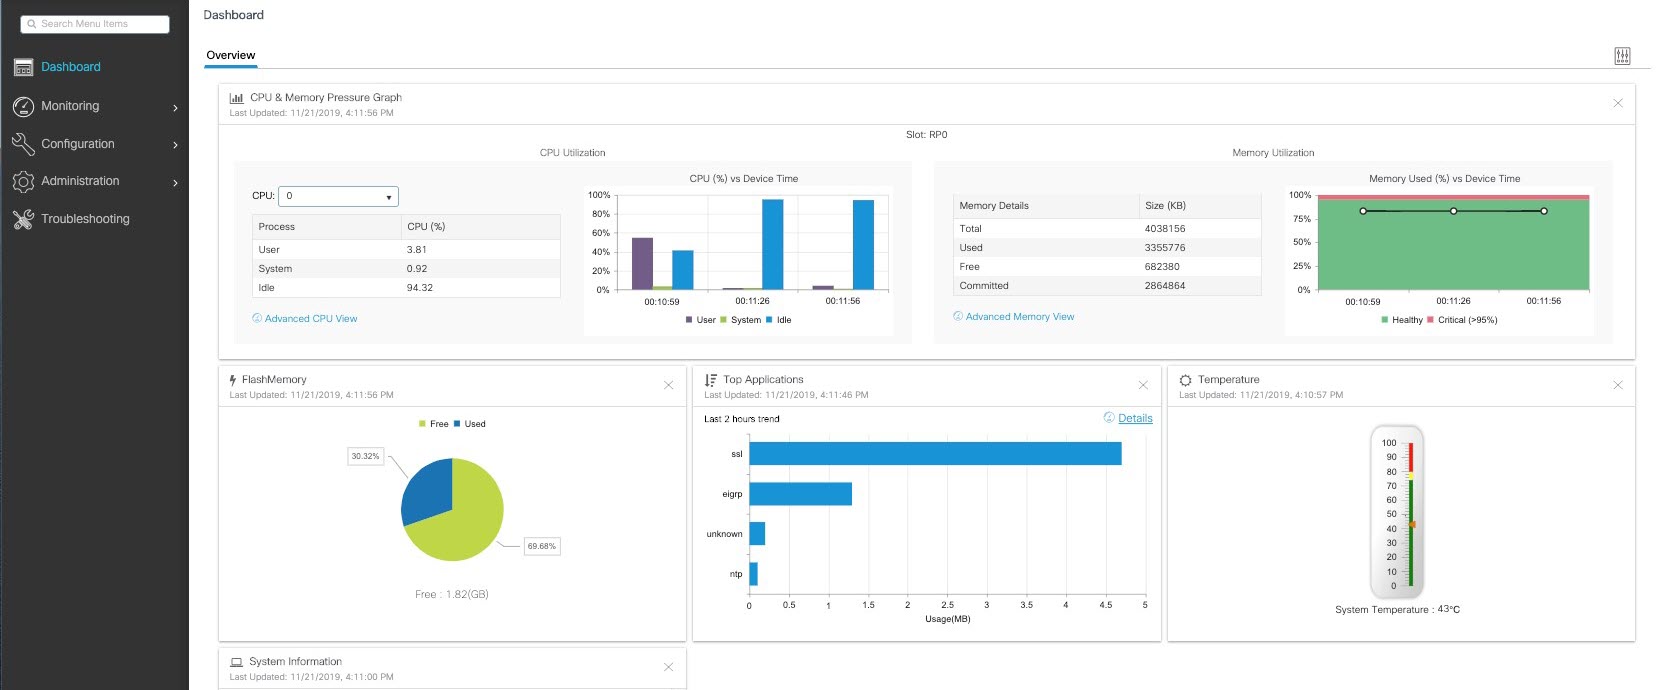
The Web User Interface (WebUI) provides network administrators with a single solution for provisioning, monitoring, and optimizing devices. After you complete the hardware installation, you need to setup the device with a configuration required to enable traffic to pass through the network. On your first day with your new device, you can perform a number of tasks to ensure that your device is online, reachable and easily configured. This is referred to as the Day 0 interface.


Note


A Day 0 configuration is defined as a device that is fresh out of the box with no startup-configuration.

After the initial Day 0 configuration, the WebUI can be used for day to day configuration.

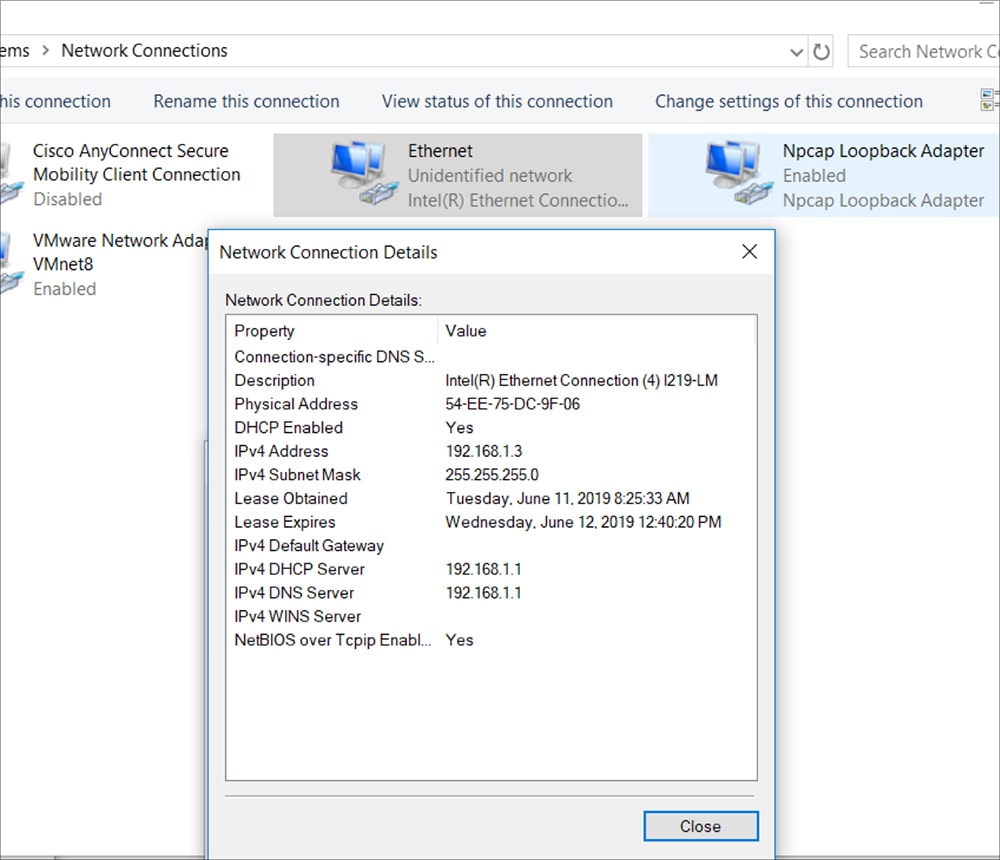
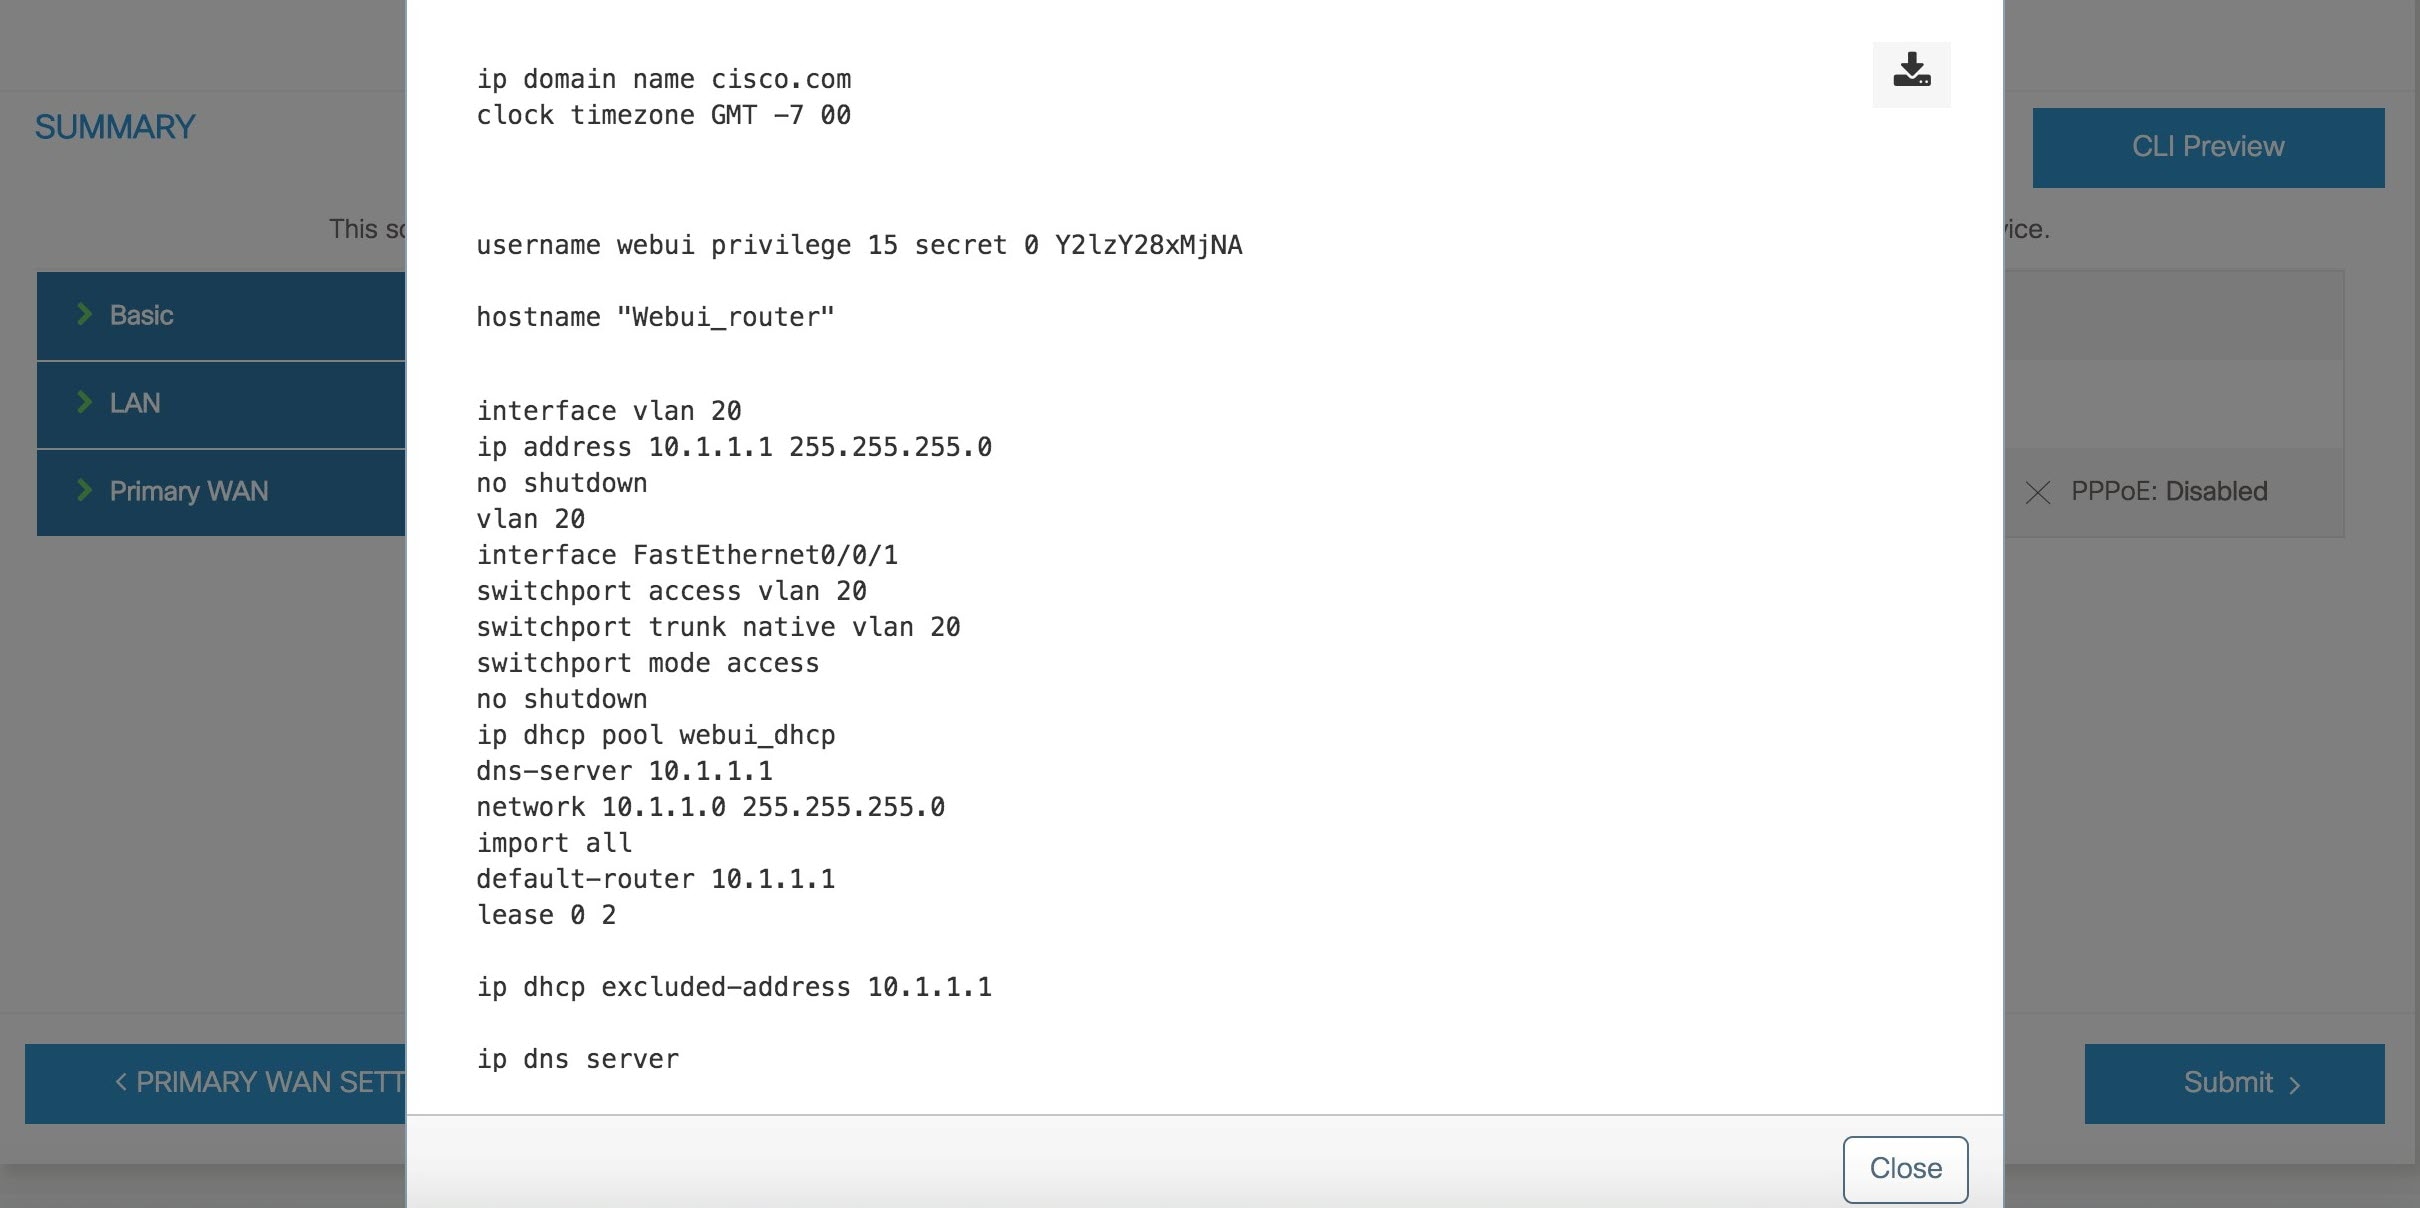
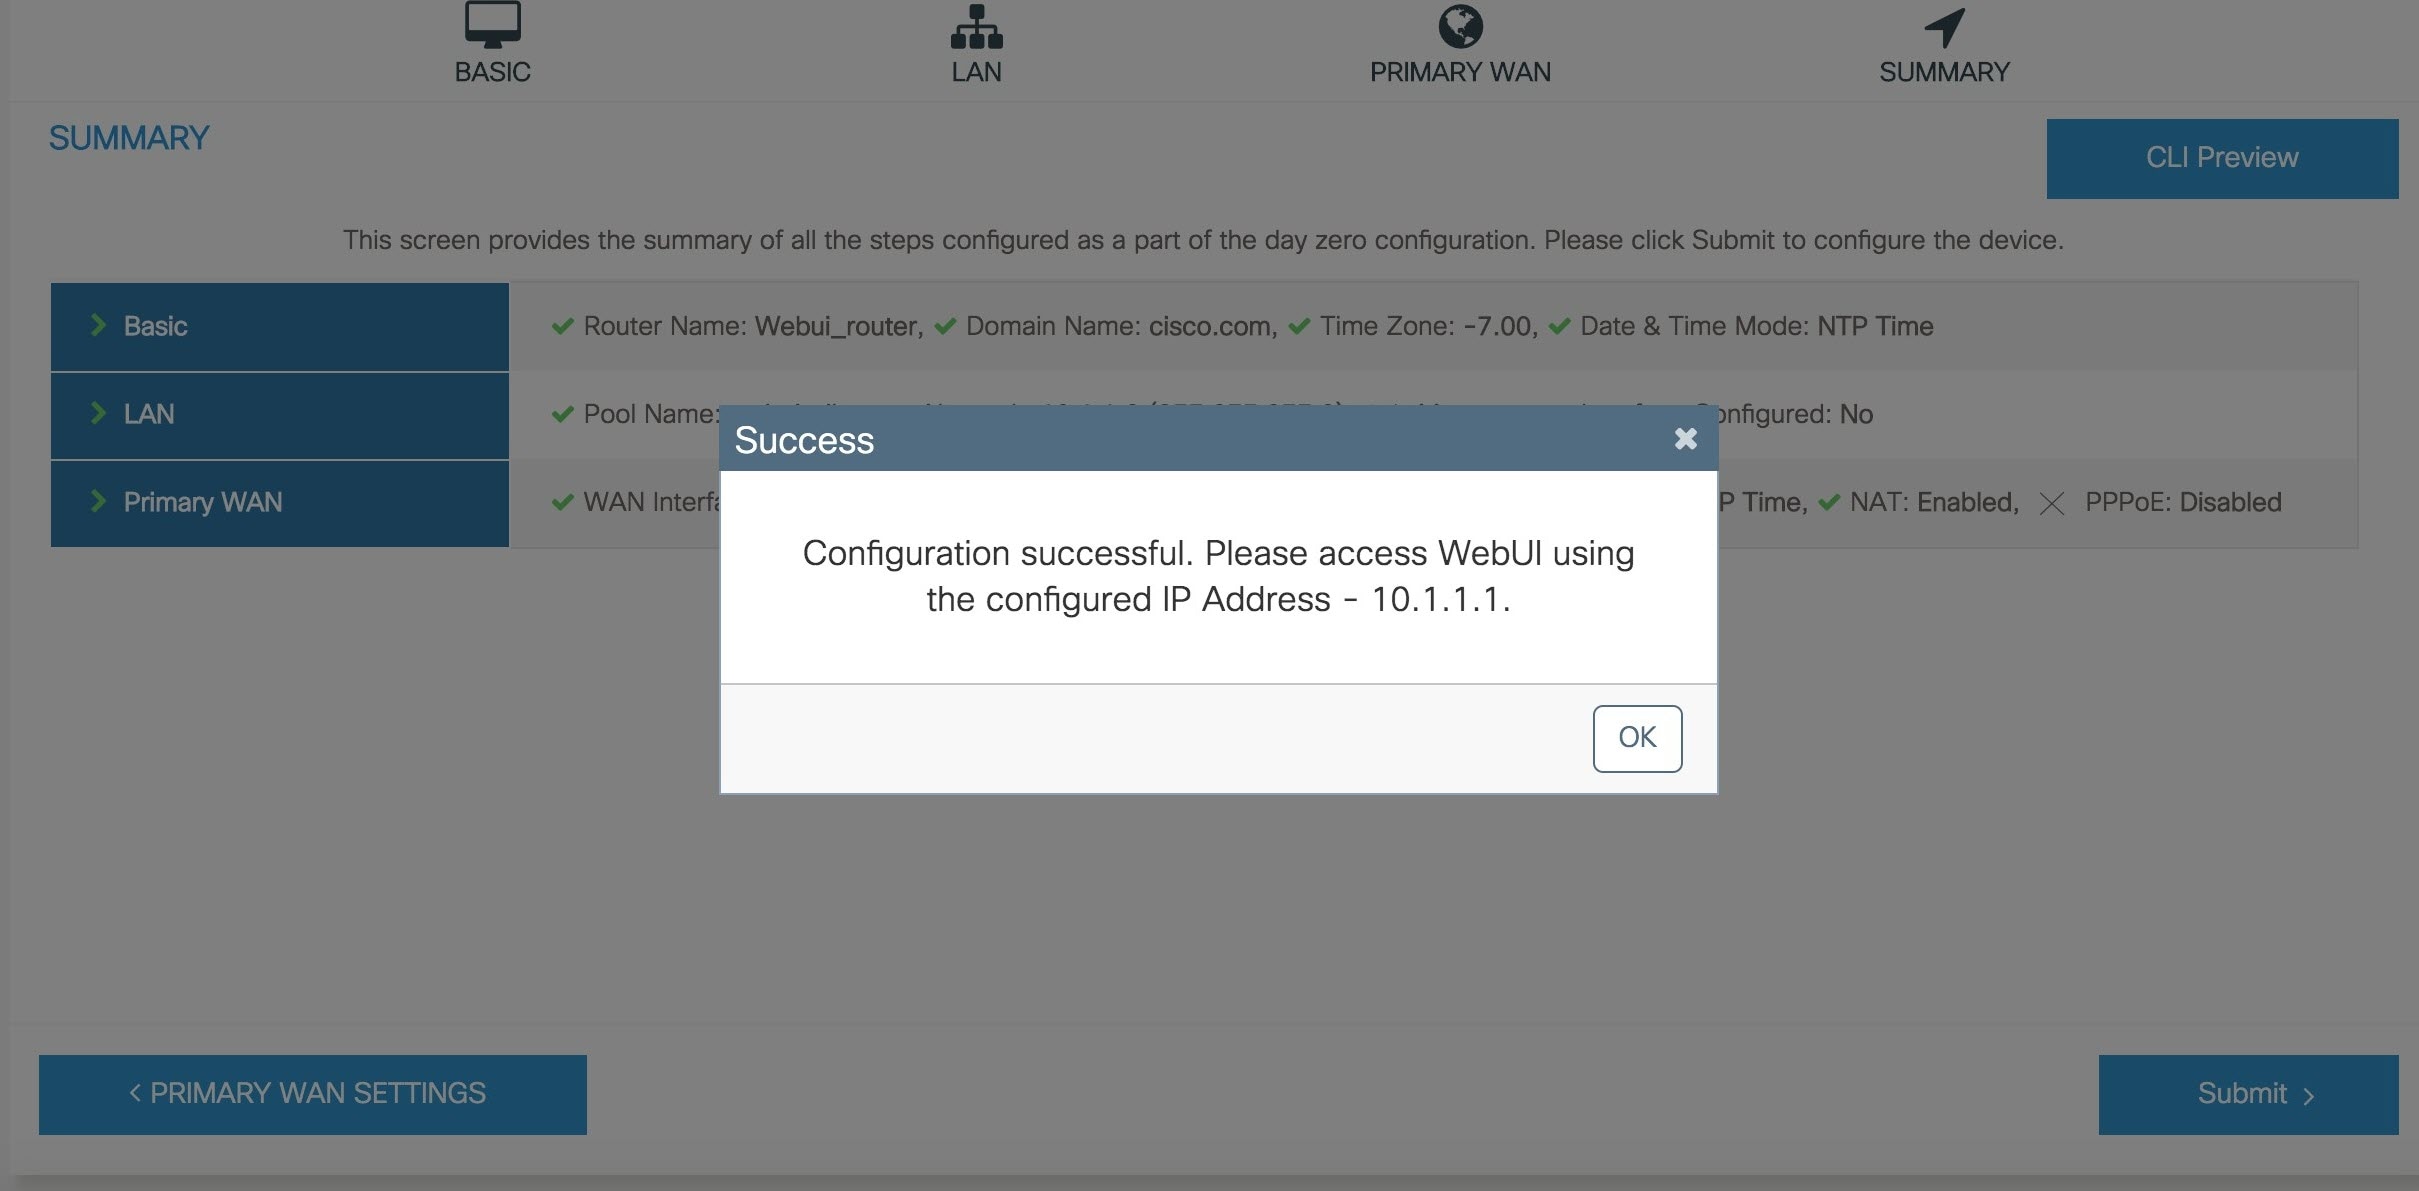
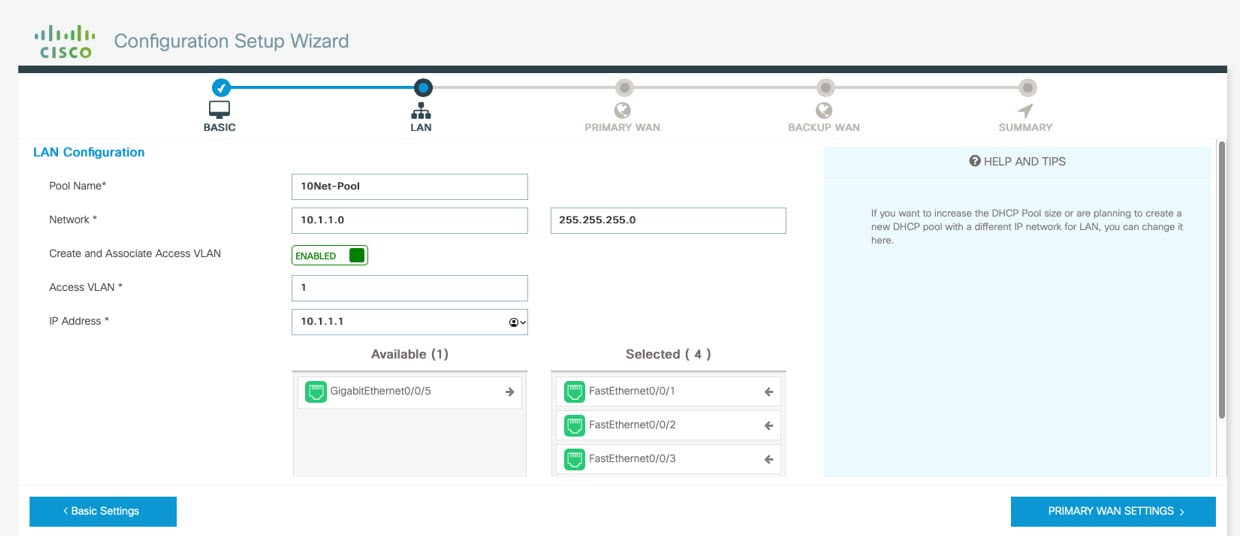
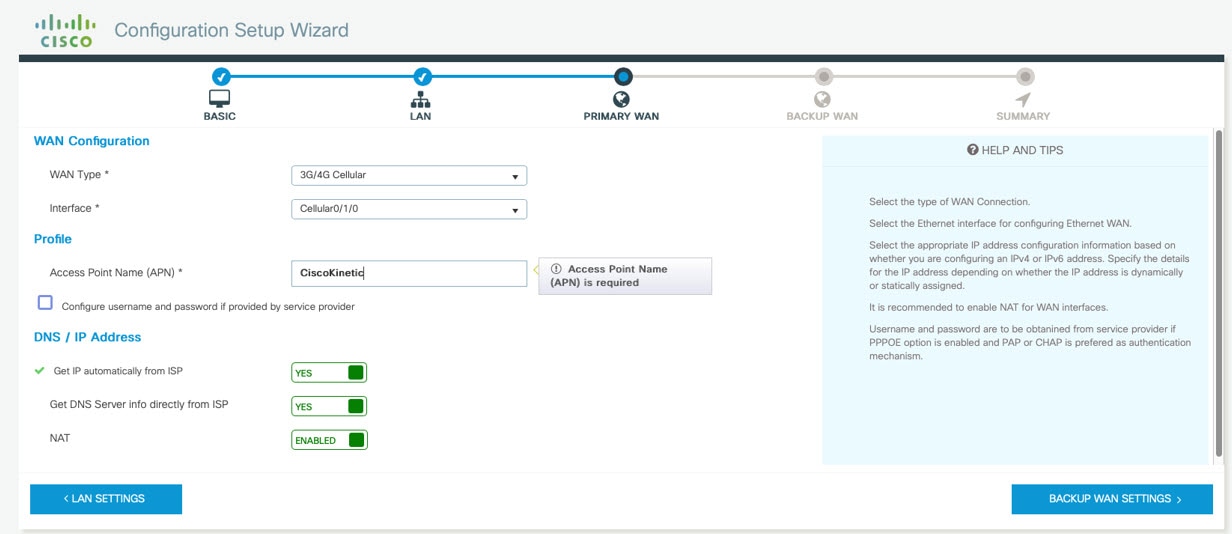
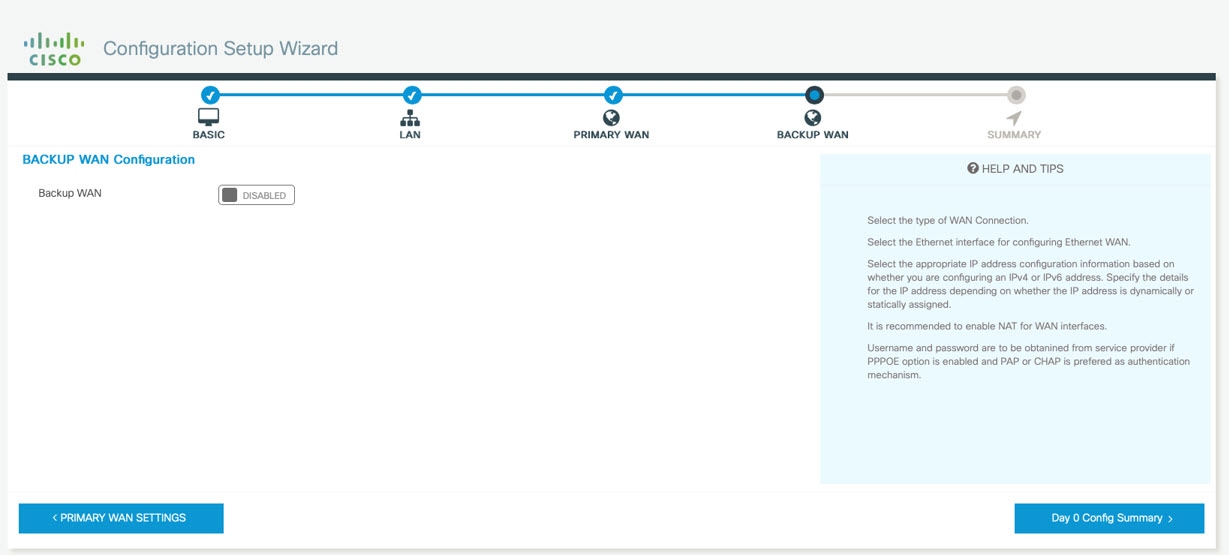
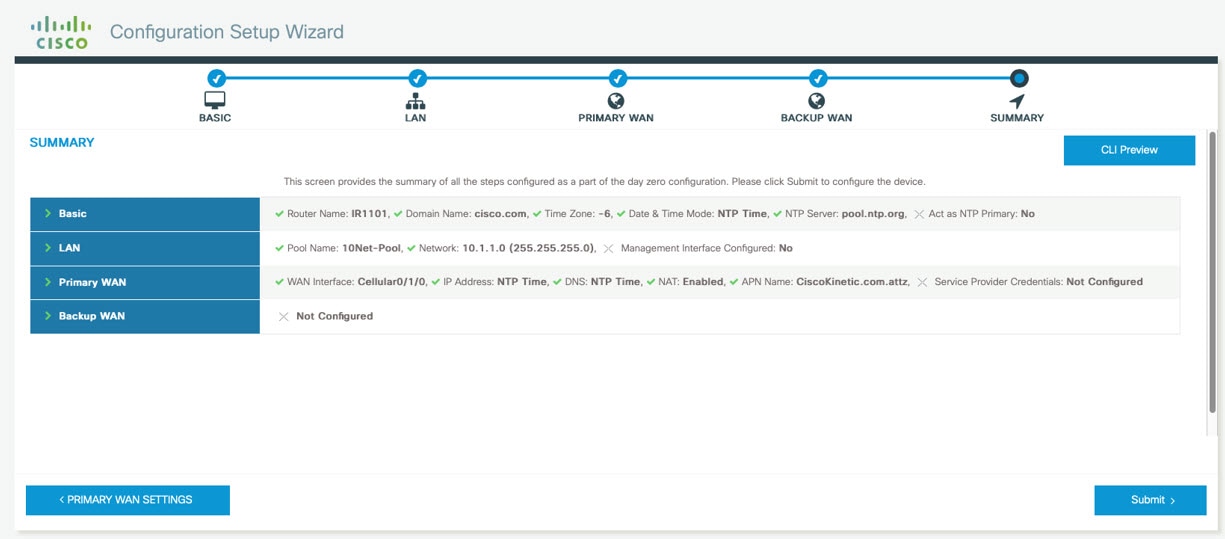
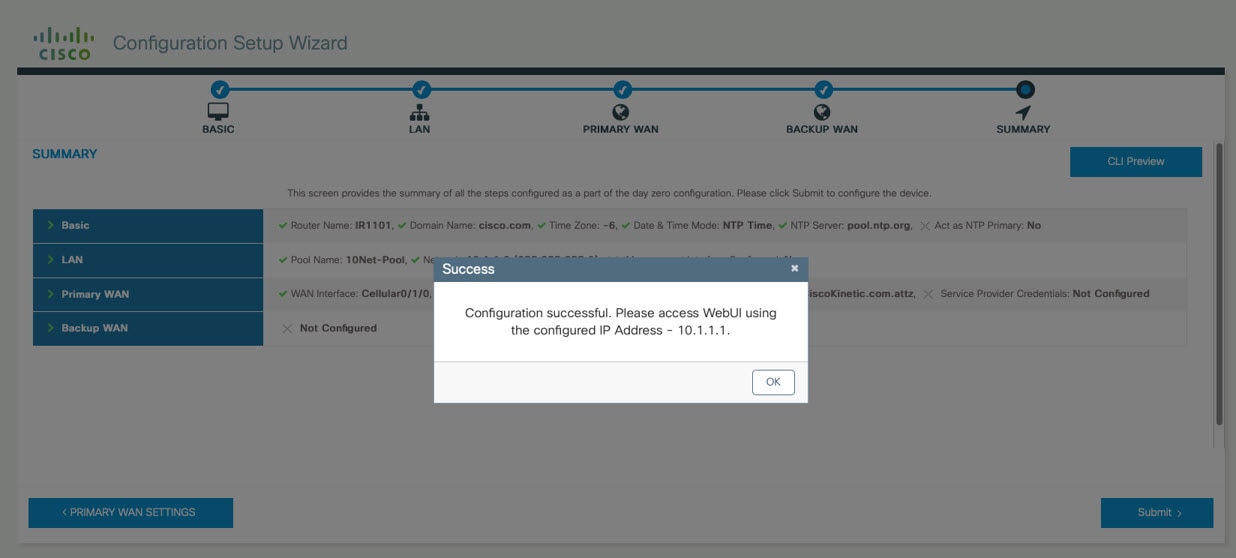
Once the router boots up in Day 0, the PC can connect to the 192.168.1.x network and can access WebUI using the IP address of 192.168.1.1 with any browser. After the configuration is applied through the WebUI, the router will display the message "Day 0 config done. Stopping autoinstall".

Day 0 Cellular Mode

Cisco IOS XE release 17.9.1 provides new functionality allowing the router to be configured on Day 0 through the cellular pluggable module. This assumes a cellular pluggable module is already installed.

This mode helps configuring the Cellular APN, assuming the customer gets a private APN (or private LTE/5G) as WAN backhaul. By doing so, the APN value is stored in the modem. Once the router reboots, it is reset to factory-default, enabling the router to perform PnP over Cellular when private APN is used.


Note


Advanced Mode is needed in order to set up Cellular WAN, including public or private APN. This should be provided by your SIM's service provider.

Note


The pluggable interface is not hot swappable. If you wish to change a SIM, power off the router.

The steps to configure through the cellular pluggable module follow:

  1. Select the Cellular interface in the WAN type.

  2. Enter the APN name.

  3. There is no need to select a backup WAN.

  4. Reboot the router.

PnP will now be able to run with private APN to connect to IOS OD, vManage, or DNA-C.

Guidelines and Limitations

The following are Guidelines and Limitations for the IR1101 and the IR1800:

IR1101

Effective with IOS-XE Release 17.3.1, the Day 0 Web User Interface (WebUI) will be supported on the IR1101. Day 0 WebUI is supported only on LAN ports. These are FastEthernet ports 0/0/1 – 0/0/4 on the IR1101. Connect a PC to one of the LAN ports of the IR1101 and boot the router on Day 0. The PC can be configured to use DHCP or with a static IP address of 192.168.1.2/255.255.255.0.

The following are limitations to the Day 0 feature:

  • The WebUI is not supported on the 1G port because this interface is dedicated to PnP. It is only supported on the 100M ports 1-4.

  • Plug and Play (PNP) cannot be used if router is being used to configure using Day 0 WebUI as PNP will be aborted once the configuration is applied through Day 0 WebUI.

  • Starting from release 17.1.2, an explicit write memory is not needed once the configuration is applied through the WebUI.

IR1800

The Day 0 Web User Interface (WebUI) is supported on the IR1800. Day 0 WebUI is supported only on LAN ports. These are GigabitEthernet ports 0/1/0 – 0/1/3 on the IR1800. Connect a PC to one of the LAN ports of the IR1800 and boot the router on Day 0. The PC can be configured to use DHCP or with a static IP address of 192.168.1.2/255.255.255.0.

The following are limitations to the Day 0 feature:

  • The WebUI is not supported on the GigabitEthernet 0/0/0 port. It is only supported on the LAN ports GigabitEthernet0/1/0 through GigabitEthernet0/1/3.

  • Plug and Play (PNP) cannot be used if router is being used to configure using Day 0 WebUI as PNP will be aborted once the configuration is applied through Day 0 WebUI.

Configuring Your Computer to Connect to the Router

The following section provides guidance for configuring your computer to properly interface with the IR1101.

You can access the application from a client web browser. Ensure that the following web client requirements are met:

  • Hardware—A Mac (OS version 10.9.5) or Windows (OS version 10) laptop or desktop compatible with one of the following tested and supported browsers:

    • Google Chrome 59 or later

    • Mozilla Firefox 54 or later

    • Apple Safari 10 or later

    • Microsoft Edge browser

  • Display resolution—We recommend that you set the screen resolution to 1280 x 800 or higher.

Connecting to the Router Using DHCP

Set up the DHCP Client Identifier on the client to get the IP address from the router, and to be able to authenticate with Day 0 login credentials.

Setting up the DHCP Client Identifier on the client for Windows

  1. Type regedit in the Windows search box on the taskbar and press enter.

  2. If prompted by User Account Control, click Yes to open the Registry Editor.

  3. Navigate to

    Computer\HKEY_LOCAL_MACHINE\SYSTEM\CurrentControlSet\Services\Tcpip\Parameters\Interfaces\ and locate the Ethernet Interface Global Unique Identifier (GUID).

  4. Add a new REG_BINARY DhcpClientIdentifier with Data 77 65 62 75 69 for webui. You need to manually type in the value.

    Figure 1. Setting up DHCP Client Identifier on Windows
  5. Restart the PC for the configuration to take effect.

Setting up the DHCP Client Identifier on the client for MAC

  1. Go to System Preferences >Network >Advanced >TCP >DHCP Client ID: and enter webui.
    Figure 2. Setting up DHCP Client Identifier on MAC
  2. Click OK to save the changes.

Continuing with the Configuration Wizard

The bootup script runs the configuration wizard, which prompts you for basic configuration input: (Would you like to enter the initial configuration dialog? [yes/no]: ). To configure Day 0 settings using the web UI, do not enter a response. Perform the following tasks instead:

  1. Make sure that no devices are connected to the router.

  2. Connect one end of an ethernet cable to one of the downlink (non-management) ports on the active supervisor and the other end of the ethernet cable to the host (PC/MAC).

  3. Set up your PC/MAC as a DHCP client, to obtain the IP address of the router automatically. You should get an IP address within the 192.168.1.x/24 range.
    Figure 3. Obtaining the IP Address

    It may take up to three mins. You must complete the Day 0 setup through the web UI before using the router terminal.

  4. Launch a web browser on the PC and enter the router IP address (https://192.168.1.1) in the address bar.

  5. Enter the Day 0 username webui and password cisco.

Configuring Basic Mode WebUI through the Browser

The following steps guide you through the process of using the browser on your PC/laptop to configure the WebUI.

Procedure


Step 1

Open your browser and enter 192.168.1.1in the address bar. The Login Screen appears. Enter the Username webui and the Password cisco. Then click Log In.

Figure 4. Login Screen

Step 2

The Welcome Screen appears. Select Advanced Mode or Basic Mode. Basic Mode allows for configuring Basic settings, LAN, and a Primary WAN. Advanced Mode allows you to configure an additional Backup WAN, AVC, as well as additional settings. For the purposes of this section, Basic Mode is used. Select Basic Mode.

Figure 5. Welcome Screen

Step 3

Click Go To Account Creation Page. The Create New Account Screen appears. Create a new Login Name and Password to access the WebUI.

Figure 6. Create New Account Screen

Step 4

Click CREATE & LAUNCH WIZARD. The Basic Settings Screen appears. Provide a Router Name (hostname), Domain Name, Time Zone and Date & Time Mode.

Figure 7. BASIC SETTINGS Screen

Step 5

Click LAN SETTINGS. The LAN Configuration Screen appears. Enter the webui_dhcp Pool Name, VLAN interface IP address, and select the interface that is connected to your laptop from the list of available interfaces.

Figure 8. LAN Configuration Screen

Step 6

Click PRIMARY WAN SETTINGS. The PRIMARY WAN SETTINGS Screen appears. Configure the WAN interface by selecting the WAN Type and Interface from the available options. Next enter your DNS IP address information and select Enable/Disable NAT.

Figure 9. Primary WAN Interface Screen

Step 7

Click Day 0 Config Summary. The Review Summary Screen appears. Verify your entries before applying the configuration.

Figure 10. Summary Screen

Step 8

(Optional) You can click on CLI Preview to see the Configuration that is being applied to the router. Close the CLI Preview and if you are ready, Click Submit.

Figure 11. CLI Preview Screen

Step 9

After clicking on Submit, a dialog box will appear which informs you that the configuration has been applied successfully. The new WebUI ip address is also presented.

Figure 12. Submit Dialog Box

Step 10

If you have web connectivity, the device will try to connect. It is recommended that you close the browser session and move to the newly configured WebUI ip address.

Figure 13. Test VLAN Connection Screen

Configuring Advanced Mode WebUI through the Browser

The following steps guide you through the process of using the browser on your PC to configure the WebUI.

Make sure your laptop is configured to obtain an IP address through DHCP, or assign an IP address n.n.n.n matching the default subnet.


Note


Advanced Mode is needed in order to set up Cellular WAN, including public or private APN.

Procedure


Step 1

Open your browser and enter 192.168.1.1 in the address bar. The Login Screen appears. Enter the Username webui and the Password cisco. Then click Log In.

Figure 14. Login Screen

Step 2

The WELCOME screen appears. Select Advanced Mode or Basic Mode. Basic Mode allows for configuring Basic settings, LAN, and a Primary WAN. Advanced Mode allows you to configure an additional Backup WAN, AVC, as well as additional settings. For the purposes of this section, Advanced Mode is used.

Figure 15. WELCOME Screen

Step 3

Select Advanced Mode, then click Go To Account Creation Page. The Create New Account screen appears. Create a new Login Name and Password to access the WebUI.

Figure 16. Create New Account Screen

Step 4

Click CREATE & LAUNCH WIZARD The LAN Configuration screen appears. Provide a Pool Name, Network IP Address, Subnet, Access VLAN, and Device IP Address. A list of available interfaces is shown to select from.

Figure 17. LAN Configuration Screen

Step 5

Click PRIMARY WAN SETTINGS. The WAN Configuration screen appears. Select the WAN Type and Interface from the pull-downs. Provide an APN (Access Point Name) from your LTE Service Provider, and then select the DNS and IP Address settings for your network.

Figure 18. WAN Configuration Screen

Step 6

Click BACKUP WAN SETTINGS. The BACKUP WAN Configuration screen appears. Select the button to Enable or Disable a backup WAN.

Figure 19. BACKUP WAN Configuration

Step 7

Click Day 0 Config Summary. The SUMMARY screen appears. Verify your entries before applying the configuration.

Figure 20. Summary Screen

Step 8

(Optional) You can click on CLI Preview to see the Configuration that is being applied to the router. Close the CLI Preview, and if you are ready, click Submit.

Note

 
A CLI Preview example is found at the end of this section.

Step 9

After clicking on Submit, a dialog box will appear which informs you that the configuration has been applied successfully. The new WebUI ip address is also presented.

Figure 21. Submit Dialog Box

Example

The following is an example of a CLI Preview:
 ip domain name cisco.com
clock timezone GMT -6 00
ntp server pool.ntp.org

username admin privilege 15 secret 0 Mjc1N0dsb2NrIQ==

hostname "IR1101"
interface vlan 1
ip address 10.1.1.1 255.255.255.0
no shutdown
vlan 1
interface FastEthernet0/0/1
switchport access vlan 1
switchport trunk native vlan 1
switchport mode access 
no shutdown 
interface FastEthernet0/0/2
switchport access vlan 1
switchport trunk native vlan 1
switchport mode access 
no shutdown 
interface FastEthernet0/0/3
switchport access vlan 1
switchport trunk native vlan 1
switchport mode access 
no shutdown 
interface FastEthernet0/0/4
switchport access vlan 1
switchport trunk native vlan 1
switchport mode access 
no shutdown 
ip dhcp pool 10Net-Pool
dns-server 10.1.1.1
network 10.1.1.0 255.255.255.0
import all
default-router 10.1.1.1
lease 0 2

ip dhcp excluded-address 10.1.1.1

ip dns server
ip dns view default
default dns forwarder
default dns forwarding
default domain lookup
default domain name-server
interface Cellular0/1/0
description primary_wan
ip address negotiated
dialer in-band
dialer-group 1
pulse-time 1
shutdown
no shutdown
ip nat outside
exit
dialer-list 1 protocol ip permit

controller Cellular 0/1/0
lte sim data-profile 2 attach-profile 2 slot 0

ip route 0.0.0.0 0.0.0.0 Cellular0/1/0

ip nat inside source list 197 interface Cellular0/1/0 overload
access-list 197 permit ip any any

WebUI Dashboard

After completing the Day 0 setup, the WebUI can now be used for day to day administration. The WebUI opens up to an easy to use dashboard.


Note


WebUI feature support may vary based on the license and platform type of your device.

The following figure shows the dashboard:

Figure 22. Dashboard

The following table provides an overview of the dashboard.

Dashboard

View dashlets that give you a snapshot of CPU and memory utilization and system information.

Monitoring

Monitor your network on a daily basis and perform other ad hoc operations related to network device inventory and configuration management.

Configuration

Configure your device.

Administration

Specify system configuration settings and user administration settings.

Troubleshooting

Troubleshoot connectivity problems and packet loss using Ping and Traceroute, and monitor device health and performance using web server logs and syslogs.