IOx Application Hosting

This chapter contains the following sections:

Information About Application Hosting

A hosted application is a software as a service solution, and it can be run remotely using commands. Application hosting gives administrators a platform for leveraging their own tools and utilities.

This module describes the Application Hosting feature and how to enable it.

Need for Application Hosting

The move to virtual environments has given rise to the need to build applications that are reusable, portable, and scalable. Application hosting gives administrators a platform for leveraging their own tools and utilities. An application, hosted on a network device, can serve a variety of purposes. This ranges from automation, configuration management monitoring, and integration with existing tool chains.

Cisco devices support third-party off-the-shelf applications built using Linux tool chains. Users can run custom applications cross-compiled with the software development kit that Cisco provides.

IOx Overview

IOx is a Cisco-developed end-to-end application framework that provides application hosting capabilities for different application types on Cisco network platforms.

IOx architecture for the IR1101 is different compared to other Cisco platforms that use the hypervisor approach. In other platforms, IOx runs as a virtual machine. IOx is running as a process on the IR1101.

Cisco Application Hosting Overview

The IR1101 enables the user to deploy the application using the app-hosting CLIs. These app-hosting CLIs are not available on the other older platforms. There are additional ways to deploy the applications using the Local Manager and Fog Director.

Application hosting provides the following services:

  • Launches designated applications in containers.

  • Checks available resources (memory, CPU, and storage), and allocates and manages them.

  • Provides support for console logging.

  • Provides access to services via REST APIs.

  • Provides a CLI endpoint.

  • Provides an application hosting infrastructure referred to as Cisco Application Framework (CAF).

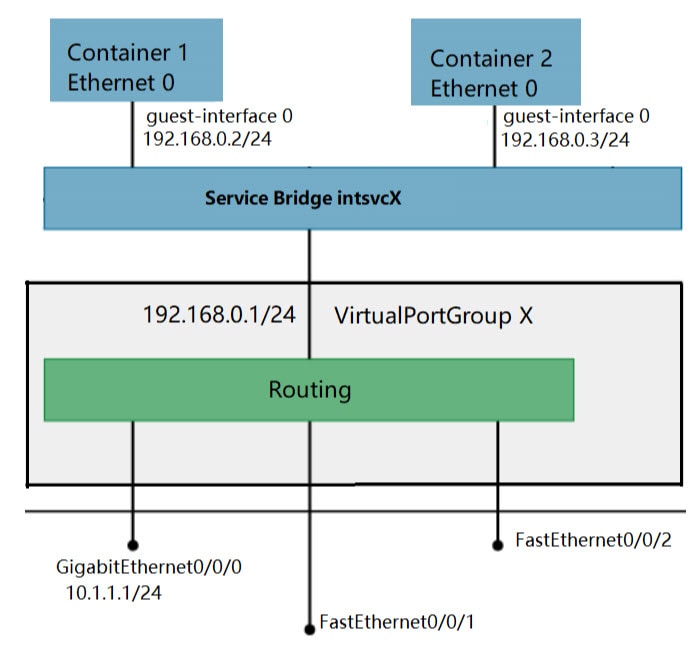
  • Helps in the setup of platform-specific networking (packet-path) via VirtualPortGroup and management interfaces

The container is referred to as the virtualization environment provided to run the guest application on the host operating system. The Cisco IOS-XE virtualization services provide manageability and networking models for running guest applications. The virtualization infrastructure allows the administrator to define a logical interface that specifies the connectivity between the host and the guest. IOx maps the logical interface into the Virtual Network Interface Card (vNIC) that the guest application uses.

Applications to be deployed in the containers are packaged as TAR files. The configuration that is specific to these applications is also packaged as part of the TAR file.

The management interface on the device connects the application hosting network to the IOS management interface. The Layer 3 interface of the application receives the Layer 2 bridged traffic from the IOS management interface. The management interface connects through the management bridge to the container/application interface. The IP address of the application must be on the same subnet as the management interface IP address.

IOXMAN

IOXMAN is a process that establishes a tracing infrastructure to provide logging or tracing services for guest applications, except Libvirt, that emulates serial devices. IOXMAN is based on the lifecycle of the guest application to enable and disable the tracing service, to send logging data to IOS syslog, to save tracing data to IOx tracelog, and to maintain IOx tracelog for each guest application.

Application Hosting on the IR1101 Router

This section describes the application-hosting characteristics specific to the IR1101 Industrial Router.


Note


The IR1101 CPU is not based on x86 architecture like other Routers. Therefore, this requires the application to comply with the ARM 64-bits architecture.

Application hosting can be achieved using the app-hosting cli's as well using the Local Manager and Fog Director.

IOx URL Access Methods

The IOx URL can be accessed in two different ways.

  1. Using the direct URL to the IOx login.

  2. Navigate to the IOx login through the Web User Interface (WebUI)

The syntax for the first method is https://IR1101-IP-ADDRESS/iox/login

The syntax for the second method is https://IR1101-IP-ADDRESS and then navigate to IOx as shown in the following:

Figure 1. Local Manager

1. From the WebUI, click on Configuration > Services > IOx

2. Login using the username and password configured.

3. Follow the steps for the application life-cycle in the Cisco IOx Local Manager Reference Guide.

IOX URL User Restriction

The second method will make the configuration of the entire router available to IOx users. In some organizations, the IOx users are different from those that manage and administer the router. In this case, there is a need for restricting the access of the IOx users to ONLY the IOx Local Manager WebUI and not the entire WebUI of the router.

Currently, IOx users are configured as privilege 15 users. To restrict the IOx users to ONLY the Local Manager, the following commands can be used:

Router(conf)# no ip http server
Router(conf)# ip http secure-server
Router(conf)# ip http session-module-list list2 OPENRESTY_PKI,NG_WEBUI 
Router(conf)# ip http secure-active-session-modules list2 

The command no ip http server will turn off the web server without https. The next command ip http secure-server is to turn on the https mode.

If you include only OPENRESTY_PKI AND NG_WEBUI, then you will be enabling ONLY the IOX local manager modules, and hence ALL users can ONLY access the IOX local manager if they have privilege 15, https://IR1101-IP-ADDRESS/iox/login.

And for ALL user, the WebUI access , https://IR1101-IP-ADDRESS will be disabled.


Note


This method will disable the main web page https://IR1101-IP-ADDRESS for all users and will enable only https://IR1101-IP-ADDRESS/iox/login for all users. Use this method if you do not use the IR1101 main router WebUI for general administration and configuration.

VirtualPortGroup

The VirtualPortGroup is a software construct on Cisco IOS that maps to a Linux bridge IP address. As such, the VirtualPortGroup represents the switch virtual interface (SVI) of the Linux container. Each bridge can contain multiple interfaces; each mapping to a different container. Each container can also have multiple interfaces.

VirtualPortGroup interfaces are configured by using the interface virtualportgroup command. Once these interfaces are created, IP address and other resources are allocated.

The VirtualPortGroup interface connects the application hosting network to the IOS routing domain. The Layer 3 interface of the application receives routed traffic from IOS. The VirtualPortGroup interface connects through the SVC Bridge to the container/application interface.

The following graphic helps to understand the relationship between the VirtualPortGroup and other interfaces, as it is different than the IR8x9 routers.

Figure 2. Virtual Port Group Mapping

vNIC

For the container life cycle management, the Layer 3 routing model that supports one container per internal logical interface is used. This means that a virtual Ethernet pair is created for each application; and one interface of this pair, called vNIC is part of the application container. The other interface, called vpgX is part of the host system.

NIC is the standard Ethernet interface inside the container that connects to the platform dataplane for the sending and receiving of packets. IOx is responsible for the gateway (VirtualPortGroup interface), IP address, and unique MAC address assignment for each vNIC in the container.

The vNIC inside the container/application are considered as standard Ethernet interfaces.

How to Configure Application Hosting

Enabling IOx

Perform this task to enable access to the IOx Local Manager. The IOx Local Manager provides a web-based user interface that you can use to manage, administer, monitor, and troubleshoot apps on the host system, and to perform a variety of related activities.


Note


In the steps that follow, IP HTTP commands do not enable IOX, but allow the user to access the WebUI to connect the IOX Local Manager.

DETAILED STEPS

Steps

Command

Purpose

1.

enable

Example:


Device>enable

Enables privileged EXEC mode.

Enter your password if prompted.

2.

configure terminal

Example:


Device#configure terminal

Enters global configuration mode.

3.

iox

Example:


Device(config)#iox

Enables IOx

4.

ip http server

Example:


Device(config)#ip http server

Enables the HTTP server on your IP or IPv6 system.

5.

ip http secure-server

Example:


Device(config)#ip http secure-server

Enables a secure HTTP (HTTPS) server.

6.

username name privilege level password {0 | 7 | user-password }encrypted-password

Example:


Device(config)#username cisco privilege 15 password 0 cisco

Establishes a username-based authentication system and privilege level for the user.

The username privilege level must be configured as 15.

7.

end

Example:


Device(config-if)#end

Exits interface configuration mode and returns to privileged EXEC mode.

Configuring a VirtualPortGroup to a Layer 3 Data Port

Multiple Layer 3 data ports can be routed to one or more VirtualPortGroups or containers. VirutalPortGroups and Layer 3 data ports must be on different subnets.

Enable the ip routing command to allow external routing on the Layer 3 data-port.

DETAILED STEPS

Step

Command

Purpose

1.

enable

Example:


Device>enable

Enables privileged EXEC mode.

Enter your password if prompted.

2.

configure terminal

Example:


Device#configure terminal

Enters global configuration mode.

3.

ip routing

Example:


Device(config)#ip routing

Enables IP routing.

The ip routing command must be enabled to allow external routing on Layer 3 data ports.

4.

interface type number

Example:


Device(config)#interface gigabitethernet 0/0/0

Configures an interface and enters interface configuration mode

5.

no switchport

Example:


Device(config-if)#no switchport

Places the interface in Layer 3 mode, and makes it operate more like a router interface rather than a switch port.

6.

ip address ip-address mask

Example:


Device(config-if)#ip address 10.1.1.1 255.255.255.0

Configures an IP address for the interface.

7.

exit

Example:


Device(config-if)#exit

Exits interface configuration mode and returns to global configuration mode.

8.

interface type number

Example:


Device(config)#interface virtualportgroup 0

Configures an interface and enters interface configuration mode.

9.

ip address ip-address mask

Example:


Device(config-if)#ip address 192.168.0.1 255.255.255.0

Configures an IP address for the interface.

10.

end

Example:


Device(config-if)#end

Exits interface configuration mode and returns to privileged EXEC mode.

11.

configure terminal

Enter configuration commands, one per line. End with CNTL/Z.

Example:


Device#configure terminal

Enters global configuration mode.

12.

app-hosting appid app1

Example:


Device(config)#app-hosting appid app1

Configures the application and enters the application configuration mode.

13.

app-vnic gateway0 virtualportgroup 0 guest-interface 0

Example:


Device(config-app-hosting)#app-vnic gateway0 virtualportgroup 0 guest-interface 0

Configures the application interface and the gateway of the application.

14.

guest-ipaddress 192.168.0.2 netmask 255.255.255.0

Example:


Device(config-app-hosting-gateway0)#guest-ipaddress 192.168.0.2 netmask 255.255.255.0

Configures the application Ethernet interface ip address.

15.

app-default-gateway 192.168.0.1 guest-interface 0

Example:


Device(config-app-hosting-gateway0)#app-default-gateway 192.168.0.1 guest-interface 0

Configures the default gateway for the application.

16.

end

Example:


Device#end

Exits global configuration mode and returns to privileged EXEC configuration mode.

Installing and Uninstalling Apps

DETAILED STEPS

Step

Command

Purpose

1.

enable

Example:


Device>enable

Enables privileged EXEC mode.

Enter your password if prompted.

2.

app-hosting install appid application-name package package-path

Example:


Device#app-hosting install appid lxc_app package flash:my_iox_app.tar

Installs an app from the specified location.

The app can be installed from any local storage location such as, flash, bootflash, and usbflash0.

3.

app-hosting activate appid application-name

Example:


Device#app-hosting activate appid app1

Activates the application.

This command validates all application resource requests, and if all resources are available the application is activated; if not, the activation fails.

4.

app-hosting start appid application-name

Example:


Device#app-hosting start appid app1

Starts the application.

Application start-up scripts are activated.

5.

app-hosting stop appid application-name

Example:


Device#app-hosting stop appid app1

Stops the application.

6.

app-hosting deactivate appid application-name

Example:


Device#app-hosting deactivate appid app1

Deactivates all resources allocated for the application.

7.

app-hosting uninstall appid application-name

Example:


Device#app-hosting uninstall appid app1

Uninstalls the application.

Uninstalls all packaging and images stored.

All changes and updates to the application are also removed.

Overriding the App Resource Configuration

Resource changes will take effect only after the app-hosting activate command is configured.

DETAILED STEPS

Step

Command

Purpose

1.

enable

Example:


Device>enable

Enables privileged EXEC mode.

Enter your password if prompted.

2.

configure terminal

Example:


Device#configure terminal

Enters global configuration mode.

3.

app-hosting appid name

Example:


Device(config)#app-hosting appid app1

Enables application hosting and enters application hosting configuration mode.

4.

app-resource profile name

Example:


Device(config-app-hosting)#app-resource profile custom

Configures the custom application resource profile, and enters custom application resource profile configuration mode.

Only the custom profile name is supported.

5.

cpu unit

Example:


Device(config-app-resource-profile-custom)# cpu 800 

Changes the default CPU allocation for the application.

Resource values are application-specific, and any adjustment to these values must ensure that the application can run reliably with the changes.

6.

memory memory

Example:


Device(config-app-resource-profile-custom)# memory 512

Changes the default memory allocation.

7.

vcpu number

Example:


Device(config-app-resource-profile-custom)# vcpu 2

Changes the virtual CPU (vCPU) allocation for the application.

8.

end

Example:


Device(config-app-resource-profile-custom)# end

Exits custom application resource profile configuration mode and returns to privileged EXEC mode.

Verifying the Application Hosting Configuration

DETAILED STEPS

1. enable

Enables privileged EXEC mode. Enter your password if prompted.

Example :


Device>enable

2. show iox-service

Displays the status of all IOx services

Example :


Device# show iox-service
IOx Infrastructure Summary:
–––––––––––––––––––––––––––––––––––-
IOx service (CAF) 1.8.0.2 : Running
IOx service (HA) : Not Supported 
IOx service (IOxman) : Running 
Libvirtd 1.3.4 : Running
Device#

3. show app-hosting detail

Displays detailed information about the application.

Example :


Device#show app-hosting detail
App id                 : app1
Owner                  : iox
State                  : RUNNING
Application
  Type                 : lxc
  Name                 : nt08-stress
  Version              : 0.1
  Description          : Stress Testing Application
  Path                 : usbflash0: my_iox_app.tar
Activated profile name : custom
Resource reservation
  Memory               : 64 MB
  Disk                 : 2 MB
  CPU                  : 500 units
Attached devices
  Type              Name               Alias
  ---------------------------------------------
  serial/shell     iox_console_shell   serial0
  serial/aux       iox_console_aux     serial1
  serial/syslog    iox_syslog          serial2
  serial/trace     iox_trace           serial3
          
Network interfaces
   ---------------------------------------
eth0:
   MAC address         : 52:54:dd:fa:25:ee

4. show app-hosting list

Displays the list of applications and their status.

Example :


Device#show app-hosting list
App id                           State
------------------------------------------------------
app1                             RUNNING

Configuration Examples for Application Hosting

See the following examples:

Example: Enabling IOx


Device> enable
Device# configure terminal
Device(config)# iox
Device(config)# ip http server
Device(config)# ip http secure-server
Device(config)# username cisco privilege 15 password 0 cisco
Device(config)# end

Example: Configuring a VirtualPortGroup to a Layer 3 Data Port


Device> enable
Device# configure terminal 
Device(config)# ip routing
Device(config)# interface gigabitethernet 0/0/0
Device(config-if)# no switchport
Device(config-if)# ip address 10.1.1.1 255.255.255.0
Device(config-if)# exit
Device(config)# interface virtualportgroup 0
Device(config-if)# ip address 192.168.0.1 255.255.255.0
Device(config-if)# end

Example: Installing and Uninstalling Apps


Device> enable 
Device# app-hosting install appid app1 package flash:my_iox_app.tar
Device# app-hosting activate appid app1
Device# app-hosting start appid app1
Device# app-hosting stop appid app1
Device# app-hosting deactivate appid app1
Device# app-hosting uninstall appid app1

Example: Overriding the App Resource Configuration


Device# configure terminal
Device(config)# app-hosting appid app1
Device(config-app-hosting)# app-resource profile custom
Device(config-app-resource-profile-custom)# cpu 800
Device(config-app-resource-profile-custom)# memory 512
Device(config-app-resource-profile-custom)# vcpu 2
Device(config-app-resource-profile-custom)# end