Introduction
 Note |
Unless otherwise specified, “ONS 15454” refers to both ANSI and ETSI shelf assemblies. |
Note |
Cisco ONS 15454 M2 chassis has reached its end-of-life status. For more information, see the Retirement Notification page. |
The document contains the topics mentioned below.
Node Timing Parameters
SONET timing parameters must be set for each Cisco ONS 15454 Cisco NCS shelf. Each ONS 15454 independently accepts its timing reference from one of three sources: The NCS independently accepts its timing reference from the internal ST3 clock of the control card.
-
The building integrated timing supply (BITS) pins on the ONS 15454 backplane (ANSI) or MIC-C/T/P coaxial connectors (ETSI).
-
An OC-N/STM-N card installed in the ONS 15454. The card is connected to a node that receives timing through a BITS source.
-
The internal ST3 clock on the control card.
You can set ONS 15454 timing to one of three modes: external, line, or mixed. If timing is received from a BITS source, set ONS 15454 timing to external. If timing is received from an OC-N/STM-N card, set the timing to line. The BITS connection on Cisco ONS 15454 M6 Cisco NCS 2006 shelf is through the external connection unit (ECU) and is through the power module on Cisco ONS 15454 M2 Cisco NCS 2002 shelf.
In typical ONS 15454 NCS networks:
-
One node is set to external. The external node derives its timing from a BITS source wired to the BITS backplane pins. The BITS source, in turn, derives its timing from a primary reference source (PRS) such as a Stratum 1 clock or global positioning satellite (GPS) signal.
-
The other nodes are set to line. The line nodes derive timing from the externally timed node through the OC-N/STM-N trunk (span) cards. The DWDM node normally derives timing from the line using the OSCM or OSC-CSM card that are inside an OC-3/STM-1 channel.
You can set three timing references for each ONS 15454 NCS. The first two references are typically two BITS-level sources, or two line-level sources optically connected to a node with a BITS source. The third reference is usually assigned to the internal clock provided on every ONS 15454 NCS control cards. However, if you assign all three references to other timing sources, the internal clock is always available as a backup timing reference. The internal clock is a Stratum 3 (ST3), so if an ONS 15454 NCS node becomes isolated, timing is maintained at the ST3 level.
The CTC Maintenance > Timing > Report tab show current timing information for an ONS 15454 NCS, including the timing mode, clock state and status, switch type, and reference data.
 Caution |
Mixed timing allows you to select both external and line timing sources. However, Cisco does not recommend its use because it can create timing loops. Use this mode with caution. |
The OC3 port of the TNC/TNCE/TSC/TSCE/TNCS/TNCS-O card can be set as the timing reference. In the NCS 2002 shelf, BITS-2 is not supported.
The TNCS-O card does not support OC3 timing as the OSC and OTDR ports on the TNCS-O card support the FE payload only.
When you provision timing reference on a control card and it is locked, but the reference is lost in less than 140 seconds due to any reason, the system Phase Lock Loop (PLL) state changes. The system PLL state changes to FREE-RUN state when provisioning the TNC card or it changes to HOLDOVER state when provisioning the TNCS-2, TNCS-2O, and TNCP card.
Network Timing
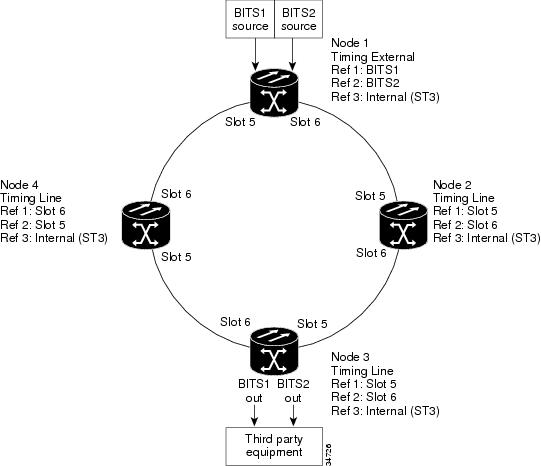
The following figure shows an ONS 15454 NCS network timing setup example. Node 1 is set to external timing. Two timing references are set to BITS. These are Stratum 1 timing sources wired to the BITS input pins on the Node 1 backplane. The third reference is set to internal clock. The BITS output pins on the backplane of Node 3 are used to provide timing to outside equipment, such as a digital access line access multiplexer.
In the example, Slots 5 and 6 contain the trunk (span) cards. Timing at Nodes 2, 3, and 4 is set to line, and the timing references are set to the trunk cards based on distance from the BITS source. Reference 1 is set to the trunk card closest to the BITS source. At Node 2, Reference 1 is set to Slot 5 because it is connected to Node 1. At Node 4, Reference 1 is set to Slot 6 because it is connected to Node 1. At Node 3, Reference 1 could be either trunk card because they are at an equal distance from Node 1.
Synchronization Status Messaging
Synchronization status messaging (SSM) is a SDH and SONET protocol that communicates information about the quality of the timing source. SSM messages are carried on the S1 byte of the SONET Line layer or on S1 byte of the SDH section overhead. They enable SONET or SDH devices to automatically select the highest quality timing reference and to avoid timing loops.
SSM messages are either Generation 1 or Generation 2. Generation 1 is the first and most widely deployed SSM message set. Generation 2 is a newer version. If you enable SSM for the ONS 15454 or the ONS 15454 SDH NCS, consult your timing reference documentation to determine which message set to use.
The following table shows the SDH message set.
|
Message |
Quality |
Description |
|---|---|---|
|
G811 |
1 |
Primary reference clock |
|
STU |
2 |
Sync traceability unknown |
|
G812T |
3 |
Transit node clock traceable |
|
G812L |
4 |
Local node clock traceable |
|
SETS |
5 |
Synchronous equipment |
|
DUS |
6 |
Do not use for timing synchronization |
The following two tables show the Generation 1 and Generation 2 message sets for SONET.
|
Message |
Quality |
Description |
|---|---|---|
|
PRS |
1 |
Primary reference source—Stratum 1 |
|
STU |
2 |
Synchronization traceability unknown |
|
ST2 |
3 |
Stratum 2 |
|
ST3 |
4 |
Stratum 3 |
|
SMC |
5 |
SONET minimum clock |
|
ST4 |
6 |
Stratum 4 |
|
DUS |
7 |
Do not use for timing synchronization |
|
RES |
— |
Reserved; quality level set by user |
|
Message |
Quality |
Description |
|---|---|---|
|
PRS |
1 |
Primary reference source—Stratum 1 |
|
STU |
2 |
Synchronization traceability unknown |
|
ST2 |
3 |
Stratum 2 |
|
TNC |
4 |
Transit node clock |
|
ST3E |
5 |
Stratum 3 E |
|
ST3 |
6 |
Stratum 3 |
|
SMC |
7 |
SONET minimum clock |
|
ST4 |
8 |
Stratum 4 |
|
DUS |
9 |
Do not use for timing synchronization |
|
RES |
— |
Reserved; quality level set by user |
Procedures for Cisco ONS 15454 and Cisco NCS Timing
This section contains the procedure related to Cisco ONS 15454 and Cisco NCS timing.
NTP-G53 Set Up Timing
|
Purpose |
This procedure provisions Cisco ONS 15454 Cisco NCS timing. |
|
Tools/Equipment |
None |
|
Prerequisite Procedures |
"NTP-G51 Verify DWDM Node Turn Up" procedure in "Turn Up a Network" chapter of the Cisco ONS 15454 DWDM Network Configuration Guide Cisco NCS 2002 and NCS 2006 Network Configuration Guide "DLP-G46 Log into CTC" task in Connect the PC and Log into the GUI document. |
|
Required/As Needed |
Required |
|
Onsite/Remote |
Onsite or remote |
|
Security Level |
Provisioning or higher |
SUMMARY STEPS
- Complete the DLP-G95 Set Up External or Line Timing task if an external building integrated timing supply (BITS) source is available. This is the most common ONS 15454 NCS timing setup method.
- If an external BITS source is not available, complete the DLP-G96 Set Up Internal Timing task. This task can provide only Stratum 3 timing.
- Repeat this procedure at each node in the network.
DETAILED STEPS
|
Step 1 |
Complete the DLP-G95 Set Up External or Line Timing task if an external building integrated timing supply (BITS) source is available. This is the most common ONS 15454 NCS timing setup method. |
|
Step 2 |
If an external BITS source is not available, complete the DLP-G96 Set Up Internal Timing task. This task can provide only Stratum 3 timing. |
|
Step 3 |
Repeat this procedure at each node in the network. |
DLP-G95 Set Up External or Line Timing
|
Purpose |
This task defines the ONS 15454 and NCS timing source (external or line). |
|
Tools/Equipment |
None |
|
Prerequisite Procedures |
"DLP-G46 Log into CTC" task in Connect the PC and Log into the GUI document. |
|
Required/As Needed |
Required |
|
Onsite/Remote |
Onsite or remote |
|
Security Level |
Provisioning or higher |
SUMMARY STEPS
- In node view (single-node mode) or shelf view (multishelf mode), click the Provisioning > Timing > General tabs.
- In the General Timing area, complete the following information:
- In the Reference Lists area, complete the following information:
- Click Apply .
- Click the BITS Facilities tab.
- In the BITS In area, complete the following information:
- If the BITS In state is set to OOS, continue with Step 8. If the BITS In state is set to IS, complete the following information:
- In the BITS Out area, complete the following information, as needed:
- If the BITS Out state is set to OOS, continue with Step 10. If the BITS Out state is set to IS, complete the following information:
- Click Apply.
- Return to your originating procedure (NTP).
DETAILED STEPS
|
Step 1 |
In node view (single-node mode) or shelf view (multishelf mode), click the Provisioning > Timing > General tabs. |
||||||
|
Step 2 |
In the General Timing area, complete the following information:
|
||||||
|
Step 3 |
In the Reference Lists area, complete the following information:
|
||||||
|
Step 4 |
Click Apply . |
||||||
|
Step 5 |
Click the BITS Facilities tab.
|
||||||
|
Step 6 |
In the BITS In area, complete the following information:
|
||||||
|
Step 7 |
If the BITS In state is set to OOS, continue with Step 8. If the BITS In state is set to IS, complete the following information:
|
||||||
|
Step 8 |
In the BITS Out area, complete the following information, as needed:
|
||||||
|
Step 9 |
If the BITS Out state is set to OOS, continue with Step 10. If the BITS Out state is set to IS, complete the following information:
|
||||||
|
Step 10 |
Click Apply.
|
||||||
|
Step 11 |
Return to your originating procedure (NTP). |
DLP-G96 Set Up Internal Timing
|
Purpose |
This task sets up internal timing (Stratum 3) for an ONS 15454 and NCS. |
|
Tools/Equipment |
None |
|
Prerequisite Procedures |
"DLP-G46 Log into CTC" task in Connect the PC and Log into the GUI document. |
|
Required/As Needed |
As needed (use only if a BITS source is not available) |
|
Onsite/Remote |
Onsite or remote |
|
Security Level |
Provisioning or higher |
Caution |
Internal timing is Stratum 3 and is not intended for permanent use. All ONS 15454 SONET (ANSI) or SDH (ETSI) NCS nodes should be timed to a Stratum 2 (or better) primary reference source. Internal timing is appropriate for DWDM nodes. |
SUMMARY STEPS
- In node view (single-node mode) or shelf view (multishelf mode), click the Provisioning > Timing > General tabs.
- In the General Timing area, complete the following information:
- In the Reference Lists area, enter the following information:
- Click Apply .
- Click the BITS Facilities tab.
- In the BITS Facilities area, change the BITS In state and BITS Out state to OOS for BITS 1 and BITS 2. Disregard the other BITS Facilities settings; they are not relevant to internal timing.
- Click Apply.
- Return to your originating procedure (NTP).
DETAILED STEPS
|
Step 1 |
In node view (single-node mode) or shelf view (multishelf mode), click the Provisioning > Timing > General tabs. |
|
Step 2 |
In the General Timing area, complete the following information:
|
|
Step 3 |
In the Reference Lists area, enter the following information:
|
|
Step 4 |
Click Apply . |
|
Step 5 |
Click the BITS Facilities tab. |
|
Step 6 |
In the BITS Facilities area, change the BITS In state and BITS Out state to OOS for BITS 1 and BITS 2. Disregard the other BITS Facilities settings; they are not relevant to internal timing. |
|
Step 7 |
Click Apply. |
|
Step 8 |
Return to your originating procedure (NTP). |
NTP-G87 Change Node Timing Parameters
|
Purpose |
This procedure changes the timing parameters for the ONS 15454 and NCS. To switch the timing reference, see the NTP-G112 Change the Node Timing Reference procedure. |
|
Tools/Equipment |
None |
|
Prerequisite Procedures |
"DLP-G46 Log into CTC" task in Connect the PC and Log into the GUI document. |
|
Required/As Needed |
As needed |
|
Onsite/Remote |
Onsite or remote |
|
Security Level |
Provisioning or higher |
Caution |
The following procedure might be service affecting and should be performed during a scheduled maintenance window. |
SUMMARY STEPS
- Complete the "NTP-G103 Back Up the Database" procedure in the chapter, "Maintaining the Node" of the Cisco ONS 15454 DWDM Network Configuration Guide Cisco NCS 2002 and NCS 2006 Network Configuration Guide.
- Click the Provisioning > Timing > General tabs.
- In the General Timing section, change any of the following information:
- In the Reference Lists area, you can change the following information:
- In node view (single-shelf mode) or shelf view (multishelf mode), click the Provisioning > Timing > BITS Facilities tabs.
- In the BITS In section, you can change the following information:
- In the BITS Out section, you can change the following information:
- Click Apply. Confirm that the changes appear.
- Complete the "NTP-G103 Back Up the Database" procedure in the chapter, "Maintaining the Node" of the Cisco ONS 15454 DWDM Network Configuration Guide Cisco NCS 2002 and NCS 2006 Network Configuration Guide.
DETAILED STEPS
|
Step 1 |
Complete the "NTP-G103 Back Up the Database" procedure in the chapter, "Maintaining the Node" of the Cisco ONS 15454 DWDM Network Configuration Guide Cisco NCS 2002 and NCS 2006 Network Configuration Guide. |
||
|
Step 2 |
Click the Provisioning > Timing > General tabs. |
||
|
Step 3 |
In the General Timing section, change any of the following information:
See the NTP-G53 Set Up Timing task for field descriptions. |
||
|
Step 4 |
In the Reference Lists area, you can change the following information:
|
||
|
Step 5 |
In node view (single-shelf mode) or shelf view (multishelf mode), click the Provisioning > Timing > BITS Facilities tabs. |
||
|
Step 6 |
In the BITS In section, you can change the following information:
|
||
|
Step 7 |
In the BITS Out section, you can change the following information:
|
||
|
Step 8 |
Click Apply. Confirm that the changes appear.
|
||
|
Step 9 |
Complete the "NTP-G103 Back Up the Database" procedure in the chapter, "Maintaining the Node" of the Cisco ONS 15454 DWDM Network Configuration Guide Cisco NCS 2002 and NCS 2006 Network Configuration Guide. |
Stop. You have completed this procedure.
NTP-G112 Change the Node Timing Reference
|
Purpose |
This procedure enables automatic timing reference switching or returns the node timing to normal operation. |
|
Tools/Equipment |
None |
|
Prerequisite Procedures |
"DLP-G46 Log into CTC" task in Connect the PC and Log into the GUI document. |
|
Required/As Needed |
As needed |
|
Onsite/Remote |
Onsite or remote |
|
Security Level |
Maintenance or higher |
SUMMARY STEPS
- Complete the DLP-G259 Manual or Force Switch the Node Timing Reference task as needed.
- Complete the DLP-G260 Clear a Manual or Force Switch on a Node Timing Reference task as needed.
DETAILED STEPS
|
Step 1 |
Complete the DLP-G259 Manual or Force Switch the Node Timing Reference task as needed. |
|
Step 2 |
Complete the DLP-G260 Clear a Manual or Force Switch on a Node Timing Reference task as needed. |
Stop. You have completed this procedure.
DLP-G259 Manual or Force Switch the Node Timing Reference
|
Purpose |
This task commands the node to switch to the timing reference you have selected. |
|
Tools/Equipment |
None |
|
Prerequisite Procedures |
"DLP-G46 Log into CTC" task in Connect the PC and Log into the GUI document. |
|
Required/As Needed |
As needed |
|
Onsite/Remote |
Onsite or remote |
|
Security Level |
Maintenance or higher |
SUMMARY STEPS
- In node view (single-shelf mode) or shelf view (multishelf mode), click the Maintenance > Timing > Source tabs.
- From the Reference drop-down list for the desired Clock, choose the desired reference.
- From the Operation drop-down list for the desired Clock, choose one of the following options:
- Click Apply next to the timing source.
- Click Yes in the confirmation dialog box. If the selected timing reference is an acceptable valid reference, the node switches to the selected timing reference. If the selected timing reference is invalid, a warning dialog box appears. Click OK; the node will not switch to the new timing reference.
- Return to your originating procedure (NTP).
DETAILED STEPS
|
Step 1 |
In node view (single-shelf mode) or shelf view (multishelf mode), click the Maintenance > Timing > Source tabs. |
||
|
Step 2 |
From the Reference drop-down list for the desired Clock, choose the desired reference. |
||
|
Step 3 |
From the Operation drop-down list for the desired Clock, choose one of the following options:
|
||
|
Step 4 |
Click Apply next to the timing source. |
||
|
Step 5 |
Click Yes in the confirmation dialog box. If the selected timing reference is an acceptable valid reference, the node switches to the selected timing reference. If the selected timing reference is invalid, a warning dialog box appears. Click OK; the node will not switch to the new timing reference. |
||
|
Step 6 |
Return to your originating procedure (NTP). |
DLP-G260 Clear a Manual or Force Switch on a Node Timing Reference
|
Purpose |
This task clears a Manual or Force switch on a node timing reference and reverts the timing reference to its provisioned reference. |
|
Tools/Equipment |
None |
|
Prerequisite Procedures |
"DLP-G46 Log into CTC" task in Connect the PC and Log into the GUI document. |
|
Required/As Needed |
As needed |
|
Onsite/Remote |
Onsite or remote |
|
Security Level |
Maintenance or higher |
SUMMARY STEPS
- In node view (single-shelf mode) or shelf view (multishelf mode), click the Maintenance > Timing > Source tabs.
- Find the Clock reference that is currently set to Manual or Force in the Operation drop-down list.
- From the Operation drop-down list, choose Clear .
- Click Apply.
- Click Yes in the confirmation dialog box. If the normal timing reference is an acceptable valid reference, the node switches back to the normal timing reference as defined by the system configuration. If the normal timing reference is invalid or has failed, a warning dialog box appears. Click OK; the timing reference will not revert.
- Return to your originating procedure (NTP).
DETAILED STEPS
|
Step 1 |
In node view (single-shelf mode) or shelf view (multishelf mode), click the Maintenance > Timing > Source tabs. |
|
Step 2 |
Find the Clock reference that is currently set to Manual or Force in the Operation drop-down list. |
|
Step 3 |
From the Operation drop-down list, choose Clear . |
|
Step 4 |
Click Apply. |
|
Step 5 |
Click Yes in the confirmation dialog box. If the normal timing reference is an acceptable valid reference, the node switches back to the normal timing reference as defined by the system configuration. If the normal timing reference is invalid or has failed, a warning dialog box appears. Click OK; the timing reference will not revert. |
|
Step 6 |
Return to your originating procedure (NTP). |
NTP-G113 View the Cisco ONS 15454 and Cisco NCS Timing Report
|
Purpose |
This procedure displays the current status of the Cisco ONS 15454 and Cisco NCS timing references. |
|
Tools/Equipment |
None |
|
Prerequisite Procedures |
"DLP-G46 Log into CTC" task in Connect the PC and Log into the GUI document. |
|
Required/As Needed |
As needed |
|
Onsite/Remote |
Onsite or remote |
|
Security Level |
Maintenance or higher |
SUMMARY STEPS
- In node view (single-shelf mode) or shelf view (multishelf mode), click the Maintenance > Timing > Report tabs.
- In the Timing Report area, you can view node timing information. The date and time of the report appear at the top of the report. The time stamp is the same as the alarms time stamp and can be configured using the DLP-G118 Display Alarms and Conditions Using Time Zone task in the Alarm and TCA Monitoring and Management document.
- To update the report, click Refresh. The following table describes the report fields and entries.
DETAILED STEPS
|
Step 1 |
In node view (single-shelf mode) or shelf view (multishelf mode), click the Maintenance > Timing > Report tabs. |
||||||||||||||||||||||||||||||||||||||||||||||||||||||||||||||||||||||||||||||||||||||||||
|
Step 2 |
In the Timing Report area, you can view node timing information. The date and time of the report appear at the top of the report. The time stamp is the same as the alarms time stamp and can be configured using the DLP-G118 Display Alarms and Conditions Using Time Zone task in the Alarm and TCA Monitoring and Management document. |
||||||||||||||||||||||||||||||||||||||||||||||||||||||||||||||||||||||||||||||||||||||||||
|
Step 3 |
To update the report, click Refresh. The following table describes the report fields and entries.
When the timing reference is provisioned for a node with the TNCS-2/TNCS-2O card, the timing status of the node moves from the FREERUN_STATE to HOLDOVER_STATE for a few seconds. When the timing reference state is OKAY, the timing status of the node moves to the NORMAL_STATE. If the timing status is not OKAY, the timing status remains in the HOLDOVER_STATE. |
Stop. You have completed this procedure.
Synchronous Ethernet Overview
With Ethernet equipment gradually replacing existing SONET and Synchronous Digital Hierarchy (SDH) equipment in service provider networks, frequency synchronization is required to provide high-quality clock synchronization over Ethernet ports.
Synchronous Ethernet (SyncE) provides synchronized timing to multiple remote network elements (NEs) without using an external circuit for timing. SyncE provides the required synchronization at the physical level. Operation messages maintain SyncE links and ensure that a node always derives timing from the most reliable source.
SyncE uses the Ethernet Synchronization Message Channel (ESMC) to enable traceability of the best clock source to correctly define the timing source and prevent a timing loop. As the Ethernet does not have the Quality Level (QL) information in its header, it requires ESMC for QL information.
SyncE clocks are compatible with the clocks used in the SONET or SDH synchronization network.
SyncE is supported on TNCS and TNCS-O controller cards. You must enable ESMC on an OSC port to configure it as a clock source. In a Node Controller (NC) and subtended shelf setup, the NC derives its clock from SyncE on the OSC port.
 Warning |
Do not enable SyncE on TNC and TNCE controller cards. |
SyncE Limitations
-
You can configure the clock source only on OSC ports of the TNCS and TNCS-O controller card.
-
Only one port per slot can be used as a clock source.
-
In a multishelf setup, only the node controller and one subtended shelf port can be used as a clock source. Other shelves in the setup are synced using BITS.
-
OSI-connected nodes are not supported for ESMC.
-
If an OSC port is only ESMC-enabled and not a clock source, it can only transmit ESMC packets.
-
During an OTDR scan, the node chooses the next configured clock as the timing source or switches to the holdover mode.
-
You can configure SyncE between two TNCS cards or TNCS to TNC-O cards or vice versa.
-
SyncE alarms are raised at port level only on reference ports or clock sources. When Ethernet-related alarms such as SYNC_LOSS or CARRIER_LOSS are raised against a port then SSM QL or ESMC_FAIL alarms will not be raised against the port.
SyncE During Switchover
-
The clock and Synchronization Status Messages (SSM) quality values are shared with the active and standby cards.
-
Each OSC port (on active and standby TNCS/TNCS-O cards) can act as an independent clock source and after a switchover of the TNCS/TNCS-O card, the original Primary Reference Clock (PRC) is used as the PRC.
-
When the active card fails or reboots, the same clock is available to the standby card. During switchover, the standby card takes over, and reuses the clock. The standby card also runs the selection process and sends the ESMC packets.
Multishelf Support
-
You can enable ESMC and configure a maximum of two ports each on a subtended shelf and a node controller as a clock source. However, only the node controller and one subtended shelf port are used as a clock source. Other shelves in the setup are synced using BITS.
-
You must not connect the NC and subtended shelf of the same node using an OSC link.
-
Subtended shelf ports can send and receive ESMC packets.
NTP-G360 Configuring Synchronous Ethernet on TNCS or TNCS-O Cards
| Purpose | (Cisco NCS 2002, NCS 2006, ONS 15454 M2, ONS 15454 M6, NCS 2015) This task configures SyncE on TNCS or TNCS-O cards. |
| Tools/Equipment | TNCS/TNCS-O card. |
| Prerequisite Procedures | |
| Required/As Needed | As Needed |
| Onsite/Remote | Onsite or Remote |
| Security Level | None |
Procedure
|
Step 1 |
Complete the DLP-G605 Provisioning PPM and Port for the TNC, TNCE, and TNCS Cards
|
||
|
Step 2 |
Complete the NTP-G38 Provisioning OSC Terminations to choose the OSC ports and create an OSC link. |
||
|
Step 3 |
Complete the DLP-G794 Configuring ESMC on OSC ports of TNCS/TNCS-O Cards. |
||
|
Step 4 |
Choose Timing > Report tabs to view the Timing Report. Stop. You have completed this procedure. |
DLP-G794 Configuring ESMC on OSC ports of TNCS/TNCS-O Cards
| Purpose | (Cisco NCS 2002, NCS 2006, ONS 15454 M2, ONS 15454 M6, NCS 2015) This task lets you enable ESMC on an OSC port of TNCS/TNCS-O Cards. |
| Tools/Equipment | TNCS/TNCS-O card |
| Prerequisite Procedures | |
| Required/As Needed | As Needed |
| Onsite/Remote | Onsite or Remote |
| Security Level | None |
Procedure
|
Step 1 |
In the node view (single-shelf mode) or shelf view (multishelf view), double-click the TNCS or TNCS-O card. |
||
|
Step 2 |
Click the Provisioning > Line > Ethernet Lines tabs. The Ethernet Lines tab appears only if you choose FE as the port type when you configure the OSC port of a TNCS or TNCS-O card. |
||
|
Step 3 |
Check the ESMC Enable check box to enable ESMC on the OSC port. If you have two nodes, you must enable ESMC on both ends of the OSC link. |
||
|
Step 4 |
Click Apply. After you enable ESMC on an OSC port, the port appears in the Clock reference list (click the Provisioning > Timing > General tabs). |
||
|
Step 5 |
In the node view (single-node mode) or shelf view (multishelf mode), click the Provisioning > Timing > General tabs. |
||
|
Step 6 |
In the General Timing area, configure the following parameters: |
||
|
Step 7 |
In the Reference Lists area, choose the ESMC-enabled OSC port as Reference 1 for NE Reference.
If the SyncE reference fails, the node chooses the next best reference clock or enters the hold-over mode, if available. |
What to do next
Click the Maintenance > Timing > Report tabs. For more details, see NTP-G113 View the Cisco ONS 15454 and Cisco NCS Timing Report.
Short Description
Cisco and the Cisco logo are trademarks or registered trademarks of Cisco and/or its affiliates in the U.S. and other countries. To view a list of Cisco trademarks, go to this URL: https://www.cisco.com/c/en/us/about/legal/trademarks.html. Third-party trademarks mentioned are the property of their respective owners. The use of the word partner does not imply a partnership relationship between Cisco and any other company. (1721R)
Communications, Services, and Additional Information
-
To receive timely, relevant information from Cisco, sign up at Cisco Profile Manager.
-
To get the business impact you’re looking for with the technologies that matter, visit Cisco Services.
-
To submit a service request, visit Cisco Support.
-
To discover and browse secure, validated enterprise-class apps, products, solutions and services, visit Cisco Marketplace.
-
To obtain general networking, training, and certification titles, visit Cisco Press.
-
To find warranty information for a specific product or product family, access Cisco Warranty Finder.
Cisco Bug Search Tool
Cisco Bug Search Tool (BST) is a web-based tool that acts as a gateway to the Cisco bug tracking system that maintains a comprehensive list of defects and vulnerabilities in Cisco products and software. BST provides you with detailed defect information about your products and software.
 Feedback