Installing and Starting the Telnet Gateway Server Software
Available Languages
Table Of Contents
Installing and Starting the Telnet Gateway Server Software
Before You Install the Telnet Gateway Server Software
Creating User IDs for the Telnet Gateway Server and Orbix Software
Installing the Telnet Gateway Server Software
Starting the Telnet Gateway Server Software
Starting the Telnet Gateway Server Software and the Watch Dog
Setting Up Connectivity to a Remote Telnet Gateway Server
Before You Begin the Setup Process
Setting Up the VPNSC Workstation for Connectivity to the Remote TGS Host
Enabling TIBCO Event Connectivity on the Remote TGS Host
Installing and Starting the Telnet Gateway Server Software
The Telnet Gateway server is part of the VPN Solutions Center Network Management Subnet. One or more Telnet Gateway Server hosts can be connected on a LAN to the VPN Solutions Center workstation. This chapter describes how to install, start, and uninstall the Telnet Gateway Server software.
You can install the Telnet Gateway Server software from the VPN Solutions Center 2.0 CD-ROM.
When the Telnet Gateway Server installation is complete, the following modules are installed:
•
Telnet Gateway Server software
If you are installing TGS on hosts in a remote network, see the "Setting Up Connectivity to a Remote Telnet Gateway Server" section.
•
•
Before You Install the Telnet Gateway Server Software
Before you begin installing the Telnet Gateway Server software, complete the following tasks:
Step 1
cd /opt/orbixadmrm -rf orbixOrbix is installed during the normal course of the Telnet Gateway Server software installation process.
Step 2

Tips
You can check to see all the current application/protocol-to-port number assignments by viewing the services file at /opt/vpnadm/vpn/etc on the VPN Solutions Center workstation.
Step 3
Creating User IDs for the Telnet Gateway Server and Orbix Software
On each Telnet Gateway Server connected to the VPN Solutions Center 2.0 workstation, you must create administrative user IDs for the Telnet Gateway Server software and the Orbix software. These administrative user IDs are the same user IDs employed on the VPN Solutions Center 2.0 workstation—vpnadm and orbixadm.
The administrative user ID for the Telnet Gateway Server software is vpnadm; the administrative user ID for the Orbix software is orbixadm. Using the Sun Solaris AdminTool, create the vpnadm and orbixadm administrative user IDs. Make sure these IDs belong to the same Primary Group.
For instructions on how to create these administrative user IDs, see the "Creating Administrative User IDs for the VPNSC and Orbix Software" section.
When this task is completed for each Telnet Gateway Server, you can install the Telnet Gateway Server software, which is described in the next section.
Installing the Telnet Gateway Server Software
To install the Telnet Gateway Server software, follow these steps.
Step 1

Caution
Invoking the Telnet Gateway Server 2.0 Installation Utility
Step 2

Note
Step 3
cd /cdrom/cdrom0Step 4
cdrom> ./tgsinstall
Note
The installation script tgsinstall is located in the root directory. The Telnet Gateway Server software is installed by default in the /opt/vpnadm directory.
The general installation instructions are displayed. Press Enter to page through them. Then the installation prompts are displayed.
Note
Orbix Installation
Step 5
Are OrbixWeb 3.2 and Orbix 3.0.1 already installed? y/n [n]•
•
If you do not perform a new Orbix installation, the prompts shown in Steps 9 and 10 below are not displayed.
Step 6
This step assumes that you have already created the administrative user ID for Orbix software, as described in the "Creating Administrative User IDs for the VPNSC and Orbix Software" section.
Press Enter.
Step 7
Note
By default, the Installation utility creates a directory called orbix in the home directory of the Orbix user ID entered in the steps described in the "Creating User IDs for the Telnet Gateway Server and Orbix Software" section:
/opt/orbixadm/orbix
Press Enter for the default directory, or enter a qualified path to the orbix directory.
Step 8
The Installation utility finds the current domain name and displays it.
Accept this domain name and proceed with installation? y/n [y]The Installation utility pings the indicated domain to confirm connectivity.
Step 9
Press Enter for the default directory (which is now the path entered in the previous step), or enter a new path to the Orbix configuration files.
Step 10
/opt/orbixadm/orbix/Orbix3Overwrite the directory contents? y/n [n]•
•
Setting Up the TGS Administrative User and Directories
Step 11
The default user name for the TGS software is vpnadm. Press Enter.
Step 12
Note
Press Enter for the default directory (/opt/vpnadm), or enter a new path for the product installation directory.
The Installation utility creates a new directory named "vpn" in this path. Thus, the full directory path to the Telnet Gateway Server software installation is /opt/vpnadm/vpn.
Step 13
This step creates a directory named tmp, if one does not yet exist.
Press Enter for the default directory (/opt/vpnadm/vpn/tmp), or enter a new path for this directory.
Note
Software Installation Begins
The installation of the Orbix and Telnet Gateway Server software begins:
Installing Orbix software...Please stand by.Installing Telnet Gateway Server...Please stand by.Installation may take several minutes.The Telnet Gateway Server Installation utility creates the environment setup files (vpnenv.sh and vpnenv.csh) and the csm.properties file.
Csm.Properties File Updated
The Telnet Gateway Server Installation utility informs you that the following part of installation will set certain values in the csm.properties file. You can also edit the file manually after installation. The csm. properties file is located in the /opt/vpnadm/vpn/etc directory.
Setting the Port Number for the TIBCO Rendezvous Port
Step 14
Tips
Do you want to assign a new port to TIBCO Rendezvous? y/n [n]a.
b.
You are prompted to enter the TIBCO Rendezvous port number.
Enter the new port for TIBCO RendezvousEnter a new value or press ENTER for the default [7500]:c.
The Telnet Gateway Server Installation utility enters the TIBCO port number in the csm.properties file.
You can check to see all the current application/protocol-to-port number assignments by viewing the services file at /opt/vpnadm/vpn/etc/services file on the VPN Solutions Center workstation.
Installing the Secure Shell (SSH) on the TGS Server
Tips
You must first apply for authorization to download 3DES/K9 software and download the SSH tar file before you can install the SSH software. This procedure assumes that you must have a current Cisco Connection Online (CCO) account.
This section of the Installation utility includes the instructions for installing SSH on the server. To see the instructions in this guide, see the "Installing the Secure Shell (SSH) Software for VPN Solutions Center 2.0" section.
Updating the .CSHRC File for the VPNSC Administrative User
Step 15
Do you want to update vpnadm's cshrc file? y/n [y]
Note
Accept the default (yes) by pressing Enter.
The product installation is now complete.
Support Hotline Phone Numbers
Note the Cisco support hotline numbers:
From the United States: 1.800.553.6387
From outside the United States: 408.526.7208
Exiting From the Telnet Gateway Server Installation Utility
Step 16
exitYou are now ready to start the Telnet Gateway Server software. Proceed to the next section.
Starting the Telnet Gateway Server Software
Before you start the Telnet Gateway Server software, complete these tasks:
Step 1
Step 2
Step 3
xhost TGS_hostnameThe TGS_hostname parameter is the name of the Telnet Gateway Server workstation. This command configures your system so that the Orbix administrative user (orbixadm) and the VPNSC administrative user (vpnadm) can communicate with your client system.
Starting Orbix
Starting the Telnet Gateway Server software requires that you first start the Orbix process and then start the Watchdog process, as described below. To start the Orbix software, follow these steps:
Step 1
Step 2
su - orbixadmWhen logged in as the orbixadm, you are placed in the /opt/orbixadm directory.
Or if you are logging in remotely, enter this command:
rlogin VPNSC_hostname -l orbixadmStep 3
cd orbix/Orbix3You are now in the /opt/orbixadm/orbix/Orbix3 directory.
Step 4
Note
C-Shell: source setenvs.csh
K-Shell: . ./setenvs.sh
Step 5
orbixd &
Starting the Telnet Gateway Server Software and the Watch Dog
To start the Telnet Gateway Server software and the Watch Dog utility, follow these steps:
Step 1
Step 2
su - vpnadmWhen logged in as vpnadm, you are placed in the /opt/vpnadm directory.
Or if you are logging in remotely, enter this command:
rloginTGS_hostname-l vpnadmStep 3
cd vpn/You are now in the /opt/vpnadm/vpn directory.
Step 4
Note
C-Shell: source vpnenv.csh
K-Shell: . ./vpnenv.sh
Step 5
setenv DISPLAYTGS_hostname:0.0Step 6
starttgsTo stop the Telnet Gateway Server process, issue the stoptgs -y command.
The Watch Dog log file is at /opt/vpnadm/vpn/tmp/wdlog.
Step 7
wdclient status
Setting Up Connectivity to a Remote Telnet Gateway Server
When you install the VPN Solutions Center software on the VPNSC workstation, the installation includes a Telnet Gateway server (TGS). The VPN Solutions Center uses TGS for all communication with routers, including downloading and uploading configuration files.
Service providers can install multiple Telnet Gateway servers, either in the same network that VPN Solutions Center resides in, or on a remote network. However, installing the TGS servers on a remote network requires that TIBCO event connectivity between the VPNSC network and the remote network must be in place.
If you install multiple Telnet Gateway servers on the LAN connected to the VPN Solutions Center workstation (which is called the VPNSC Network Management Subnet), no special setup is required. However, if you want to install and use TGS on remote networks, the TIBCO rvrd software must be properly configured on both the VPN Solutions Center workstation and on one TGS machine in each remote network.
Note
Before You Begin the Setup Process
If VPN Solutions Center is currently running, you must bring it down before proceeding with the remote TGS setup procedure.
Step 1
Step 2
ps -A | grep rv
Step 3
Step 4
Setting Up the VPNSC Workstation for Connectivity to the Remote TGS Host
To set up the VPN Solutions Center workstation to allow TIBCO event connectivity to a TGS host in a remote network, follow these steps.
You must complete this procedure before you start the Watch Dog, bring up the VPN Solutions Center software, and start TGS on the VPN Solutions Center workstation.
Note
Step 1
Step 2
source vpnenv.csh
Step 3
ps -A | grep rv
Step 4
Step 5
rvrd -store rvrd.store
Step 6
http:\\VPNSC_hostname:7580
The TIB/Rendezvous home page appears (see Figure 3-1).
Figure 3-1 TIBCO/Rendezvous Home Page

Step 7
The dialog box shown in Figure 3-2 appears.
Figure 3-2 Entering the VPNSC Host Name
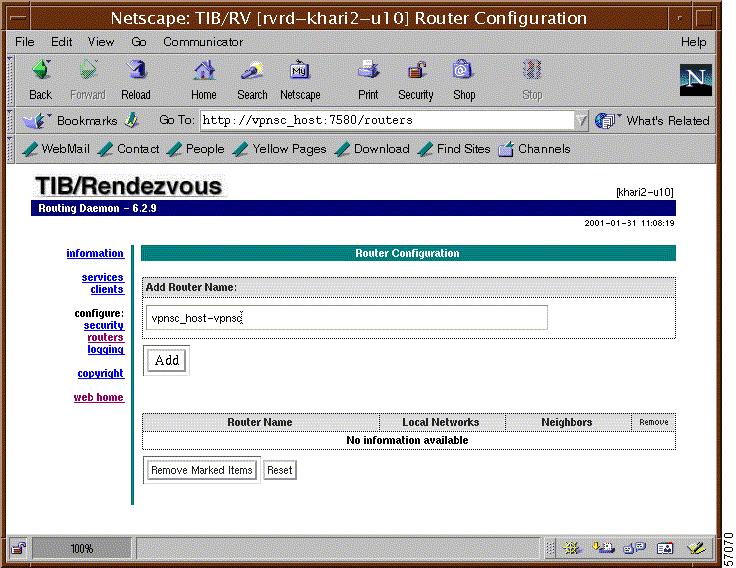
Step 8
Step 9
The value you entered is now displayed in the Router Name column.
Step 10
The dialog box shown in Figure 3-3 appears.
Figure 3-3 Entering the VPNSC Local Network Information
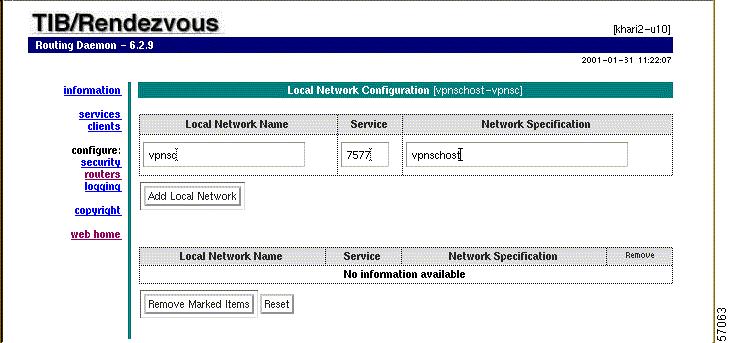
Step 11
a.
vpnsc
b.
c.
Step 12
On the lower section of the page, the values you entered are now displayed in the corresponding cells.
Step 13
Step 14
The dialog box shown in Figure 3-4 appears.
Figure 3-4 Entering the VPNSC Neighbor Information
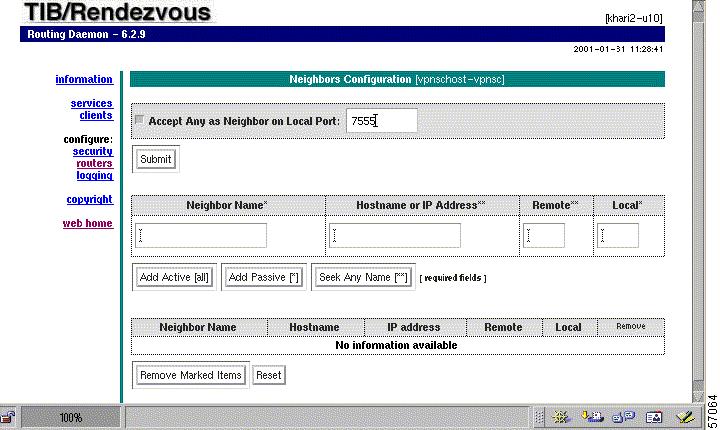
Step 15
Step 16
7555
Step 17
Step 18
Step 19
The dialog box updates to the screen shown in Figure 3-3. Notice that "vpnsc" is now displayed in the Local Network Name column.
Step 20
The dialog box shown in Figure 3-5 appears.
Figure 3-5 Entering the VPNSC Neighbor Information
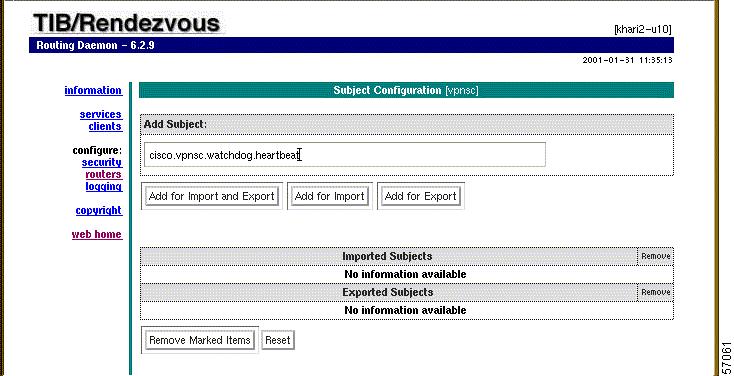
Step 21
cisco.vpnsc.watchdog.heartbeat
Step 22
The import subject you entered is now displayed in the Imported Subjects field.
This completes the procedure for setting up the for connectivity to the remote TGS host from the VPN Solutions Center workstation.
Enabling TIBCO Event Connectivity on the Remote TGS Host
To enable TIBCO event connectivity between a Telnet Gateway Server host on a remote network and the VPN Solutions Center workstation, follow these steps. This procedure assumes that TGS is installed on the Telnet Gateway Server host.
Note
In the following procedure, "TGS_host" refers to the hostname of the machine on which you are configuring the TIBCO rvrd software.
Step 1
Step 2
source vpnenv.csh
Step 3
ps -A | grep rv
Step 4
Step 5
rvrd -store rvrd.store
Step 6
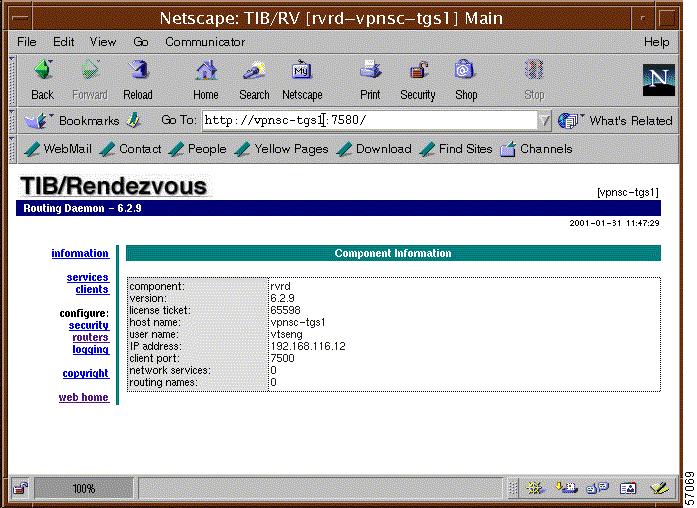
http:\\TGS_hostname:7580
The TIB/Rendezvous home page appears (see Figure 3-6).
Figure 3-6 TIBCO/Rendezvous Home Page
Step 7
The dialog box shown in Figure 3-7 appears.
Figure 3-7 Entering the TGS Host Name
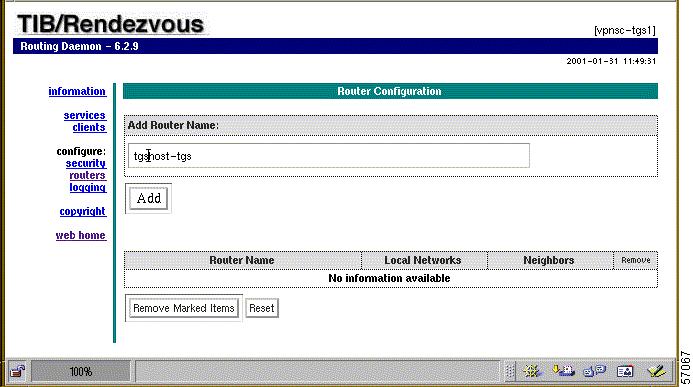
Step 8
Step 9
The TGS host name is displayed in the Router Name column.
Step 10
The dialog box shown in Figure 3-8 appears.
Figure 3-8 Entering the TGS Local Network Information
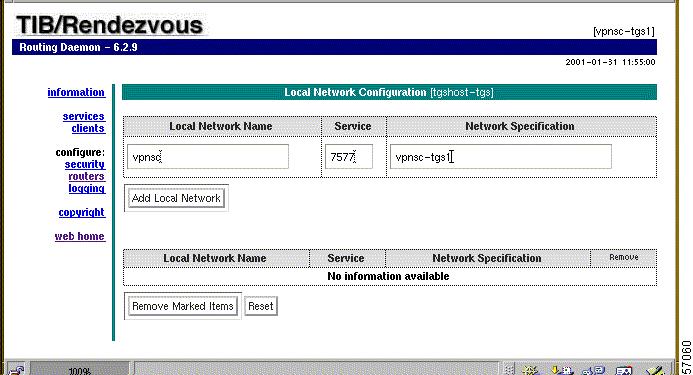
Step 11
a.
vpnsc
b.
The port number entered here should be same TIBCO port number entered in Step 11-b in the previous procedure to set up the VPNSC workstation for connectivity to the remote TGS host (see Figure 3-3).
c.
Step 12
On the lower section of the page, the values you entered are now displayed in the corresponding cells.
Step 13
Step 14
The dialog box shown in Figure 3-9 appears.
Figure 3-9 Entering the Telnet Gateway Server Neighbor Information
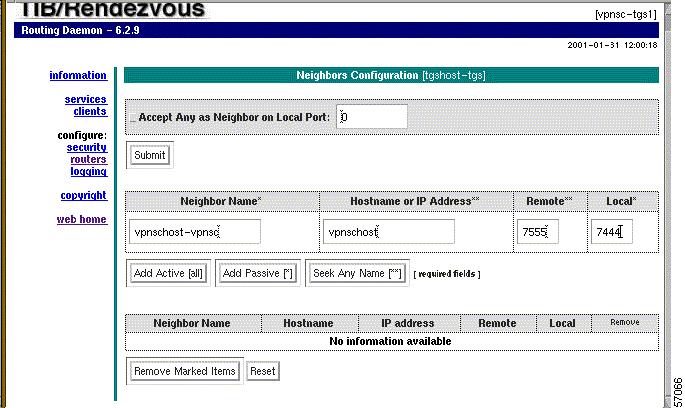
Step 15
a.
VPNSC_host-vpnsc
b.
c.
7555
d.
7444
Step 16
Step 17
Step 18
Step 19
The dialog box shown in Figure 3-10 appears.
Figure 3-10 Entering the Export Object Information

Step 20
cisco.vpnsc.watchdog.heartbeat
Step 21
The export subject you entered is now displayed in the Exported Subjects field.
This completes the procedure for setting up the for connectivity to the VPNSC workstation on the remote TGS host.
Step 22
Step 23
 Feedback
Contact Cisco
- Open a Support Case

- (Requires a Cisco Service Contract)