Adding Standard Configuration
You can set a series of device configuration values as standard configuration for compliance monitoring. MSX provides four categories of standard configuration: DNS, NTP, SNMP, and SYSLOG. You can set the values of these categories using API. After you set these values, they will be prepopulated when you access the standard configuration from Managed Device.
Editing Standard Configuration
The Standard Configuration is the set of values that must be compliant across devices added to compliance monitoring. Devices that are added to Compliance monitoring will have their configuration validated against the Standard Configuration. Any deviations from the Standard Configuration will be reported immediately in the system and users alerted. Devices are also monitored in real-time for any remote changes that may deviate from the Standard Configuration. The values in the Standard Configuration will be applied to all configured device types. Categories in the Standard Configuration can be added or removed.
To update or delete values:
Procedure
| Step 1 |
Log in to the Cisco MSX portal. |
| Step 2 |
From the left pane, choose Tenant Workspace > Service Controls. The list of service controls associated with a tenant is displayed. |
| Step 3 |
Click Compliance. The compliance settings window is displayed. 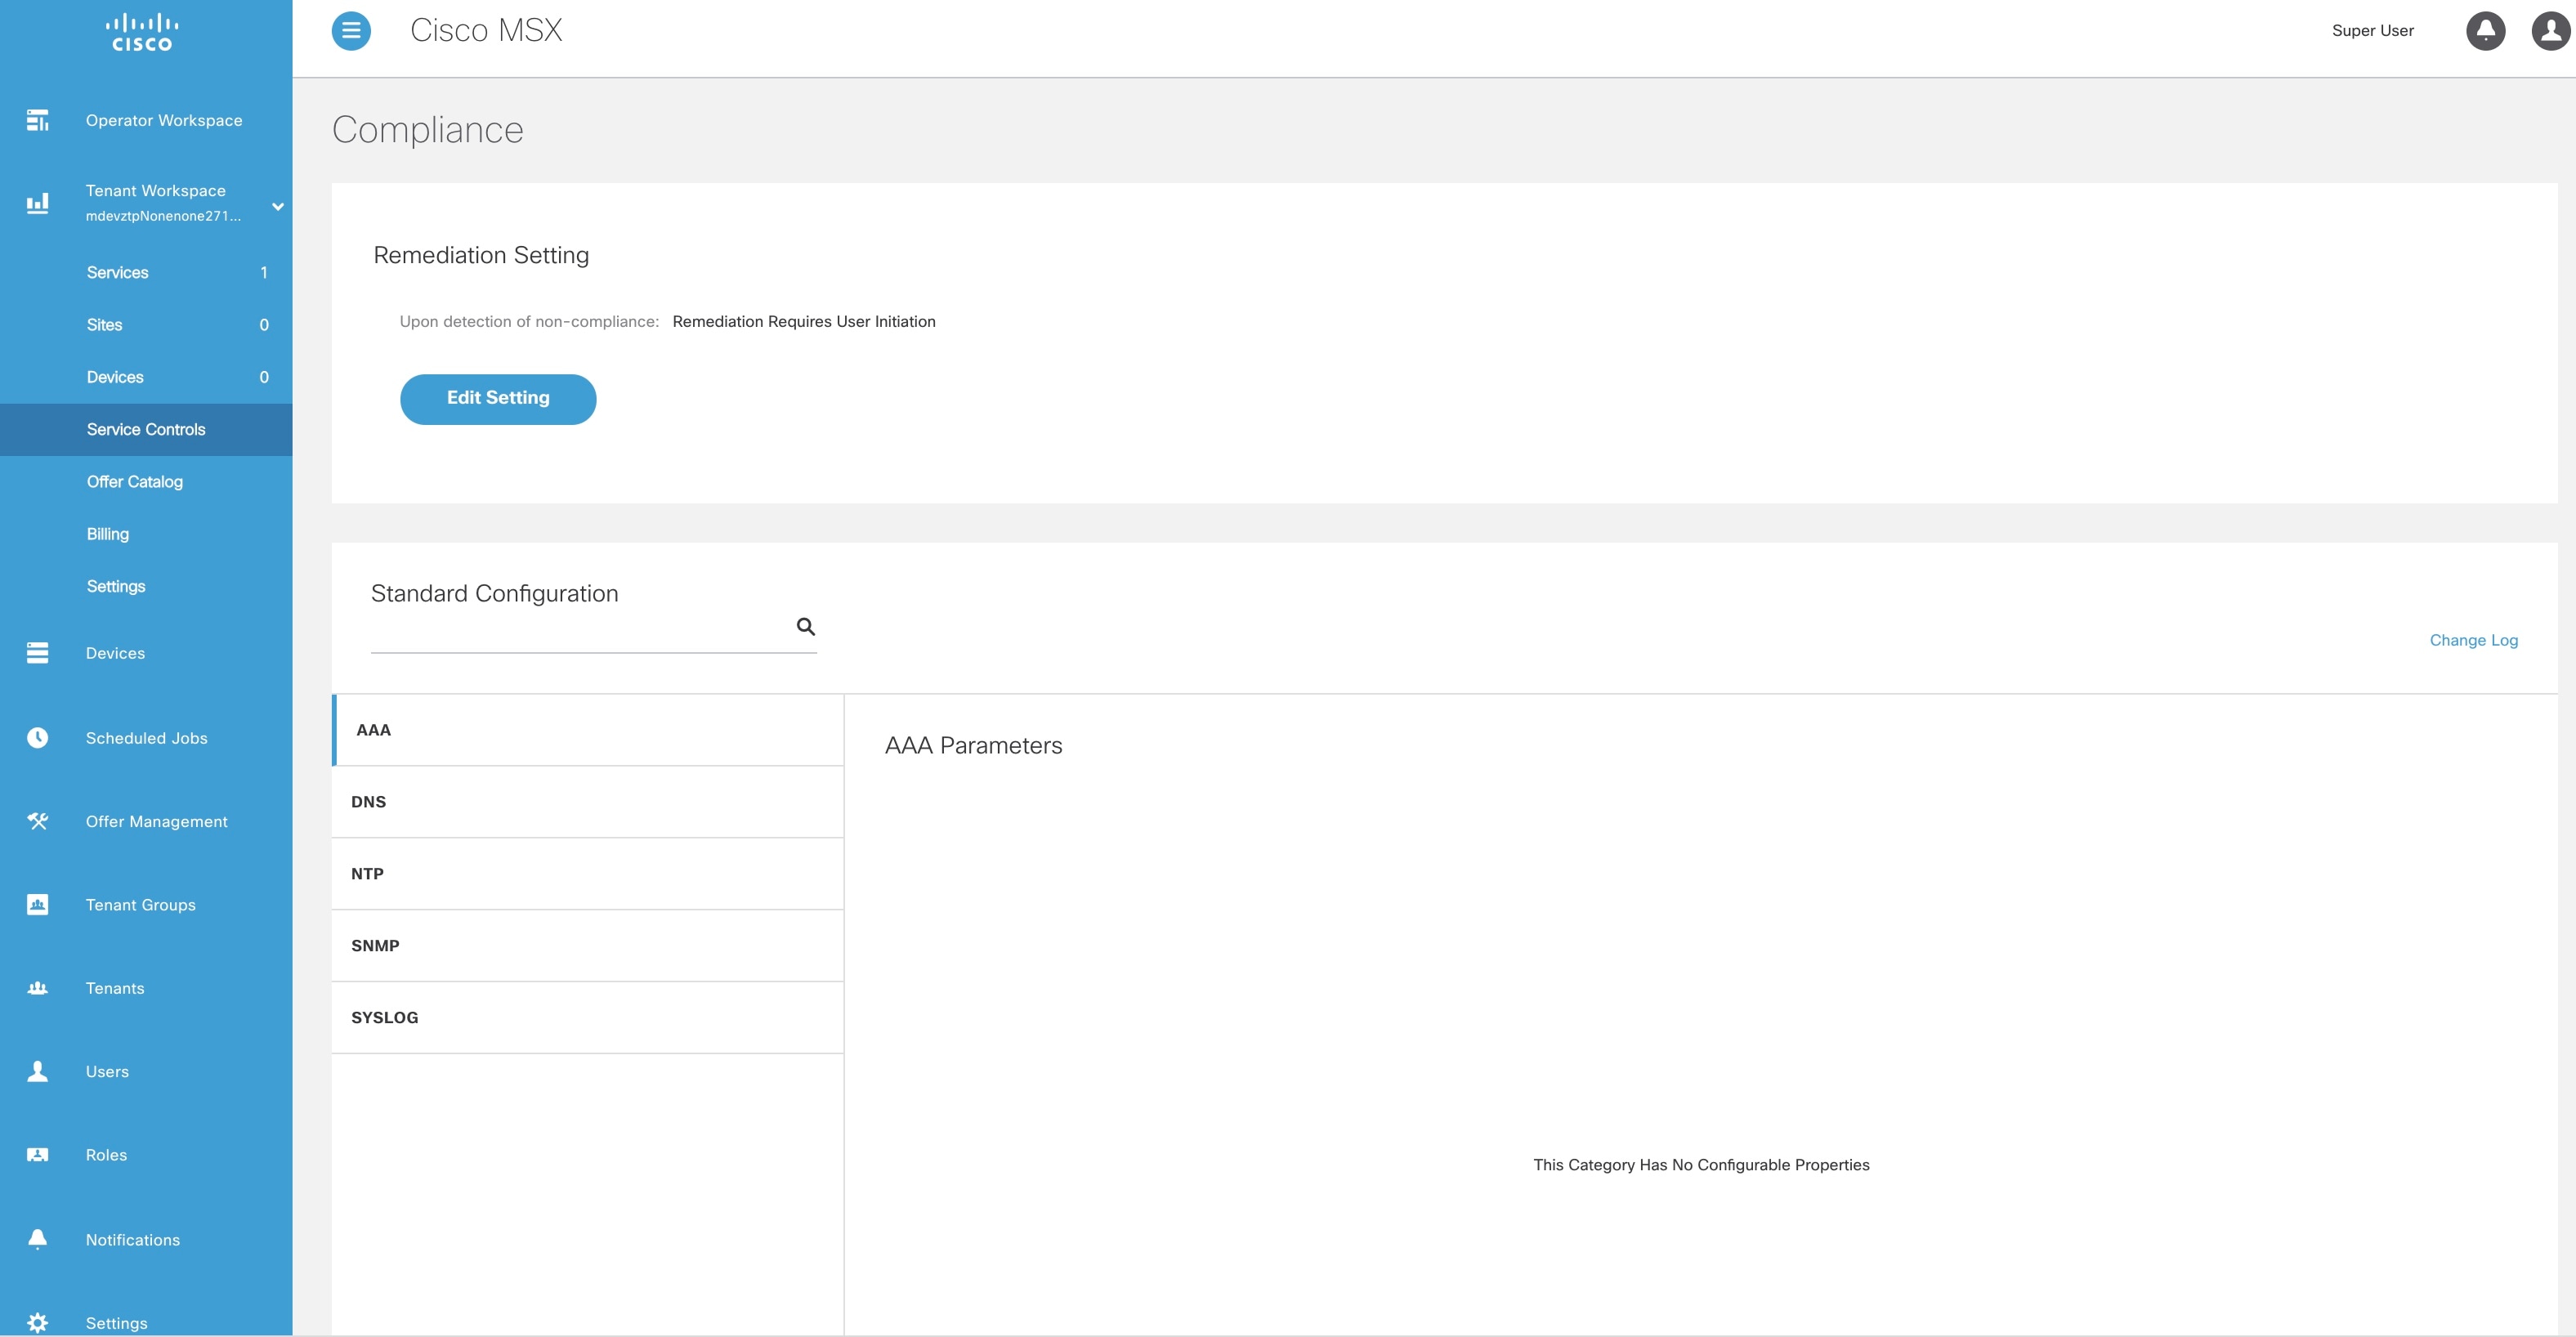
|
| Step 4 |
Click Edit Standard Configuration. The Edit Standard Configuration window is displayed. |
| Step 5 |
You can either make changes or delete the category values. |
| Step 6 |
Click Save Configuration. A message 'Standard Configuration Values Saved' is displayed. |
| Step 7 |
Click Update Devices to propagate the changes to devices. |
Creating a ServiceNow Account
You can create a ServiceNow account for generating incident tickets for compliance drift and remediation actions.
For more information on integrating incident tracking system with Cisco MSX, see Integrating Incident Tracking System with Cisco MSX.
To create a ServiceNow account:
Procedure
| Step 1 |
Log in to the Cisco MSX portal. |
||
| Step 2 |
From the left pane, choose Tenant Workspace > Service Controls. The list of service controls associated with a tenant is displayed. |
||
| Step 3 |
Click ServiceNow Settings. The ServiceNow Settings window is displayed. 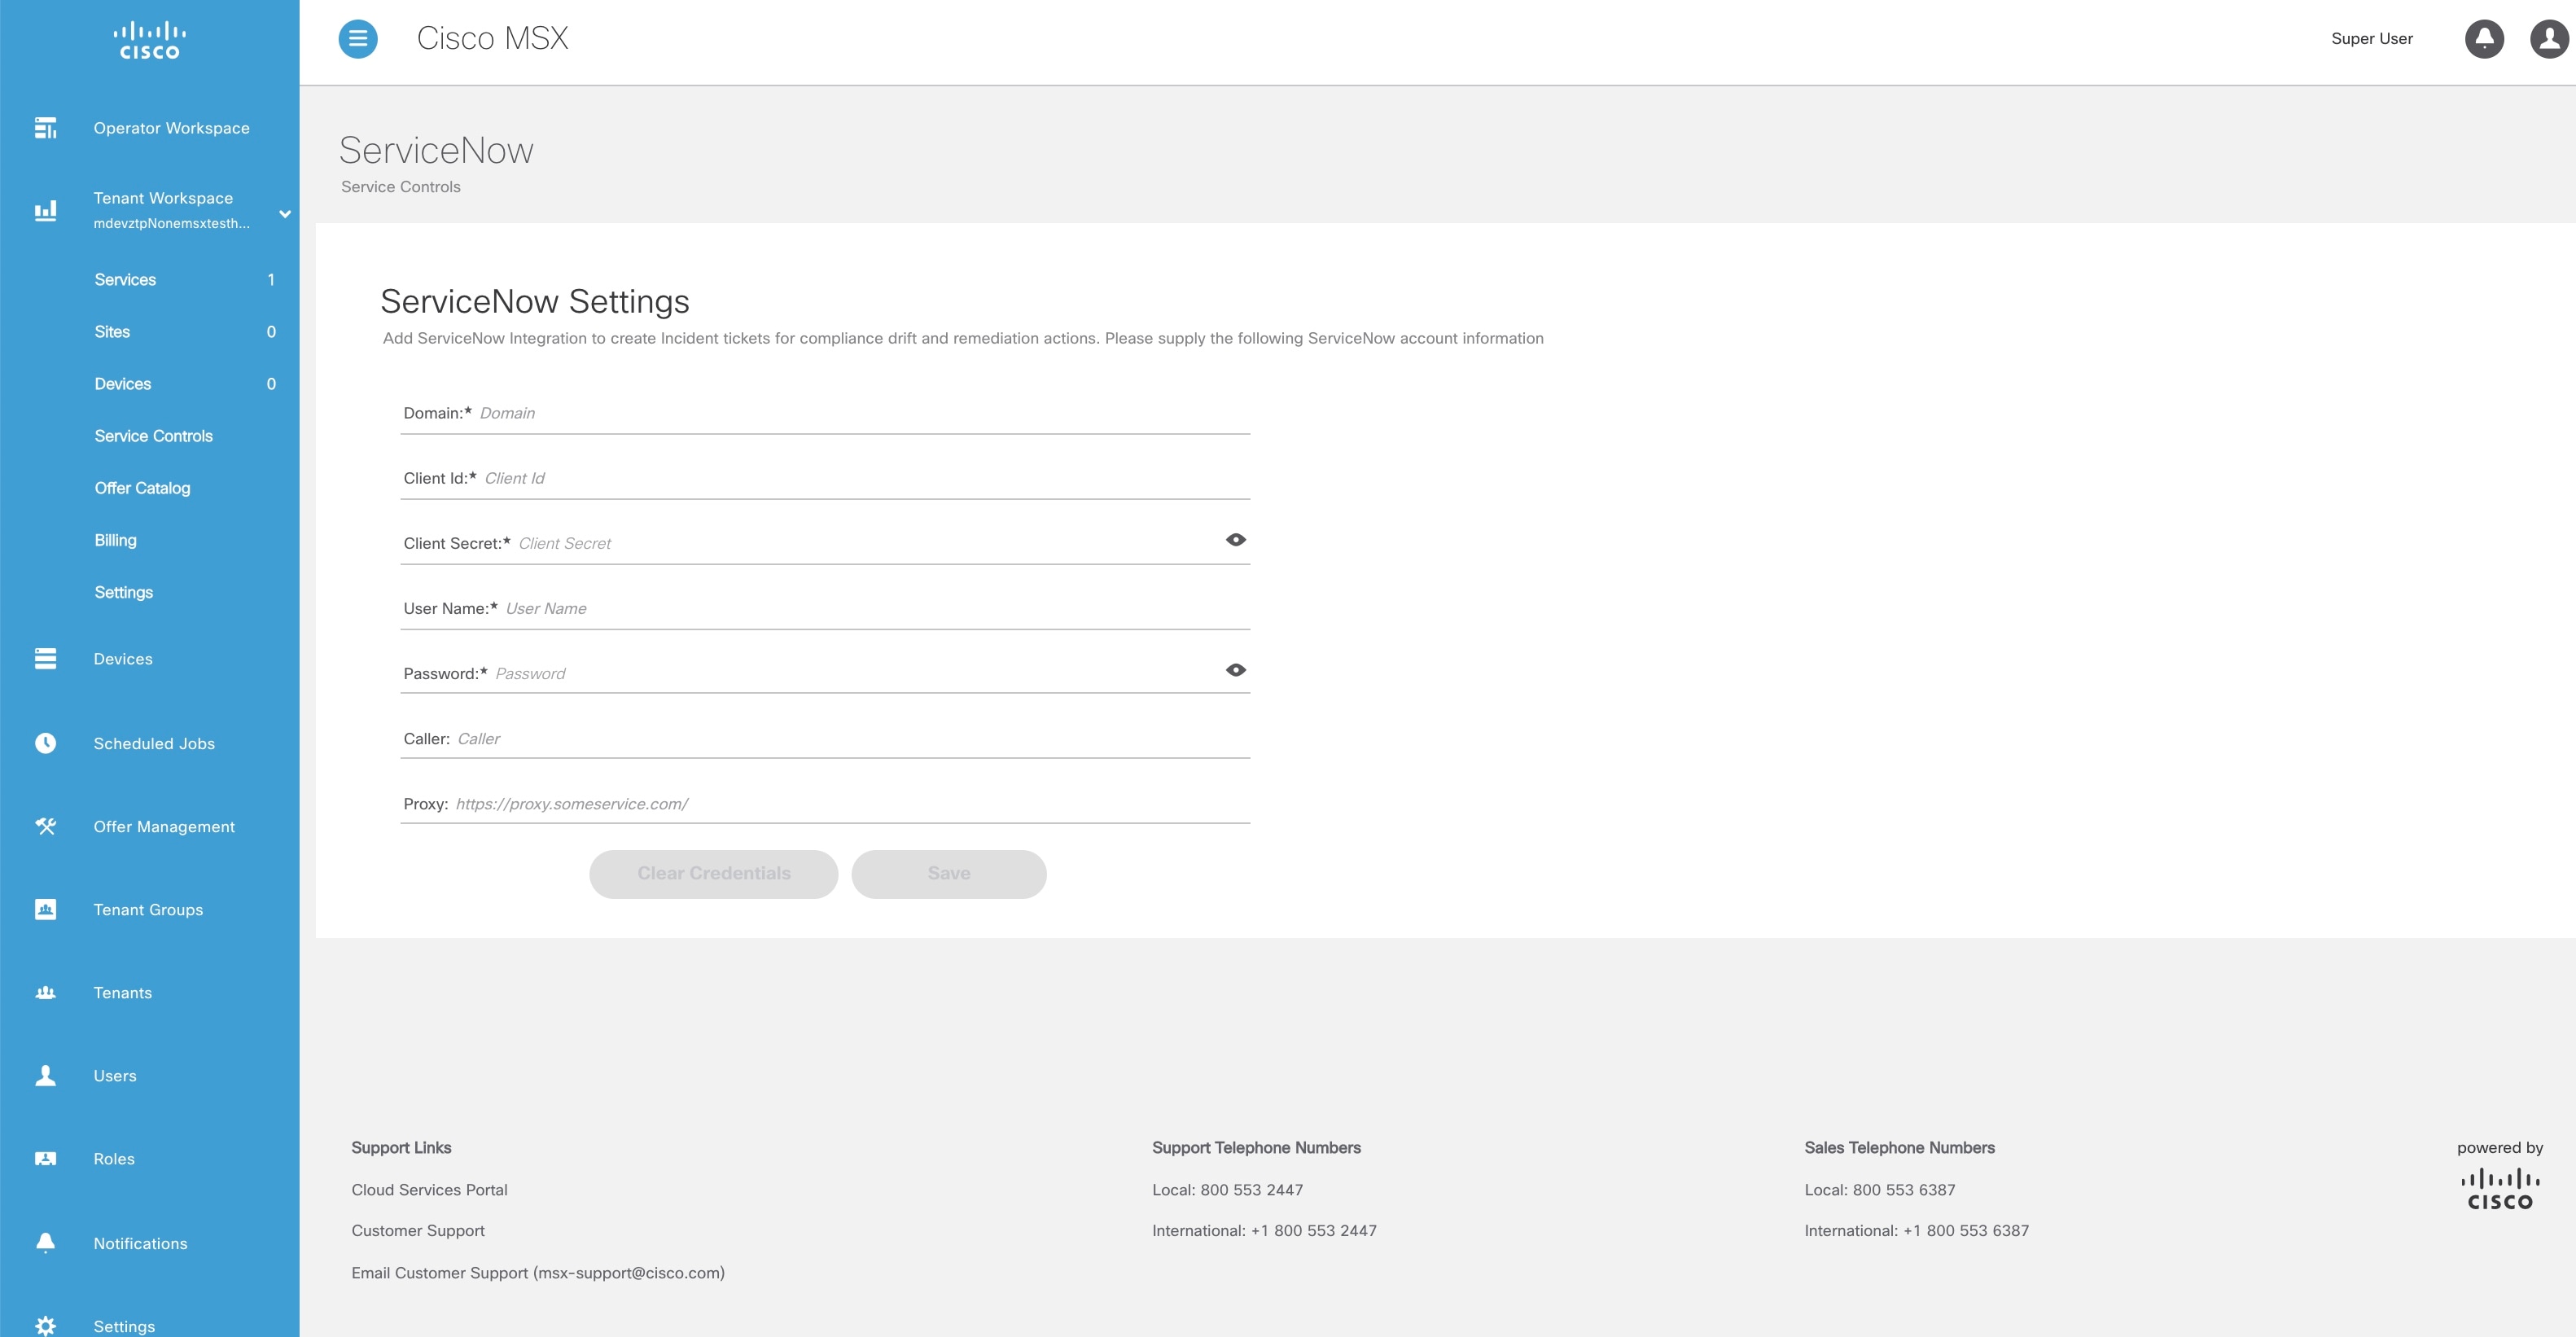
|
||
| Step 4 |
In the Domain field, enter a domain name. |
||
| Step 5 |
In the Client Id field, enter a client id. |
||
| Step 6 |
In the Client Secret field, enter a client secret. |
||
| Step 7 |
In the User Name field, enter your user name. |
||
| Step 8 |
In the Password field, enter your password. |
||
| Step 9 |
(Optional) In the Proxy field, enter a proxy URL. |
||
| Step 10 |
Click Save. A message 'ServiceNow Configuration Saved Successfully' is displayed.
|
Adding a Device to Compliance Monitoring
Compliance monitoring for devices ensures any deviation from the defined set of compliant values (the Standard Configuration) is detected and reported immediately to system administrators. The deviations can be auto-remediated or invoked by user interaction. A full audit log is available to view activities related to compliance deviation and remediations.
To add a device to compliance monitoring:
Procedure
| Step 1 |
Log in to the Cisco MSX portal. |
||
| Step 2 |
From the left pane, choose Tenant Workspace > Devices. The Devices tile is displayed with the list of devices. |
||
| Step 3 |
Choose a device or devices from the list. |
||
| Step 4 |
If you choose a single device, click the ellipsis (...) that is located far right on the same row and then choose Add to Compliance Monitoring. If you choose multiple devices, click the ellipsis (...) that is located far right on the column header, and then choose Add to Compliance Monitoring. The Add Devices to Compliance Monitoring dialog box is displayed. The dialog box provides information about how many devices are already monitored and how many will be added for monitoring. |
||
| Step 5 |
Click Add to Monitoring. A confirmation message is displayed.
|
||
| Step 6 |
Click Close. |
Removing a Device from Compliance Monitoring
You can remove a device or devices from compliance monitoring. After you remove a device from compliance monitoring, it will not be monitored for any changes that deviate from the Standard Configuration.
To remove a device from compliance monitoring:
Procedure
| Step 1 |
Log in to the Cisco MSX portal. |
| Step 2 |
From the left pane, choose Tenant Workspace > Devices. The Devices tile is displayed with the list of devices. |
| Step 3 |
Choose a device or devices from the list. |
| Step 4 |
If you choose a single device, click the ellipsis (...) that is located far right on the same row and then choose Remove from Compliance Monitoring. If you choose multiple devices, click the ellipsis (...) that is located far right above all devices, and then choose Remove from Compliance Monitoring. The Remove Device from Compliance Monitoring dialog box is displayed. The dialog box provides information about how many devices will be removed from monitoring. |
| Step 5 |
Click Remove from Monitoring. A confirmation message is displayed. |
| Step 6 |
Click Close. |
Configuring the Compliance for Devices
You can edit the compliance remediation settings of devices. You can either choose automatic remediation or user initiated remediation.
To edit compliance settings:
Procedure
| Step 1 |
Log in to the Cisco MSX portal. |
| Step 2 |
From the left pane, choose Tenant Workspace > Service Controls. The list of service controls associated with a tenant is displayed. |
| Step 3 |
Click Compliance. The compliance settings window is displayed.
|
| Step 4 |
Click Edit Compliance Settings to change the compliance settings. The Edit Compliance Settings window is displayed. |
| Step 5 |
Click the Remediation Requires User Initiation radio button if user initiation is required for remediation. If you choose this option, the values will not be reverted to standard values until you initiate it from your side. |
| Step 6 |
Click the Non-compliance Values Reverted When Detected radio button if you want automatic remediation. If you choose this option, devices are automatically reverted to standard configuration values when non-compliant values are detected. You will be notified of the changes. |
Remediating Non-compliant Values on a Device
Deviations on a device from the Standard Configuration can be remediated in two ways. The first option is to revert the changes on the device to the Standard Configuration values. The second option is to accept the Non Complaint values on the device. This action will track the exception for this device and not warn again if the device is checked again for deviation drift. Changing the Standard Configuration value will negate any exceptions stored for a device against the changed Standard Configuration value.
To remediate non-compliance values:
Procedure
| Step 1 |
Log in to the Cisco MSX portal. |
| Step 2 |
From the left pane, choose Tenant Workspace > Devices. The Devices tile is displayed with the list of devices. |
| Step 3 |
From the list, click a device. The device summary is displayed. |
| Step 4 |
Click Device Details. The device metric page lists the device information. |
| Step 5 |
From the Compliance section, click Remediate. The Remediate Non-Compliant Values window is displayed. From the remediation options, you can either choose Revert to Standard Configuration Values or Accept Devices Values. |
| Step 6 |
Click Revert to Standard Configuration Values if you want to revert the values to standard configuration. |
| Step 7 |
Click Accept Devices Values if you want to accept the values as compliant despite their differences with the standard configurations. |
Updating Monitored Devices with Standard Configuration
You can update all the monitored devices with standard configuration.
To push standard configuration to monitored devices:
Procedure
| Step 1 |
Log in to the Cisco MSX portal. |
| Step 2 |
From the left pane, choose Tenant Workspace > Service Controls. The list of service controls associated with a tenant is displayed. |
| Step 3 |
Click Compliance. The compliance settings window is displayed.
|
| Step 4 |
Click Update Monitored Devices. The Push Standard Config to Monitored Devices window is displayed. |
| Step 5 |
Click Update Devices. A message 'Standard Configuration Saved Successfully' is displayed. |
Viewing Device Vulnerabilities
The Cisco MSX platform now detects and reports the software compliance vulnerabilities for both the Cisco devices and third-party software devices. You can see the vulnerability details in the Device Metric page.
For more information on how vulnerabilities are detected, see Managing the Device Compliance Vulnerability Using API.
To view the device vulnerabilities:
Procedure
| Step 1 |
Log in to the Cisco MSX portal. |
| Step 2 |
From the left pane, choose Tenant Workspace > Devices. The Devices tile is displayed with the list of devices. |
| Step 3 |
From the list, click a device. The device summary is displayed. |
| Step 4 |
Click Device Details. The device metric page lists the device information. Go to Vulnerabilities tile to see the device vulnerabilities. |
Viewing Monitored Devices
You can view the devices under compliance monitoring. The device listing page allows you to filter the devices based on device compliance. The following filtering options are available:
-
All: Displays all the devices.
-
Non-complaint: Displays all non-compliant devices.
-
Monitored: Displays all devices that are monitored for compliance.
-
Eligible: Displays all the devices that are eligible for compliance.
To view all the devices under compliance monitoring:
Procedure
| Step 1 |
Log in to the Cisco MSX portal. |
| Step 2 |
From the left pane, choose Tenant Workspace > Service Controls. The list of service controls associated with a tenant is displayed. |
| Step 3 |
Click Compliance. The compliance settings window is displayed.
|
| Step 4 |
Click View Monitored Devices. The list of devices under compliance monitor is displayed. |
| Step 5 |
To filter the devices based on compliance criteria, choose a filtering option from the Compliance drop-down list. |
Converting Device Configuration to Device Template
The Cisco MSX platform allows you to convert both Cisco and non-Cisco native device configuration formats to device template formats. You can import these converted templates into the centralized template service, and any services like MD can use those templates. This feature also allows you to copy or download the converted configuration.
To convert device configuration to device template:Procedure
| Step 1 |
Log in to the Cisco MSX portal. |
| Step 2 |
From the left pane, choose Settings. |
| Step 3 |
In the Settings window, choose Template Management. |
| Step 4 |
In the Template Management window, choose Device Templates. The Template window is displayed. |
| Step 5 |
In the Select A Configurational Template section, click the ellipsis (…) and choose Convert to Template from the menu. The Convert to Template window is displayed. 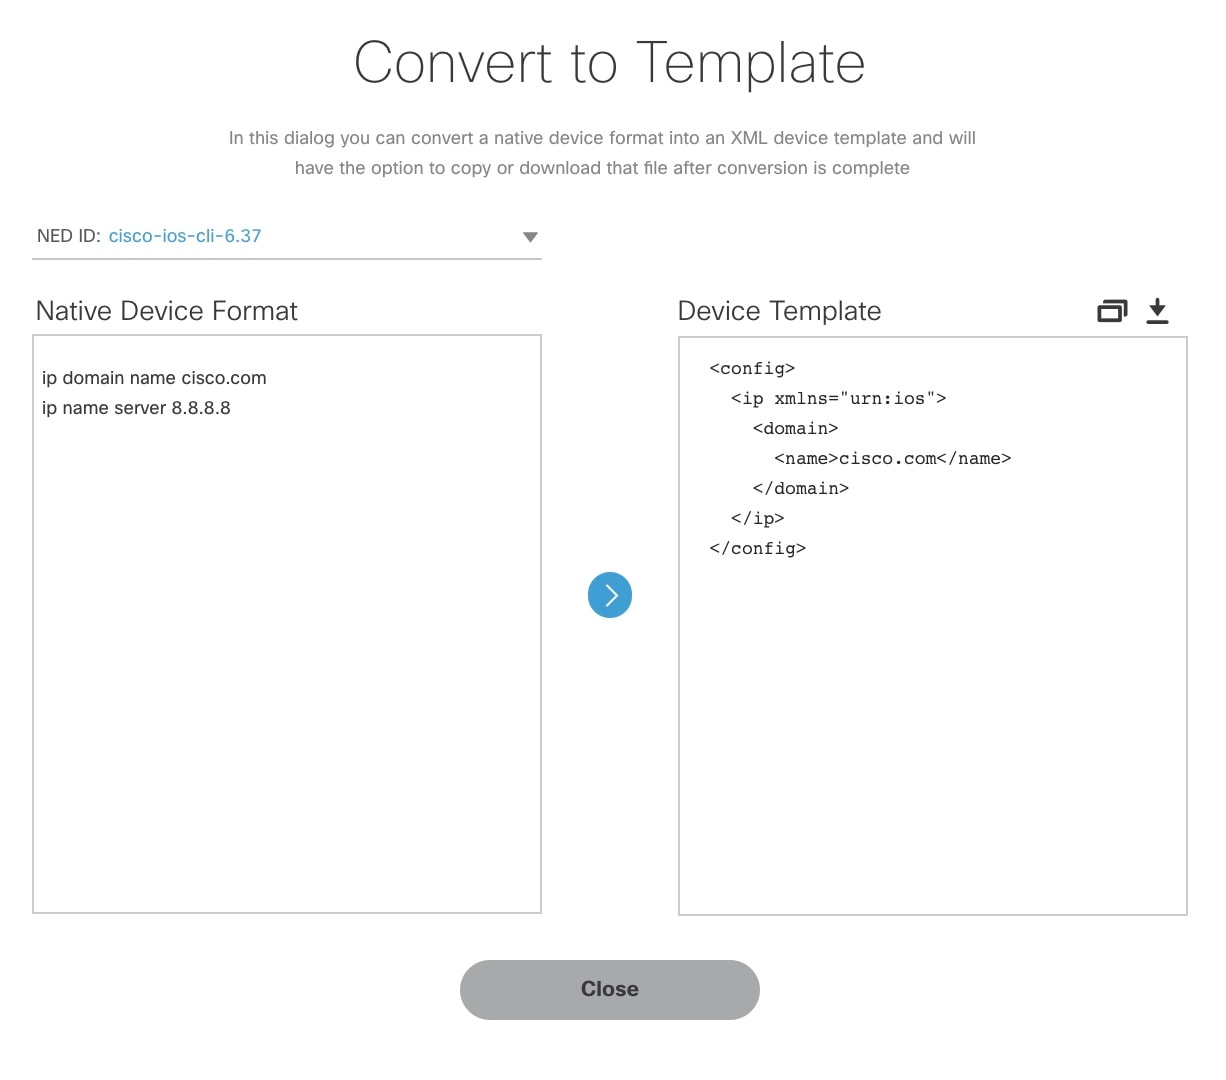 |
| Step 6 |
From the NED IDs drop-down list, choose a NED ID. |
| Step 7 |
In the Native Device Format pane, enter the native device configuration. |
| Step 8 |
Click Convert. The Device Template pane displays the converted configuration in XML format. |
| Step 9 |
Click the Copy icon to copy the configuration to clipboard. |
| Step 10 |
Click the Download icon to download the configuration file. |
| Step 11 |
Click Close. |
 Feedback