Inventory and Reporting Reports
Available Languages
Table Of Contents
Inventory and Reporting Reports
Overview of Inventory and Reporting Reports
Executive/Management Summary Report
Inventory/Product Alerts Reports
Product Advisory/ Field Notices
Install Base Management Report
MACD Network View Report Overview
Inventory and Reporting Reports
Overview of Inventory and Reporting Reports
Inventory and Reporting (IR) makes a variety of reports available to users. The Reports function provides reports that are based on the devices that have been either manually or automatically discovered in your network. The transport gateway securely uploads the collected device information to the IR backend for report processing.
Inventory reports can be of four different types:
•
Inventory/Product Alerts Reports
•
These four reports:
•
•
•
•

Note
Inventory Reports
The Inventory reports give a complete overview of the hardware, and software characteristics. These reports also identify exceptions in your network and provide a complete look at your network's composition and any incomplete data.
The topics in this section describe the different types of Inventory reports you can request and view:
•
•
To access the Inventory reports noted above, perform the following steps:
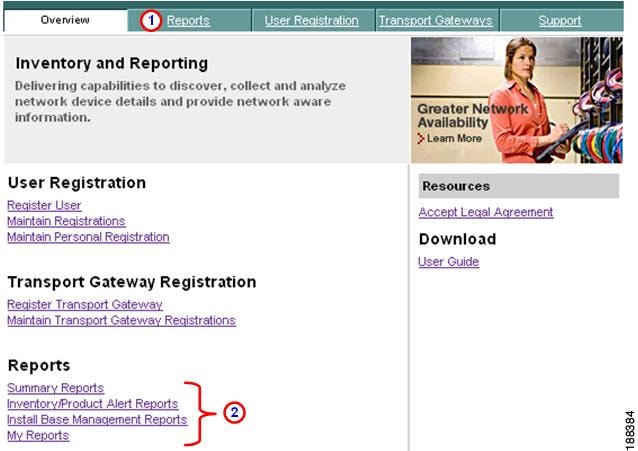
Step 1
which displays the Summary Reports page by default, or click one of the report types
in the reports list, which displays the respective Reports page.
Summary Reports
The Summary Reports provides an overview of all the devices that the Cisco Network Collector successfully found in the customer network. Summary Reports provides an overview of the device hardware and software (Cisco IOS® software and non-Cisco IOS software) used in the customer network:
There are three reports that provide a complete look at the network's composition and identify what areas of the network have incomplete inventory data and why.
Summary Reports are created automatically for each uploaded inventory. The Summary Reports include the following reports:
•
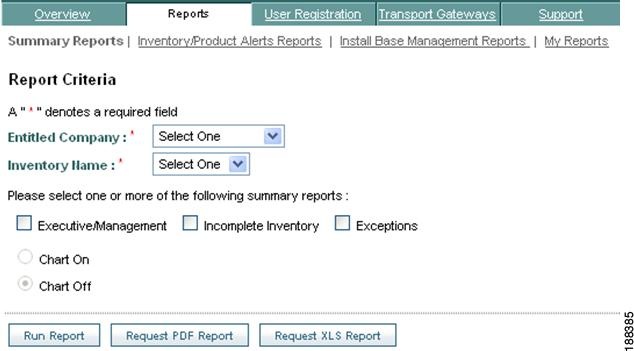
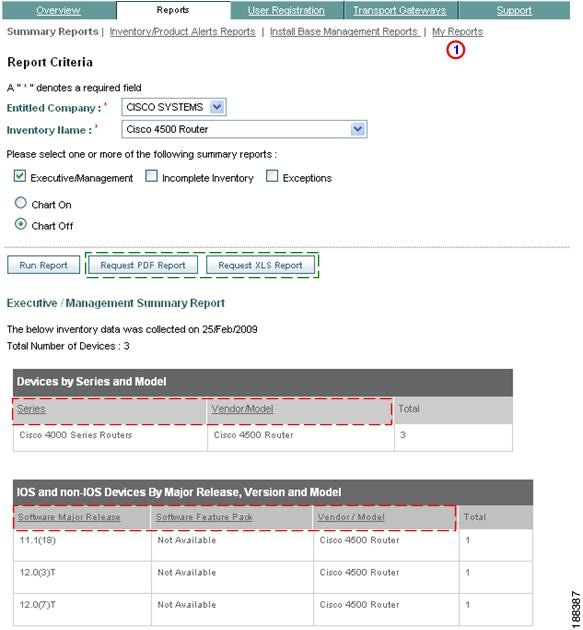
Executive/Management Summary Report
The Executive/Management Summary Report identifies which devices in the network were successfully found, contacted and had their inventory data collected.
The Executive/Management Summary Report provides the following summary information on the devices in the uploaded inventory:
Device Summary:
•
•
•
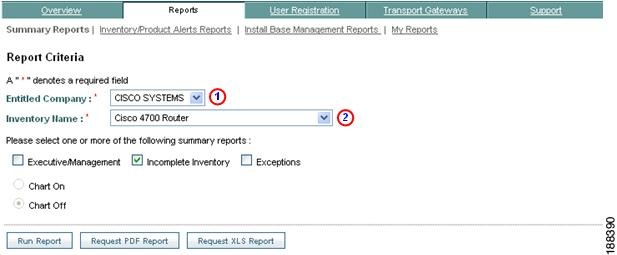
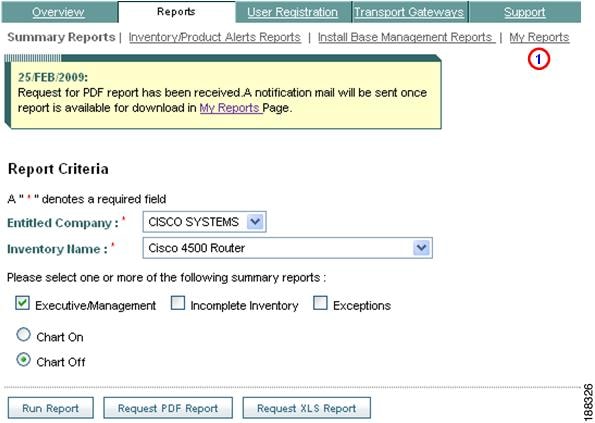
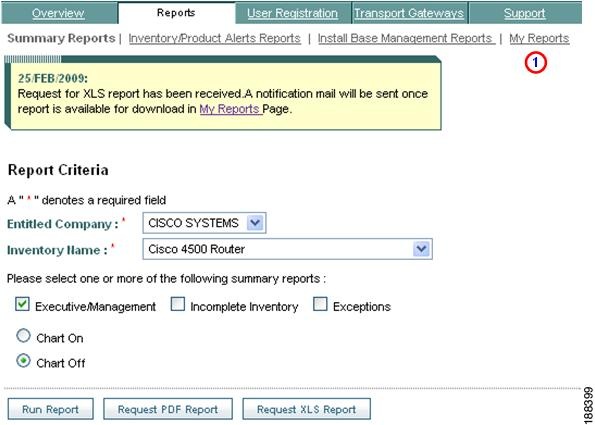
To generate the Executive/Management Summary Report, perform the following steps:
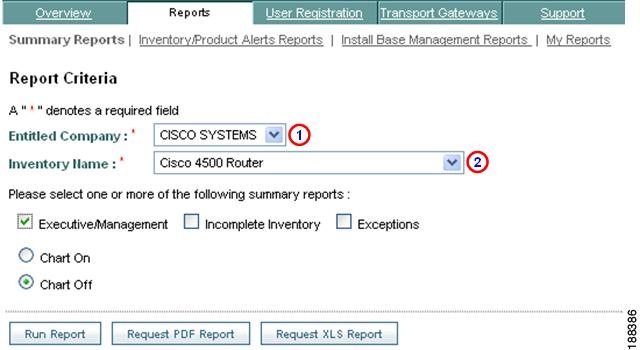
Step 1
Step 2
Note
Step 3
Step 4
Step 5
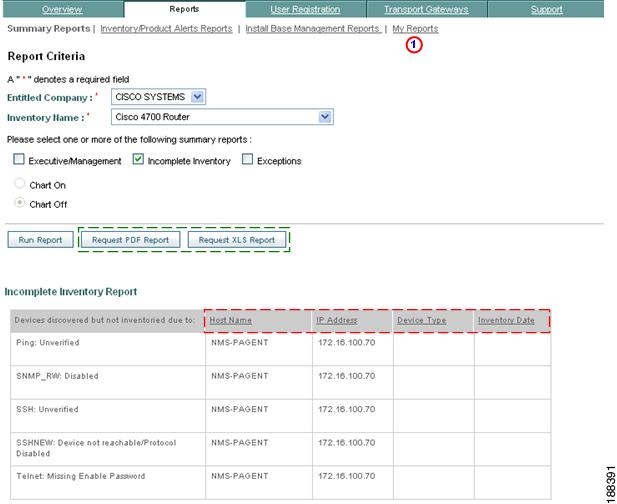
When IR finishes the requested reports, they can be accessed by clicking the My Reports link.
Note
indicates that the column can be sorted by clicking the header text.
Charts
•
•
–
–
–
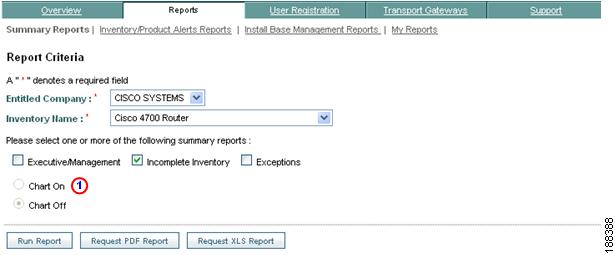
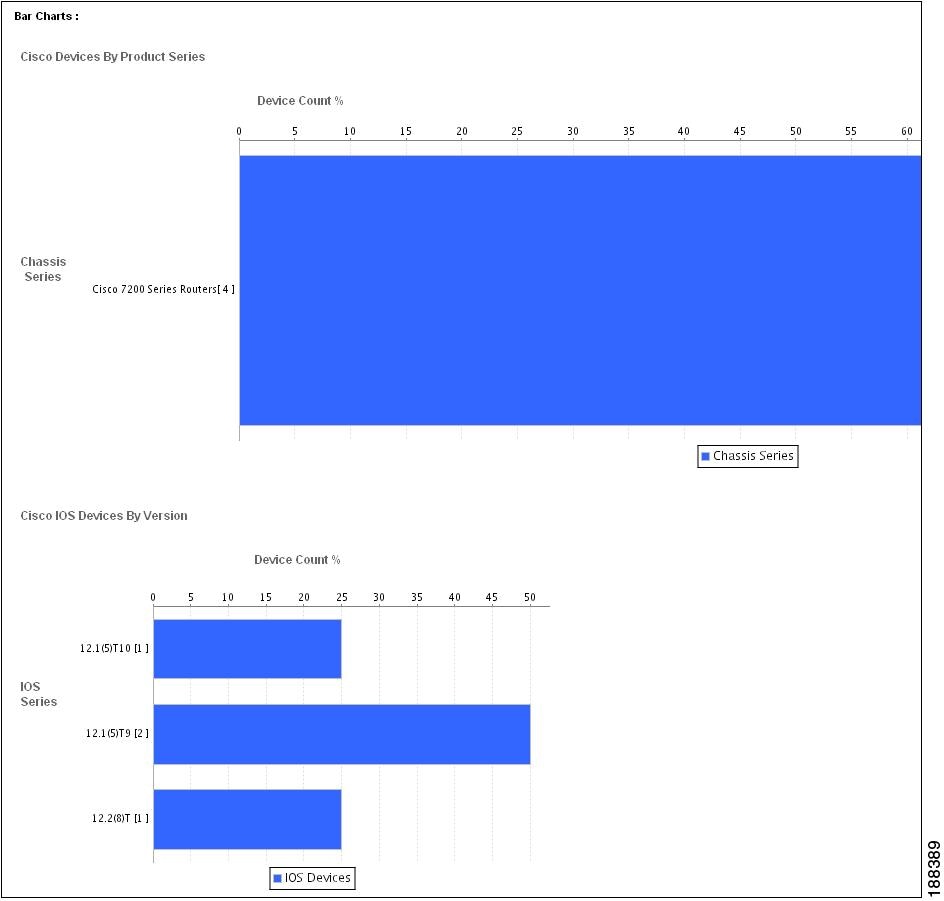
When the Chart On option
The bar chart portion of the results is shown in the following graphic.
Note
Incomplete Inventory Report
The Incomplete Inventory Report lists those devices that were identified in the network (that is, were discovered or identified in a customer seed file) but provided incomplete inventory data due to an access protocol error. The report provides details about the technical difficulties that occurred when IR tried to access the device. Inventory and Reporting uses the following protocols are the protocols to access and then collect the inventory data for a device:
•
•
•
Note
Details about the access protocol difficulties that IR encountered while collecting the inventory are included as part of the inventory upload. Some examples of the problems are listed below:
•
•
•
•
•
•
•
•
•
•
To generate the Incomplete Inventory Report, perform the following steps:
Step 1
Step 2
Note
Step 3
Step 4
Step 5
Note
Exceptions Report
The Exceptions Report identifies those devices that were successfully found in the network and had their inventory data collected but have a specific exception noted.
The report identifies the specific exception that is associated with each device that occurred during the inventory processing. Some of the exceptions include:
•
•
•
•
•
•
•
To generate the Exceptions Report, perform the following steps:
Step 1
Step 2
Note
Step 3
Step 4
Step 5
Note
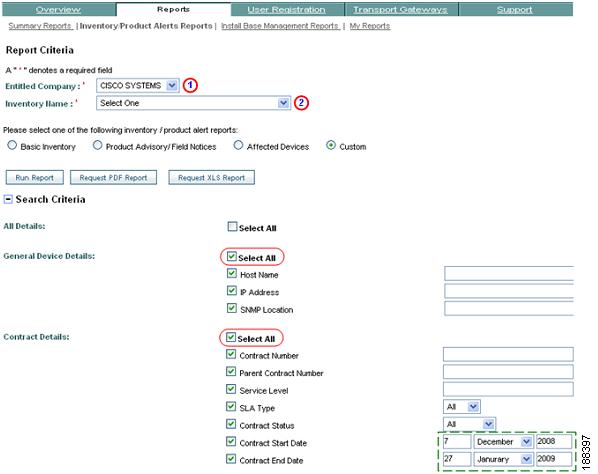
Inventory/Product Alerts Reports
The reports in this category provide specific details about the devices in an inventory upload. This report category lets you specify different search criteria, which lets you obtain a specifically focused report; reports in this category include:
•
This report group provides more specific details about the devices in the inventory. The following information describes the different behavior characteristics on this page:
•
•
•
•
The Search Criteria area has the following key category areas, with associated sub-categories off of them:
•
•
•
•
•
Note
Basic Inventory Report
The Basic Inventory Report is a device summary report that provides basic details about the devices in the inventory. This report identifies the hardware and software details of all the discovered device chassis and installed cards.
When this report is selected, specific pre-determined check boxes are selected for processing this type of report. If you select or de-select any other check boxes then the report automatically changes to a Custom Report.
The options that are selected for the Basic Inventory are:
General Device Details:
Host Name
IP Address
Contract Details:
Installed-At Site Name
Install at Address
Device Details: Chassis
Device Type
Series
Vendor/Model
Product ID (validated)
Serial Number (validated)
Software Version
Feature Set
Last Inventory Date w/ dd/mm/yyyy specified
Device Details: Cards:
Device Type
Card Description
Card Product ID (validated)
Card Serial Number (validated)
Last Inventory Date w/ dd/mm/yyyy specified
Product Alert Details:
None specified
To generate the Basic Inventory Report, perform the following steps:
Note
Step 1
Step 2
Note
Step 3
Step 4
Product Advisory/ Field Notices
This report lists the devices in the customer network that are affected by one or more of Cisco's specified and published product alerts.
When this report is selected, specific pre-determined check boxes are selected for processing this type of report. If you select or de-select any other check boxes then the report automatically changes to a Custom Report.
The options that are selected for the Product Advisory/ Field Notices are:
General Device Details:
Host Name
IP Address
Contract Details:
None specified
Device Details: Chassis
Device Type
Vendor/Model
Product ID (validated)
Serial Number (validated)
Software Version
Device Details: Cards:
Device Type
Card Product ID (validated)
Card Serial Number (validated)
Product Alert Details:
Hardware Alerts Count
Software Alerts Count
FN Alerts Count
PSIRT Alerts Count
To generate the Product Advisory/ Field Notices Report, perform the following steps:
Note
Step 1
Step 2
Note
Step 3
Step 4
Affected Devices
This report displays a list of product alerts and field notices that affect one or more devices in the customer's network, and provides a navigation function that lets you view the number of devices that are affected by a specific product alert/field notice and indicates which devices are affected.
When this report is selected, specific pre-determined check boxes are selected for processing this type of report. If you select or de-select any other check boxes, then the report automatically changes to a Custom Report.
The options that are selected for the Product Advisory/ Field Notices are:
General Device Details:
Host Name
IP Address
Contract Details:
None specified
Device Details: Chassis
Series
Product ID (original)
Serial Number (original)
Device Details: Cards:
None specified
Product Alert Details:
None specified
To generate the Affected Devices Report, perform the following steps:

Note
Step 1
Step 2
Note
Step 3
Step 4
Custom Reports
You can customize the Inventory report by applying filters and selecting as many output attributes as available. The following are the search criteria attributes that are applicable for the inventory reports. The search criteria attributes are grouped into five categories:
•
•
•
•
•
To generate a Custom Report, perform the following steps:
Note
Step 1
Step 2
Note
Step 3
Step 4
Note
to select all the check boxes for the corresponding category. It is possible to select all the checkboxes; doing so will generate a very large report. There are some sub-categories that also let you specify time frames,
Step 5
Install Base Management Report
The Install Base Management Report contains only one report, the MACD Network View Report, which is covered in the next two sections.
MACD Network View Report Overview
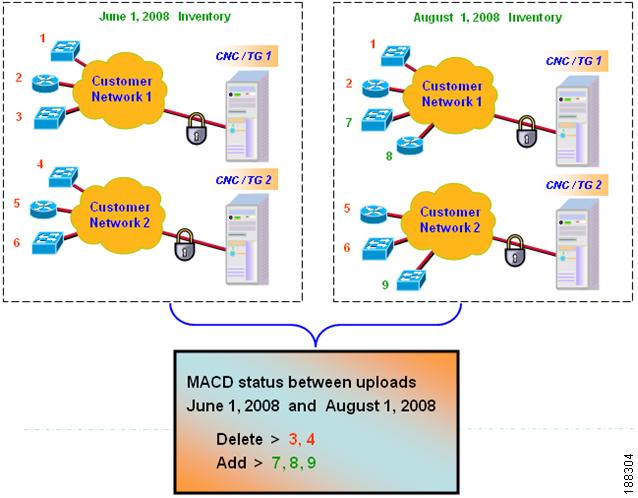
The MACD (Move, Add, Change and Delete) Report currently supports the Add, and Delete functions. The MACD Network View Report compares the devices from two different inventory uploads. In the following example, one upload is from an inventory performed earlier (June 1), the other upload is from an inventory performed on the same network area but at a later date (August 1).
Note
The example above displays a MACD Network View Report that compares the inventory uploads performed on June 1, 2008 and Aug. 1, 2008. The MACD Network View Report identifies the following MACD statuses for the device:
•
•
Note
•
•
•
The MACD Network View Report also compares devices that do not have validated SN/PID; without this validation, the devices will show not available, since the devices can't be related to the previously uploaded data.
MACD Network View Report
This report identifies the MACD devices in your network that have been added or deleted from your network. This list provides a delta between devices (only chassis and cards) from the previous and in the current, aggregated inventories.
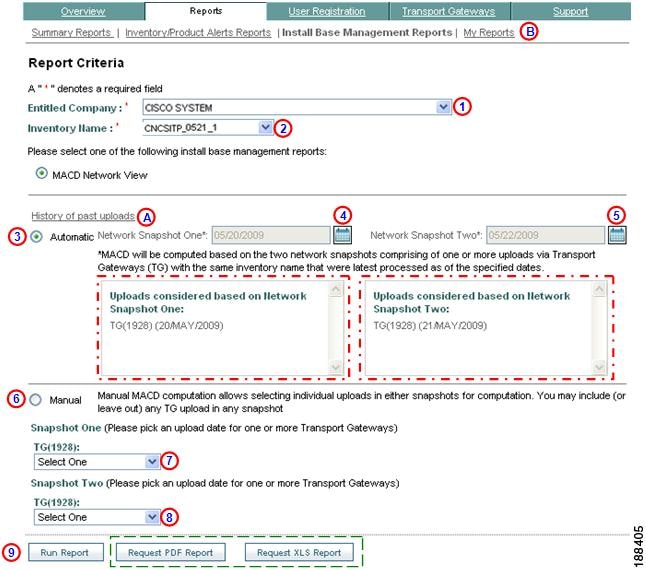
There are two methods for generating a MACD Network View Report, using either an automatic or manual method for selecting upload dates.
To generate a MACD Network View Report, perform the following steps:
Step 1
Step 2
Note
Step 3
1.
-user specifies two network snapshot dates

and IR automatically determines what uploads are used for MACD processing.
2.
- user selects specific upload inventories from each drop-down list;

the upload inventories are from all the TG's deployed in the customer network.
Note
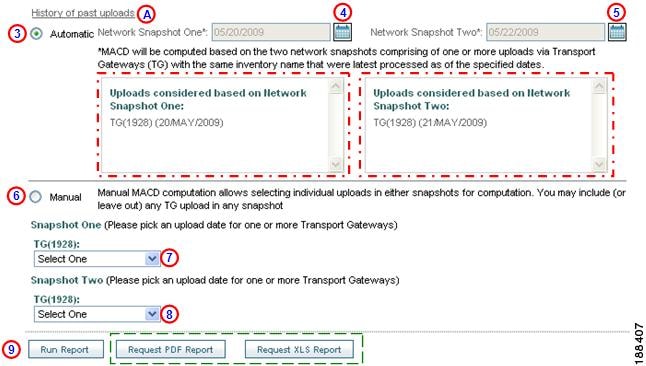
Automatic
When using the Automatic option, perform the following steps:
Step 4
Step 5
Step 6
Step 7

Step 8
which displays upload inventories from all transport gateways
.
Manual
When using the Manual option, perform the following steps:
Step 9
Step 10
Step 11
Step 12
the MACD Network View Report Results page appears.

Note
Step 13

Note
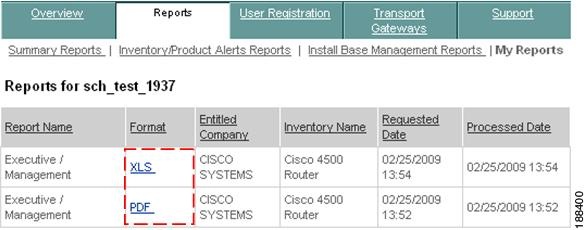
My Reports
All user requests for PDF or XLS formatted reports, once processed, will be displayed on the My Reports Page. When the report is available for download, two events will occur:
•
•
When a PDF version of a report is requested IR displays a message that indicates that the report request was received and that a notification will be sent when the report is available for download.:
Step 1
When an XLS version of a report is requested IR displays a message that indicates that the report request was received and that a notification will be sent when the report is available for download.:
Step 1
Step 2
 Feedback
Contact Cisco
- Open a Support Case

- (Requires a Cisco Service Contract)
This Document Applies to These Products
- Collaboration Endpoints - Retired Products
- Conferencing - Retired Products
- Contact Center - Retired Products
- Optical Networking - Retired Products
- Routers - Retired Products
- Security - Retired Products
- Servers - Unified Computing (UCS) Retired Products
- Storage Networking Retired Products
- Switches - Retired Products
- Video - Retired Products
- Wireless - Retired Products