Troubleshooting Virtual Network Function Deployment
Available Languages
Troubleshooting Virtual Network Function Deployment
First Published: February 9, 2018
Last Updated: February 9, 2018
Overview
This guide provides step by step instruction on how to troubleshoot issues among the VNFs deployed and managed by ESC.
Logs for Troubleshooting
Before performing ESC troubleshooting for VNF deployment, the first step is to collect and check logs. To collect ESC logs:
For ESC Release 2.3.2:
sudo /opt/cisco/esc/esc-scripts/collect_esc_log.sh
For ESC Release 3.0 and above:
sudo escadm log collect
There are several important logs containing useful error messages.
§ YangESC log contains the incoming request and notification:
/var/log/esc/yangesc.log
§ ESCManager log contains the ESC processing details:
/var/log/esc/escmanager.log
§ VimManager log contains the VimManager processing details:
/var/log/esc/vimmanager/vimmanager.log
§ Vim_VimManager log contains raw request/response between VimManager and VIM
/var/log/esc/vimmanager/vim_vimmanager.log
§ Mona log conatins monitoring procesing defails plus script executions
/var/log/esc/mona/mona.log
VNF VM Deployed Failed with VIM Related Error
When VM_DEPLOYED notification received (thru Netconf, REST, Portal) with a non-200 status code means the deployment failed due to an error.
Notification found in /var/log/esc/yangesc.log
02:19:25,758 23-Jan-2018 WARN ===== SEND NOTIFICATION STARTS =====
02:19:25,758 23-Jan-2018 WARN Type: VM_DEPLOYED
02:19:25,758 23-Jan-2018 WARN Status: FAILURE
02:19:25,758 23-Jan-2018 WARN Status Code: 500
02:19:25,759 23-Jan-2018 WARN Status Msg: VIM Driver: Exception while creating VM: Error creating VM from template, the host [10.67.103.255] does not exist
02:19:25,759 23-Jan-2018 WARN Tenant: admin
02:19:25,759 23-Jan-2018 WARN Deployment ID: 169384d7-c67b-40a4-bcaa-dd3294305ba3
02:19:25,759 23-Jan-2018 WARN Deployment name: Vmware-NetConf-Intra-Affinity-Anti-Affinity-With-InvalidCluster-InvalidHost
02:19:25,759 23-Jan-2018 WARN VM group name: Group2-uLinux-Intra-Anti-Affinity-With-InvalidHost
02:19:25,759 23-Jan-2018 WARN User configs: 1
02:19:25,759 23-Jan-2018 WARN VM Name: Vmware-NetConf-I_Group2_0_65aa6ca8-3b53-4eb3-a39f-a3f12394a190
02:19:25,759 23-Jan-2018 WARN Host ID:
02:19:25,759 23-Jan-2018 WARN Host Name:
02:19:25,760 23-Jan-2018 WARN ===== SEND NOTIFICATION ENDS =====
Often the reason of the failure can be found within the status message itself. The above example shows that the targeted host for deployment does not exist. Another example of a failed VM deployment:
Notification found in /var/log/esc/yangesc.log
07:20:56,164 25-Jan-2018 WARN Status Msg: Failed to create VM ports for instance : jenkins-ErrHandl_ErrorG_2_cc0f8c28-8900-4977-90d9-b9f996c8ca71. Create port operation failed: Exception during processing: com.cisco.esc.vimmanager.exceptions.CreatePortException: Create port failed: ClientResponseException{message=No more IP addresses available on network 0b7965b4-c604-444c-8cbb-7c2399e912d4., status=409, status-code=CONFLICT}. The above example shows a deployment failure message containing direct response from VIM that has an error message and status code. In case of deployment failure due to role access issues such as these VIM related issues, perform the required action on the VIM instance, or adjust ESC deployment datamodel with proper configurations. Here are some common VIM related issues:
1. Out of quota errors
1. You need to either delete some resource in question via ESC under that tenant/project/user or,
2. Configure your VIMs resource limit per tenant/project/user.
2. Already in use errors
1. Change resource name/configuration or sometimes there are restrictions on the VIM disallow and is sometimes configurable.
2. Delete the resource in question.
VNF VM Deployed Failed with LCM
If the VNF deployment datamodel involves LCM action (e.g. a staging script), the deployment may have failed because the action failed to complete. In this case the following error message can be found in /var/log/esc/escmanager.log
/var/log/esc/escmanager.log
22:12:11,912 25-Jan-2018 VM_STATE_MACHINE-ab-auto-test-vnf_ab-aut_0_31ebad33-e12f-4772-a89c-3bdc239acf69 ERROR [StateMachineCloudUtils.java:setupPersonalities():1081] [tid=fffae7af-a321-4ea5-a1bc-3b30c903f3a5]
com.cisco.esc.datamodel.exceptions.ESCException: Action [GEN_VPC_ISO] failed
at com.cisco.esc.statemachines.utils.StateMachineCloudUtils.setupPersonalities(StateMachineCloudUtils.java:1069)
To find out the details of a staging script failure, look for some entries like the following in the /var/log/esc/mona/mona.log.
/var/log/esc/mona/mona.log
2018-01-25 19:34:45.751 [http-nio-127.0.0.1-8090-exec-5] Script: [/opt/cisco/esc/esc-scripts/esc_volume_em_staging.sh] execution in progress
2018-01-25 19:34:45.751 [http-nio-127.0.0.1-8090-exec-5] Use the original script path and skip downloading: no protocol: /opt/cisco/esc/esc-scripts/esc_volume_em_staging.sh
2018-01-25 19:49:45.772 [http-nio-127.0.0.1-8090-exec-5] Script execution failed, timer expired for script: /opt/cisco/esc/esc-scripts/esc_volume_em_staging.sh
2018-01-25 19:49:45.805 [http-nio-127.0.0.1-8090-exec-5] Script execution failed
com.cisco.esc.mona.exceptions.ActionExecutionException: Script execution failed, timer expired for script:/opt/cisco/esc/esc-scripts/esc_volume_em_staging.sh
Some common errors can a permission issue, or script execution timed out. It is always good to do a dry run for the script on the ESC VM to make sure it works.
VNF VM Deployed Failed Due to Role Access Issue (ESC Release 3.1 and above)
When deploying VNF on OpenStack as a non-admin user, deployment may encounter role access errors such as
02:19:25,758 23-Jan-2018 WARN ===== SEND NOTIFICATION STARTS =====
02:19:25,758 23-Jan-2018 WARN Type: VM_DEPLOYED
02:19:25,758 23-Jan-2018 WARN Status: FAILURE
02:19:25,758 23-Jan-2018 WARN Status Code: 500
02:19:25,759 23-Jan-2018 WARN Status Msg: VIM Driver: Exception while creating VM: {"message": "You are not authorized to perform the requested action: identity:create_project", "code": 403, "title": "Forbidden"}} 02:19:25,759 23-Jan-2018 WARN Tenant: admin
02:19:25,759 23-Jan-2018 WARN Deployment ID: 169384d7-c67b-40a4-bcaa-dd3294305ba3
02:19:25,759 23-Jan-2018 WARN Deployment name: Vmware-NetConf-Intra-Affinity-Anti-Affinity-With-InvalidCluster-InvalidHost
02:19:25,759 23-Jan-2018 WARN VM group name: Group2-uLinux-Intra-Anti-Affinity-With-InvalidHost
02:19:25,759 23-Jan-2018 WARN User configs: 1
02:19:25,759 23-Jan-2018 WARN VM Name: Vmware-NetConf-I_Group2_0_65aa6ca8-3b53-4eb3-a39f-a3f12394a190
02:19:25,759 23-Jan-2018 WARN Host ID:
02:19:25,759 23-Jan-2018 WARN Host Name:
02:19:25,760 23-Jan-2018 WARN ===== SEND NOTIFICATION ENDS =====
ESC Release 3.1 and above requires two permissions granted in Neutron
create_port:fixed_ips
create_port:mac_address
1. Create a new role on OpenStack for ESC. Go to the OpenStack Horizon (Identity -> Roles), and create a new role with the name "vnfm" or any other name you want.
2. Assign the user with the vnfm role to a project managed by ESC on OpenStack Horizon (Identity → Projects). Click "Manage members" and make sure the user for ESC has the vnfm role.
3. Modify the following items in OpenStack controller by adding "or role:vnfm" in the default values. Changes to the policy.json file become effective immediately and does not require service restart[2].
| /etc/neutron/policy.json | "create_port:fixed_ips": "rule:context_is_advsvc or rule:admin_or_network_owner", | "create_port:fixed_ips": "rule:context_is_advsvc or rule:admin_or_network_owner or role:vnfm", |
| /etc/neutron/policy.json | "create_port:mac_address": "rule:context_is_advsvc or rule:admin_or_network_owner" | "create_port:mac_address": "rule:context_is_advsvc or rule:admin_or_network_owner or role:vnfm" |
VNF VM Deployed But Goes Into a Boot Loop
Consider the VNF is deployed, the VM_DEPLOYED notification with a 200 status code is received, but VM_ALIVE is not yet received. While checking the VNF's console through VIM UI (e.g. OpenStack Horizon, VMware vCenter), the VNF goes into a reboot cycle/loop. Most of these cases are a symptom of a failure day-0 data passed. To verify the day 0 data passed in, for OpenStack, check the /var/log/esc/vimmanger/vim_vimmanager.log, looking for the POST request sent to OpenStack for creating a server.
2018-01-26 16:02:55.648 INFO os - 1 * Sending client request on thread http-nio-127.0.0.1-8095-exec-4
1 > POST http://ocata1-external-controller:8774/v2/d6aee06abdbe42edaade348280199a64/servers
1 > Accept: application/json
1 > Content-Type: application/json
1 > User-Agent: OpenStack4j / OpenStack Client
1 > X-Auth-Token: ***masked***
{ "server" : { "name" : "jenkins-jenkinsy_MAKULA_0_bbc61ba6-6c63-4fb9-b9cd-5ae92a898943",
"imageRef" : "67fc9890-230e-406c-bd01-f2e1ffa2437f",
"flavorRef" : "cc12dec2-411a-46bd-b8c2-4ff8738ddb02",
"personality" : [ { "path" : "iosxe_config.txt",
"contents" : "aG9zdG5hbWUgY3NyCiEKcGxhdGZvcm0gY29uc29sZSBzZXJpYWwKIQppcCBzdWJuZXQtemVybwpubyBpcCBkb21haW4tbG9va3VwCmlwIGRvbWFpbiBuYW1lIGNpc2NvLmNvbQohCmVuYWJsZSBwYXNzd29yZCBjaXNjbzEyMwp1c2VybmFtZSBhZG1pbiBwYXNzd29yZCBjaXNjbzEyMwp1c2VybmFtZSBhZG1pbiBwcml2aWxlZ2UgMTUKIQppbnRlcmZhY2UgR2lnYWJpdEV0aGVybmV0MQogZGVzY3JpcHRpb24gbWFuYWdlbWVudCBuZXR3b3JrCiBpcCBhZGRyZXNzIGRoY3AKIG5vIHNodXQKIQppbnRlcmZhY2UgR2lnYWJpdEV0aGVybmV0MgogZGVzY3JpcHRpb24gc2VydmljZSBuZXR3b3JrCiBpcCBhZGRyZXNzIGRoY3AKIG5vIHNodXQKIQppbnRlcmZhY2UgR2lnYWJpdEV0aGVybmV0MwogZGVzY3JpcHRpb24gc2VydmljZSBuZXR3b3JrCiBpcCBhZGRyZXNzIGRoY3AKIG5vIHNodXQKIQpjcnlwdG8ga2V5IGdlbmVyYXRlIHJzYSBtb2R1bHVzIDEwMjQKaXAgc3NoIHZlcnNpb24gMgppcCBzc2ggYXV0aGVudGljYXRpb24tcmV0cmllcyA1CmlwIHNjcCBzZXJ2ZXIgZW5hYmxlCmZpbGUgcHJvbXB0IHF1aWV0CiEKbGluZSBjb24gMAogc3RvcGJpdHMgMQpsaW5lIHZ0eSAwIDQKIGxvZ2luIGxvY2FsCiBwcml2aWxlZ2UgbGV2ZWwgMTUKIHRyYW5zcG9ydCBpbnB1dCBzc2ggdGVsbmV0CiB0cmFuc3BvcnQgb3V0cHV0IHNzaCB0ZWxuZXQKIQpzbm1wLXNlcnZlciBjb21tdW5pdHkgcHVibGljIFJPCiEKZW5kCg=="
} ],
"config_drive" : true,
"networks" : [ { "port" : "01b3b168-8fab-4da4-b195-f9652d36674e"
}, { "port" : "dfe709c9-4ca4-400f-a765-2dbc88828585"
} ],
"block_device_mapping_v2" : [ { "source_type" : "image",
"destination_type" : "local",
"uuid" : "67fc9890-230e-406c-bd01-f2e1ffa2437f",
"boot_index" : 0,
"delete_on_termination" : true
} ]
}
}
Decode the base64 encoded string value of the personality content.
hostname csr
!
platform console serial
!
ip subnet-zero
no ip domain-lookup
ip domain name cisco.com
!
enable password cisco123
username admin password cisco123
username admin privilege 15
!
interface GigabitEthernet1
description management network
ip address dhcp
no shut
!
interface GigabitEthernet2
description service network
ip address dhcp
no shut
!
interface GigabitEthernet3
description service network
ip address dhcp
no shut
!
crypto key generate rsa modulus 1024
ip ssh version 2
ip ssh authentication-retries 5
ip scp server enable
file prompt quiet
!
line con 0
stopbits 1
line vty 0 4
login local
privilege level 15
transport input ssh telnet
transport output ssh telnet
!
snmp-server community public RO
!
end
Verify if the content contains correct day 0 configuration or not. If the day 0 config is passed through a volume, detach the volume from the VNF, and attach it to another VM to check its content.
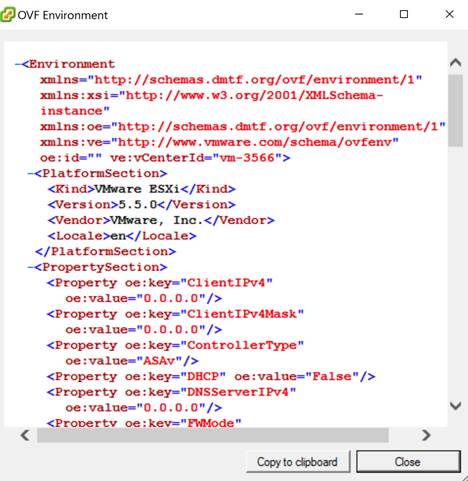
For VMware, if the day 0 config is passed through the ovf settings, it can be verified from vCenter:
1. Open VM settings.
2. Under Options, select "OVF Settings".
3. Click "View..." under OVF Environment.
If the day 0 config is passed through CDROM, it can be verified by finding which ISO file was mounted to the CDROM.
Download the ISO file from the specific datastore, then mount the ISO file locally to verify its content.
VNF VM Deployed But Never Goes to ALIVE State
If a VNF is deployed successfully, but never received a VM_ALIVE notification, then it is inferred that the ESC was unable to reach the newly deployed VNF. This is mostly because of an issue in the network. Firstly, check the KPI section of the VNF deployment datamodel:
<kpi_data>
<kpi>
<event_name>VM_ALIVE</event_name>
<metric_value>1</metric_value>
<metric_cond>GT</metric_cond>
<metric_type>UINT32</metric_type>
<metric_occurrences_true>1</metric_occurrences_true>
<metric_occurrences_false>30</metric_occurrences_false>
<metric_collector>
<type>ICMPPing</type>
<nicid>2</nicid>
<poll_frequency>10</poll_frequency>
<polling_unit>seconds</polling_unit>
<continuous_alarm>false</continuous_alarm>
</metric_collector>
</kpi>
</kpi_data>
To verify if the VNF is alive, do an ICMP ping from ESC VM to the VNF using a particular IP indicated by,
<nicid>2</nicid>
where, nicid 2 refers to the IP of the interface with nicid of 2 which ESC is about to ping, pointing to:
<interface>
<nicid>2</nicid>
<network>NVPGW100-UAS-uas-orchestration</network>
<allowed_address_pairs>
<address>
<ip_address>172.168.11.0</ip_address>
<netmask>255.255.255.0</netmask>
</address>
</allowed_address_pairs>
</interface>
Here 172.168.11.0 is the IP. Make sure the interface shares the same network with ESC. In the above example, the network is NVPGW100-UAS-uas-orchestration. If the ping fails, pinging the gateway or another IP available on the subnet will be a way to find out if the issue with the network.
VNF Recovery Failed
Here are some common recovery issues:
1. Recovery behavior not behaving as expected. ESC is not attempting a redeploy after a failed reboot.
1. Make sure the recovery policy in the XML file is set to REBOOT_THEN_REDEPLOY, and not set to reboot only. Ensure you have read the recovery documentation to understand the recovery options and expectations.
2. ESC only attempts the recovery once, or too many times
1. Double check the config parameter "VM_RECOVERY_RETRIES_MAX", the default value is 3 times. To check this value, execute the REST call within the ESC VM.
curl -H "accept: Application/json" http://127.0.0.1:8080/ESCManager/v0/config/default/VM_RECOVERY_RETRIES_MAX | python -mjson.tool
2. If it is set correctly, then make sure ESC was healthy at the time of recovery and that a switch over did not occur; It may have continued the recovery attempt in the second ESC VM.
VNF VM Recovery Failed Because of Failure Reboot
VNF VM recovery has failed because of VM reboot failed event. This depends on the VM recovery policy definition:
<recovery_policy>
<recovery_type>AUTO</recovery_type>
<action_on_recovery>REBOOT_ONLY</action_on_recovery>
<max_retries>3</max_retries>
</recovery_policy>
Based on the above definition, by the time RECOVERY_COMPLETED event received with an error state, ESC has tried rebooted the VNF VM three times with non-success states. However, the reboot operation also depends on two other system wide configuration parameters.
VM_STATUS_POLLING_VM_OPERATION_RETRIES
VM_STATUS_POLLING_WAIT_TIME_SEC
Afer ESC asks VIM to reboot VM, it will keep polling VM status. The VM_STATUS_POLLING_VM_OPERATION_RETRIES defines how many times ESC tries to poll, and VM_STATUS_POLLING_WAIT_TIME_SEC defines how long does ESC wait between polls. The below are their default values:
VM_STATUS_POLLING_VM_OPERATION_RETRIES=10
VM_STATUS_POLLING_WAIT_TIME_SEC=5
If VNF VM takes more than 50 seconds to transition from REBOOT to ACTIVE state in OpenStack, then change the VM_STATUS_POLLING_WAIT_TIME_SEC to a higher number through the ESC REST API:
curl -X PUT -H "accept:application/json" http://localhost:8080/ESCManager/v0/config/openstack/vm_status_polling_wait_time_sec/20 -k | python -mjson.tool
After receiving a success response, do a VM manual recovery again.
Get VNF VM Out of Error State
If a VNF VM is in ERROR state in ESC, two options can help it transition back to ALIVE state considering that the external issue(s) that caused the ERROR state has been resolved (for example, issue on VIM). Before doing any of the following two options, ensure there is no on-going operation performed on the same deployment. This can be checked in the /var/log/esc/yangesc.log. Look for any previously initiated action without a completed notification (either success or failed). If any on-going operation is found, wait for the operation to complete before performing the following actions:
Manual Recovery the VNF VM
Execute the following command:
/opt/cisco/esc/esc-confd/esc-cli/esc_nc_cli recovery-vm-action DO {ESC generated VM Name} Manual Unset/Set VM Monitoring (ESC Release 3.1 and above)
Execute the following command to unset the monitoring:
/opt/cisco/esc/esc-confd/esc-cli/esc_nc_cli vm-action DISABLE_MONITOR {ESC generated VM Name} Then enable it again:
/opt/cisco/esc/esc-confd/esc-cli/esc_nc_cli vm-action ENABLE_MONITOR {ESC generated VM Name} Remove/Add VNF thru Service Update
Using Script to Prepare Datamodels
Please run the script on the ESC VM. The script generates two datamodel xml files, one for deleting the VM group(s), and the other one for adding the VM group(s) back.
[admin@leishi-test-232 ~]$ ./genVMGroupDeletionDM.py -h
usage: genVMGroupDeletionDM.py [-h] vm_group_name [vm_group_name ...]
*****************************************************************
Utility tool for generating VM group removing datamodel for ESC
Check the following wiki for details
https://confluence-eng-sjc1.cisco.com/conf/display/ESCWIKI/How+to+Use+Service+Update+to+Remove+a+VM+Group
positional arguments:
vm_group_name <Required> VM group name(s) separate by space
optional arguments:
-h, --help show this help message and exit
Example
[admin@leishi-test-232 ~]$ ./genVMGroupDeletionDM.py g1 g2
Datamodel is generated:
[/home/admin/delete_g1_g2.xml]
[/home/admin/add_g1_g2.xml]
** Use on your own risk! **
[admin@leishi-test-232 ~]$
Manual Prepare Datamodels
1. Get the current ESC datamodel
/opt/cisco/esc/esc-confd/esc-cli/esc_nc_cli get esc_datamodel/tenants > {file name} 2. Remove the extra wrappers <data> and <rpc-reply> from the original file (also any cli outputs before the <xml> tag) from step 1. The end result will look like
Example Datamodel After Step #2
<?xml version="1.0" encoding="UTF-8"?>
<rpc-reply xmlns="urn:ietf:params:xml:ns:netconf:base:1.0" message-id="1">
<data>
<esc_datamodel xmlns="http://www.cisco.com/esc/esc">
Note
If the datamodel contains multiple deployments, make sure to keep the other deployments as they are when datamodel is being edited. Please do not change any text formatting since it may be very important for some day0 data. Alternatively, to be safe, the other deployment(s) portion can be removed, by "remove" it means remove the deployment section from the datamodel completely. This ensures that when the service update happens, these deployment(s) will remain untouched. For example, if the VM group to be deleted is c3, when editing the datamodel, the deployment portion for EM can be removed from the datamodel.
3. In this example, let us try to delete VM group c3. First check if there is any <placement_group> or <placement> policy(ies) defined under <policies> which has VM group c3 involved. If found, these policy(ies) need to be marked for deletion. In this example, there are 8 placement policies:
4. ... <placement>
<target_vm_group_ref>c3</target_vm_group_ref>
<type>anti_affinity</type>
<enforcement>strict</enforcement>
<vm_group_ref>c1</vm_group_ref>
<vm_group_ref>s2</vm_group_ref>
</placement>
<placement>
<target_vm_group_ref>s10</target_vm_group_ref>
<type>anti_affinity</type>
<enforcement>strict</enforcement>
<vm_group_ref>c1</vm_group_ref>
<vm_group_ref>c3</vm_group_ref>
<vm_group_ref>s2</vm_group_ref>
<vm_group_ref>s4</vm_group_ref>
<vm_group_ref>s5</vm_group_ref>
<vm_group_ref>s6</vm_group_ref>
<vm_group_ref>s7</vm_group_ref>
<vm_group_ref>s8</vm_group_ref>
<vm_group_ref>s9</vm_group_ref>
</placement>
...
<placement>
<target_vm_group_ref>s4</target_vm_group_ref>
<type>anti_affinity</type>
<enforcement>strict</enforcement>
<vm_group_ref>c1</vm_group_ref>
<vm_group_ref>c3</vm_group_ref>
<vm_group_ref>s2</vm_group_ref>
</placement>
<placement>
<target_vm_group_ref>s5</target_vm_group_ref>
<type>anti_affinity</type>
<enforcement>strict</enforcement>
<vm_group_ref>c1</vm_group_ref>
<vm_group_ref nc:operation='delete'>c3</vm_group_ref>
<vm_group_ref>s2</vm_group_ref>
<vm_group_ref>s4</vm_group_ref>
</placement>
<placement>
<target_vm_group_ref>s6</target_vm_group_ref>
<type>anti_affinity</type>
<enforcement>strict</enforcement>
<vm_group_ref>c1</vm_group_ref>
<vm_group_ref>c3</vm_group_ref>
<vm_group_ref>s2</vm_group_ref>
<vm_group_ref>s4</vm_group_ref>
<vm_group_ref>s5</vm_group_ref>
</placement>
<placement>
<target_vm_group_ref>s7</target_vm_group_ref>
<type>anti_affinity</type>
<enforcement>strict</enforcement>
<vm_group_ref>c1</vm_group_ref>
<vm_group_ref>c3</vm_group_ref>
<vm_group_ref>s2</vm_group_ref>
<vm_group_ref>s4</vm_group_ref>
<vm_group_ref>s5</vm_group_ref>
<vm_group_ref>s6</vm_group_ref>
</placement>
<placement>
<target_vm_group_ref>s8</target_vm_group_ref>
<type>anti_affinity</type>
<enforcement>strict</enforcement>
<vm_group_ref>c1</vm_group_ref>
<vm_group_ref>c3</vm_group_ref>
<vm_group_ref>s2</vm_group_ref>
<vm_group_ref>s4</vm_group_ref>
<vm_group_ref>s5</vm_group_ref>
<vm_group_ref>s6</vm_group_ref>
<vm_group_ref>s7</vm_group_ref>
</placement>
<placement>
<target_vm_group_ref>s9</target_vm_group_ref>
<type>anti_affinity</type>
<enforcement>strict</enforcement>
<vm_group_ref>c1</vm_group_ref>
<vm_group_ref>c3</vm_group_ref>
<vm_group_ref>s2</vm_group_ref>
<vm_group_ref>s4</vm_group_ref>
<vm_group_ref>s5</vm_group_ref>
<vm_group_ref>s6</vm_group_ref>
<vm_group_ref>s7</vm_group_ref>
<vm_group_ref>s8</vm_group_ref>
</placement>
For c3 as the target_vm_group, the whole placement policy need to be deleted by adding attribute nc:operation='delete' to the XML element
<placement nc:operation='delete'>
<target_vm_group_ref>c3</target_vm_group_ref>
<type>anti_affinity</type>
<enforcement>strict</enforcement>
<vm_group_ref>c1</vm_group_ref>
<vm_group_ref>s2</vm_group_ref>
</placement>
For c3 as the vm_group_ref, you need to remove the vm_group_ref entry itself, and keep other relationships as they are.
<placement>
<target_vm_group_ref>s10</target_vm_group_ref>
<type>anti_affinity</type>
<enforcement>strict</enforcement>
<vm_group_ref>c1</vm_group_ref>
<vm_group_ref nc:operation='delete'>c3</vm_group_ref>
<vm_group_ref>s2</vm_group_ref>
<vm_group_ref>s4</vm_group_ref>
<vm_group_ref>s5</vm_group_ref>
<vm_group_ref>s6</vm_group_ref>
<vm_group_ref>s7</vm_group_ref>
<vm_group_ref>s8</vm_group_ref>
<vm_group_ref>s9</vm_group_ref>
</placement>
For a placement policy that has only one vm_group_ref element, either the the vm_group_ref is c3 or the target_vm_group is c3, the whole policy needs to be removed. This is becuase, when c3 is removed this policy does not have any meaning:
<placement nc:operation='delete'>
<target_vm_group_ref>c11</target_vm_group_ref>
<type>anti_affinity</type>
<enforcement>strict</enforcement>
<vm_group_ref>c1</vm_group_ref>
<vm_group_ref>c3</vm_group_ref>
</placement>
The last step is to mark the VM group itself for deletion by adding attribute nc:operation='delete' to the XML element
<vm_group nc:operation='delete'>
<name>c3</name>
<flavor>SFPCF101-DEPLOYMENT-control-function</flavor>
<bootup_time>1800</bootup_time>
<recovery_wait_time>1</recovery_wait_time>
...
To prepare the datamodel for adding the same VM group back, simply take the deletion datamodel, remove all the nc:operation='delete' everywhere.
Once the two datamodel files are ready, use the following command for service update:
/opt/cisco/esc/esc-confd/esc-cli/esc_nc_cli edit-config {deleting datamodel file} Wait until the service update is complete. Then add the VNF back:
/opt/cisco/esc/esc-confd/esc-cli/esc_nc_cli edit-config {adding datamodel file} Get VNF Service (Deployment) Out of INERT State (ESC Release 3.1 and above)
For ESC Release 3.1 and later, service may get stuck in the inert state when stop VM operation fails and no recovery is triggered. One VM is error but service is inert. You can use ENABLE MONITOR to get the VM and service back to alive or error.
/opt/cisco/esc/esc-confd/esc-cli/esc_nc_cli vm-action ENABLE_MONITOR {VM Name} This operation can enable the monitoring of the VM. If the VM is running in the VIM, then the VM ALIVE event should be back to VM state machine. The VM finally transits to alive state. If the VM is not running in the VIM, when the timer expires, the recovery procedure can bring the VM back. Meanwhile, the service transits to active or error state.
VNF Recovery Rejected Because of Wrong Service Status (ESC 3.1 and above)
When doing VNF VM manual recovery, the request gets rejected as:
$ /opt/cisco/esc/esc-confd/esc-cli/esc_nc_cli recovery-vm-action DO vm-name
Recovery VM Action
/opt/cisco/esc/confd/bin/netconf-console --port=830 --host=127.0.0.1 --user=admin --privKeyFile=/home/admin/.ssh/confd_id_dsa --privKeyType=dsa --rpc=/tmp/esc_nc_cli.L1WdqyIE7r
<?xml version="1.0" encoding="UTF-8"?>
<rpc-reply xmlns="urn:ietf:params:xml:ns:netconf:base:1.0" message-id="1">
<rpc-error>
<error-type>application</error-type>
<error-tag>operation-failed</error-tag>
<error-severity>error</error-severity>
<error-path xmlns:esc="http://www.cisco.com/esc/esc" xmlns:nc="urn:ietf:params:xml:ns:netconf:base:1.0">
/nc:rpc/esc:recoveryVmAction
</error-path>
<error-message xml:lang="en">Exception from action callback: Recovery VM Operation: recovery_do is not applicable since the service is in [SERVICE_INERT_STATE] state.</error-message>
<error-info>
<bad-element>recoveryVmAction</bad-element>
</error-info>
</rpc-error>
</rpc-reply>
At this point, check the opdata to find out the service state and vm state.
$ /opt/cisco/esc/esc-confd/esc-cli/esc_nc_cli get esc_datamodel/opdata
<state_machine>
<state>SERVICE_INERT_STATE</state>
<vm_state_machines>
<vm_state_machine>
<vm_name>depz_g1_0_b6d19896-bc3b-400a-ad50-6d84c522067d</vm_name>
<state>VM_MONITOR_UNSET_STATE</state>
</vm_state_machine>
<vm_state_machine>
<vm_name>depz_g1_1_f8445a8a-29ba-457d-9224-c46eeaa97f72</vm_name>
<state>VM_ALIVE_STATE</state>
</vm_state_machine>
</vm_state_machines>
</state_machine>
Enable monitor for the vm in the unset monitor state:
$ /opt/cisco/esc/esc-confd/esc-cli/esc_nc_cli vm-action ENABLE_MONITOR vm-name
After a while, check the opdata again. The service should transit to active state or error state:
$ /opt/cisco/esc/esc-confd/esc-cli/esc_nc_cli get esc_datamodel/opdata
<state_machine>
<state>SERVICE_ACTIVE_STATE</state>
<vm_state_machines>
<vm_state_machine>
<vm_name>depz_g1_0_b6d19896-bc3b-400a-ad50-6d84c522067d</vm_name>
<state>VM_ALIVE_STATE</state>
</vm_state_machine>
<vm_state_machine>
<vm_name>depz_g1_1_f8445a8a-29ba-457d-9224-c46eeaa97f72</vm_name>
<state>VM_ALIVE_STATE</state>
</vm_state_machine>
</vm_state_machines>
</state_machine>
Now do a manual recovery of the VM in error state:
$ /opt/cisco/esc/esc-confd/esc-cli/esc_nc_cli recovery-vm-action DO vm-name
VNF Operation Rejected Because of VIM Connector Issue
When VNF operation (for example, deploy, recovery) gets denied with the following reason:
Default VIM Connector is not set up, or is unreachable. Please check your VIM Connector credentials and VIM status.
If ESC was setup for multi-vim (ESC has more than one VIM connectors setup), make sure that at least one VIM connector is marked as "default". Otherwise, check the ESC VIM connector status.
[admin@leishi-test ~]$ escadm vim show
[
{ "status": "CONNECTION_SUCCESSFUL",
"status_message": "Successfully connected to VIM",
"type": "OPENSTACK",
"id": "default_openstack_vim",
"properties": { "property": [
{ "name": "os_project_domain_name",
"value": "default"
},
{ "name": "os_auth_url",
"value": "http://10.85.103.143:35357/v3"
},
{ "name": "os_project_name",
"value": "admin"
}
]
}
}
]
{ "user": [
{ "credentials": { "properties": { "property": [
{ "name": "os_password",
"value": "cisco123"
},
{ "name": "os_user_domain_name",
"value": "default"
}
]
}
},
"vim_id": "default_openstack_vim",
"id": "admin"
}
]
}
If there is no VIM connector returned, add one. If one VIM connector is returned but the status is not "CONNECTION_SUCCESSFUL", check the /var/log/esc/vimmanager/vimmanager.log for the following entry:
2017-12-07 23:11:49.760 [http-nio-127.0.0.1-8095-exec-5] INFO c.c.e.v.c.VimConnectionManagerService - Registering an user.
If there is an exception or error after the entry, it usually indicates the root cause. For example, if there is an error related to SSL, it means the certificate is missing or wrong.
2017-12-07 23:11:49.818 [http-nio-127.0.0.1-8095-exec-5] ERROR c.c.e.v.p.i.o.OpenStackProvider - Failed to register a user
org.openstack4j.api.exceptions.ConnectionException: javax.net.ssl.SSLHandshakeException: sun.security.validator.ValidatorException: PKIX path building failed: sun.security.provider.certpath.SunCertPathBuilderException: unable to find valid certification path to requested target
at org.openstack4j.connectors.jersey2.HttpExecutorServiceImpl.invoke(HttpExecutorServiceImpl.java:58)
Another example, if there is a connection timeout or host name cannot reach exception, try to make a CURL get call to the AuthUrl provided, make sure that the OpenStack is reachable from the ESC VM.
curl -k https://www.xxxxx.com:5000/
If there is no error nor exception after the "Register an user" entry, it means that the authentication information provided is not correct. In this case, check the /var/log/esc/vimmanager/vim_vimmanager.log . Look at the beginning of the log file where the initial authentication happens:
2017-12-07 23:11:49.748 INFO os - 1 * Sending client request on thread http-nio-127.0.0.1-8095-exec-4
1 > POST https://10.85.103.49:35357/v3/auth/tokens
1 > Accept: application/json
1 > Content-Type: application/json
1 > OS4J-Auth-Command: Tokens
{ "auth" : { "identity" : { "password" : { "user" : { "name" : "admin",
"domain" : { "name" : "default"
},
"password" : "****"
}
},
"methods" : [ "password" ]
},
"scope" : { "project" : { "name" : "admin",
"domain" : { "name" : "default"
}
}
}
}
}
Double check the authUrl, user, project/tenant. For V3 authentication make sure the authUrl is the actual V3 endpoint, otherwise a 404 will be returned. Also for V3 authentication, make sure the user domain and project domain are provided. If you use an openrc file from Horizon to boot ESC VM, and the openrc does not contain the project domain or user domain, declare explicitly:
OS_PROJECT_DOMAIN_NAME=default
OS_USER_DOMAIN_NAME=default
To verify if ESC gets the correct password for the default vim connector with bootvm, do the following:
admin@leishi-test ~]$ sudo escadm reload
[sudo] password for admin:
[admin@leishi-test ~]$ cat /opt/cisco/esc/esc-config/esc_params.conf
openstack.os_auth_url= http://10.85.103.153:35357/v3
openstack.os_project_name= admin
openstack.os_tenant_name= admin
openstack.os_user_domain_name= default
openstack.os_project_domain_name= default
openstack.os_identity_api_version= 3
openstack.os_username = admin
openstack.os_password = cisco123
 Feedback
Contact Cisco
- Open a Support Case

- (Requires a Cisco Service Contract)