Chapter 8 Discrepancies and Best Practices Deviations
Available Languages
Table Of Contents
Discrepancies and Best Practices Deviations
Understanding Discrepancies and Best Practices Deviations
Trunking Related Discrepancies
Trunk Negotiation Across VTP Boundary
VLAN-VTP Related Discrepancies
No VTP Server in Domain with AtLeast One VTP Client
Port is in Error Disabled State
Devices With Duplicate SysName
Spanning Tree Related Discrepancy
Port Fast Enabled on Trunk Port
Interpreting Best Practices Deviations
Channel Ports Related Best Practices Deviations
Non-channel Port in Desirable Mode
Spanning Tree Related Best Practices Deviations
BPDU Filter Disabled on Access Ports
BPDU-Guard Disabled on Access Ports
BackboneFast Disabled in Switch
Loop Guard and Port Fast Enabled on Ports
Trunk Ports Related Best Practices Deviations
Non-trunk Ports in Desirable Mode
VLAN Related Best Practices Deviations
Link Ports Related Best Practice Deviation
Access Ports Related Best Practice Deviation
Cisco Catalyst 6000 Devices Related Best Practice Deviation
High Availability not Operational
Understanding Discrepancy Reports
Viewing Details on Discrepancies
Viewing Best Practices Deviations Reports
Understanding Best Practices Deviations Reports
Viewing Details on Best Practices Deviations
Fixing Best Practices Deviations
Customizing Discrepancies Reporting and Syslog Generation
Discrepancies and Best Practices Deviations
The Discrepancies Reporting module of Campus Manager allows you to view the discrepancies and best practices deviations in your network. This chapter contains the following:
•
Understanding Discrepancies and Best Practices Deviations
•
•
•
Understanding Discrepancies and Best Practices Deviations
Campus Manager provides reports on discrepancies, such as network inconsistencies and anomalies or misconfiguration in the discovered network. This makes it easy to identify configuration errors such as link-speed mismatches on either end of a connection. Discrepancies are computed at the end of each data collection schedule.
Campus Manager also reports Best Practices Deviations. These are variations from the normal or recommended practices in a network. These do not have any serious impact on the functioning of the network.
Campus Manager allows you to:
•
•
•
•
•
•
Fixing Discrepancies and Best Practices Deviations through Campus Manager
The following Discrepancies can be fixed through Campus Manager:
•
The following Best Practices Deviations can be fixed through Campus Manager:
•
•
•
•
Interpreting Discrepancies
This section contains information on each of the discrepancy reported in Campus Manager. It describes the discrepancy, the impact it has on the network, and ways to resolve it.
The user interface in Campus Manager displays commands you can use to make configuration changes on devices to resolve discrepancies.
This section contains:
•
•
•
Trunking Related Discrepancies
The trunking related discrepancies that Campus Manager reports are:
•
Trunk Negotiation Across VTP Boundary
Campus Manager reports a discrepancy when the trunk mode on any end of the trunk link is set to Auto or Desirable.
Dynamic Trunking Protocol (DTP) cannot be used for trunk negotiation across VTP domain boundary. This occurs when trunk mode on both sides has any of the following combinations:
•
•
•
•
•
Impact
Trunk negotiation across VTP boundary (that is, trunk link connecting two devices that are part of different VTP domains) fails.
Fix
You cannot fix this discrepancy using Campus Manager.
To fix the discrepancy on switches using Cisco IOS:
Step 1
Step 2
switchport trunk encapsulation dot1q | isl
switchport mode trunk
end
Step 3
show interfaces trunkOr
show interface mod interface_id trunk
To fix the discrepancy on switches using Catalyst operating system:
Step 1
Step 2
set trunk mod/port on Dot1Q | ISL
Step 3
show trunk mod/port
Native VLANs Mismatch
Campus Manager reports a discrepancy when the native VLANs of all ports in a trunk do not match.
This mismatch occurs when you have created a trunk port to connect another switch, and both ends are in different native VLANs.

Note
Impact
The native VLAN must match on both sides of the trunk link, otherwise the traffic flow across the link is affected. The trunk continues to remain operational.
Fix
If you have altered the default native VLAN configuration, ensure that all trunks have the same native VLAN. Use the set vlan command for Cisco Catalyst operating system switches or the switchport trunk native vlan command for Cisco IOS switches to specify the native VLAN.
You cannot fix this discrepancy through Campus Manager.
For more information on configuring VLANs, see the document Creating and Maintaining VLANs at the following location:
Trunk VLANs Mismatch
Campus Manager reports a discrepancy when the list of active or allowed VLANs between the two ends of a trunk do not match.
Impact
The trunk remains operational but the network traffic across the link is affected.
Fix
You can resolve this by modifying the list of allowed VLANs between the two ends of a trunk and ensuring that there is no mismatch. You cannot fix this discrepancy through Campus Manager.
Trunk VLAN Protocol Mismatch
Campus Manager reports a discrepancy when different trunk encapsulations are set on the two ends of a trunk.
For example, when one end of a trunk is configured as ISL and the other as 802.1q, Campus Manager reports a discrepancy.
ISL and 802.1q are the different encapsulation types that you can configure in a trunk VLAN.
Impact
The trunk remains operational when the trunk mode is set to On or No-negotiate with mismatching encapsulation types. However, the network traffic across the link is affected because of the mismatch.
Fix
Configure the same encapsulation type on both ends of the trunk. You cannot fix this discrepancy through Campus Manager.
VLAN-VTP Related Discrepancies
The VLAN-VTP related discrepancies that Campus Manager reports are:
•
VTP Disconnected Domain
Campus Manager reports a discrepancy if the devices that are part of the same VTP domain have different VTP configuration revision numbers. When a switch in the same VTP domain has a higher configuration revision number compared to the other switches, it could overwrite your server-configured switch with incorrect information.
Impact
The VLAN information is not dynamically shared across the VTP domain.
Fix
Ensure that you configure VTP Configuration Revision number consistently across devices of the same VTP domain. You cannot fix this discrepancy through Campus Manager.
No VTP Server in Domain with AtLeast One VTP Client
Campus Manager reports a discrepancy when there is no VTP Server configured in a VTP domain.
You can configure a switch to operate in any one of these VTP modes—Server, Client, Transparent, and Off. Primary and secondary servers are two types of servers that may exist on an instance in the VTPv3 domain.
A VTP client cannot store VLAN information. When a VTP client boots, it needs to reacquire the entire configuration that is propagated by VTP.
The primary server can initiate or change the VTP configuration. The main purpose of a VTP secondary server is to back up the configuration that is propagated over the network.
Impact
Campus Manager reports a discrepancy when an existing VTP server or primary server goes down and there is no alternative or backup server.
This can occur in a VTPv2 or VTPv3 domain that has only client mode devices. This could happen when the existing primary server or server mode device has gone down temporarily and if the server mode device does not come up.
If you do not configure atleast one server, the devices become unreachable. Campus Manager discovers only the client-mode devices in the domain and ignores the rest.
Fix
Configure atleast one device as server in a VTP domain. If the device you have configured as server is temporarily down, configure another device as server. You cannot fix this discrepancy through Campus Manager.
For more information on VTP domain, see the document Configuring VTP at the following location:
http://www.cisco.com/en/US/docs/switches/lan/catalyst6500/catos/8.x/configuration/guide/vtp.html
Link Related Discrepancies
The link related discrepancies that Campus Manager reports are:
Link Duplex Mismatch
Campus Manager reports a discrepancy when there is a duplex mismatch between links.
Duplex mismatch on 10/100Mb Ethernet links occurs when one port on the link is operating at half-duplex while the other port is operating at full-duplex.
This happens when one or both ports on a link are reset and the auto-negotiation process does not cause both partners to have the same configuration. It also happens when you reconfigure one side of a link and do not reconfigure the other side.
Impact
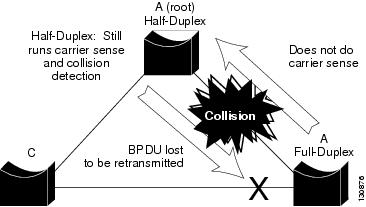
Half-duplex device waits until no other devices are transmitting on the same LAN segment. However a full-duplex device transmits whenever it has something to send, regardless of other devices.
If this transmission occurs while the half-duplex device is transmitting, the half-duplex device will consider this either a collision (during the slot time), or a late collision (after the slot time). Since the full-duplex side does not expect collisions, it does not realize that it must retransmit that dropped packet.
A low percentage rate of collisions are normal with half-duplex, but not with full-duplex. If the switch port receives many late collisions, it usually indicates a duplex mismatch problem. See Figure 8-1.
Figure 8-1 Duplex Mismatch
Fix
Campus Manager provides commands to resolve link duplex mismatch. Campus Manager displays commands to set the port speed to Auto. Setting the port speed to Auto will automatically make the link duplex to be negotiated between devices.
To fix the discrepancy on switches using Cisco IOS:
Step 1
The Discrepancy Detail dialog box appears. The Recommended Fix field displays the following command:
duplex auto
endwhere auto enables the autonegotiation capability.
Step 2
A message appears indicating whether the discrepancy was successfully fixed or not.
To fix the discrepancy on switches using Catalyst operating system:
Step 1
The Discrepancy Detail dialog box appears. The Recommended Fix field displays the following command:
set port speedmod/port autowhere:
•
•
autospecifies autonegotiation for transmission speed and duplex mode on 10/100 Fast Ethernet portsStep 2
A message appears indicating whether the discrepancy was successfully fixed or not.
Link Speed Mismatch
Campus Manager reports a discrepancy when there is a mismatch in the link speeds, that is, different link speeds on either side of a link (for 10/100 ports or for any group of links).
The IEEE 802.3u autonegotiation protocol manages the switch settings for speed (10 Mbps or 100 Mbps) and duplex (half or full). There are situations when this protocol can incorrectly align these settings, reducing performance. A mismatch occurs under these circumstances:
•
•
Impact
Link speed mismatch results in reduced performance of the link.
Fix
Campus Manager displays commands to resolve link speed mismatch.
To fix the discrepancy on switches using Cisco IOS:
Step 1
The Discrepancy Detail dialog box appears. The Recommended Fix field displays the following command:
speed auto
endwhere
autoenables the autonegotiation capability.Step 2
A message appears indicating whether the discrepancy was successfully fixed or not.
To fix the discrepancy on switches using the Catalyst operating system:
Step 1
The Discrepancy Detail dialog box appears. The Recommended Fix field displays the following command:
set port speedmod/port autowhere:
•
•
autospecifies autonegotiation for transmission speed and duplex mode on 10/100 Fast Ethernet portsStep 2
A message appears indicating whether the discrepancy was successfully fixed or not.
Link Trunk/NonTrunk Mismatch
Campus Manager reports a discrepancy when there are trunking ports and non-trunking ports on either side of a link. This happens when one end of the trunk is set to On, and the other end is set to Off.
Impact
This results in the trunk not coming up, and there would be no traffic flow across the link.
Fix
Campus Manager resolves the discrepancy by setting the trunk modes on the switches to Desirable mode.
To fix the discrepancy on switches using the Catalyst operating system:
Step 1
The Discrepancy Detail dialog box appears. The Recommended Fix field displays the following command:
set trunkmod/port desirablewhere:
•
desirablecauses the port to negotiate actively with the neighboring port to become a trunk link•
Step 2
A message appears indicating whether the discrepancy was successfully fixed or not.
To fix the discrepancy on switches using Cisco IOS:
Step 1
The Discrepancy Detail dialog box appears. The Recommended Fix field displays the following command:
switchport mode dynamic desirable
endwhere
dynamic desirablespecifies an interface that actively attempts to convert the link to a trunk link.Step 2
A message appears indicating whether the discrepancy was successfully fixed or not.
Port Related Discrepancy
The port related discrepancy that Campus Manager reports is Port is in Error Disabled State. See Port is in Error Disabled State
Port is in Error Disabled State
Campus Manager reports a discrepancy when one or more of the switch ports in the discovered network have a status of errDisable.
Causes of errDisable
A port enters errdisable state for any of the following reasons:
•
•
•
•
Impact
When a port is error-disabled, it is effectively shut down and no traffic is sent or received on that port. The port LED is set to the color orange and when you enter the show port command, the port status shows errdisable.
Fix
To recover from errDisable:
Step 1
Step 2
You cannot fix this discrepancy through Campus Manager.
For more information on the errDisable state, see the document Recovering From errDisable Port State on the CatOS Platforms at the following location:
http://www.cisco.com/en/US/partner/tech/tk389/tk214/technologies_tech_note09186a0080093dcb.shtml
Device Related Discrepancy
The device related discrepancy that Campus Manager reports is Devices With Duplicate Sysname. See Devices With Duplicate SysName
Devices With Duplicate SysName
Campus Manager reports a discrepancy when it discovers two devices with the same SysName. Campus Manager stores the device details of only one of the two devices.
Impact
Campus Manager manages only one of these devices.
Fix
Assign unique SysName for all devices in the network. You cannot fix this discrepancy through Campus Manager.
Spanning Tree Related Discrepancy
The spanning tree related discrepancy that Campus Manager reports is PortFast Enabled on Trunk Port. See Port Fast Enabled on Trunk Port
Port Fast Enabled on Trunk Port
Campus Manager reports a discrepancy when PortFast is enabled on trunk ports.
PortFast causes a spanning tree port to immediately enter the forwarding state, bypassing the listening and learning states.
You must disable STP PortFast for switch-switch links. This is because, if you enable PortFast on a port that is connected to another Layer 2 device, such as a switch, you might create network loops.
Impact
If you enable PortFast on ports that connect two switches, spanning tree loops can occur if Bridge Protocol Data Units (BPDUs) are being transmitted and received on those ports.
Fix
Campus Manager provides commands for disabling PortFast on ports.
To fix the discrepancy on switches using the Catalyst operating system:
Step 1
The Discrepancy Detail dialog box appears. The Recommended Fix field displays the following command:
set spantree portfast mod/port disablewhere
disabledisables the spanning tree PortFast-start feature on the port.Step 2
A message appears indicating whether the discrepancy was successfully fixed or not.
To fix the discrepancy on switches using Cisco IOS:
Step 1
The Discrepancy Detail dialog box appears. The Recommended Fix field displays the following command:
no spanning-tree portfast
endThis command disables PortFast on the given port.
Step 2
A message appears indicating whether the discrepancy was successfully fixed or not.
Interpreting Best Practices Deviations
This section contains information on each of the Best Practice Deviation reported in Campus Manager. It gives a description of the Best Practice Deviation, the impact (if any) it has on the network, and ways to resolve it.
The user interface in Campus Manager displays commands to make configuration changes on devices, to resolve some Best Practices deviations.
This section contains:
•
•
•
•
•
•
•
Channel Ports Related Best Practices Deviations
The channel ports related best practices deviations that Campus Manager reports are:
•
Non-channel Port in Desirable Mode
Campus Manager reports a Best Practice Deviation when a non-channel port is in the Desirable mode.
There are four user-configurable channel modes:
•
•
•
•
Port Aggregation Protocol (PAgP) packets are exchanged only between ports in Auto and Desirable modes. Ports configured in on or off mode do not exchange PAgP packets.
To form EtherChannel between, it is best to have both switches set to the Desirable mode. This gives the most robust behavior if one side or the other encounters error situations or is reset. The default mode of the channel is Auto.
Both Auto and Desirable modes allow ports to negotiate with connected ports to determine whether they can form a channel. The determination is based on criteria such as port speed, trunking state, and native VLAN.
Ports can form an EtherChannel when they are in different channel modes if the modes are compatible.
Examples of ports that can form an EtherChannel are:
•
•
•
•
•
Impact
When a non-channel port is in the Desirable mode, the links will not be efficiently used.
Fix
To fix the Best Practice Deviation on switches using Catalyst operating system:
Step 1
The Best Practice Deviation Detail dialog box appears. The Recommended Fix field displays the following command:
set port channel mod/port mode auto
Step 2
A message appears indicating whether the Best Practice Deviation was successfully fixed or not.
To fix the Best Practice Deviation on switches using Cisco IOS:
Step 1
The Best Practice Deviation Detail dialog box appears. The Recommended Fix field displays the following command:
channel-group Channel group number mode auto
Step 2
A message appears indicating whether the Best Practice Deviation was successfully fixed or not.
Channel Port in Auto Mode
Campus Manager reports a Best Practice Deviation when a channel port is in Auto mode.
There are four user-configurable channel modes:
•
•
•
•
Port Aggregation Protocol (PAgP) packets are exchanged only between ports in Auto and Desirable mode. Ports configured in On or Off mode do not exchange PAgP packets.
For switches to which you want to form an EtherChannel, it is best to have both switches set to Desirable mode. This gives the most robust behavior if one of the sides encounters error situations or is reset. The default mode of the channel is Auto.
Both Auto and Desirable modes allow ports to negotiate with connected ports to determine if they can form a channel. The determination is based on criteria such as port speed, trunking state, and native VLAN.
Ports can form an EtherChannel when they are in different channel modes if the modes are compatible.
Examples of ports that can form an EtherChannel are:
•
•
•
•
•
Impact
Channel port set to Auto mode is considered a Best Practice Deviation because it is not the recommended configuration. Cisco recommends that you set the channel port to Desirable mode. There is no serious impact on the network.
Fix
To fix the Best Practise Deviation on switches using the Catalyst operating system:
Step 1
The Best Practise Deviation Detail dialog box appears. The Recommended Fix field displays the following command:
set port channelmod/port mode desirablewhich sets the port to desirable mode.
Step 2
A message appears indicating whether the Best Practise Deviation was successfully fixed or not.
To fix the Best Practise Deviation on switches using Cisco IOS:
Step 1
The Best Practise Deviation Detail dialog box appears. The Recommended Fix field displays the following command:
channel-groupChannel group number mode desirablewhich sets the port to desirable mode.
Step 2
A message appears indicating whether the Best Practise Deviation was successfully fixed or not.
Spanning Tree Related Best Practices Deviations
The spanning tree related best practices deviations that Campus Manager reports are:
•
•
•
•
BPDU Filter Disabled on Access Ports
Campus Manager reports a Best Practice Deviation when BPDU Filter is not enabled on access ports.
Impact
BPDU filtering allows you to avoid transmitting BPDUs on PortFast-enabled ports that are connected to an end system. When you enable PortFast on the switch, spanning tree places ports in the forwarding state immediately, instead of going through the listening, learning, and forwarding states.
By default, spanning tree sends BPDUs from all ports regardless of whether PortFast is enabled. BDPUFilter can be enabled for each port or globally. When you enable BPDUFilter globally, it applies to all PortFast-enabled ports on the switch.
When you disable PortFast on a port, the BPDU Filter that was globally enabled on the PortFast enabled port is also disabled.
Fix
Campus Manager provides commands for enabling BPDU Filter on access ports.
To fix the Best Practice Deviation on switches using Catalyst operating system:
Step 1
The Best Practice Deviation Details dialog box appears. The Recommended Fix field displays the following command:
set spantree bpdu-filter
mod/port enablewhere:
•
•
Step 2
A message appears indicating whether the Best Practice Deviation was successfully fixed or not.
To fix the Best Practice Deviation on switches using Cisco IOS:
Step 1
The Best Practice Deviation Details dialog box appears. The Recommended Fix field displays the following command:
spanning-tree bpdufilter enable
end
where
enableenables BPDU Filtering on the particular interface.Step 2
A message appears indicating whether the Best Practice Deviation was successfully fixed or not.
BPDU-Guard Disabled on Access Ports
Campus Manager reports a Best Practice Deviation if PortFast is enabled and BPDU-Guard is not enabled on a port.
BPDU-Guard prevents spanning-tree loops by moving a port into the errdisable state when a BPDU is received on that port. When you enable BPDU-Guard on the switch, spanning tree shuts down the interfaces that receive BPDUs instead of putting the interfaces into the spanning-tree blocking state.
Impact
Cisco recommends that you enable BPDUGuard to block incoming BPDUs on edge devices (end-hosts). The Cisco BPDUGuard feature, when enabled, informs the switch to disable PortFast ports if a BPDU is received on those ports.
BDPUGuard can be enabled on each port or globally. When you enable BPDUGuard globally, it applies to all PortFast-enabled ports on the switch.
Fix
Campus Manager displays commands for enabling BPDU Filter on access ports.
To fix the Best Practice Deviation on switches using Catalyst operating system:
Step 1
The Best Practice Deviation Details dialog box appears. The Recommended Fix field displays the following command:
set spantree bpdu-guard
mod/port enablewhere:
•
•
Step 2
A message appears indicating whether the Best Practice Deviation was successfully fixed or not.
To fix the Best Practice Deviation on switches using Cisco IOS:
Step 1
The Best Practice Deviation Details dialog box appears. The Recommended Fix field displays the following command:
spanning-tree bpduguard enable
endwhere
enableenables BPDUGuard on the particular interface.Step 2
A message appears indicating whether the Best Practice Deviation was successfully fixed or not.
BackboneFast Disabled in Switch
Campus Manager reports a Best Practice Deviation when BackboneFast is enabled on one of the switches and not enabled on all other switches in a switch cloud.
Cisco recommends that BackboneFast be enabled on all switches running STP. It can be added without disruption to a production network.
Impact
If you do not enable BackboneFast on all devices, it might lead to undesirable effects on the spanning tree operation.
BackboneFast provides rapid convergence from indirect link failures. By adding functionality to STP, you can reduce convergence times from the default of 50 seconds to 30 seconds.
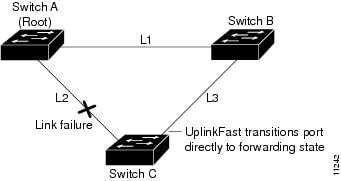
Figure 8-2 shows an example topology with no link failures. Switch A, the root switch, connects directly to Switch B over link L1 and to Switch C over link L2. The port on Switch C that connects directly to Switch B is in the blocking state.
Figure 8-2 BackboneFast Example Before Indirect Link Failure

If link L1 fails, Switch C detects this failure as an indirect failure, because it is not connected directly to link L1.
Switch B no longer has a path to the root switch. BackboneFast allows the blocked port on Switch C to move immediately to the listening state without waiting for the maximum aging time for the port to expire.
BackboneFast then transitions the port on Switch C to the forwarding state, providing a path from Switch B to Switch A.
This switchover takes approximately 30 seconds. Figure 8-3 shows how BackboneFast reconfigures the topology to account for the failure of link L1.
Figure 8-3 BackboneFast Example After Indirect Link Failure

Fix
Enable BackboneFast on all switches in a switch cloud.
To enable BackboneFast Globally on a Catalyst operating system:
Step 1
set spantree backbonefast enable
Step 2
show spantree backbonefast
To enable BackboneFast Globally on Cisco IOS:
Step 1
spanning-tree backbonefast
Step 2
show spanning-tree backbonefast
You cannot fix this Best Practice Deviation through Campus Manager.
For more information on Spanning Tree related configuration, see the document Configuring Spanning Tree PortFast, UplinkFast, and BackboneFast at the following location:
UplinkFast not Enabled
Campus Manager reports a Best Practice Deviation when UplinkFast is not enabled on switches.
Note
Cisco recommends that you enable UplinkFast for switches with blocked ports, typically at the access layer. Do not use on switches without the implied topology knowledge of a backup root link—typically, distribution and core switches in Cisco's multilayer design. It can be added without disruption to a production network.
Impact
UplinkFast provides fast STP convergence after a direct link failure in the network access layer. It operates without modifying STP, and its purpose is to speed up convergence time in a specific circumstance to less than three seconds, rather than the typical 30-second delay.
Figure 8-4 shows an example topology with no link failures. Switch A, the root switch, is connected directly to Switch B over link L1 and to Switch C over link L2. The port on Switch C that is connected directly to Switch B is in the blocking state.
Figure 8-4 UplinkFast Example Before Direct Link Failure
If Switch C detects a link failure on the currently active link L2 (a direct link failure), UplinkFast unblocks the blocked port on Switch C and transitions it to the forwarding state without going through the listening and learning states, as shown in Figure 8-5. This switchover takes approximately 1 to 5 seconds.
Figure 8-5 UplinkFast Example After Direct Link Failure
Fix
Enable UplinkFast on all access layer switches.
To enable Uplink Fast on Catalyst operating system:
Step 1
set spantree uplinkfast enable
Step 2
show spantree uplinkfast
To enable Uplink Fast on Cisco IOS:
Step 1
spanning-tree uplinkfast
Step 2
show spanning-tree uplinkfast
You cannot fix this Best Practice Deviation through Campus Manager.
For more information on Spanning Tree related configuration, see the document Configuring Spanning Tree PortFast, UplinkFast, and BackboneFast at the following location:
Loop Guard and Port Fast Enabled on Ports
Loop Guard
Assume that a switch port is receiving BPDUs, and is in the blocking state. The port makes up a redundant path. It is blocking because it is neither a Root Port nor a Designated Port. If, the flow of BPDUs stops, the last known BPDU is retained until the Max Age timer expires.
When the Max Age timer expires, that BPDU is flushed, and the switch thinks there is no longer a need to block the port. The port moves through the STP states until it begins to forward traffic. The switch then forms a bridging loop. In its final state, the port becomes a Designated Port.
To prevent this situation, you can use the loop guard STP feature. When you enable this feature, loop guard keeps track of the BPDU activity on nondesignated ports. While BPDUs are received, the port is allowed to behave normally.
When BPDUs are missing, loop guard moves the port into the loop-inconsistent state. The port is effectively blocking at this point to prevent a loop from forming and to keep it in the nondesignated role.
After BPDUs are received on the port again, loop guard allows the port to move through the normal STP states and become active. In this way, Loop Guard automatically governs ports without the need for manual intervention.
STP PortFast
STP configures meshed topology into a loop-free, tree-like topology. When the link on a bridge port goes up, STP calculation occurs on that port. The result of the calculation is the transition of the port into forwarding or blocking state. The result depends on the position of the port in the network and the STP parameters.
This calculation and transition period usually takes about 30 to 50 seconds. At that time, no user data passes through the port. Owing to this, some user applications can time out during the period.
To allow immediate transition of the port into forwarding state, enable the STP PortFast feature. PortFast immediately transitions the port into STP forwarding mode upon linkup. This way the port still participates in STP. So if the port is to be a part of the loop, the port eventually transitions into the STP blocking mode.
Impact
Enabling both the above features in a port, gives unpredictable results. Hence Campus Manager flags it as a Best Practice Deviation.
Fix
If you fix the above Best Practice Deviation through Campus Manager, it disables the Port Fast feature in the port.
To fix the Best Practice Deviation on switches using the Catalyst operating system:
Step 1
The Best Practice Deviation Details dialog box appears. The Recommended Fix field displays the following command:
set spantree portfast disable
Step 2
A message appears indicating whether the Best Practice Deviation was successfully fixed or not.
To fix the Best Practice Deviation on switches using Cisco IOS:
Step 1
The Best Practice Deviation Details dialog box appears. The Recommended Fix field displays the following command:
spanning-tree portfast disableStep 2
A message appears indicating whether the Best Practice Deviation was successfully fixed or not.
Trunk Ports Related Best Practices Deviations
The trunk ports related best practices deviations that Campus Manager reports are as follows:
•
Non-trunk Ports in Desirable Mode
Campus Manager reports a Best Practice Deviation when non-trunk ports are set to Desirable mode.
Impact
Cisco recommends that you set trunk to Off on all non-trunk ports. This helps eliminate wasted negotiation time when bringing host ports up. If a non-trunk port is set to Desirable, it attempts to become a trunk port if the neighboring port is in Desirable or Auto mode, although that is not the intended behavior.
Fix
To fix the Best Practice Deviation, set the trunk mode to Off on all non-trunk ports.
To fix it through Campus Manager, on switches using the Catalyst operating system:
Step 1
The Best Practice Deviation Details dialog box appears. The Recommended Fix field displays the following command:
set port hostmod/portStep 2
A message appears indicating whether the Best Practice Deviation was successfully fixed or not.
To fix it through Campus Manager, on switches using Cisco IOS:
Step 1
The Best Practice Deviation Details dialog box appears. The Recommended Fix field displays the following command:
switchport mode accessStep 2
A message appears indicating whether the Best Practice Deviation was successfully fixed or not.
Table 8-1 lists all possible combinations of trunk mode configurations and when Campus Manager reports a Best Practice Deviation.
Table 8-1 Trunking Configuration 1
Modes
On
Auto
Desirable
Nonegotiate
Off
On
None.
(Trunking)
Reports Best Practice Deviation.
(Trunking)
None.
(Trunking)
None.
(Trunking)
Reports Best Practice Deviation.
(Not Trunking)
Auto
Reports Best Practice Deviation.
(Trunking)
None.
(Not Trunking)
Reports Best Practice Deviation.
(Trunking)
Reports Best Practice Deviation.
(Not Trunking)
None.
(Not Trunking)
Desirable
None.
(Trunking)
Reports Best Practice Deviation.
(Trunking)
None.
(Trunking)
Reports Best Practice Deviation.
(Not Trunking)
Reports Best Practice Deviation.
(Not Trunking)
Nonegotiate
None.
(Trunking)
Reports Best Practice Deviation.
(Not Trunking)
Reports Best Practice Deviation.
(Not Trunking)
None.
(Trunking)
Reports Best Practice Deviation.
(Not Trunking)
Off
Reports Best Practice Deviation.
(Not Trunking)
None.
(Not Trunking)
Reports Best Practice Deviation.
(Not Trunking)
Reports Best Practice Deviation.
(Not Trunking)
None.
(Not Trunking)
1 Information in brackets indicate the trunking state of the interface.
Trunk Ports in Auto Mode
Campus Manager reports a Best Practice Deviation when trunk ports are set to Auto mode.
Impact
Cisco recommends an explicit trunk configuration of Desirable at both ends. Auto mode indicates a static property and the port will not initiate the trunking link, if the neighbor does not initiate it. See Table 8-1 for different trunk mode combinations.
Fix
To fix the Best Practice Deviation on switches using the Catalyst operating system:
Step 1
The Best Practice Deviation Details dialog box appears. The Recommended Fix field displays the following command:
set trunkmod/port desirableStep 2
A message appears indicating whether the Best Practice Deviation was successfully fixed or not.
To fix the Best Practice Deviation on switches using Cisco IOS:
Step 1
The Best Practice Deviation Details dialog box appears. The Recommended Fix field displays the following command:
switchport mode dynamic desirableStep 2
A message appears indicating whether the Best Practice Deviation was successfully fixed or not.
VLAN Related Best Practices Deviations
The VLAN related best practices deviations that Campus Manager reports are as follows:
VLAN Index Conflict
Campus Manager reports a Best Practice Deviation when there is a conflict in the VLAN Index. A VLAN Index conflict occurs in case of a VTP domain which has Server mode and Transparent or Off mode devices, where a same VLAN index has different VLAN name in transparent and server mode devices in the domain.
Impact
There is no serious impact on the network connectivity. It is considered as a Best Practice Deviation because Campus Manager cannot manage a VTP domain where the same VLAN index has different VLAN names in transparent and server mode devices.
Fix
Assign the same name for a VLAN Index in both the transparent and server modes of the VTP domain. You cannot fix this Best Practice Deviation through Campus Manager.
VLAN Name Conflict
Campus Manager reports a Best Practice Deviation when there is a conflict in the VLAN Name. A VLAN Name conflict occurs in case of a VTP domain which has Server mode and Transparent or Off mode devices, where a VLAN part of the transparent mode device in the domain has the same name as VLAN part of the server mode device in the domain.
Impact
There is no serious impact on the network connectivity. It is considered as a Best Practice Deviation because Campus Manager cannot manage a VTP domain with devices where a VLAN part of the transparent mode device in the domain has the same name as VLAN part of the server mode device in the domain.
Fix
Resolve the conflict by assigning different names for the VLAN part of the transparent mode and the server mode devices. You cannot fix this Best Practice Deviation through Campus Manager.
Link Ports Related Best Practice Deviation
The link port related Best Practice Deviation that Campus Manager reports is UDLD Disabled on Link Ports. See UDLD Disabled on Link Ports
UDLD Disabled on Link Ports
Campus Manager reports a Best Practice Deviation if UniDirectional Link Detection (UDLD) is disabled on link ports.
Impact
If you disable UDLD, it could result in Spanning Tree loops.
Unidirectional links are often caused by a failure not detected on a fiber link, or by a problem with a transceiver.
Figure 8-6 Unidirectional Links
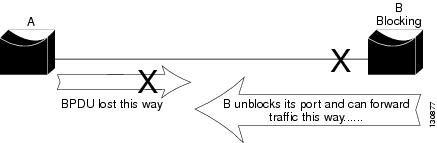
In Figure 8-6, suppose the link between A and B is unidirectional and drops traffic from A to B while transmitting traffic from B to A. Suppose that B should be blocking. It has previously been stated that a port can only block if it receives BPDUs from a bridge that has a higher priority. In this case, all these BPDUs coming from A are lost and bridge B eventually forwards traffic, creating a loop.
To detect the unidirectional links before the forwarding loop is created, Cisco designed and implemented the UniDirectional Link Detection (UDLD) protocol. This feature is able to detect improper cabling or unidirectional links on Layer 2 and automatically break resulting loops by disabling some ports.
For maximum protection against symptoms resulting from uni-directional links, we recommend that you enable aggressive mode UDLD on point-to-point links between Cisco switches, where you have set the message interval to the default 15 seconds.
Fix
Campus Manager provides commands to enable UDLD on link ports.
To fix the Best Practice Deviation on switches using Catalyst operating system:
Step 1
The Best Practice Deviation Details dialog box appears. The Recommended Fix field displays the following command:
set udld enablemod/portwhere enable enables the UDLD information display.
Step 2
A message appears indicating whether the Best Practice Deviation was successfully fixed or not.
To fix the Best Practice Deviation on switches using Cisco IOS:
Step 1
The Best Practice Deviation Details dialog box appears. The Recommended Fix displays the following command:
udld port
endThis command enables UDLD in normal mode by default on all interfaces.
Step 2
A message appears indicating whether the Best Practice Deviation was successfully fixed or not.
Access Ports Related Best Practice Deviation
The access ports related Best Practice Deviation that Campus Manager reports is CDP Enabled on Access Ports. See CDP Enabled on Access Ports
CDP Enabled on Access Ports
Campus Manager reports a Best Practice Deviation when Cisco Discovery Protocol (CDP) is enabled on the access port of a switch.
CDP is enabled by default and is essential to gain visibility of adjacent devices and for troubleshooting. It is also used by network management applications to build Layer 2 topology maps.
Impact
In parts of the network where a high level of security is required (such as Internet-facing de-militarized zones), you should turn off CDP.
Fix
Campus Manager provides commands to disable CDP on switches.
To fix the Best Practice Deviation on switches running Catalyst operating system:
Step 1
The Best Practice Deviation Details dialog box appears. The Recommended Fix field displays the following command:
set cdp disable mod/portStep 2
A message appears indicating whether the Best Practice Deviation was successfully fixed or not.
To fix the Best Practice Deviation on switches running Cisco IOS:
Step 1
The Best Practice Deviation Details dialog box appears. The Recommended Fix field displays the following command:
no cdp enableStep 2
A message appears indicating whether the Best Practice Deviation was successfully fixed or not.
Cisco Catalyst 6000 Devices Related Best Practice Deviation
The Cisco Catalyst 6000 devices related Best Practice Deviation that Campus Manager reports is High Availability not Operational. See High Availability not Operational
High Availability not Operational
Enabling High Availability on switches is applicable only for Cisco Catalyst 6000 devices. Campus Manager reports a Best Practice Deviation when there are two supervisor engines in Cisco Catalyst 6000 devices and High Availability is not enabled.
Impact
High Availability:
•
•
•
•
You can enable High Availability using Command Line Interface (CLI).
Fix
As a general practice with redundant supervisors, we recommend that you enable High Availability feature for normal operation.
Campus Manager provides commands for enabling High Availability.
To fix the Best Practice Deviation on switches using Catalyst operating system:
Step 1
The Best Practice Deviation Details dialog box appears. The Recommended Fix field displays the following command:
set system highavailability enableStep 2
A message appears indicating whether the Best Practice Deviation was successfully fixed or not.
For more information on Supervisor engines and High Availability, see the document Configuring Redundancy at the following location:
http://www.cisco.com/en/US/docs/switches/lan/catalyst6500/catos/6.x/configuration/guide/redund.html
Viewing Discrepancy Reports
To view discrepancy reports:
Step 1
The Report Generator page appears.
Step 2
The Report Generator page has options to configure the report you want to view. Table 8-2 describes the options that you can configure to generate a Discrepancy Report.
Step 3
The Discrepancy Report appears if you had set the Run Type to Immediate.
For any other Run Type, the report is created as a job. For details on viewing, stopping, and deleting the scheduled report job, see Using the Reports Job Browser
To clear the values you entered click Reset.
Understanding Discrepancy Reports
The Discrepancy Report is displayed in a tabular format. Table 8-3 describes the fields in a Discrepancy Report.
Table 8-3 Discrepancy Reports
Acknowledge
If you have launched:
•
You can acknowledge discrepancies from this report.
For details on acknowledging a discrepancy, see Acknowledging Discrepancies.
•
You can unacknowledge discrepancies from this report.
For details on unacknowledging a discrepancy, see Unacknowledging Discrepancies.
•
The Acknowledge column displays Yes for Acknowledged discrepancies and No for Unacknowledged Discrepancies.
Type
Brief description of the discrepancy.
Severity
The severity level of the discrepancy. Discrepancies are categorized according to their severity as medium, or high.
Summary
The IP addresses of the devices that are affected by the discrepancy are displayed here. Click the hyperlink to view more details on the discrepancy.
For more information, see Viewing Details on Discrepancies.
Fix
States if the discrepancy can be fixed through Campus Manager.
A link is provided, clicking on which takes you to the Fix Page.
For details on fixing discrepancies, see Fixing Discrepancies.
First Found
The date and time when the discrepancy was first discovered by Campus Manager.
Remarks
If a fix has been attempted on the discrepancy, it is shown here. The RME Job ID for the fix operation is also shown here.
Acknowledging Discrepancies
Discrepancies that do not having serious impact in the network, can be acknowledged. You can also acknowledge a discrepancy that you no longer want to see in the Discrepancy Report. If you acknowledge it, it is removed from the report.
To acknowledge a discrepancy:
Step 1
Step 2
The acknowledged discrepancy does not appear in the report, the next time you generate it.
Unacknowledging Discrepancies
If you want the acknowledged discrepancy to reappear in the Discrepancy Report, you need to unacknowledge it.
To unacknowledge a discrepancy:
Step 1
Step 2
The unacknowledged discrepancy appears in the report, the next time you generate it.
Viewing Details on Discrepancies
To get detailed information on a discrepancy, click the hyperlink in the summary column of the Discrepancy Report. The Discrepancy Details dialog box appears.
Table 8-4 explains Discrepancy Details:
Fixing Discrepancies
This page displays information about the Discrepancy detected in the network and helps you fix it through appropriate commands.
Table 8-5 describes the fields in the Discrepancy Details dialog box.
Table 8-5 Discrepancy Details
Type
Name of the discrepancy.
Severity
Severity level of the discrepancy. Discrepancies are categorized according to their severity as low and high.
First Found
Date and time when the discrepancy was first discovered by Campus Manager.
Description
IP Addresses of the devices which cause this discrepancy are displayed here.
Detail
Brief summary of the discrepancy.
Recommended Fix
If the discrepancy can be fixed through Campus Manager:
A set of commands is displayed that will be used to resolve the discrepancy. You can edit the commands provided by Campus Manager, to suit your network requirements.

Caution
If the discrepancy cannot be fixed through Campus Manager:
This field will be blank. You can enter commands to fix the discrepancy. See Command Format for details on the format to be used.
Campus Manager uses the cwcli interface of Resource Manager Essentials (RME) to resolve discrepancies.
For details on setting RME Credentials, see Setting RME Credentials
Command Format
Commands should be entered in the following format in the Fix column:
[IP Address or Host Name]
command1
command2
If the commands have to be run for more than one device:
[IP Address1 or Host Name1]
command1
command2
[IP Address2 or Host Name2]
command1
command2
For example:
[172.20.5.82]
interface Gi49
speed auto
[172.20.5.6]
interface Gi2/1
speed autoNotes on Fixing Discrepancies
For fixing Discrepancies, Campus Manager uses RME CiscoWorks CLI (CWCLI) framework.
Set the following from Campus Manager to access the RME Server:
•
•
•
•
•
For complete details on this, see Setting RME Credentials.
While fixing Discrepancies through Campus Manager:
•
If you enter the wrong RME server or IP Address or if the RME server is down, the fix fails. To overcome this, ping RME server from the Campus Manager server and ensure connectivity.
•
Port number for http is 1741 and for https is 443. The fix fails if you enter the wrong port numbers.
•
The fix fails when the username or password is incorrect.
•
TFTP uses SNMP credentials for RME CWCLI. So ensure that correct SNMP read/write credentials are available while using TFTP as transport protocol in RME.
•
RME CWCLI updates the device configuration with the transport protocols configured in
RME > Admin >Config Management >Transport Settings dialog box.To update the device configuration, RME uses the protocols in the available order. If the fix fails for one protocol, RME tries again with the next protocol according to the specified order.
For the fix to succeed, ensure that the correct credentials are set for the devices. The credentials need to be configured in the CommonServices >Device and Credentials page.
•
Check whether the device is managed in RME when you are fixing the Discrepancy on a remote RME Server. If the device is not managed in RME, the job is not created for that device and the fix fails.
•
When either deploy or fetch configuration is successful, Job Status in RME Jobs/Archive Management is shown as Partial Success. However, the Fix status in Campus Manager is shown as fail. Fix is successful only when both deploy and fetch are successful.
For example, when trying to deploy configuration with TFTP, the operation may be successful. However, fetching configuration may fail because of timeouts for the TFTP operation. This could happen if the configuration is large.
In this case, select RME > Admin > System Preferences > RME device Attributes and increase TFTP Timeout in the dialog box.
Viewing Best Practices Deviations Reports
To view Best Practices Deviations reports:
Step 1
The Report Generator page appears.
Step 2
The Report Generator page has options to configure the report you want to view. Table 8-6 describes the options that you can configure to generate a Best Practices Deviations Report.
Step 3
The Best Practices Deviations report appears if you had set the Run Type to Immediate.
For any other Run Type, the report is created as a job. For details on viewing, stopping, and deleting the scheduled report job, see Using the Reports Job Browser
You can click Reset to clear the values you entered.
Understanding Best Practices Deviations Reports
The Best Practices Deviations Report is displayed in a tabular format. Table 8-7 describes the fields in this report.
Table 8-7 Best Practices Deviations Report
Acknowledge
If you have launched:
•
You can acknowledge Best Practise Deviations from this report.
For details, see Acknowledging Best Practices Deviations.
•
You can unacknowledge Best Practise Deviations from this report.
For details, see Unacknowledging Best Practices Deviations.
•
The Acknowledge column displays Yes for Acknowledged Best Practise Deviations and No for Unacknowledged Best Practise Deviations.
Type
Brief description of the Best Practice Deviation.
Summary
IP addresses of the devices which are affected by the Best Practice Deviation. Click the hyperlink to view more details on the Best Practice Deviation.
For more information, see Viewing Details on Best Practices Deviations.
Fix
States if the Best Practice Deviation can be fixed through Campus Manager.
A link is provided, clicking on which takes you to the Fix Page.
For details on fixing Best Practice Deviation, see Fixing Best Practices Deviations.
First Found
Date and Time when the Best Practice Deviation was first discovered by Campus Manager.
Remarks
If a fix has been attempted on the Best Practice Deviation, it is shown here. The RME Job ID for the Fix operation is also shown here.
Acknowledging Best Practices Deviations
You can acknowledge a Best Practice Deviation that you no longer want to see in the Best Practices Deviations Report.
If you acknowledge it, it will no longer be available in the report. If you want the acknowledged best practice deviation to reappear in the Best Practice Deviation Report, you need to unacknowledge it.
To acknowledge a Best Practice Deviation:
Step 1
Step 2
The Best Practice Deviation is not shown in the report, the next time you generate it.
Unacknowledging Best Practices Deviations
If you want the acknowledged Best Practise Deviations to reappear in the Best Practise Deviations Report, you need to unacknowledge it.
To unacknowledge a Best Practise Deviation:
Step 1
Step 2
The unacknowledged Best Practise Deviation appears in the report, the next time you generate it.
Viewing Details on Best Practices Deviations
To get detailed information on a Best Practice Deviation, click the hyperlink in the summary column of the Best Practices Deviations Report. The Best Practices Deviations Details dialog box appears.
Table 8-8 displays the following details:
Fixing Best Practices Deviations
This page displays information about the Best Practice Deviation detected in the network and helps you fix it through appropriate commands.
Table 8-9 explains the Best Practice Deviation Details:
Table 8-9 Best Practices Deviations Details
Type
Name of the Best Practice Deviation.
First Found
Date and time when the Best Practice Deviation was first discovered by Campus Manager.
Description
IP addresses of the devices which cause this Best Practice Deviation.
Detail
Brief summary of the Best Practice Deviation.
Recommended Fix
If the Best Practice Deviation can be fixed through Campus Manager:
A set of commands is displayed here that will be used to resolve the Best Practice Deviation. You can edit the commands provided by Campus Manager, to suit your network requirements.
Caution
If the Best Practice Deviation cannot be fixed through Campus Manager:
This field will be blank. You can enter commands to fix the Best Practice Deviation. See Command Format for details on the format to be used.
Campus Manager uses the cwcli interface of Resource Manager Essentials (RME) to resolve Best Practice Deviations.
For details on setting RME Credentials, see Setting RME Credentials
Command Format
Commands should be entered in the following format in the Fix column:
[IP Address or Host Name]
command1
command2
If the commands have to be run for more than one device:
[IP Address1 or Host Name1]
command1
command2
[IP Address2 or Host Name2]
command1
command2
Example:
[
10.77.209.131]
interface Fa0/1
no cdp enable
interface Fa0/2
no cdp enable
[cfm-sw1]
interface Fa0/2
no cdp enable
interface Fa0/3
no cdp enableNotes on Fixing Best Practices Deviation
For fixing Best Practices Deviations, Campus Manager uses RME CiscoWorks CLI (CWCLI) framework.
Set the following from Campus Manager, to access the RME Server:
•
•
•
•
•
For complete details, see Setting RME Credentials.
While fixing Best Practise Deviations through Campus Manager:
•
If you enter the wrong RME server or IP Address or if the RME server is down, the fix fails. To overcome this, ping RME server from the Campus Manager server and ensure connectivity.
•
Port number for http is 1741 and for https is 443. The fix fails if you enter the wrong port numbers.
•
The fix fails when the username or password is incorrect.
•
TFTP uses SNMP credentials for RME CWCLI. So ensure that correct SNMP read/write credentials are available while using TFTP as transport protocol in RME.
•
RME CWCLI updates the device configuration with the transport protocols configured in
RME > Admin >Config Management >Transport Settings.To update the device configuration, RME uses the protocols in the available order. If the fix fails for one protocol, RME tries again with the next protocol according to the specified order.
For the fix to succeed, ensure that the correct credentials are set for the devices. Select CommonServices >Device and Credentials and configure the credentials in the page.
•
Check whether the device is managed in RME when you are fixing the Best Practice Deviation on a remote RME Server. If the device is not managed in RME, the job is not created for that device and the fix fails.
•
When either Deploy or Fetch Configuration is successful, Job Status in RME Jobs/Archive Management is shown as Partial Success. But the Fix status in Campus Manager is shown as fail. Fix is successful only when both Deploy and Fetch are successful.
For example, when trying to deploy configuration with TFTP, the operation may be successful. However, fetching configuration may fail because of timeouts for the TFTP operation. This could happen if the configuration is large.
In this case, increase TFTP Timeout in RME > Admin > System Preferences > RME device Attributes.
Customizing Discrepancies Reporting and Syslog Generation
You can customize the Discrepancies Report and Best Practices Deviations Report to display only those discrepancies and Best Practice Deviations about which you want to be notified.
To customize the reports:
Step 1
Alternatively, if you are in Campus Manager Administration page, click Other Admin Settings and choose Discrepancies from the Table of Contents (TOC).
The discrepancies page appears. You can view the list of Network discrepancies, and Discrepancies configured to send Syslog messages by clicking the corresponding View Details link.
Step 2
The Configuring Discrepancies dialog box appears.
•
Checking all the checkboxes results in a report displaying all discrepancies and Best Practice Deviations in the network.
•
Step 3
A list of the selected Discrepancies and Best Practice Deviations appears.
Step 4
Step 5
A summary of the selected Discrepancies and Best Practice Deviations appears.
Step 6
You can use the filters to display discrepancy reports for specific devices, link or network types. This makes it easy to find a particular discrepancy for a particular type.
You can use more than one filter at the same time, but results will vary.
•
For example, if you select Duplex, Speed under Link, any link or port that fulfils at least one filter criteria will be displayed in the report.
•
For example, if you select both a Link type and a Port type filter from the discrepancy filter, any link that fulfils both filter criteria will appear in the report.
 Feedback
Contact Cisco
- Open a Support Case

- (Requires a Cisco Service Contract)
This Document Applies to These Products
- Collaboration Endpoints - Retired Products
- Conferencing - Retired Products
- Contact Center - Retired Products
- Optical Networking - Retired Products
- Routers - Retired Products
- Security - Retired Products
- Servers - Unified Computing (UCS) Retired Products
- Storage Networking Retired Products
- Switches - Retired Products
- Video - Retired Products
- Wireless - Retired Products