Deploying Cisco Nexus Dashboard Data Broker as a Service

Beginning with Release 3.10.1, Cisco Nexus Data Broker (NDB) has been renamed to Cisco Nexus Dashboard Data Broker. However, some instances of NDB are present in this document, to correspond with the GUI, and installation folder structure. References of NDB/ Nexus Data Broker/ Nexus Dashboard Data Broker, can be used interchangeably.

This chapter contains the following details:

Downloading Cisco Nexus Dashboard Data Broker Application from the Cisco App Center

Use this procedure to download Cisco Nexus Dashboard Data Broker application.

Before you begin

You must have administrative credentials to download applications.

Procedure


Step 1

Log in to the GUI with admin priviliges.

If you do not have admin privileges, log in to Cisco App Center to download the application.

Step 2

Select Apps.

Step 3

Click the Download Applications icon (far-right side of the work pane).

A new window or browser tab opens to the Cisco App Center.

Step 4

In the Search bar, search for Nexus Dashboard Data Broker.

Step 5

Select the Cisco Nexus Dashboard Data Broker application and click Download.

Step 6

Review the licence agreement and, if OK, click Agree and Download.

The Cisco Nexus Dashboard Data Broker app is downloaded to your local machine.

Alternatively, you can move the downloaded app to a HTTP server. This is optional.


What to do next

Install the Nexus Dashboard Data Broker app on Cisco APIC/ Nexus Dashboard.

Installing Cisco Nexus Dashboard Data Broker as a Service on Cisco APIC

You can install Cisco Nexus Dashboard Data Broker as a service on Cisco APIC using either of these methods:

Installing Cisco Nexus Dashboard Data Broker as a Service on Cisco APIC from a Local Machine

Use this procedure to install Cisco Nexus Dashboard Data Broker as a service on Cisco APIC from your local machine.

You can also use this procedure if you are migrating from centralized deployment of the Cisco Nexus Dashboard Data Broker to deploying it on APIC.

Before you begin

You must have administrative credentials to install Cisco Nexus Dashboard Data Broker as a service.

Procedure


Step 1

Log in to the Cisco APIC GUI with admin privileges.

Step 2

Click the Apps tab.

Step 3

To add Cisco Nexus Dashboard Data Broker as a sevice to APIC from your local machine, click Add Application.

Step 4

In the Add application to APIC dialog box that is displayed, browse and provide the path of the .aci file.

Step 5

The Location is by default selected as APIC.

Step 6

Click Submit.

After Cisco Nexus Dashboard Data Broker is installed on APIC, it appears under the Apps tab.

Step 7

Click the green Enable button to enable Nexus Dashboard Data Broker on APIC.

After you enable, the Nexus Dashboard Data Broker service is displayed with a blue Open button.

Step 8

Click Open.

The standard Nexus Dashboard Data Broker GUI is displayed. This may take a few minutes.

If you are migrating from centralized deployment to deployment on APIC, continue to steps 9, 10, 11.

Step 9

On the Nexus Dashboard Data Broker GUI, navigate to Administration > Backup/ Restore > Actions > Restore Locally.

For the detailed procedure about backing up the configuration file, see Taking Backup of the Configuration File.

Note


To reconfigure the device during the upgrade, select the Restore option (by checking the check-box) during configuration upload.

Step 10

On the Cisco APIC GUI, navigate to the Apps tab.

Step 11

Disable and enable the Nexus Dashboard Data Broker app to complete the migration.


Installing Cisco Nexus Dashboard Data Broker as a Service on Cisco APIC from a Server

Use this procedure to install Cisco Nexus Dashboard Data Broker as a service on Cisco APIC from the APIC Downloads tab.

Before you begin

You must have administrative credentials to install Cisco Nexus Dashboard Data Broker as a service.

Procedure


Step 1

On Cisco APIC, navigate to Admin > Downloads > General.

Step 2

Click the Task icon on the far right of the Downloads work pane and select Add File to APIC.

The Add File to APIC dialog box is displayed.

Step 3

Enter the name of the download file in the Dowload Name field.

Step 4

In the Protocol field, choose Secure Copy or HTTP.

If the Nexus Dashboard Data Broker file was downloaded to a file server use HTTP, else select Secure Copy.

Step 5

In the URL field, enter the path of the image location.

Step 6

Enter your name and password in the Username and Password fields.

The default Authenticaton Type is Use Password.

Step 7

Click Submit.


What to do next

After Cisco Nexus Dashboard Data Broker is installed on APIC, it appears under the Apps tab. Click the green Enable button to enable Cisco Nexus Dashboard Data Broker on APIC. After you enable, Cisco Nexus Dashboard Data Broker is displayed with a blue Open button. Click Open to get the standard Cisco Nexus Dashboard Data Broker GUI.

Installing Cisco Nexus Dashboard Data Broker as a Service on Cisco Nexus Dashboard

Use this procedure to install and enable Cisco Nexus Dashboard Data Broker on Cisco Nexus Dashboard (ND).

You can also use this procedure if you are migrating from centralized deployment of the Cisco Nexus Dashboard Data Broker to deploying it on ND.

See the Capacity Planning tool for details about the required cluster size while deploying the data broker on pND/ vND.


Note


Nexus Dashboard Data Broker cannot be co-hosted with other Nexus Dashboard services. Ensure that you deploy a dedicated Nexus Dashboard cluster for Nexus Dashboard Data Broker.


Procedure


Step 1

Log in to Cisco Nexus Dashboard.

Step 2

Navigate to Services > Service Catalog > App Store.

The Cisco Nexus Dashboard Data Broker service is available.

Step 3

Click Install.

If you have downloaded the Data Broker service on to a remote server or local machine, then, click Actions > Upload App. Select the required option and click Install.

Step 4

Navigate to Services > Service Catalog > Installed Services.

Step 5

Click Enable .

The Enable Nexus Dashboard Data Broker window is displayed.

Select the required Deployment Profile from the drop down list. The options are:

  • Small

  • Medium

  • Large

The resource requirement for the selected deployment profile is displayed.

Resource requirement details for a deployment profile, are as shown in the table below.

Deployment Profile (App Profile)

Cores per node

Memory per node(RAM in GB)

HDD per node (in GB)

No. of NDB Devices

Small

4

4

2

25*

Medium

6

8

2

50*

Large

8

16

2

75*

* Nexus switches with 54 ports.

Step 6

Click Open.

The standard Nexus Dashboard Data Broker GUI is displayed. This may take a few minutes.

If you are migrating from centralized deployment to deployment on ND, continue to steps 7 to 12.

Step 7

Copy the tlsKeyStore and tlsTrustStore files from the previous release's configuration directory into any of the ND nodes (say ND-1 or node-1) using the scp command to the path - /home/rescue-user

Example: scp tlsKeyStore rescue-user@x.x.x.x:/home/rescue-user

Step 8

Login as root user on the ND node on to which the tls files were copied (node-1 or ND-1).

Step 9

Navigate to /home/rescue-user and run the following commands:

  • kubectl cp tlsKeyStore cisco-ndb/ndbserver-0:/home/app/ndb/configuration

  • kubectl cp tlsTrustStore cisco-ndb/ndbserver-0:/home/app/ndb/configuration

  • kubectl cp tlsKeyStore cisco-ndb/ndbserver-1:/home/app/ndb/configuration

  • kubectl cp tlsTrustStore cisco-ndb/ndbserver-1:/home/app/ndb/configuration

  • kubectl cp tlsKeyStore cisco-ndb/ndbserver-2:/home/app/ndb/configuration

  • kubectl cp tlsTrustStore cisco-ndb/ndbserver-2:/home/app/ndb/configuration

Step 10

On the Nexus Dashboard Data Broker GUI, navigate to Administration > Backup/ Restore > Actions > Restore Locally.

For the detailed procedure about backing up the configuration file, see Taking Backup of the Configuration File.

Note


To reconfigure the device during the upgrade, select the Restore option (by checking the check-box) during configuration upload.

Step 11

On the Cisco ND GUI, navigate to the Services tab.

Step 12

Disable and enable the Nexus Dashboard Data Broker app to complete the migration.

Note


If the backed up configuration has an APIC which is also connected as a site to ND, ensure that the APIC site is reachable, and connected to ND for Nexus Dashboard Data Broker to be able to connect to the APIC site via ND.


Guidelines and Limitations

The following are the guidelines and limitations for Cisco Nexus Dashboard Data Broker as a service on Cisco APIC/ Nexus Dashboard:

  • A minimum of a 3-node APIC/ND cluster is required for installing NDDB as an app on ND or APIC.

  • No separate log in is required (single sign-on). You will be directed to the Nexus Dashboard Data Broker GUI.

  • Host APIC is discovered automatically and you need not add it again.

    The APIC on which the Nexus Dashboard Data Broker service is being installed is automatically discovered, and is displayed on Nexus Dashboard Data Broker's Span Devices screen, after the Nexus Dashboard Data Broker service is enabled.

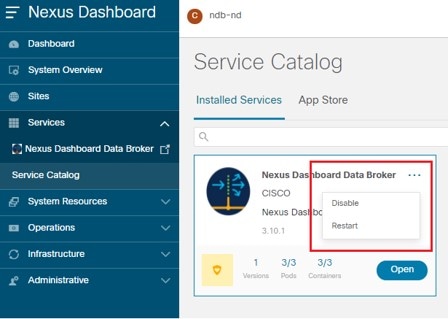
  • To restart the Nexus Dashboard Data Broker service, Disable the service on APIC/ ND and, then Enable it again. For ND, you can also use the Restart option.

  • Nexus Dashboard Data Broker uses the host's (APIC/ ND) RBAC.

  • Root users of APIC/ ND can modify the Nexus Dashboard Data Broker config.ini file.

  • Users can download the audit log by downloading the configuration (backup locally option).

    (Only for Nexus Dashboard Data Broker on APIC) Nexus Dashboard Data Broker logs need to be downloaded from APIC tech support logs page.

  • TLS between browser and Nexus Dashboard Data Broker is not applicable while it is deployed as a service. TLS between Nexus Dashboard Data Broker controller and the NDB devices will have the same steps and the user (with root permissions) needs to copy the tls files in to all containers in the directory. The directory paths are:

    /home/app/local-data/configuration for APIC; /home/app/ndb/configuration/ for ND.

    For details, see the Managing TLS chapter of the Cisco Nexus Dashboard Data Broker Configuration Guide.

Taking Backup of the Configuration File

Use this procedure, for taking backup of the configuration file, before migrating from centralized deployment to deloyment on ND.

Procedure


Step 1

Log in to the Nexus Dashboard Data Broker GUI.

Step 2

Navigate to Administration > Backup/Restore > Actions > Backup Locally.

The default name of the zip file is configuration_startup.zip.

Step 3

Stop the current Nexus Dashboard Data Broker instance using the /runndb.sh -stop command.

Step 4

If TLS certification is enabled between the Nexus Dashboard Data Broker server and NX-OS switch, copy the tlsTrustStore and tlsKeyStore files into the containers of the app in the configuration directory from the old ndb configuration directory.