Cisco OpenStack Integration Installation Guide for Nexus Dashboard, Release 4.3.x
Available Languages
Bias-Free Language
The documentation set for this product strives to use bias-free language. For the purposes of this documentation set, bias-free is defined as language that does not imply discrimination based on age, disability, gender, racial identity, ethnic identity, sexual orientation, socioeconomic status, and intersectionality. Exceptions may be present in the documentation due to language that is hardcoded in the user interfaces of the product software, language used based on RFP documentation, or language that is used by a referenced third-party product. Learn more about how Cisco is using Inclusive Language.
- US/Canada 800-553-2447
- Worldwide Support Phone Numbers
- All Tools
 Feedback
 Feedback
OpenStack provides a flexible software architecture designed to build cloud-computing environments. Its reference software implementation supports multiple Layer 2 or Layer 3 transport options such as VLAN, GRE, and VXLAN. Additionally, the Neutron project within OpenStack offers software-based Layer 3 forwarding capabilities.
This guide provides step-by-step instructions for integrating OpenStack with the Nexus Dashboard Fabric Controller (NDFC), a component of Nexus Dashboard (ND). It covers the overall architecture, installation procedures, and configuration steps to ensure seamless integration with OpenStack’s Neutron microservice.
ND release 4.3 introduces hardware-accelerated Layer 3 forwarding through the new nd network type, address scope-to-VRF mapping for granular network isolation, and a network deploy-status extension for monitoring and retrying ND network deployments.
This guide is intended for network engineers, cloud administrators, and IT professionals familiar with ND, NDFC, and OpenStack.
The integration enables OpenStack workflows to configure fabric networking through Nexus Dashboard. It uses the NDFC Modular Layer 2 (ML2) Mechanism Driver, the ND type driver, the NdMl2Plugin core plugin, and Topology Agents to provide seamless connectivity between virtualized compute instances and network switches.
Figure 1 is a system diagram of integration. Cloud users interact with OpenStack, managing resources such as networks, subnets, routers, and VMs, which results in REST requests to Nexus Dashboard and consequently programs the fabric switches accordingly.
This solution requires deploying Cisco topology agents in each OpenStack compute node. The topology agents use LLDP discovery to create host-to-fabric mappings and transmit this information to OpenStack over the message bus using remote procedure calls (RPCs). OpenStack then uses these mappings to determine which switches and switch ports to configure when cloud users create virtual networks.
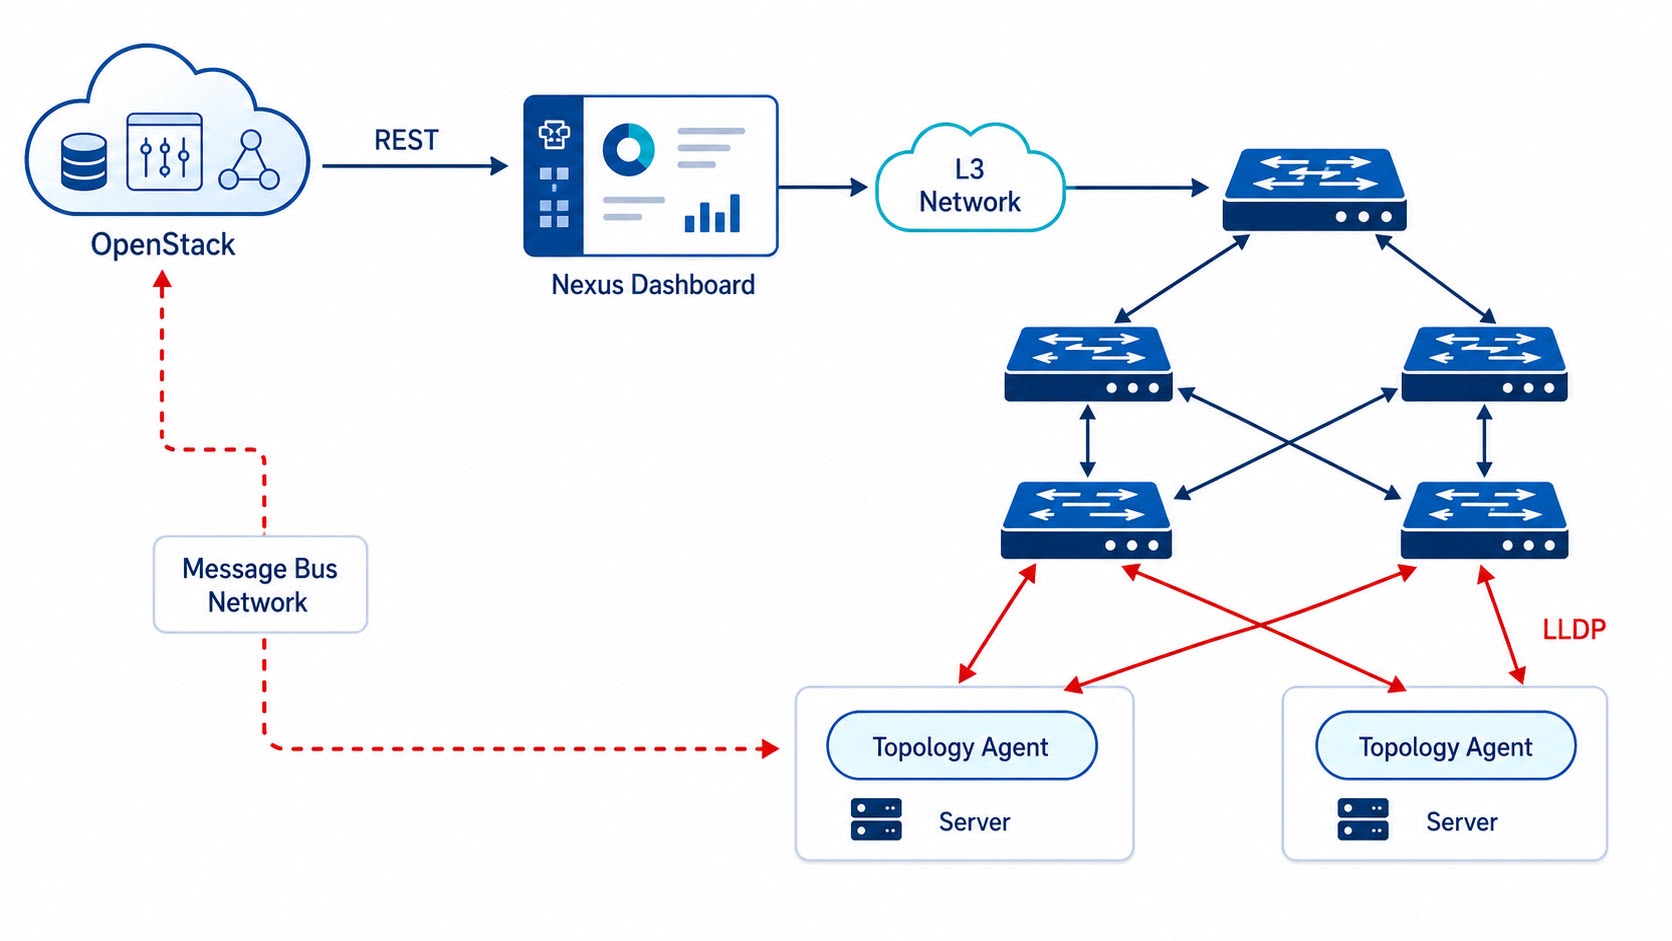
OpenStack with NDFC System Diagram.
A key component of the integration involves mapping OpenStack resources to Nexus Dashboard resources. When cloud users or administrators create, update, or delete specific Neutron resources, the corresponding resources are automatically created, updated, or deleted in Nexus Dashboard and, as a result, in fabric switches. Table 1 lists the mappings used by this integration.
Table 1. OpenStack to Nexus Dashboard Resource Mappings.
| OpenStack Resource |
Nexus Dashboard Resource |
| Project |
VRF |
| Address Scope |
VRF (with custom name) |
| Network |
Network |
| Subnet |
Subnet gateway of the network |
| Port |
Network |
ND release 4.3 introduces the following features.
● ND network type and type driver — Adds the ND network type for hardware-accelerated Layer 3 forwarding through NDFC.
● Hierarchical port binding — Enables dynamic allocation of VLAN segments for nd networks so OVN can complete port binding between compute hosts and connected fabric switches.
● Network isolation using address scopes — Maps OpenStack address scopes to specific ND VRFs, enabling multiple VRFs per OpenStack project.
● Network deploy robustness — Adds the nd-status extension, manual SYNC retry support, and periodic polling to reconcile network deploy state with NDFC.
● Configurable NDFC API retry behavior — Adds the new attach_max_retries parameter, which controls how many times the integration retries NDFC network attach/detach API calls when transient errors are encountered (such as VRF deployment in progress). Uses exponential backoff starting at 5 seconds.
Benefits of Using Nexus Dashboard with OpenStack
Integrating ND with OpenStack delivers a powerful combination of hardware-accelerated performance, intelligent automation, and flexible network management. Following are the key benefits of OpenStack integration.
● Accelerated Layer 2 and Layer 3 performance — Layer 3 gateway for Neutron resources is configured at the switch level, enabling hardware-accelerated Layer 2 and Layer 3 functions. This setup enhances scalability and performance, especially in large-scale deployments.
● Modern fabric architecture — Native integration with BGP-EVPN fabric and VXLAN provides a scalable, standards-based foundation for multi-tenant cloud environments.
● Automated topology discovery — Built-in LLDP support automatically discovers and maps the network topology, reducing manual configuration and operational overhead.
● Simplified fabric management — Purpose-built automation streamlines fabric network management for OpenStack deployments, making Layer 2 and Layer 3 network operations easier to configure and maintain.
● Broad SDN framework support — Compatible with both the legacy Open vSwitch (OVS) and the modern Open Virtual Network (OVN) SDN frameworks, allowing flexibility across diverse environments.
● Flexible network coexistence — Supports hardware-accelerated ND networks and traditional VLAN networks within the same OpenStack cloud, enabling gradual migration and mixed-mode deployments.
● Configurable Layer 3 forwarding — Offers software-based Layer 3 forwarding on VLAN networks when you set vlan_hardware_l3 to False, providing deployment flexibility based on workload requirements.
● Granular network isolation — Enables per-project or per-address-scope isolation through custom VRF mapping, strengthening multi-tenant security and segmentation.
● Reliable deployment visibility — Provides network deployment status tracking and automated retry capabilities through nd-status, ensuring consistent and observable provisioning outcomes.
● Resilient NDFC API operations — Configurable retry with exponential backoff for NDFC attach/detach API calls handles transient errors.
Limitations of Using Nexus Dashboard with OpenStack
While the integration delivers significant advantages, you must be aware of the following limitations of using ND with OpenStack before deployment.
● The integration supports only VLAN-type and ND-type networks. Other network types, such as VXLAN or GRE tunnels, are not supported.
● Deployments must use the "provider networks" workflow, which requires cloud administrators to pre-provision networks in OpenStack and make them available to cloud users. Cloud administrators use the provider network extensions in OpenStack to fully define network parameters, including encapsulation type (VLAN), segmentation ID (VLAN ID), and physical network. Because these extensions remain restricted to administrative users, non-administrative users can only attach VMs to the pre-provisioned networks. This workflow typically shifts Layer 3 forwarding outside of OpenStack orchestration.
● You must not attach OpenStack routers to nd type networks, or to VLAN type networks when vlan_hardware_l3 is set to True. Since routers represent Layer 3 forwarding within OpenStack, attaching them would force OpenStack to orchestrate forwarding, conflicting with the hardware-accelerated Layer 3 forwarding in the fabric. Overlay networking solutions such as Open Virtual Network (OVN) perform software-based distributed Layer 3 forwarding, which bypasses the fabric's hardware acceleration. The provider networks workflow instead delegates Layer 3 forwarding outside OpenStack, allowing cloud users to take full advantage of the hardware-accelerated Layer 3 data plane.
OpenStack routers may be attached to VLAN type networks only when vlan_hardware_l3 is set to False, which enables software-based Layer 3 forwarding through OVN.
● The integration currently supports only IPv4 subnets. IPv6 subnets are not supported in this deployment model.
● The --share option is not supported when creating address scopes with the --nd-vrf-name extension.
● The backup-restore feature of ND is currently not supported with OpenStack.
This section explains how to install the Cisco OpenStack Integration for Nexus Dashboard. Installation is performed using a pip-based method, as an installer is not provided. Depending on your deployment’s installer, the installation steps may vary. Note that this integration does not support migrating existing OpenStack clouds using other network virtualization technologies. Deployment must be either a greenfield installation or an upgrade of an existing environment that already uses this integration.
System Requirements
● Nexus Dashboard version 4.3 or later.
● Supported Cisco N9000 switches.
Nexus Dashboard Cluster Requirements
● Data Center VXLAN EVPN fabric.
● Ingress replication enabled.
● Fabric pre-provisioned with appropriate VRF and VLAN configurations.
OpenStack Node Requirements
● Compute and Controller nodes with networking-cisco package installed.
● Compute nodes must have network interface that supports LLDP.
● Compute nodes should be directly connected to NX-OS leaf switches or ToR switches.
● OpenStack Epoxy (2025.1) release installed on all OpenStack nodes.
Network Requirements
● IPv4 addressing (initial integration does not support IPv6).
● VXLAN overlay with VLANs between hypervisors and switches.
OpenStack external networking configured manually for tenant connectivity.
Software Requirements
● Nexus Dashboard version 4.3.
● Supported OpenStack version: Epoxy 2025.1. (For more information, see Cisco OpenStack Integration for Nexus Dashboard Release Notes, Release 4.3.1 to verify compatibility).
● Neutron ML2 Plugin Mechanism Driver for NDFC. (For more information, see Cisco OpenStack Integration for Nexus Dashboard Release Notes, Release 4.3.1 for version number).
● Networking-cisco package version validated for release 4.3.
Creating and Installing OpenStack Packages for Nexus Dashboard
The networking-cisco repository must be installed on controller hosts, compute hosts, and any admin workstation where OpenStack CLI commands are run. The admin workstation requires the package to use the release 4.3 OpenStack CLI extensions, including nd-status and --nd-vrf-name. For pip-based installations, you must create a source distribution. The steps below outline how to create this source distribution. In the following examples, the version tag 10.1.0 is used as a reference. For more information, see Cisco OpenStack Integration for Nexus Dashboard Release Notes, Release 4.3.1 to get the correct tag.
1. Clone the networking-cisco repository and change directory to networking-cisco:
$ git clone https://github.com/noironetworks/networking-cisco
$ cd networking-cisco
2. Find the networking-cisco tag that matches your OpenStack release:
$ git tag -n
$ git checkout 10.1.0
3. Create a tarball of the release:
$ sudo python3 setup.py sdist
4. Transfer the tarball to the controller and compute hosts and install it:
$ tar -xzf networking-cisco-10.1.0.tar.gz
$ sudo pip3 install networking-cisco-10.1.0
Configuring Nexus Dashboard for OpenStack Integration
After installing the networking-cisco source package, each host must be configured for operation. Controller hosts should be set up to use the NDFC ML2 mechanism driver and the ND core plugin, while compute hosts need to be configured to run the Topology Agent.
Step 1: Configure Neutron on the Controller Node
1. Update the core plugin in /etc/neutron/neutron.conf:
[DEFAULT]
core_plugin = nd_ml2
Note: This replaces the default neutron.plugins.ml2.plugin.Ml2Plugin with NdMl2Plugin, which adds support for address scope VRF extensions, network deploy status (nd-status), and prevents routers from being attached to hardware-accelerated nd type networks.
2. Update the ML2 configuration in /etc/neutron/plugins/ml2/ml2_conf.ini:
[ml2]
type_drivers = nd,geneve,gre,vlan,flat,local
tenant_network_types = nd,geneve,gre,vlan,flat,local
mechanism_drivers = ndfc,ovn
extension_drivers = nd_extension_driver
Note: The nd type driver must appear in both type_drivers and tenant_network_types. The nd_extension_driver enables the nd-status network deploy extension.
3. Configure the ND type driver (optional) in the same file:
[ml2_type_nd]
default_nd_network = physnet1
This sets the default physical network for tenant-created nd networks. Defaults to physnet1 if not specified.
4. Verify OpenStack VLAN allocations in the same file:
Neutron enables you to define VLAN allocation ranges for each physical network (physnet). Cloud administrators should verify that these ranges do not overlap with any VLAN ranges specified in templates used during fabric provisioning in Nexus Dashboard, such as VRF templates. These ranges are also used by Hierarchical Port Binding to dynamically allocate VLAN segments for ND type networks.
[ml2_type_vlan]
network_vlan_ranges = physnet1:1000:2000,physnet2:3000:3900
5. Configure the NDFC mechanism driver in the same file:
[ndfc]
ndfc_ip = <Nexus Dashboard REST/UI IP>
user = <user>
pwd = <password>
fabric_name = <fabric_name>
switch_sync_interval = 1800
enable_l3_on_border = True
vlan_hardware_l3 = True
nd_sync_poll_interval = 600
force_old_api = False
attach_max_retries = 3
enable_keystone_notification_purge = True
keystone_notification_exchange = keystone
keystone_notification_topic = notifications
keystone_notification_pool =
Note: The attach_max_retries parameter controls the maximum number of retries for NDFC network attach/detach API calls when a transient error (such as VRF deployment in progress) is encountered. The default is 3, with exponential backoff starting at 5 seconds.
6. Run the networking-cisco database migrations:
$ neutron-db-manage --subproject networking-cisco upgrade head
7. Restart the neutron-server service:
$ sudo systemctl restart neutron-server
Step 2: Configure Keystone
When you create, update, or delete projects in OpenStack, you must notify Neutron so it can perform the corresponding VRF operations in Nexus Dashboard.
Follow these steps to ensure that Neutron receives updates from the Keystone microservice.
1. Update the file: /etc/keystone/keystone.conf file:
[oslo_messaging_notifications]
driver = messagingv2
transport_url = <transport_url>
For example:
transport_url = rabbit://guest:password@controller-0.localdomain:5672/?ssl=0
2. Restart the Keystone service:
$ sudo systemctl restart apache2
Step 3: Configure OVS Bridge Mappings on Compute Nodes
Each compute node must have its OVS bridge mappings configured so that OVN can bind ports on the correct physical networks. This maps each physnet to a local OVS bridge that is connected to the leaf/ToR switch.
1. Check the current bridge mappings:
$ sudo ovs-vsctl get Open_vSwitch . external-ids:ovn-bridge-mappings
2. Set bridge mappings for a single physnet:
$ sudo ovs-vsctl set Open_vSwitch . external-ids:ovn-bridge-mappings="physnet1:br-ex"
Or for multiple physnets:
$ sudo ovs-vsctl set Open_vSwitch . external-ids:ovn-bridge-mappings="physnet1:br-ex1,physnet2:br-ex2"
3. Verify the updated mappings:
$ sudo ovs-vsctl get Open_vSwitch . external-ids:ovn-bridge-mappings
4. Restart the OVN controller to apply the changes:
$ sudo systemctl restart ovn-controller
Note: The physnet names used here must match the physnets defined in network_vlan_ranges on the controller (see Step 1.4). If the bridge mapping is missing or incorrect, OVN will not be able to bind ports on that compute node.
5. Verify the network agents are reporting correctly (run from the controller or admin workstation):
$ openstack network agent list
$ openstack network agent show compute01.maas
$ openstack network agent show compute02.maas
Step 4: Configure and Start Topology Agent on Compute Nodes
1. Install the networking-cisco package on all compute nodes.
2. Create the file: /etc/neutron/plugins/ml2/lldp.ini
[lldp_topology_agent]
topology_handlers = networking_cisco.agent.nxos_topology.NxosTopologyHandler
3. Create the file with content: /etc/neutron/rootwrap.d/cisco-apic.filters
# neutron-rootwrap command filters for nodes on which
# neutron is expected to control network
#
# This file should be owned by (and only-writeable
# by) the root user format seems to be
# cmd-name: filter-name, raw-command, user, args
[Filters]
# cisco-apic filters
lldpctl: CommandFilter, lldpctl, root
4. Edit the file: /etc/neutron/neutron.conf file:
◦ Add the hostname under the [DEFAULT] section:
host = <compute_node_hostname>
◦ Add the transport_url.
transport_url = <transport_url>
5. Install and start the LLDP agent:
$ sudo /usr/local/bin/neutron-cisco-topology-agent \
--config-file /etc/neutron/neutron.conf \
--config-file /etc/neutron/plugins/ml2/lldp.ini \
--config-file /etc/neutron/plugins/ml2/ml2_conf.ini
1. Verify the installation of the networking-cisco package:
$ pip show networking-cisco
2. Confirm the correct configuration of Neutron ML2 Mechanism Driver by creating and attaching networks in OpenStack.
3. Verify the host name of the compute by running below command on the compute node:
$ hostname
4. Verify that the transport_url in the keystone.conf file in keystone and the neutron.conf files in the compute nodes is same as the transport_url in the neutron.conf file in neutron_api.
5. Create OpenStack Resources: To thoroughly verify the integration, create the following resources in OpenStack:
Test VRF creation:
◦ Create a new project in OpenStack:
openstack project create <project-name>
◦ Verify that the corresponding VRF is created in the Nexus Dashboard.
Test ND network creation:
◦ Create a new nd type network:
$ openstack network create --project <project-name> \
--provider-network-type nd \
--provider-physical-network physnet1 <network-name>
◦ Verify the corresponding network is created in Nexus Dashboard.
◦ Create a subnet:
$ openstack subnet create --project <project-name> \
--network <network-name> \
--subnet-range 10.10.10.0/24 <subnet-name>
◦ Verify the subnet gateway IP is added to the corresponding network in Nexus Dashboard.
Test VLAN network creation:
◦ Create a new VLAN type network:
$ openstack network create --project <project-name> \
--provider-network-type vlan \
--provider-physical-network physnet1 \
--provider-segment 1701 <network-name>
◦ Verify the corresponding network is created in Nexus Dashboard (if vlan_hardware_l3 = True).
Test router blocking on ND networks
◦ Create a router:
$ openstack router create <router-name>
◦ Attempt to add an nd network subnet to the router:
$ openstack router add subnet <router-name> <nd-subnet-name>
◦ Verify the command fails with:
ConflictException: 409: ... RouterNotCompatibleWithNetworkType:
Router interface cannot be added to a network of type 'nd'.
◦ Verify the router and network are unchanged:
$ openstack router show <router-name>
$ openstack network show <network-name>
$ openstack port list --network <network-name> --device-owner network:router_interface
Test address scope with VRF name
◦ Create an address scope with a custom VRF name:
$ openstack address scope create --nd-vrf-name <vrf-name> \
--ip-version 4 <scope-name>
◦ Verify the corresponding VRF is created in Nexus Dashboard with the specified name.
Test network deploy status
◦ Check the deploy status of an nd network:
$ openstack network show <nd-network-name>
◦ Verify the nd_status field is present (values: SUCCESS, FAILED, or None).
◦ Trigger a manual redeploy:
$ openstack network set --nd-status SYNC <nd-network-name>
◦ Verify the status updates after the redeployment completes.
Test network attachment:
◦ Launch OpenStack instances on the network.
◦ Verify that that the network is attached to corresponding Leafs/ToRs in Nexus Dashboard.
6. Test connectivity between OpenStack instances and verify configurations in Nexus Dashboard.
7. DB tool for listing records: These commands allow you to verify what host links and ToRs are currently registered in the database. This is useful for confirming that the topology agents are correctly discovering and reporting information, and for general monitoring.
List NXOS Host Links:
$ neutron-cisco-db-tool \
--config-file /etc/neutron/neutron.conf \
list-nxos-links
List NXOS ToRs:
$ neutron-cisco-db-tool \
--config-file /etc/neutron/neutron.conf \
list-nxos-tors
8. DB tool for deleting records: The database deletion tool commands are essential for maintenance and troubleshooting. For example, when a compute node or a ToR switch is decommissioned or replaced, its related database entries can become outdated or "stale." Executing these delete commands removes such obsolete records, keeping the database up-to-date with the current network topology. This cleanup helps avoid problems caused by the system trying to communicate with components that no longer exist.
Delete NXOS Host Links:
$ neutron-cisco-db-tool \
--config-file /etc/neutron/neutron.conf \
delete-nxos-links --condition "host_name='host1'”
Delete NXOS ToRs:
$ neutron-cisco-db-tool \
--config-file /etc/neutron/neutron.conf \
delete-nxos-tors \
--condition "tor_serial_number='1234'"
9. After running the database tool commands, verify that the expected records are listed or deleted.
● Issue: Database migration failure
◦ Check the neutron-db-manage logs for errors.
◦ Verify connectivity between the OpenStack controller and the database.
● Issue: Keystone notification errors
◦ Ensure the transport_url matches the value in neutron.conf.
● Issue: LLDP agent not starting
◦ Verify the lldp.ini configuration file for errors.
◦ Check that the lldpd package is installed.
● Issue: Stale entries in topology databases
◦ List database entries using the database tool list commands.
◦ Delete the stale entries using the database tool delete commands.
● Issue: Router attach to nd network fails with 409
◦ This is expected. nd type networks use hardware-accelerated Layer 3 forwarding and cannot have OpenStack routers attached.
◦ Use VLAN networks with vlan_hardware_l3 = False if software-based L3 routing is needed.
● Issue: nd-status shows FAILED
◦ Check NDFC for network deploy errors.
◦ Retry the deploy:
openstack network set --nd-status SYNC <network-name>
◦ Check the neutron-server log for errors
$ grep "nd_deploy\|nd-status" /var/log/neutron/neutron-server.log
● Issue: nd-status not updating after SYNC
◦ Verify that nd_sync_poll_interval is not set to 0.
◦ Verify NDFC connectivity from the controller node.
When upgrading from ND release 4.1 to release 4.3, update the networking-cisco package and apply the new Neutron configuration required for the ND type driver, NdMl2Plugin, address-scope extensions, and nd-status extension.
1. Backup Neutron configuration files and the Neutron database.
2. Install the latest version of the networking-cisco package. For more information, see Creating and Installing OpenStack Packages.
3. Apply the following configuration changes:
● /etc/neutron/neutron.conf: Set core_plugin = nd_ml2 (previously used the default ML2 plugin).
[DEFAULT]
core_plugin = nd_ml2
● /etc/neutron/plugins/ml2/ml2_conf.ini: Add nd to type_drivers and tenant_network_types.
[ml2]
type_drivers = nd,geneve,gre,vlan,flat,local
tenant_network_types = nd,geneve,gre,vlan,flat,local
● /etc/neutron/plugins/ml2/ml2_conf.ini: Add extension_drivers = nd_extension_driver.
[ml2]
extension_drivers = nd_extension_driver
● /etc/neutron/plugins/ml2/ml2_conf.ini: Add the new [ndfc] parameters:
[ndfc]
vlan_hardware_l3 = True
enable_l3_on_border = True
nd_sync_poll_interval = 600
force_old_api = False
attach_max_retries = 3
4. Run database migrations:
$ neutron-db-manage --subproject networking-cisco upgrade head
5. Restart the neutron-server service:
$ sudo systemctl restart neutron-server
6. Test the upgraded setup for connectivity and functionality:
● Verify nd network creation.
● Verify address-scope VRF mapping.
● Verify nd-status reporting.
| ND |
Nexus Dashboard |
| ML2 |
Modular Layer 2 |
| OVN |
Open Virtual Networking |
| VXLAN |
Virtual Extensible LAN |
| HPB |
Hierarchical Port Binding |
| DVR |
Distributed Virtual Routing |
| VRF |
Virtual Routing and Forwarding |
| LLDP |
Link Layer Discovery Protocol |
| OVS |
Open vSwitch |
|
|
|