Configuring Internal Connectivity for Google Cloud Workloads

Internal Connectivity Workflow

The following sections describe how to configure Google Cloud sites infra, intersite connectivity, and a simple deployment use case. The workflow includes:

  • Select the EPG you create in the previous section

  • Configuring route leaking between cloud VRFs

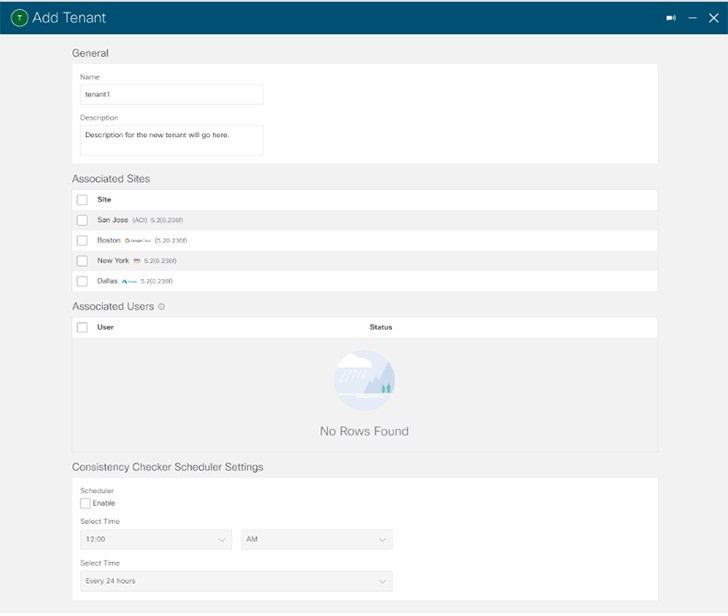
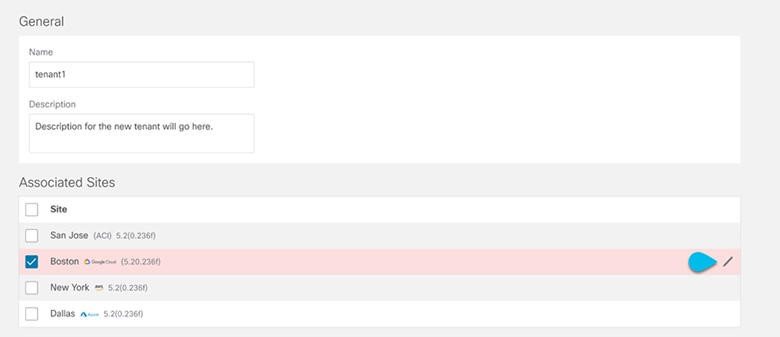
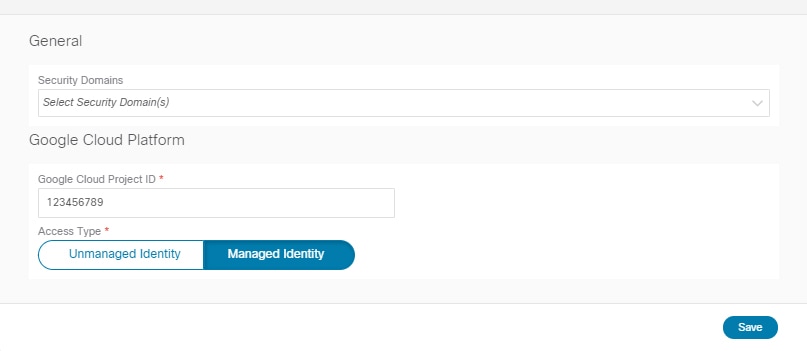
  • Creating or importing a Google cloud user tenant and EPGs and applying contracts to enable communication between sites

Importing Google Cloud User Tenant

If you are importing an existing tenant follow the procedure below. If you wish to create a new tenant, refer to this section Creating Google Cloud User Tenant.

Procedure


Step 1

From the Nexus Dashboard's Service Catalog, open the Nexus Dashboard Orchestrator service.

You will be automatically logged in using the Nexus Dashboard user's credentials.

Step 2

In the Nexus Dashboard Orchestrator GUI, manage the sites.

  1. From the left navigation menu, select Infrastructure > Sites.

  2. In the main pane, change the State from Unmanaged to Managed for each fabric that you want the Nexus Dashboard Orchestrator to manage.

Step 3

Import the existing cloud tenant.

  1. In the Sites page, click the actions (...) menu next to the site you enabled for management and select Import Tenants.

  2. In the Import Tenants dialog, select the tenant you want to import and click OK.

Step 4

Verify that the tenant's external connectivity infra configuration was imported successfully.

For external connectivity to be imported, it has to be configured on all the regions in which hub is instantiated.

  1. Navigate to Infrastructure > Site Connectivity page.

  2. Click Configure.

  3. In the General Settings page, select the External Devices tab.

    Verify that the external device is present

  4. In the General Settings page, select the IPSec Tunnel Subnet Pools tab.

    Verify that the external connectivity subnet pool is present.

  5. In the left sidebar, select the site from which you imported the tenant.

    In the site's settings, select the External Connectivity tab and confirm that the external network is present.

Note 

Do not deploy infra configuration from Nexus Dashboard at this time and proceed to the next section to import the external VRF.


Creating a Tenant

The following sections describe how to create a managed tenant or unmanaged tenant.

Setting Up the Google Cloud Project for a User Tenant

Perform the procedures in this section to set up the Google Cloud project for a user tenant, where that user tenant is either a managed or an unmanaged tenant.

Procedure


Step 1

Create a Google Cloud project for the user tenant, if necessary.

Each user tenant is mapped one-to-one to a Google Cloud project. If you do not have a Google Cloud project created yet for your user tenant, follow these procedures to create a Google Cloud project.

  1. Log into your Google account.

  2. Navigate to IAM & Admin > Manage resources.

  3. Using the Select organization drop-down list at the top of the page, choose the organization where you want to create a project.

  4. Click + CREATE PROJECT.

  5. In the New Project window that appears, enter a project name and select a billing account as applicable.

    A project name can contain only letters, numbers, single quotes, hyphens, spaces, or exclamation points, and must be between 4 and 30 characters.

  6. Enter the parent organization or folder in the Location field.

    That resource will be the hierarchical parent of the new project.

  7. Click CREATE.

Step 2

In Google Cloud, enable the appropriate service APIs in the service account associated with this user tenant.

  1. In the Google Cloud GUI, log into the Google Cloud project that is associated with this user tenant.

    The Dashboard for the project is displayed.
  2. In the search bar at the top of the Dashboard, search for APIs & Services, then click the result from that search to access the APIs & Services window.

  3. In the APIs & Services window, click the + ENABLE APIS AND SERVICES tab.

    The API Library window appears.

  4. In the Search for APIs & Services field, search for and enable the necessary services.

    For each of the services in the list below:

    1. Search for the API or service in the Search for APIs & Services field.

    2. Click on the search result to display the page for that API or service.

    3. Click the ENABLE button in that API or service page.

    Following are the APIs and services that you must search for and enable:

    • Compute Engine API

    • Cloud Deployment Manager V2 API

    • Cloud Pub/Sub API

    • Cloud Resource Manager API

    • Service Usage API

    • Cloud Logging API

    Each API or service takes several minutes to enable. You will have to navigate back to the APIs & Services window after you enable each API or service.

    Note that the following additional APIs and services should be enabled automatically when you enable all of the APIs and services listed above:

    • Identity and Access Management (IAM) API

    • IAM Service Account Credentials API

    • Cloud OS Login API

    • Cloud DNS API

    • Recommender API

    If they are not enabled automatically, enable them manually.

Step 3

Set the necessary permissions for this user tenant in Google Cloud.

  1. In the Google Cloud GUI, log into the Google Cloud project that is associated with this user tenant.

    The Dashboard for the project is displayed.
  2. In the left nav bar, click on IAM & Admin, then choose IAM.

    The IAM window appears with several service accounts displayed.

  3. Locate the appropriate service account.

  4. Set the permissions for this service account.

    1. Click the pencil icon on the row for this service account.

      The Edit Permissions window is displayed.

    2. Click + ADD ANOTHER ROLE, then choose Editor as the role.

      You are returned to the IAM window with the service accounts displayed.

    3. Click + ADD ANOTHER ROLE again, then add the remaining necessary roles for this service account.

      Following is the full list of roles that you must assign to this service account, including the Cloud Functions Service Agent that you added in the first step of this process:

      • Editor

      • Role Admin

      • Project IAM Admin

    4. After you have added all the necessary roles, click SAVE.

      You are returned to the IAM window with the service accounts displayed and the necessary roles assigned to this service account.


Generating and Downloading Private Key Information from Google Cloud for an Unmanaged Tenant

If you are creating an unmanaged tenant, you must first generate and download the necessary private key information from Google Cloud.


Note

You do not have to follow the steps in this procedure if you are creating a managed tenant.


Procedure


Step 1

In Google Cloud, select the Google Cloud project that will be associated with this unmanaged tenant, if you have not selected it already .

Step 2

In the left nav bar, click on IAM & Admin, then choose Service Accounts.

The service accounts for this Google Cloud project are displayed.

Step 3

Select an existing service account or click + CREATE SERVICE ACCOUNT to create a new one.

Information on this service account is displayed, with the Details tab selected by default.

Step 4

Click the KEYS tab.

Step 5

Click ADD KEY > Create New Key.

A window appears, providing an option to create a private key for this service account.

Step 6

Leave the JSON key type selected, then click Create.

A window appears, saying that the private key has been saved to your computer.

Step 7

Locate the JSON file that was downloaded to your computer and move it to a secure location on your computer.

This JSON file will contain the key information that you need to fill in the fields for the unmanaged tenant.


Creating Google Cloud User Tenant

Before you begin

You must make certain configurations in Google Cloud before creating a Google Cloud user tenant in the Nexus Dashboard Orchestrator:

Procedure


Step 1

Log in to your Nexus Dashboard Orchestrator.

Step 2

In the left navigation menu, choose "Tenants".

Step 3

Choose "Add Tenant".

Step 4

Under General, provide a tenant name and an optional description.

The tenant name must be in the following format:

[a-z]([-a-z0-9]*[a-z0-9])?

This means that the first character must be a lowercase letter, and all the following characters can be hyphens, lowercase letters, or digits, except the last character, which cannot be a hyphen.

Step 5

From the Associated Sites area, choose the Google Cloud site where you want to create the tenant.

Step 6

After selecting your Google Cloud site, click on the edit icon to specify your account information.

Step 7

Fill in all the mandatory information.

Step 8

Choose Save after filling in the configuration for the Google Cloud.


What to do next

If you are creating a managed tenant, you must now set the necessary permissions in Google Cloud for the managed tenant. Go to Setting the Necessary Permissions in Google Cloud for a Managed Tenant for those procedures.

Setting the Necessary Permissions in Google Cloud for a Managed Tenant

If you are creating a managed tenant, you must now set the necessary permissions in Google Cloud.


Note

You do not have to follow the steps in this procedure if you are creating an unmanaged tenant.


Procedure


Step 1

In the Google Cloud GUI, log into the Google Cloud project that is associated with this managed tenant.

The Dashboard for the project is displayed.

Step 2

In the left nav bar, click on IAM & Admin, then choose IAM.

The IAM window appears with several service accounts displayed.

Step 3

Locate the service account that was created in the project that is associated with the infra account.

Step 4

Copy the service account name.

Step 5

Add this service account name as an IAM user in the user tenant project.

Step 6

Set the permissions for this service account.

  1. Click the pencil icon on the row for this service account.

    The Edit Permissions window is displayed.

  2. Click + ADD ANOTHER ROLE, then choose Cloud Functions Service Agent as the role.

    You are returned to the IAM window with the service accounts displayed.

  3. Click + ADD ANOTHER ROLE again, then add the remaining necessary roles for this service account.

    Following is the full list of roles that you must assign to this service account, including the Cloud Functions Service Agent that you added in the first step of this process:

    • Cloud Functions Service Agent

    • Compute Instance Admin (v1)

    • Compute Network Admin

    • Compute Security Admin

    • Logging Admin

    • Pub/Sub Admin

    • Storage Admin

  4. After you have added all the necessary roles, click SAVE.

    You are returned to the IAM window with the service accounts displayed and the necessary roles assigned to this service account.


Creating Schema, Template and VRFs for your Google Cloud Site

Procedure


Step 1

In the Main menu, click Schemas.

Step 2

On the Schema screen, click the Add Schema button.

Step 3

On the Untitled Schema screen, replace the text Untitled Schema at the top of the page with a name for the schema that you intend to create (for example, schema-1).

Step 4

Configure the first template.

If your Google cloud site has BGP-EVPN intersite connectivity, choose ACI Multi-Cloud template type; if the site has BGP-IPv4 connectivity, choose Cloud Local.

Step 5

In the left pane, mouse over Template 1 and click the notepad icon. Then change the template's name (for example, template1-gcp).

Step 6

Navigate to your cloud template.

Step 7

Choose Add VRF under VRFs, then enter the display name and description for the VRF.

Step 8

Click on the VRF that you just created.

The Template Properties and Site Local Properties are displayed on the right side of your screen.

Step 9

Under Site Level Properties, choose Add Region.

In the pop-up, select the region that you want.

Step 10

After selecting the region, choose Add CIDR.

Enter the CIDR information for the VRF.

  • Choose Primary if you are adding a primary CIDR.

  • Choose Secondary if you are adding a secondary CIDR.

Step 11

Enter the Subnet and Subnet Group Label.

When creating a subnet, you will use the Subnet Group Label to assign a unique label to a specific subnet group. For more details on configuring CIDR, subnets, and subnet group labels, see "Understanding VPCs and Subnets Under Google Cloud and Cloud Context Profiles Under Cloud APIC" in the Cisco Cloud APIC for Google Cloud User Guide.

Step 12

Choose Save.


Creating Cloud EPGs

We recommend creating cloud objects in a separate template and schema from the Infra tenant configuration (such as external VRFs) you have already done.

Use the following procedure to create a new schema for the Cloud APIC site. For this use-case example, we will configure a single schema and one template.

You are in the Nexus Dashboard Orchestrator for this entire procedure.

Procedure


Step 1

In the Main menu, click Schemas.

Step 2

On the Schema screen, click the Add Schema button.

Step 3

On the Untitled Schema screen, replace the text Untitled Schema at the top of the page with a name for the schema that you intend to create (for example, schema-1).

Step 4

Create a template.

If your Google cloud site has BGP-EVPN intersite connectivity, choose ACI Multi-Cloud template type; if the site has BGP-IPv4 connectivity, choose Cloud Local.

  1. In the left pane, mouse over Template 1 and click the notepad icon. Then change the template's name, for example in Google Cloud case template1-gcp.

  2. In the middle pane, click the area To build your schema please click here to select a tenant.

  3. In the right pane, access the Select A Tenant dialog box and choose the tenant you want. This is the tenant you imported Importing Google Cloud User Tenant or created in Creating Google Cloud User Tenant.

Step 5

After choosing the tenant, create an Application Profile in the template.

You will need to associate the cloud EPG you create with an application profile.

Step 6

Create and configure a Cloud EPG.

  1. Select Create Object > Cloud EPGs.

  2. From the Application Profile dropdown, select the profile you created in the previous step.

  3. From the Virtual Routing and Forwarding dropdown, select the cloud VRF you created.

  4. In the right-hand properties sidebar, select the cloud VRF you created for this EPG.

Step 7

Assign the template you just created to the Google Cloud site.

Step 8

Configure the cloud EPG's site-local properties.

  1. In the left sidebar, select the template under a site to which it is assigned.

  2. In the template's site-local properties, select Cloud Site for Route Reachability.


Applying contract between the cloud EPGs

This section describes how to apply a contract to allow communication between the endpoints with in your cloud site. One thing to keep in mind regarding Google Cloud contracts is that the contracts should be deployed bi-directionally for bi-directional traffic.

Before you begin

You must have multiple cloud EPGs Creating Cloud EPGs already configured in your cloud site.

Procedure


Step 1

In the Main menu, select Application Management > Schemas.

Step 2

Create a contract and assign it to the cloud EPG.

  1. Select the schema and the template that contains your existing cloud EPG.

  2. Create the contract you will use for this use case.

    If you already have an existing contract you want to apply for communication between the Cloud EPGs, you can skip this step.

    Otherwise, create a contract and the required filters as you typically would for any inter-EPG communication in Cisco ACI fabrics.

  3. Assign the contract to the cloud EPG.

    You can decide which of the two EPGs will be the provider and which will be the consumer based on your specific use case.

Step 3

Select the other EPG.

  1. From the right property side bar , choose Add contract.

  2. In the contract window, select which contract you want to assign.

  3. Select the same contract you assigned in previous step.

  4. Click Save

Step 4

Deploy the templates.


Configuring Route Leaking between Two Cloud VRFs

This use case focuses on route leaking between two internal cloud VRFs. You must have multiple cloud VRFs already configured in your cloud site. If you want to configure route leaking between a cloud VRF an external VRF (for example, to enable external connectivity for your Google Cloud site to another site), see Configuring Route Leaking Between Cloud VRF and External VRF

.

Procedure


Step 1

In the Main menu, select Application Management > Schemas.

Step 2

Configure route leaking from Cloud VRF-1 to a cloud VRF-2.

The following steps show how to configure the following route leaking:

  1. Open the schema where you created the Infra tenant template containing the first cloud VRF.

  2. In the left sidebar under SITES, select that specific template associated to the cloud site.

  3. In the site-local properties, select the cloud VRF defined in the template.

  4. In the VRF's right-hand properties sidebar, click +Add Leak Route.

    The Add Leak Routes dialog will open.

  5. In the Add Leak Routes dialog's settings area, click Select a VRF and choose a cloud VRF.

  6. In the Add Leak Routes dialog, choose Leak All routes.

    After selecting Leak All, the subnet IP will be populated with 0.0.0.0/0 to leak all routes.

  7. Click Save to save the route leak configuration.

  8. Select the template and click Deploy to deploy the configuration.

Step 3

Configure route leaking from a cloud VRF-2 to the cloud VRF-1.

  1. Open the schema which contains the template that defines your cloud VRF.

  2. In the left sidebar under SITES, select the specific cloud site.

  3. In the site-local properties, select the cloud VRF.

  4. In the VRF's right-hand properties sidebar, click +Add Leak Route.

    The Add Leak Routes dialog will open.

  5. In the Add Leak Routes dialog's settings area, click Select a VRF and choose the internal VRF.

    The goal of this step is to leak routes between the cloud VRFs

  6. In the Add Leak Routes dialog, choose Leak All routes.

  7. Click Save to save the route leak configuration.

  8. Select the template and click Deploy to deploy the configuration.