Network Maintenance Window

This section explains the following topics:

Overview

Objective

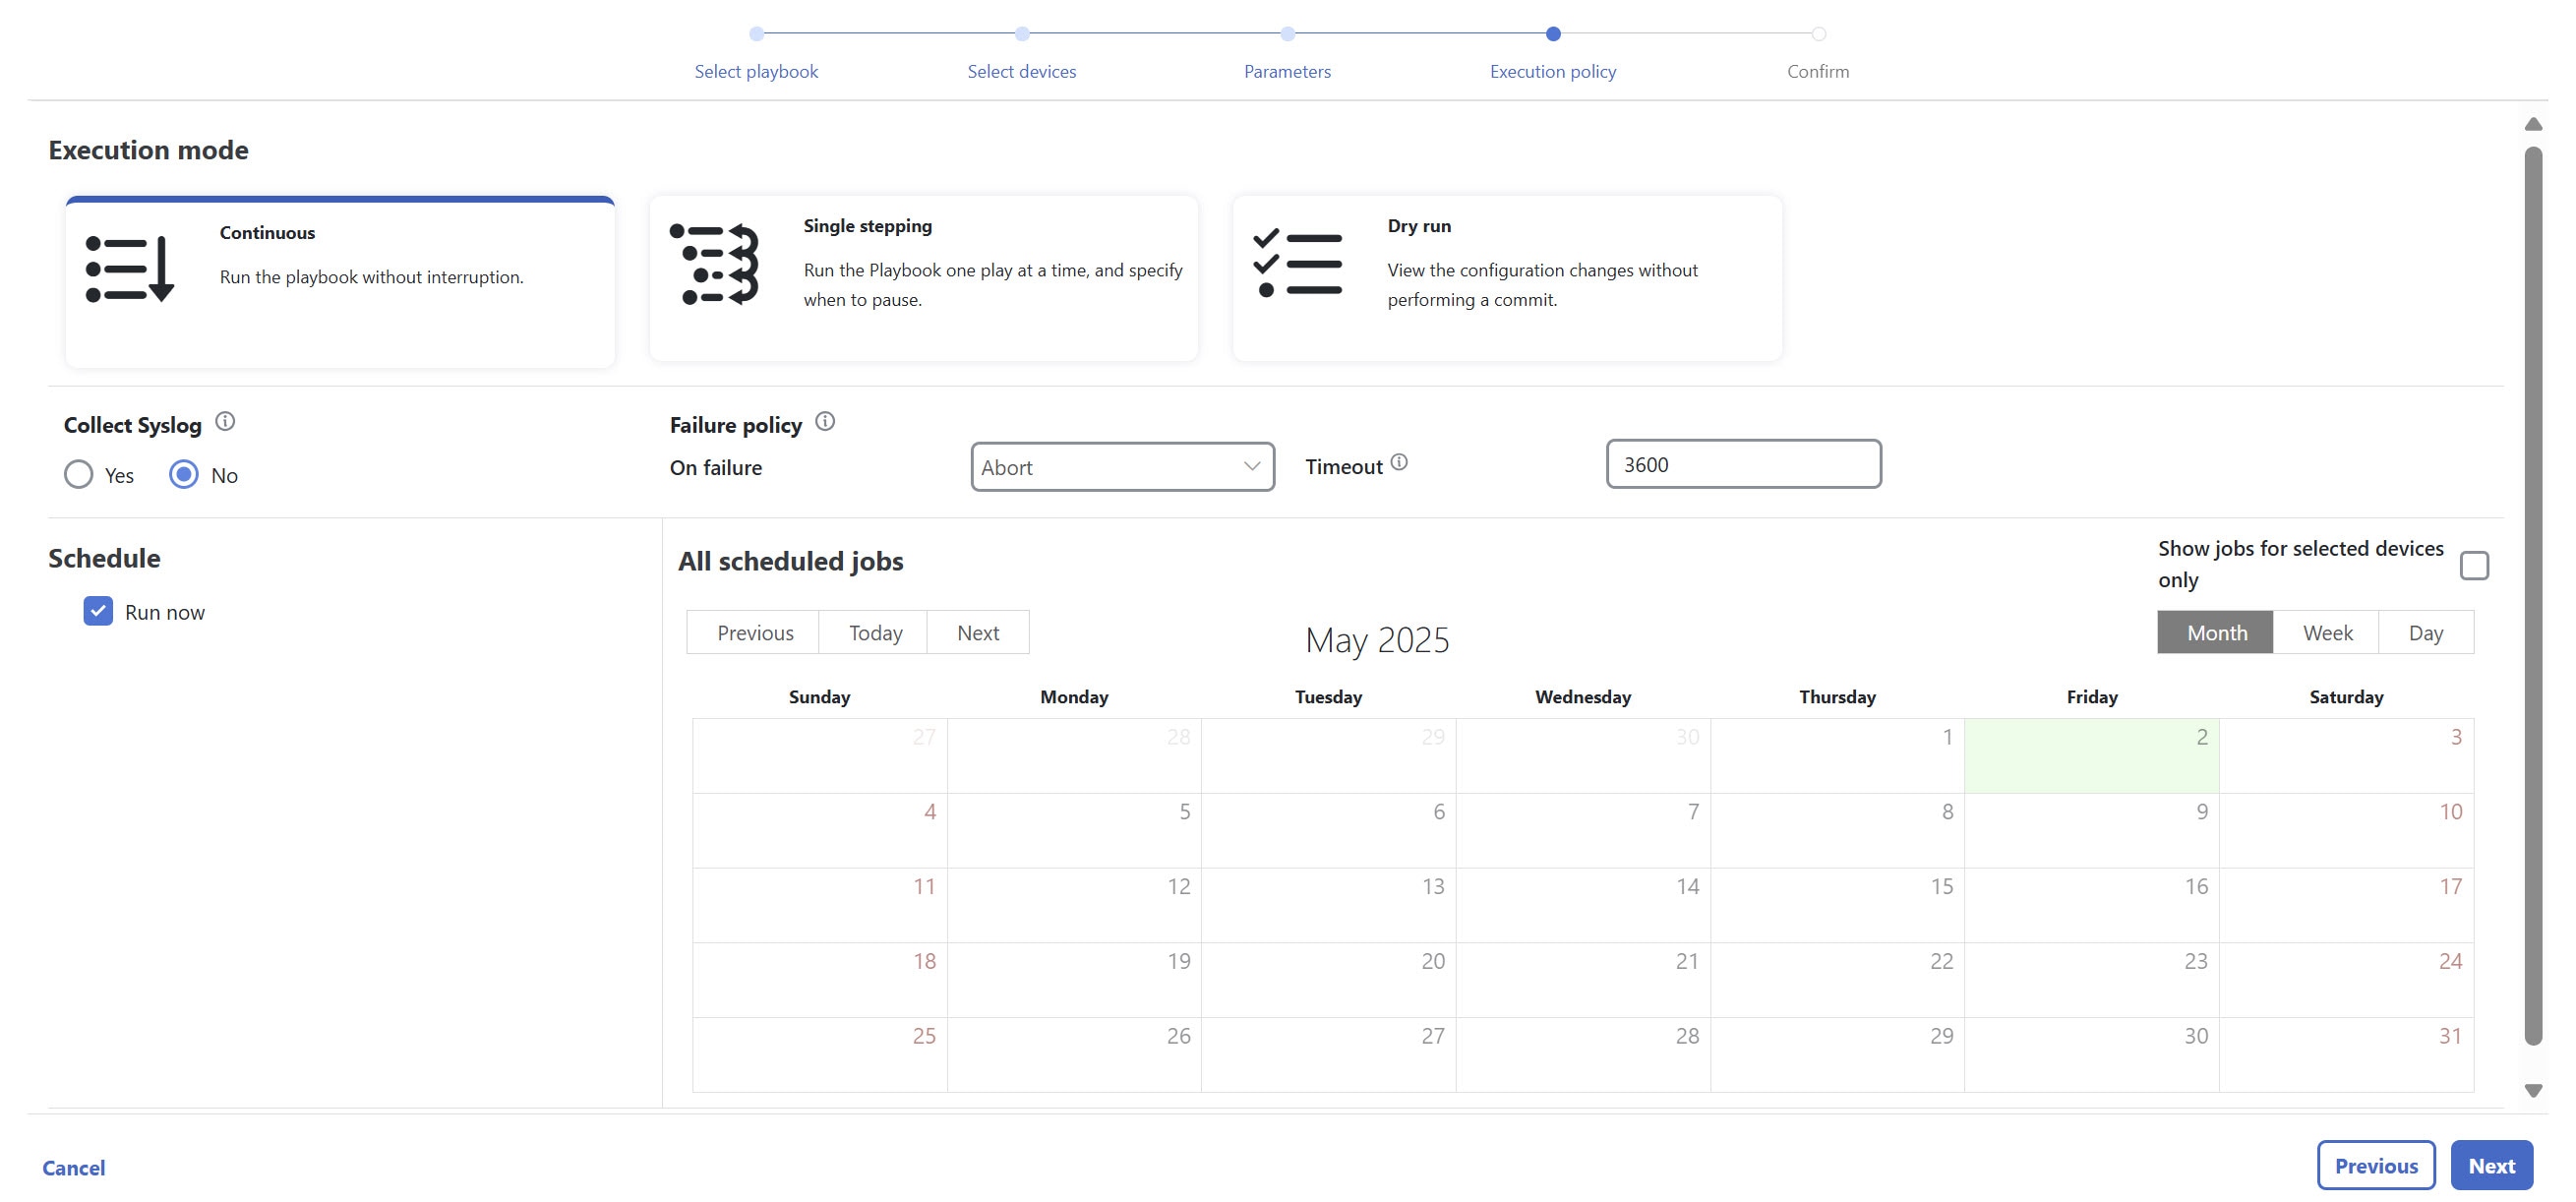
Schedule and automate maintenance workflows with minimal network interruption and most efficient results.

Challenge

Maintenance activities typically require system downtime and temporary disruption of services. Keeping downtime and disruption to a minimum is critical but challenging. Therefore, maintenance activities occur during a carefully calculated optimal time slot, usually when activity is at its lowest.

Solution

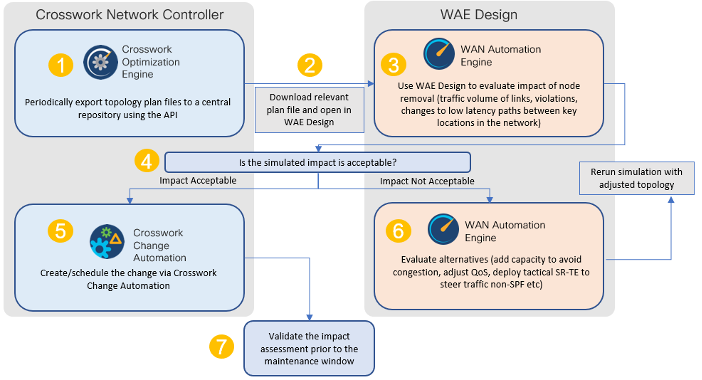
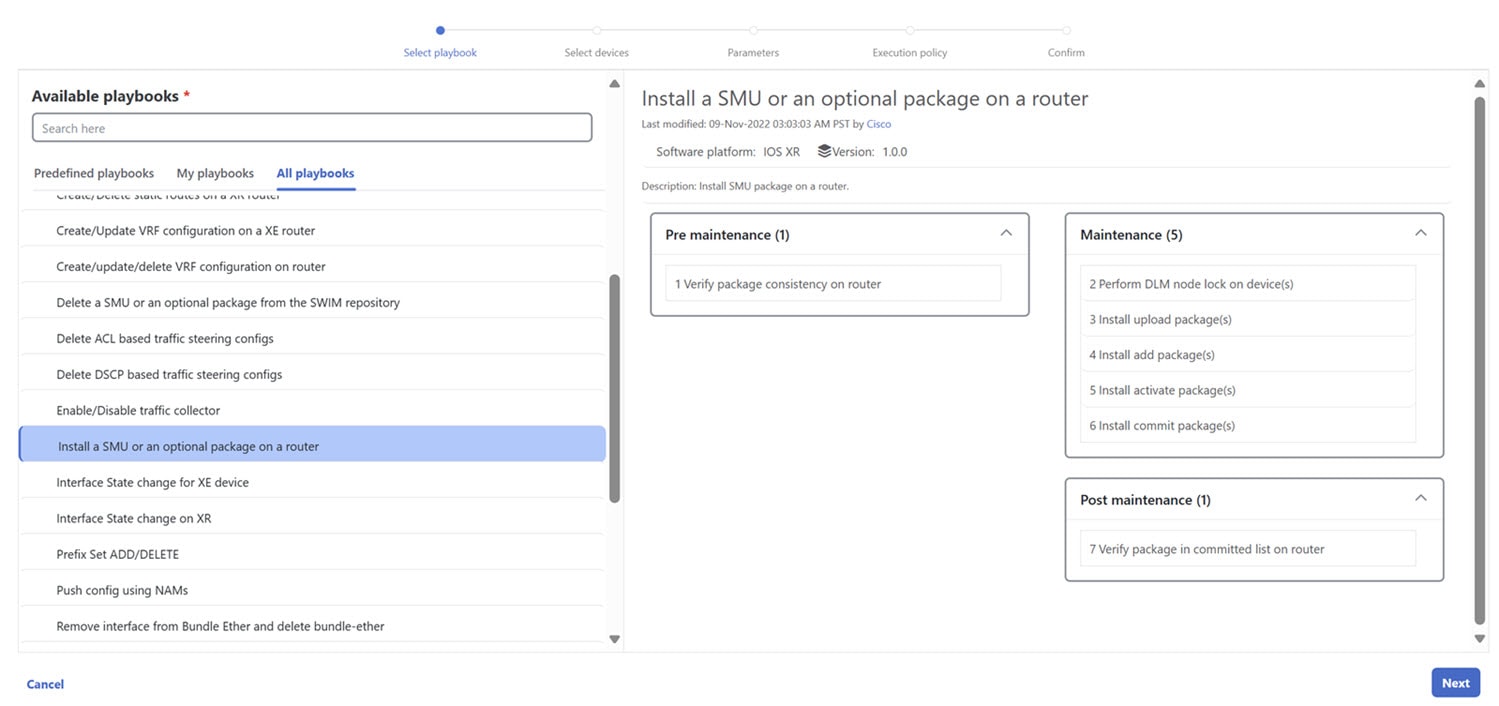
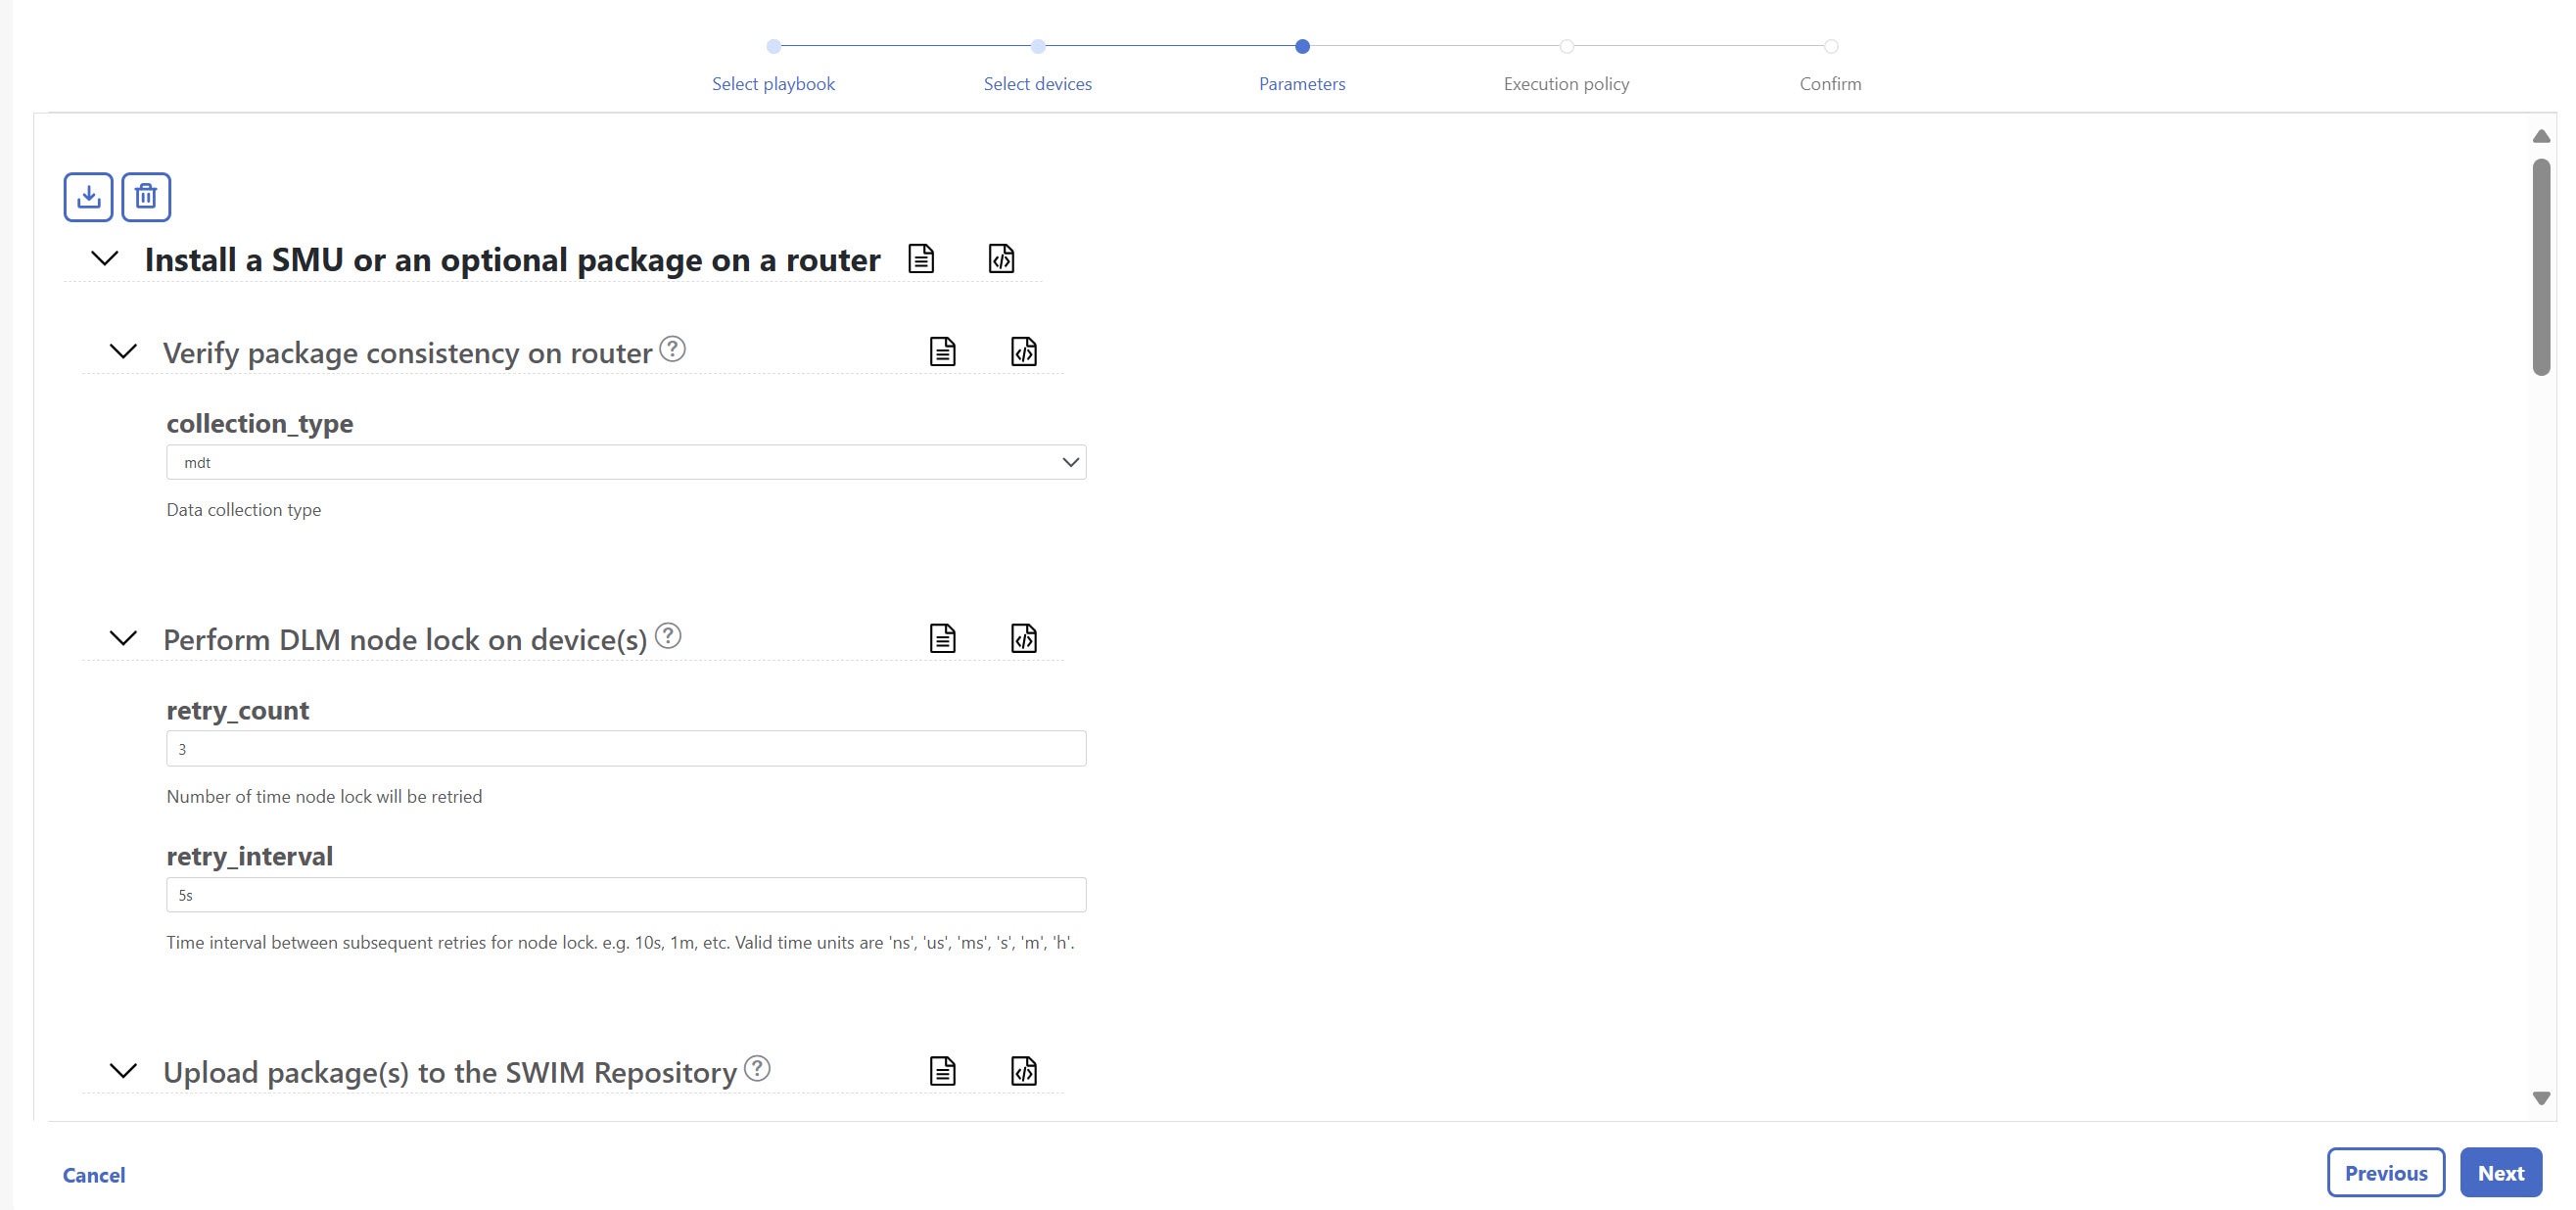
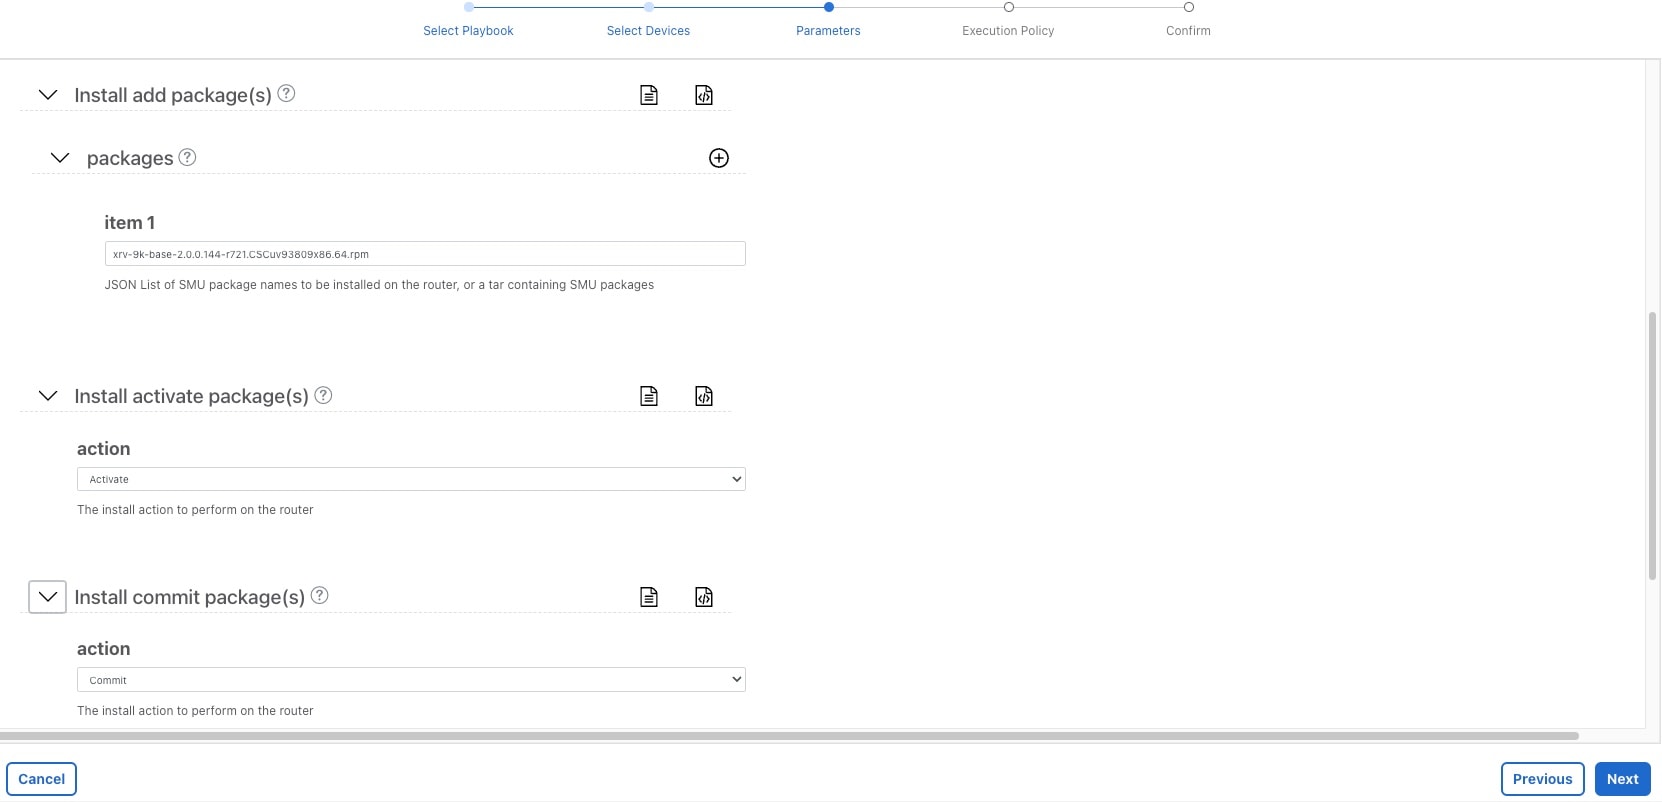
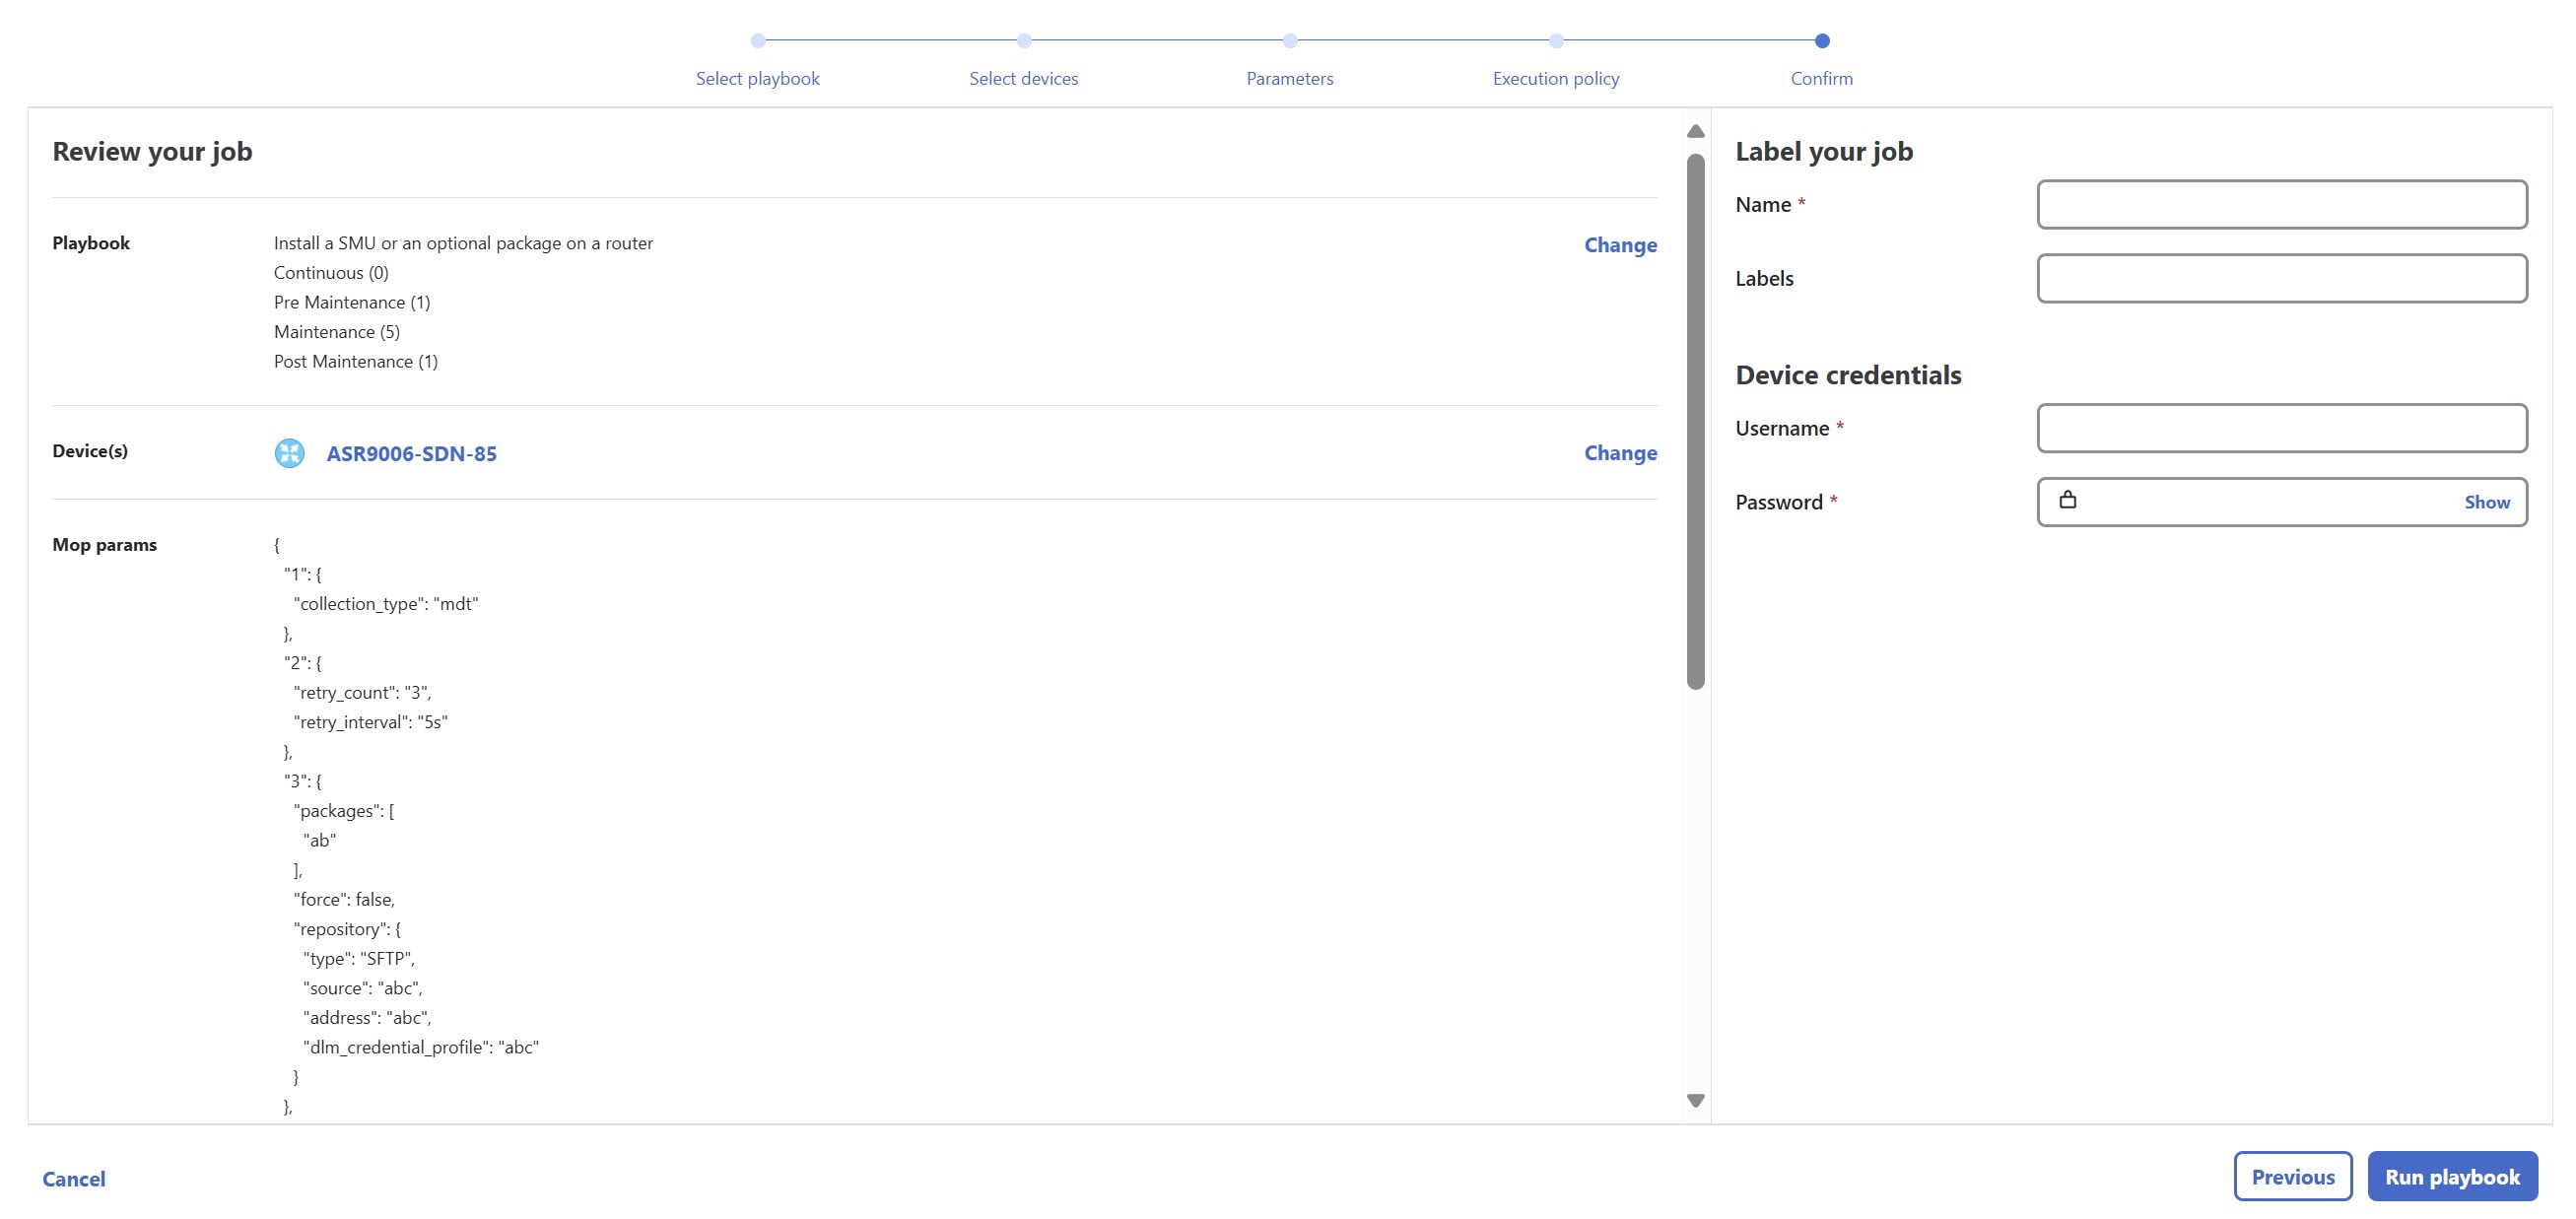
Change Automation and Health Insights provide the functionality needed to automate the scheduling and execution of maintenance tasks (see Crosswork Network Controller 7.0 Closed-Loop Network Automation Guide for further information on Change Automation and Health Insights). Planning the optimal time for maintenance activities can be done successfully using Cisco WAE Design to simulate “what-if” scenarios based on timed topology snapshots exported from Crosswork Network Controller using APIs.


Note


Cisco WAN Automation Engine (WAE) is now also known as Crosswork Planning.


How does it work?

  • Using Crosswork Network Controller APIs, you can create topology snapshots (plan files) that capture and represent the topology state at a given time, including the IGP topology and interface level statistics (traffic load). For impact analysis purposes, these snapshots should represent a time period to be evaluated for an upcoming maintenance activity. For example, if you are planning a router upgrade at midnight on a Monday, you would take snapshots from several Mondays at midnight to evaluate typical traffic loads. You can export these plan files to a central storage repository, where a library of topology plan files can be stored for a specified period.

  • Cisco WAE Design allows you to explore “what-if” scenarios relevant to maintenance window planning. For example, if a router is upgraded, Cisco WAE Design can simulate the resulting traffic load on the remaining devices after traffic is diverted from the upgraded device. You can also explore the impact of deploying tactical traffic engineering policies to further optimize the topology during the maintenance window. For more information, contact your Cisco Customer Experience representative.

Additional resources

Cisco WAE Design documentation

Cisco Crosswork Network Automation API Documentation on Cisco Devnet

Scenario: Install an SMU during a scheduled maintenance window

Scenario context

In this scenario, we will first use Cisco WAE Design to evaluate the impact of removing a Provider node from the network during a specific time frame to install a Cisco SMU (Software Maintenance Upgrade) on the device. We will choose a predefined Crosswork Playbook to automate the SMU installation on the device, and schedule it to run during the predetermined maintenance window.

Assumptions and prerequisites

The high-level requirements that must be met to enable this scenario include:

  • Change Automation is installed and running.

  • You have access to Cisco WAE Design.

  • The Device Override Credentials are set for Crosswork Network Change Automation, so that the Playbook can be run. From the main menu, choose Administration > Settings > System Settings > Network Automation to set these credentials.

Step 1 Download topology plan files for impact analysis

When considering when to take down a device for maintenance so that there will be the least impact on the network, you need information about the traffic trends around that device at the targeted time. Using the Cisco Crosswork Optimization API, you can download plan files that capture a snapshot of the network topology at that time. If you download plan files at the same time over a period of time, you can use Cisco WAE Design to analyze the traffic trends. Based on this analysis, you can decide whether the impact on the network would be acceptable or not.

Refer to Cisco Crosswork Network Automation API Documentation on Cisco Devnet for more information about the API.

The input for this scenario is as follows:

Procedure


Step 1

Prepare the input required to download the plan file. You need to specify the version of Cisco WAE design that you will be using for analysis and the format in which you want the plan file, either txt or pln.

Note

 
If you download the plan file as a txt file, you can view it in any text editor. If you download it as a pln file, you can open it only in Cisco WAE design.

The input for this scenario is as follows:

'{
  "input": {
    "version": "7.3.1",
    "format": "txt",

    }
  }
}'

Step 2

Invoke the API on the Crosswork Network Controller server using the input prepared in the previous step. For example:

curl --location --request POST 
'https://10.194.63.198:30603/crosswork/nbi/optima/v1/restconf/operations/cisco-crosswork-
optimization-engine-operations:get-plan \
--header 'Content-Type: application/yang-data+json' \
--header 'Accept: application/yang-data+json' \
--header 'Authorization: Bearer 
eyJhbGciOiJIUzUxMiJ9.eyJzdWIiOiJhZG1pbiIsImlzRnJvbU5ld0xvZ2luIjoidHJ1ZSIsInBvbGljeV9pZCI6ImFkb
WluIiwiYXV0aGVudGljYXRpb25EYXRlIjoiMjAyMS0wMy0yMlQxNjozODozNy43NDY2MTZaW0dNVF0iLCJzdWNjZXNzZnV
sQXV0aGVudGljYXRpb25IYW5kbGVycyI6IlF1ZXJ5RGF0YWJhc2VBdXRoZW50aWNhdGlvbkhhbmRsZXIiLCJpc3MiOiJod
HRwOlwvXC9sb2NhbGhvc3Q6NTQ4OVwvU1NPIiwibGFzdF9uYW1lIjoic21pdGgiLCJjcmVkZW50aWFsVHlwZSI6IlVzZXJ
uYW1lUGFzc3dvcmRDcmVkZW50aWFsIiwiYXVkIjoiaHR0cHM6XC9cLzEwLjE5NC42My4xOTg6MzA2MDNcL2FwcC1kYXNoY
m9hcmQiLCJhdXRoZW50aWNhdGlvbk1ldGhvZCI6IlF1ZXJ5RGF0YWJhc2VBdXRoZW50aWNhdGlvbkhhbmRsZXIiLCJsb25
nVGVybUF1dGhlbnRpY2F0aW9uUmVxdWVzdFRva2VuVXNlZCI6ImZhbHNlIiwiY2hhbmdlX3B3ZCI6ImZhbHNlIiwiZXhwI
joxNjE2NDU5OTIwLCJpYXQiOjE2MTY0MzExMjAsImZpcnN0X25hbWUiOiJqb2huIiwianRpIjoiU1QtODQtOFVlWXMybEt
3R2d1Z3RIYjl4MzVmTFlNTGVVRlp6OURyNGpoeFcxakhsV01VYXdXSWgxbUdTd01aRC1tOEk1S2Z0amI2ZmlWTUhlYnBYY
jBMMFZqRFc2WVppUFVUbHRpNFVpZnNUeG9aQ284WWpPWEc2VlFjS0Mwb29lWjJhc3BWanMzYnA3bHo5VkhySlBCTzl5TDN
GcFRIWXRPeWJtVi1jYXMtMSJ9.Vi4k0w8KsOv5M_O8zBqWochT3k9V9Pn2NjSn5ES9c5Pf-
4ds0o4kk6xuZx5_cggauiEICuUMnzmRzneST-oAuA' \
--data-raw '{
  "input": {
    "version": "7.3.1",
    "format": "txt",
    " 
    }
  }
}

Step 3

Note the plan file content in the API response. It is encoded for security purposes and must be decoded before you can view the content.

{
  "cisco-crosswork-optimization-engine-operations:output": {
    "status": "accepted",
    "plan-file content": " 
PE5ldHdvcms+ClByb3BlcnR5CVZhbHVlClRpdGxlCQpWZXJzaW9uCTcuMy4xCgo8TmV0d29ya09wdGlvbnM+Ck9wdGlvbg
lWYWx1ZQpFbmZvcmNlQWRqU0lETG9jYWxpemF0aW9uCVRSVUUKCjxDaXJjdWl0cz4KTmFtZQl<<<>>>Ob2RlQQlJbnRlcm
ZhY2VBCU5vZGVCCUludGVyZmFjZUIJQ2FwYWNpdHkJRGVsYXkJRGlzdMJTmV0SW50U05NUF9FcnJvcglOZXRJbnRTb3VyY
2UJTmV0SW50UkUwQ1BVMW0JTmV0SW50UkUwQ1BVNWZpZXIJQWxnb3JpdGhtCVJmbGFnCU5mbGFnCVBmbGFnCUVmbGFnCVZ
mbGFnCUxmbGFnCg=="
  }
}

Step 4

Use a script to decode the plan file or copy the plan file content into a decoder. After decoding the plan file, you can see the model content to be used in Cisco WAE Design. It includes a full topology snapshot, including the devices, interfaces, links, LSPs, traffic levels, and other information.

Step 5

Open the plan file in Cisco WAE Design, simulate the device going down, and observe the impact on the network. Refer to the Cisco WAE Design documentation for more information.

Step 6

Based on the analysis, decide an optimal time to execute the SMU.


Step 2: Schedule the SMU installation playbook run

If the simulated impact is acceptable, you can create and schedule the change by running a playbook through Change Automation. For this scenario, we will run a predefined playbook to install a Software Maintenance Update (SMU) on devices tagged under a certain geographic location (NY).


Note


If the predefined (stock) plays and playbooks do not meet your specific needs, you can create custom plays and playbooks. To create a custom play, from the main menu, choose Network Automation > Play List, and to create a custom playbook, choose Network Automation > Playbook List.


Procedure


Step 1

From the main menu, choose Network Automation > Run Playbook.

Step 2

Browse the Available Playbooks list, and click the Install a SMU playbook. You can also filter using keywords to identify the playbook. Note that the playbook execution stages, supported software platform, software version, and individual play details are displayed on the right side.

Figure 1. Select playbook settings
Select Playbook Settings

Step 3

Click Next to go to the next task: Select Devices. All devices tagged with City: NY will be selected for SMU installation.

Step 4

Under the City tag on the left, click NY. The devices tagged with NY are listed on the right and automatically selected.

Figure 2. Select devices settings
Select Devices Settings

Step 5

Click Next to go to the next task: Parameters.

Step 6

Edit the runtime parameters to execute the SMU playbook. Alternatively, you can upload a JSON file that contains the parameter values. The following values are used specifically for this scenario. You can change them as required:

  1. Under the Install a SMU or an optional package on a router play, set collection_type as mdt.

  2. Under the Perform DLM node lock on device(s) play, set retry_count and retry_interval as 3 and 5s, respectively.

    Figure 3. Parameters settings
    Parameters Settings
  3. Under the Install add package(s) play, enter the SMU package name in item 1.

    Figure 4. Install add package(s)
    Install Add Package(s)
  4. Under the Install activate package(s) play, click the piece of paper symbol, and set action to Activate.

  5. Under the Install commit package(s) play, set the action to Commit.

  6. Under the Verify package in committed list on router play, set collection_type to mdt.

Step 7

Click Next to go to the next task: Execution Policy.

Step 8

Set the Execution Mode to Continuous. This will set the playbook to run uninterrupted, with no pauses. Under Failure policy, select the action you want taken if the execution fails: Abort or Complete Roll Back.

Step 9

Under Schedule, set the playbook to execute for the optimal time calculated during the impact analysis stage. Uncheck the Run Now option. Note the calendar at the right and the timers that let you Schedule Pre-check and Schedule Perform play execution dates and times.

Figure 5. Execution policy settings
Execution Policy Settings

Step 10

Click Next to go to the next task: Confirm Job.

Step 11

Review your job details. Label your job with a unique name.

Step 12

When you are finished, click Run Playbook. The SMU installation is now scheduled to run during the planned maintenance window.

Figure 6. Confirm job
Confirm Job

Step 3 Verify the SMU job status

Procedure


Step 1

After the scheduled maintenance window time, from the main menu, choose Network Automation > Automation Job History. Under Job Sets, check that the job status icon on the SMU install job is green, indicating that the scheduled job has run successfully.

Step 2

Select the SMU install job. Note the Job Set details on the right side. Click the link under the job Execution ID for job details.

Step 3

Double-check that the correct SMU has been installed by executing the show install active summary and show install committed summary commands on the device. If the installation was successful, the SMU will appear in the list of packages. The following figure shows example outputs from these commands:

Figure 7. Example output
Example Output

Summary and conclusion

In this scenario, we saw how to plan for a maintenance window. Here, we took down a device for maintenance and scheduled an SMU installation. The goal is to cause as little impact to the network traffic as possible. To analyze the impact on the network, we showed how to download snapshots of the network topology (plan files) at the target time for the maintenance window. The plan files can then be analyzed using Cisco WAE design.

Assuming the impact was acceptable, we selected a predefined playbook to install the SMU on specific devices and scheduled it for the planned maintenance window.