Geo Redundancy Workflow (Day 0)
This topic explains the workflow to enable geo redundancy on day 0. The workflow give a high level description of the tasks necessary to install and enable geo redundancy in Crosswork Network Controller.
 Note |
The recommended day-0 setup for enabling geo redundancy is an empty Crosswork cluster (without any applications, devices or data gateways onboarded). |
The following table describes the stages to install and enable the geo redundancy mode on Crosswork Network Controller.
|
Step |
Action |
||
|---|---|---|---|
|
1. Install the Active Crosswork cluster. |
Install using your preferred method:
Verify if the installation was successful, and log into the Cisco Crosswork UI. |
||
|
2. Install the Standby Crosswork cluster. |
Install using your preferred method:
Verify if the installation was successful, and log into the Cisco Crosswork UI. |
||
|
3. Validate the Crosswork Inventory. In case of manual installation of Crosswork Cluster, you must import a cluster inventory file (.yaml file) to the Crosswork UI.
|
For more information, see the Import Cluster Inventory topic in the Crosswork Network Controller 6.0 Administration Guide. |
||
|
4. (Recommended) Create a backup of your Crosswork cluster. |
Follow the instructions in Manage Backups chapter in Cisco Crosswork Network Controller 6.0 Administration Guide. |
||
|
5. Perform the connectivity checks. |
Follow the instructions in Connectivity Checks topic. |
||
|
6. Prepare and upload the cross cluster inventory template in the Active and Standby clusters to enable geo redundancy. |
Follow the instructions in Enable Geo Redundancy topic. |
||
|
7. Verify that the geo redundancy was successfully enabled on the active and standby clusters. |
Follow the instructions in View Cross Cluster Status topic. |
||
|
8. Configure the cross cluster settings |
Follow the instructions in below topics:
|
||
|
9. Validate if geo redundancy is enabled |
Check the following:
|
Connectivity Checks
Perform the following connectivity checks before enabling geo redundancy:
Important |
|
SCP Connectivity
Copy (using SCP) a file from Availability Zone 1 (AZ1) to Availability Zone 2 (AZ2), and from AZ2 to AZ1 in corresponding Crosswork VMs and
Crosswork Orchestrator pods to ensure connectivity between both clusters.
# Perform these actions from AZ1 to AZ2 and AZ2 to AZ1

root@dev4-jump:~# ssh cw-admin@192.168.6.100
Password:
Last login: Sat Jul  1 16:50:21 2023 from 192.168.6.6
Cisco Crosswork


Copyright (c) 2023 by Cisco Systems, Inc.
Version: release-6.0.0 (Build 182)
Built on: Jul-01-2023 01:27 AM UTC

cw-admin@192-168-6-101-hybrid:~$ sudo su
[sudo] password for cw-admin:
root@192-168-6-101-hybrid:/home/cw-admin# kubectl exec -it -n=kube-system robot-orch-76856487-562w6 -- bash
robot-orch-76856487-562w6:~# touch t.txt
robot-orch-76856487-562w6:~# scp t.txt cw-admin@YOUR_PEER_CLUSTER_MGMT_VIP:/home/cw-admin/
(cw-admin@192.168.5.100) Password:
t.txt

robot-orch-76856487-562w6:~# scp t.txt cw-admin@YOUR_PEER_CLUSTER_DATA_VIP:/home/cw-admin/
(cw-admin@192.168.5.100) Password:
t.txt
DNS Connectivity
Test the DNS resolution on system wide DNS server.
### Internal Authortative  resolution

dig @your_dns_server_ip  your_name.cw.cisco

; <<>> DiG 9.10.6 <<>> @172.28.122.84 geomanagement.cw.cisco
; (1 server found)
;; global options: +cmd
;; Got answer:
;; ->>HEADER<<- opcode: QUERY, status: NOERROR, id: 8167
;; flags: qr aa rd ra; QUERY: 1, ANSWER: 1, AUTHORITY: 0, ADDITIONAL: 1

;; OPT PSEUDOSECTION:
; EDNS: version: 0, flags:; udp: 1232
;; QUESTION SECTION:
;your_name.cw.cisco.        IN  A

;; ANSWER SECTION:
your_name.cw.cisco. 5   IN  A   192.168.6.100

;; Query time: 126 msec
;; SERVER: 172.28.122.84#53(172.28.122.84)
;; WHEN: Fri Jun 30 23:47:51 PDT 2023
;; MSG SIZE  rcvd: 67

### External forwarding and resolution

 dig @your_dns_server_ip  ntp.esl.cisco.com

; <<>> DiG 9.10.6 <<>> @172.28.122.84 ntp.esl.cisco.com
; (1 server found)
;; global options: +cmd
;; Got answer:
;; ->>HEADER<<- opcode: QUERY, status: NOERROR, id: 43986
;; flags: qr rd ra; QUERY: 1, ANSWER: 1, AUTHORITY: 0, ADDITIONAL: 1

;; OPT PSEUDOSECTION:
; EDNS: version: 0, flags:; udp: 1232
;; QUESTION SECTION:
;ntp.esl.cisco.com.     IN  A

;; ANSWER SECTION:
ntp.esl.cisco.com.  1   IN  A   171.68.38.66

;; Query time: 311 msec
;; SERVER: 172.28.122.84#53(172.28.122.84)
;; WHEN: Fri Jun 30 23:46:37 PDT 2023
;; MSG SIZE  rcvd: 62
Verify if the DNS TTL in your VM is lesser than 60 seconds (< 60s).
cw-user@admin-M-C2EM ~ %  dig +nocmd +noall +answer @your_dns_server_ip  your_fqdn
geomanagement.cw.cisco. 60  IN  A   192.168.6.100

For ipv4 check

````dig +nocmd +noall +answer @your_dns_server_ip  your_fqdn ```

For ipv6 check

````dig +nocmd +noall +answer aaaa @your_dns_server_ip  your_fqdn ```
Enable Geo Redundancy
This topic explains the procedure to enable geo redundancy from Crosswork UI.
 Tip |
Click on How it works? link to view a visual representation of how geo redundancy is enabled. |
Before you begin
Ensure you have met all the requirements specified in Geo Redundancy Requirements.
Procedure
|
Step 1 |
Log in to the Crosswork cluster that will function as the active cluster. |
||
|
Step 2 |
From the main menu, choose . The Geo Redundancy Manager window is displayed. 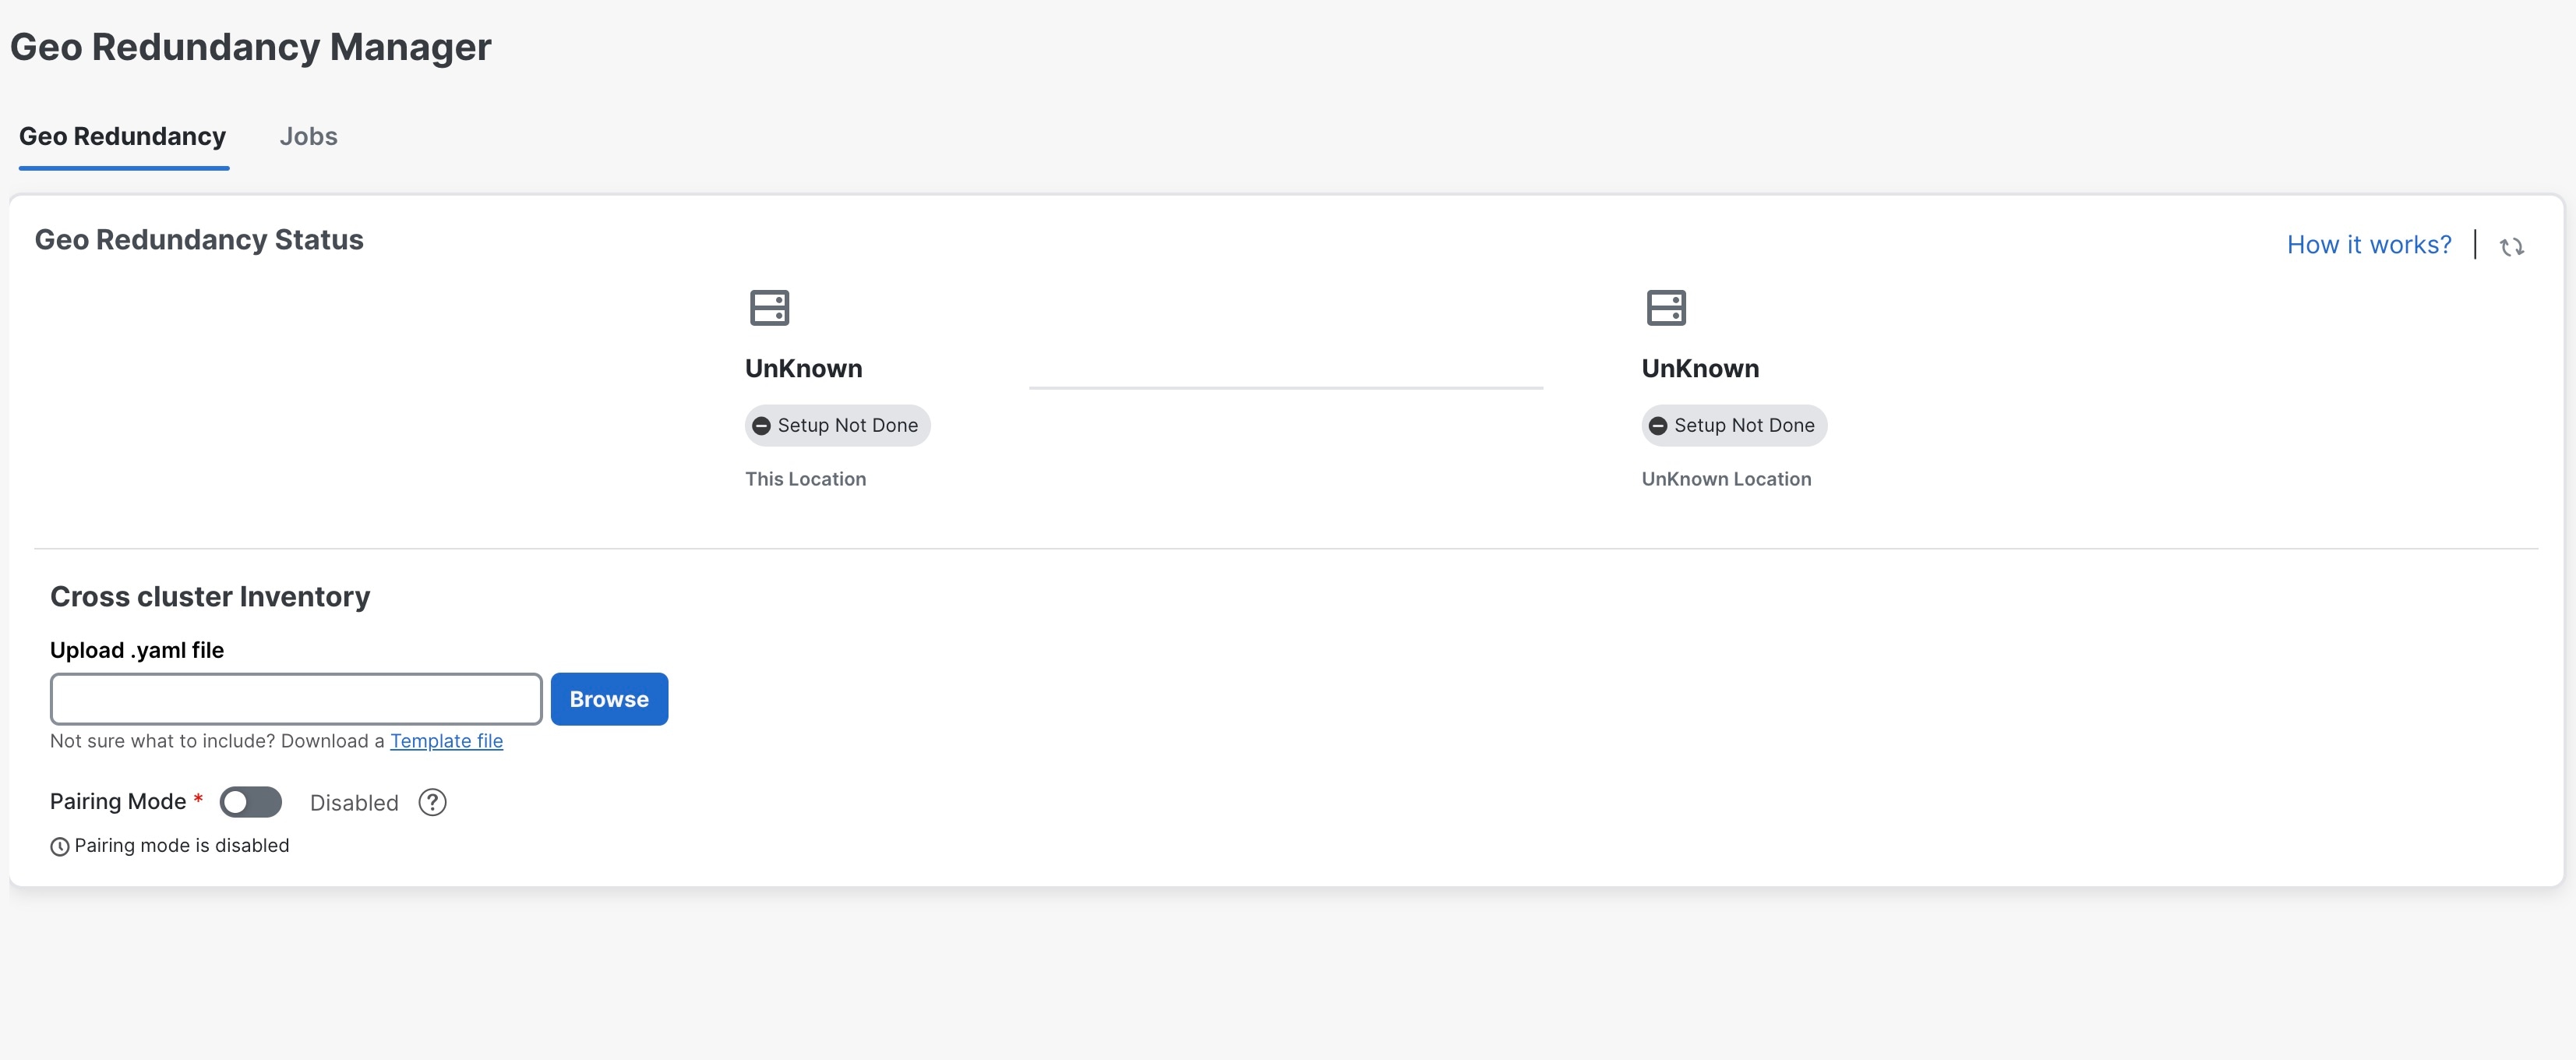
|
||
|
Step 3 |
Click on Download a Template file to download the sample template (.yaml file) for the cross cluster inventory (for more details, see example). Fill the template file with the relevant information for active and standby clusters and the unified cross cluster. |
||
|
Step 4 |
Click Browse and select the cross cluster inventory file that you prepared. The Import Inventory File dialog box is displayed. Verify the contents of the template file. |
||
|
Step 5 |
After you have verified, click Setup. A service interruption alert is displayed. Click Proceed to continue.
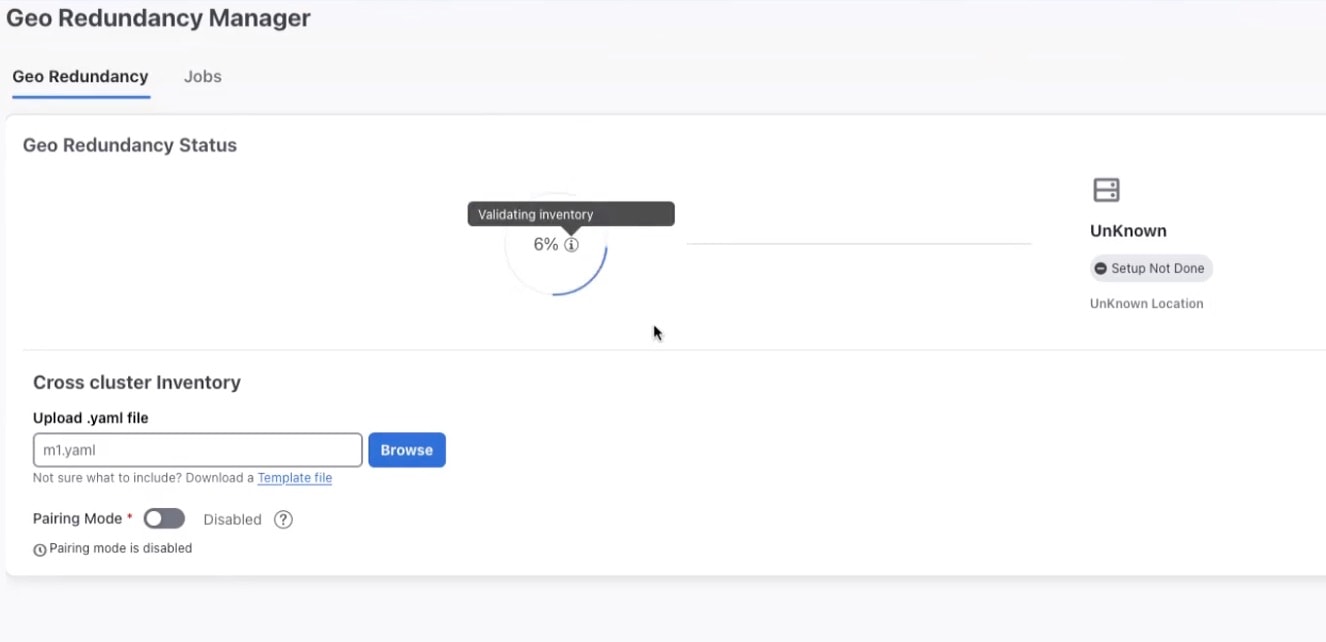
After the standby cluster is created, the setup status will be displayed as Completed on both clusters. 
|
||
|
Step 6 |
After inventory upload is completed in the first cluster, the same process must be repeated in the second cluster. |
||
|
Step 7 |
Log in to the Crosswork cluster that will function as the standby cluster, and repeat the actions in steps 4 and 5.
Once the inventory upload is successfully completed on both clusters, the status will be updated in the Geo Redundancy Manager window. 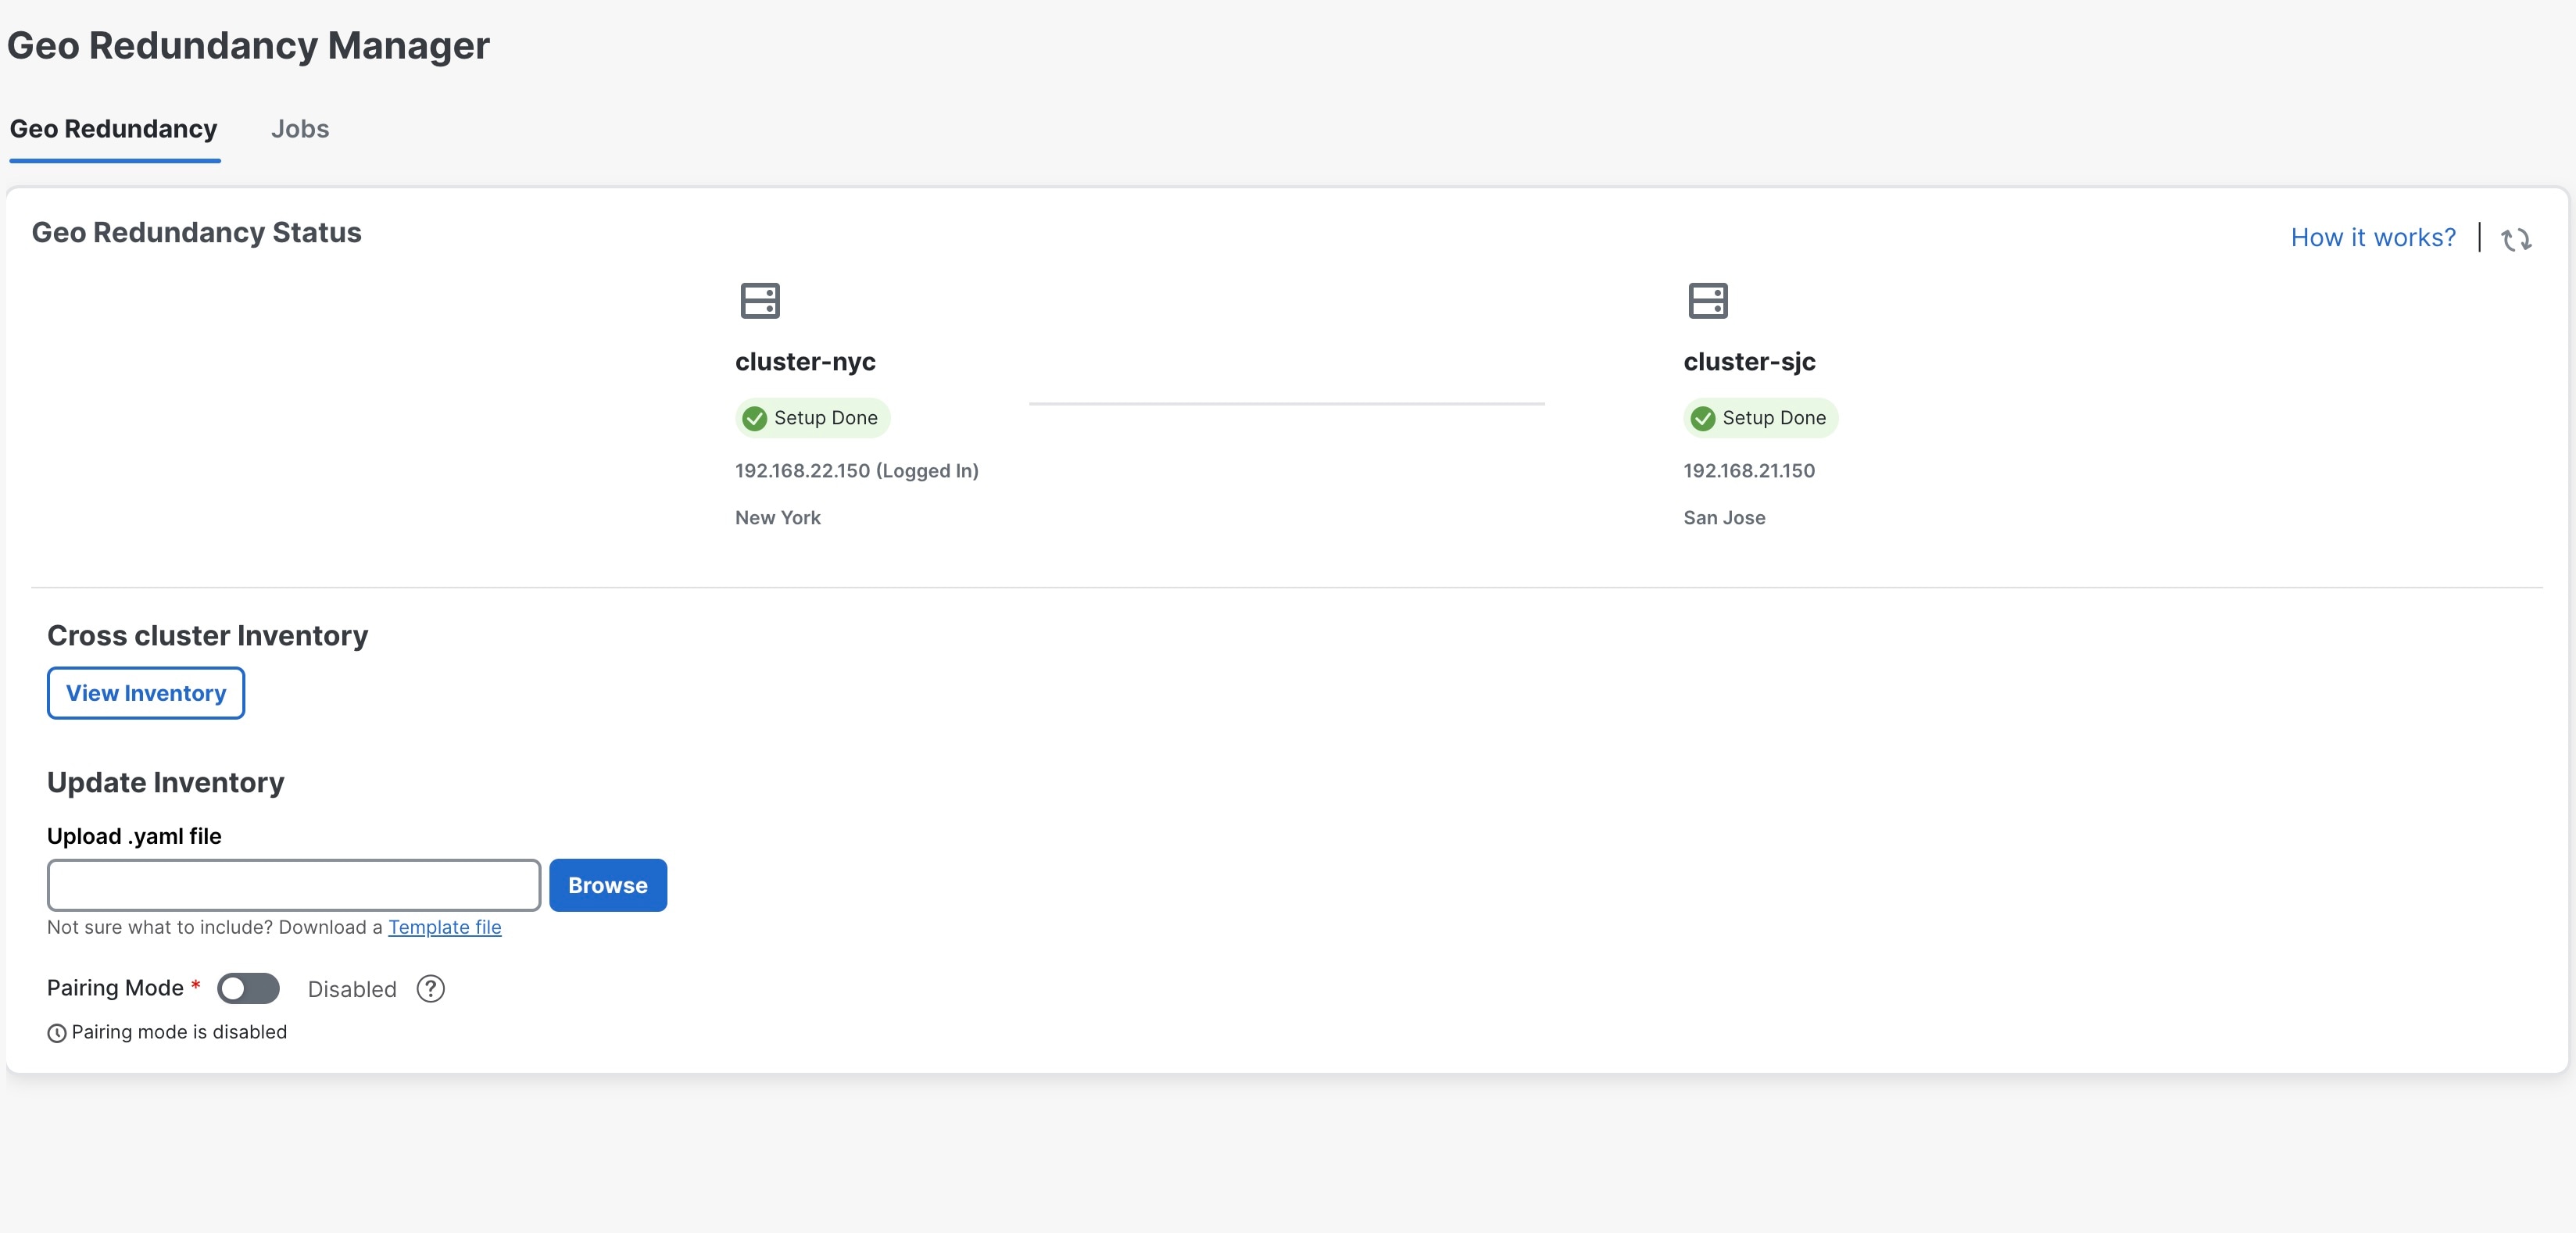
|
Sample Cross Cluster Inventory Template
Here is an example of the cross cluster inventory file (.yaml) that you need to prepare to enable geo redundancy:
############## Crosswork Multi cluster yaml for enabling Geo Redundancy ##########
## meta version of yaml ###
meta_version: 1.0.0
## Crosscluster name , mutable
crosscluster_name: mycnc-geo-cluster
### Unified endpoint of multi cluster for management and data endpoint across clusters
crosscluster_unified_connectivity:
  unified_end_point:
    unified_endpoint_type:
      #### fqdn_type,ip_type are options , only fqdn_type is supported.
      fqdn_type: {}
    #### DNS,BGP,NLB are options, only DNS is supported for now.
    unified_endpoint_implementation: DNS
     ### The below is needed if fqdn_type is chosen,else data_vip,mgmt_vip could be used for ip_type endpoint type
  management_fqdn:
    ## cnc domain zone, DNS server would be checked for resolution
    domain_name: your-name.domain
    host_name: your-unified-cnc-mgmt-hostname
  data_fqdn:
    ## cnc domain zone name, DNS server would be checked for resolution
    domain_name: your-name.domain
    host_name: your-unified-cnc-data-hostname

### Constituent clusters ####
clusters:
##### Mutable cluster name
  - cluster_name: cluster-sjc
    connectivity:
      ### Intra cluster (within a cluster) unified endpoint  ###
      ### Endpoint type is ip_type,fqdn_type , Implementation could be VRRP,NLB,BGP.
      unified_end_point:
        unified_endpoint_type:
          ip_type: {}
        #### VRRP,BGP,NLB are options, only VRRP,ip_type is supported for now in on prem. For cloud NLB,
        ### fqdn_type could be used.
        unified_endpoint_implementation: VRRP
      ### The below is needed if ip_type is chosen,else data_fqdn,mgmt_fqdn could be used for fqdn_type endpoint type
      ## Your intra cluster data vip
      data_vip: 10.10.10.11
      ## data vip subnet mask
      data_vip_mask: 0
      ## Your intra cluster management vip
      management_vip: 20.20.20.11
      ## management vip subnet mask
      management_vip_mask: 0
      ## management and data fqdn for crosscluster instance
      ## management and data fqdn is applicable for only for unified crosscluster instance
    ## STANDBY or ACTIVE for leadership state
    initial_preferred_leadership_state: ACTIVE
    ### DC location , needs to be unique per cluster, For cloud region-az could be used
    site_location:
      location: San Jose
      #Mutable credentials
    cluster_credential:
      ## This is the https credential post first time cluster login
      https_credential:
        username: admin
        #### pwd/secrets are within single quotes,if special chars are used
        password: your-password
      ssh_credential:
        username: admin
        #### pwd/secrets are within single quotes,if special chars are used
        password: your-password
##### Mutable cluster name
  - cluster_name: cluster-nyc
    ## STANDBY or ACTIVE for leadership state
    initial_preferred_leadership_state: STANDBY
    connectivity:
      ### Intra cluster (within a cluster) unified endpoint  ###
      ### Endpoint type is ip_type,fqdn_type , Implementation could be VRRP,NLB,BGP.
      unified_end_point:
        unified_endpoint_type:
          ip_type: {}
        #### VRRP,BGP,NLB are options, only VRRP,ip_type is supported for now in on prem. For cloud NLB,
        ### fqdn_type could be used.
        unified_endpoint_implementation: VRRP
      ### The below is needed if ip_type is chosen,else data_fqdn,mgmt_fqdn could be used for fqdn_type endpoint type
      ## Your intra cluster data vip
      data_vip: 30.30.30.11
      ## data vip subnet mask
      data_vip_mask: 0
      ## Your intra cluster management vip
      management_vip: 40.40.40.11
      ## management vip subnet mask
      management_vip_mask: 0
      ## management and data fqdn for crosscluster instance
      ## management and data fqdn is applicable for only for unified crosscluster instance
    ### DC location , needs to be unique per cluster, For cloud region-az could be used
    site_location:
      location: New York City
    #Mutable credentials
    cluster_credential:
      ## This is the https credential post first time cluster login
      https_credential:
        username: admin
        #### pwd/secrets are within single quotes if special chars are used
        password: your-password
      ssh_credential:
        username: admin
        #### pwd/secrets are within single quotes if special chars are used
        password: your-password
#### Mutable secret are within single quotes if special chars are used, used to kick-start inter cluster mTLS
### needs to be >= 10 chars with at-least 1 special,upper,numerical characters
secret: Your-secret1
### Set this to true , if one is enabling geo mode on a system post migration setup, rather than a fresh first time
## install
is_post_migration_activation: false
### Set this to true , if one is enabling geo mode on a system post Disaster Recovery when both the clusters are down
is_skip_peer_check_enabled: false
View Cross Cluster Status
This topic explains how to view the cross cluster status after successfully enabling geo redundancy.
Procedure
|
Step 1 |
From the main menu, choose . The Cross Cluster window is displayed. The cross cluster health status is displayed along with the high availability state, heartbeats round trip time, failed heartbeats, and last active cluster change time. You can also view the status of the active and standby clusters along with the operational state and last sync status. 
|
|
Step 2 |
(Optional) Click 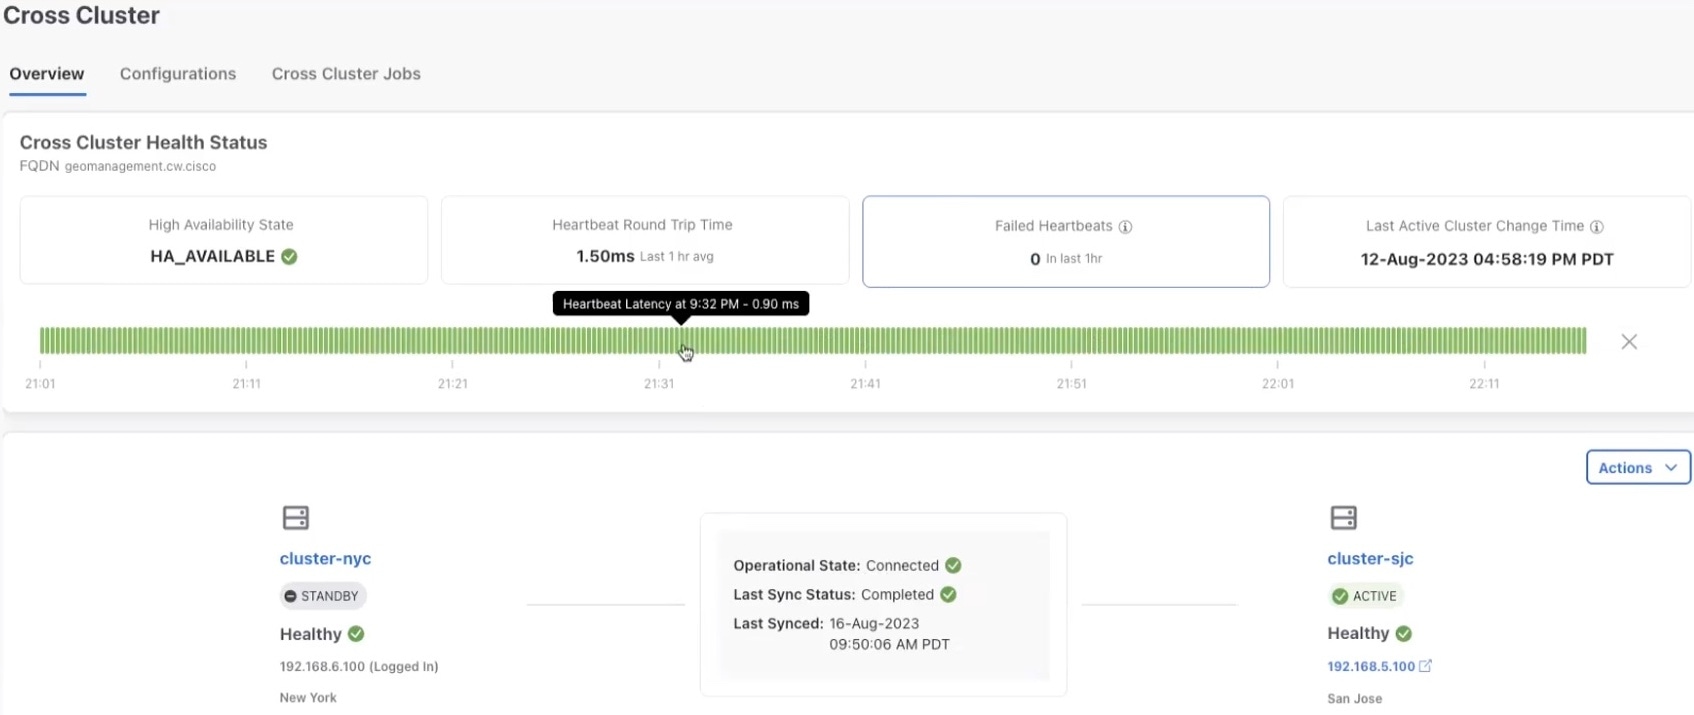
|
|
Step 3 |
(Optional) Click to download the showtech logs. |
Configure Cross Cluster Storage Settings
This topic explains how to configure the cross cluster storage settings.
Procedure
|
Step 1 |
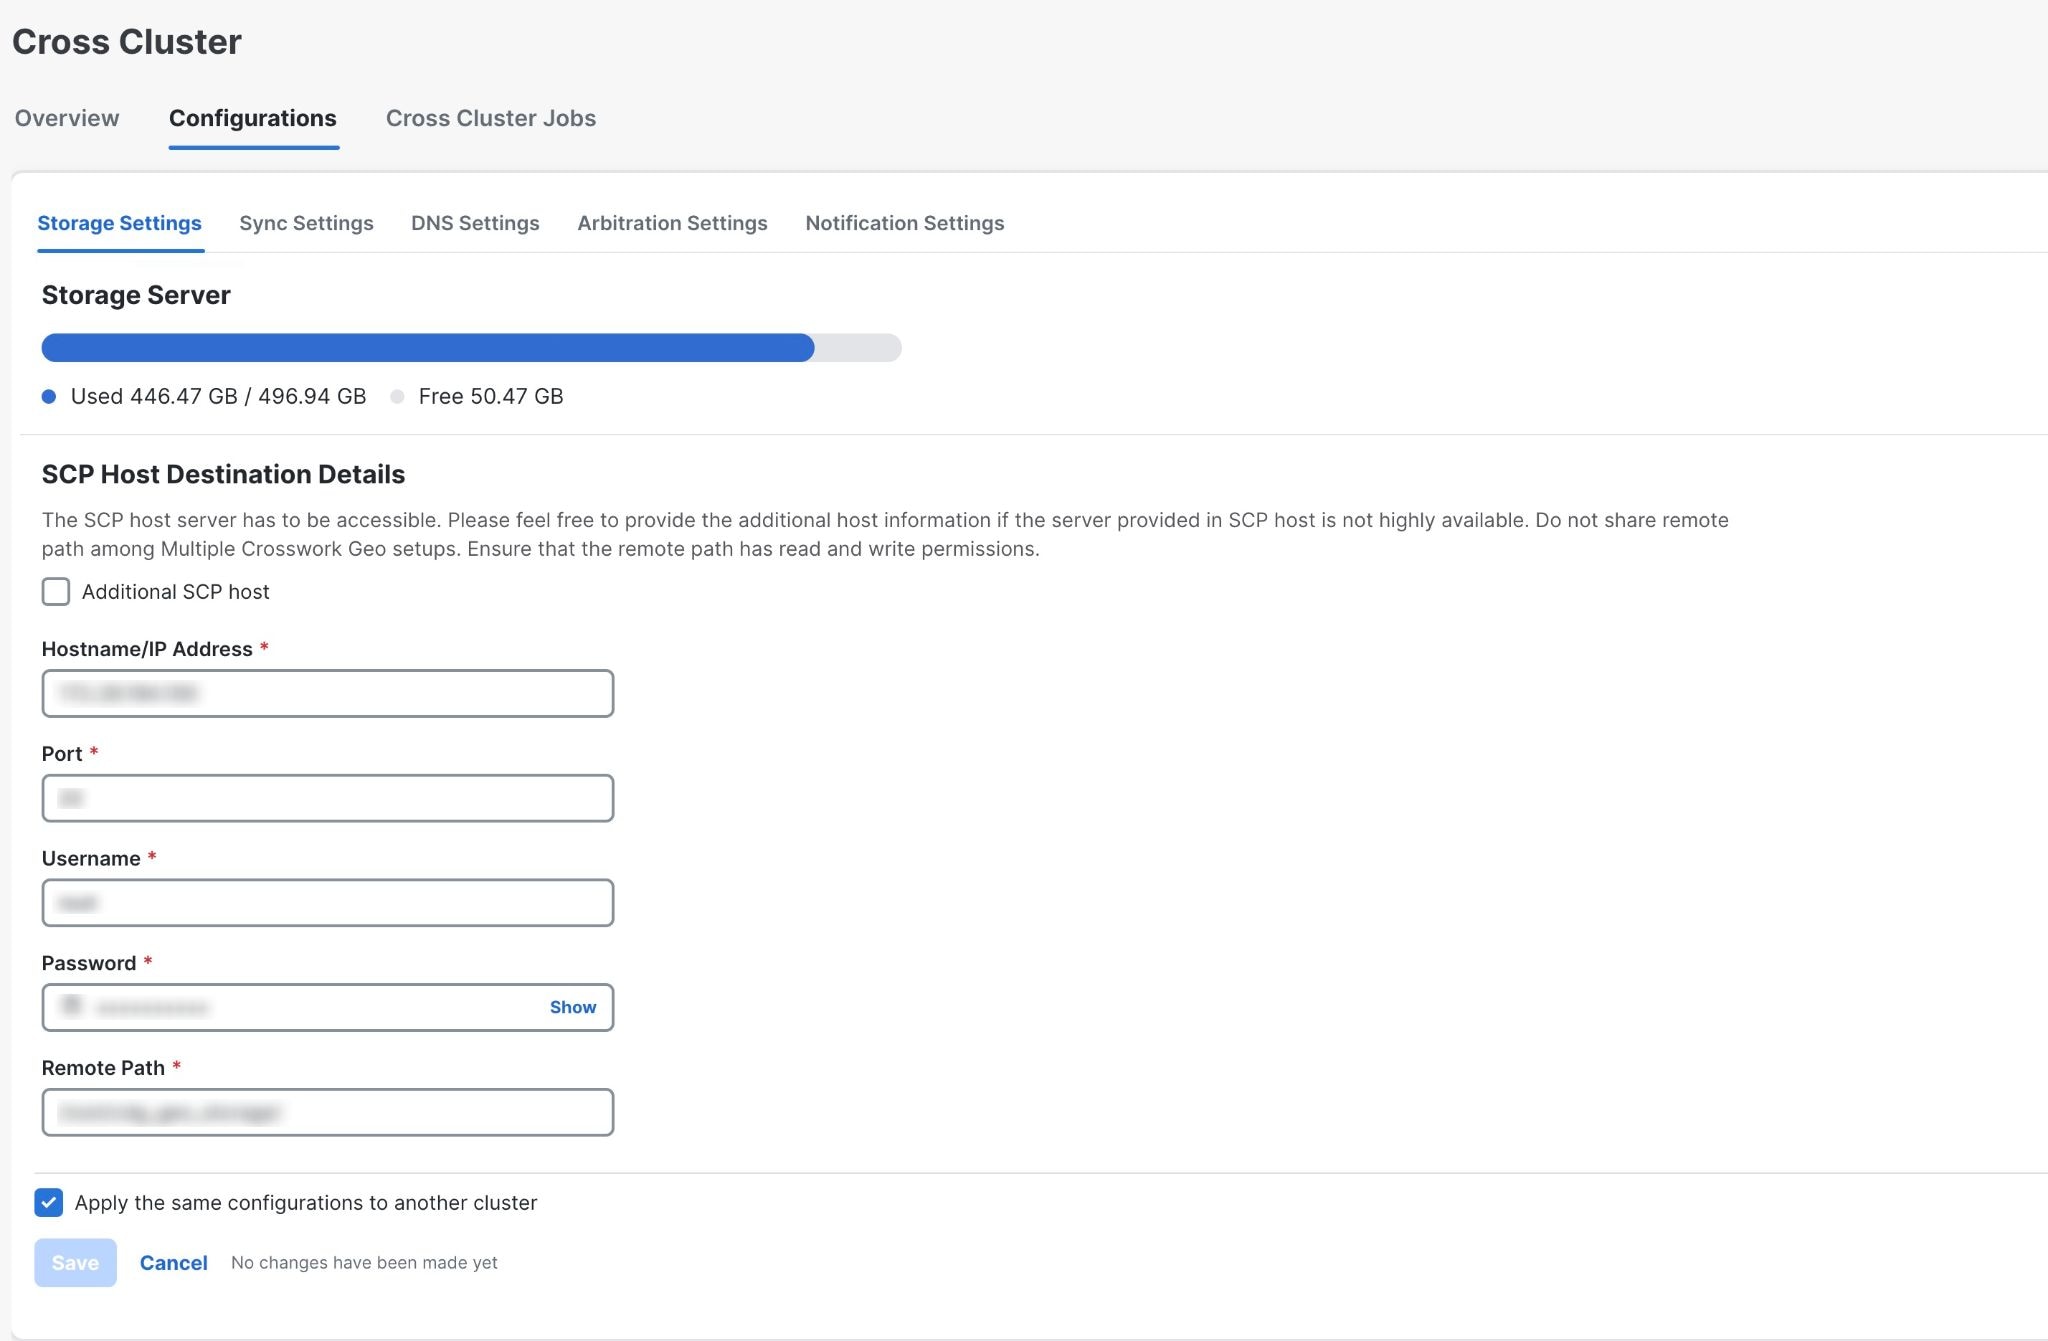
From the main menu, choose . The Cross Cluster window is displayed. Click on the Configurations tab. The Storage Settings window is displayed.
|
||
|
Step 2 |
Fill all the fields provided for the SCP Host server. To add additional SCP host, select the Additional SCP host checkbox. Additional SCP host is needed only when the current SCP host is not highly available across both AZs. |
||
|
Step 3 |
(Optional) Select the checkbox to apply the same configuration to the other cluster. |
||
|
Step 4 |
Click Save to save the changes.
|
Configure Cross Cluster Sync Settings
This topic explains how to configure the cross cluster sync settings.
Note |
During the sync, the system will automatically go in to maintenance mode and can result in service disruptions. It is recommended to schedule the sync accordingly to minimize disruption to other users. |
Procedure
|
Step 1 |
From the main menu, choose . The Cross Cluster window is displayed. Click on the Configurations tab. |
||
|
Step 2 |
Click on the Configurations tab, and click on the Sync Settings. The Sync Settings window is displayed. The Sync Status will display the current status of the clusters. the last sync status, and the last successful sync job time. 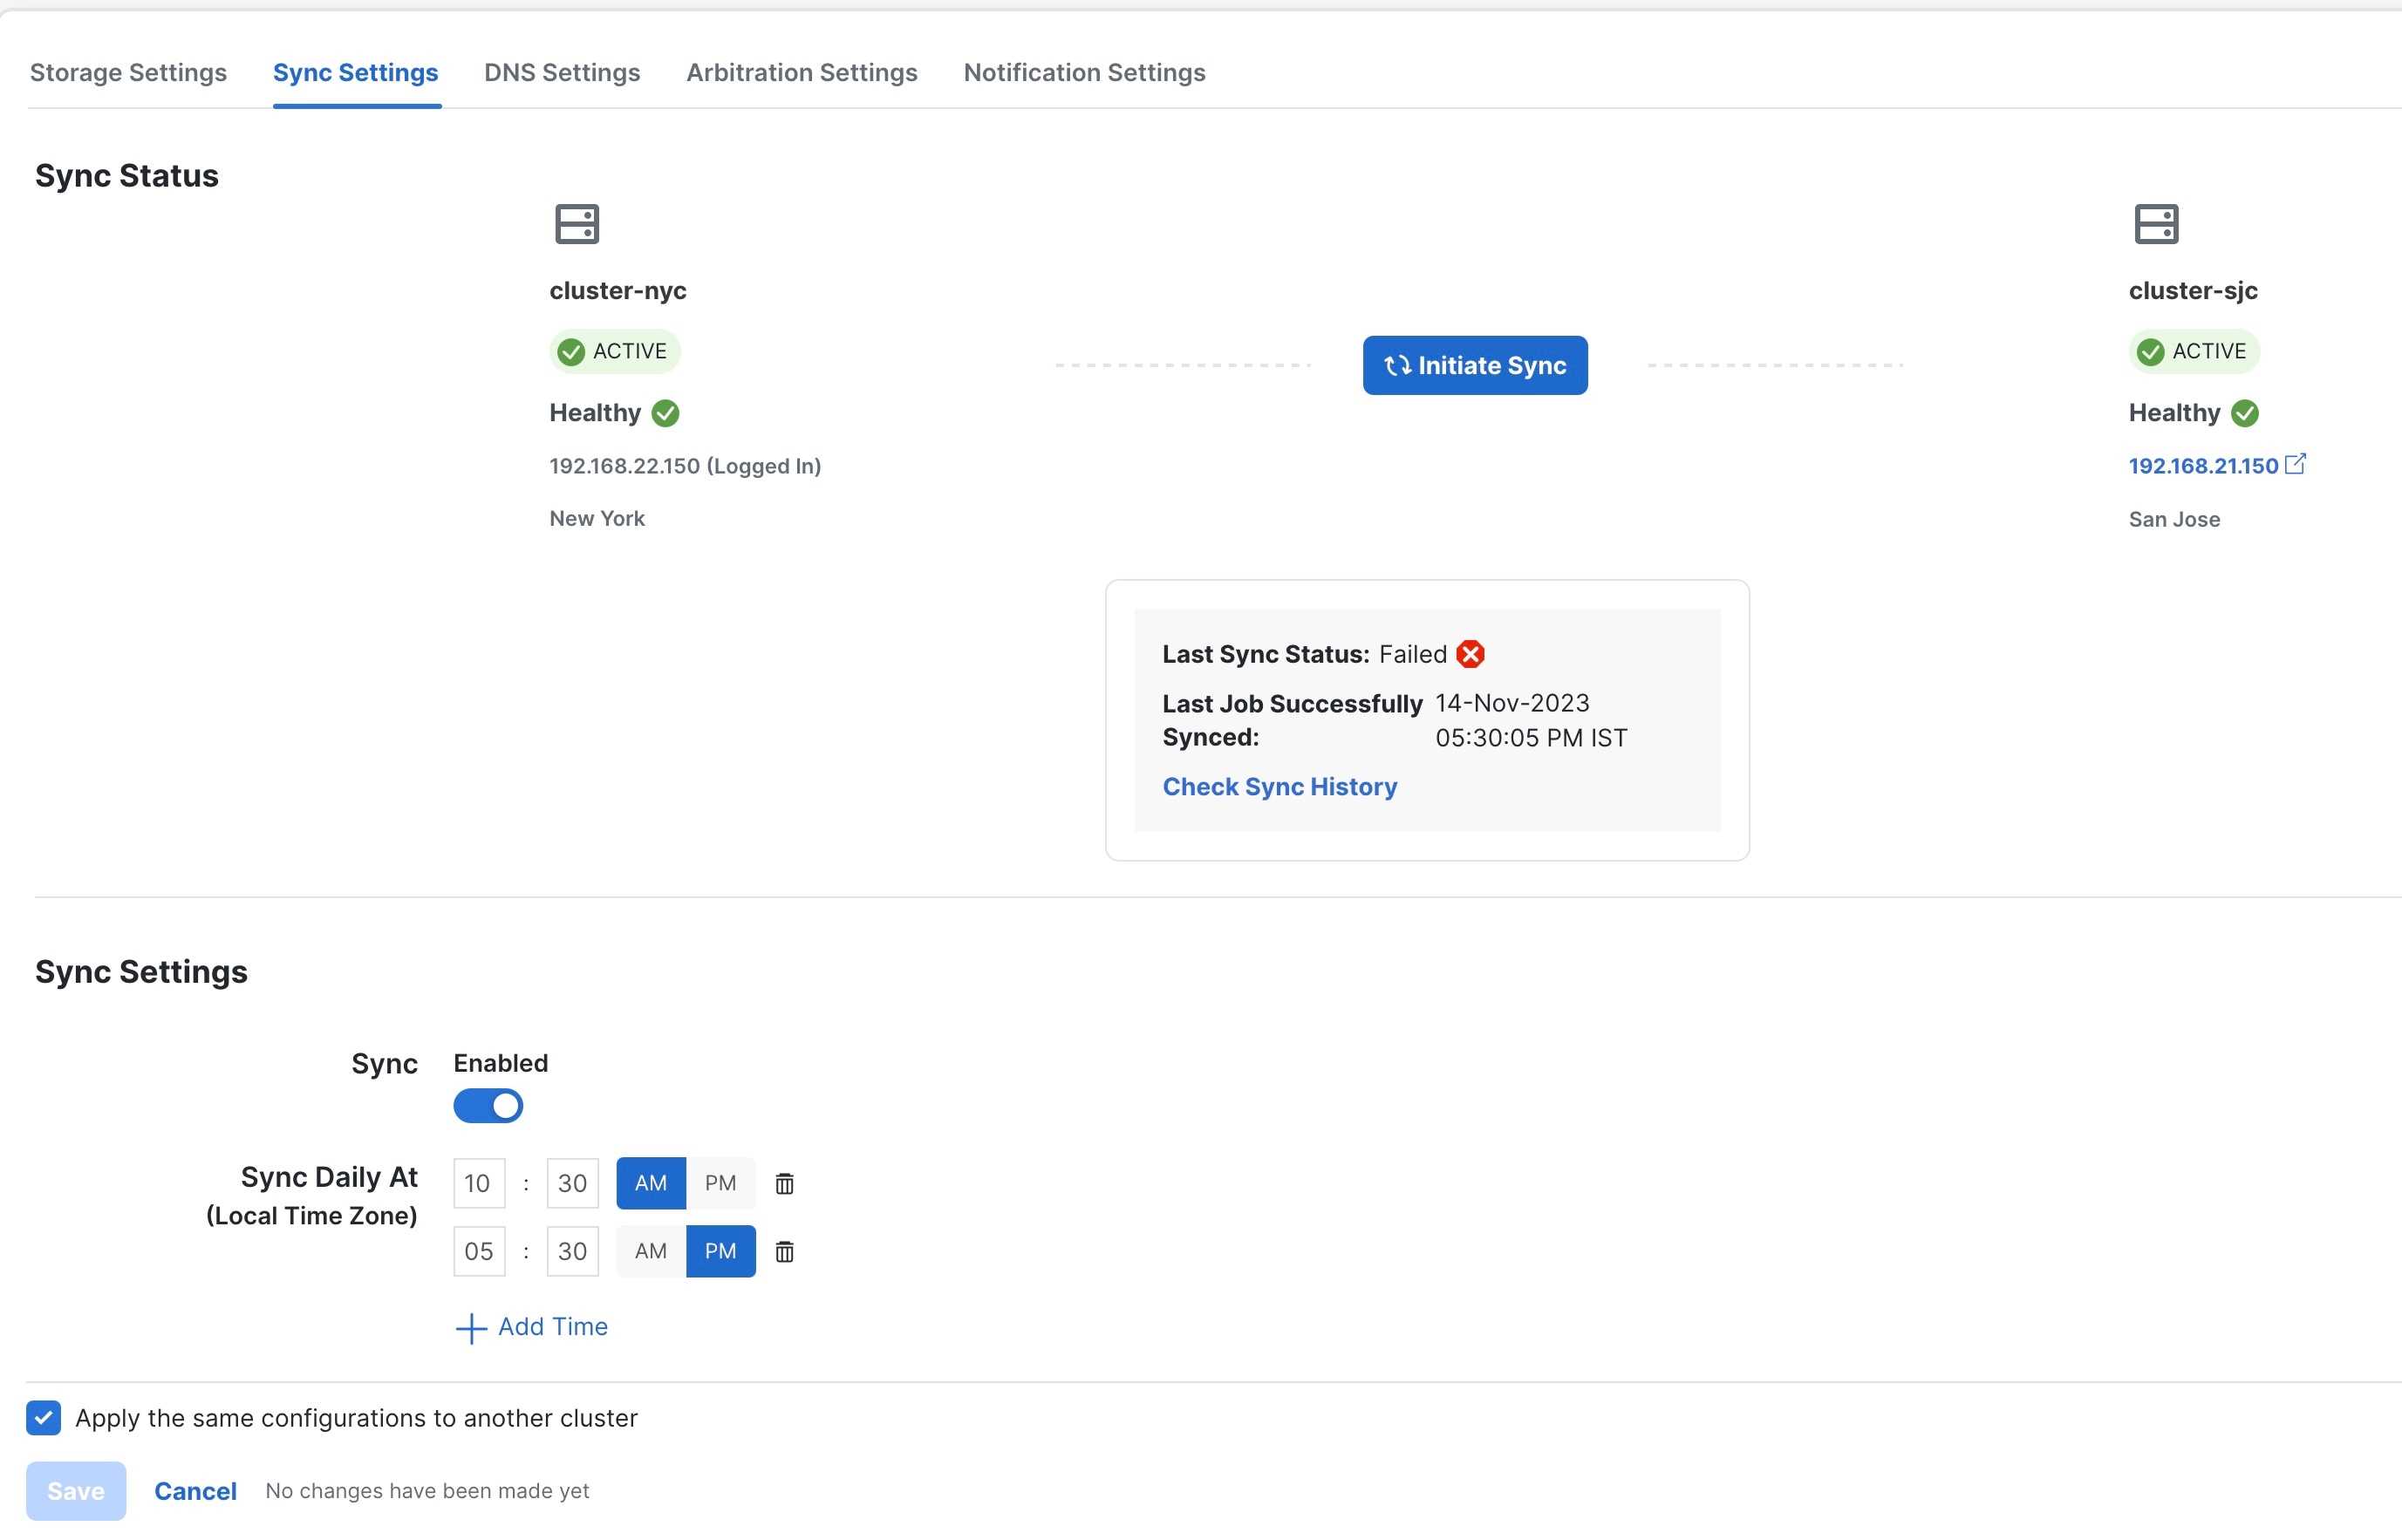
|
||
|
Step 3 |
(Optional) Click Initiate Sync to start the sync immediately. A confirmation prompt is displayed. Click Proceed to continue.
|
||
|
Step 4 |
(Optional) To set a auto-sync schedule, toggle the Sync Enabled button, and set the sync times.
|
||
|
Step 5 |
(Optional) Select the check box to apply the same configuration to the other cluster. |
||
|
Step 6 |
Click Save to save the changes.
|
Configure Cross Cluster DNS Settings
This topic explains how to configure the cross cluster DNS settings.
Note |
The DNS record TTL for FQDN must be lesser than 60 seconds (< 60s). |
Procedure
|
Step 1 |
From the main menu, choose . The Cross Cluster window is displayed. Click on the Configurations tab. |
||
|
Step 2 |
Click on the Configurations tab, and click on the DNS Settings. The DNS Settings window is displayed. The management FQDN and data FQDN details are displayed. 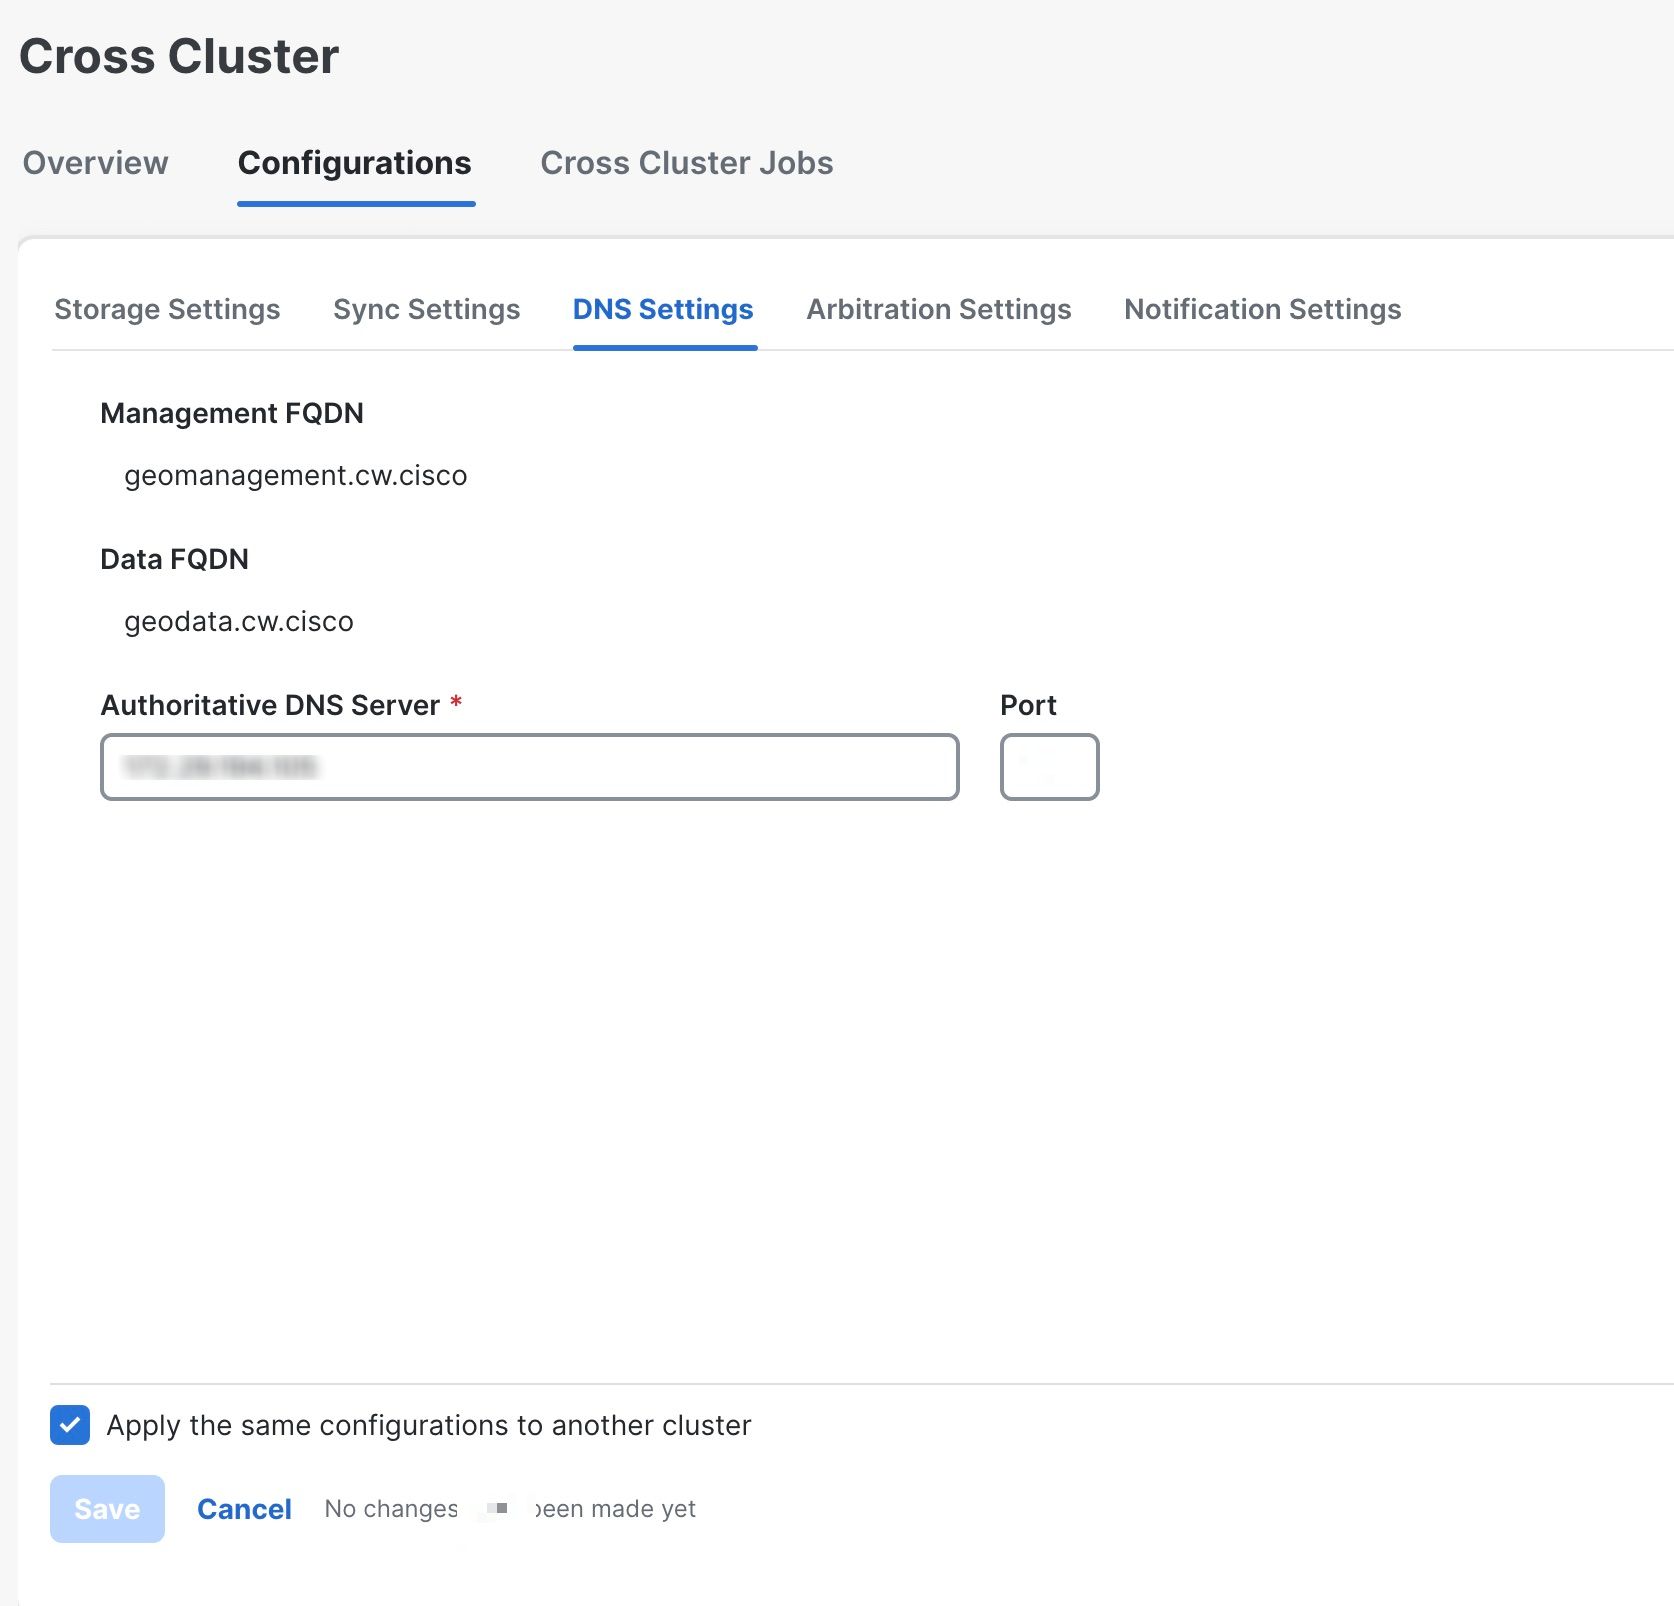
|
||
|
Step 3 |
Add the details for the Authoritative DNS Server and Port. |
||
|
Step 4 |
(Optional) Select the checkbox to apply the same configuration to the other cluster. |
||
|
Step 5 |
Click Save to save the changes.
|
Configure Cross Cluster Arbitration Settings
This topic explains how to configure the cross cluster arbitration settings.
Procedure
|
Step 1 |
From the main menu, choose . The Cross Cluster window is displayed. Click on the Configurations tab. |
||
|
Step 2 |
Click on the Configurations tab, and click on the Arbitration Settings. The Arbitration Settings window is displayed. 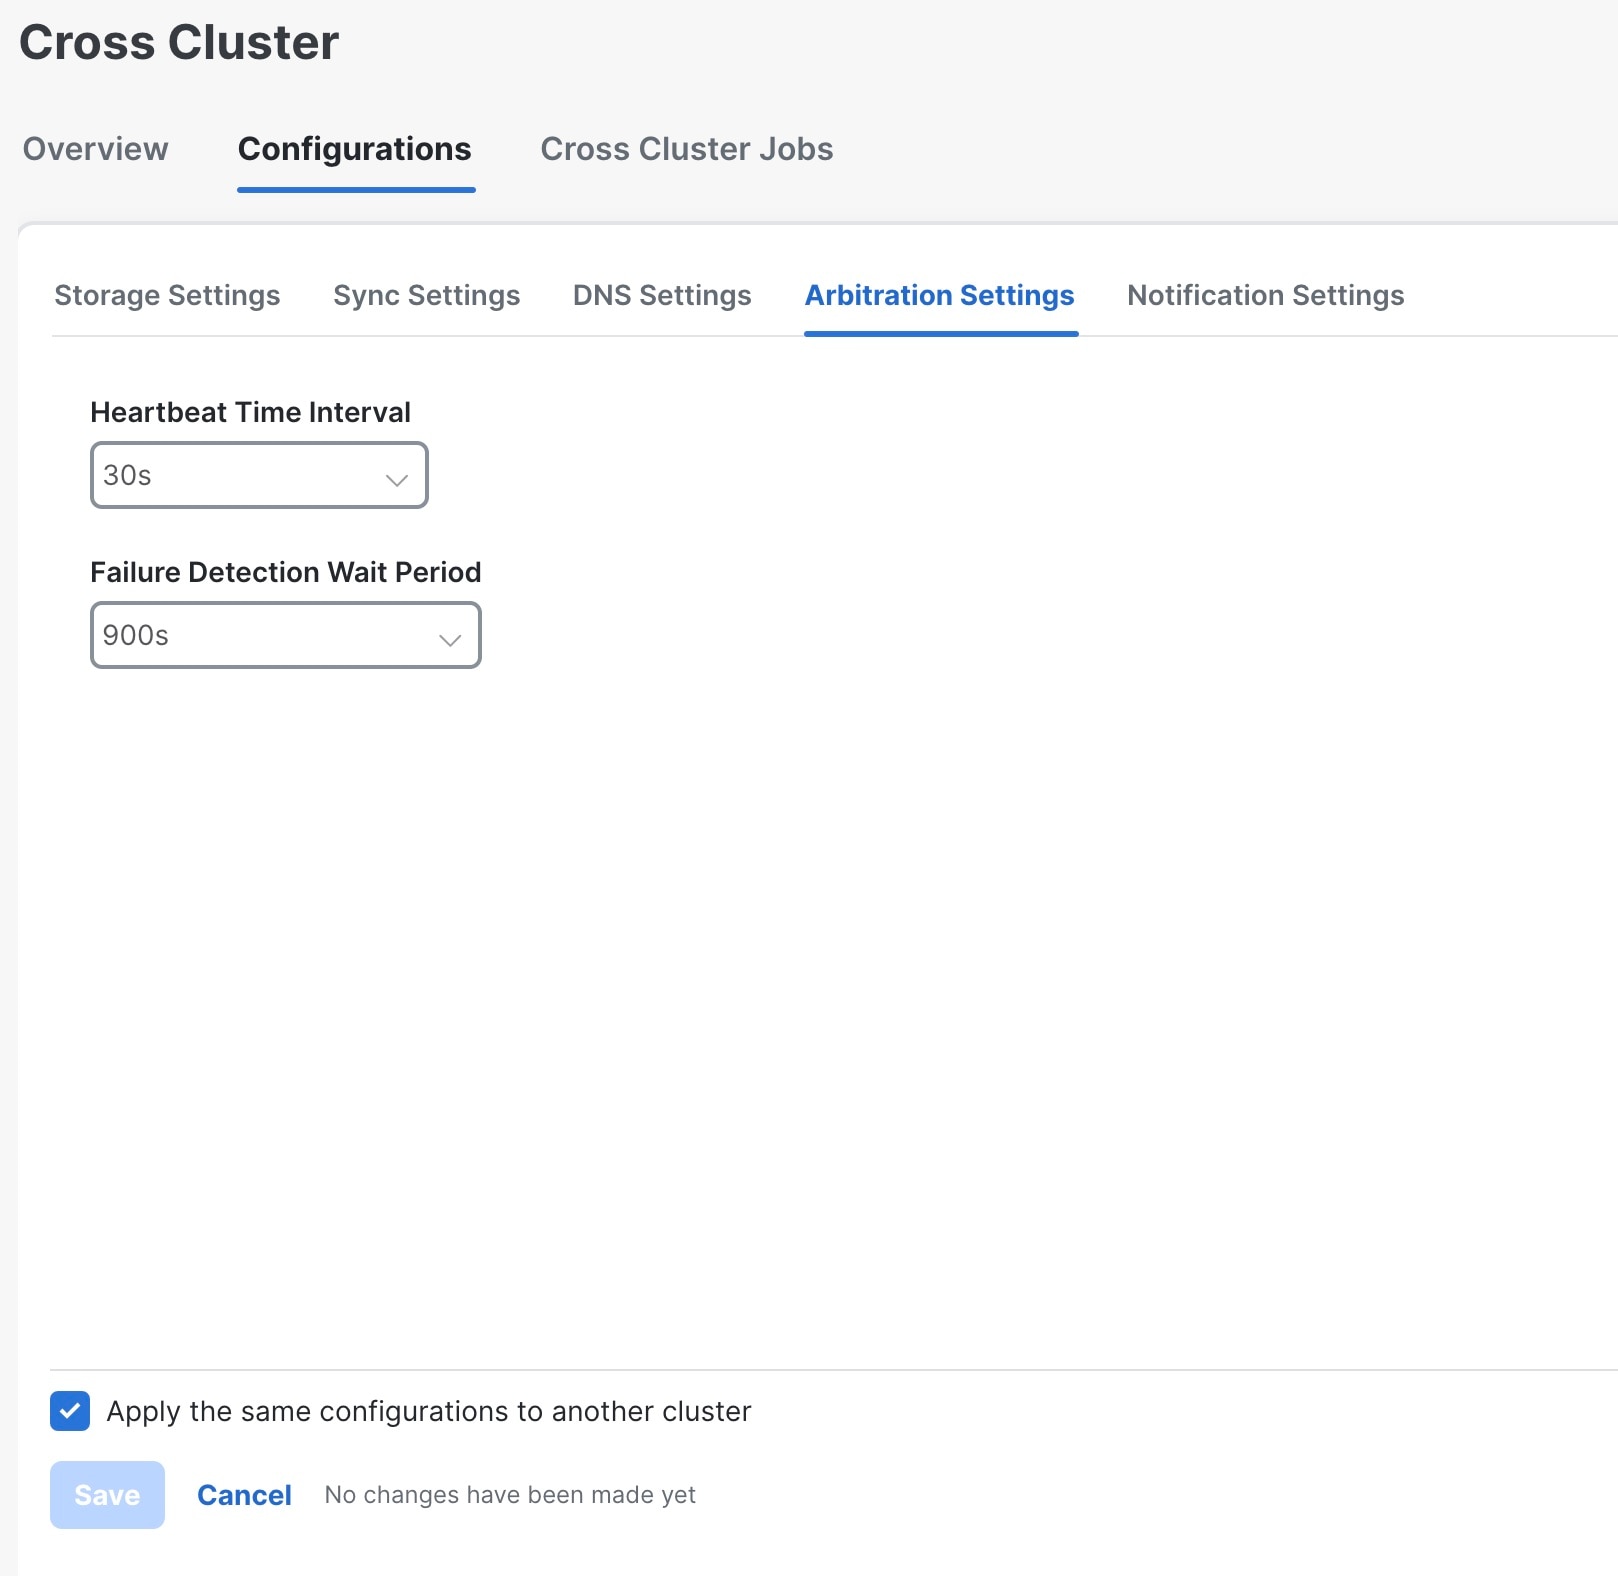
|
||
|
Step 3 |
Set relevant values for the Heartbeat Time Interval and Failure Detection Wait Period fields. |
||
|
Step 4 |
(Optional) Select the checkbox to apply the same configuration to the other cluster. |
||
|
Step 5 |
Click Save to save the changes.
|
Configure Cross Cluster Notification Settings
This topic explains how to configure the cross cluster notification settings.
Procedure
|
Step 1 |
From the main menu, choose . The Cross Cluster window is displayed. Click on the Configurations tab. |
||
|
Step 2 |
Click on the Configurations tab, and click on the Notification Settings. The Notification Settings window is displayed. 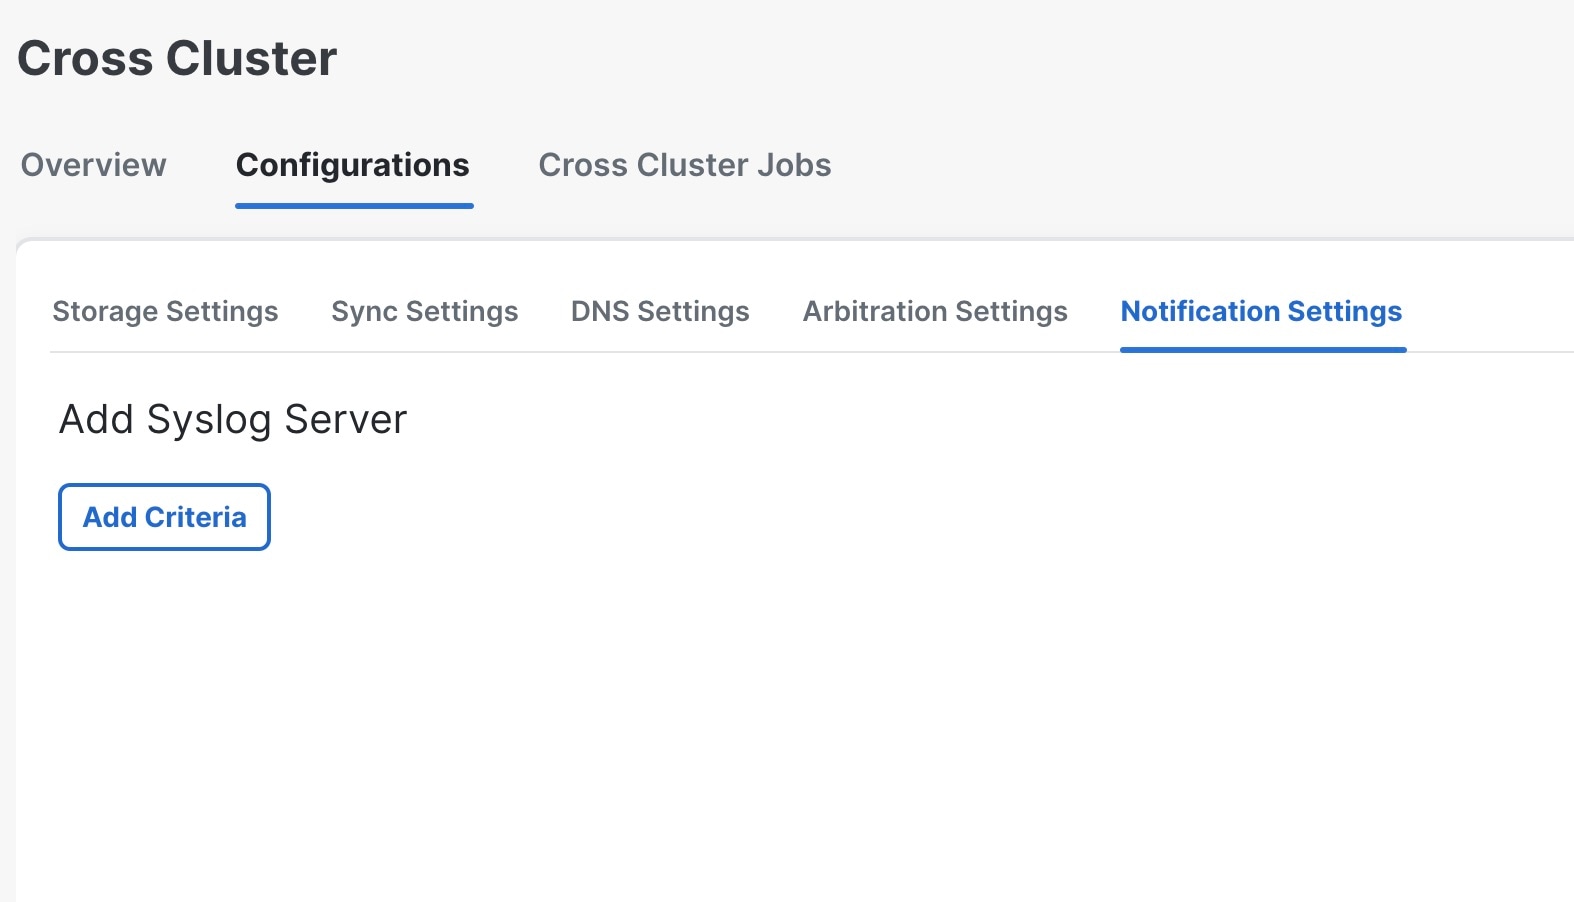
|
||
|
Step 3 |
(Optional) Click Add Criteria to add a syslog server. |
||
|
Step 4 |
Once the syslog server is added, provide the relevant information for the notification settings. |
||
|
Step 5 |
(Optional) Select the checkbox to apply the same configuration to the other cluster. |
||
|
Step 6 |
Click Save to save the changes.
|
 Feedback