Cisco Compute Hyperconverged with XE-Series Nutanix (CCHC+N) Ordering Guide
Available Languages
Bias-Free Language
The documentation set for this product strives to use bias-free language. For the purposes of this documentation set, bias-free is defined as language that does not imply discrimination based on age, disability, gender, racial identity, ethnic identity, sexual orientation, socioeconomic status, and intersectionality. Exceptions may be present in the documentation due to language that is hardcoded in the user interfaces of the product software, language used based on RFP documentation, or language that is used by a referenced third-party product. Learn more about how Cisco is using Inclusive Language.
- US/Canada 800-553-2447
- Worldwide Support Phone Numbers
- All Tools
 Feedback
 Feedback
Cisco Compute Hyperconverged with Nutanix accelerates and simplifies the delivery of infrastructure and applications, at a global scale, through best-in-class cloud-operating models, industry-leading flexibility, and enhanced support and resiliency capabilities so you can power your hybrid multicloud future with the industry’s most complete hyperconverged solution.
Cisco Unified Edge brings together computing, storage, routing, switching, and security into a single configurable solution to help IT organizations simplify the deployment, operations, and lifecycle management of edge infrastructure at global scale. Cisco Unified Edge is a fully integrated, edge-optimized, AI-ready, and SaaS managed platform, engineered to deliver a superior user experience with unprecedented visibility, consistency, and control for a host of edge use cases.
Cisco Unified Edge is a modular edge platform, with a 3RU, short-depth, multi-mountable chassis with features to operate in extended temperature range (5°C to 45°C), maintain a quiet acoustic profile (40s dBA at 25°C and 20% PWM), and offer protection against high particulate environments, allowing deployments in a wide range of physical spaces.
The Cisco Compute Hyperconverged with Nutanix XE130c M8 Edge Server is a family of 1RU, half-width server; up to five Cisco Compute Hyperconverged with Nutanix XE130c M8 Edge Server can be housed inside a Cisco UCS XE9305 chassis. It delivers enterprise class, performance, versatility and density but in a compact edge-optimized form factor. Powered by the Intel® Xeon® 6 SoC processors with Performance-Cores and available in two riser configurations (“Storage-Optimized” and “IO-Optimized”), the Cisco Compute Hyperconverged with Nutanix XE130c M8 Edge Server offers industry-leading adaptability at the edge, supporting a variety of PCIe accelerators (such as GPUs) and adaptors, and integrated networking with two front-panel 1/10 Gbps NICs and two rear-facing 25 Gbps NICs connecting to the in-chassis network mid-plane. This versatility enables the Cisco Compute Hyperconverged with Nutanix XE130c M8 Edge Server as a building block in the deployment of a wide range of workloads including bare-metal servers, virtualization, containers, and AI/ML.
Purpose, Audience, and Scope
Purpose
This publication provides information about the ordering Cisco Compute Hyperconverged XE-Series M8 with Nutanix from CCW estimate creation.
Scope
This ordering guide describes the information for:
● Workflow from approved Nutanix Deal Registration to License fulfillment
● Ordering Structure of Cisco Compute Hyperconverged XE-Series M8 with Nutanix
● Catalog of Product IDs of Cisco Compute Hyperconverged XE-Series M8 with Nutanix
● Ordering Nutanix Hardware, Software Licensing and Professional Service options
● Links to additional resources
Audience
Cisco sales teams and partners.
Ordering Structure of Cisco Compute Hyperconverged XE-Series M8 with Nutanix
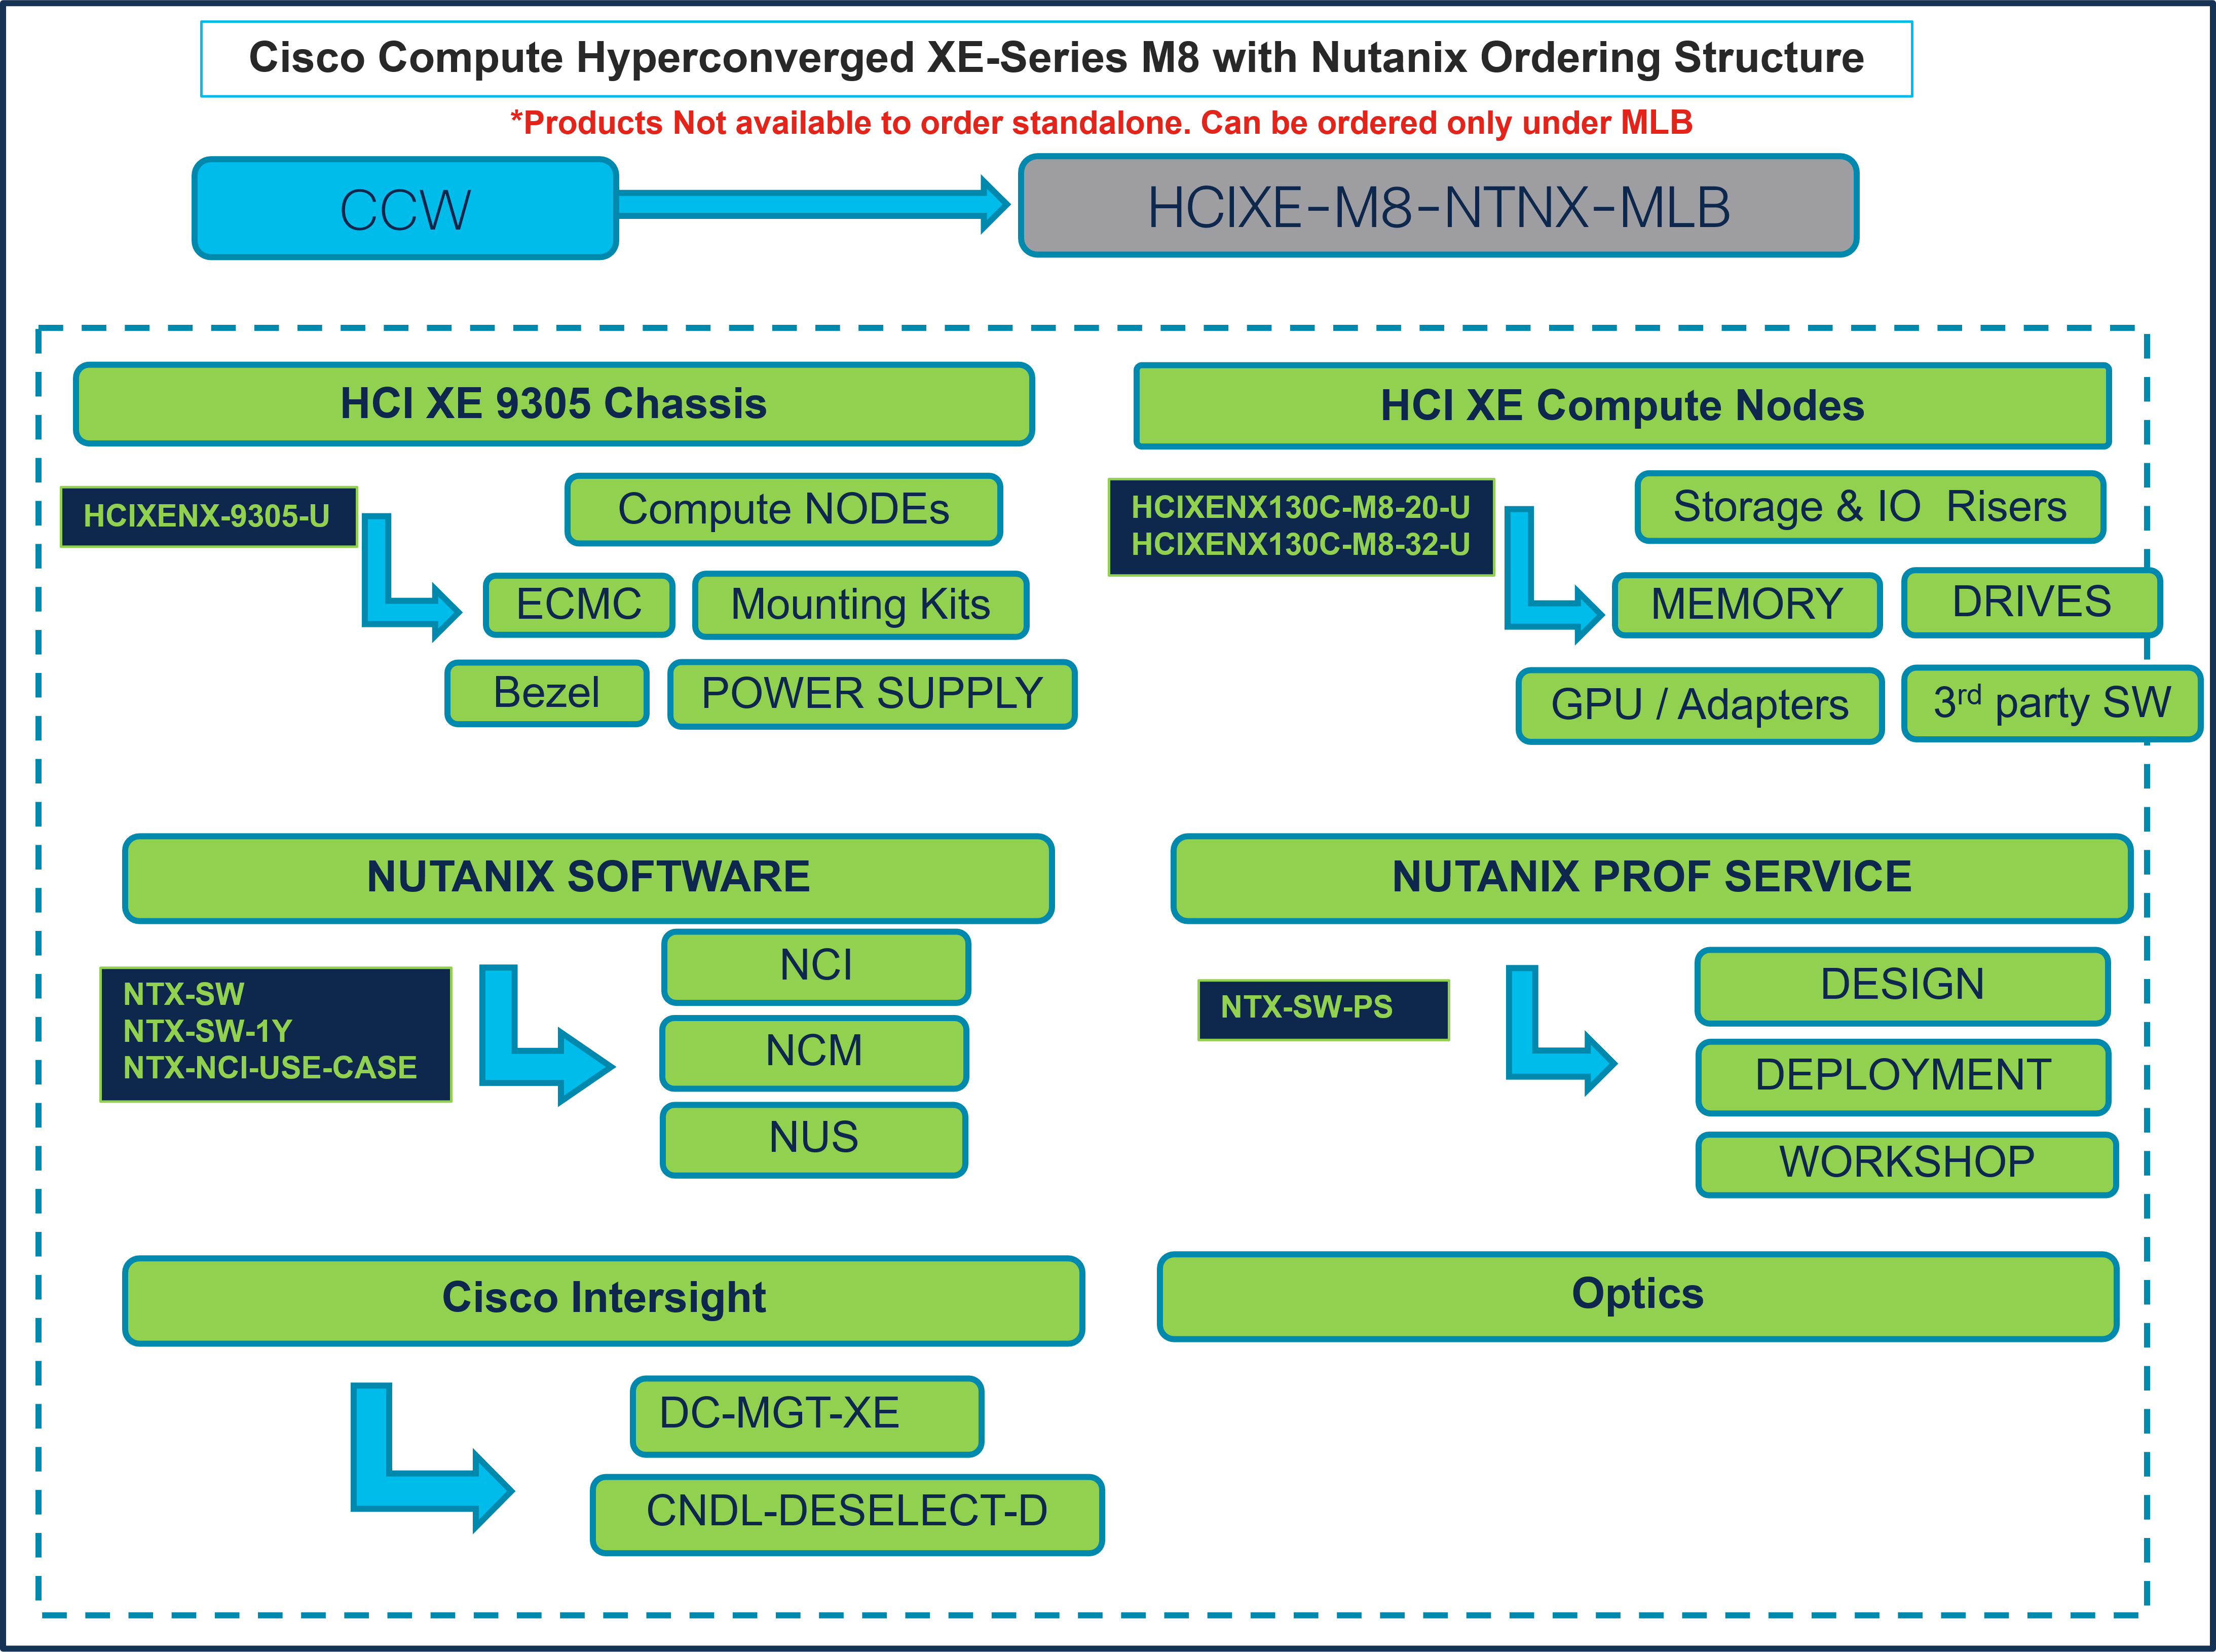
Catalog of Product IDs (PIDs)
Note: For a complete list of part numbers for the see the https://www.cisco.com/c/dam/en/us/products/collateral/hyperconverged-infrastructure/compute-hyperconverged/hcixe-130c-m8-specsheet.pdf
Table 1. PID of Major Line Bundle (MLB)
| Product ID (PID) |
Description |
| HCIXE-M8-NTNX-MLB |
Cisco Compute Hyperconverged XE-Series M8 with Nutanix MLB. |
Table 2. Cisco Compute Hyperconverged Server node Major Line PIDs
| Description |
|
| Cisco Compute Hyperconverged XE130c M8 20-Core 1U Server without memory, risers, drives, GPUs, or adapters (ordered as a UCS XE9305 chassis option |
|
| HCIXENX130C-M8-32 |
Cisco Compute Hyperconverged XE130c M8 32-Core 1U Server without memory, risers, drives, GPUs, or adapters (ordered as a UCS XE9305 chassis option) |
| HCIXENX130C-M8-20U |
Cisco Compute Hyperconverged XE130c M8 20-Core 1U Server without memory, risers, drives, GPUs, or adapters (ordered standalone) |
| HCIXENX130C-M8-32U |
Cisco Compute Hyperconverged XE130c M8 32-Core 1U Server without memory, risers, drives, GPUs, or adapters (ordered standalone) |
Table 3. Cisco Intersight Major Line PIDs
| Product ID (PID) |
Description |
| DC-MGT-XE |
DC-MGT-XE |
| CNDL-DESELECT-D |
Conditional Deselect |
This section provides more information and details related to packages and PIDs specific to Compute Hyperconverged XE-Series M8 Server with Nutanix. It also provides references to additional buying programs and subscription packages that Compute Hyperconverged XE-Series M8 Server with Nutanix products may be included in.
Step 1. Launch your web browser and navigate to the Cisco Commerce Estimate Creation page.
Step 2. Log In to Cisco screen, type your Cisco.com user ID and password.
Step 3. In the Estimates page, set preferences for this estimate by entering the SKU, PID, product description or product family (for example, HCIXE-M8-NTNX-MLB) to search for the HCI product you wish to order.
Configuring the Hardware Components
Step 4.
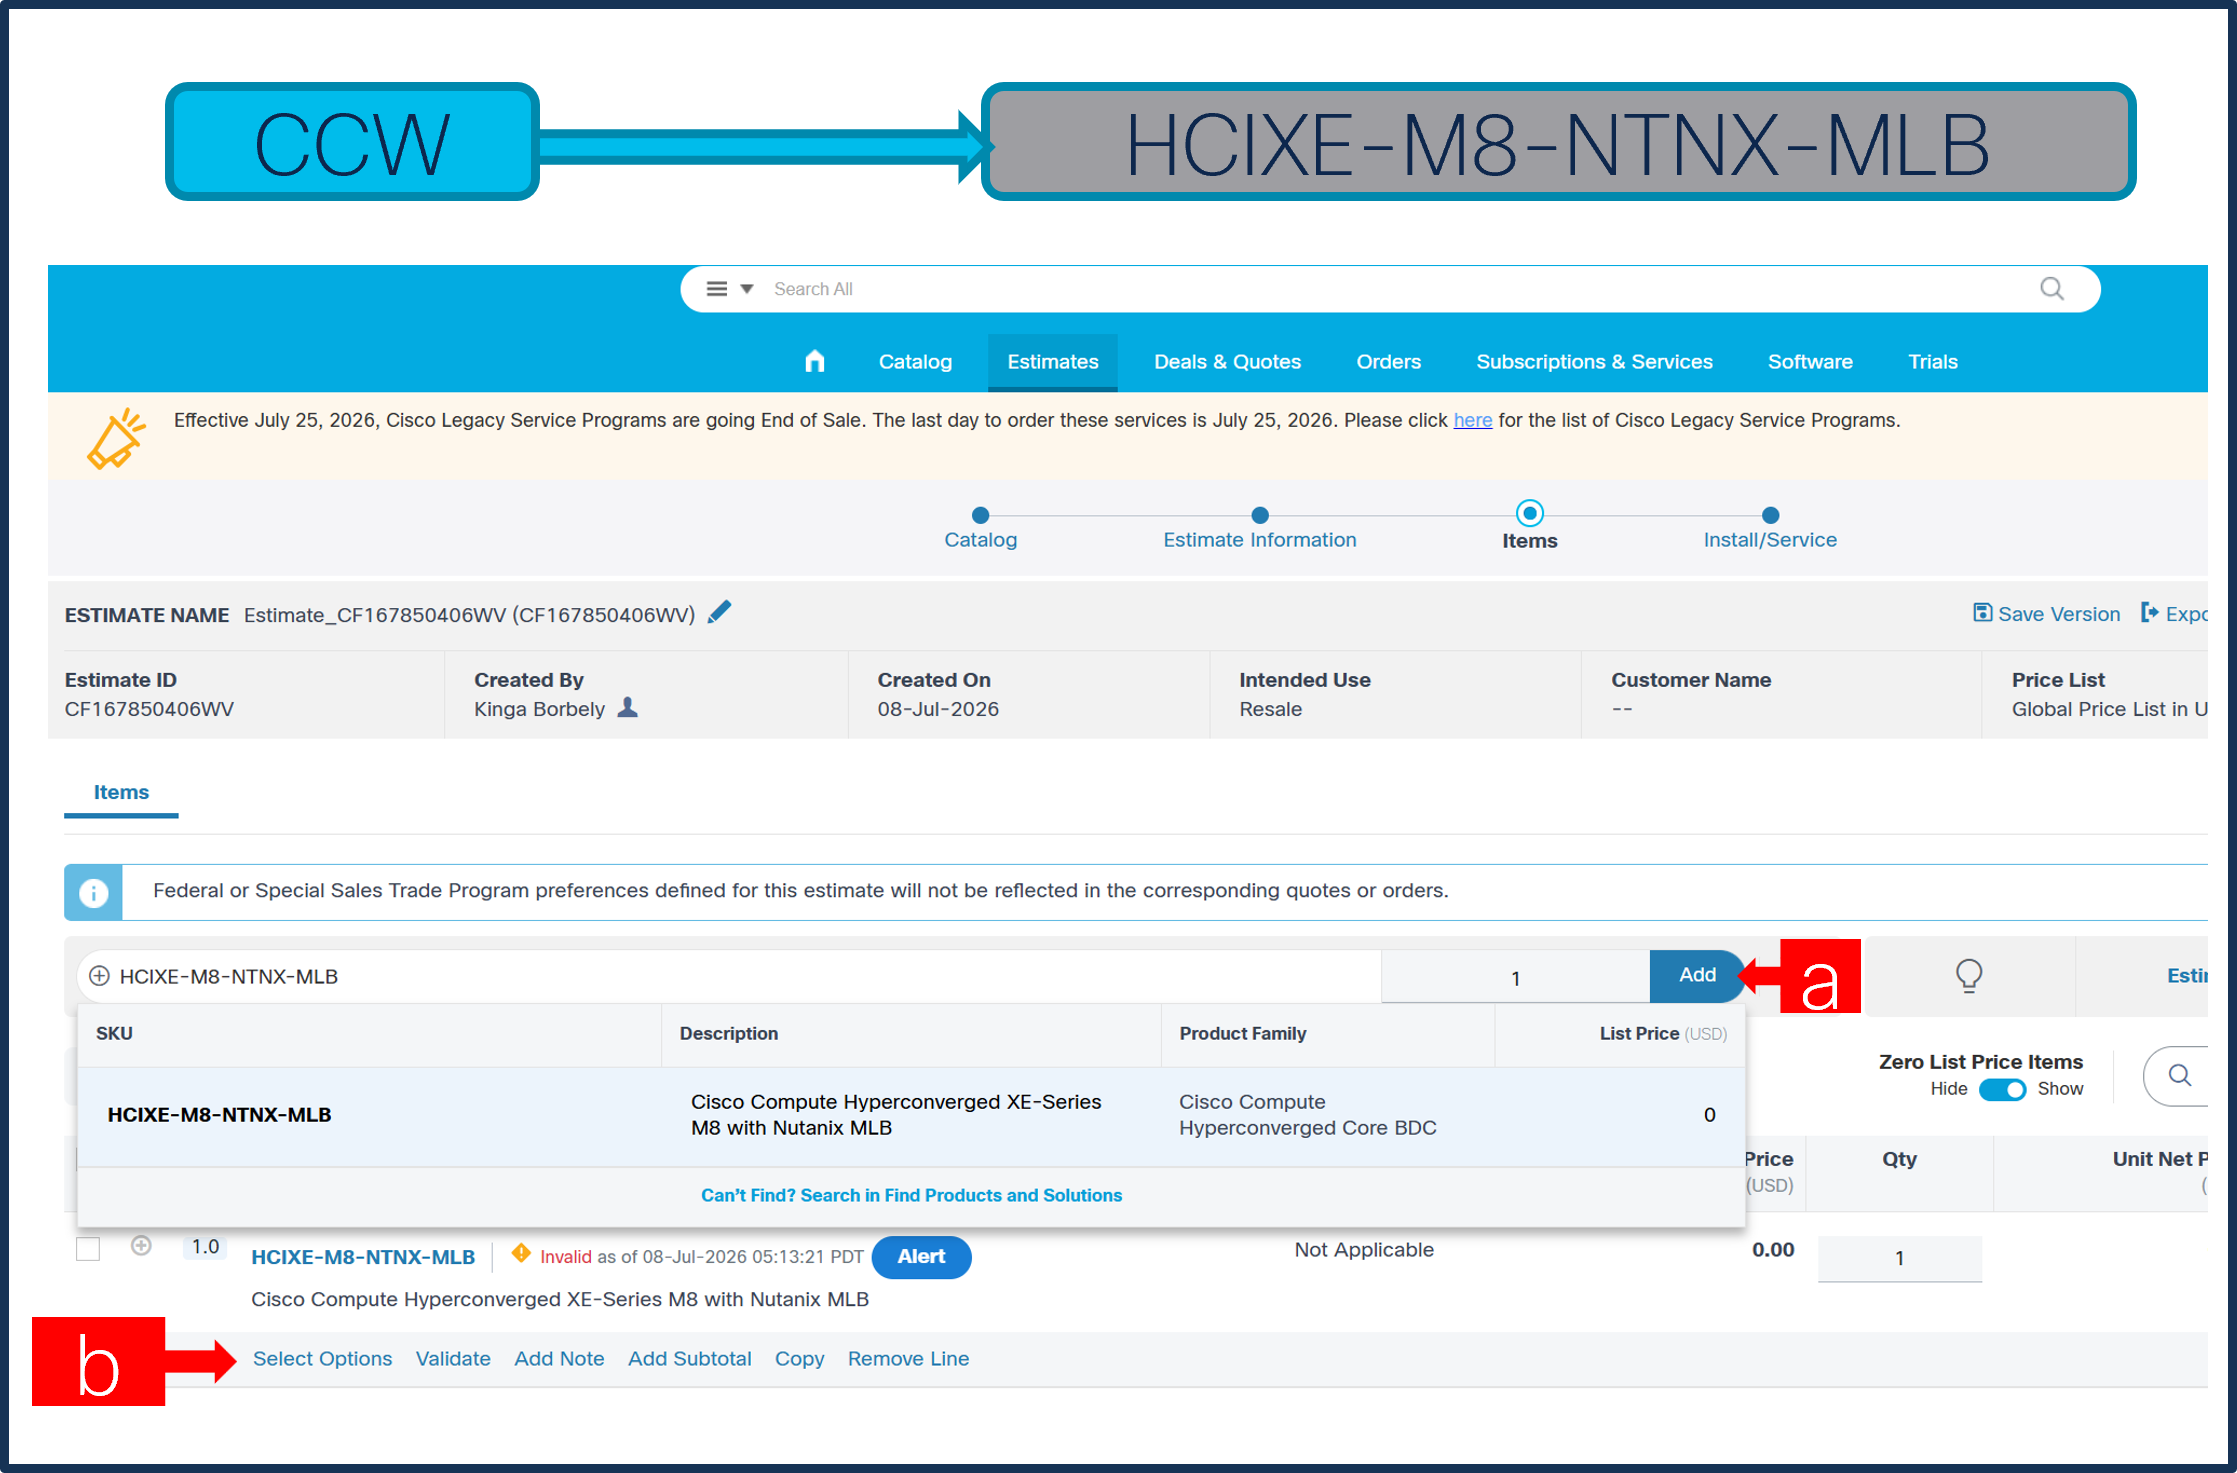
a. In CCW search for MLB PID and Click on button.
b. Then Click on ‘Select Options’ to enter the configurator.
Step 5.
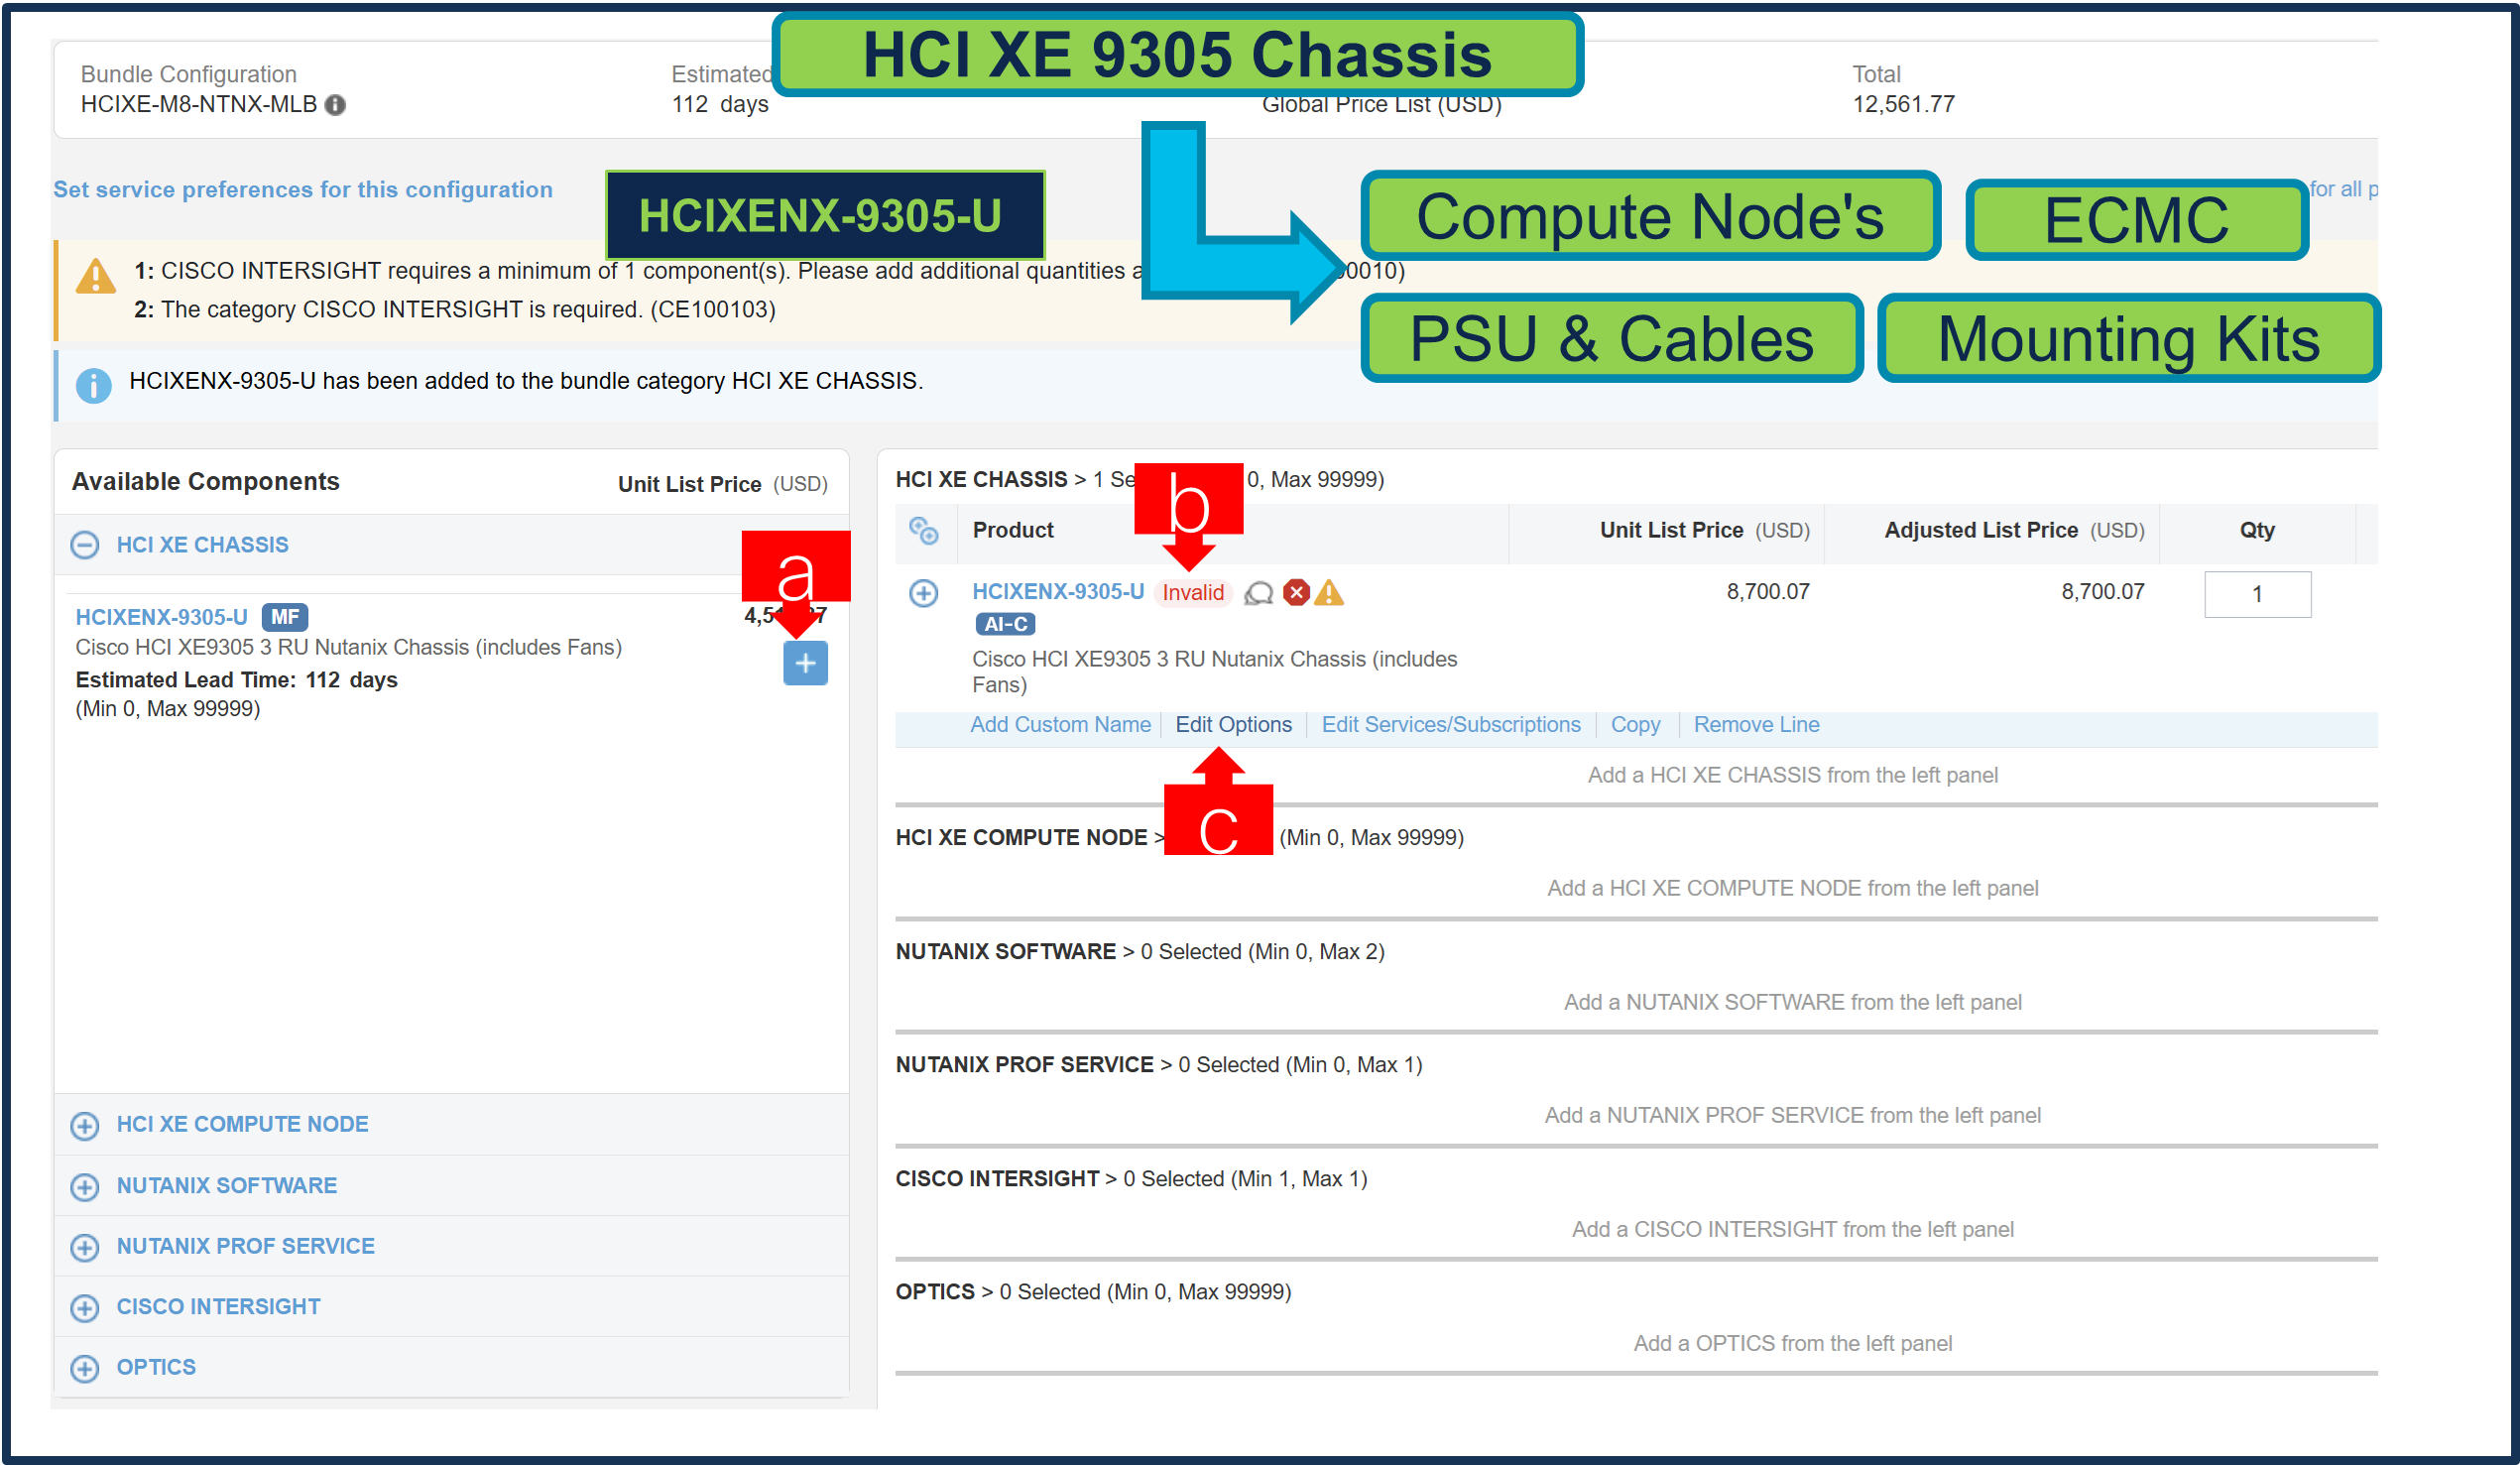
a. Select HCIXENX-9305-U chassis ATO from under MLB by clicking the “PLUS”
b. Notice the chassis Status is invalid as further configuration needed.
c. Select ‘Edit Options’ to enter the configurator.
Step 6.
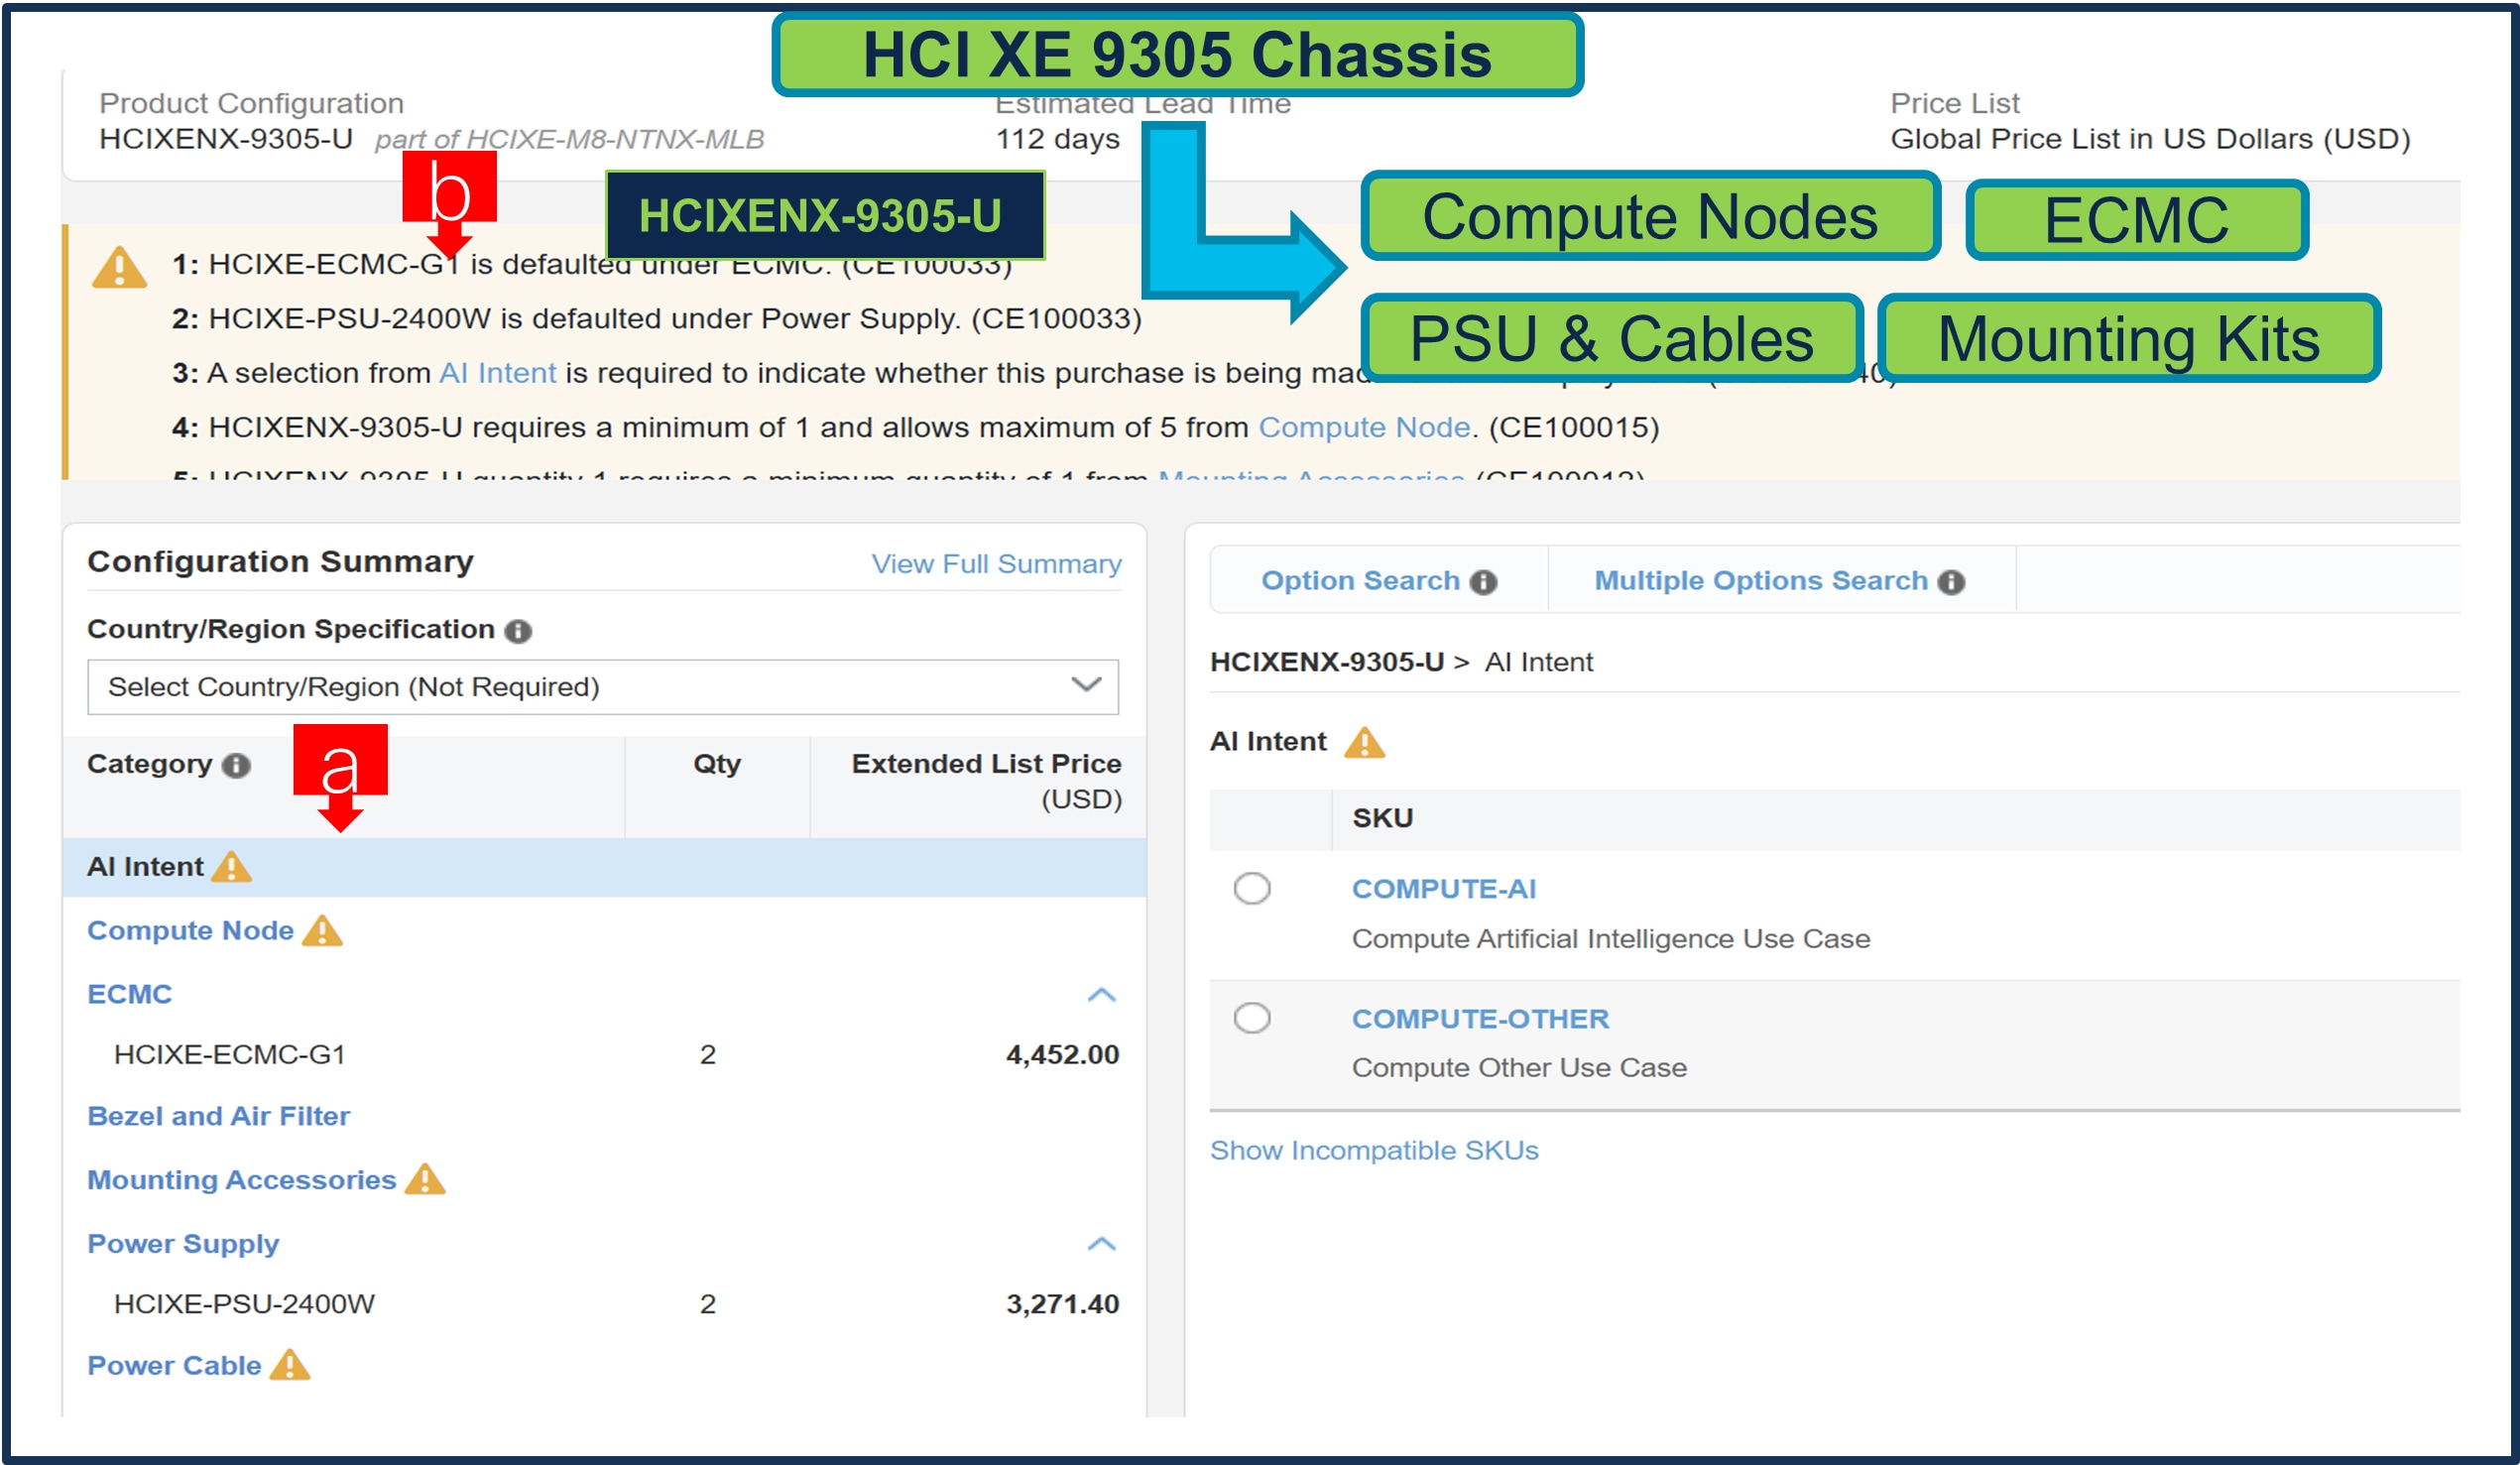
a. Configure chassis HCIXENX-9305-U by selecting Compute Node/s, ECMC, Mounting Accessories, Power Supply & Cables from category window on the left.
b. Follow warning messages to configure the minimum required selections under Chassis
Step 7.
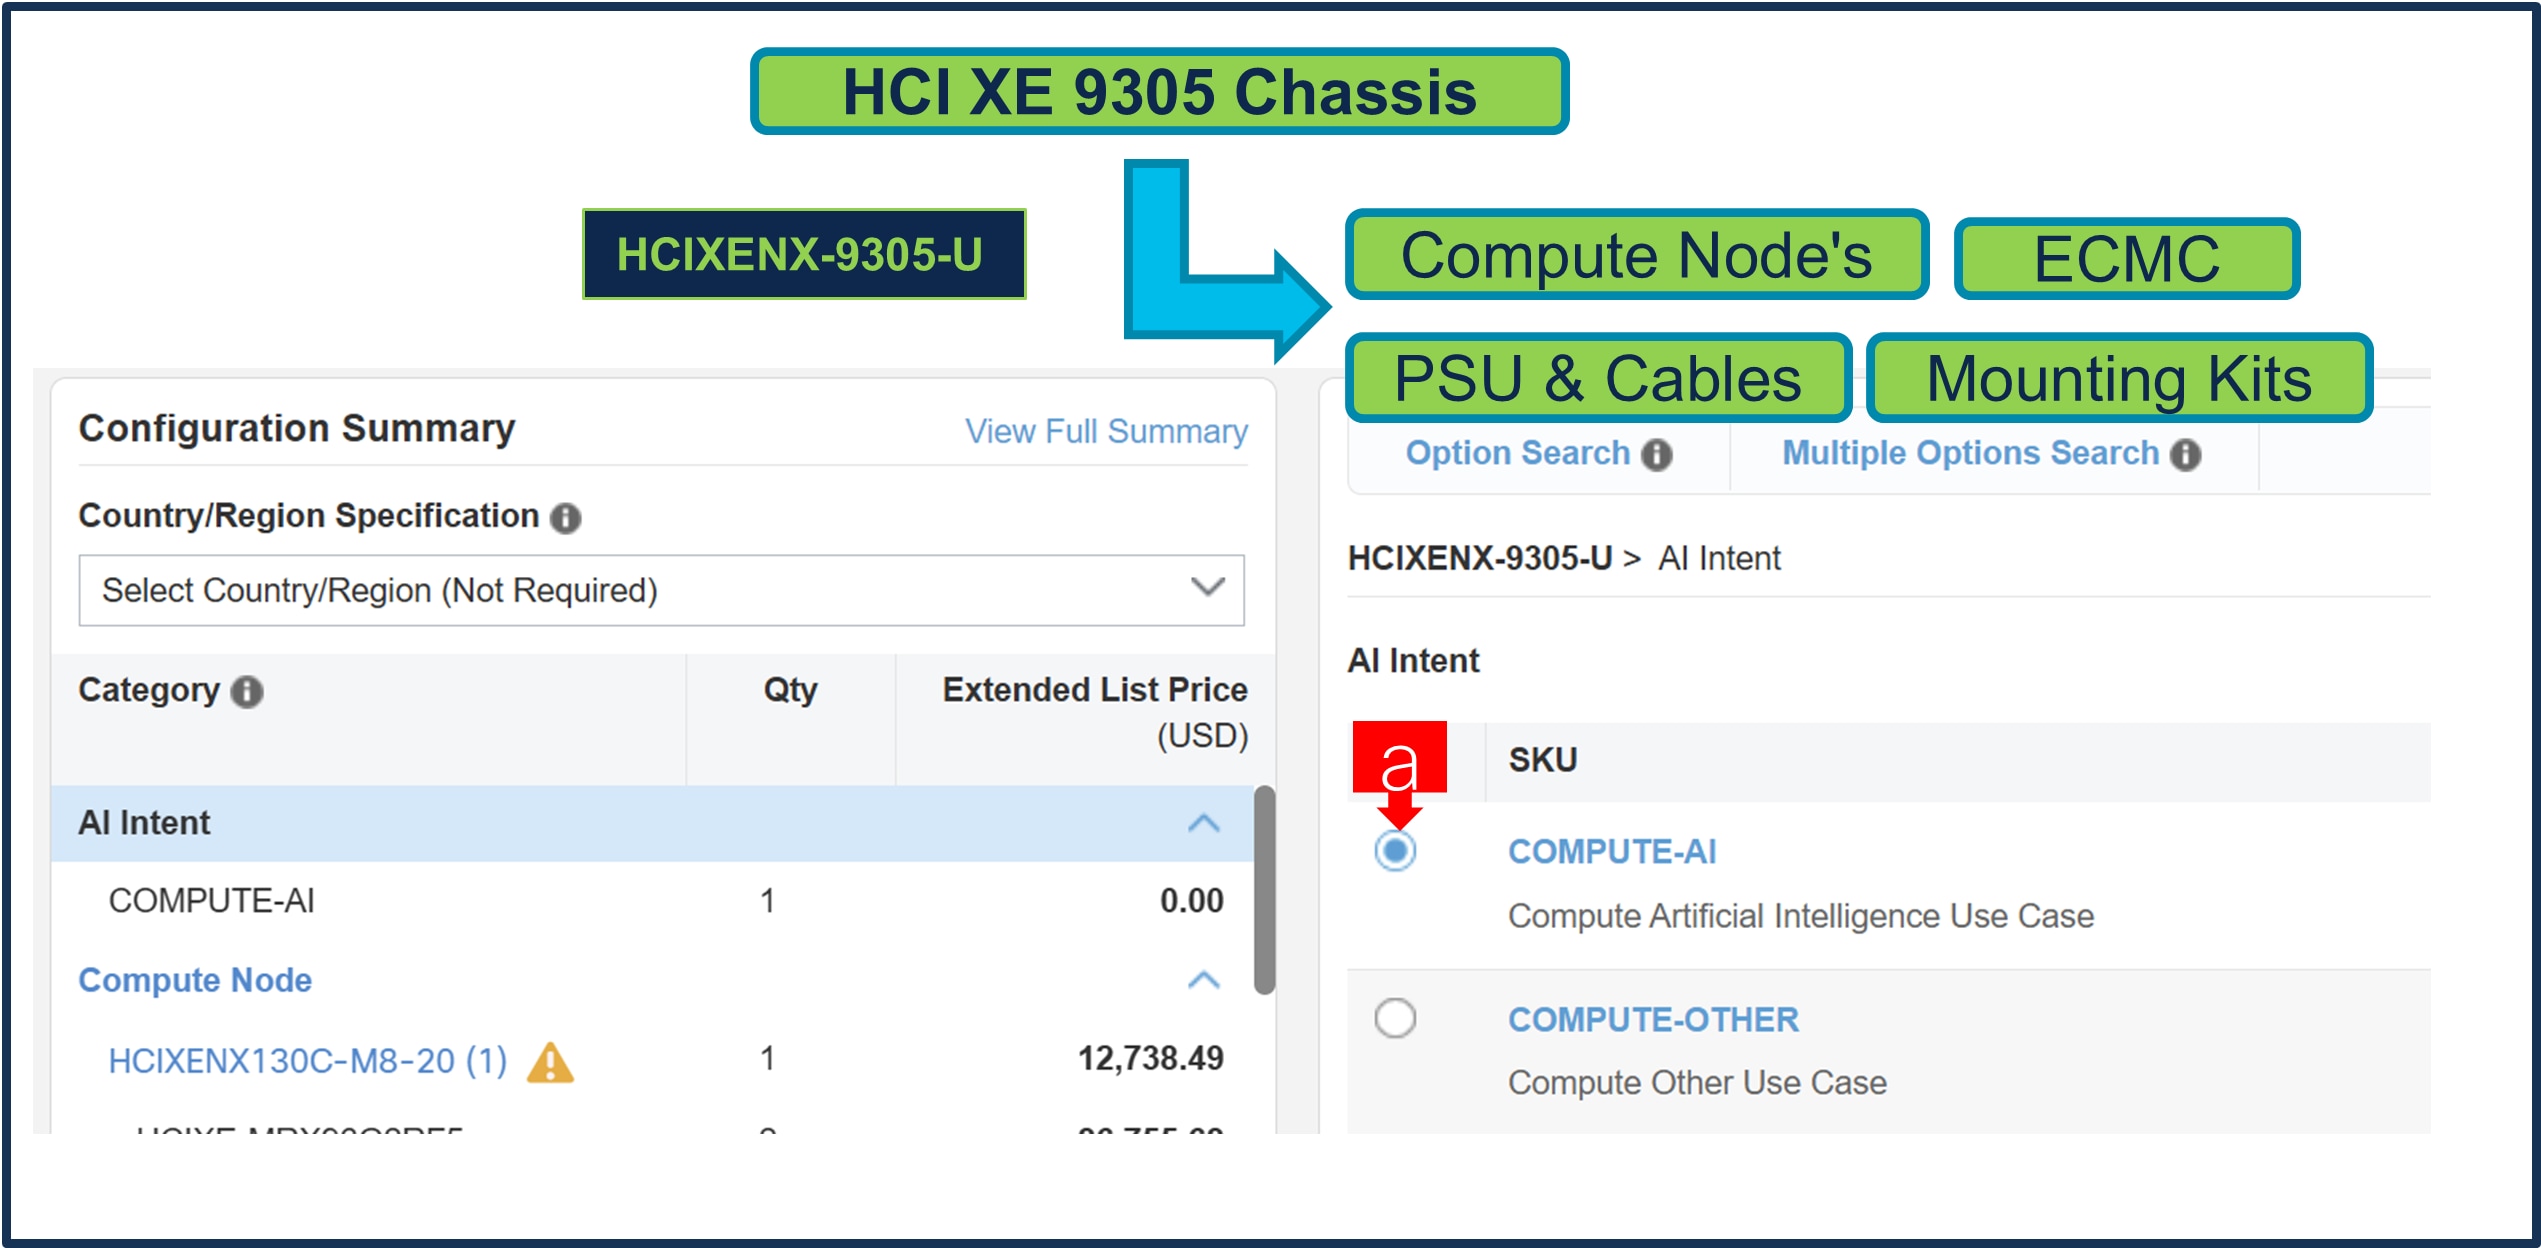
a. PIDs are set up as AI Capable, so User need to make selection from AI Intent option class. By making the right selection it provides information to Cisco that if Server is being intended to use AI features or not.
b. If a GPU is selected, the configuration automatically counts as an AI product, and the AI Intent selection goes away.
Step 8.
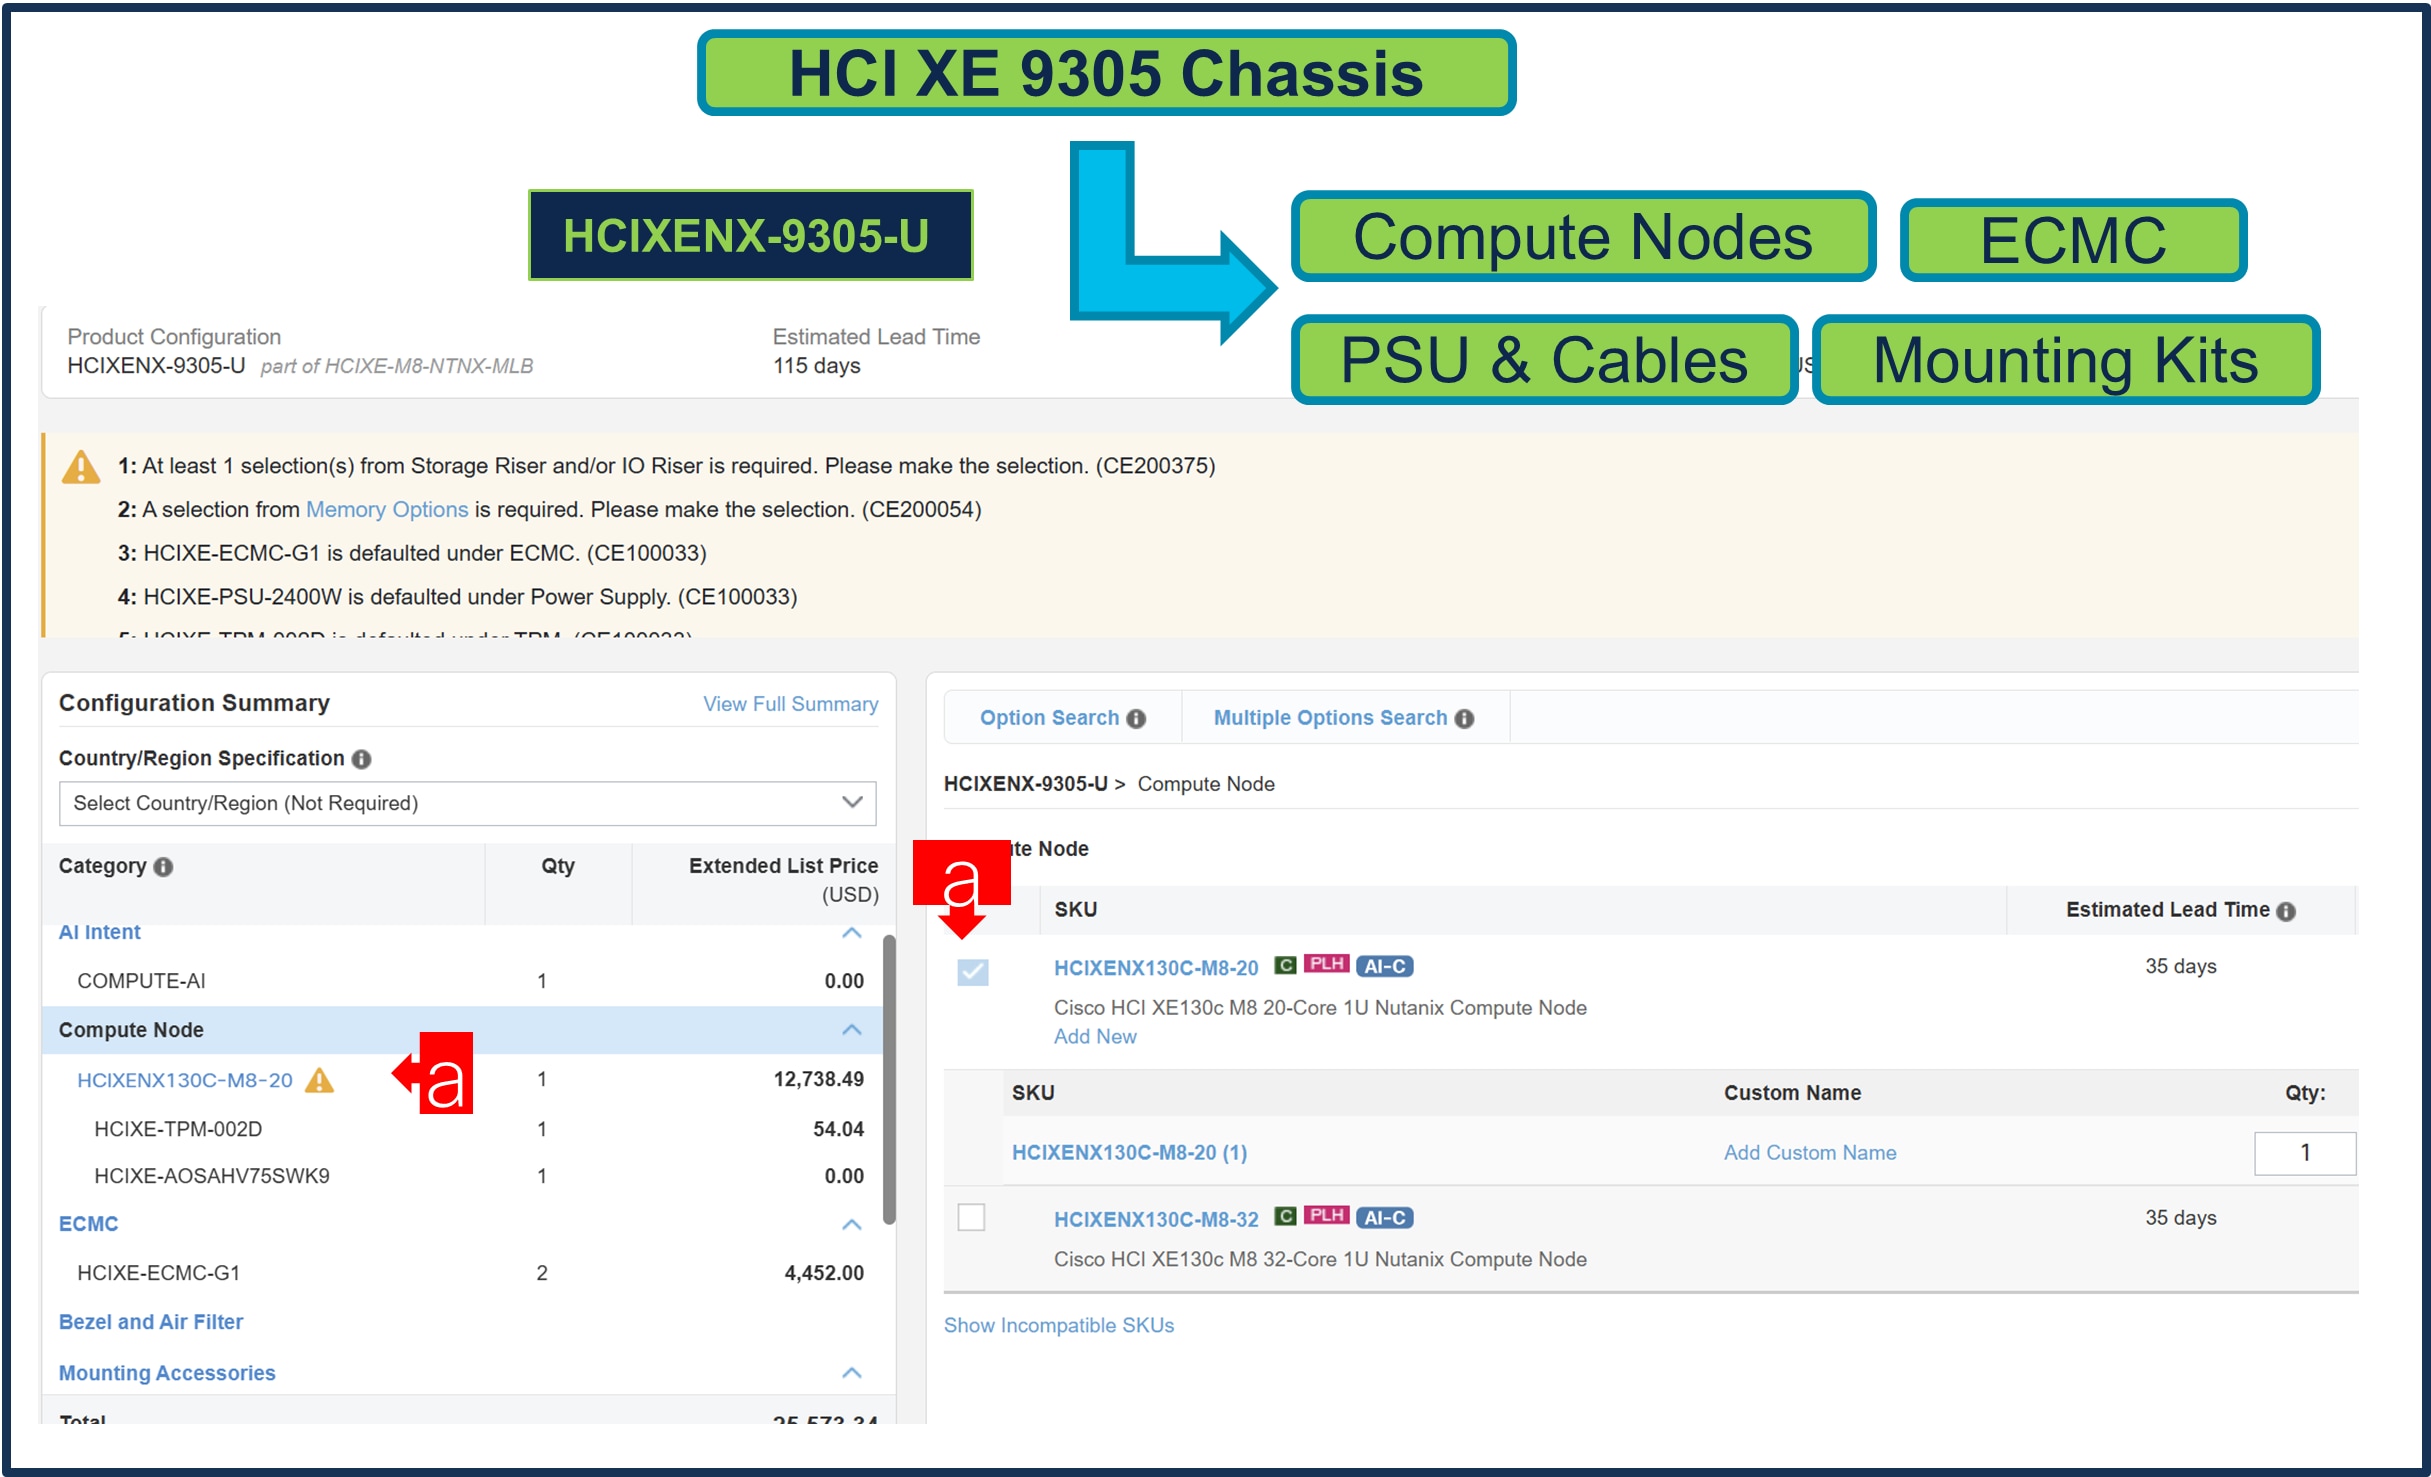
a. Compute Node is required selection, and it is further configurable. User can select any Server/s: HCIXENX130C-M8-20, HCIXENX130C-M8-32.
Step 9.
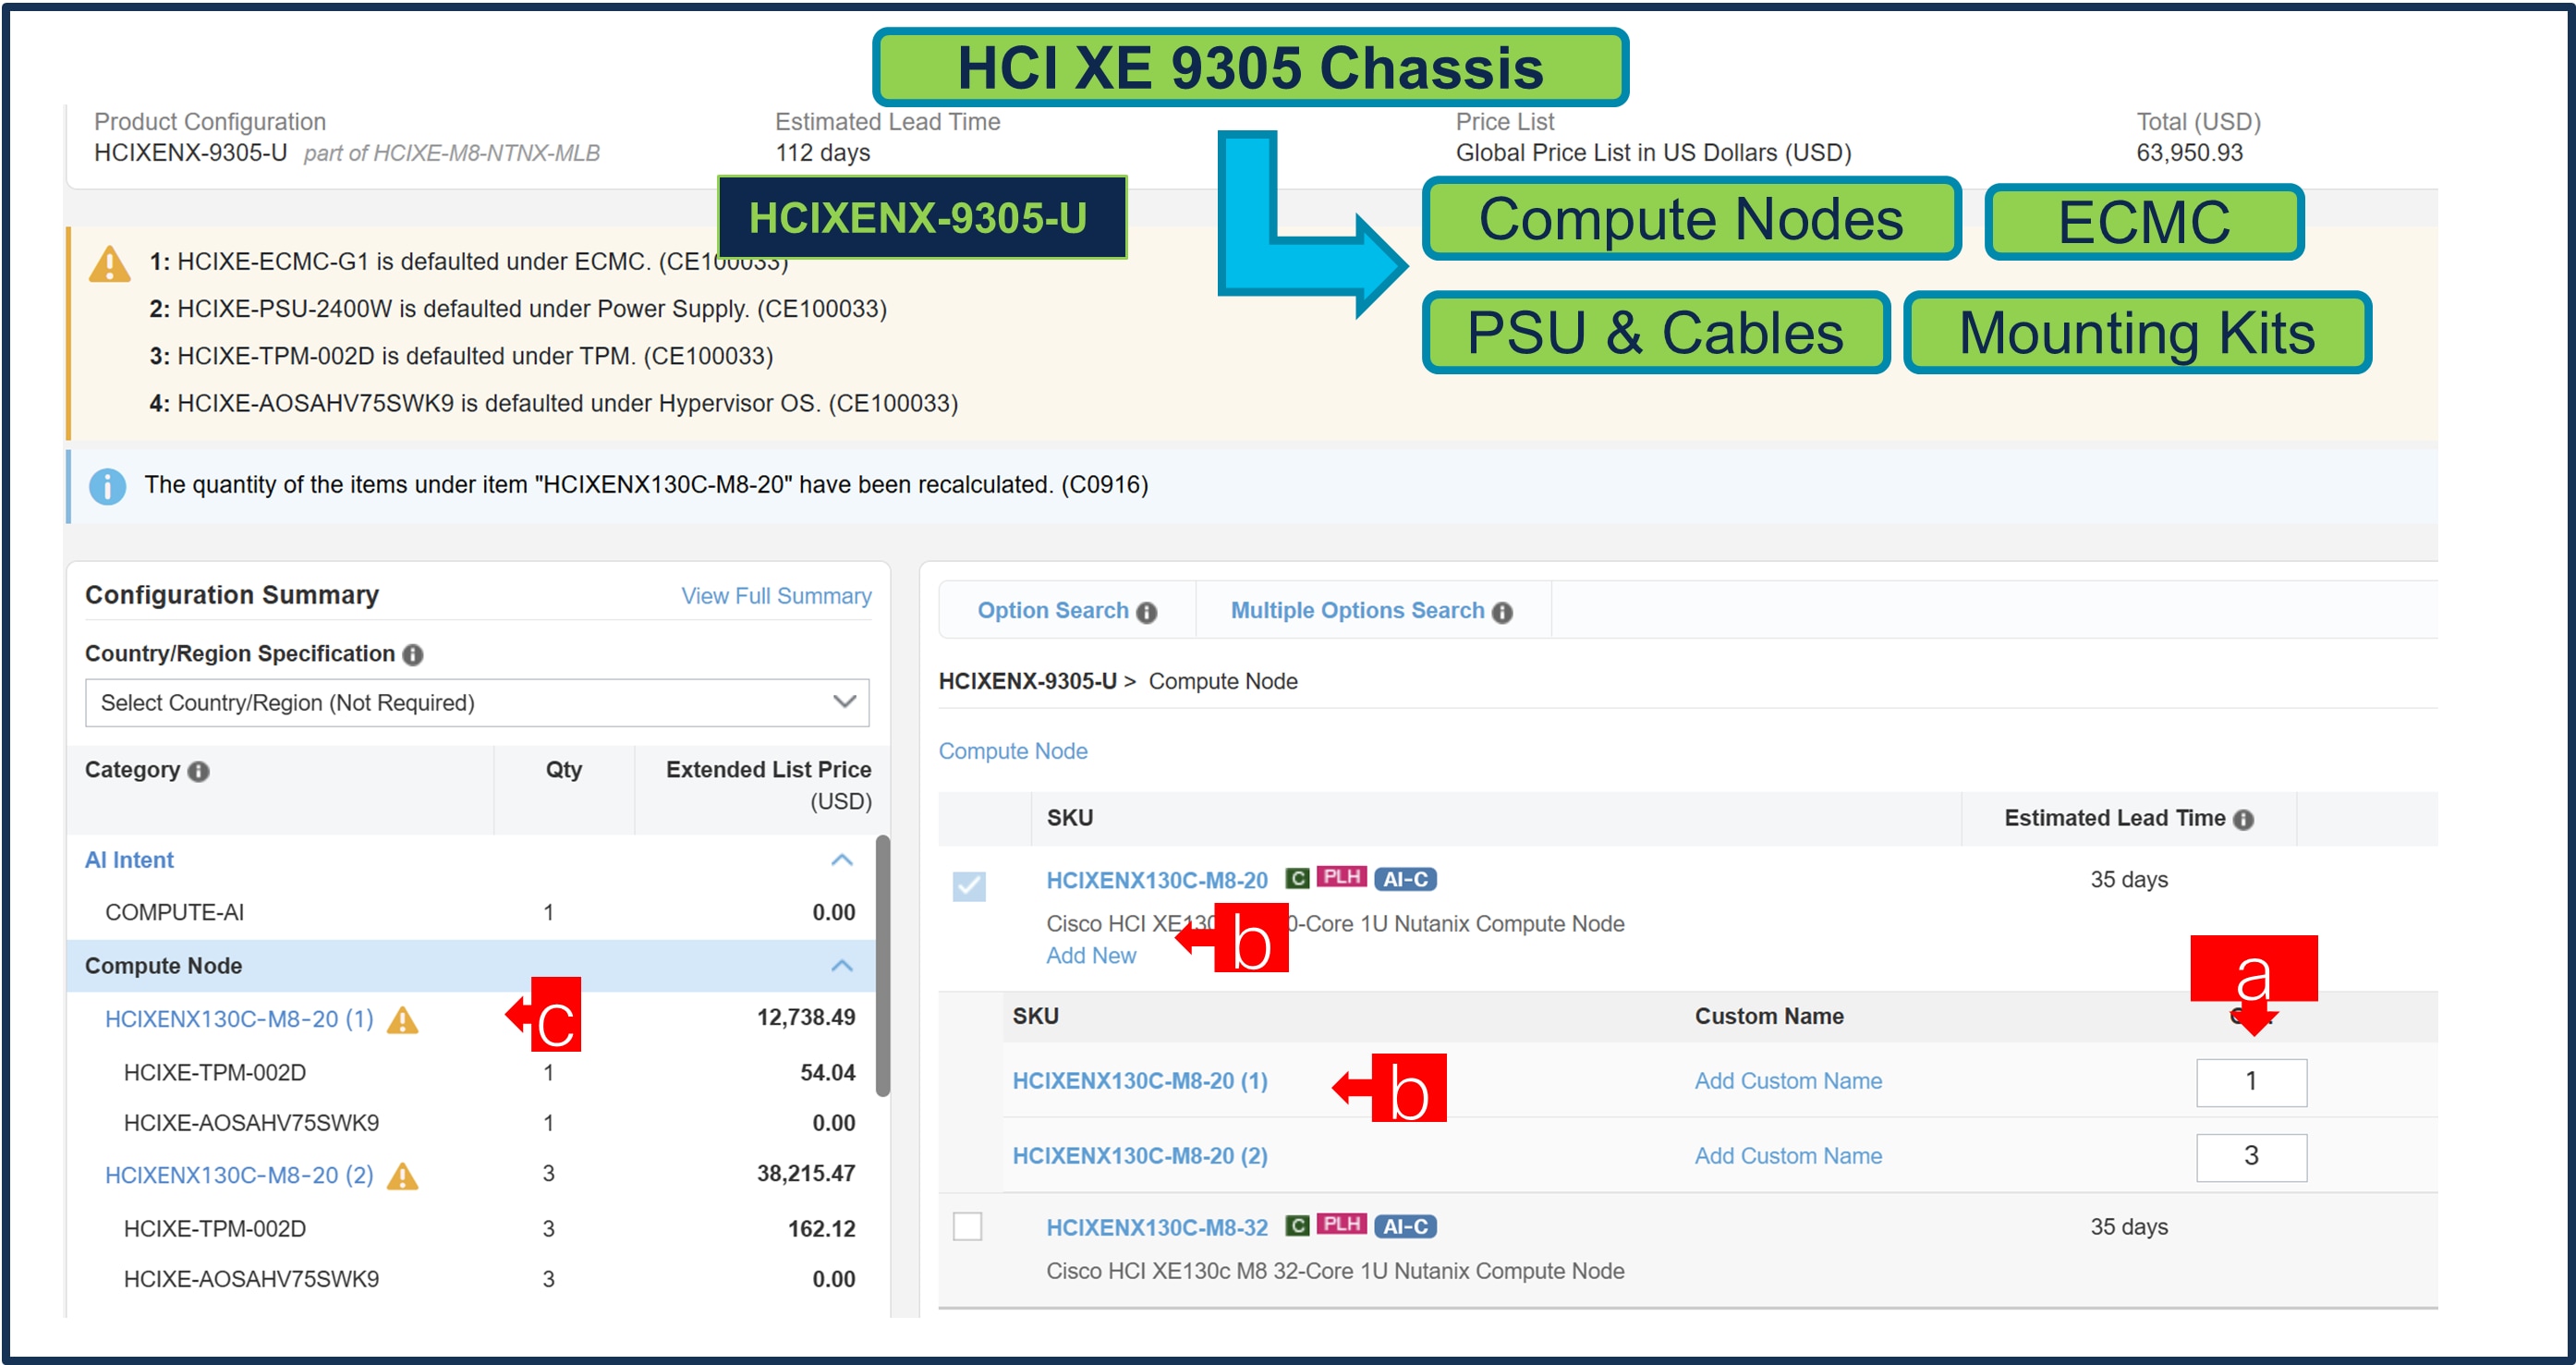
a. Any Server can be selected in multiple QTY by changing the QTY in the box.
b. &/or you can select same server and configure differently within same chassis by clicking in button Here in this example, we have 2 instances of server selected with QTY 1 and 3.
c. Click on Server PID in the left to configure the particular instance (ea can be configured differently).
Step 10.
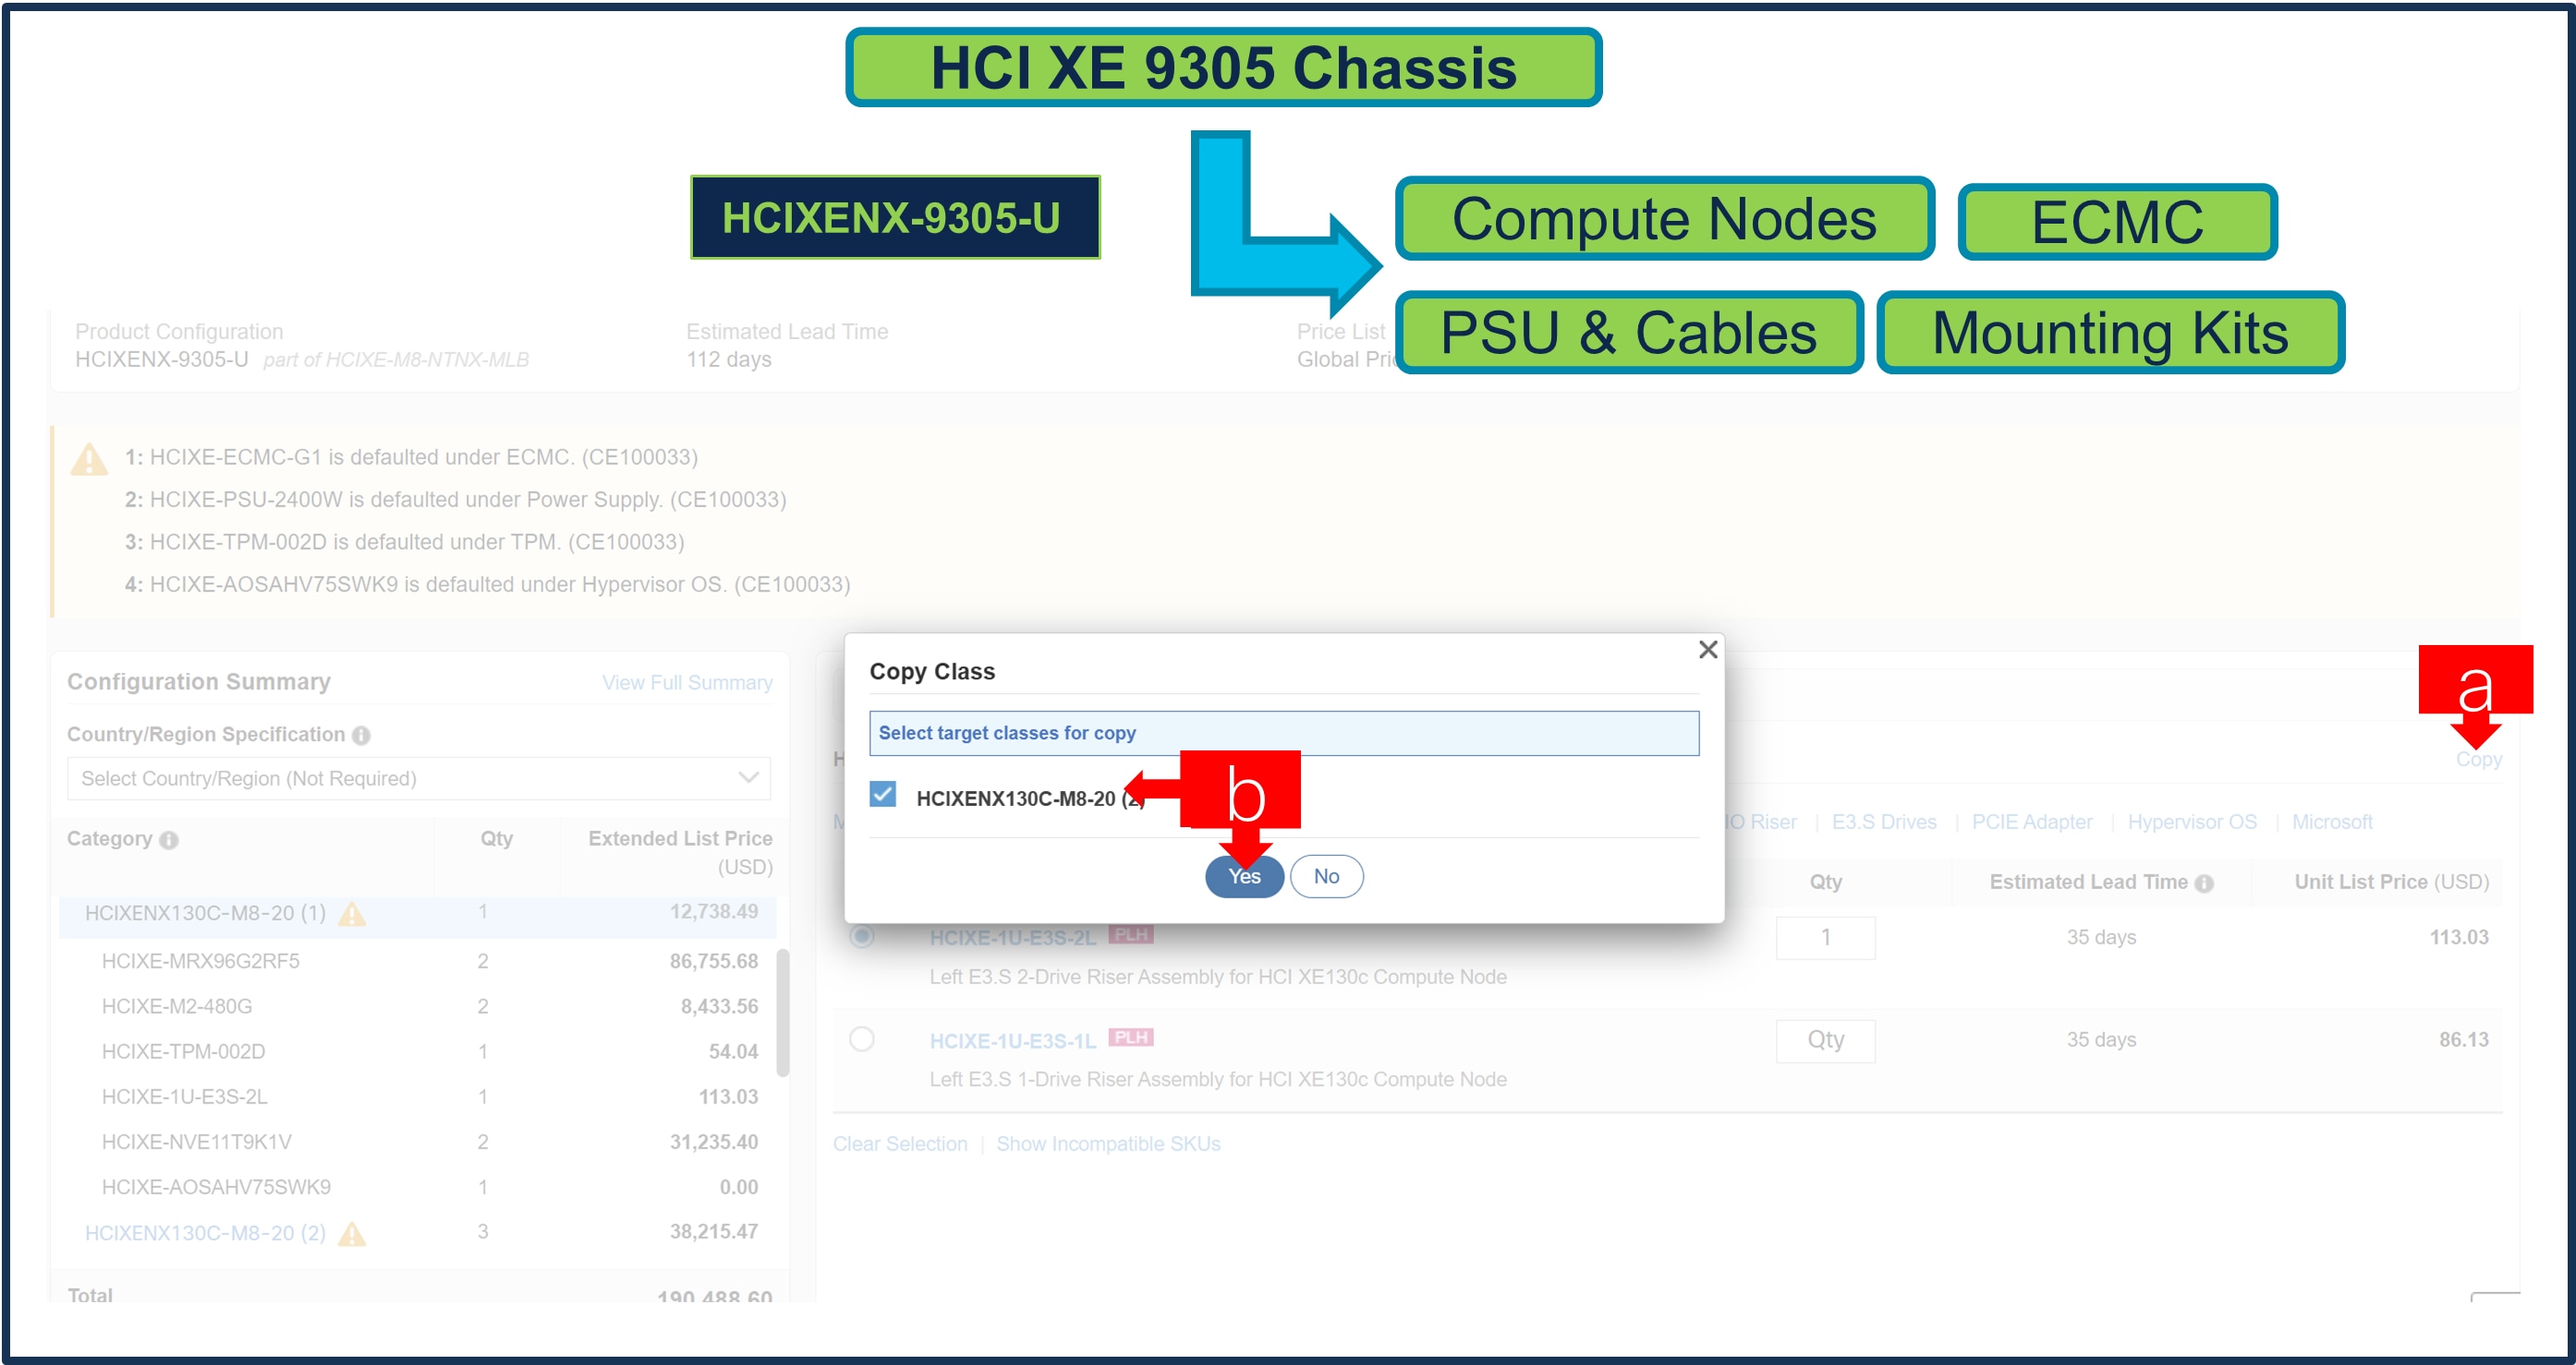
a. Or configuration of one server Instance can be copied to another instance. Click on Copy Button on the far-right side of the page as shown here.
b. Select the particular instance and click Yes.
Step 11.
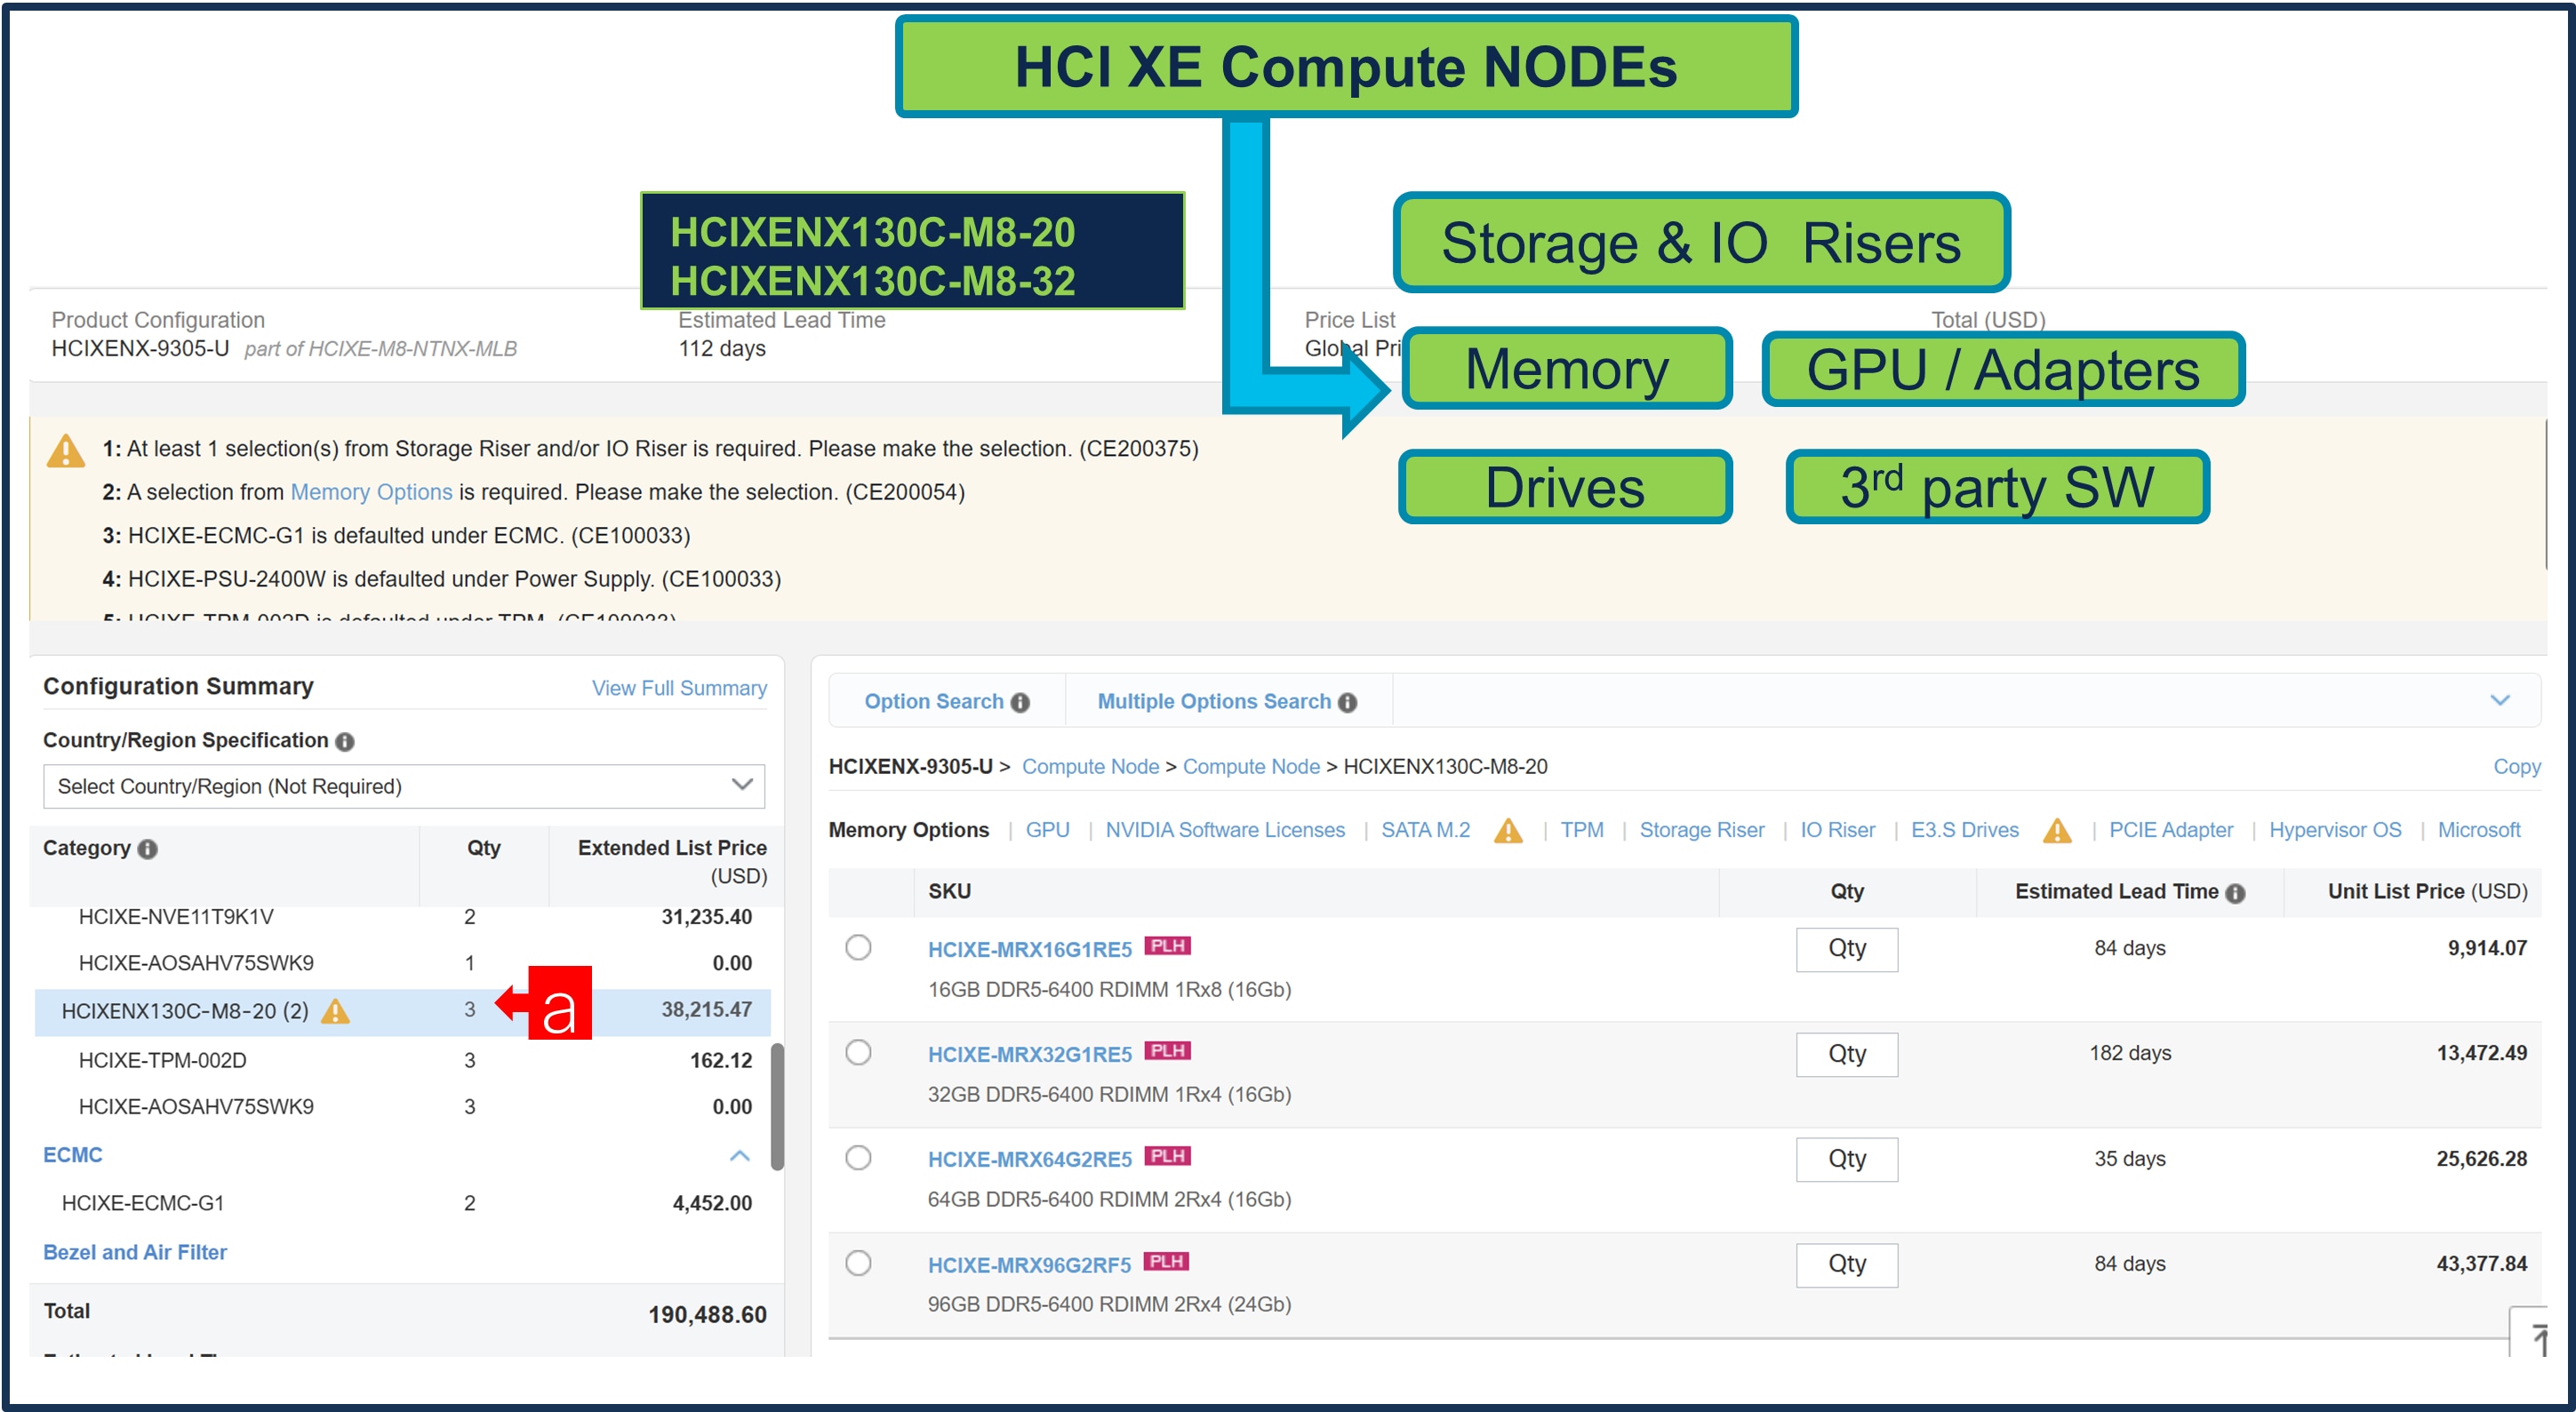
a. Click on Server PID in the left to configure it.
Step 12.
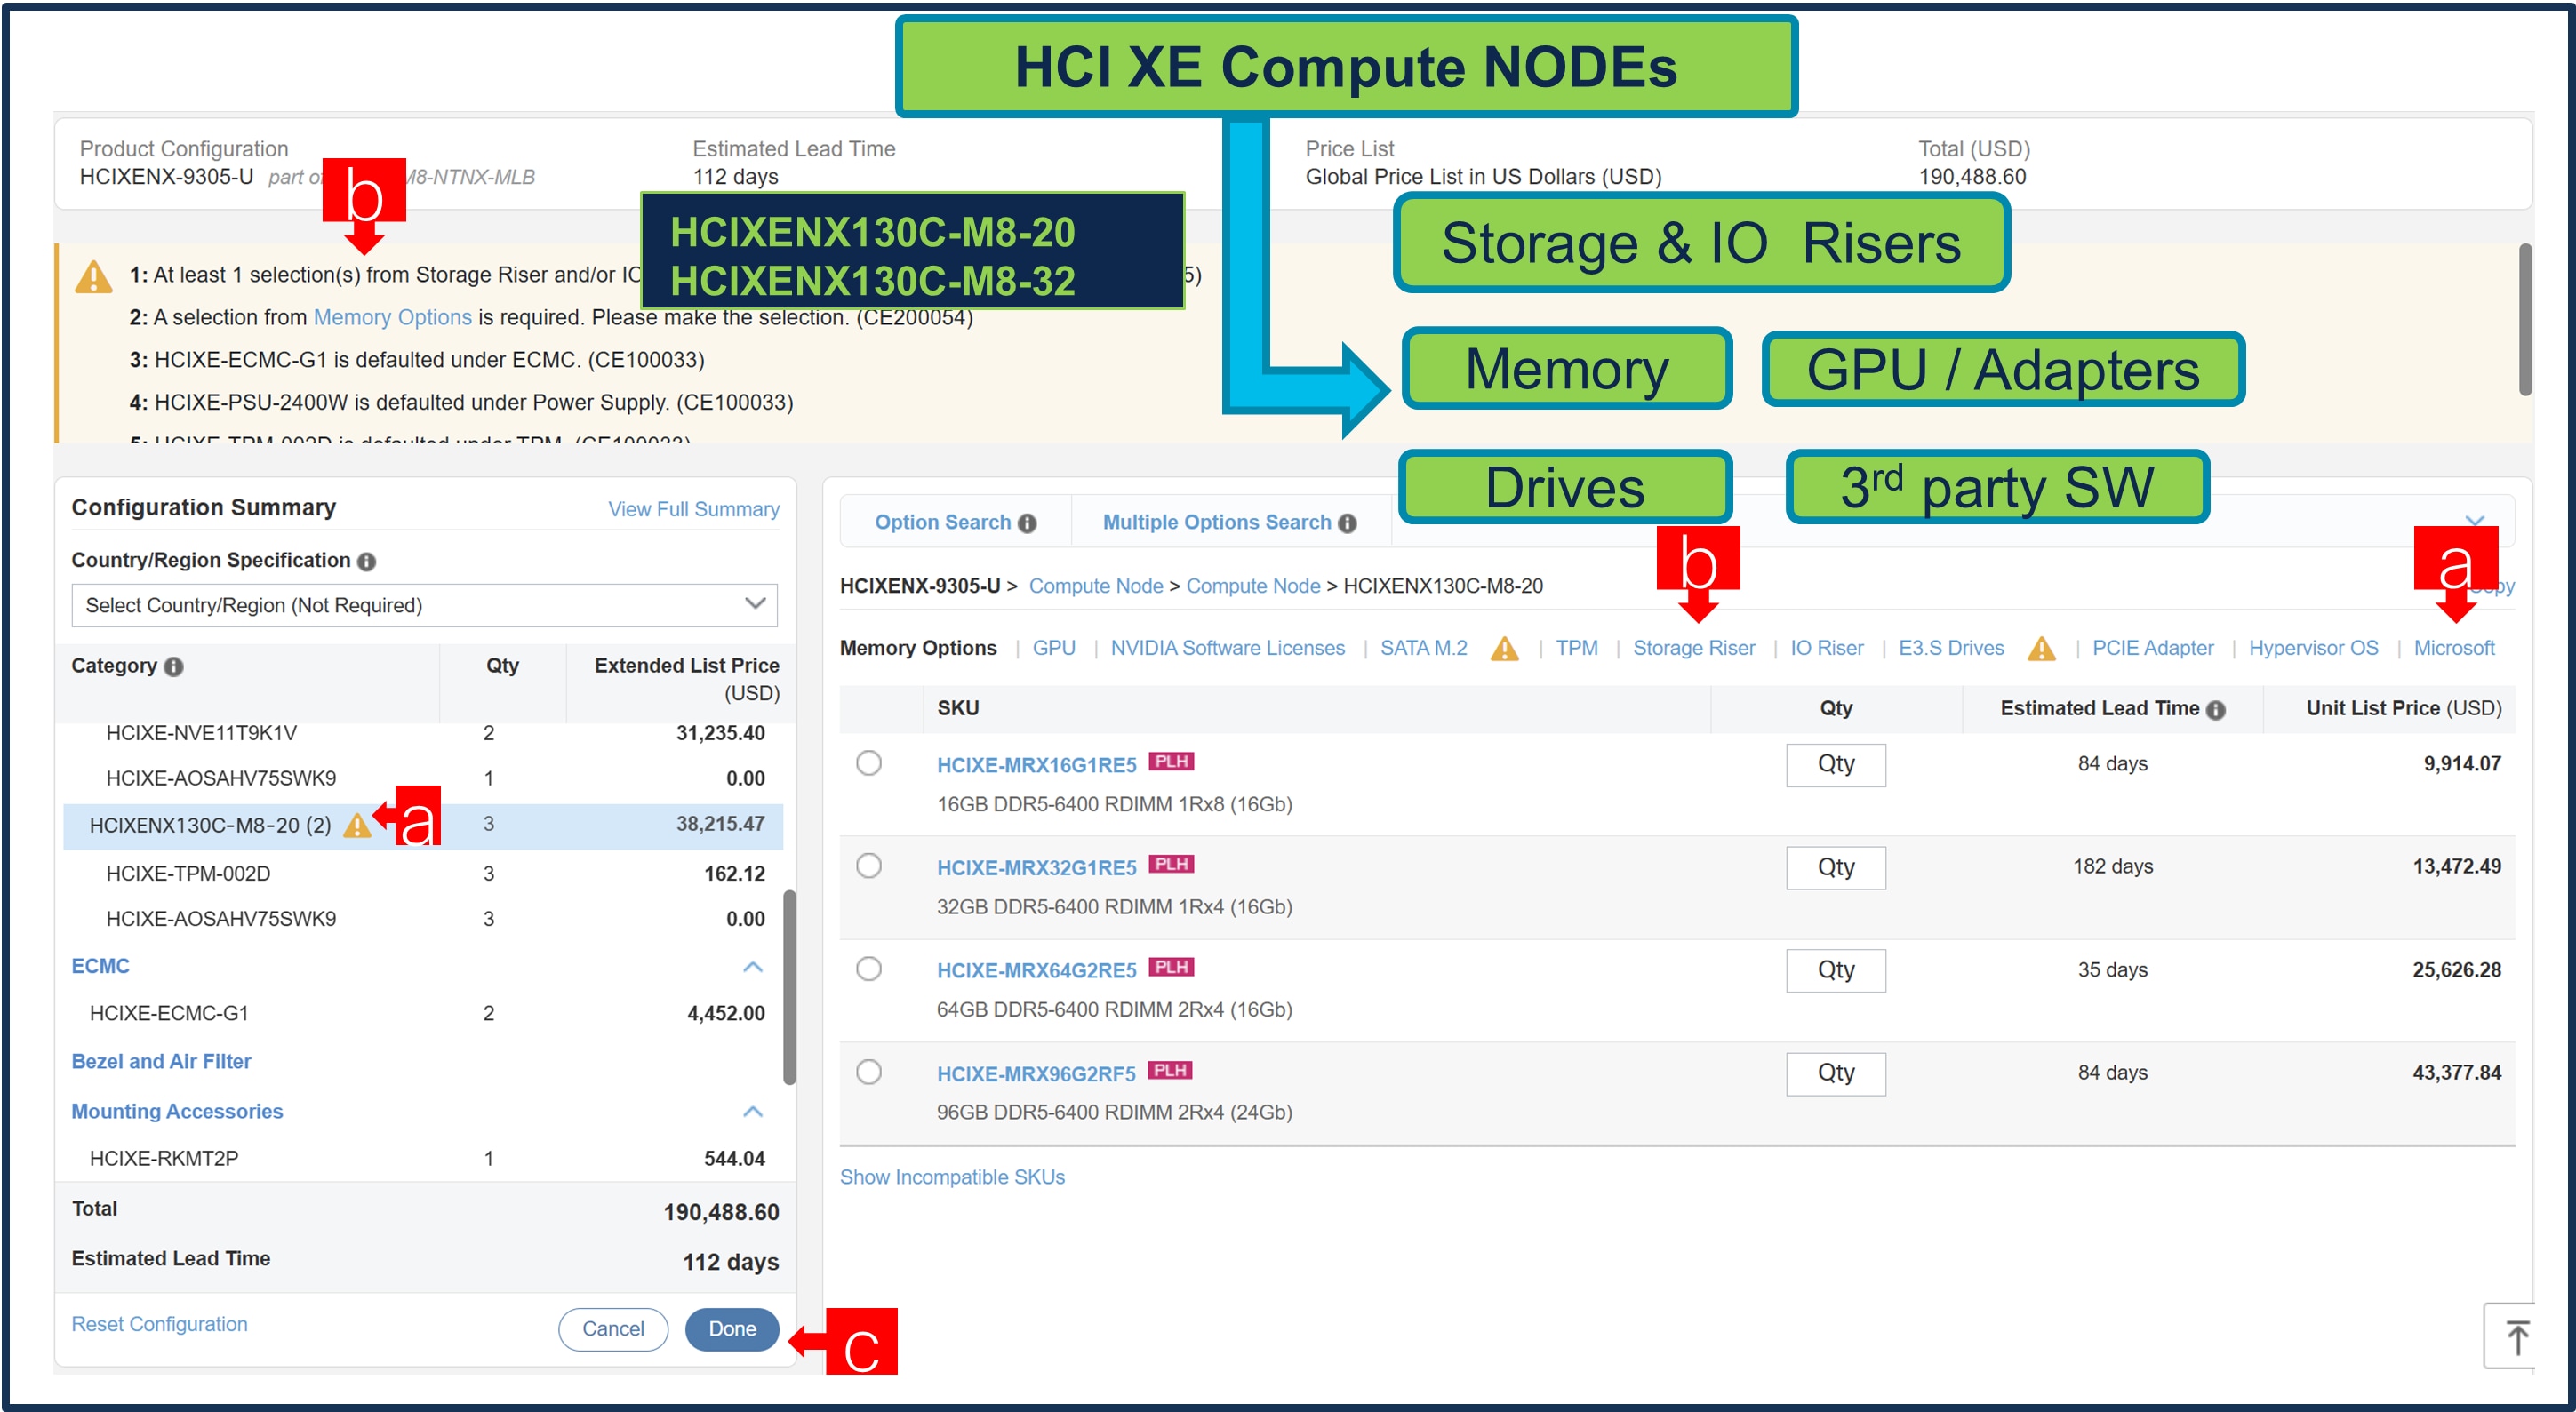
a. Configure node by selecting Memory, Storage Riser /or IO Riser and other peripheral devices and PIDs are listed in the window on the right.
b. Follow warning messages to configure the minimum required selections under Server node.
c. Select Done when completed.
Step 13.
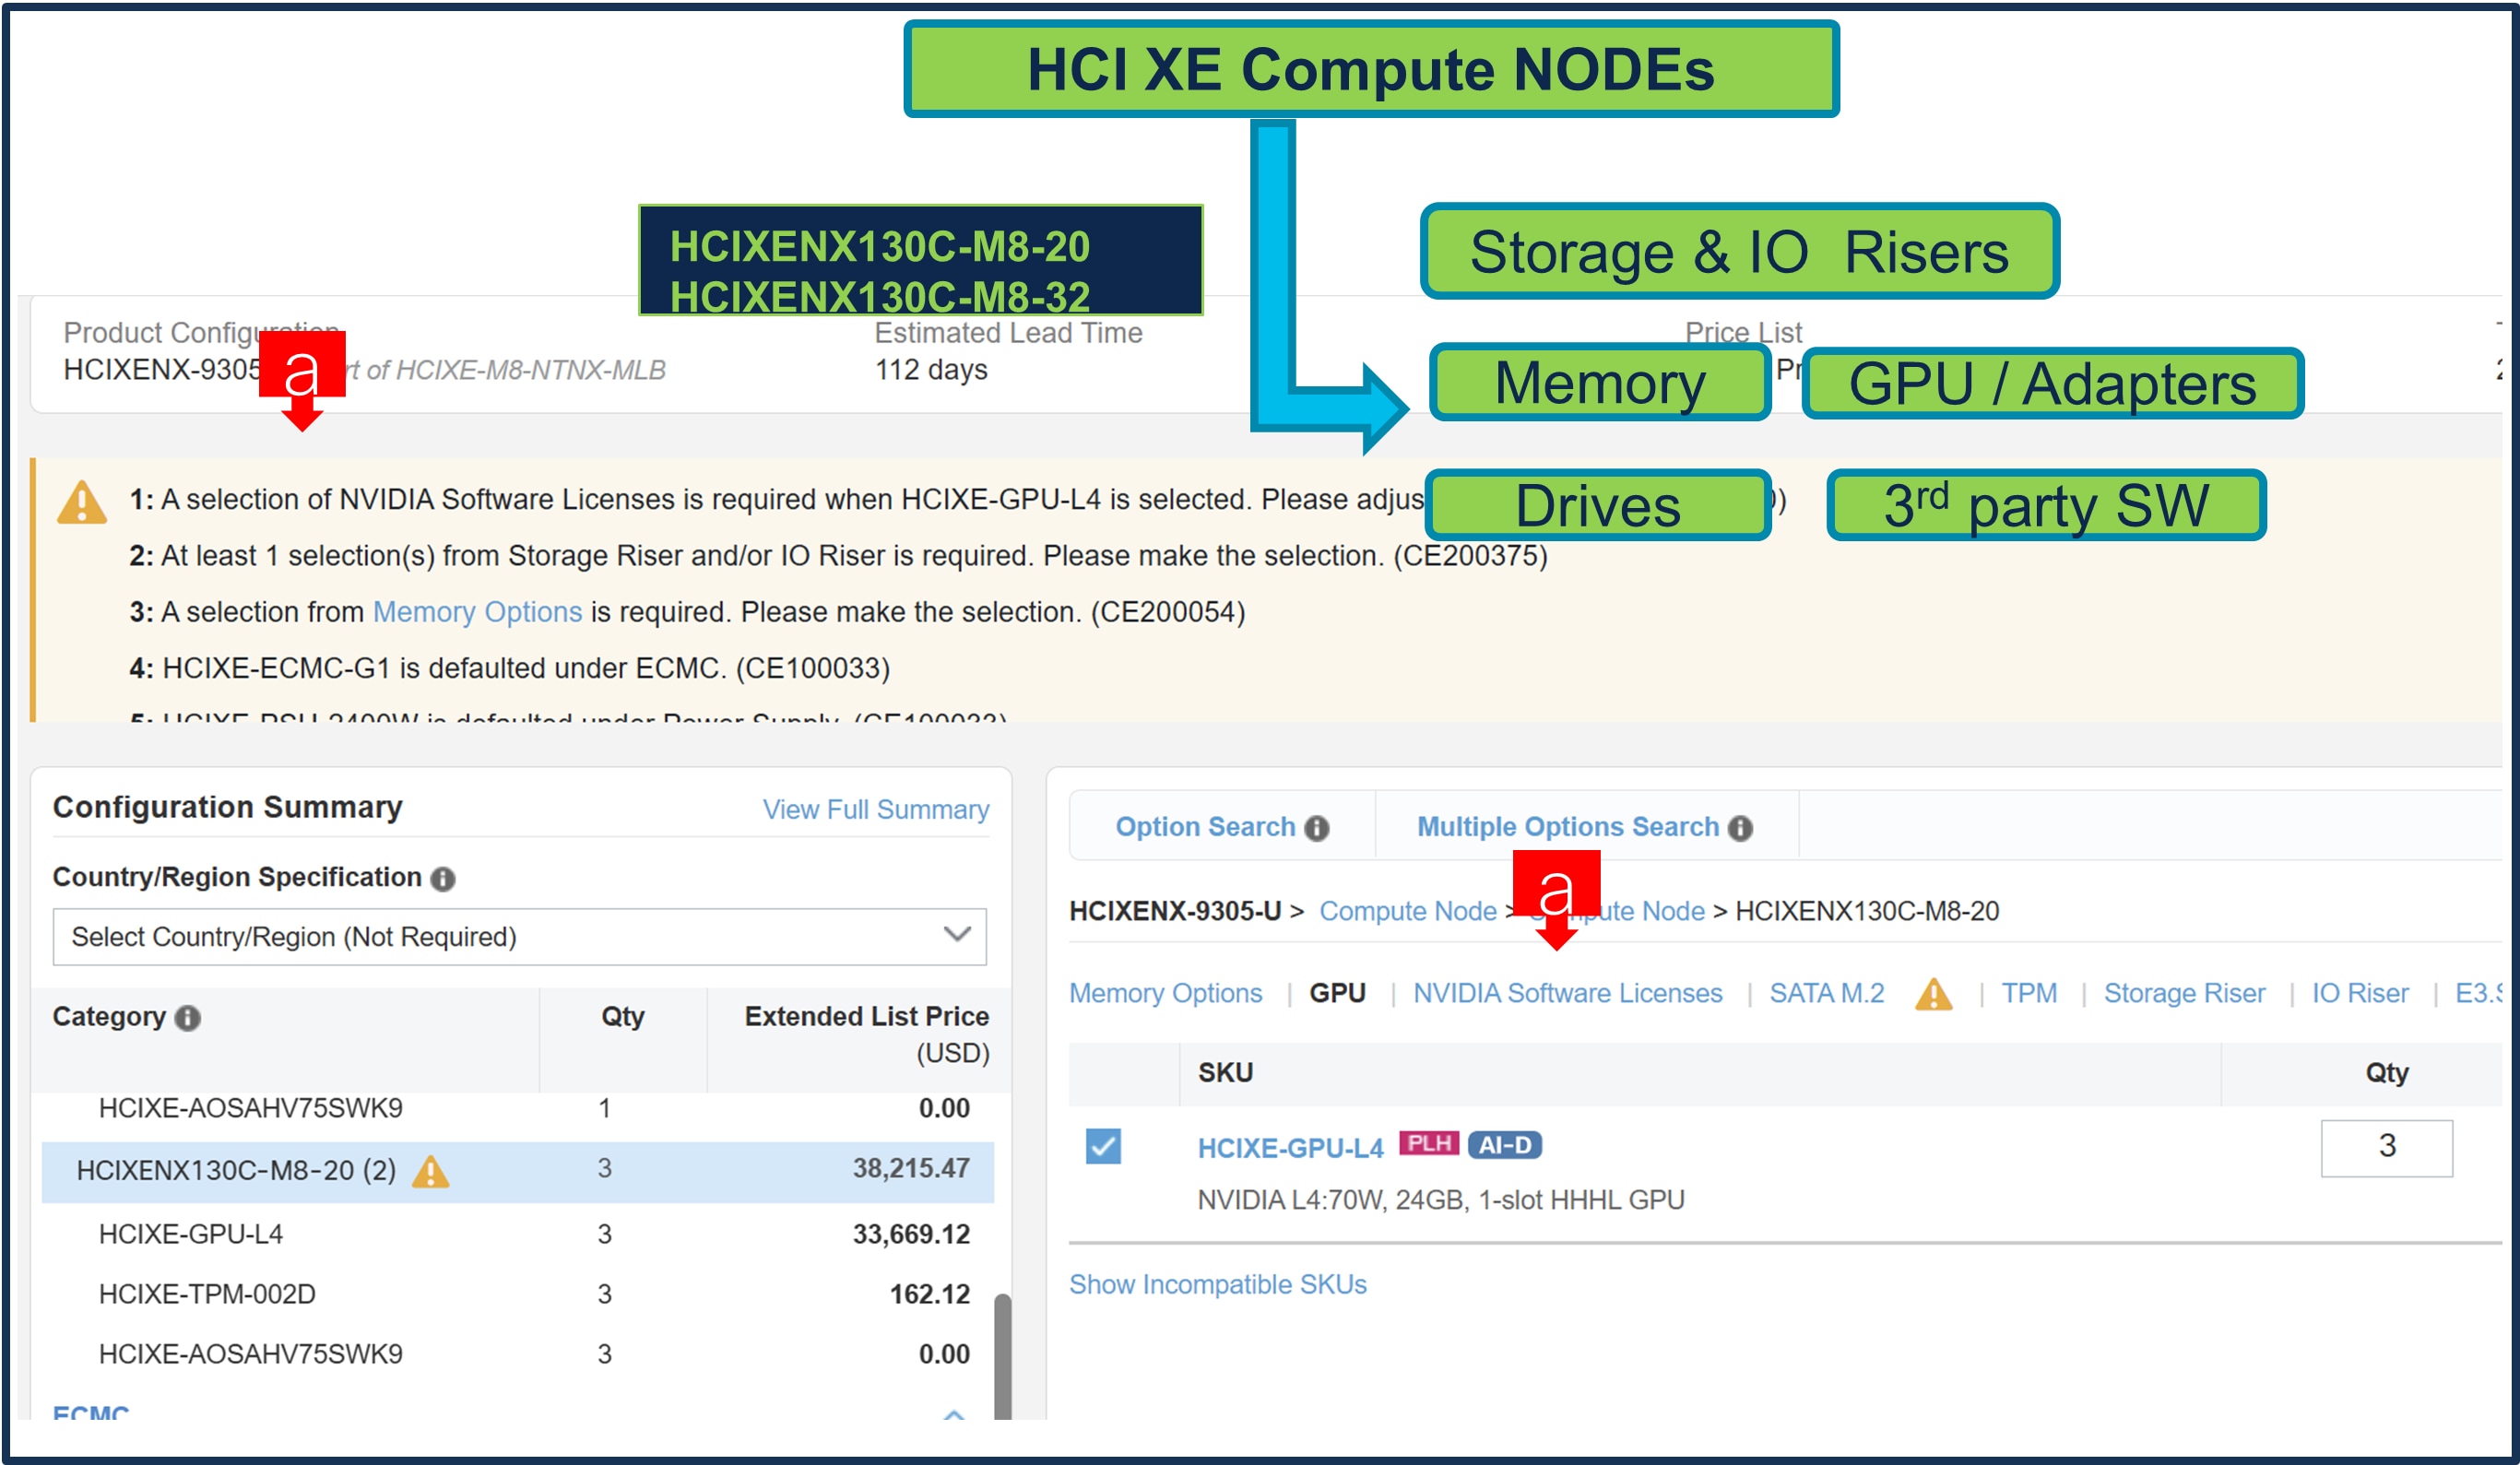
a. If you add GPU, then that requires selection of NVIDIA Software License
Step 14.
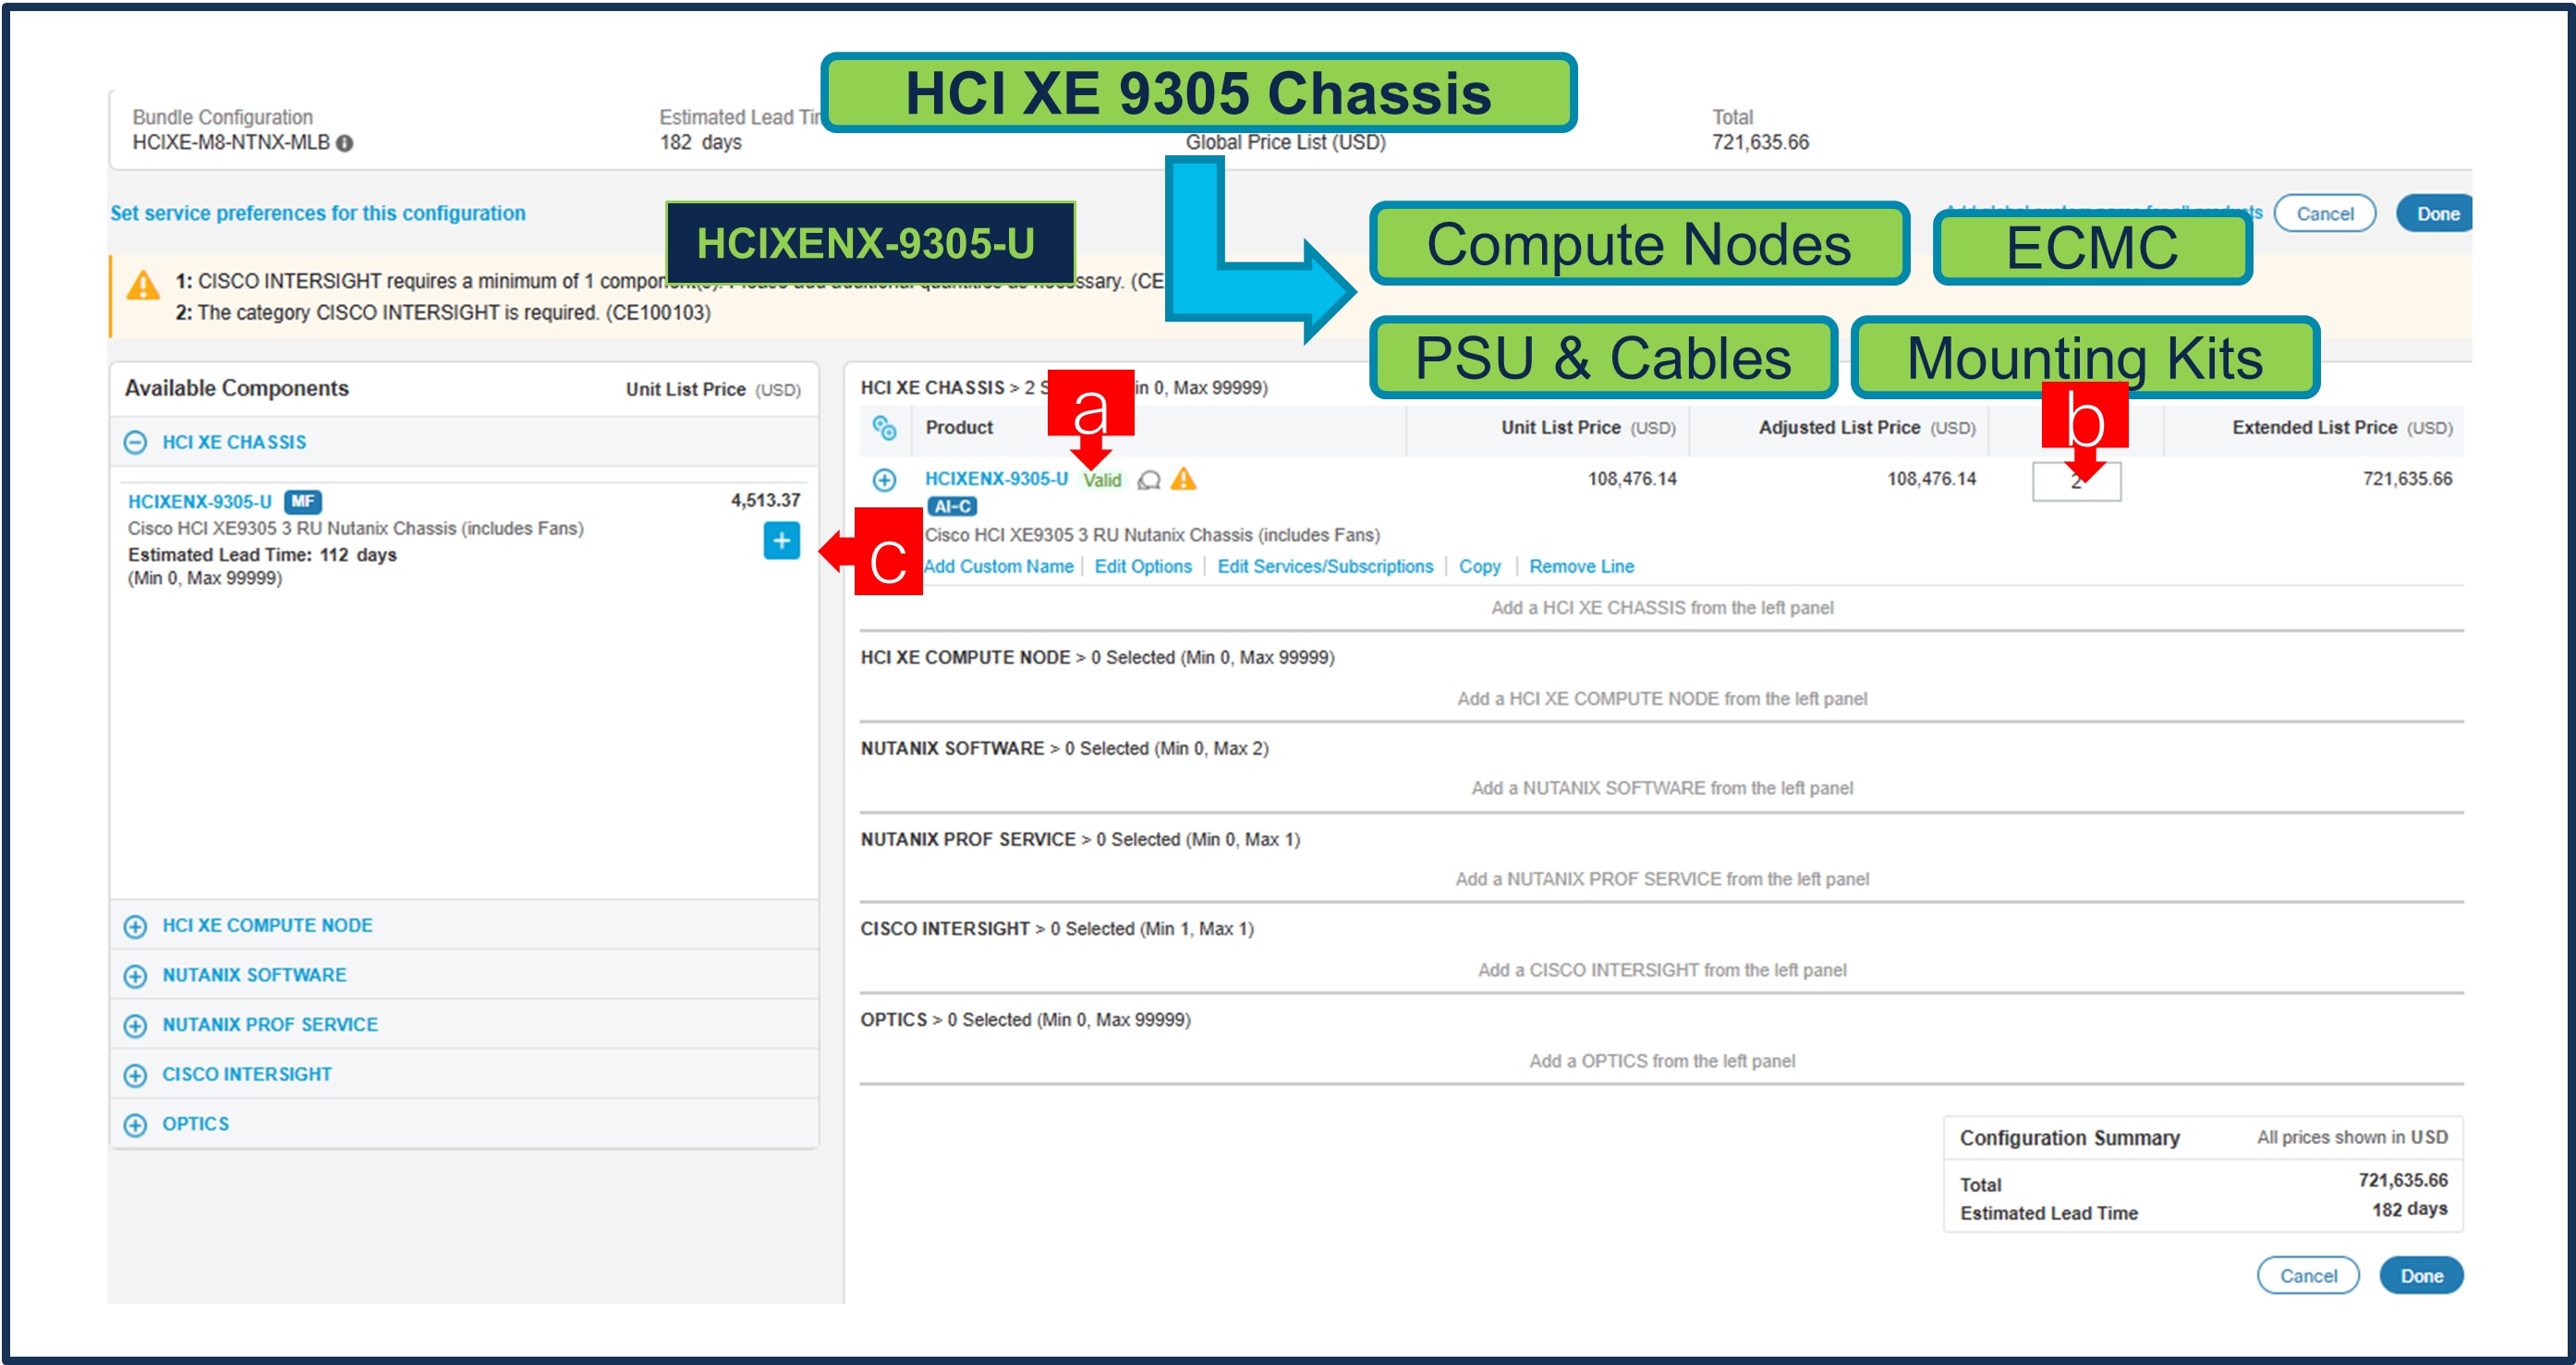
a. Note Status is now Valid.
b. Increase the quantity for multiples of same configuration if needed, in this example I changed to QTY2.
c. Or select the to add and configure the same product with different option/quantities.
Step 15.
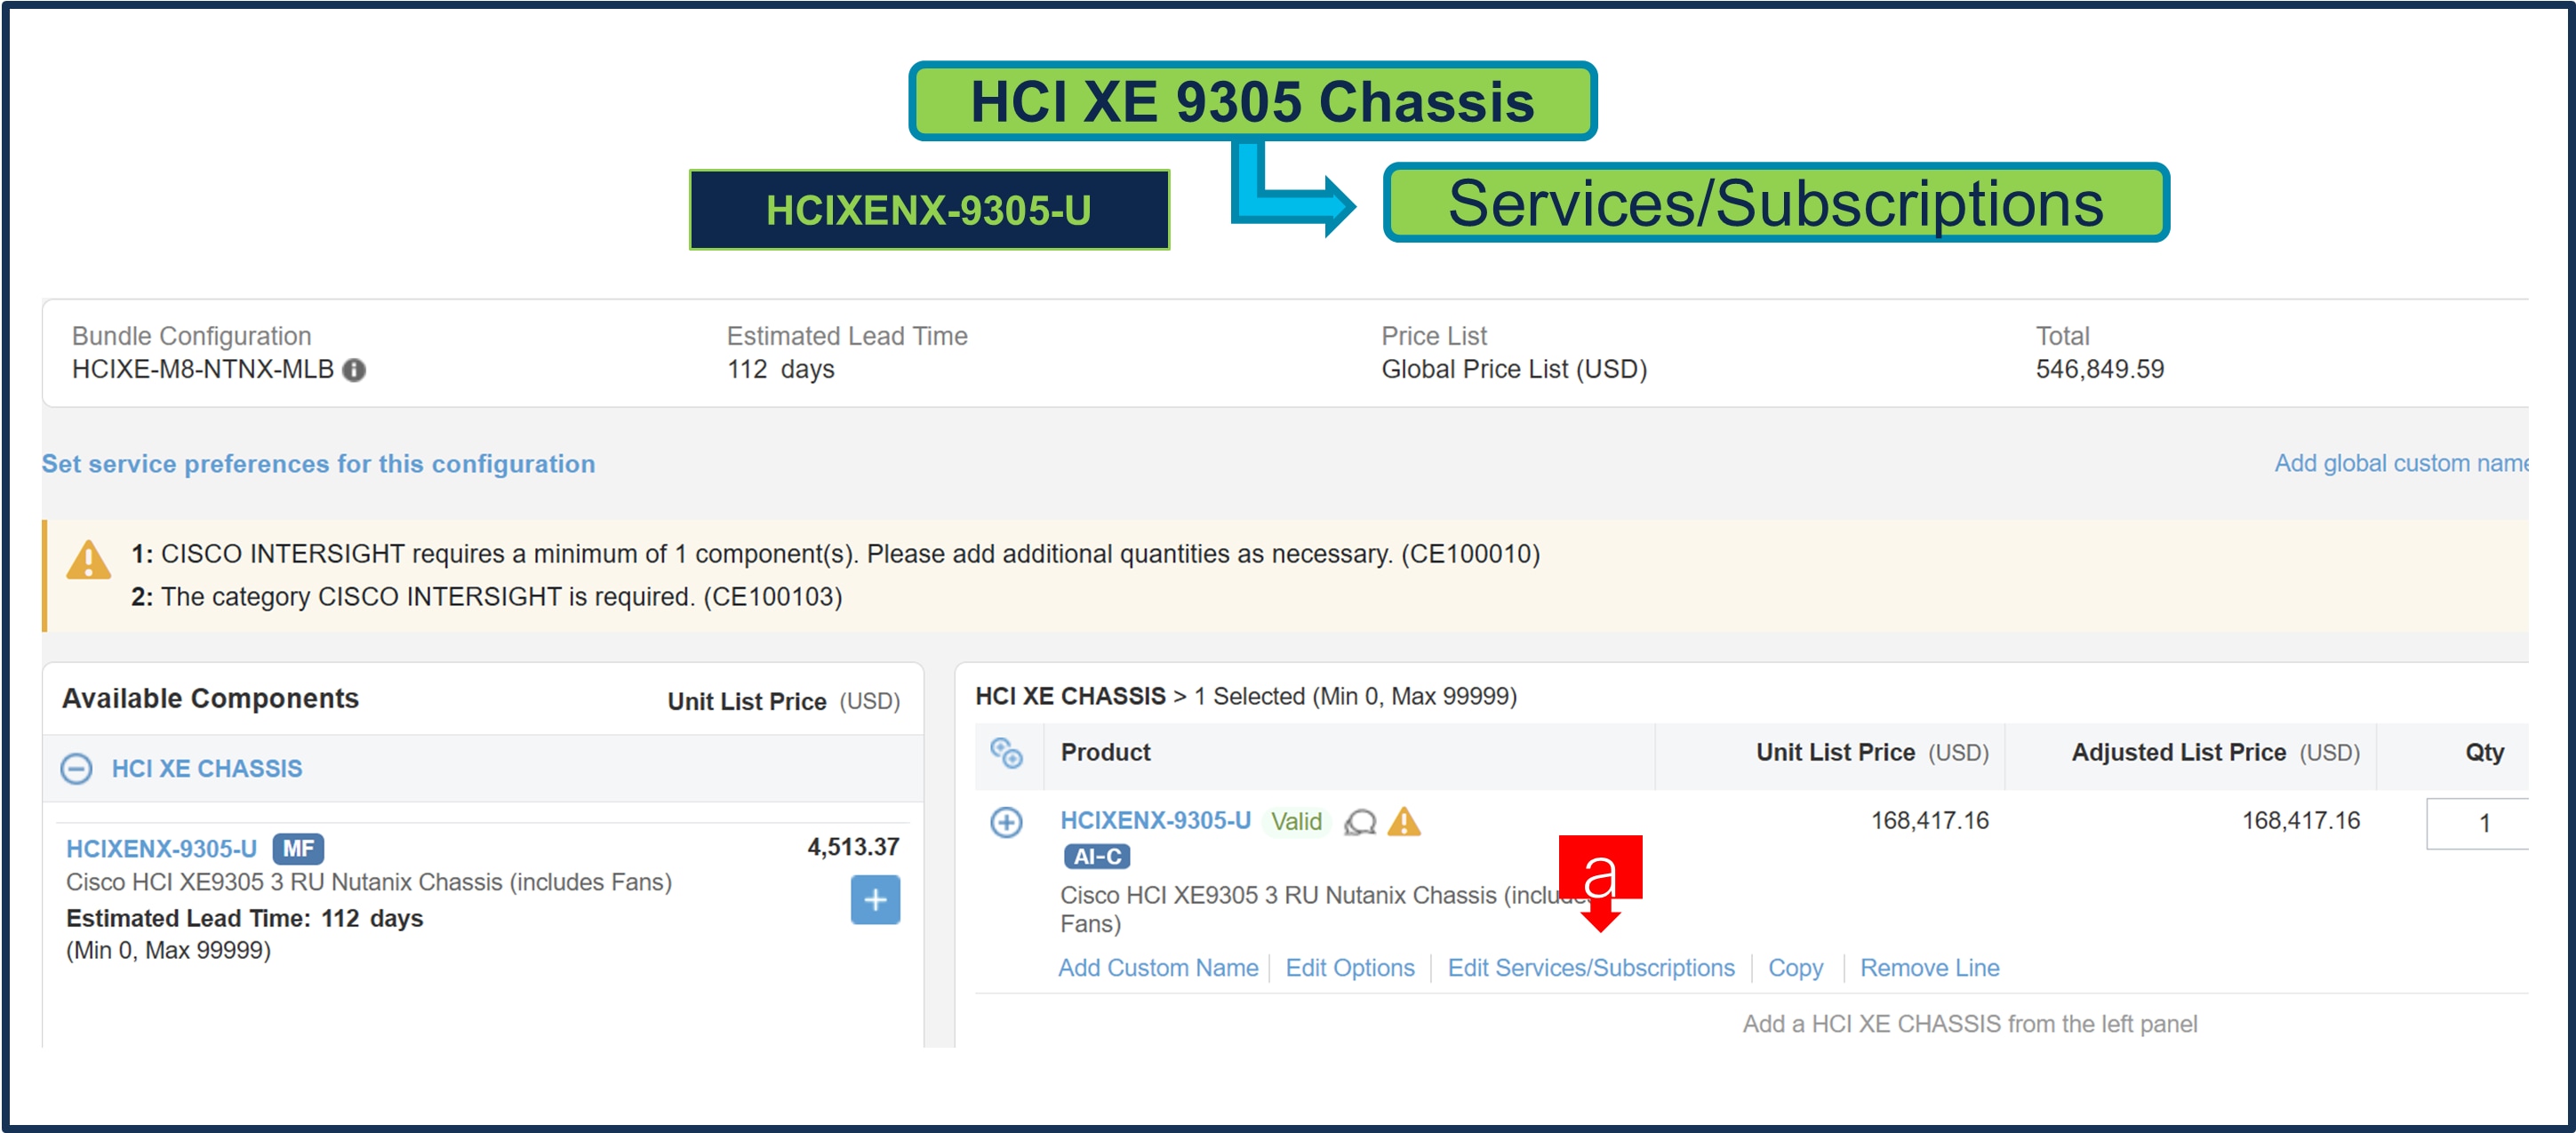
a. Click on Edit Service/Subscriptions to edit Term Duration for HW Support.
b. It is recommended that Term Duration for HW Support must align with Software Subscription Duration.
Note: If Nutanix Mission Critical Software Support is purchased, it is recommended that Customer upgrade to CX Success Track Level 1 or Level 2 or Solution Support to ensure consistent SLA response time between Hardware and Software.
Step 16.
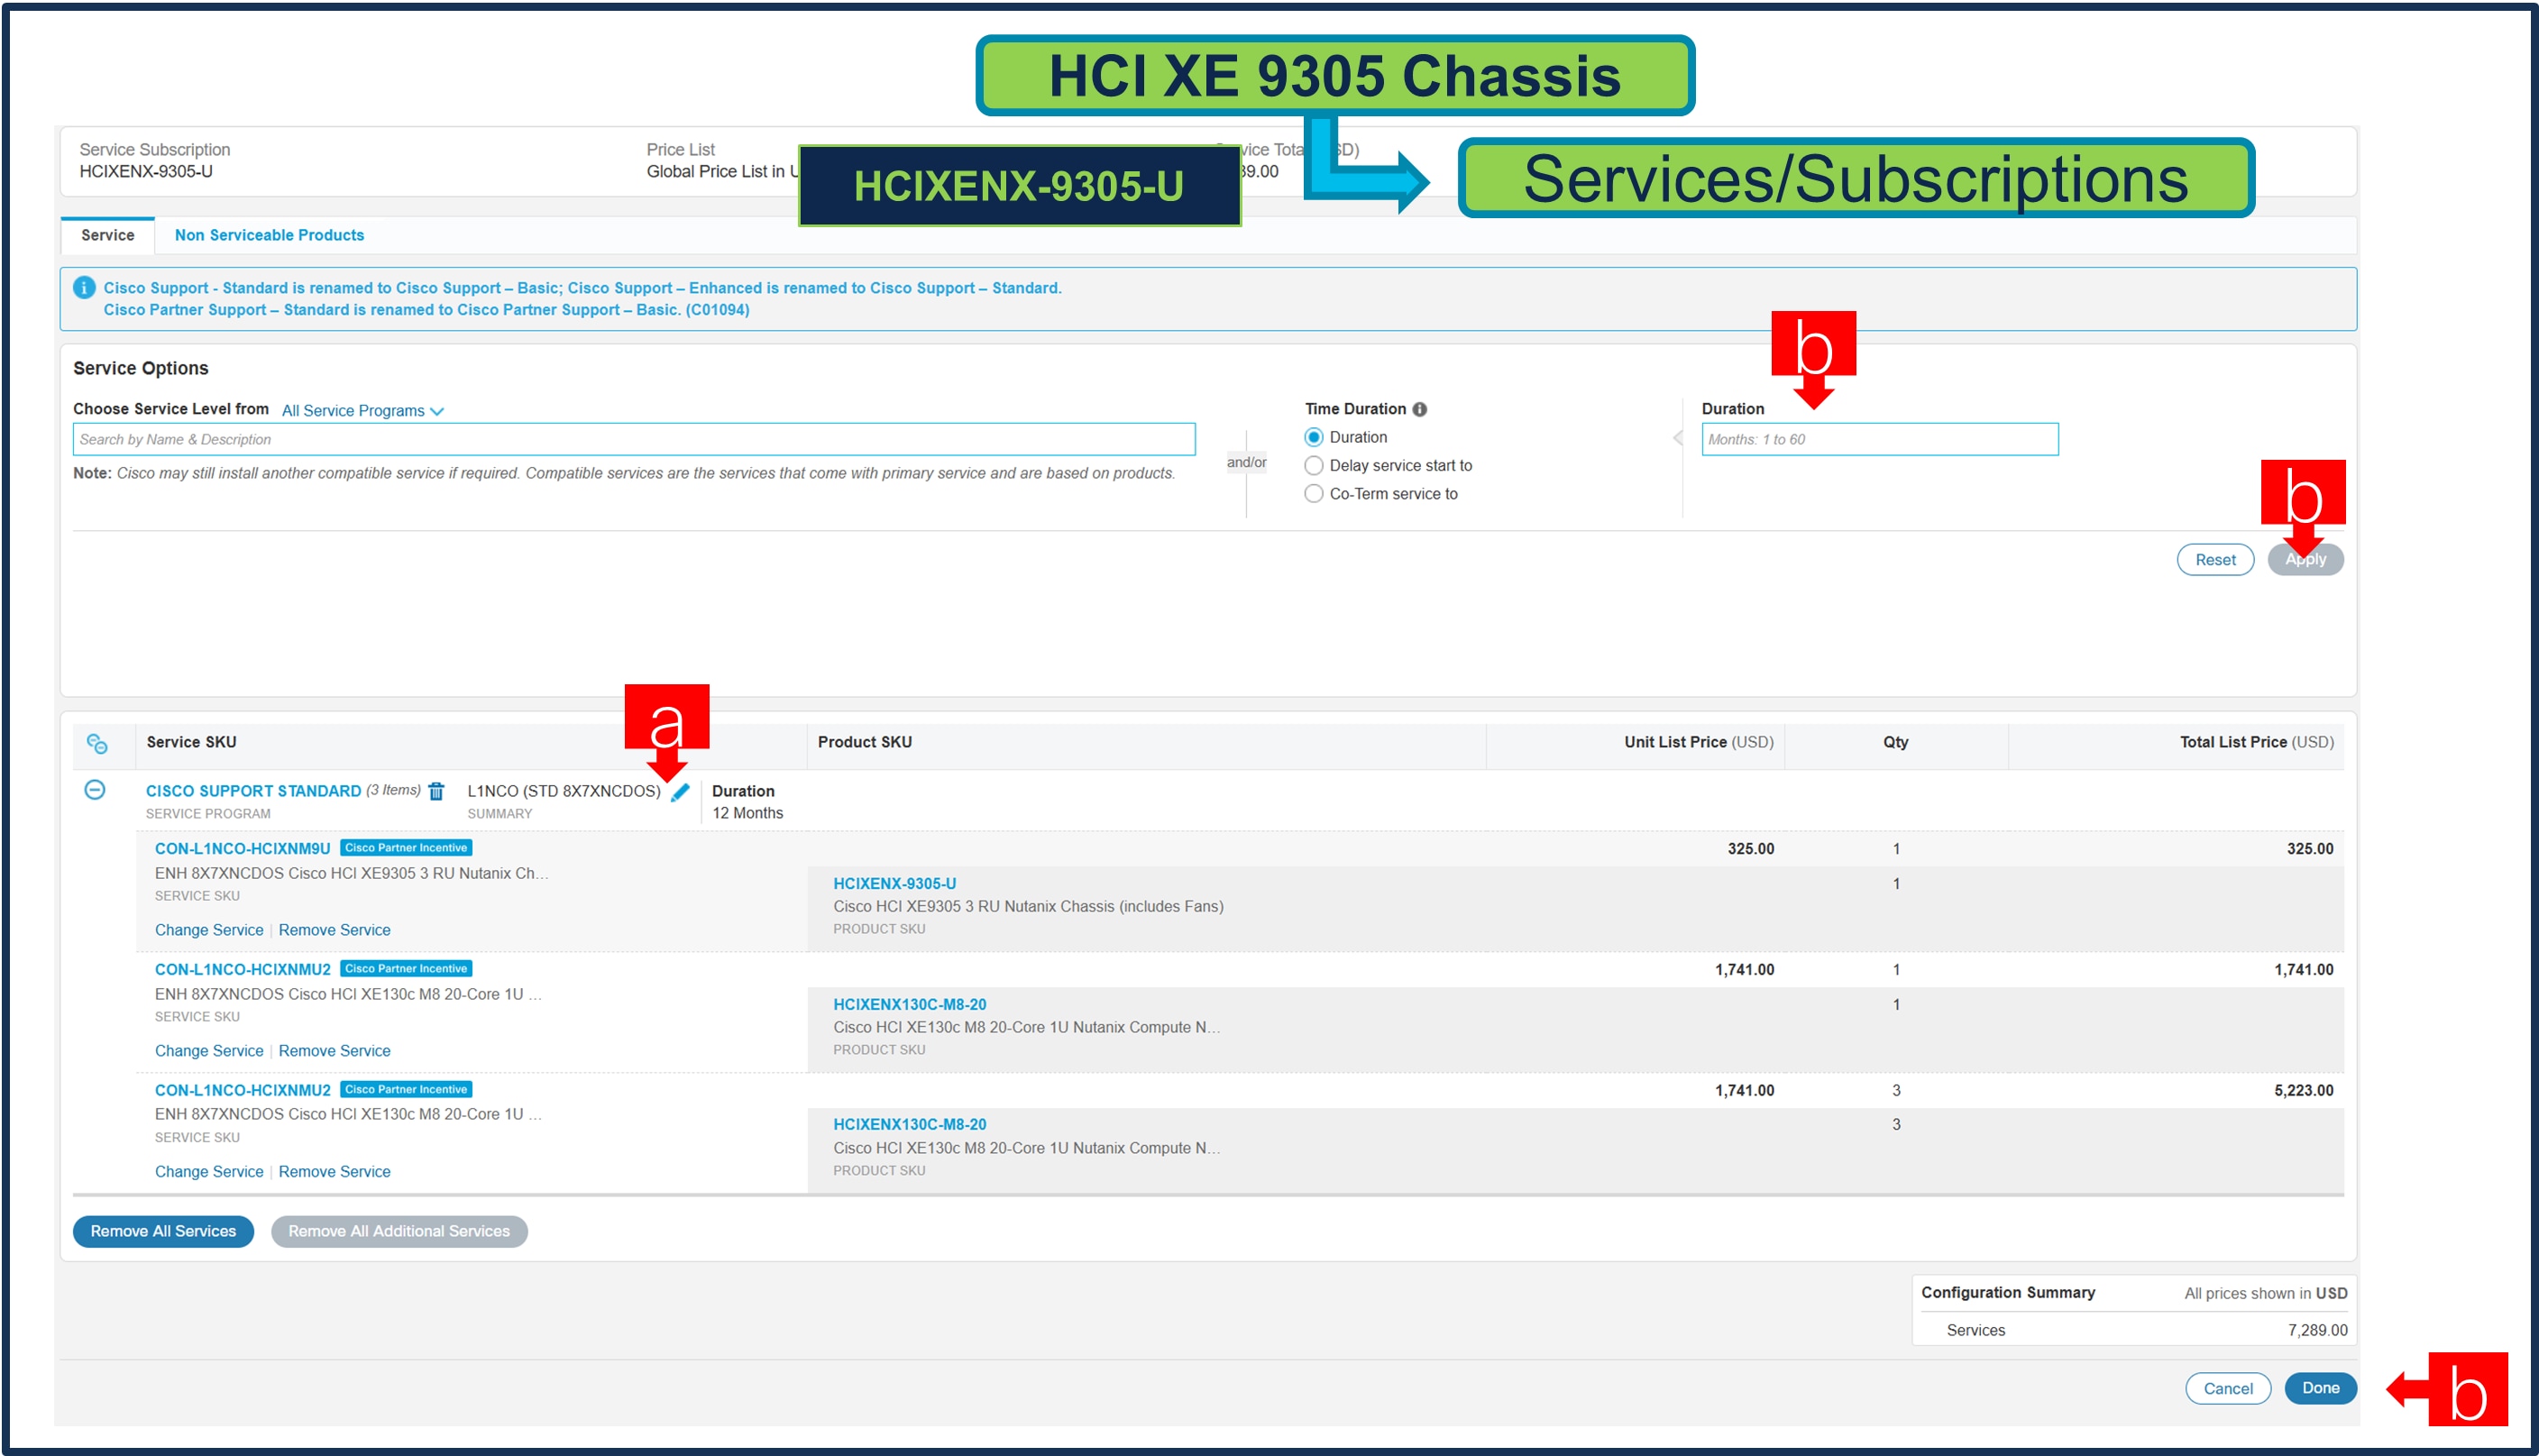
Note: If Nutanix Mission Critical Software Support is purchased, it is recommended that Customer upgrade to CX Success Track Level 1 or Level 2 or Solution Support to ensure consistent SLA response time between Hardware and Software.
a. You can Edit if needed by clicking the pencil
b. Enter the Term Duration & Click on Apply then hit Done
Step 17.
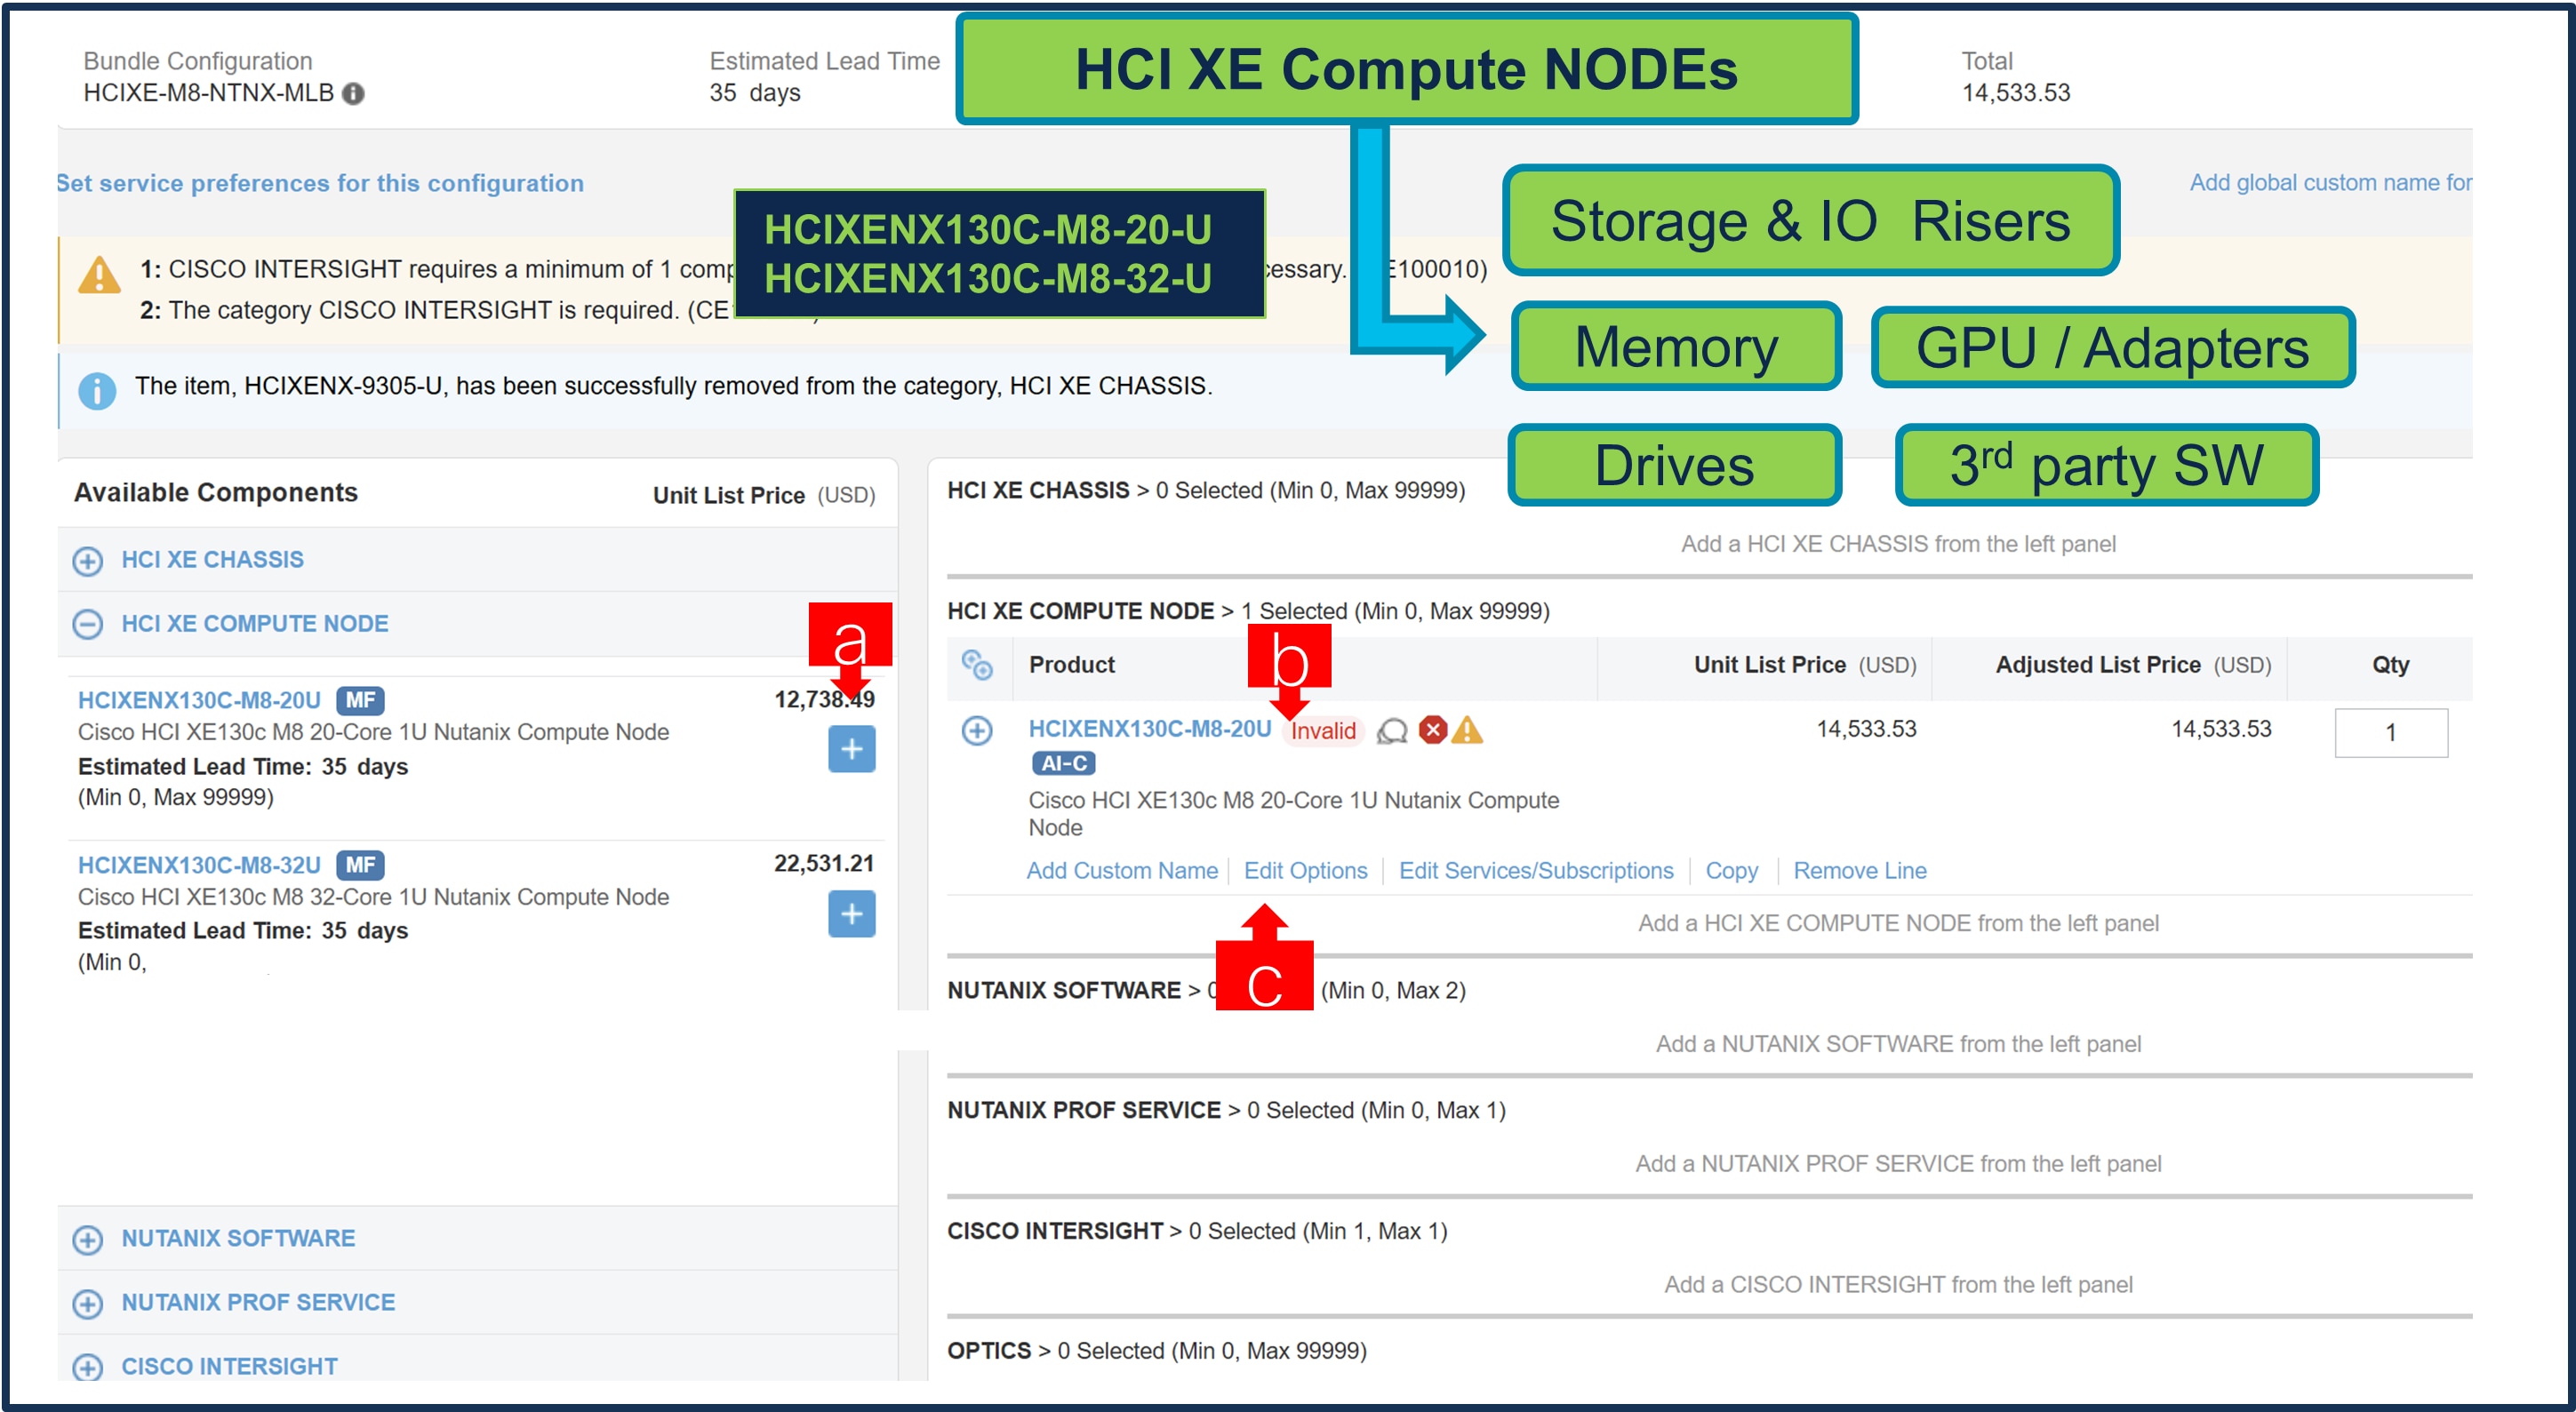
a. You can also Select the standalone Compute Nodes ATO from under MLB by clicking the “PLUS”
b. Notice the ATO Status is invalid as further configuration needed
c. Select 'Edit Option' to enter the configurator and follow the same workflow as configuring a node under a chassis ATO.
Step 18.
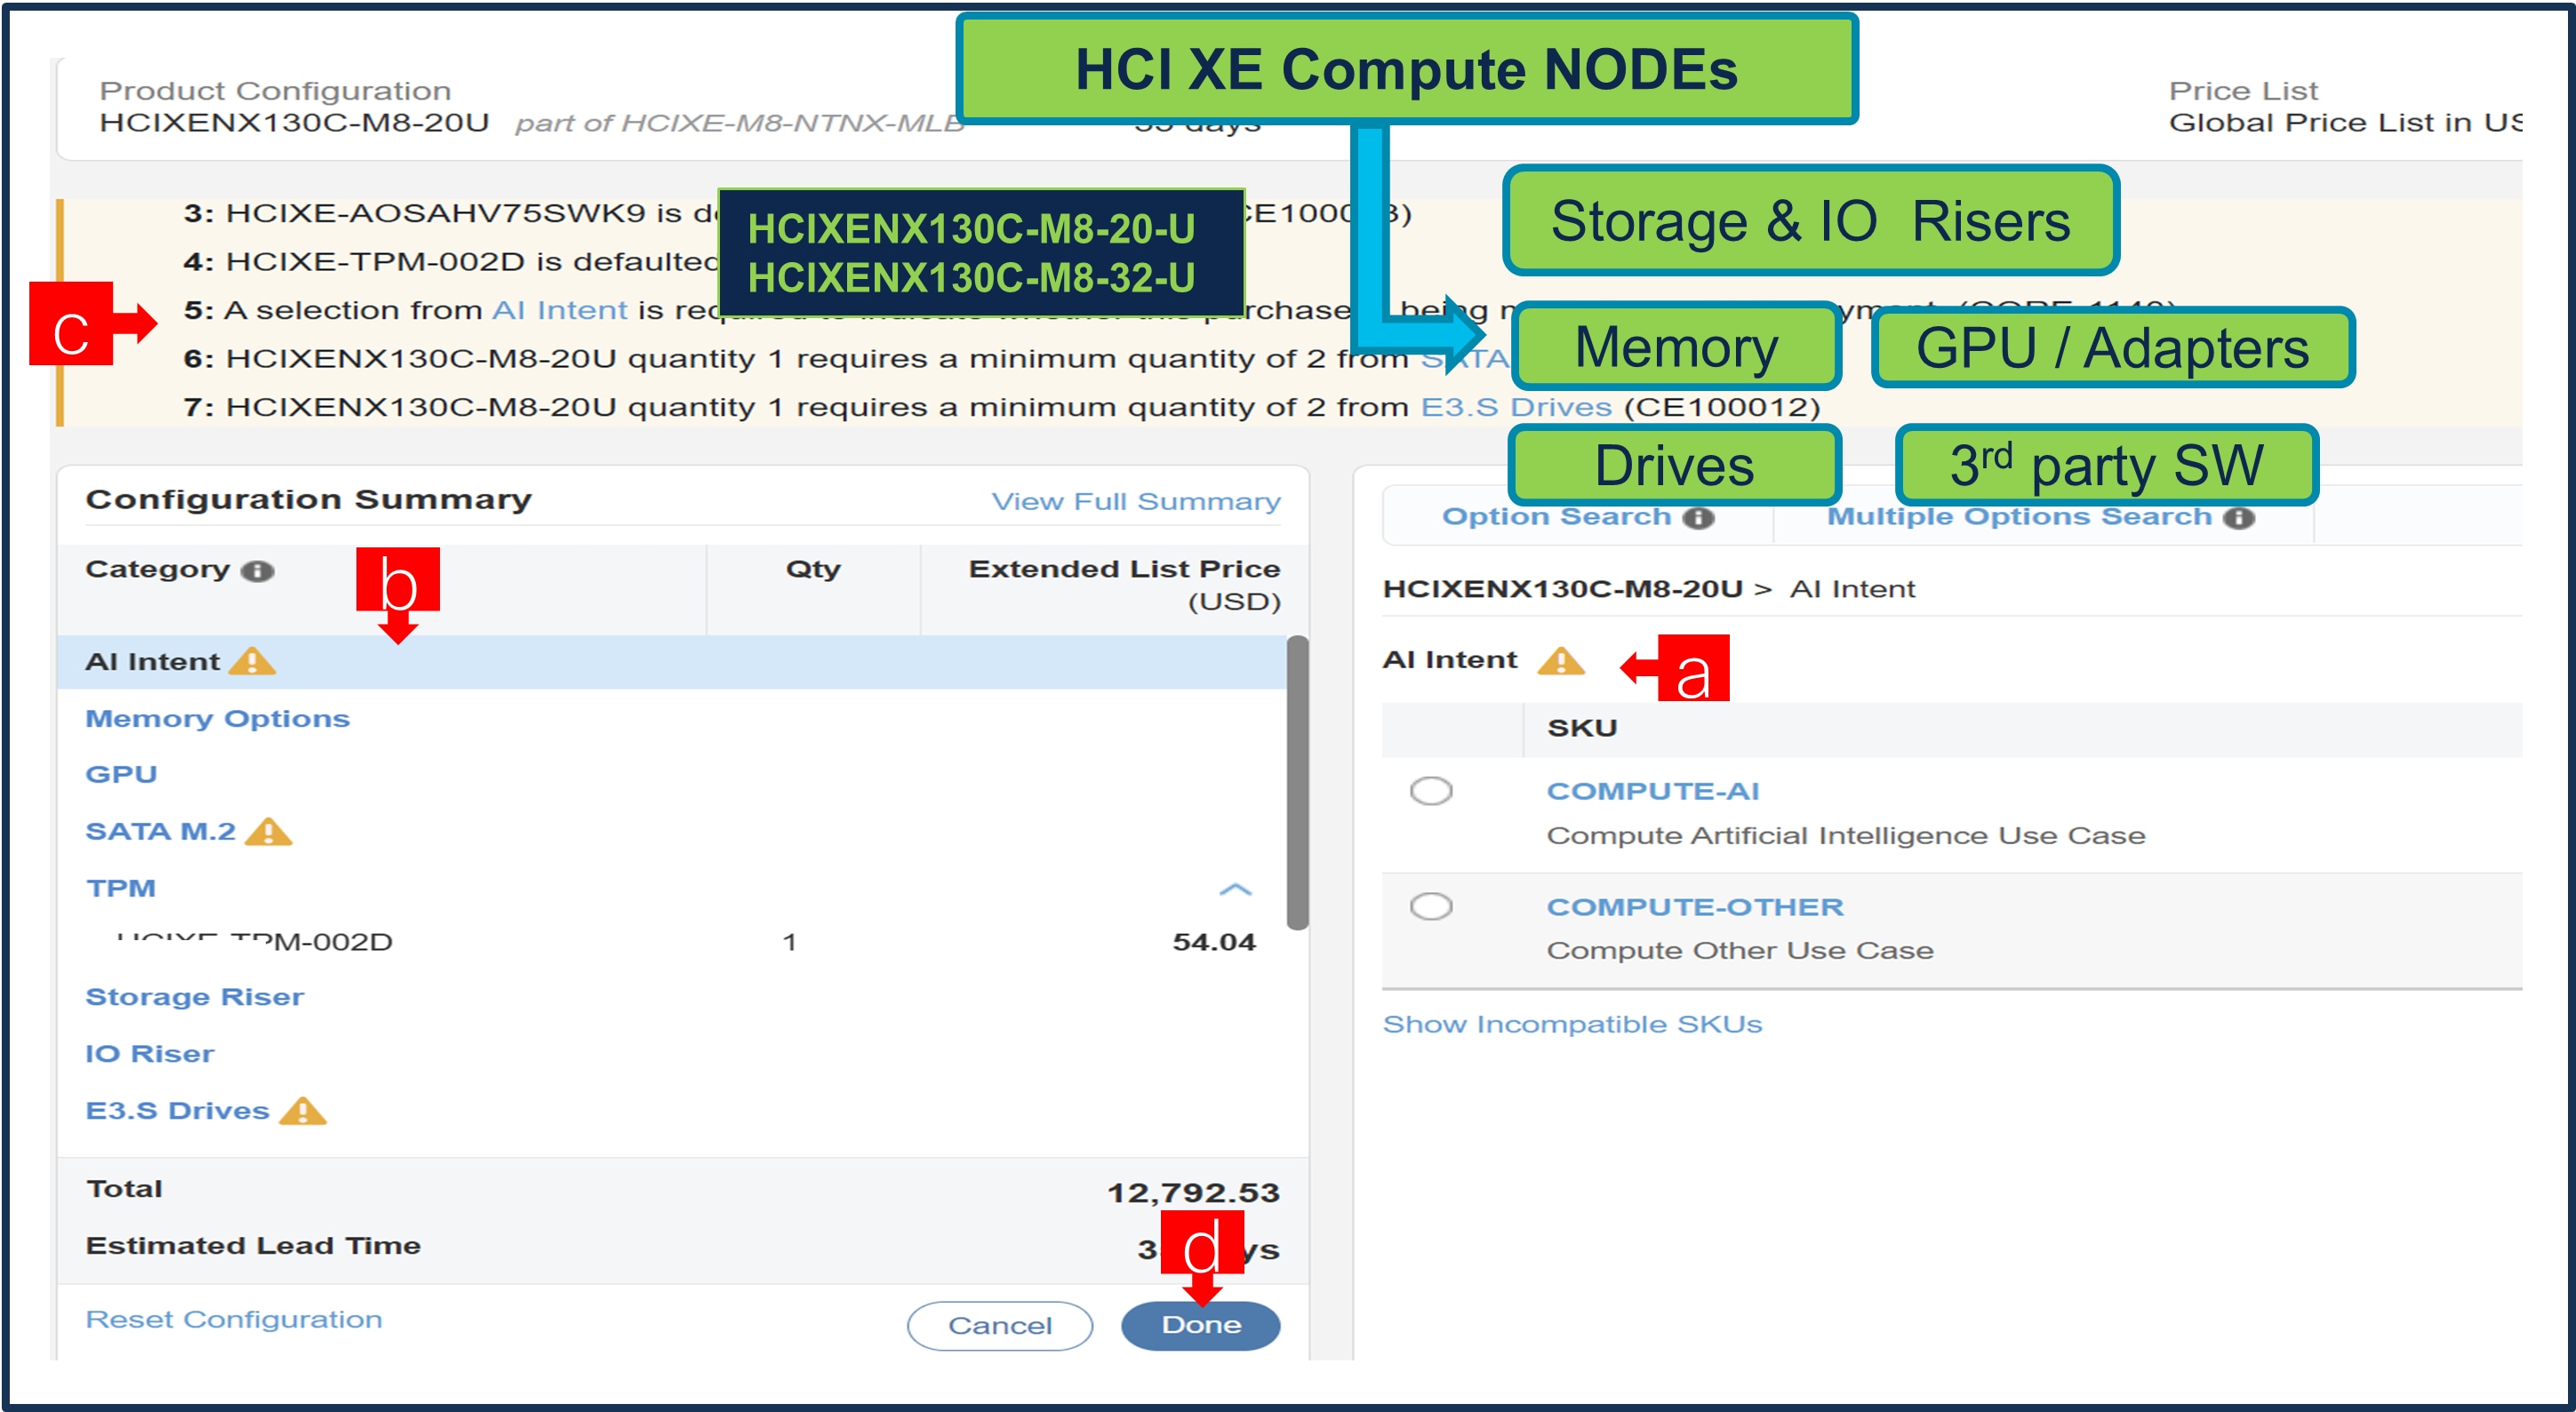
a. PIDs are set up as AI Capable, so User need to make selection from AI Intent option class. By making the right selection it provides information to Cisco that if Server is being intended to use AI features or not. If a GPU is selected, the configuration automatically counts as an AI product and the AI Intent selection goes away.
b. Configure node by selecting Memory, Storage Riser /or IO Riser and other peripheral devices and PIDs.
c. Follow warning messages to configure the minimum required selections under Server.
d. Select Done when completed.
Step 19.
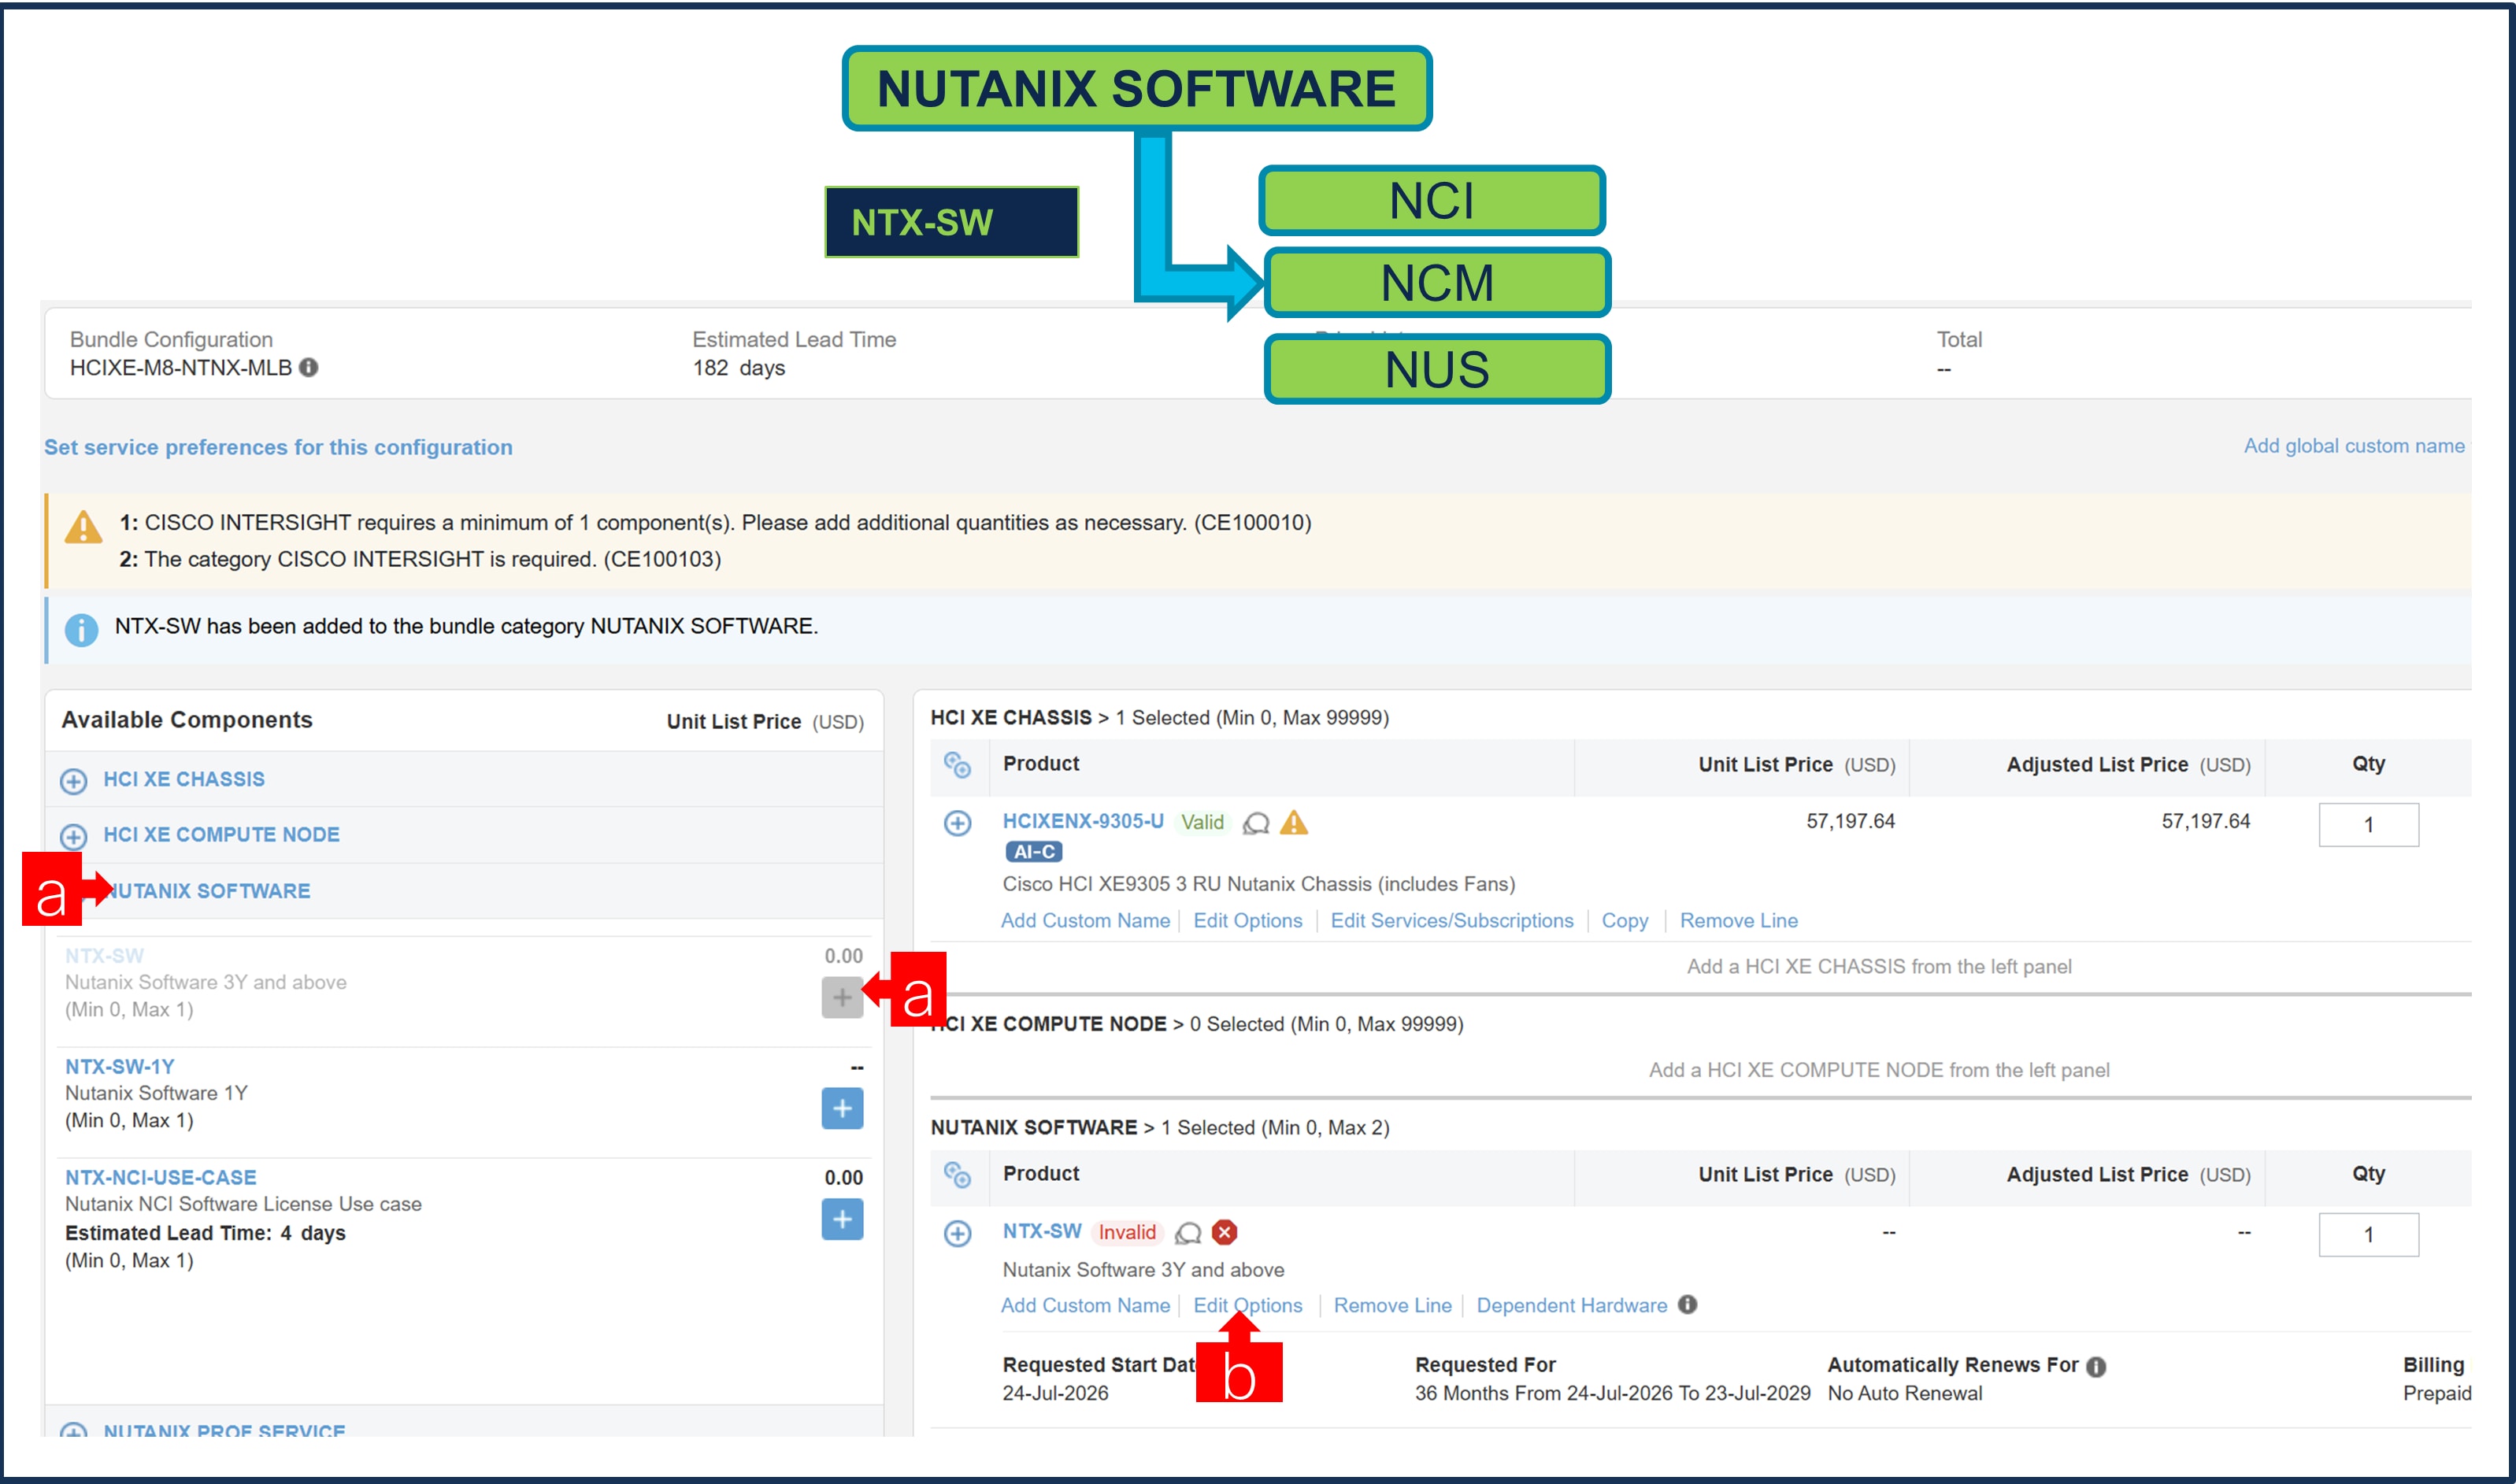
a. NTX-SW or NTX-SW-1Y is a required selection. Please make selection by clicking “PLUS”
b. Click on ‘Edit Options’ to configure the Product.
Note: Subscription Term for NTX-SW is 36 to 60 Months and for NTX-SW-1Y is 12 Months
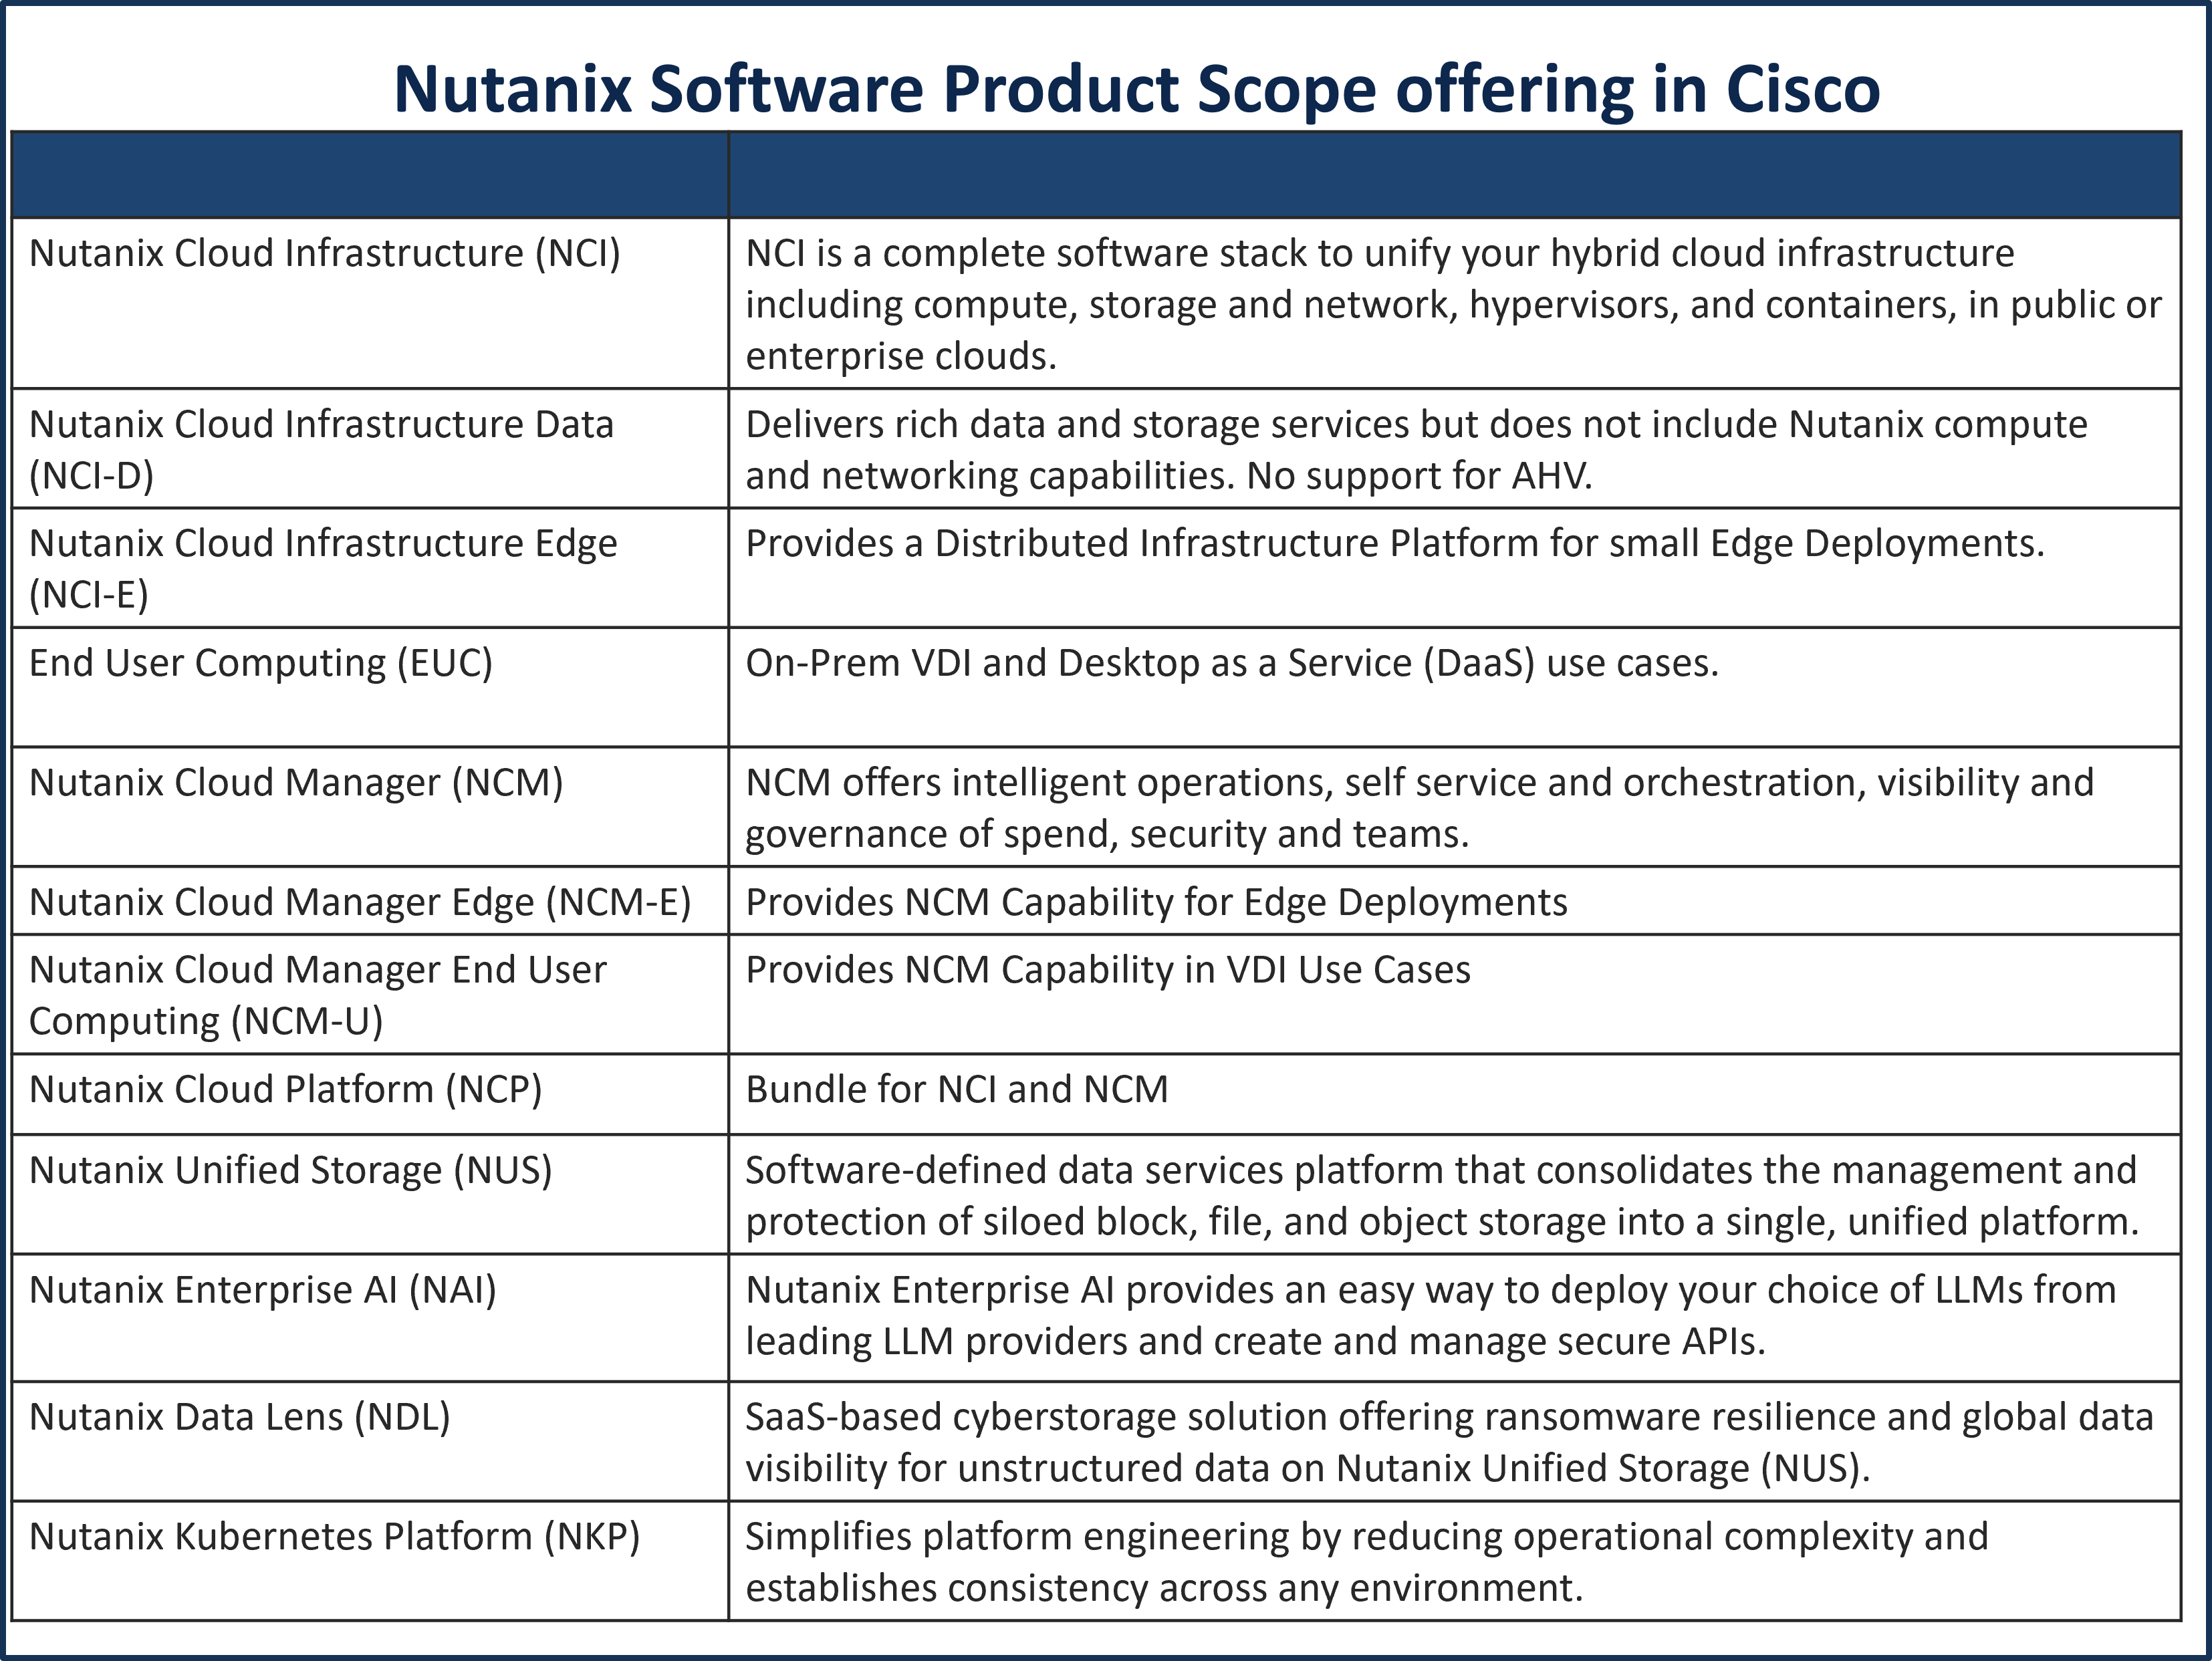
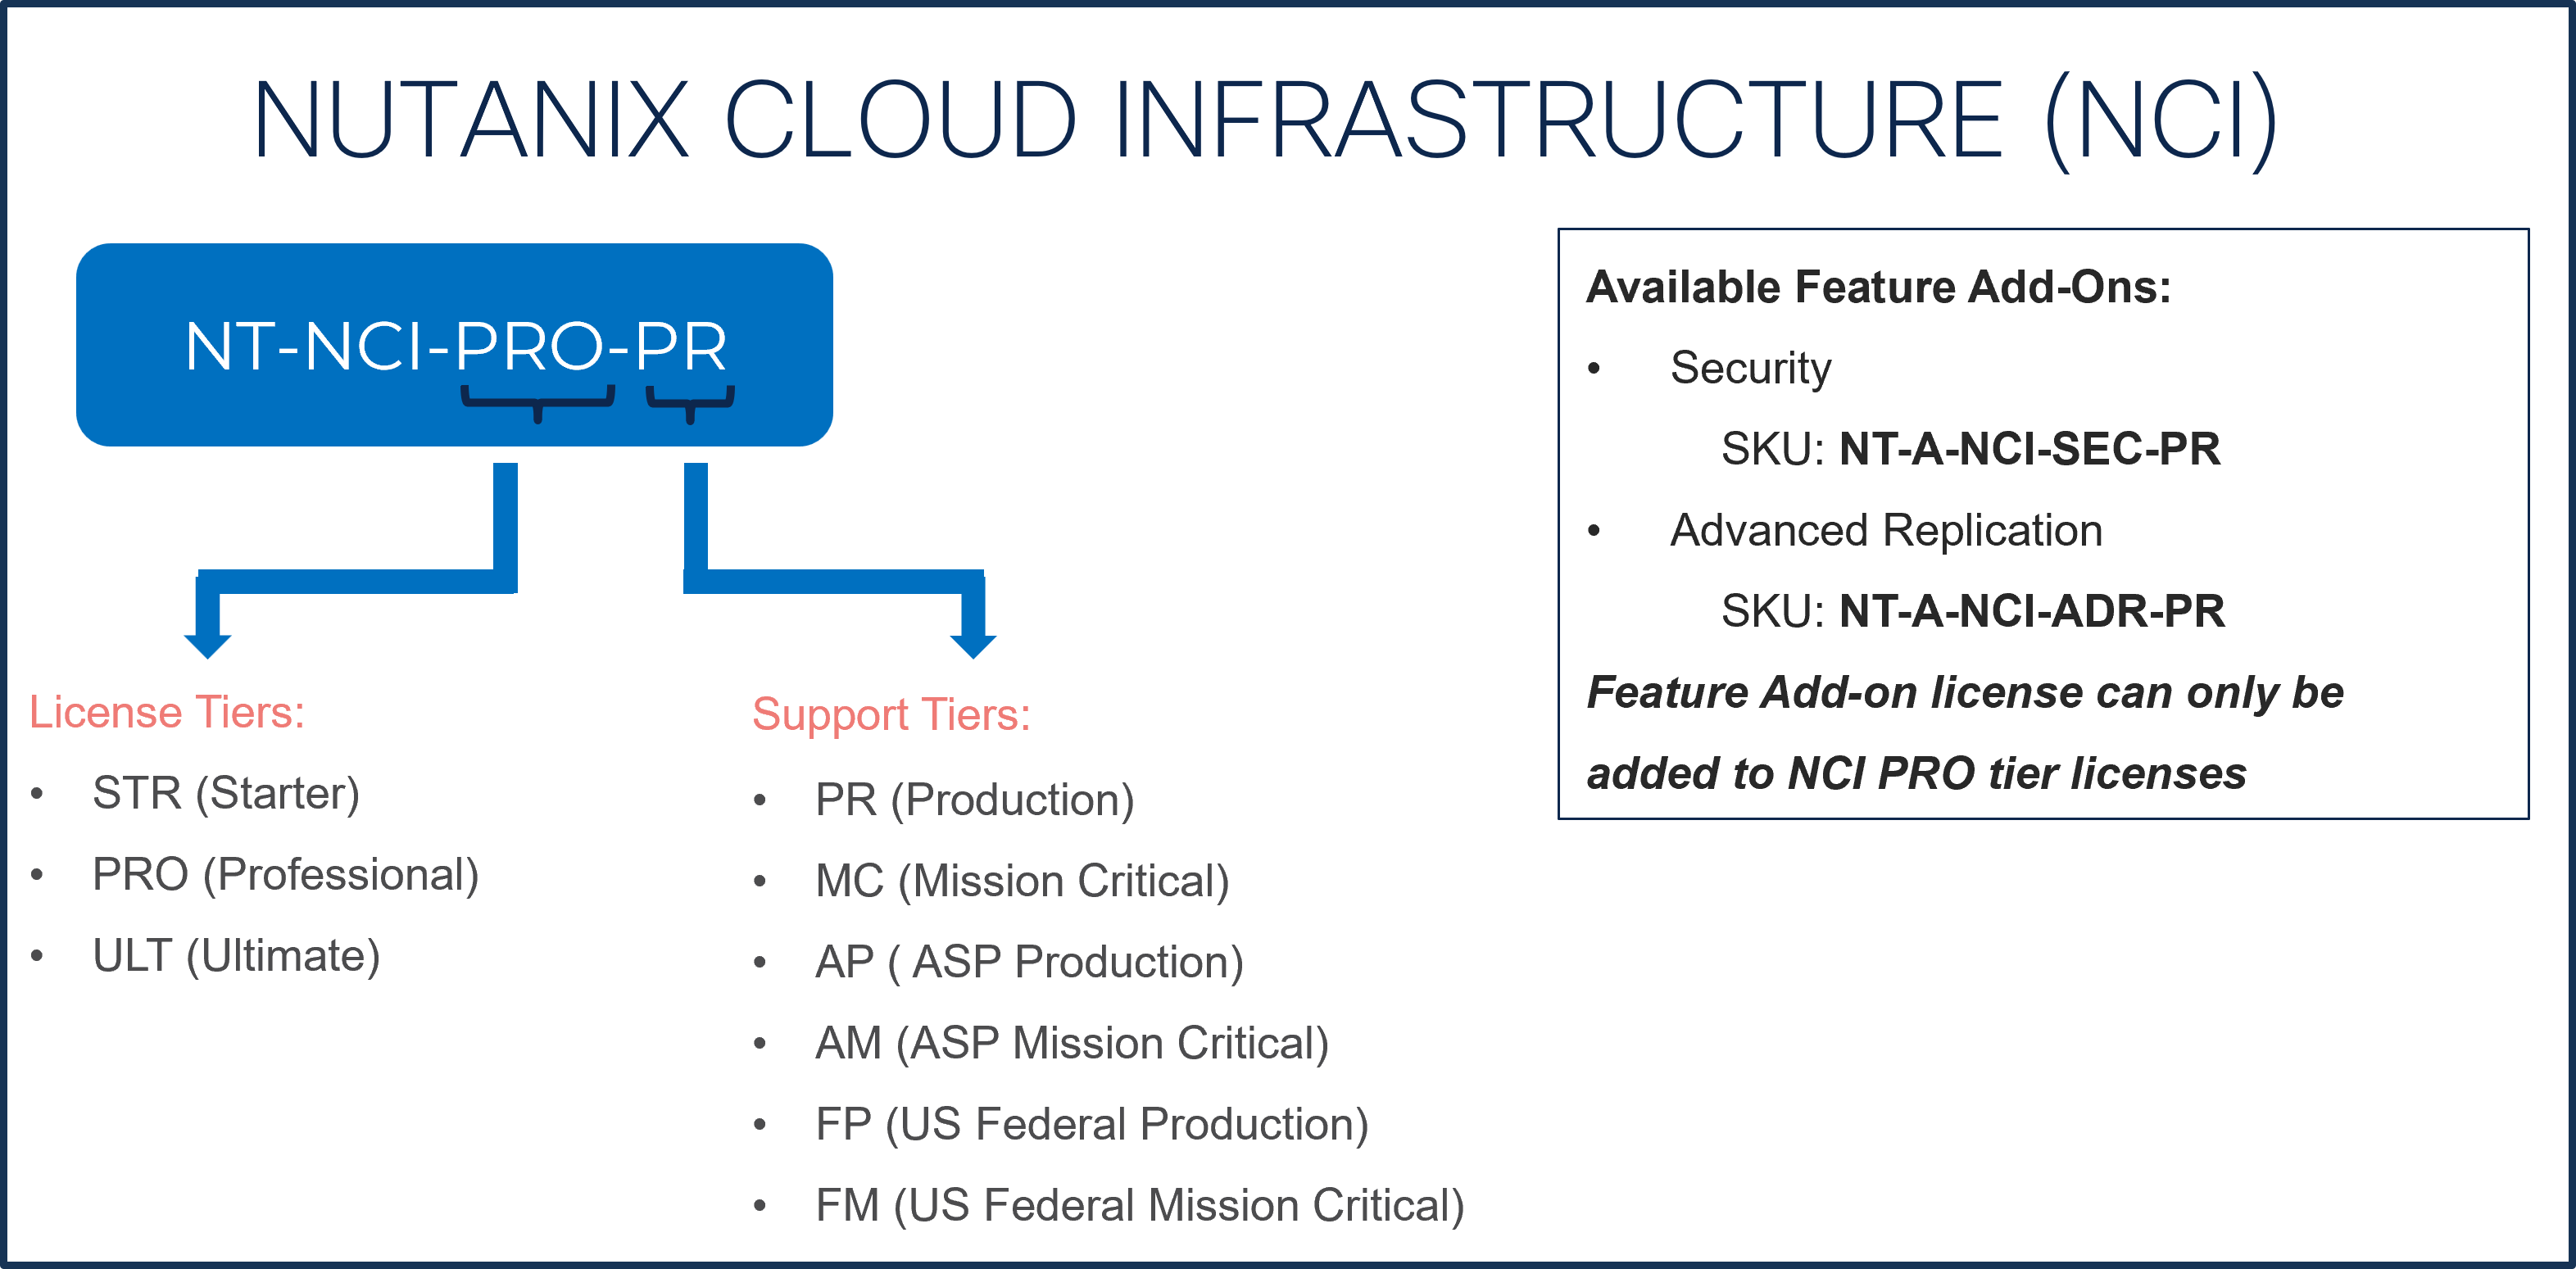
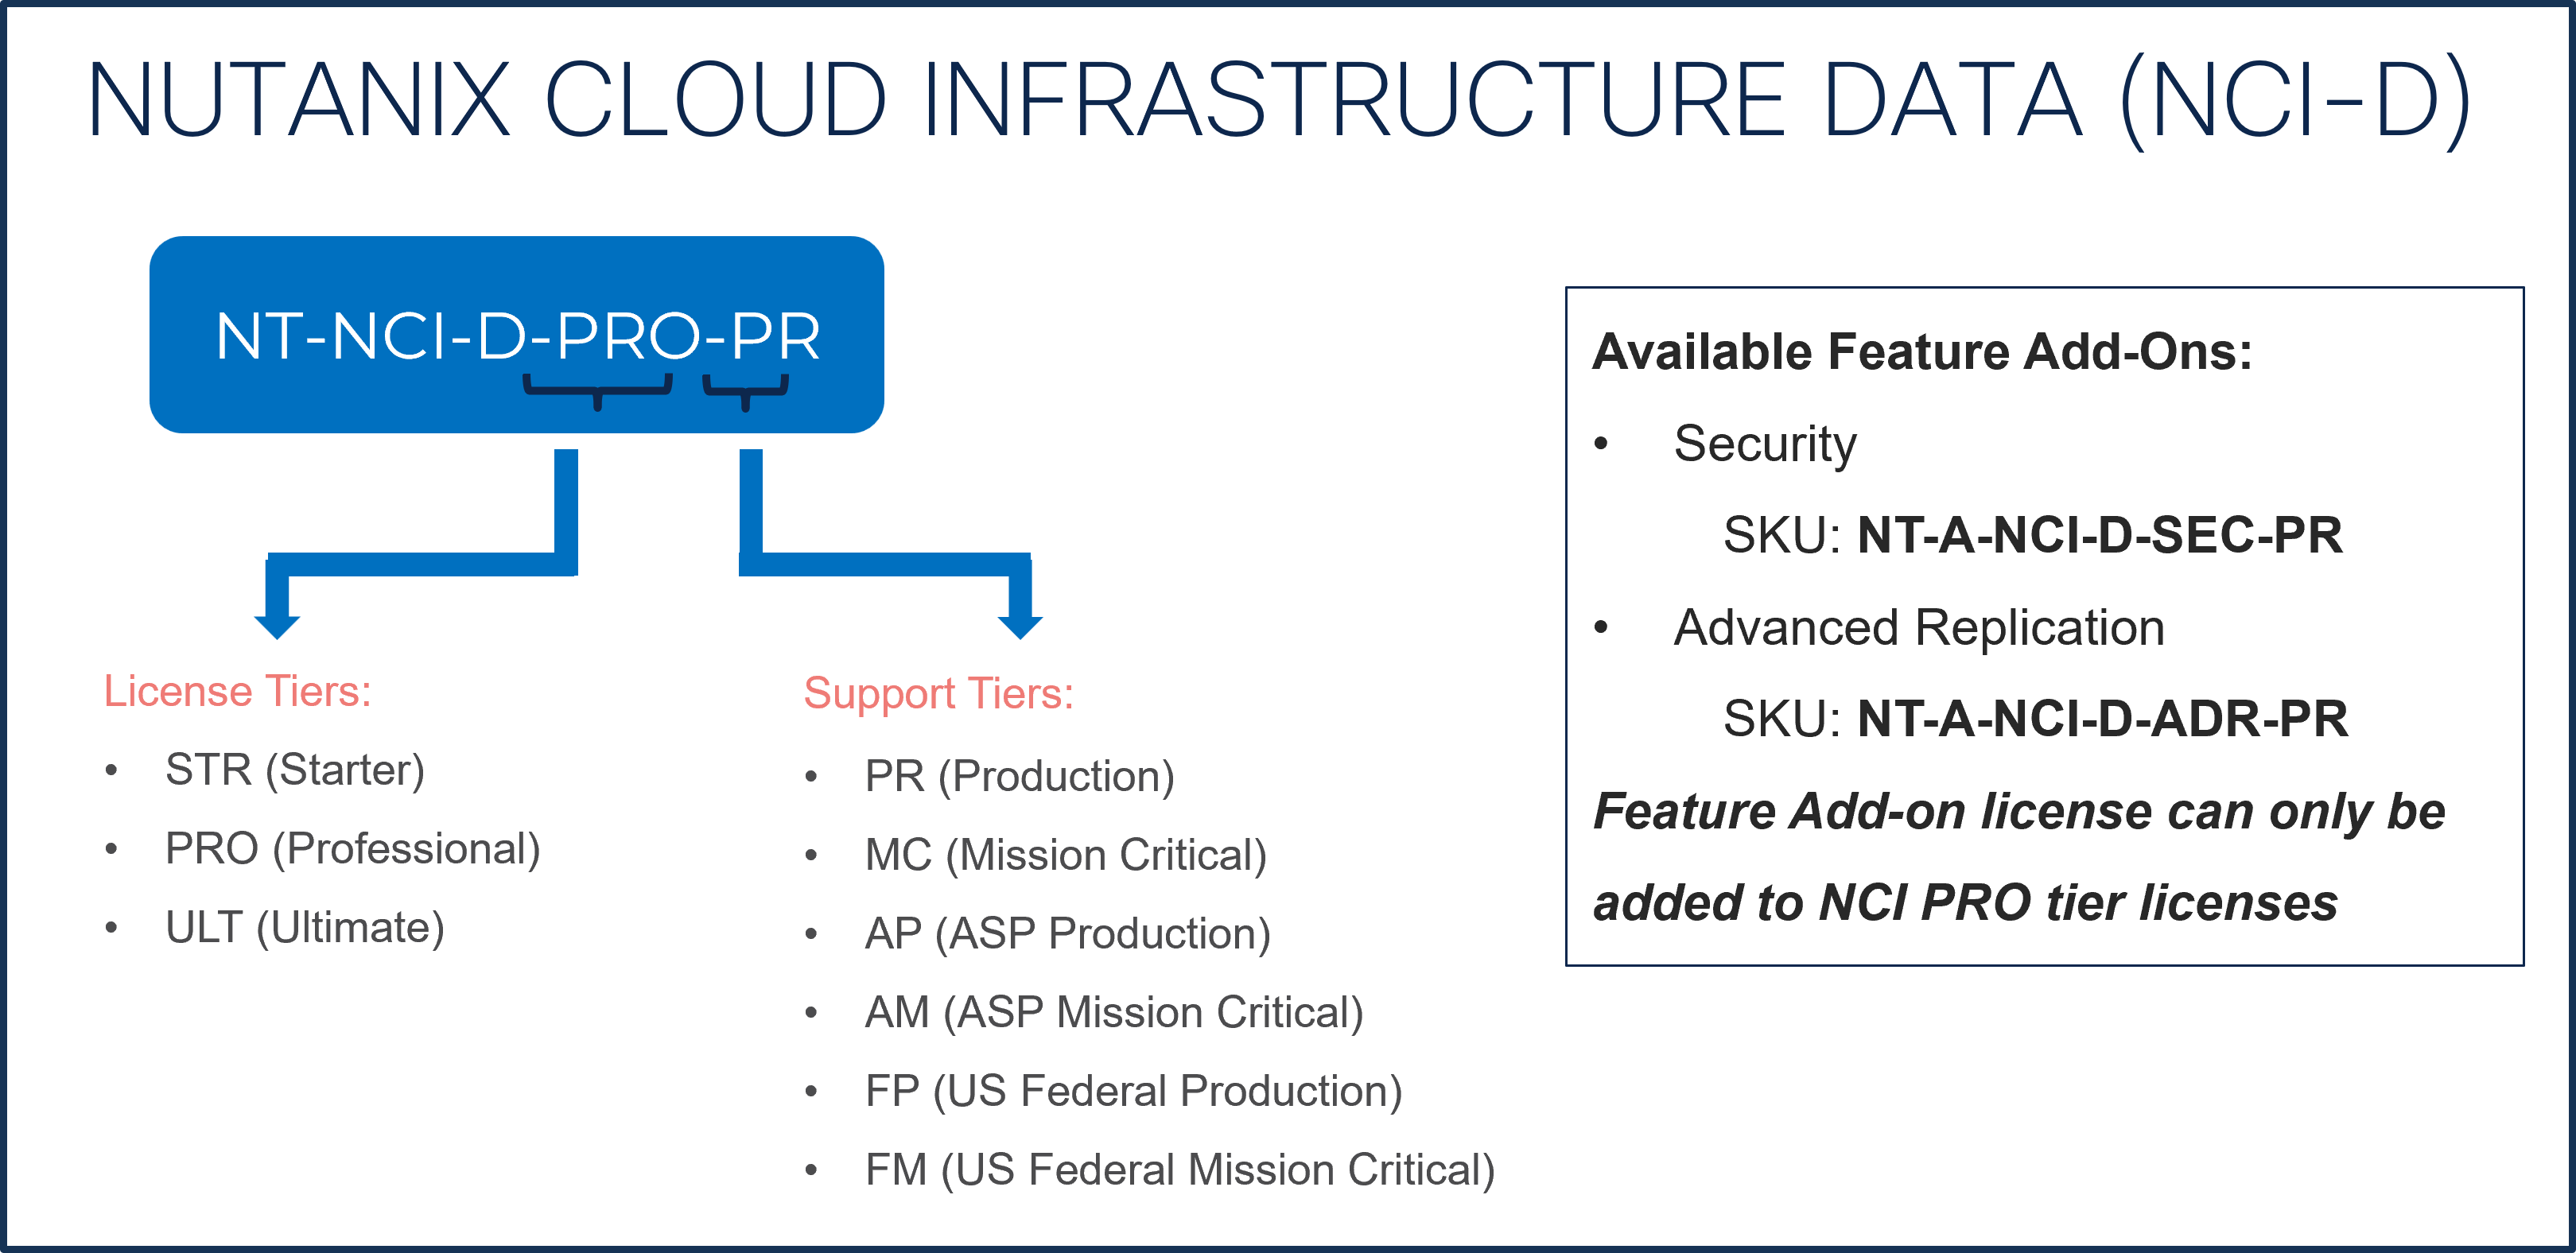
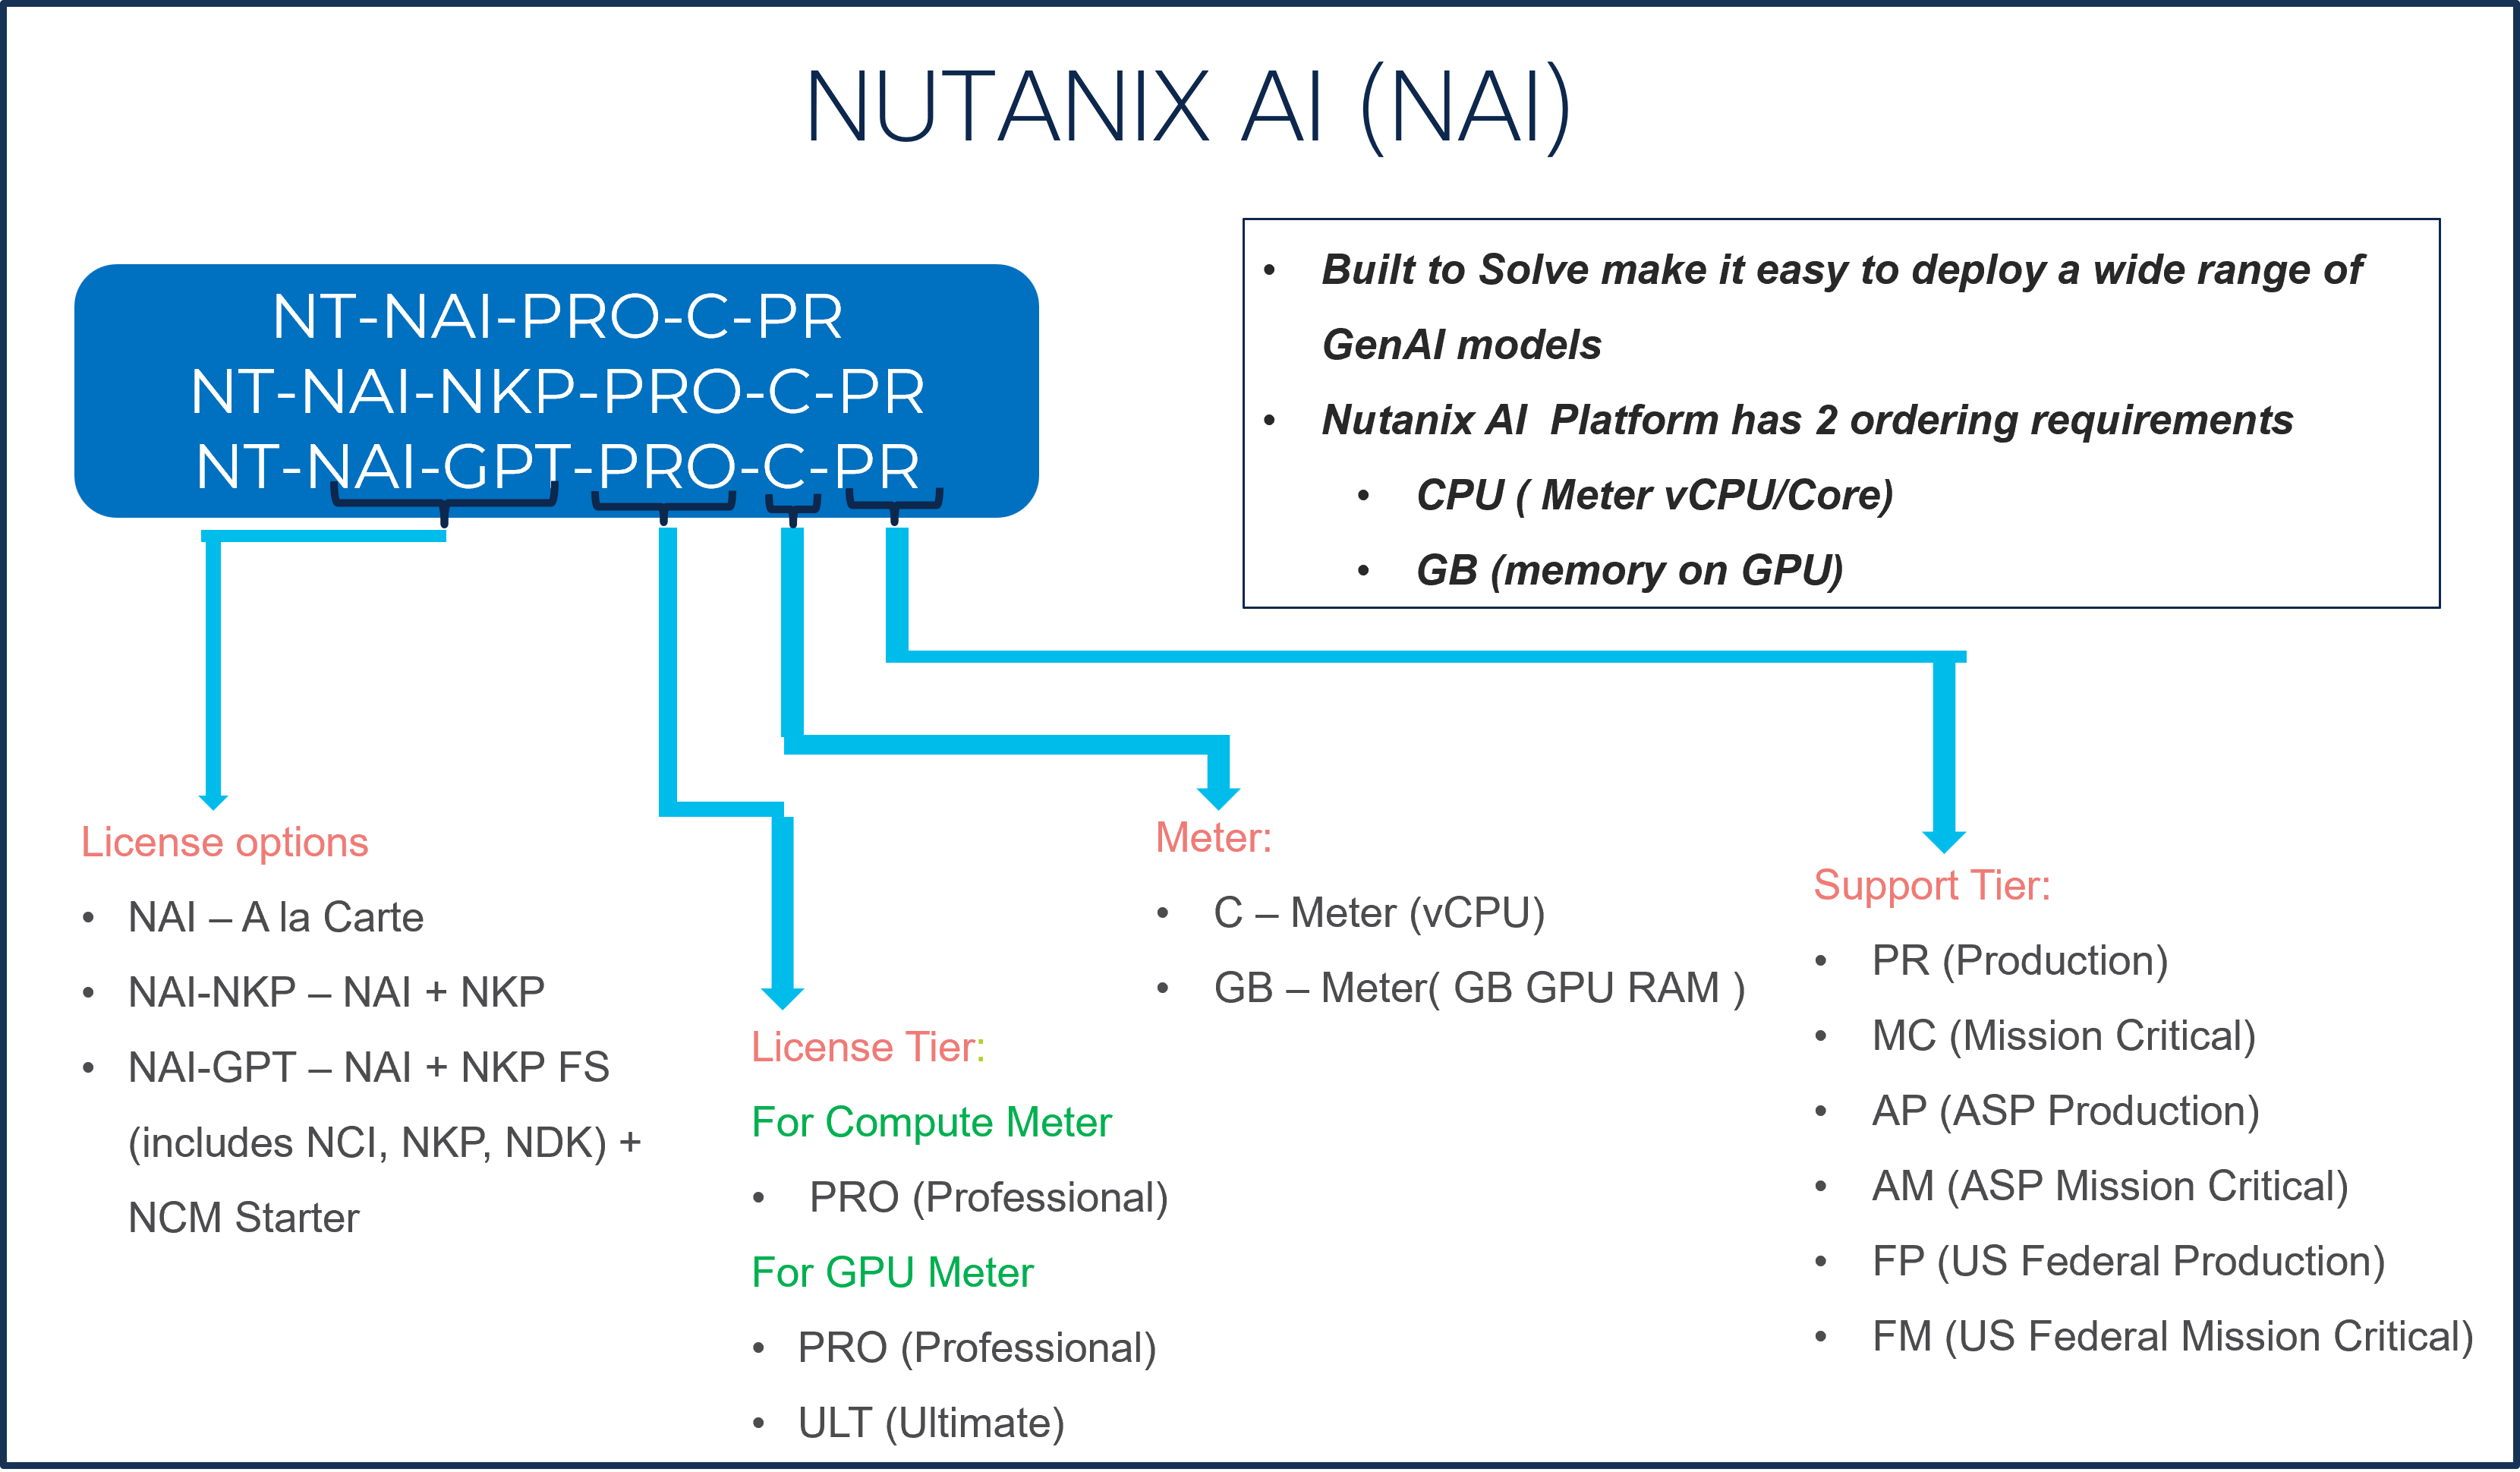
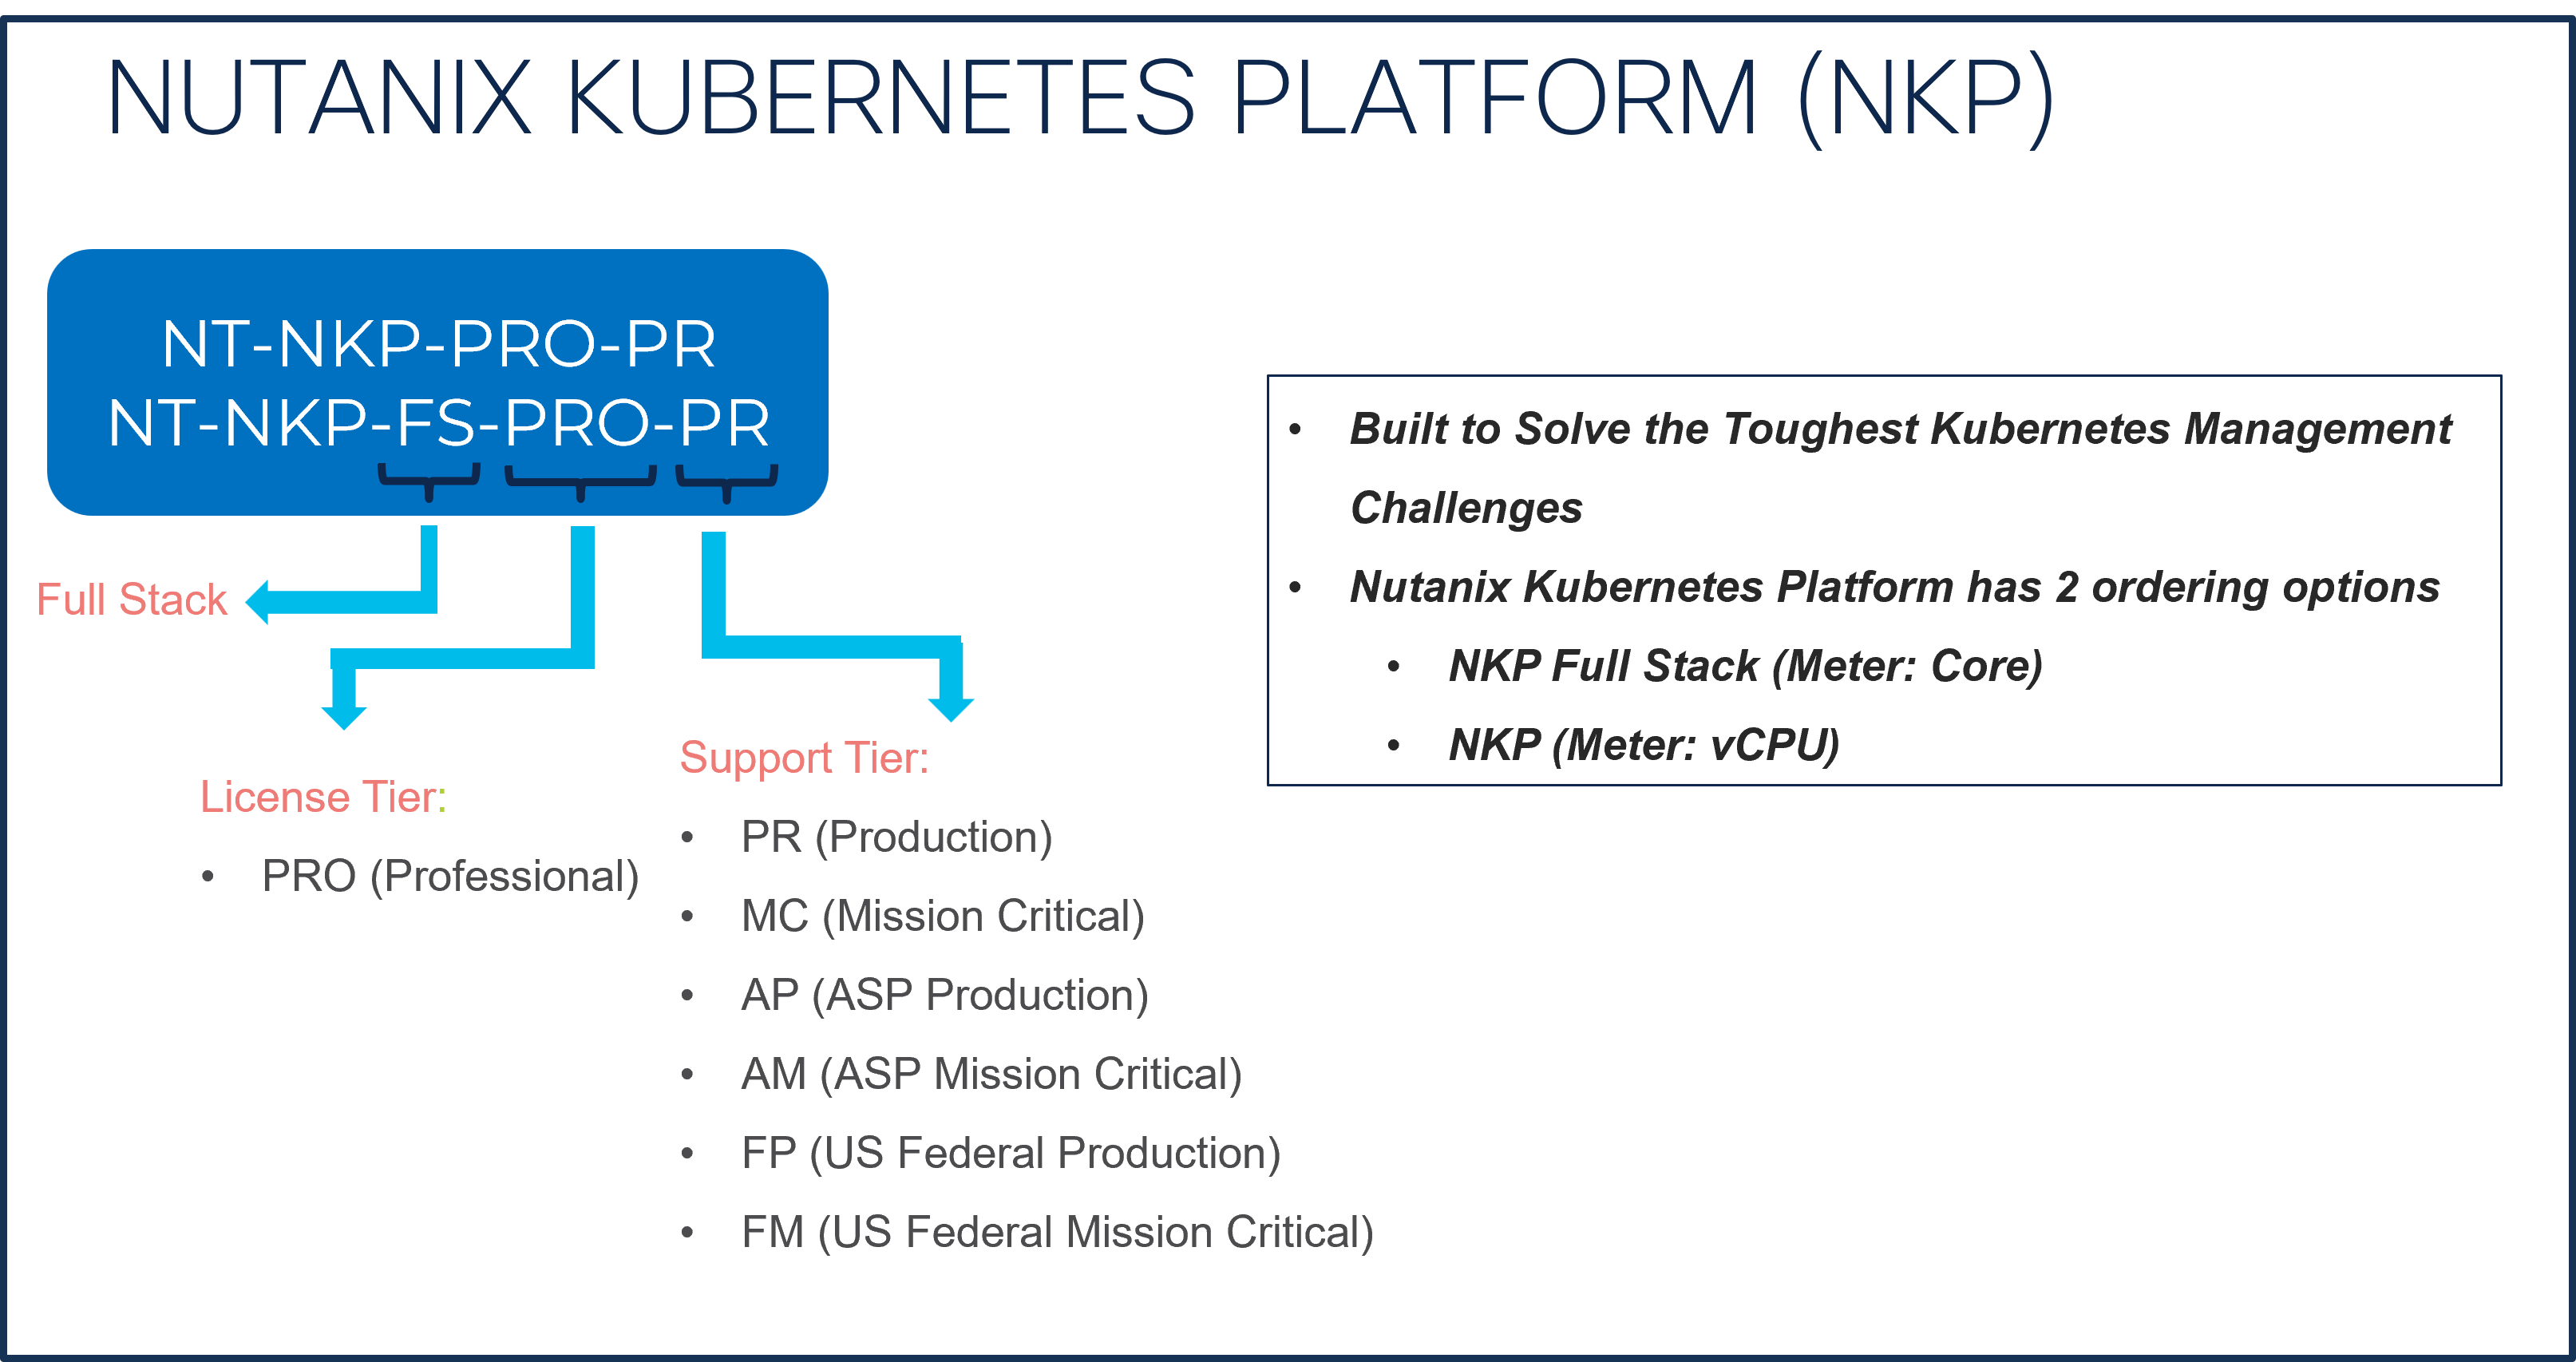
Step 20.
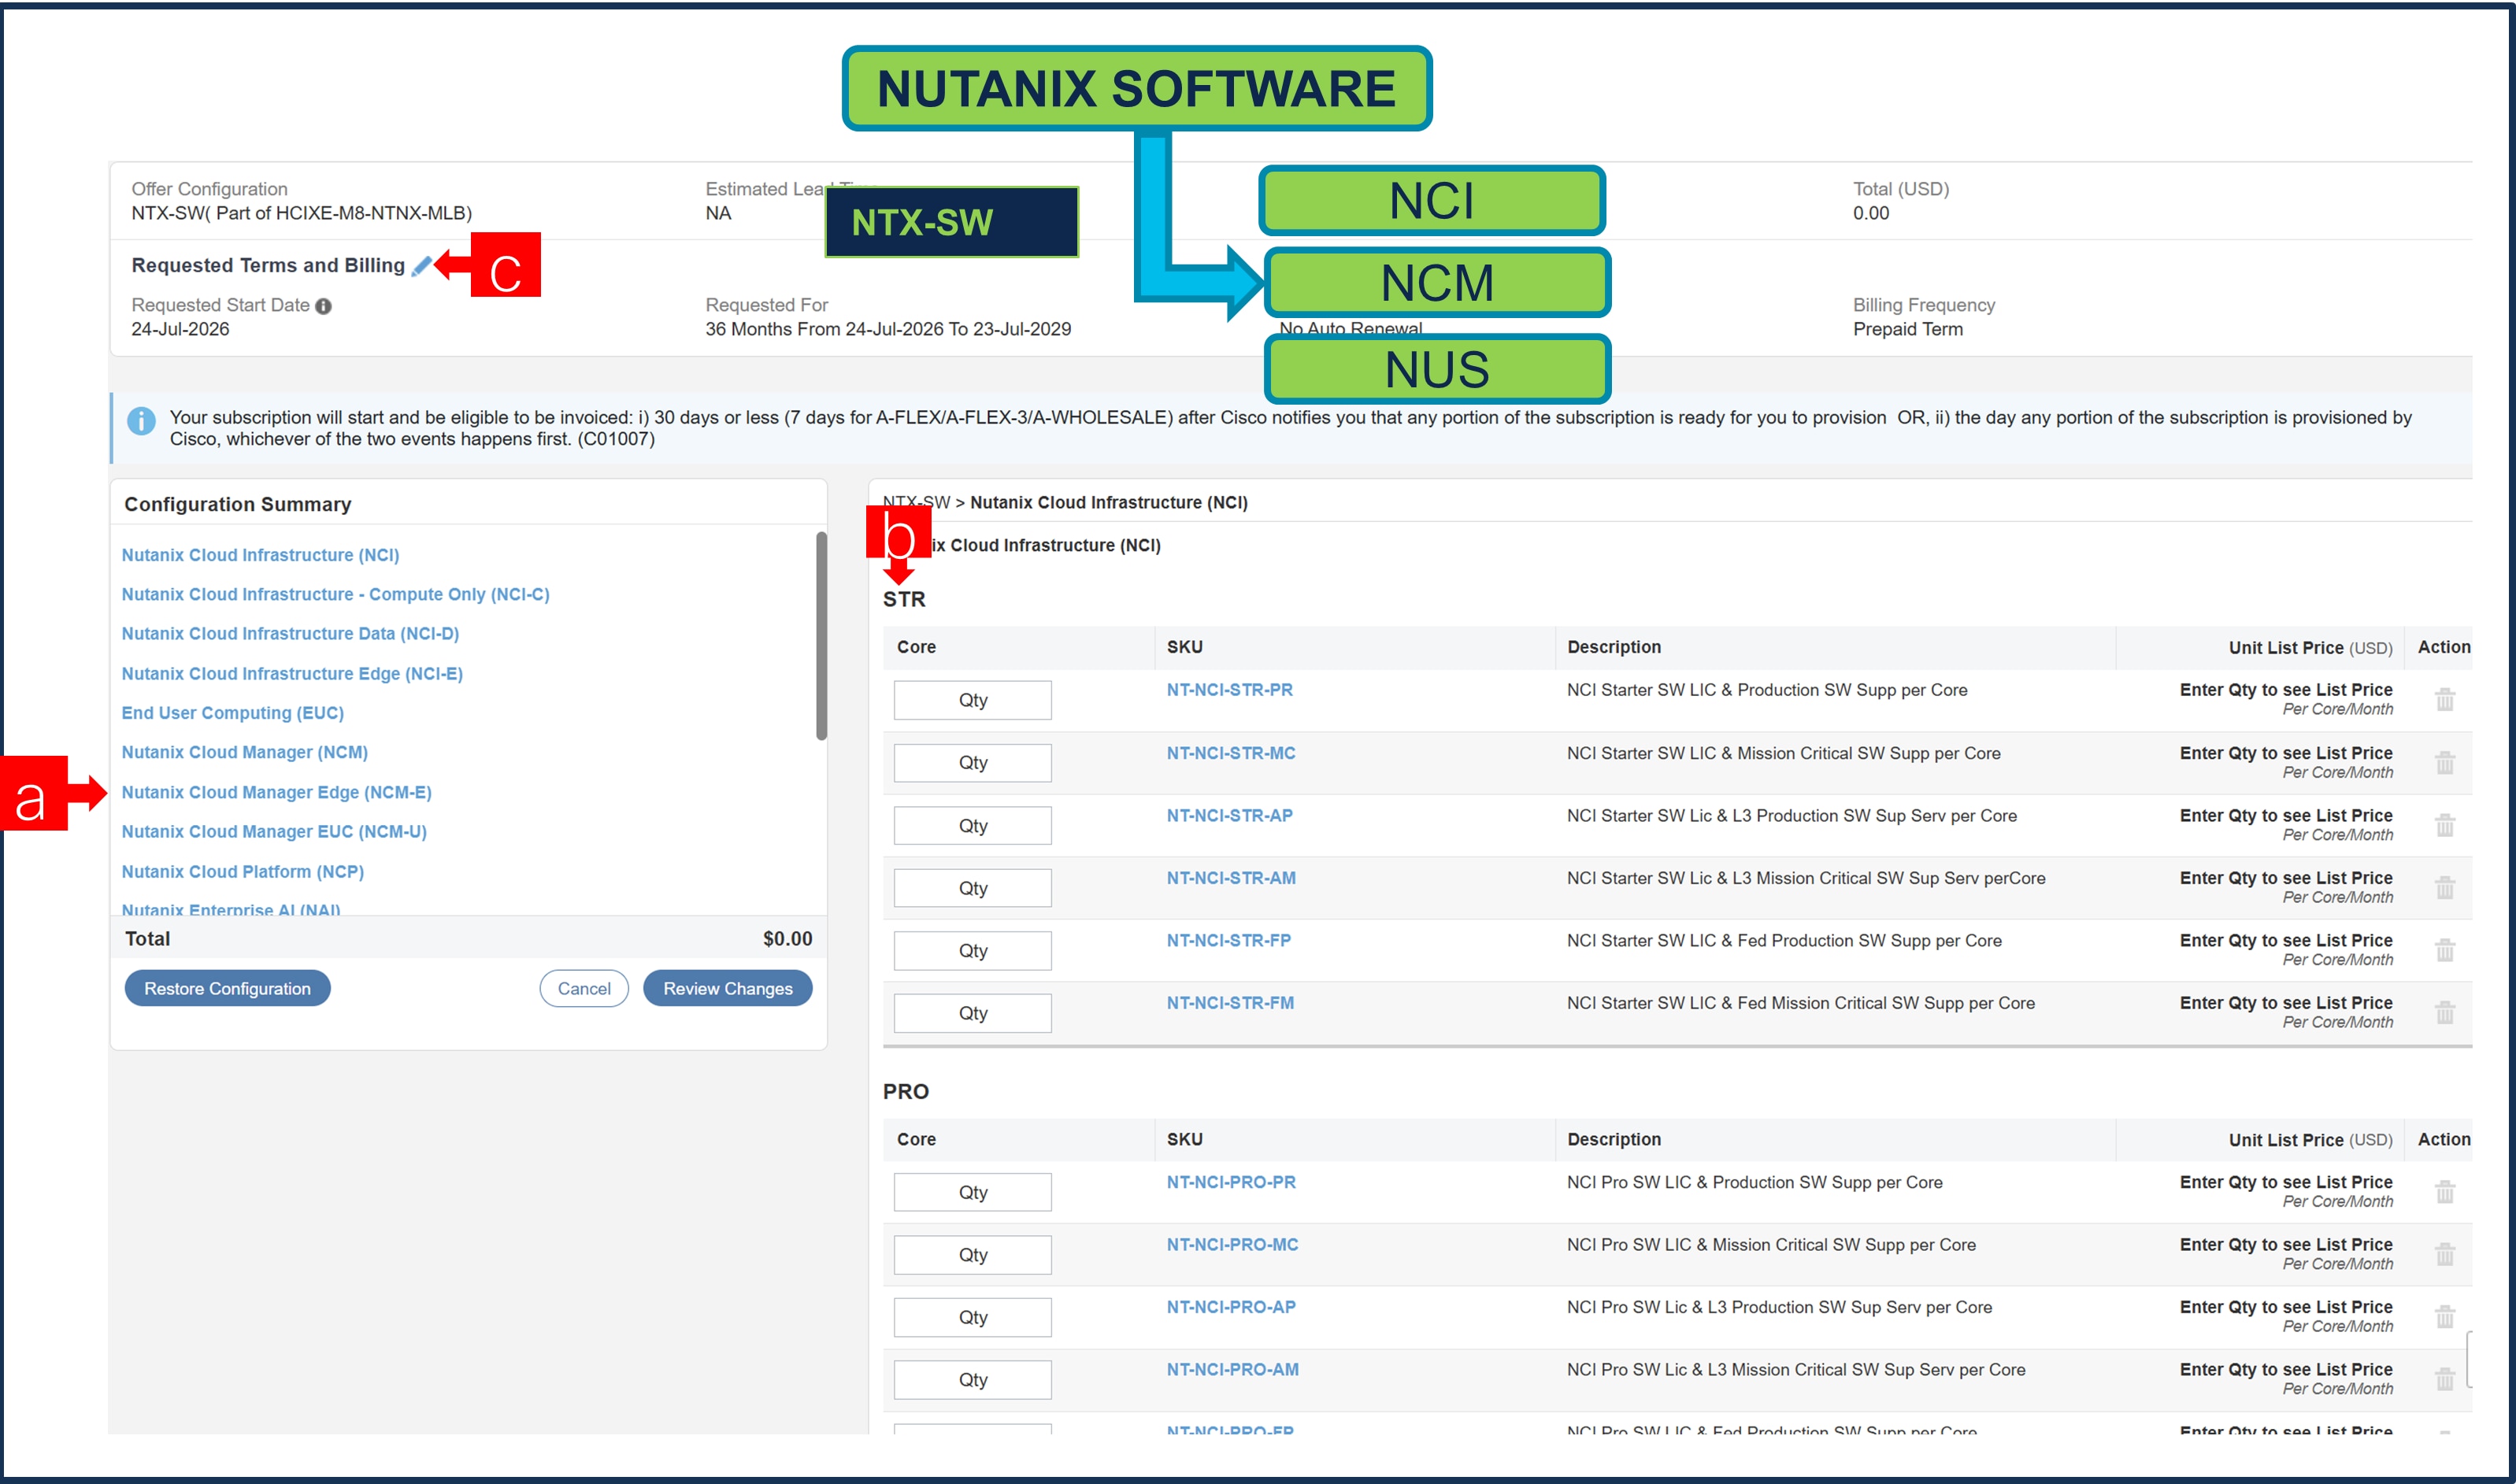
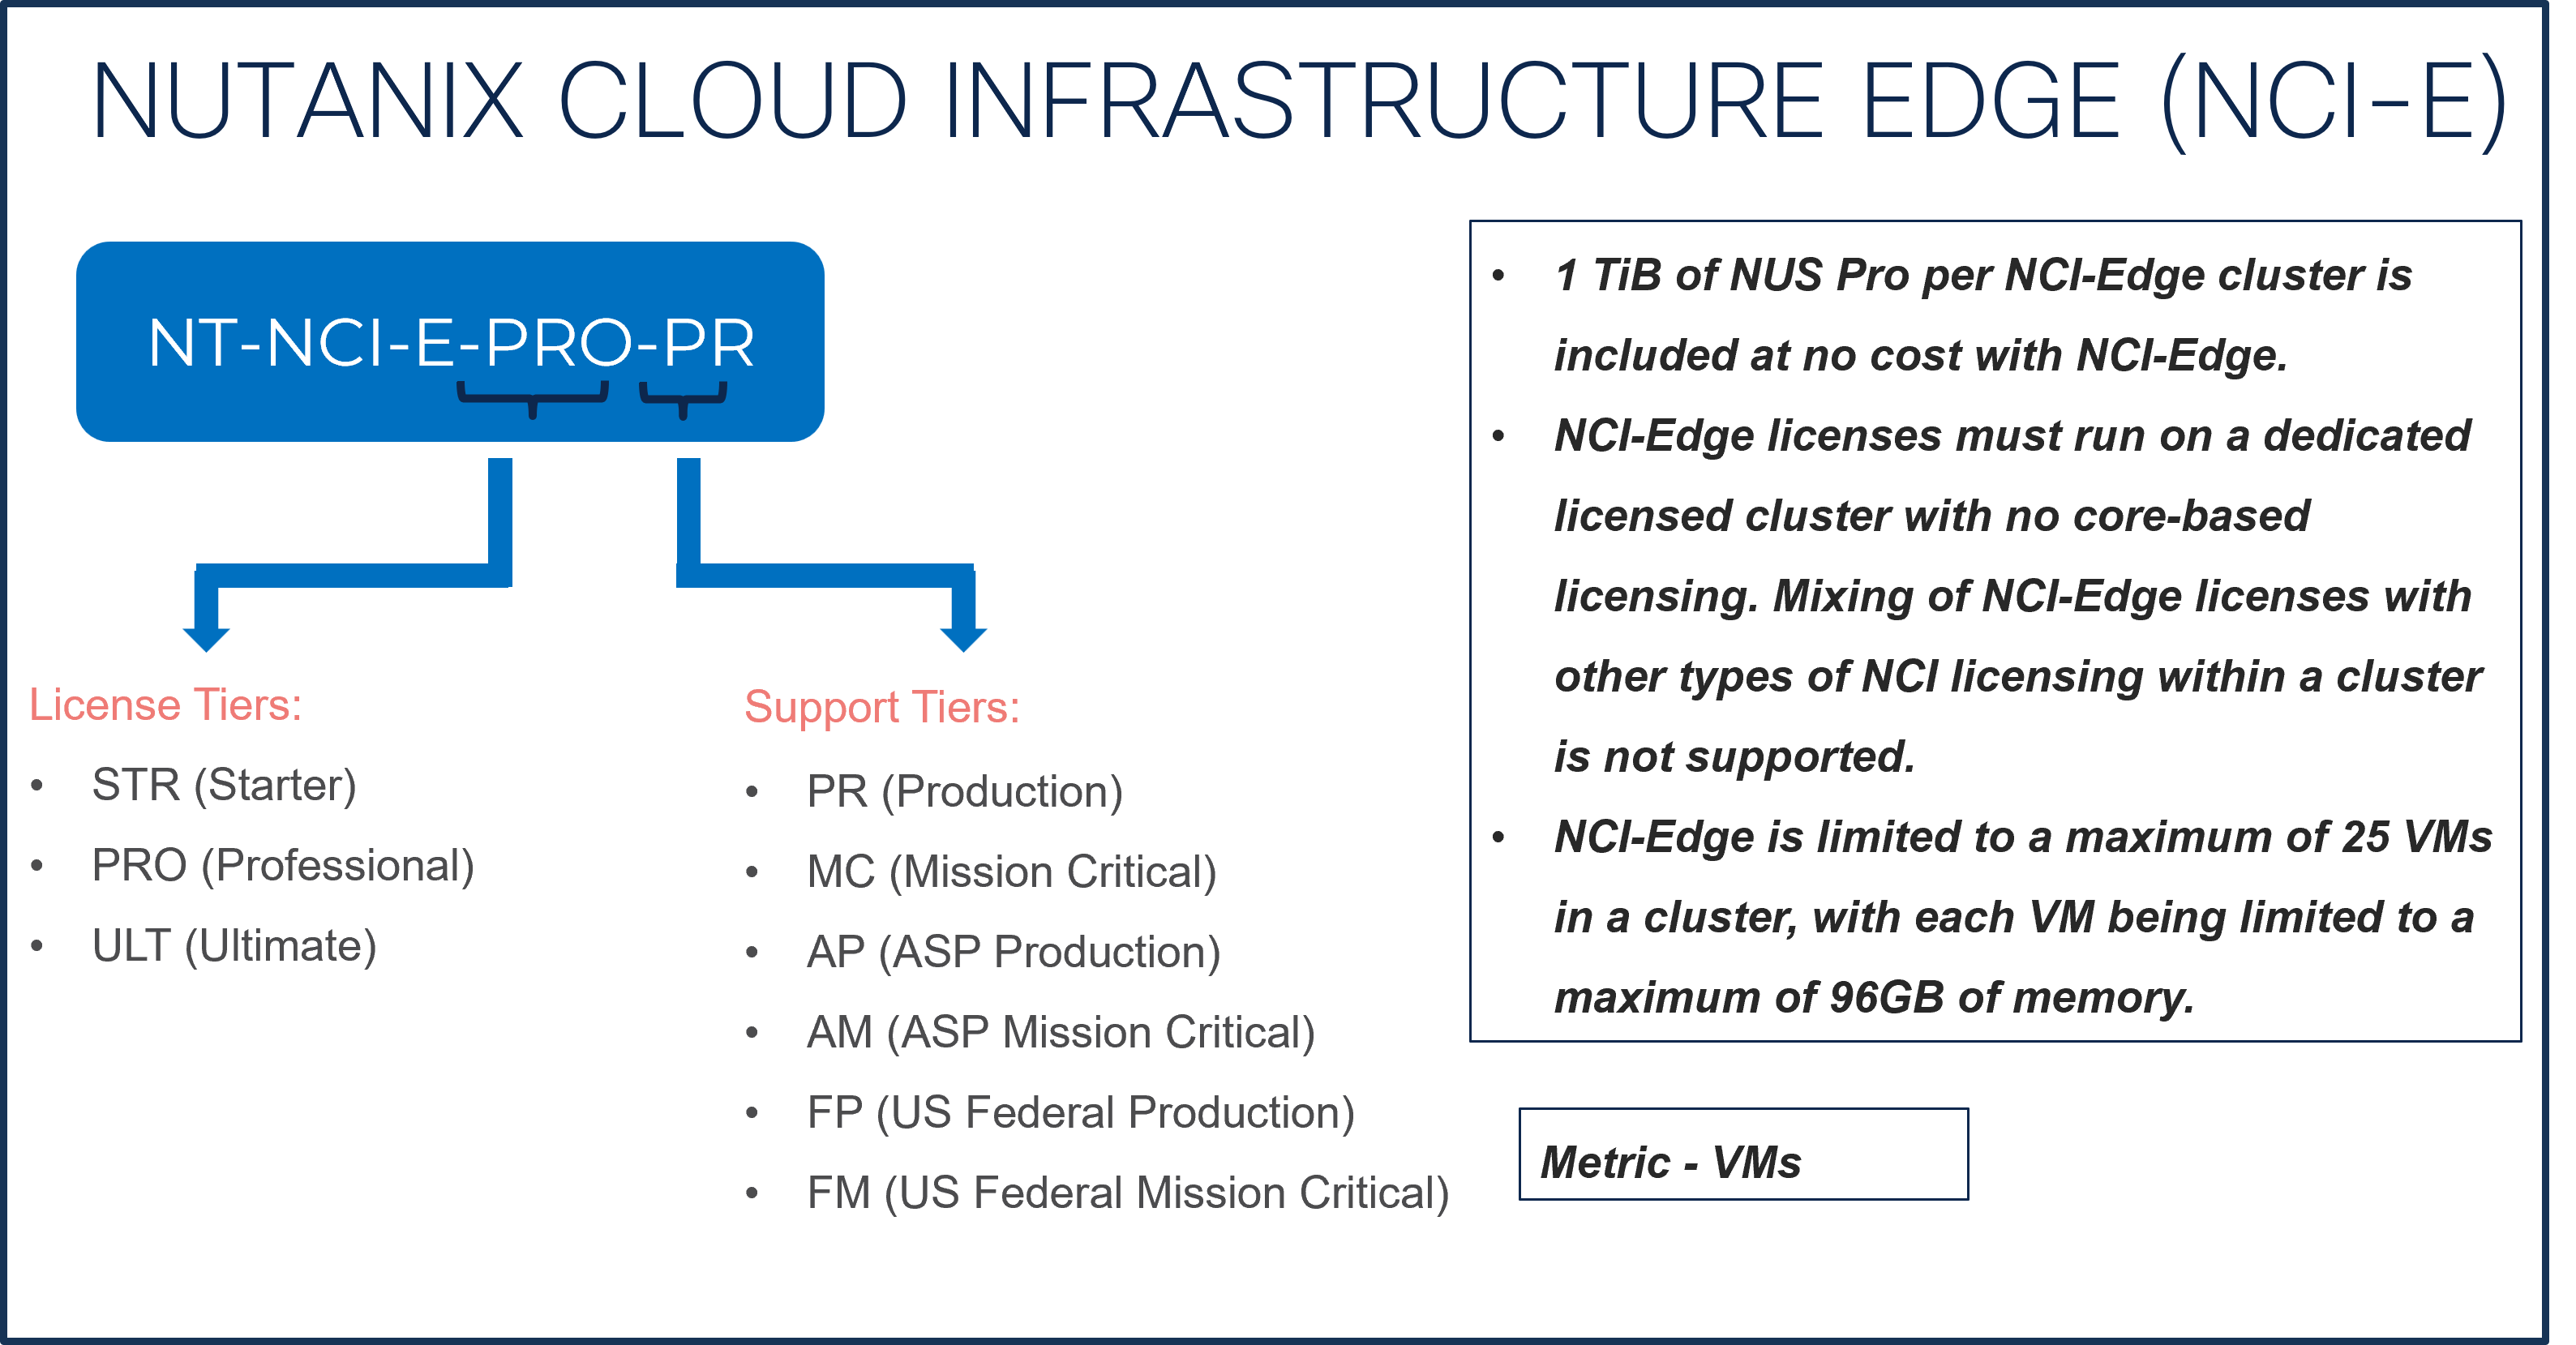
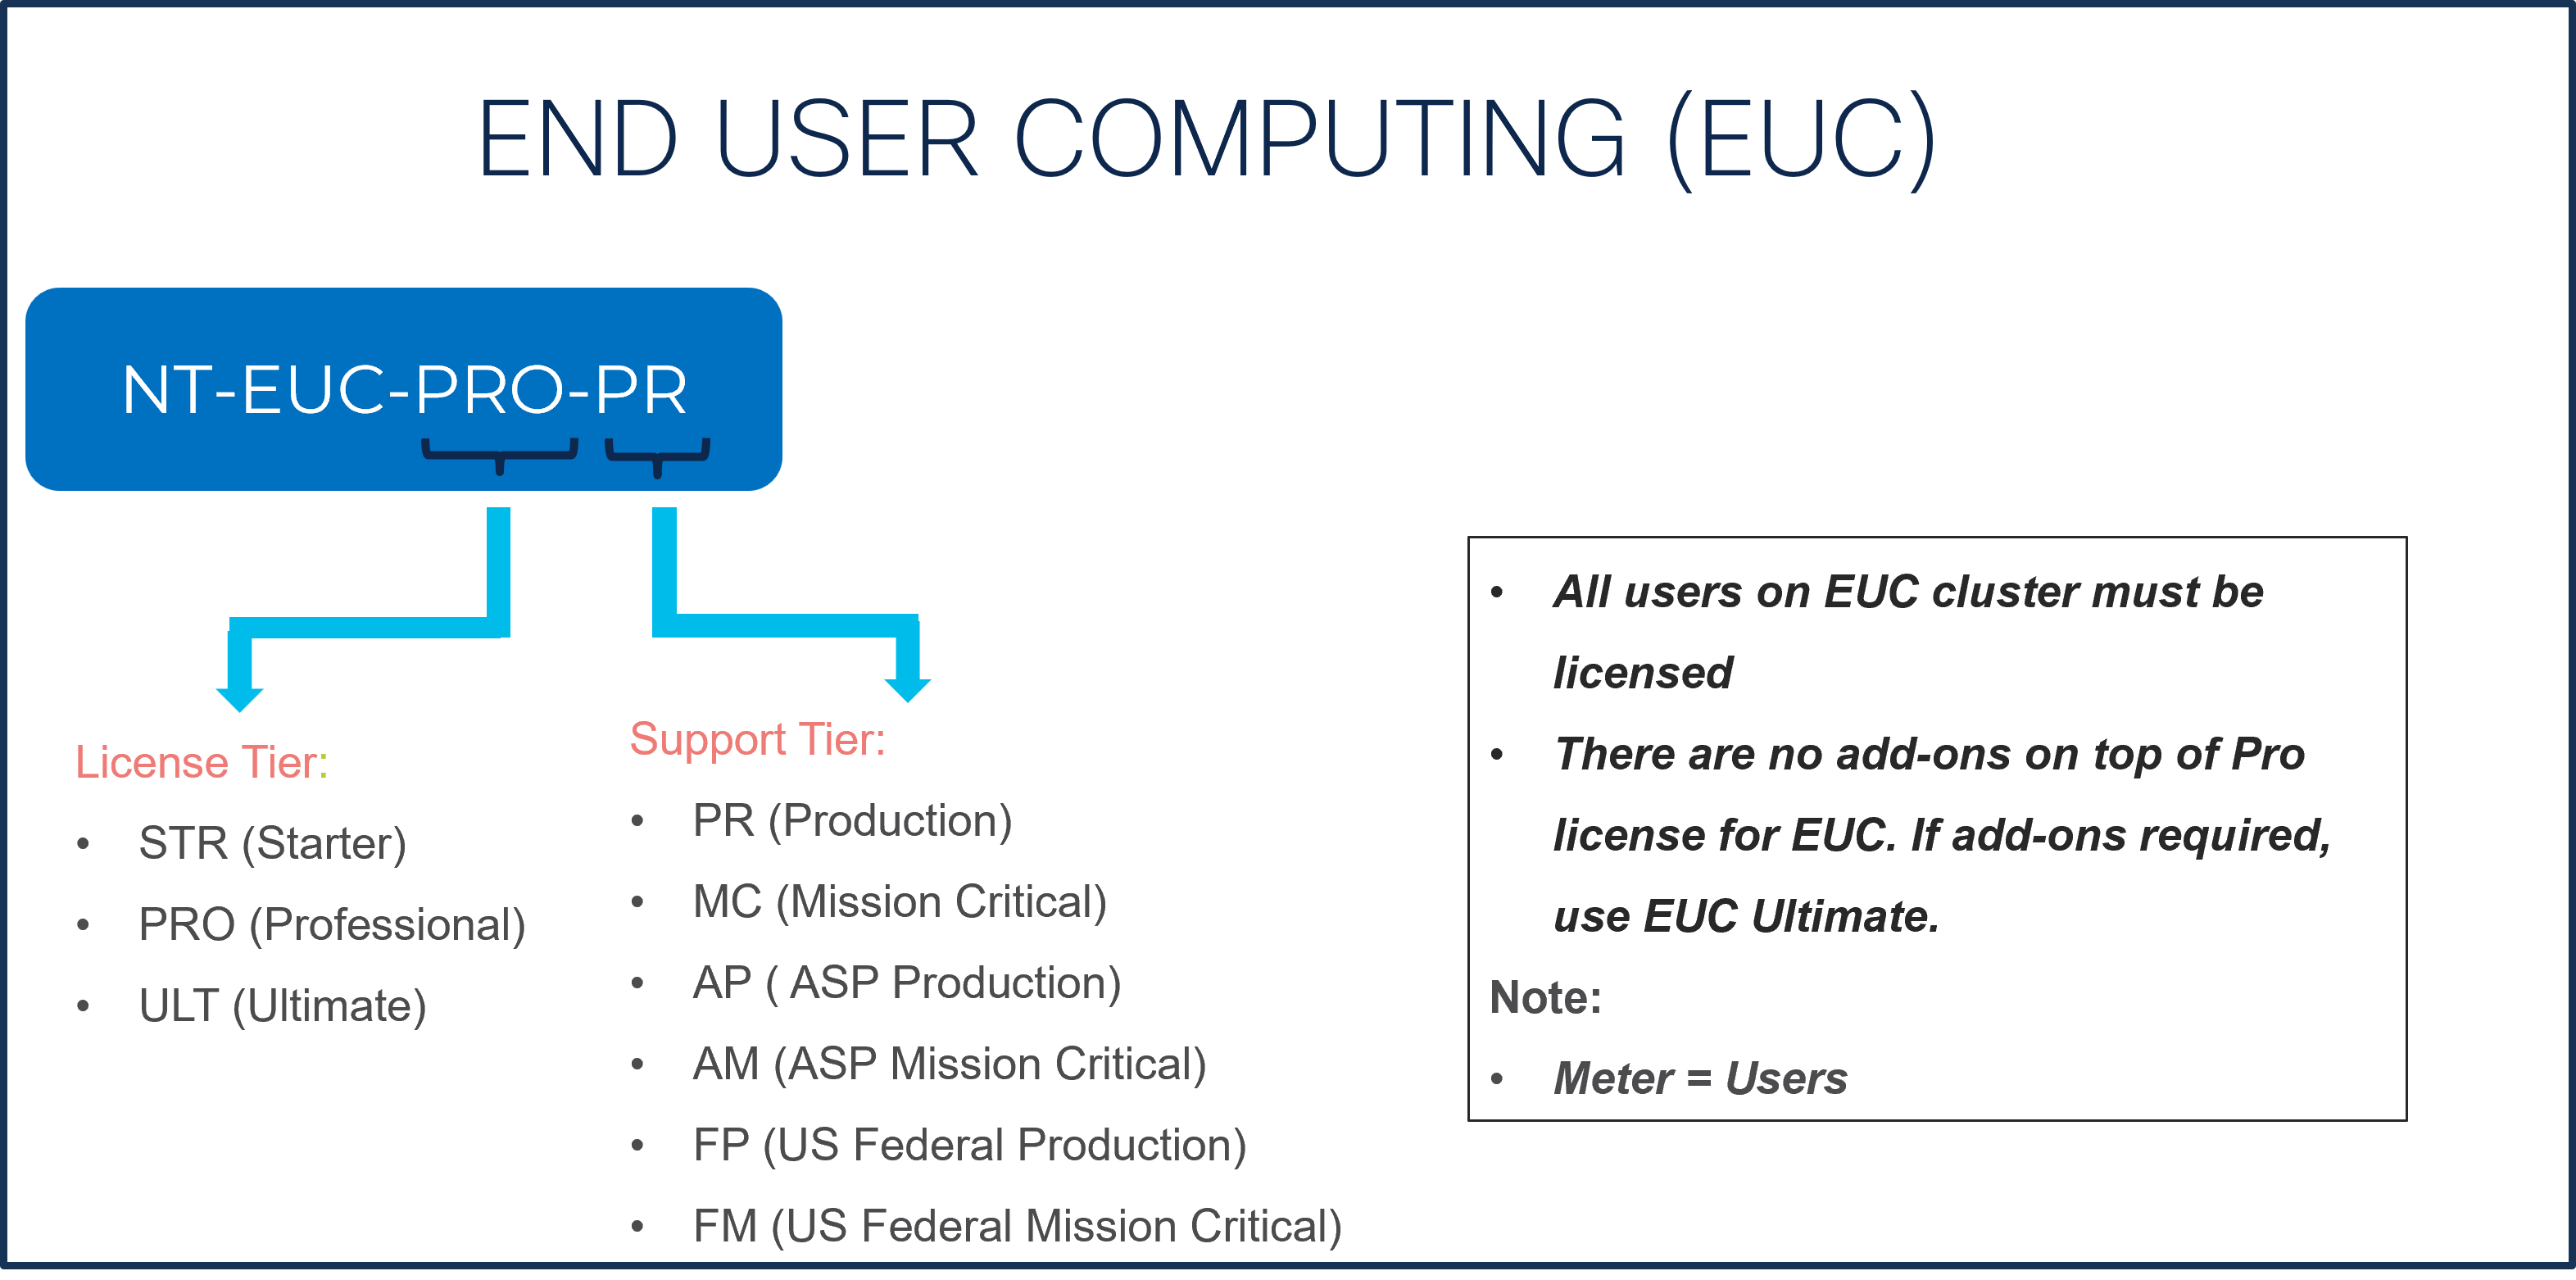
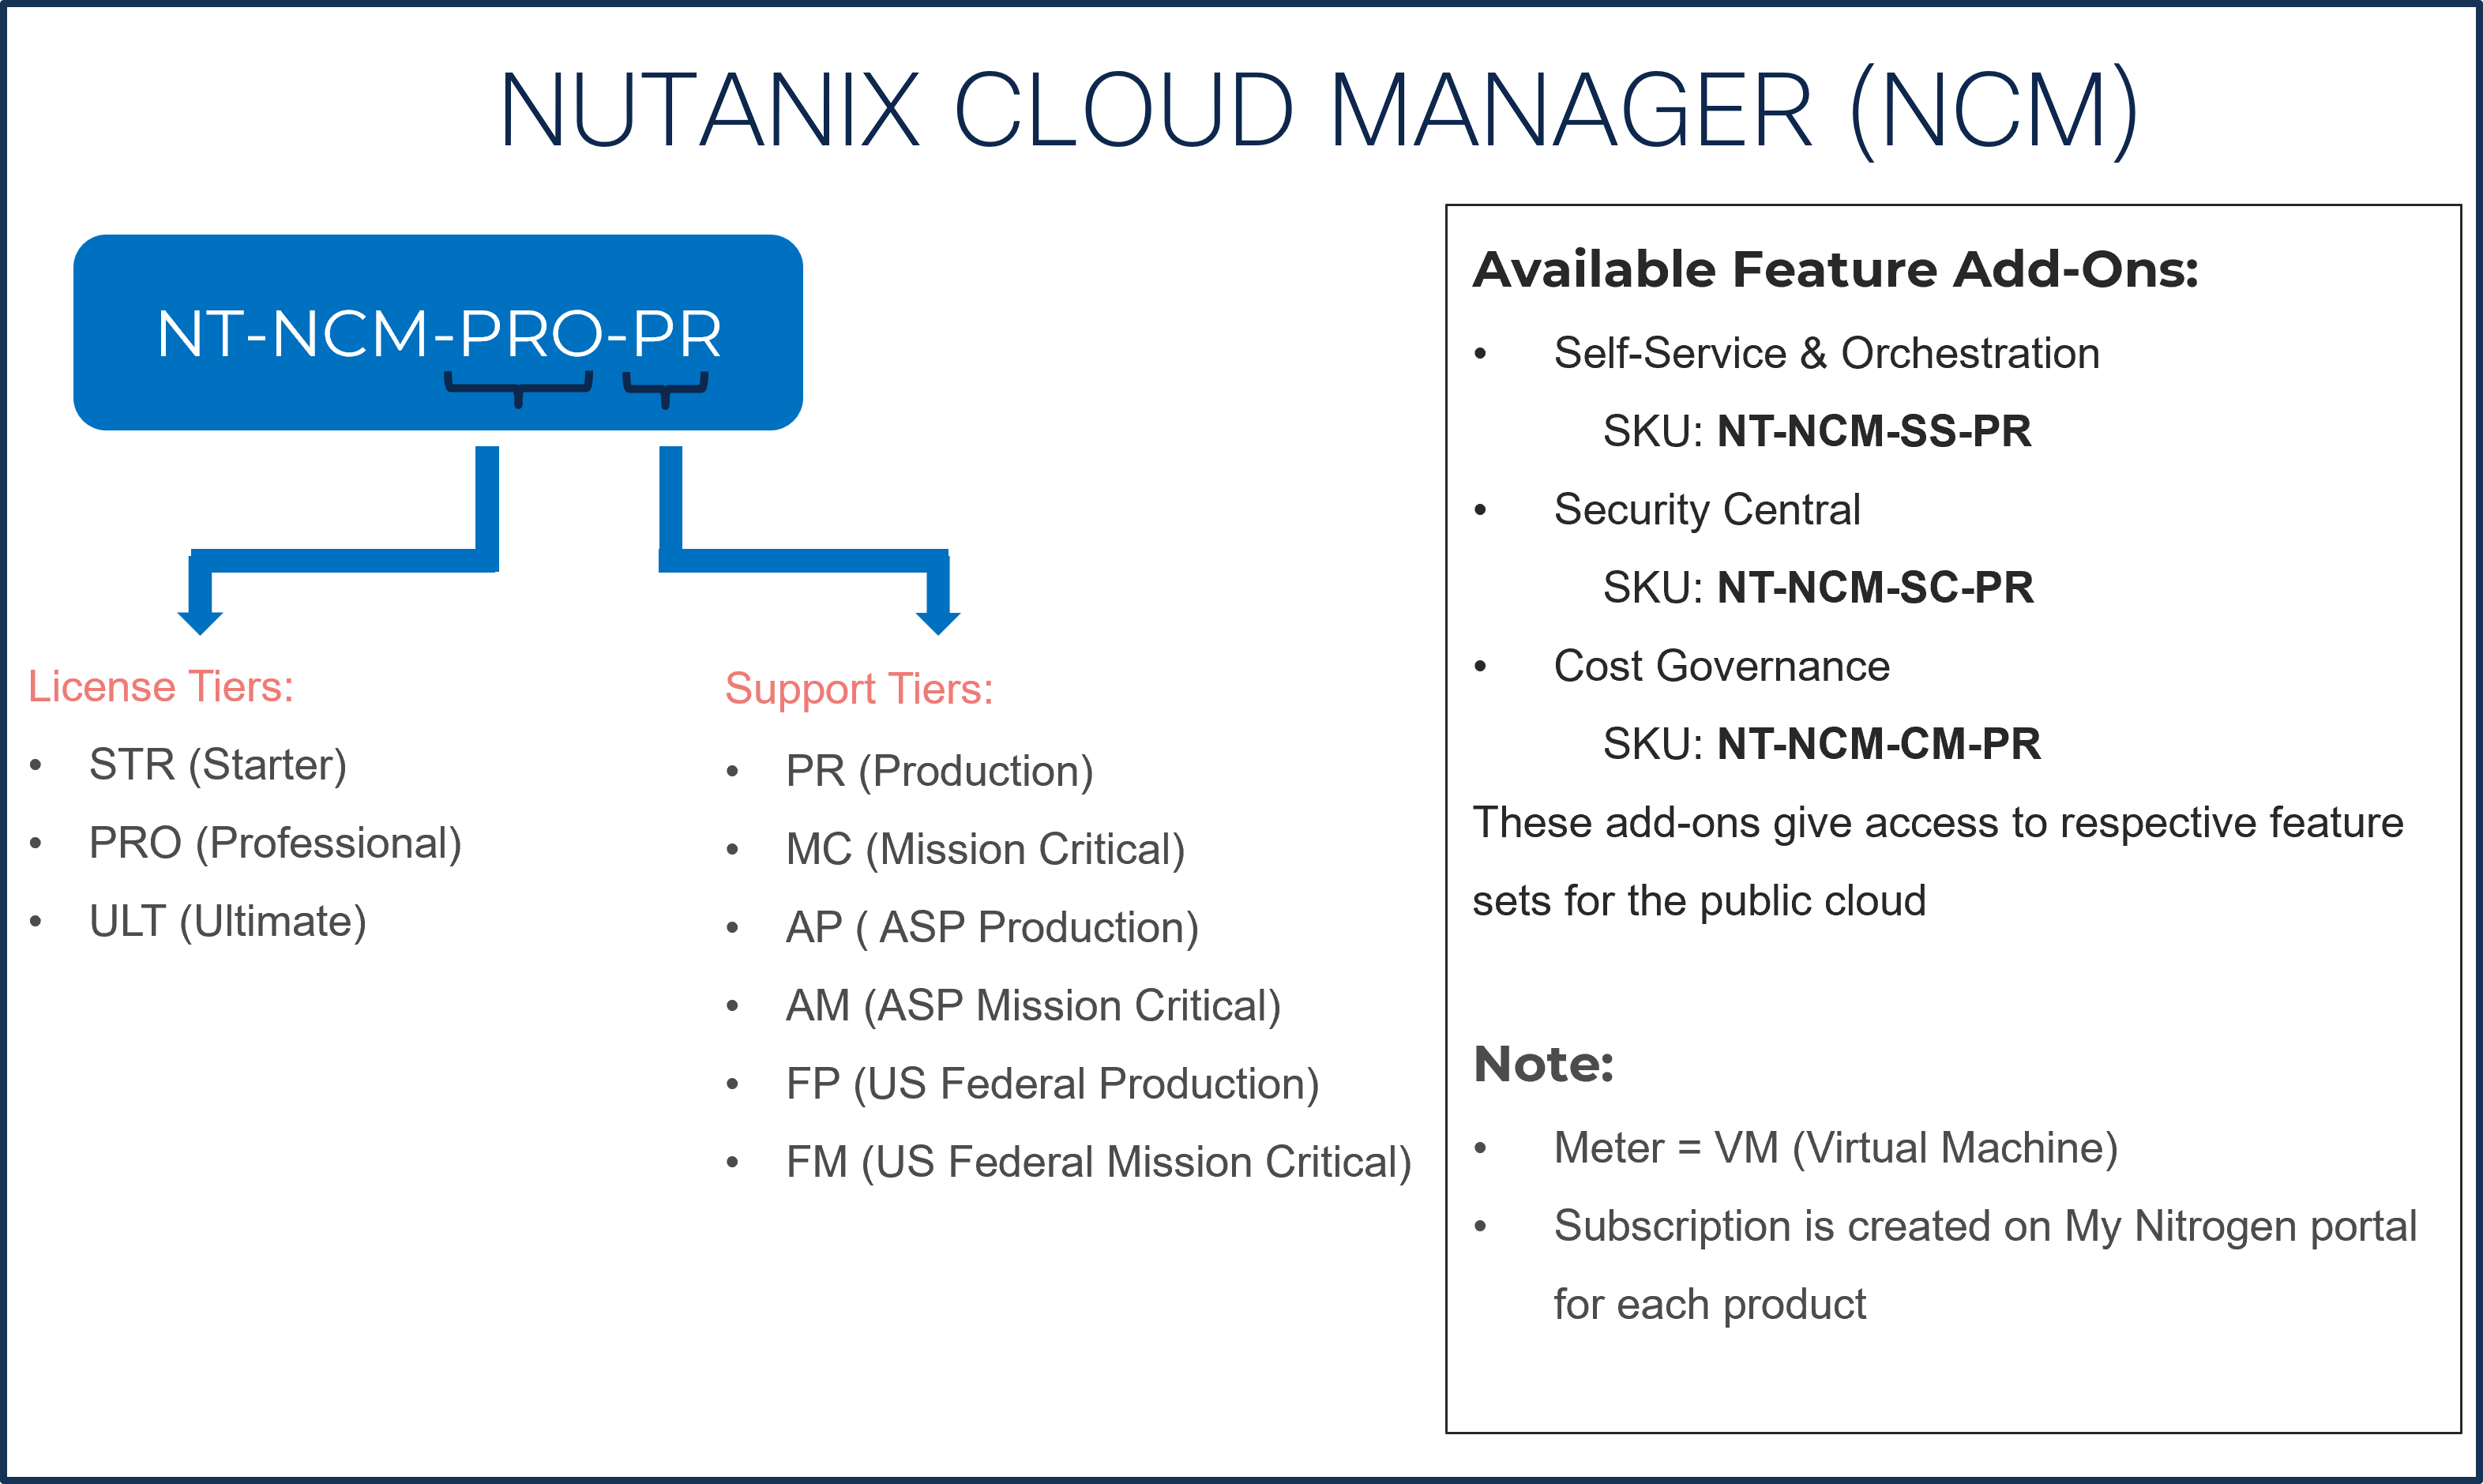
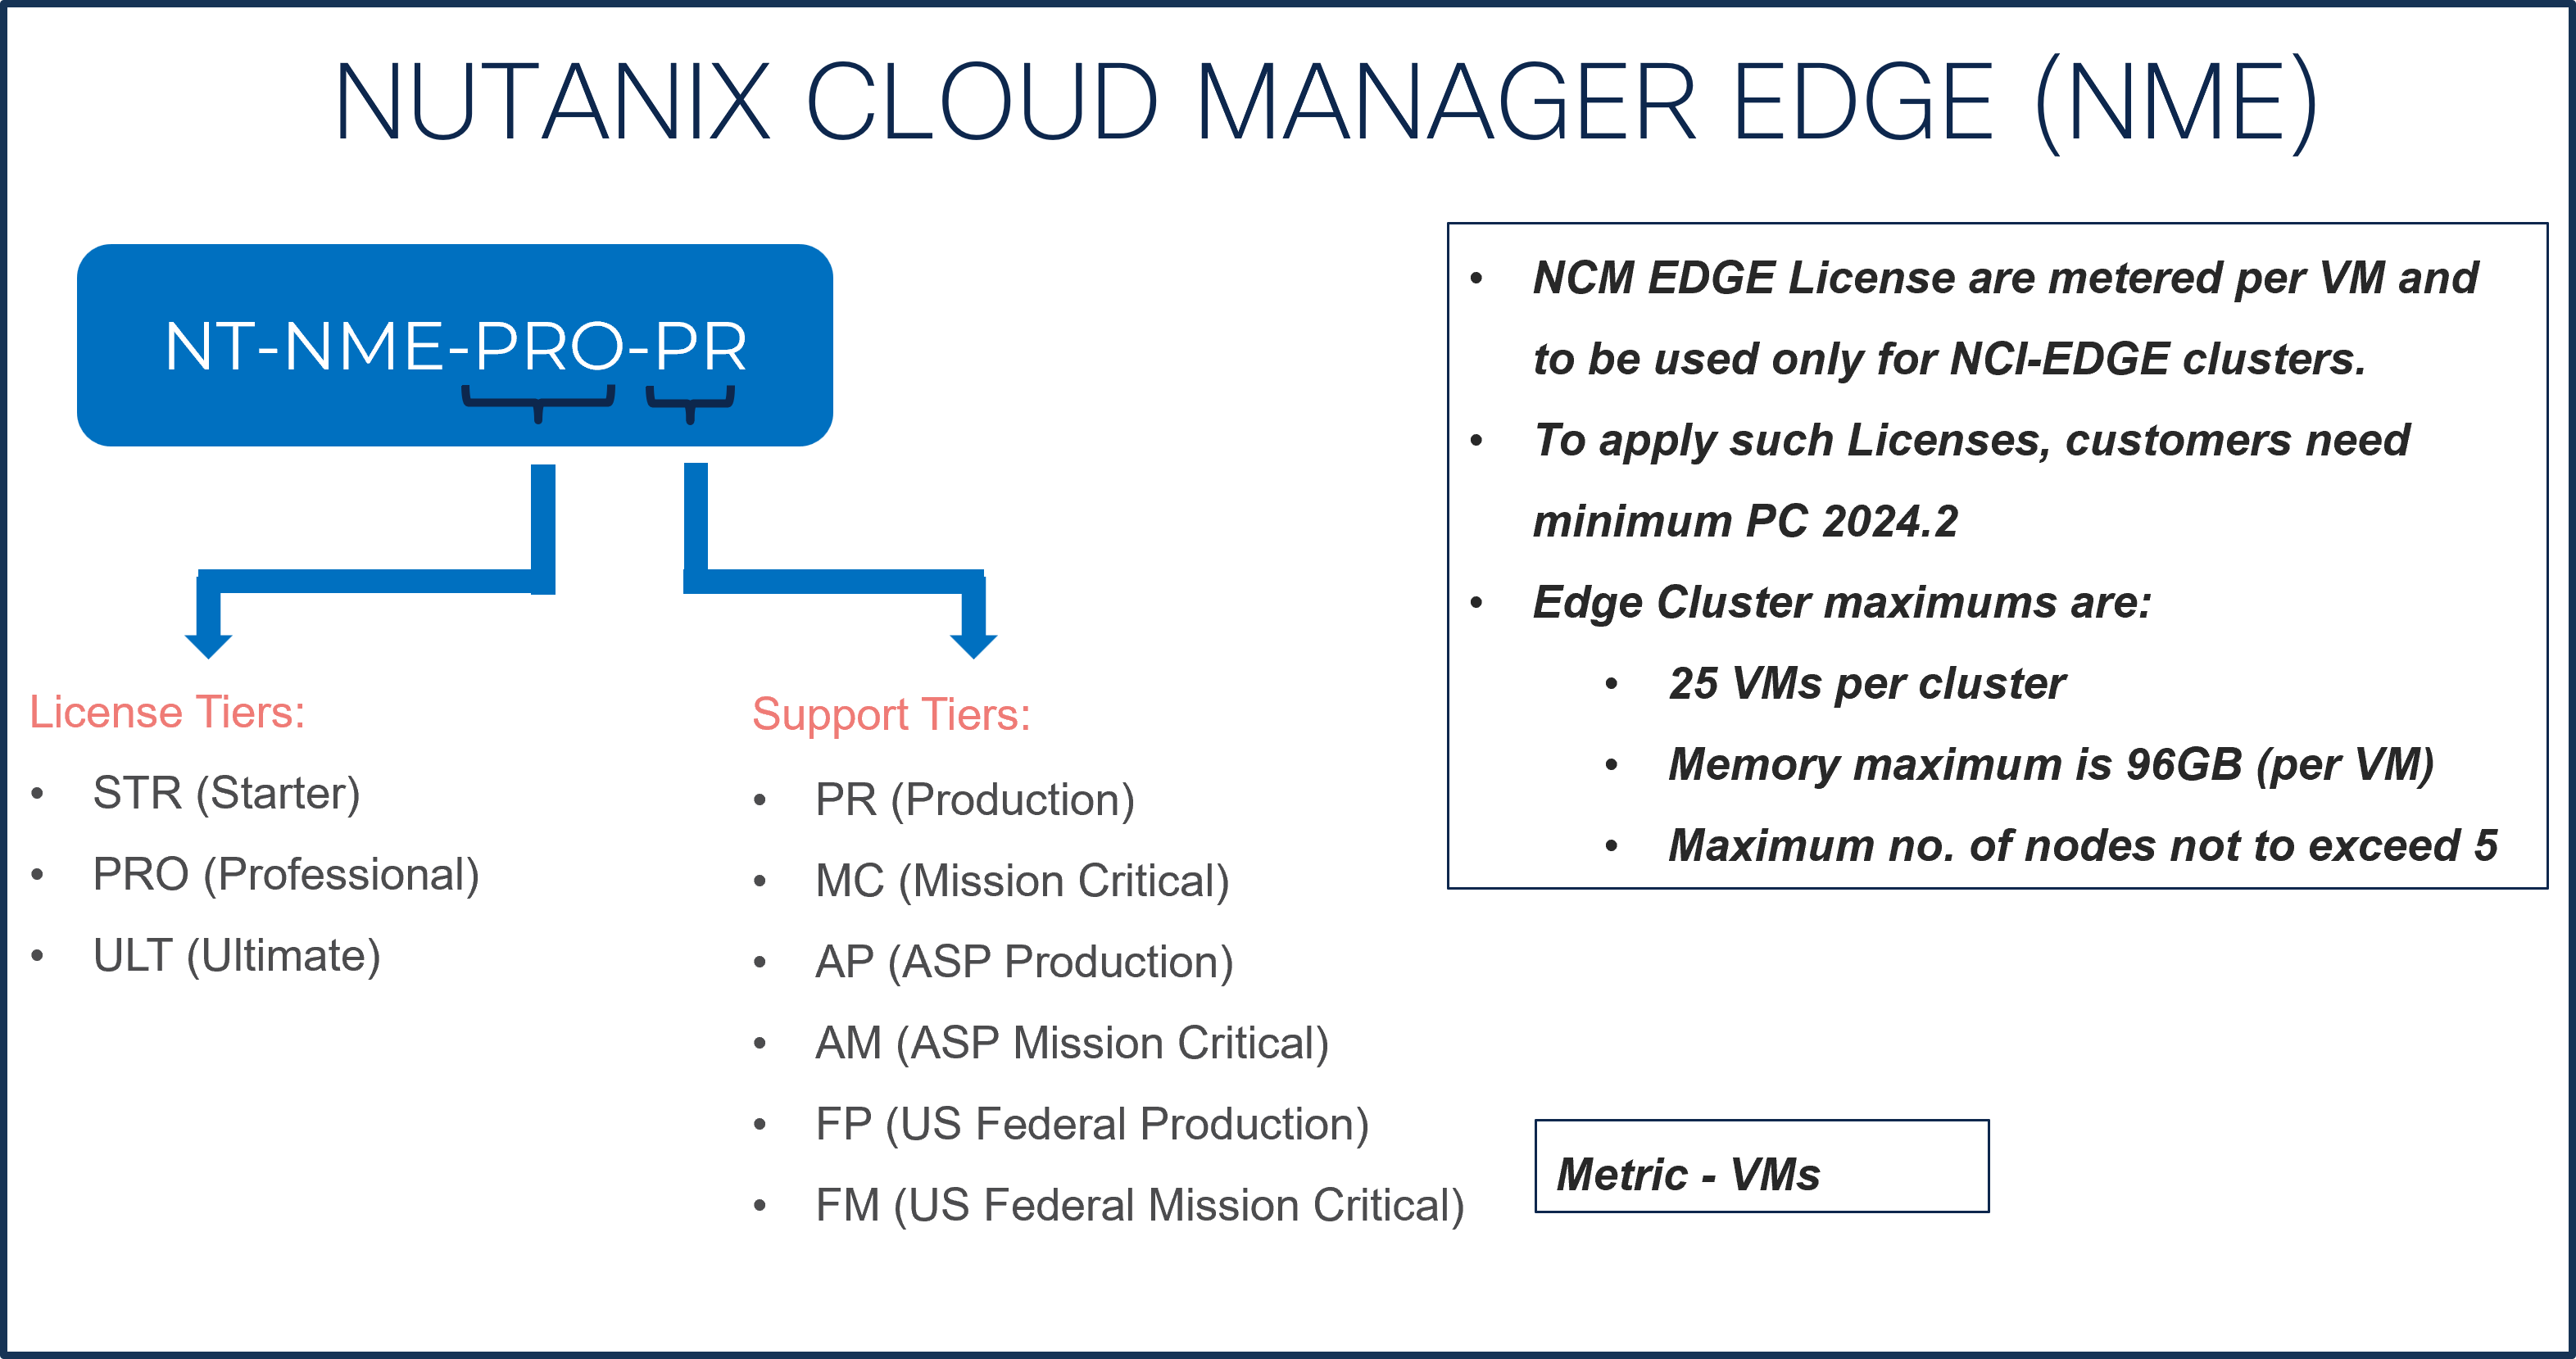
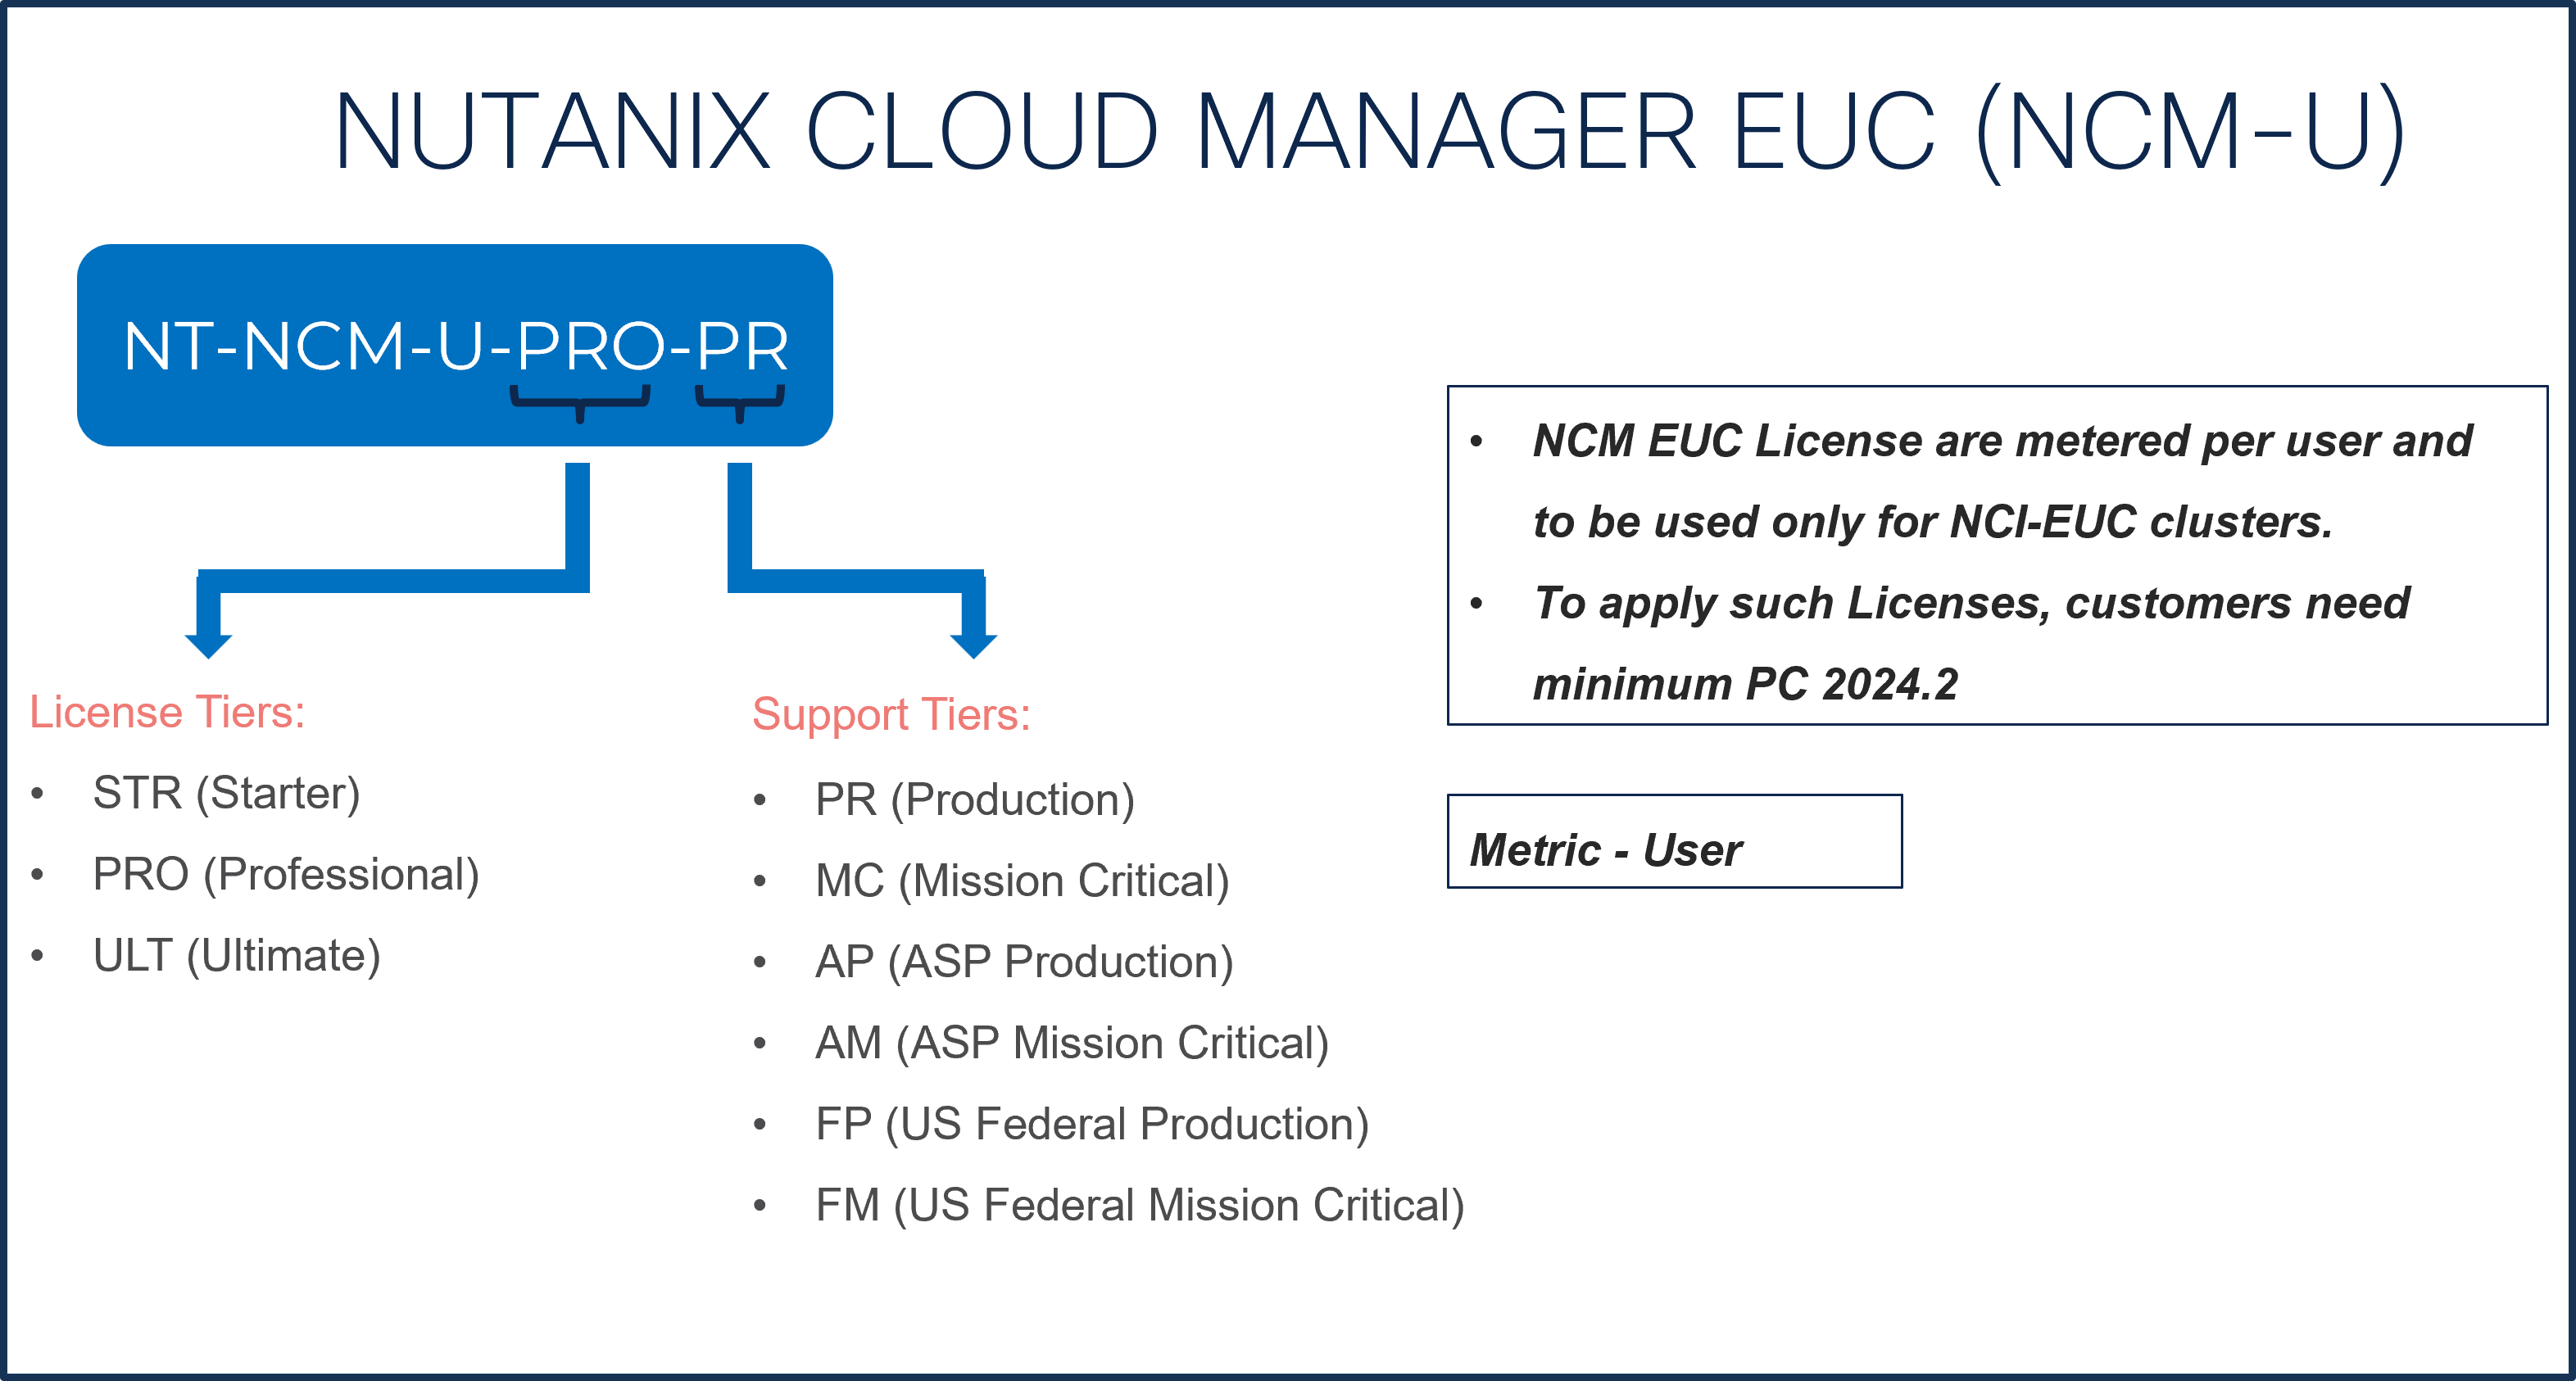
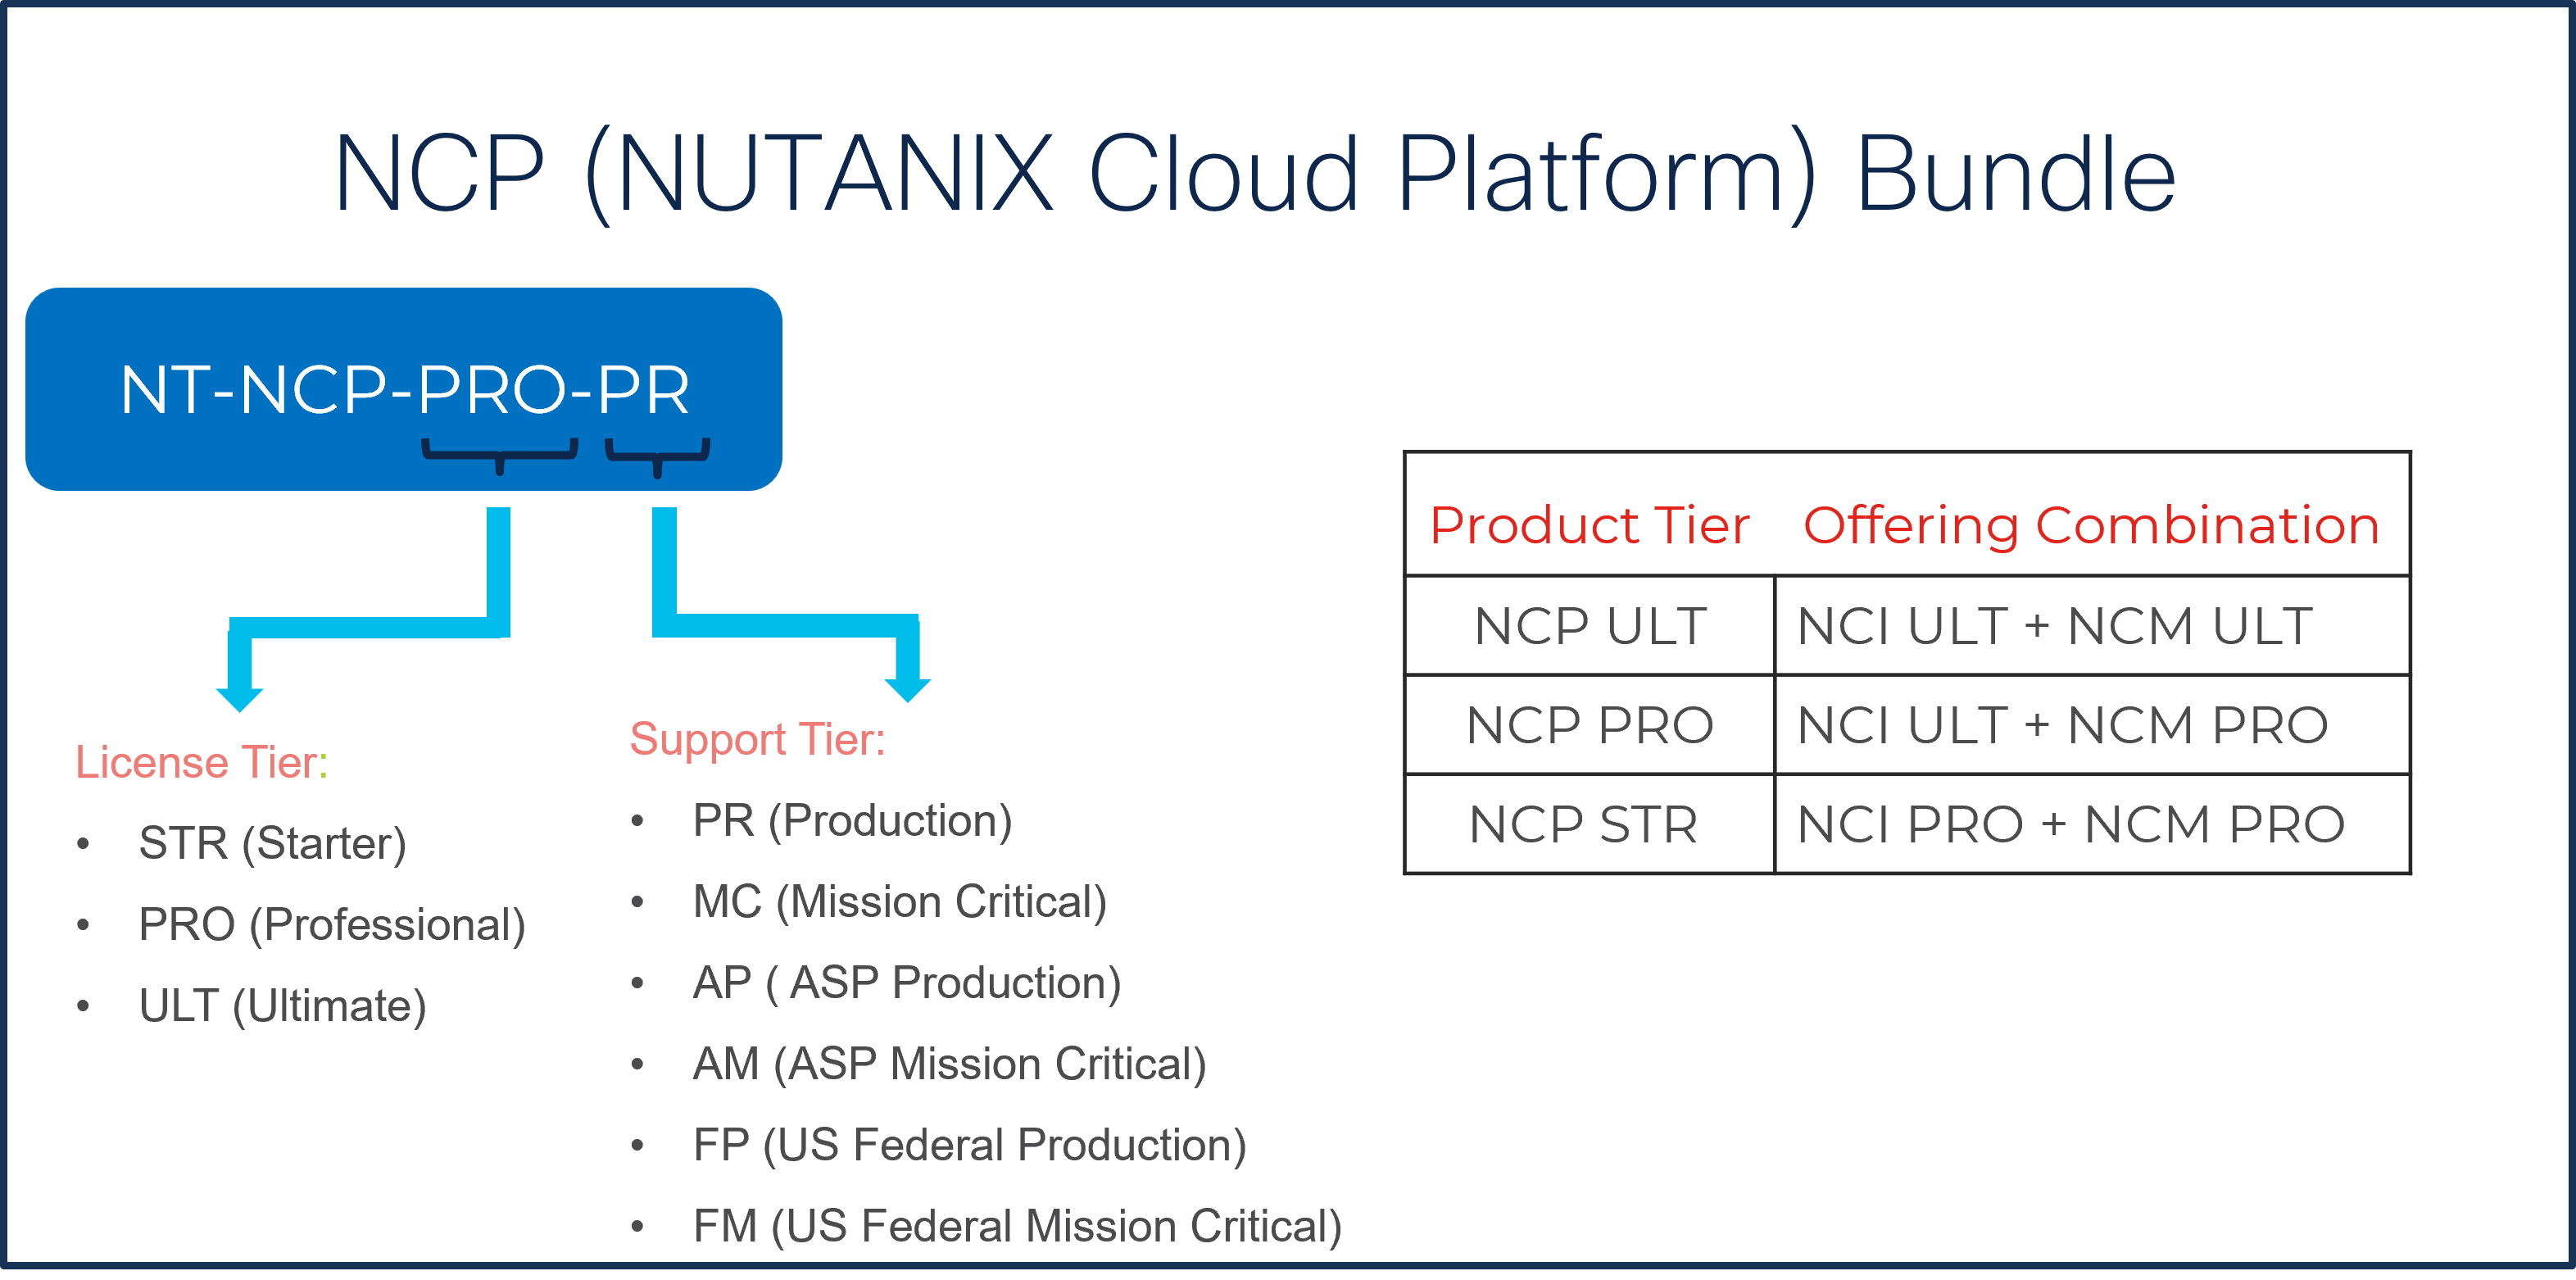
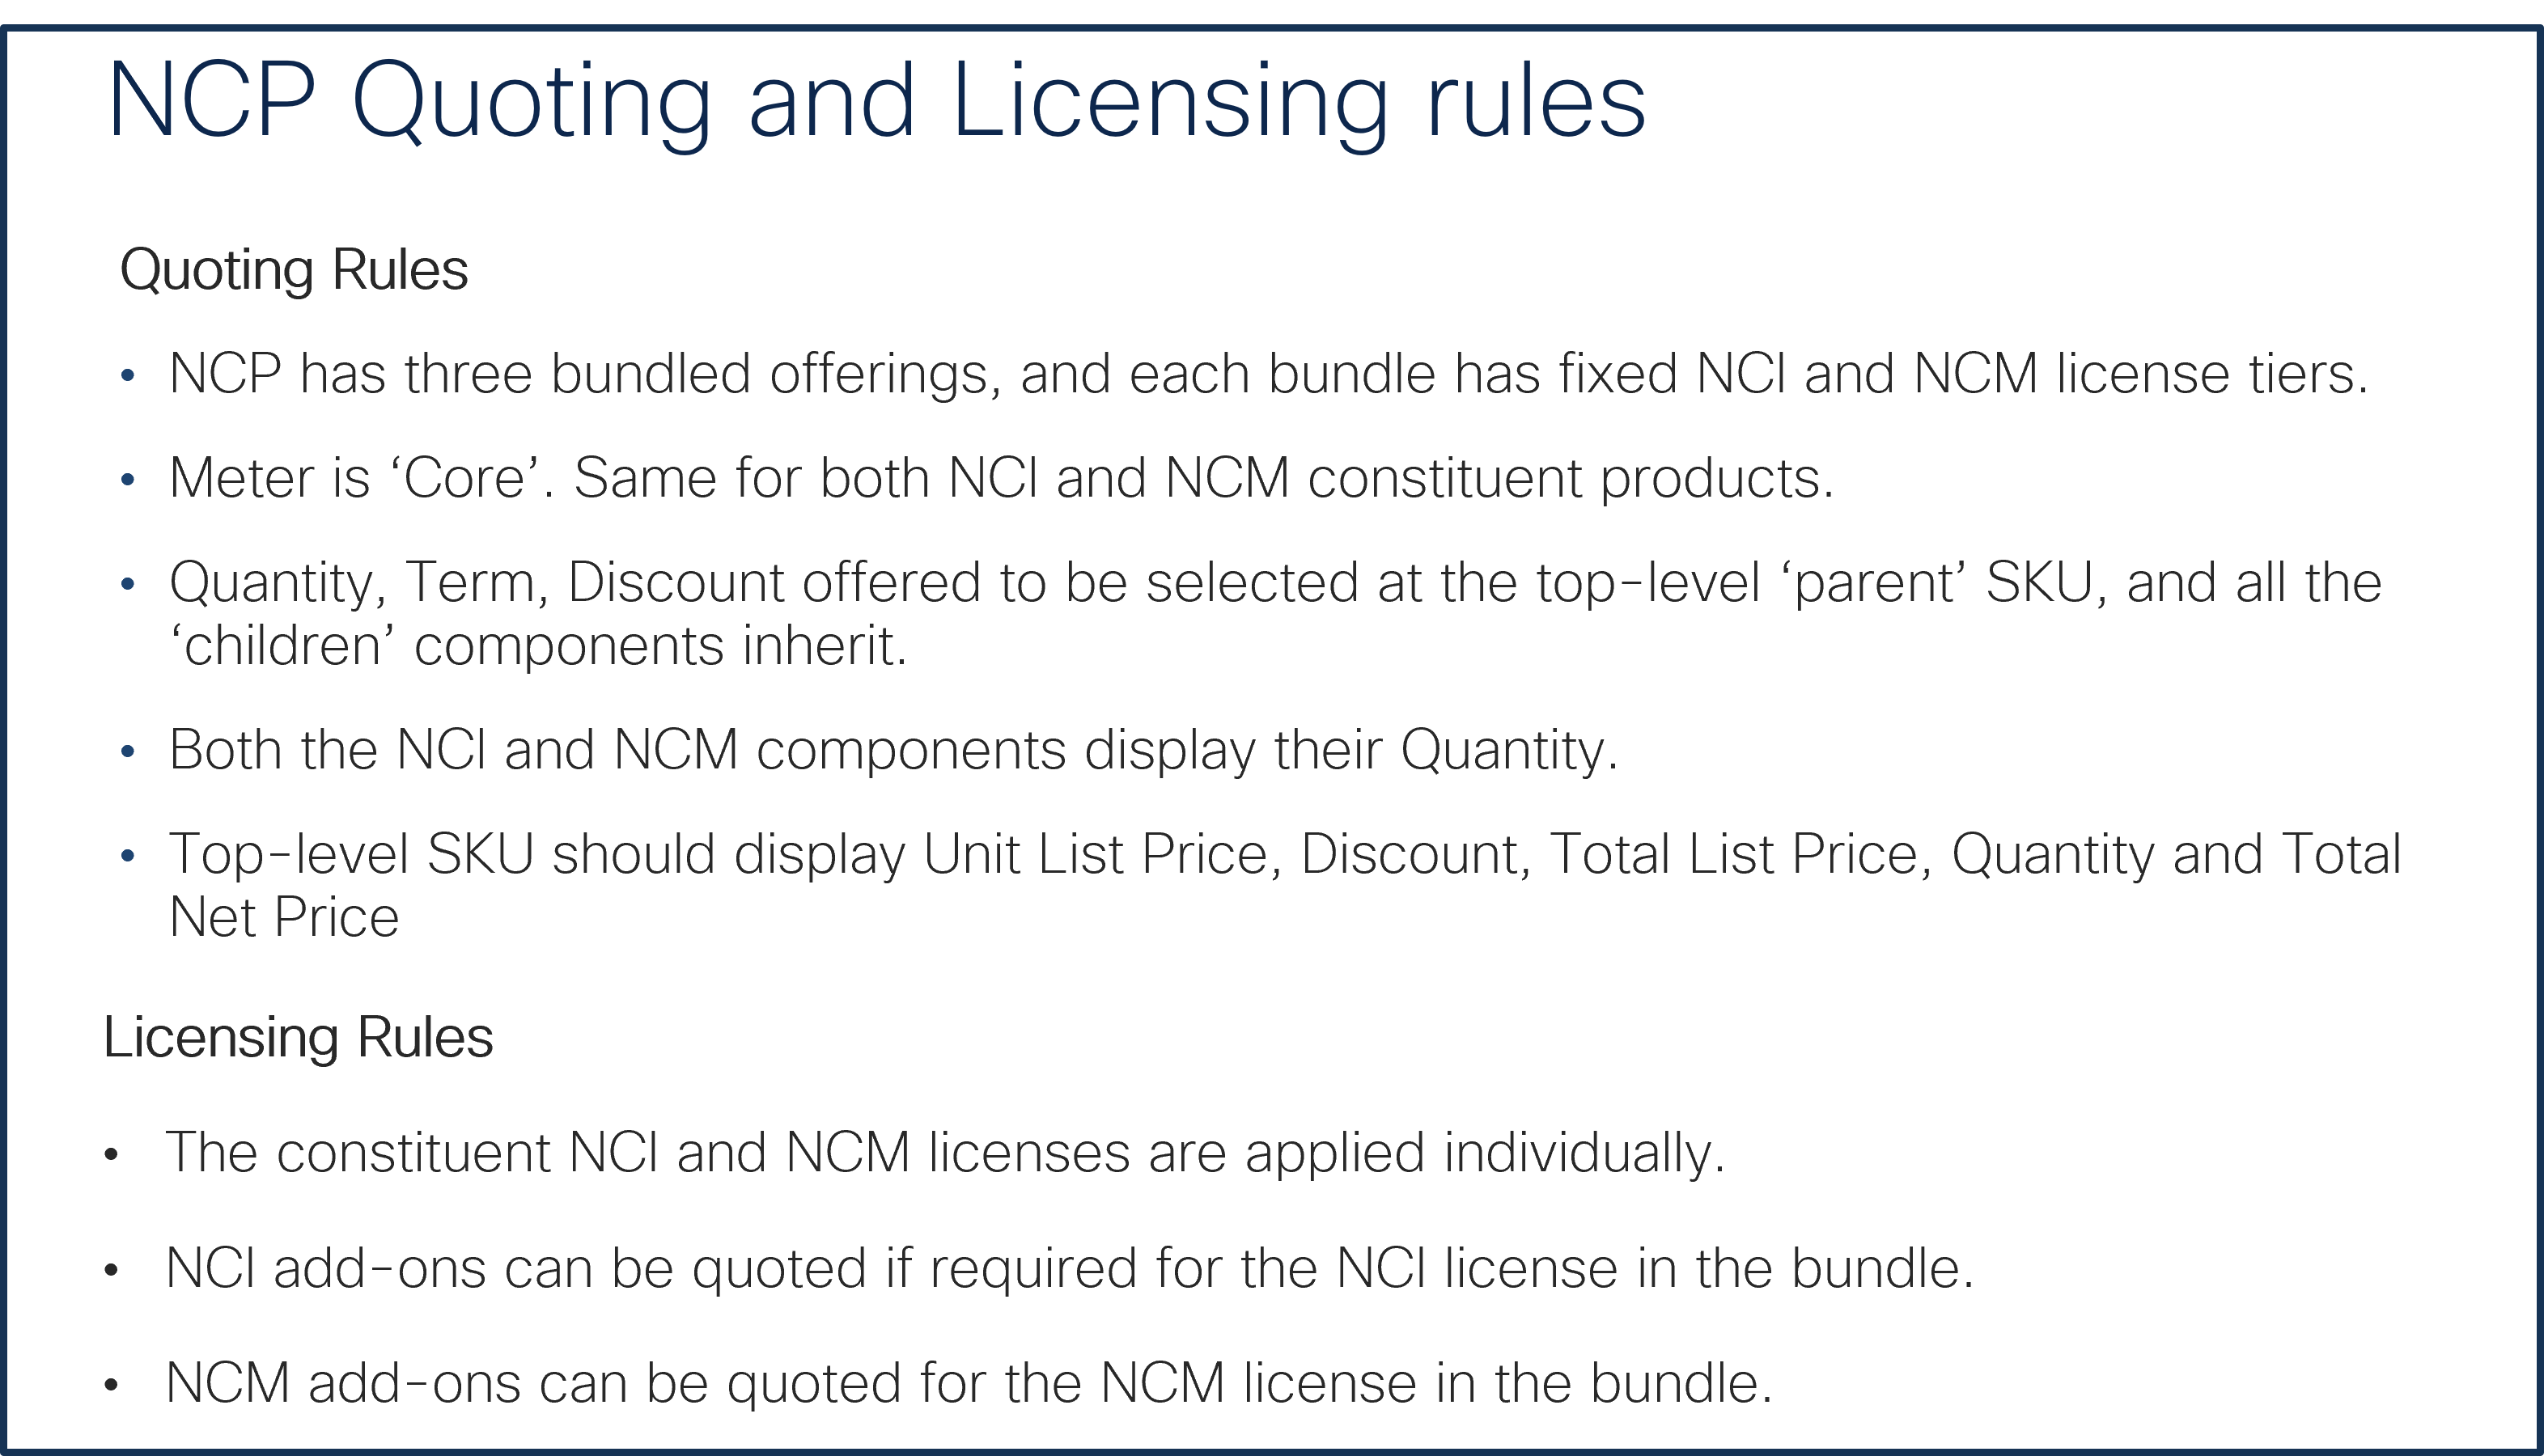
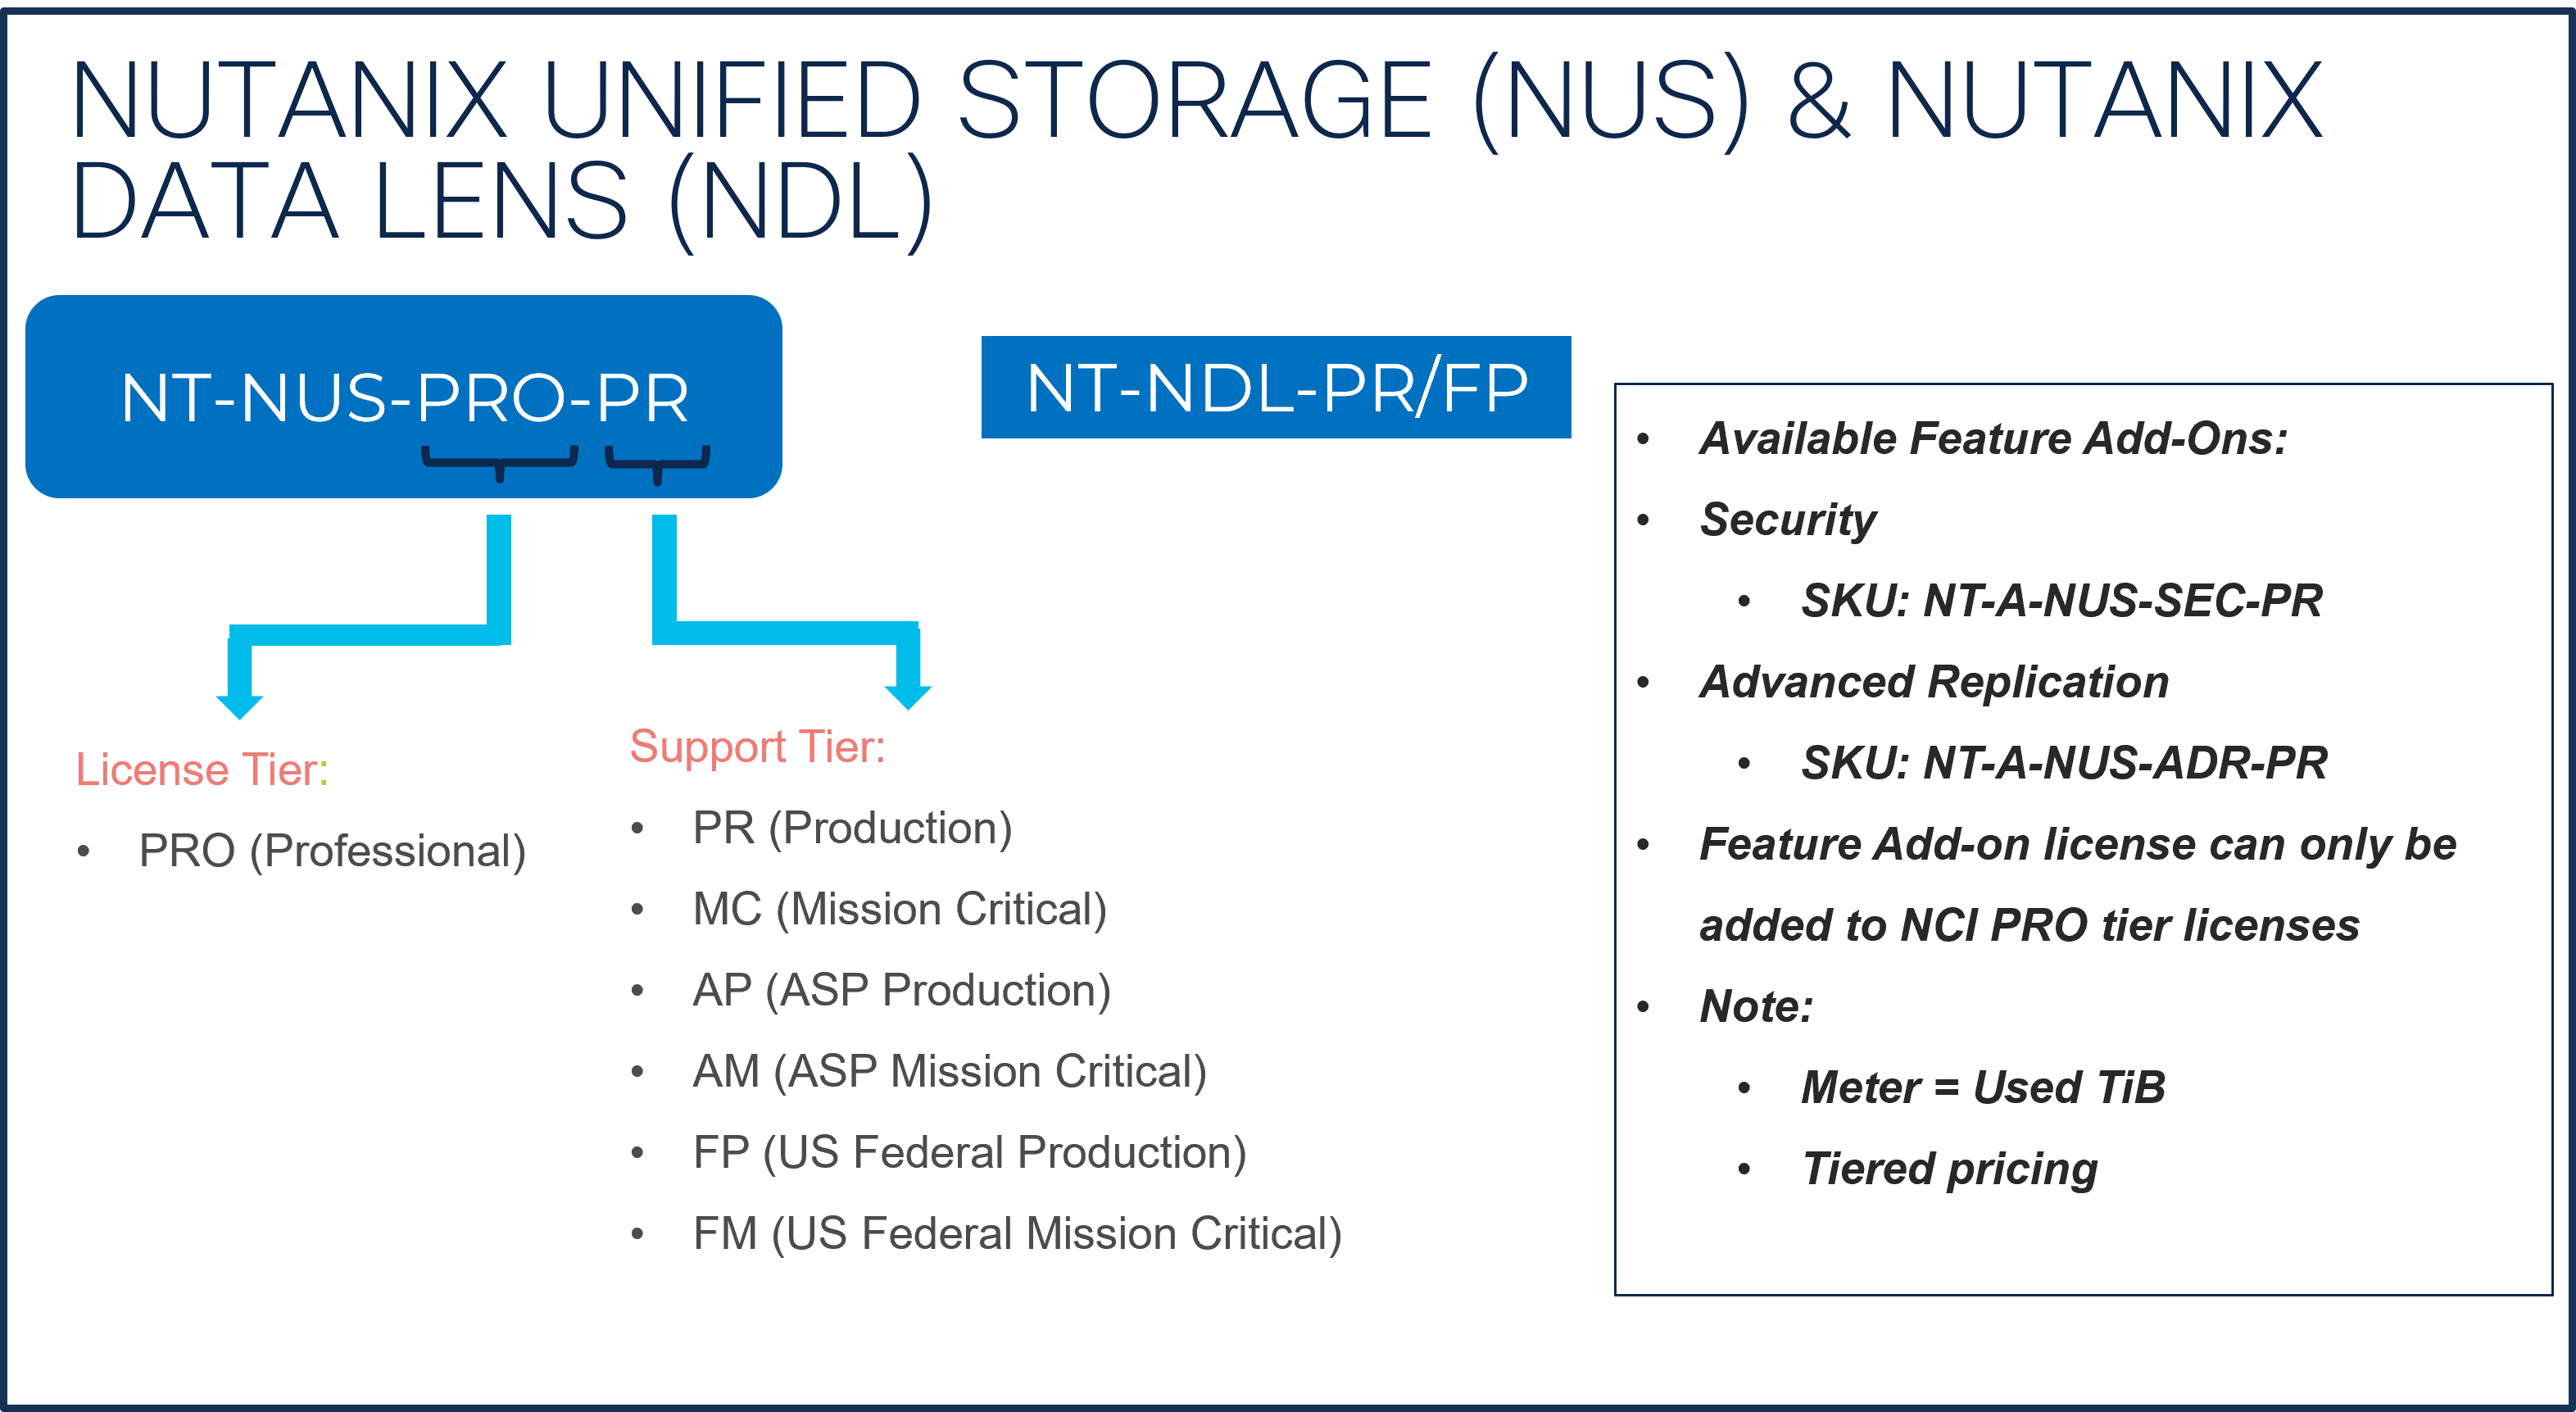
Note: The Quantity of NCI or NCI-D or NCM or (NCI and NCM under NCP) or NKP FS License must match with the QTY of Processor Core selected under Servers.
The Quantity of NCI-E, NCM-E, EUC, NCM-U, NAI, NKP, NUS and NDL License can be selected per recommended system requirement.
a. Pick a Nutanix Software Product offering at the left
b. Pick a License & Support Tier pid & QTY at the right for that specific lic type
c. To change Term, Start Date, co-term and others click at the at top next to the ‘Requested Terms and Billing ‘
Step 21.
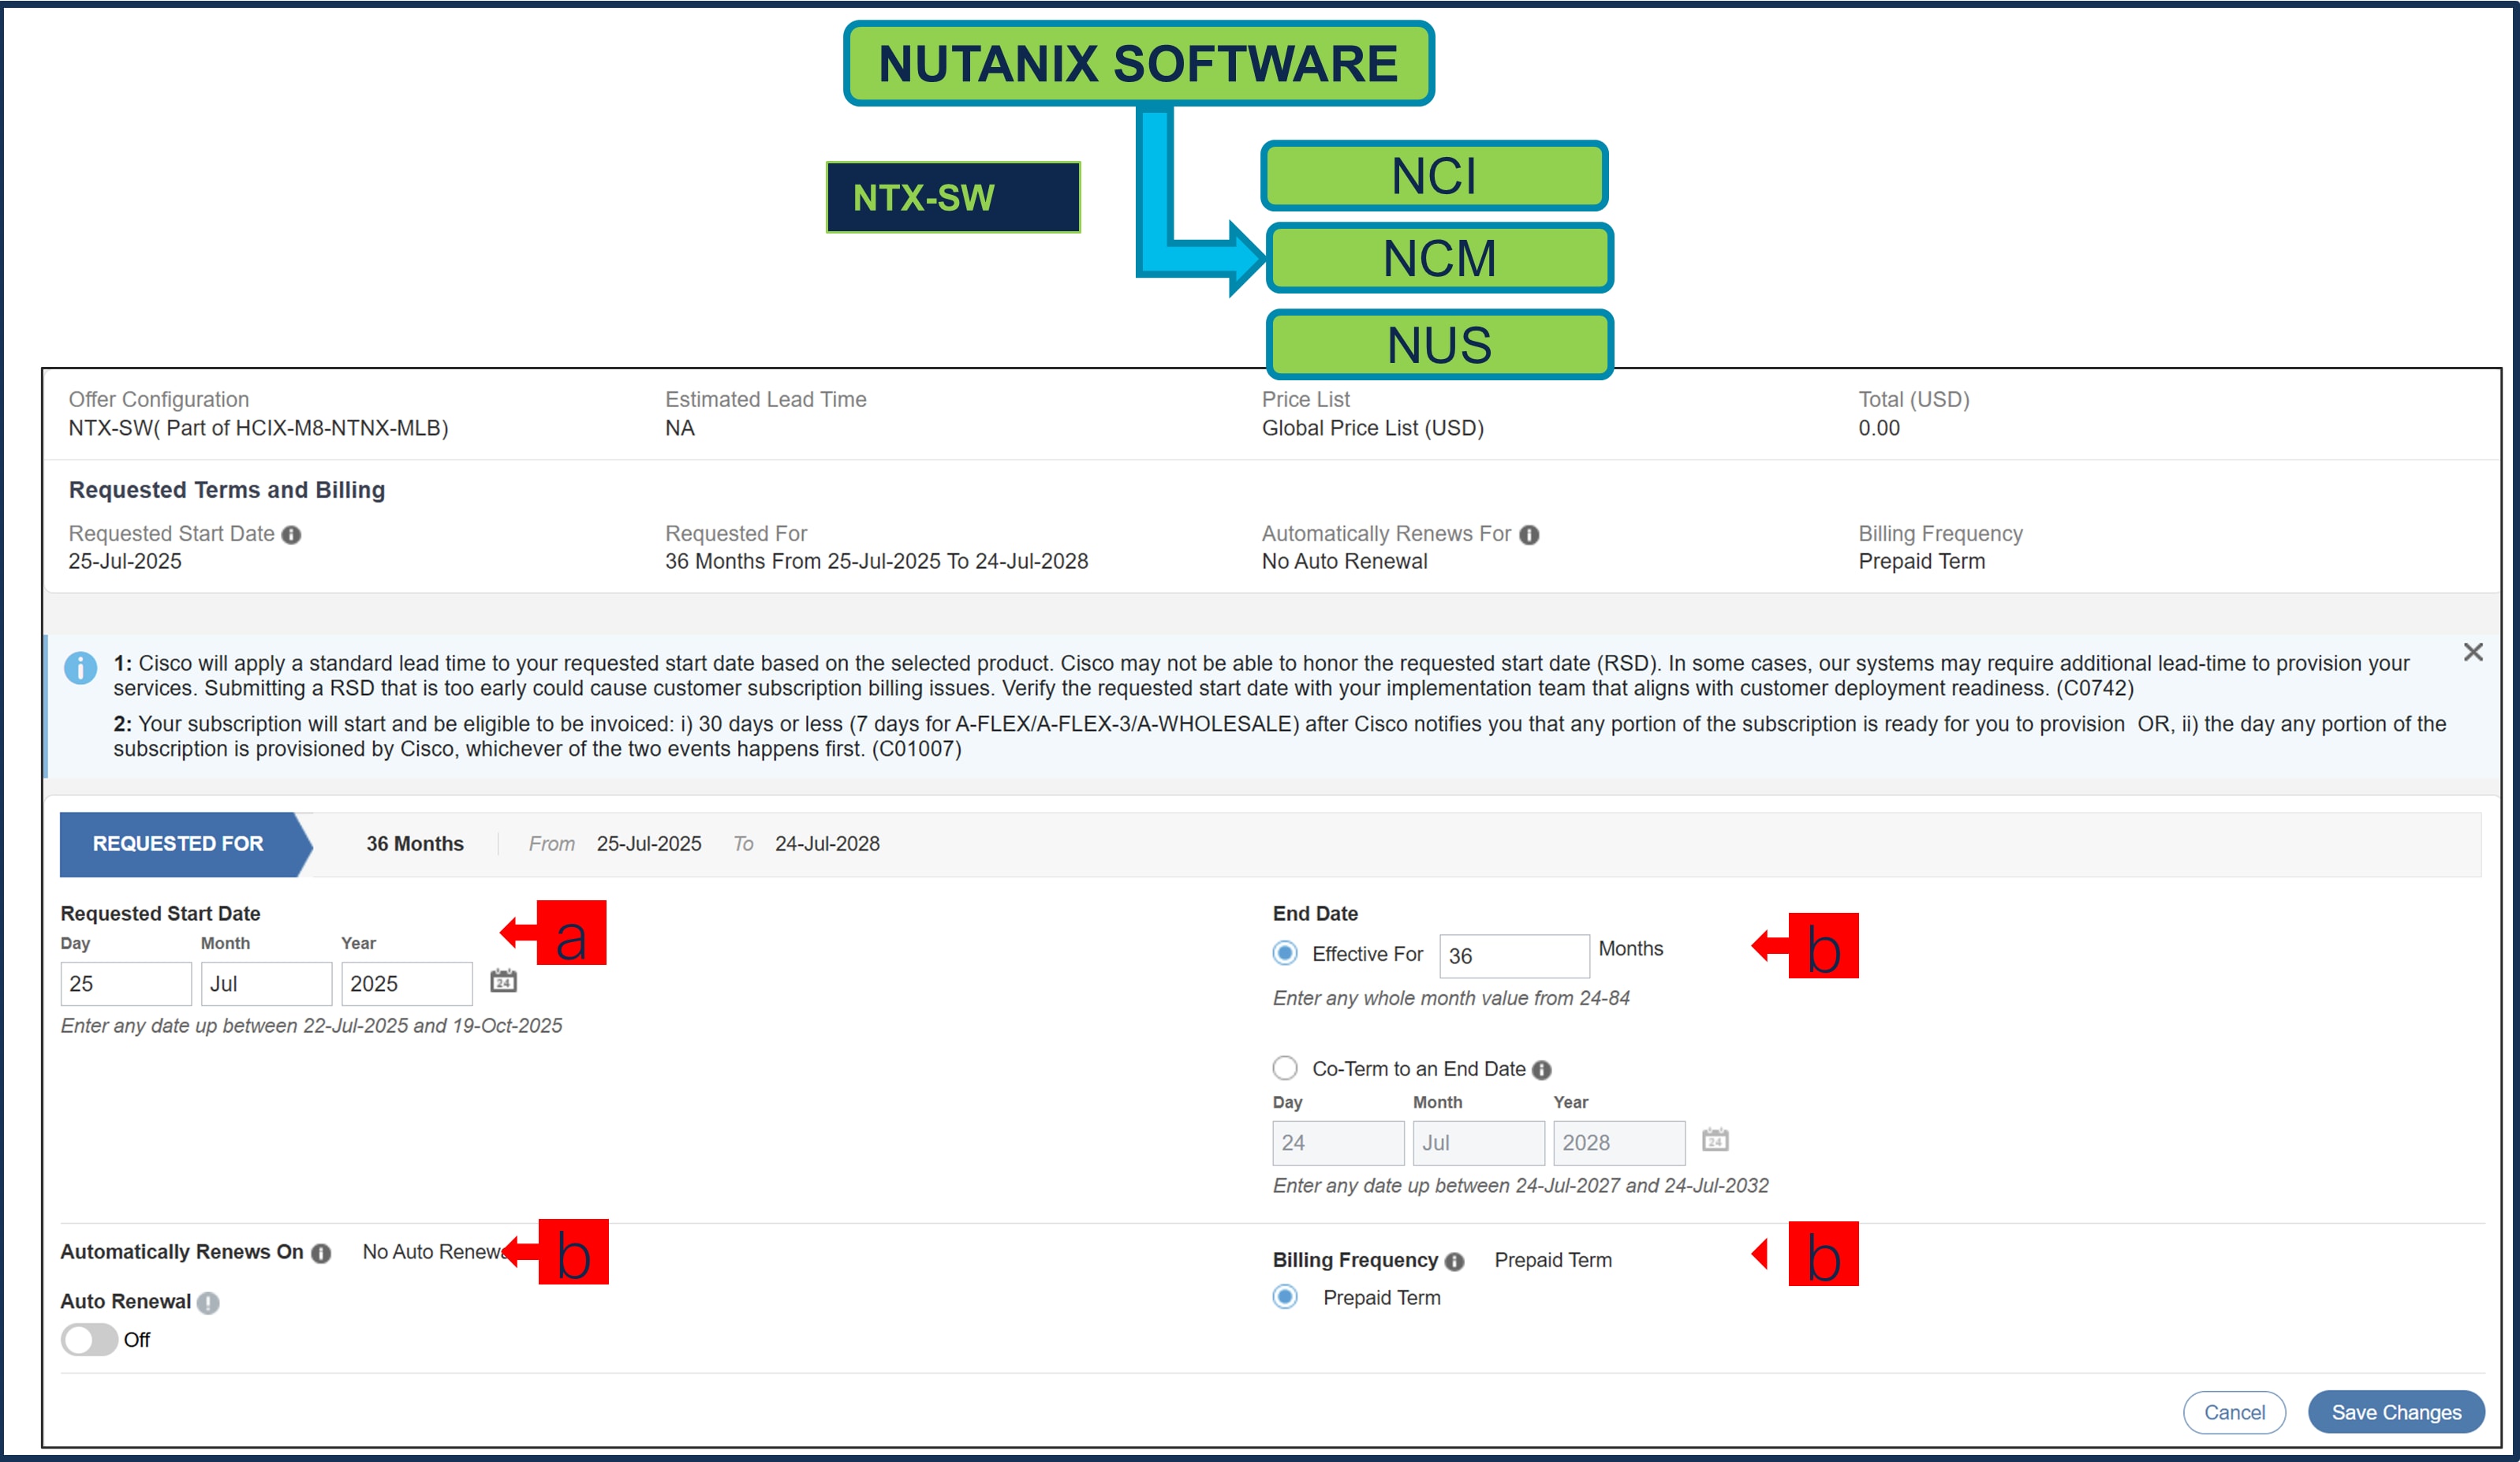
a. Requested Start Date (RSD) is now dependent on HW Ship Date and will automatically starts when the HW ships. If you change the RSD, the Software will start either on the RSD you picked or the HW Ship Date whichever is later.
b. End Date (duration in months) is defaulted to 36 Months, Auto Renewal (on/off) is defaulted to Off and Billing Frequency is defaulted to Prepaid Term. You can still change the setting accordingly.
Step 22.
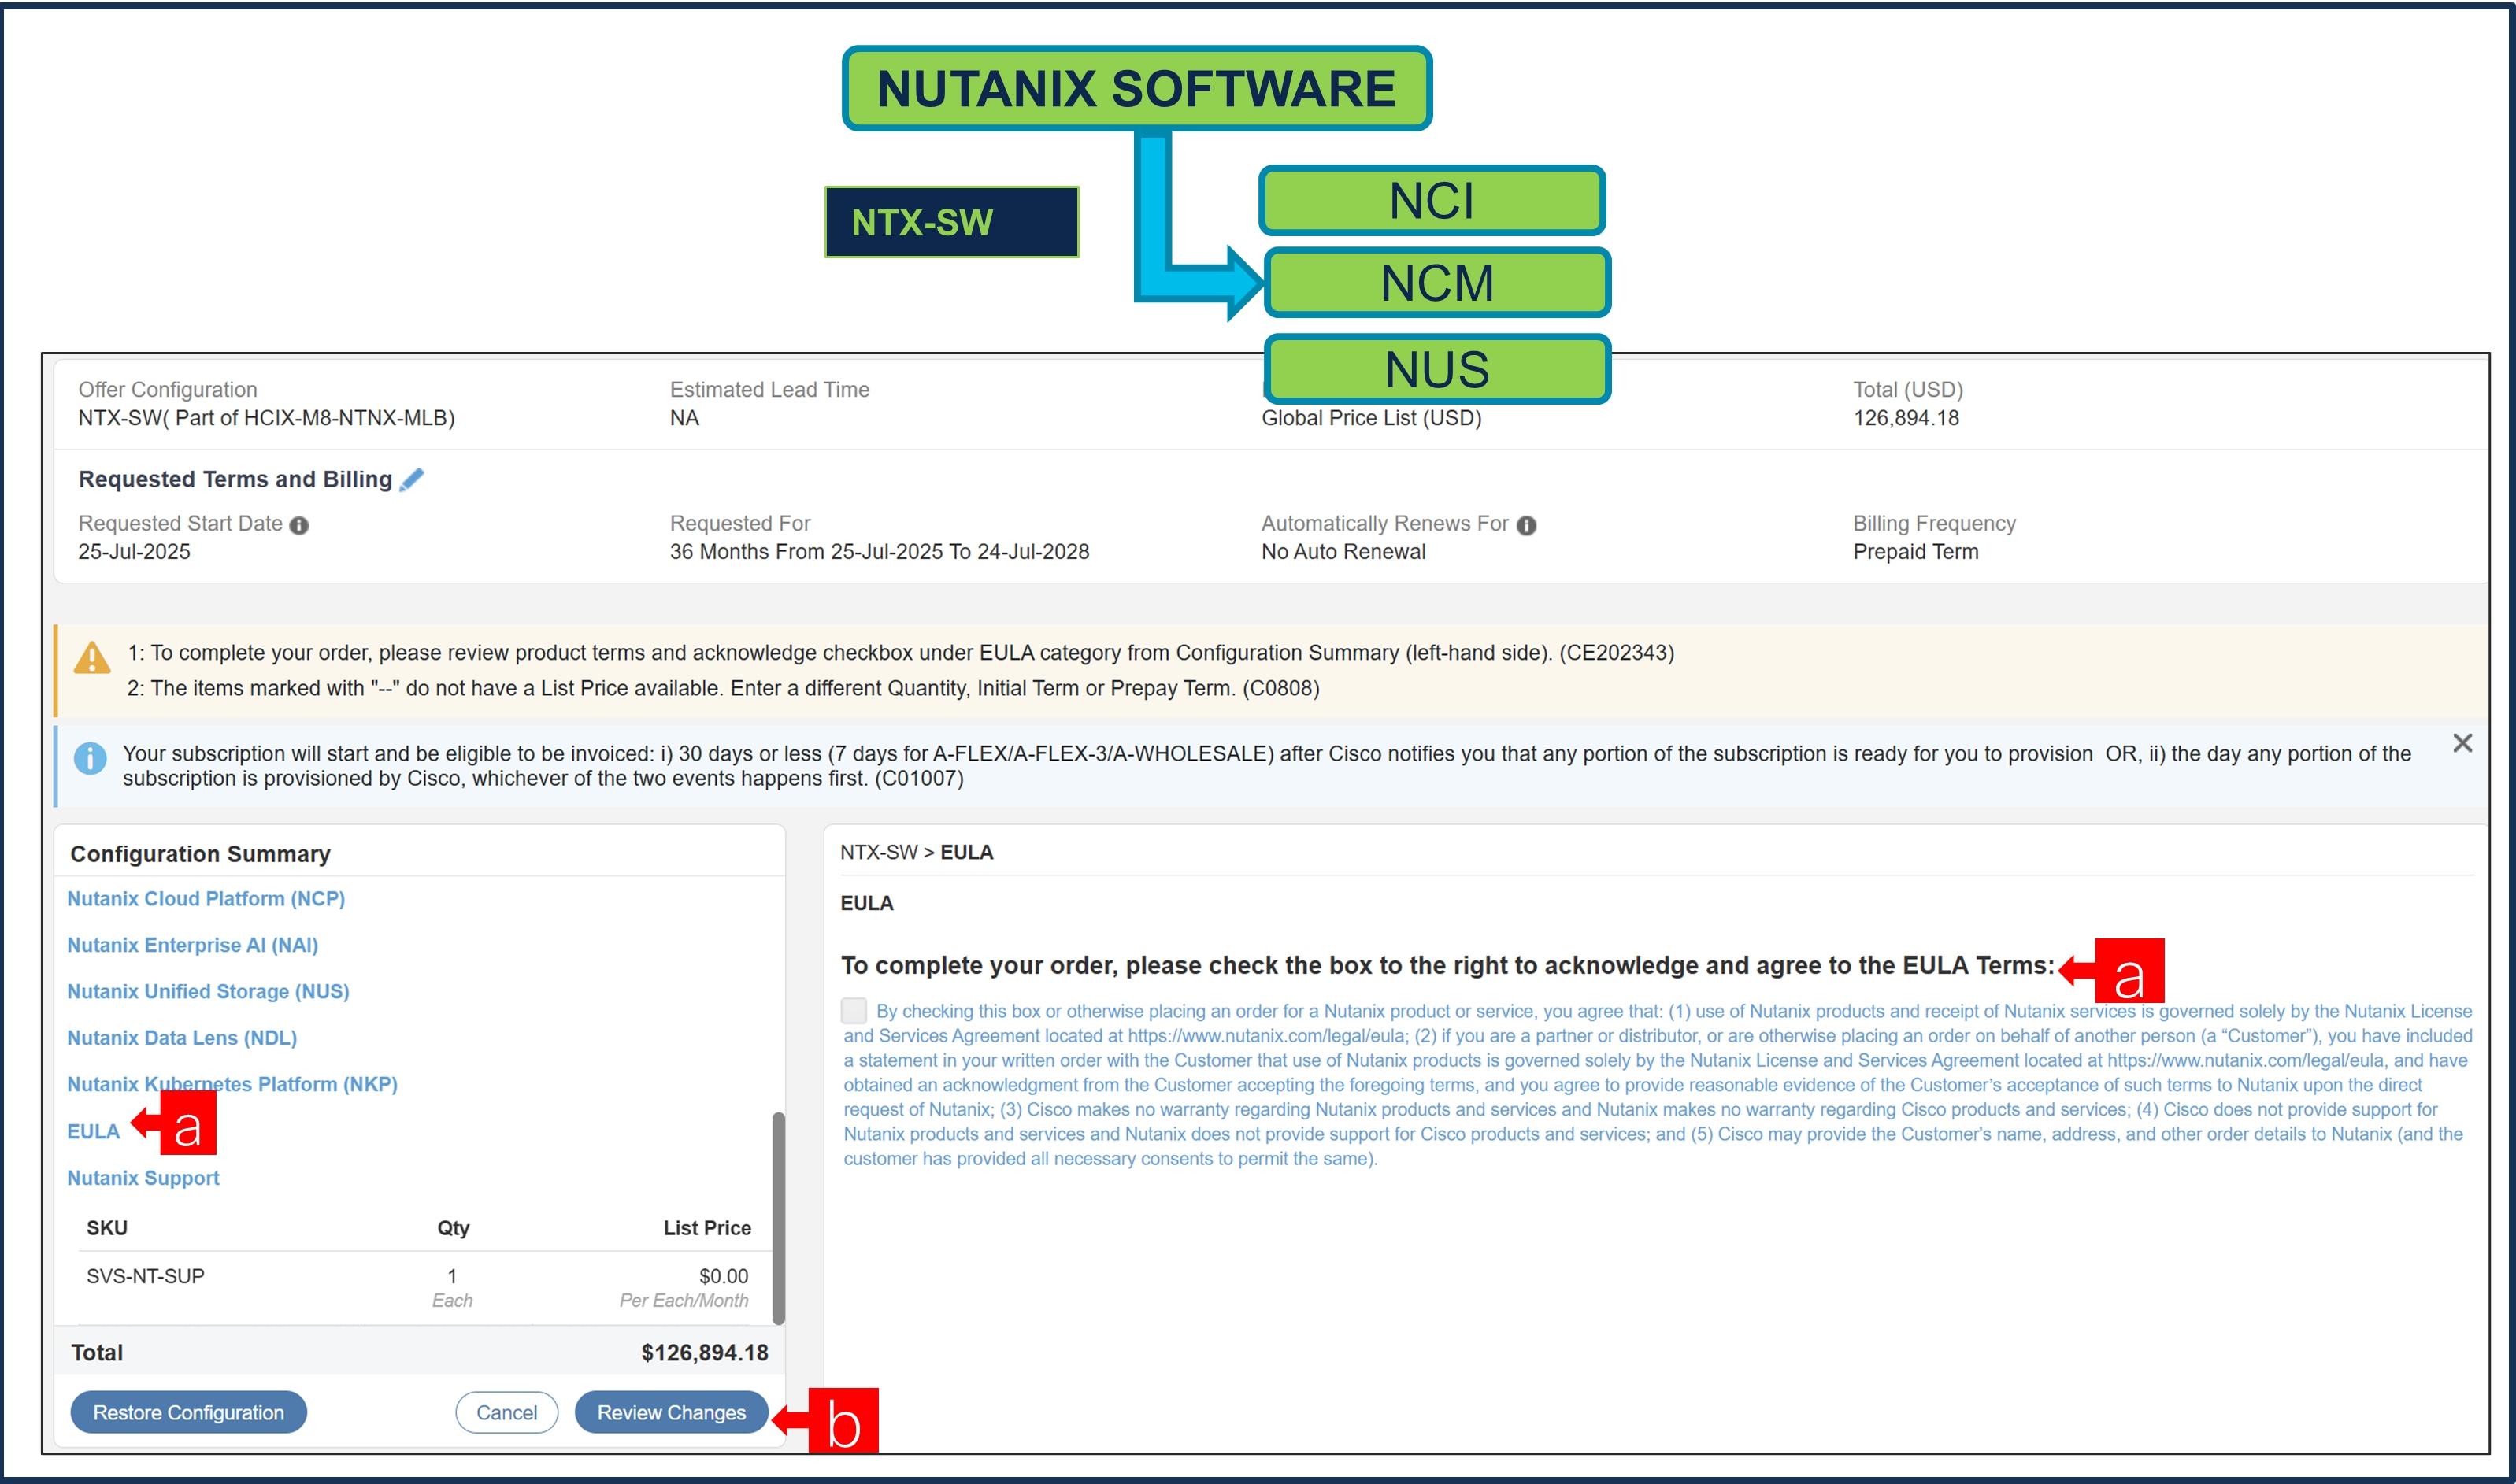
a. To complete the order, please check the box to the right to acknowledge and agree to the EULA Terms
b. Click on Review Changes and Done
Step 23.
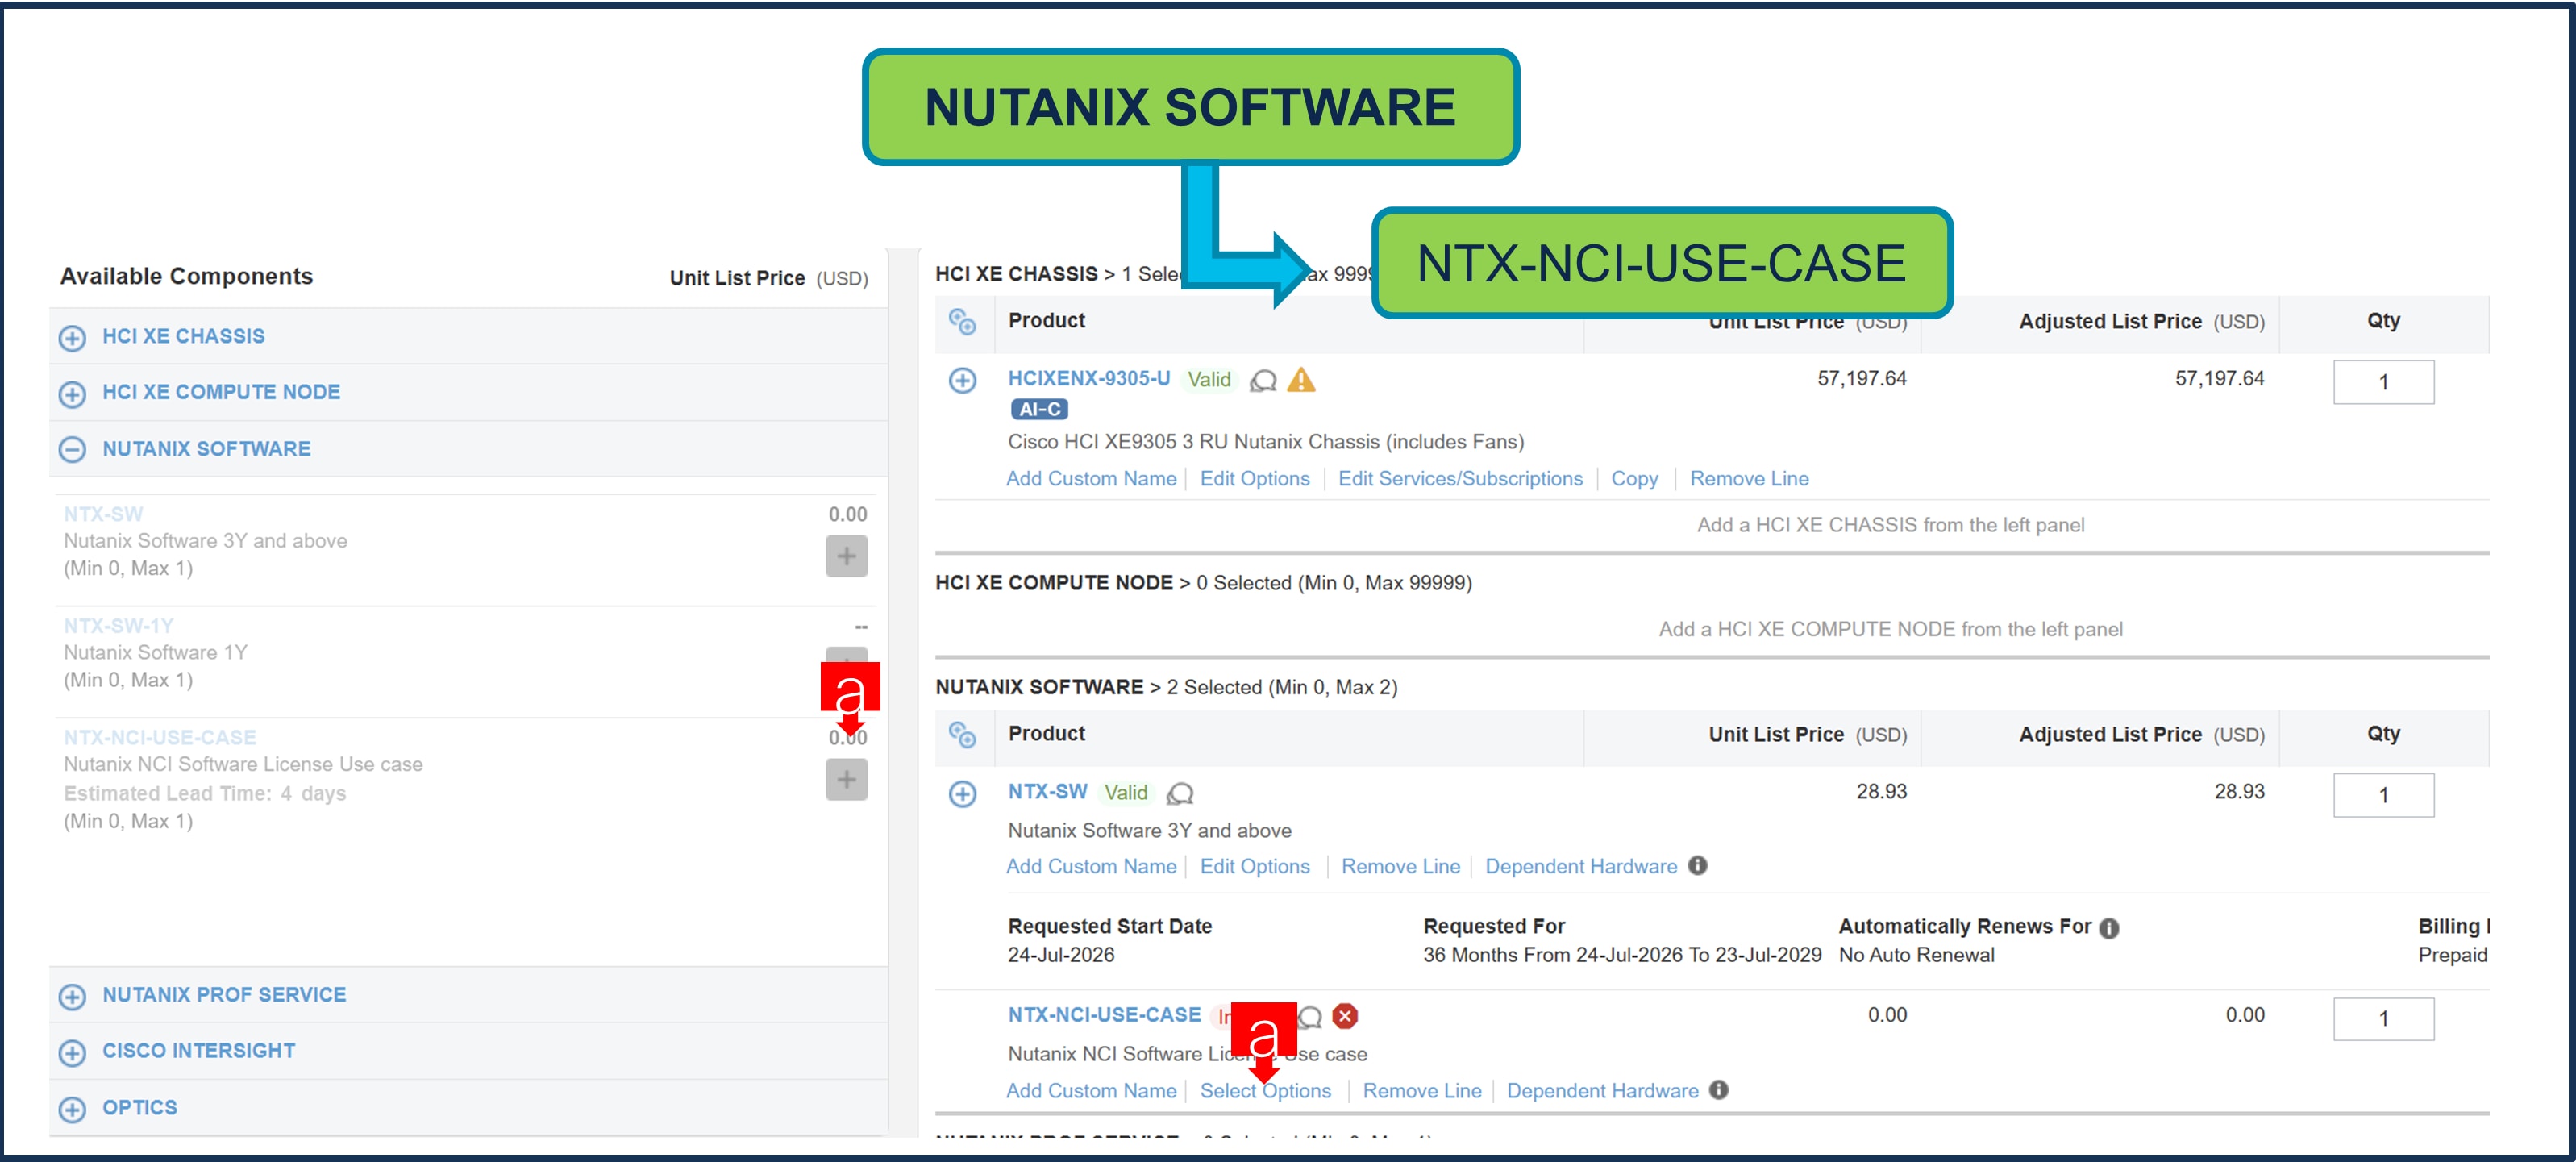
a. NTX-NCI-USE-CASE needs to be selected when NCI/NCI-D/ NCI-E License are selected under Nutanix Software ATO.
Step 24.
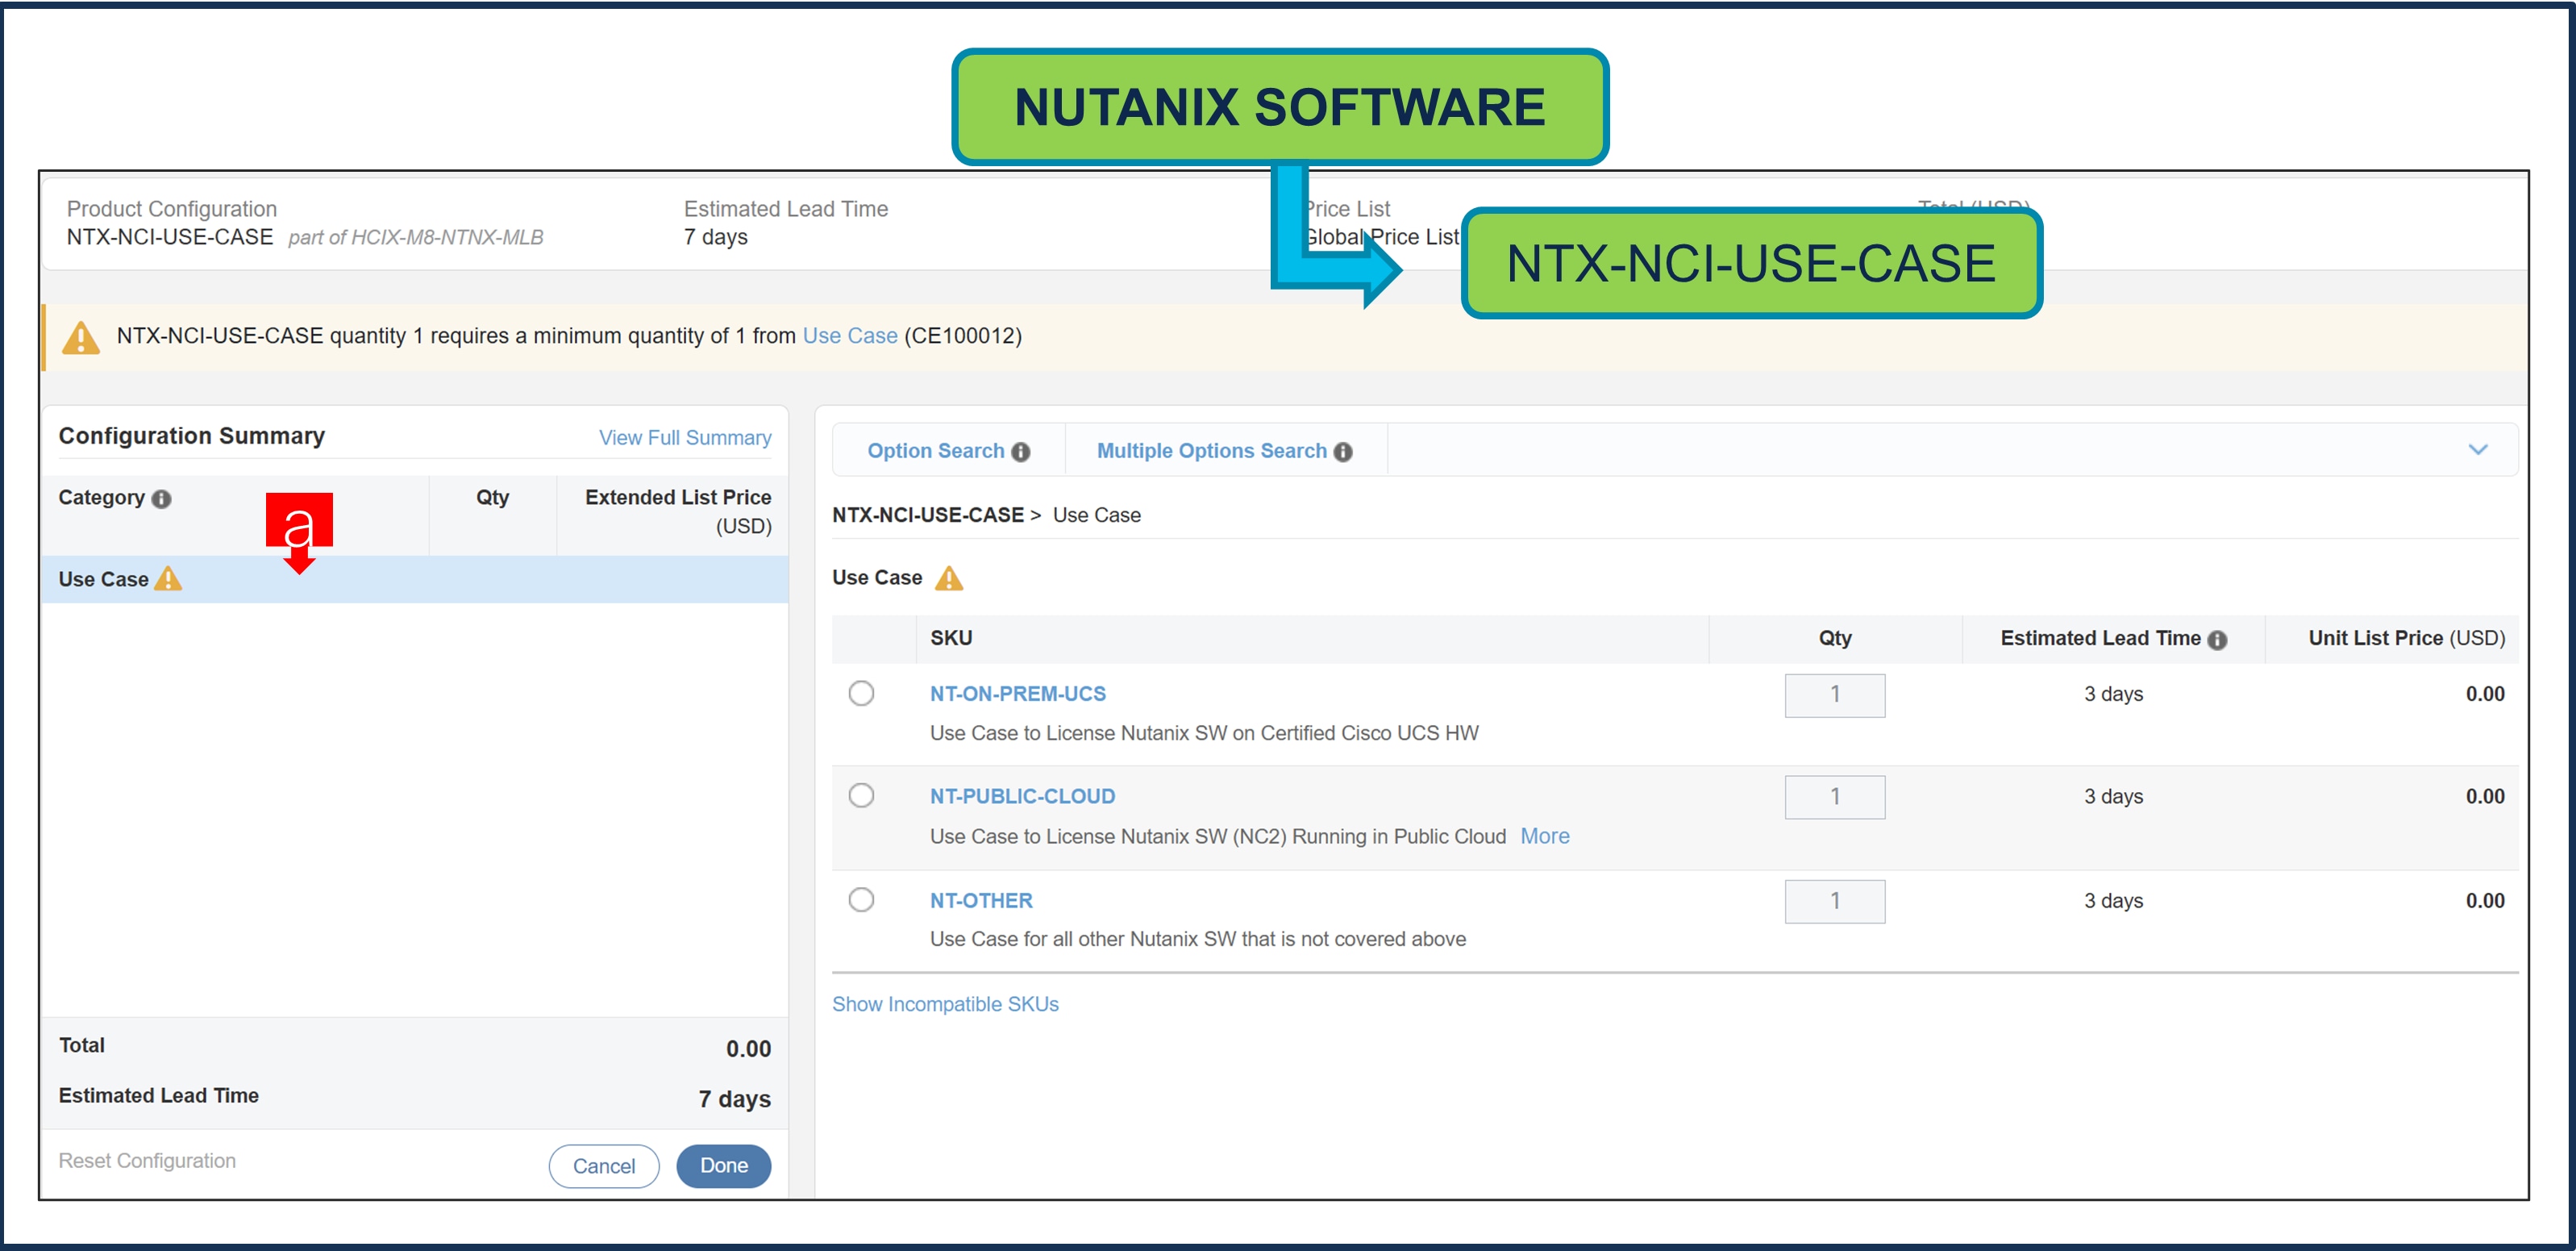
a. Please select appropriate Use Case.
Step 25.
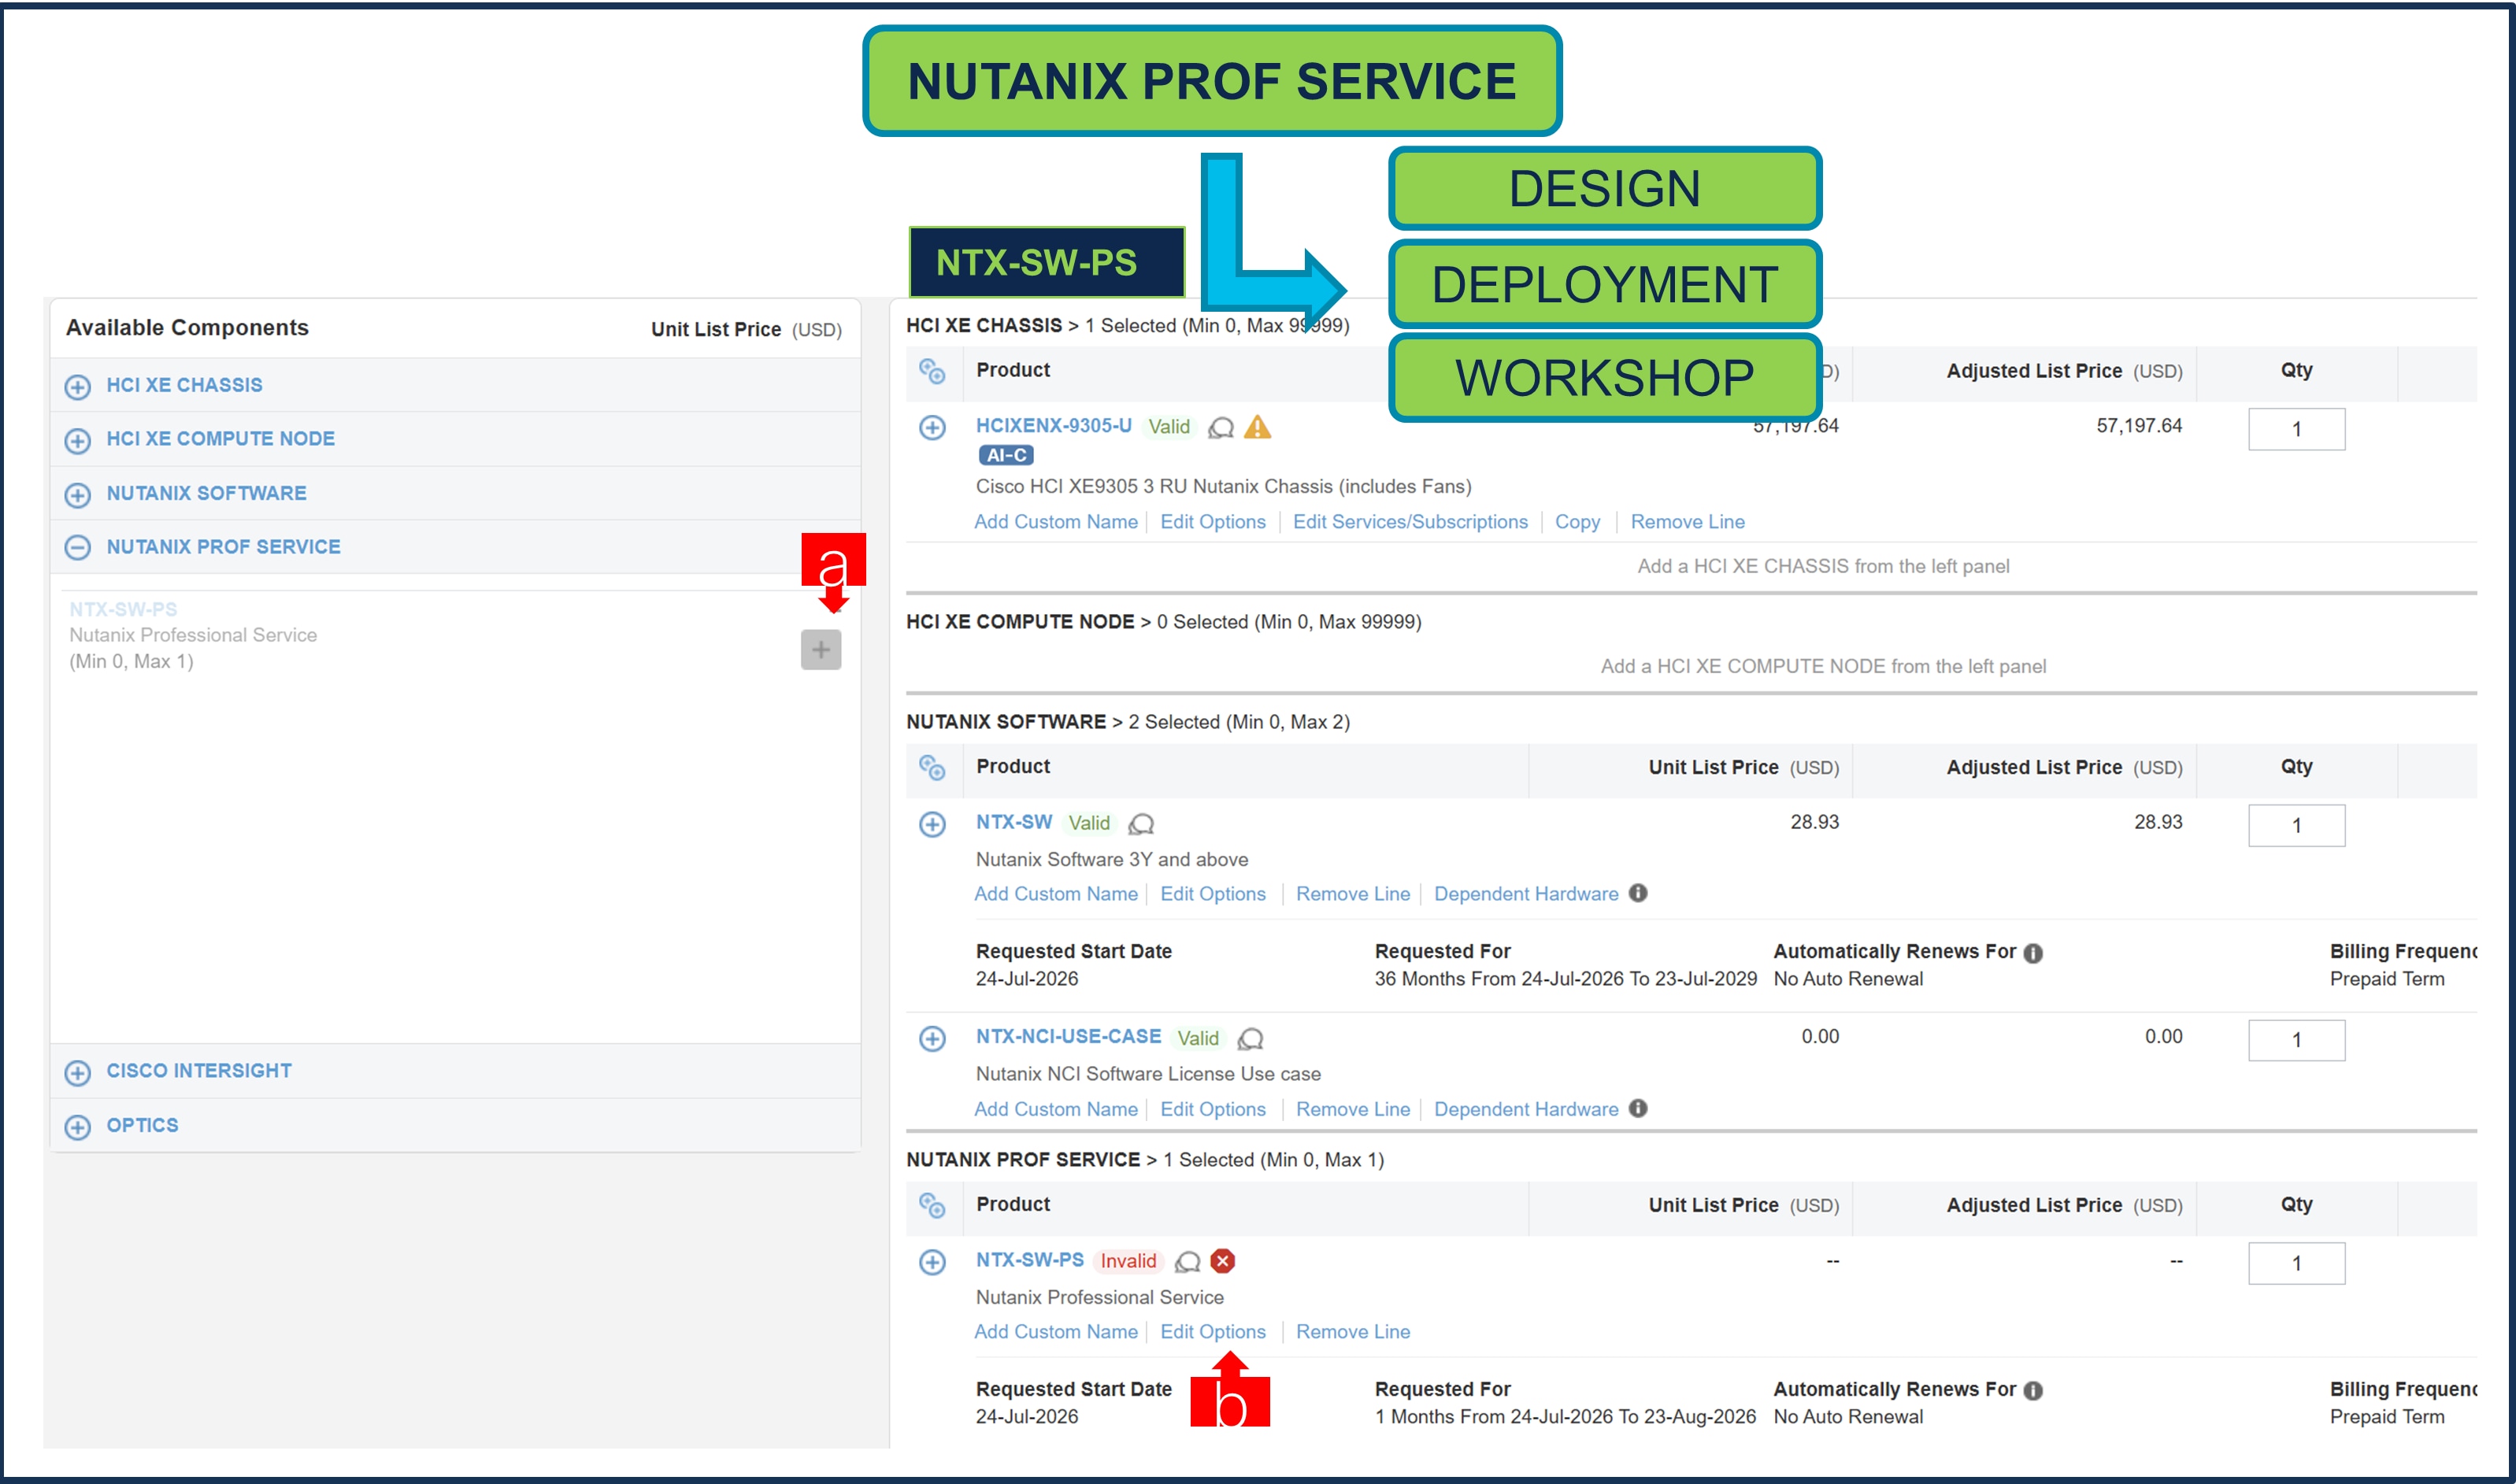
a. It is recommended that User Purchase NTX-SW-PS. Please make selection by clicking .
b. Click on Edit Options to configure the Product.
Note: Nutanix Professional Service is mandatory for NCI, NCM and NCP License under NTX-SW-1Y or when NCM PRO or NCM ULT License is selected under NTX-SW. For other Licenses under NTX-SW, its recommended.
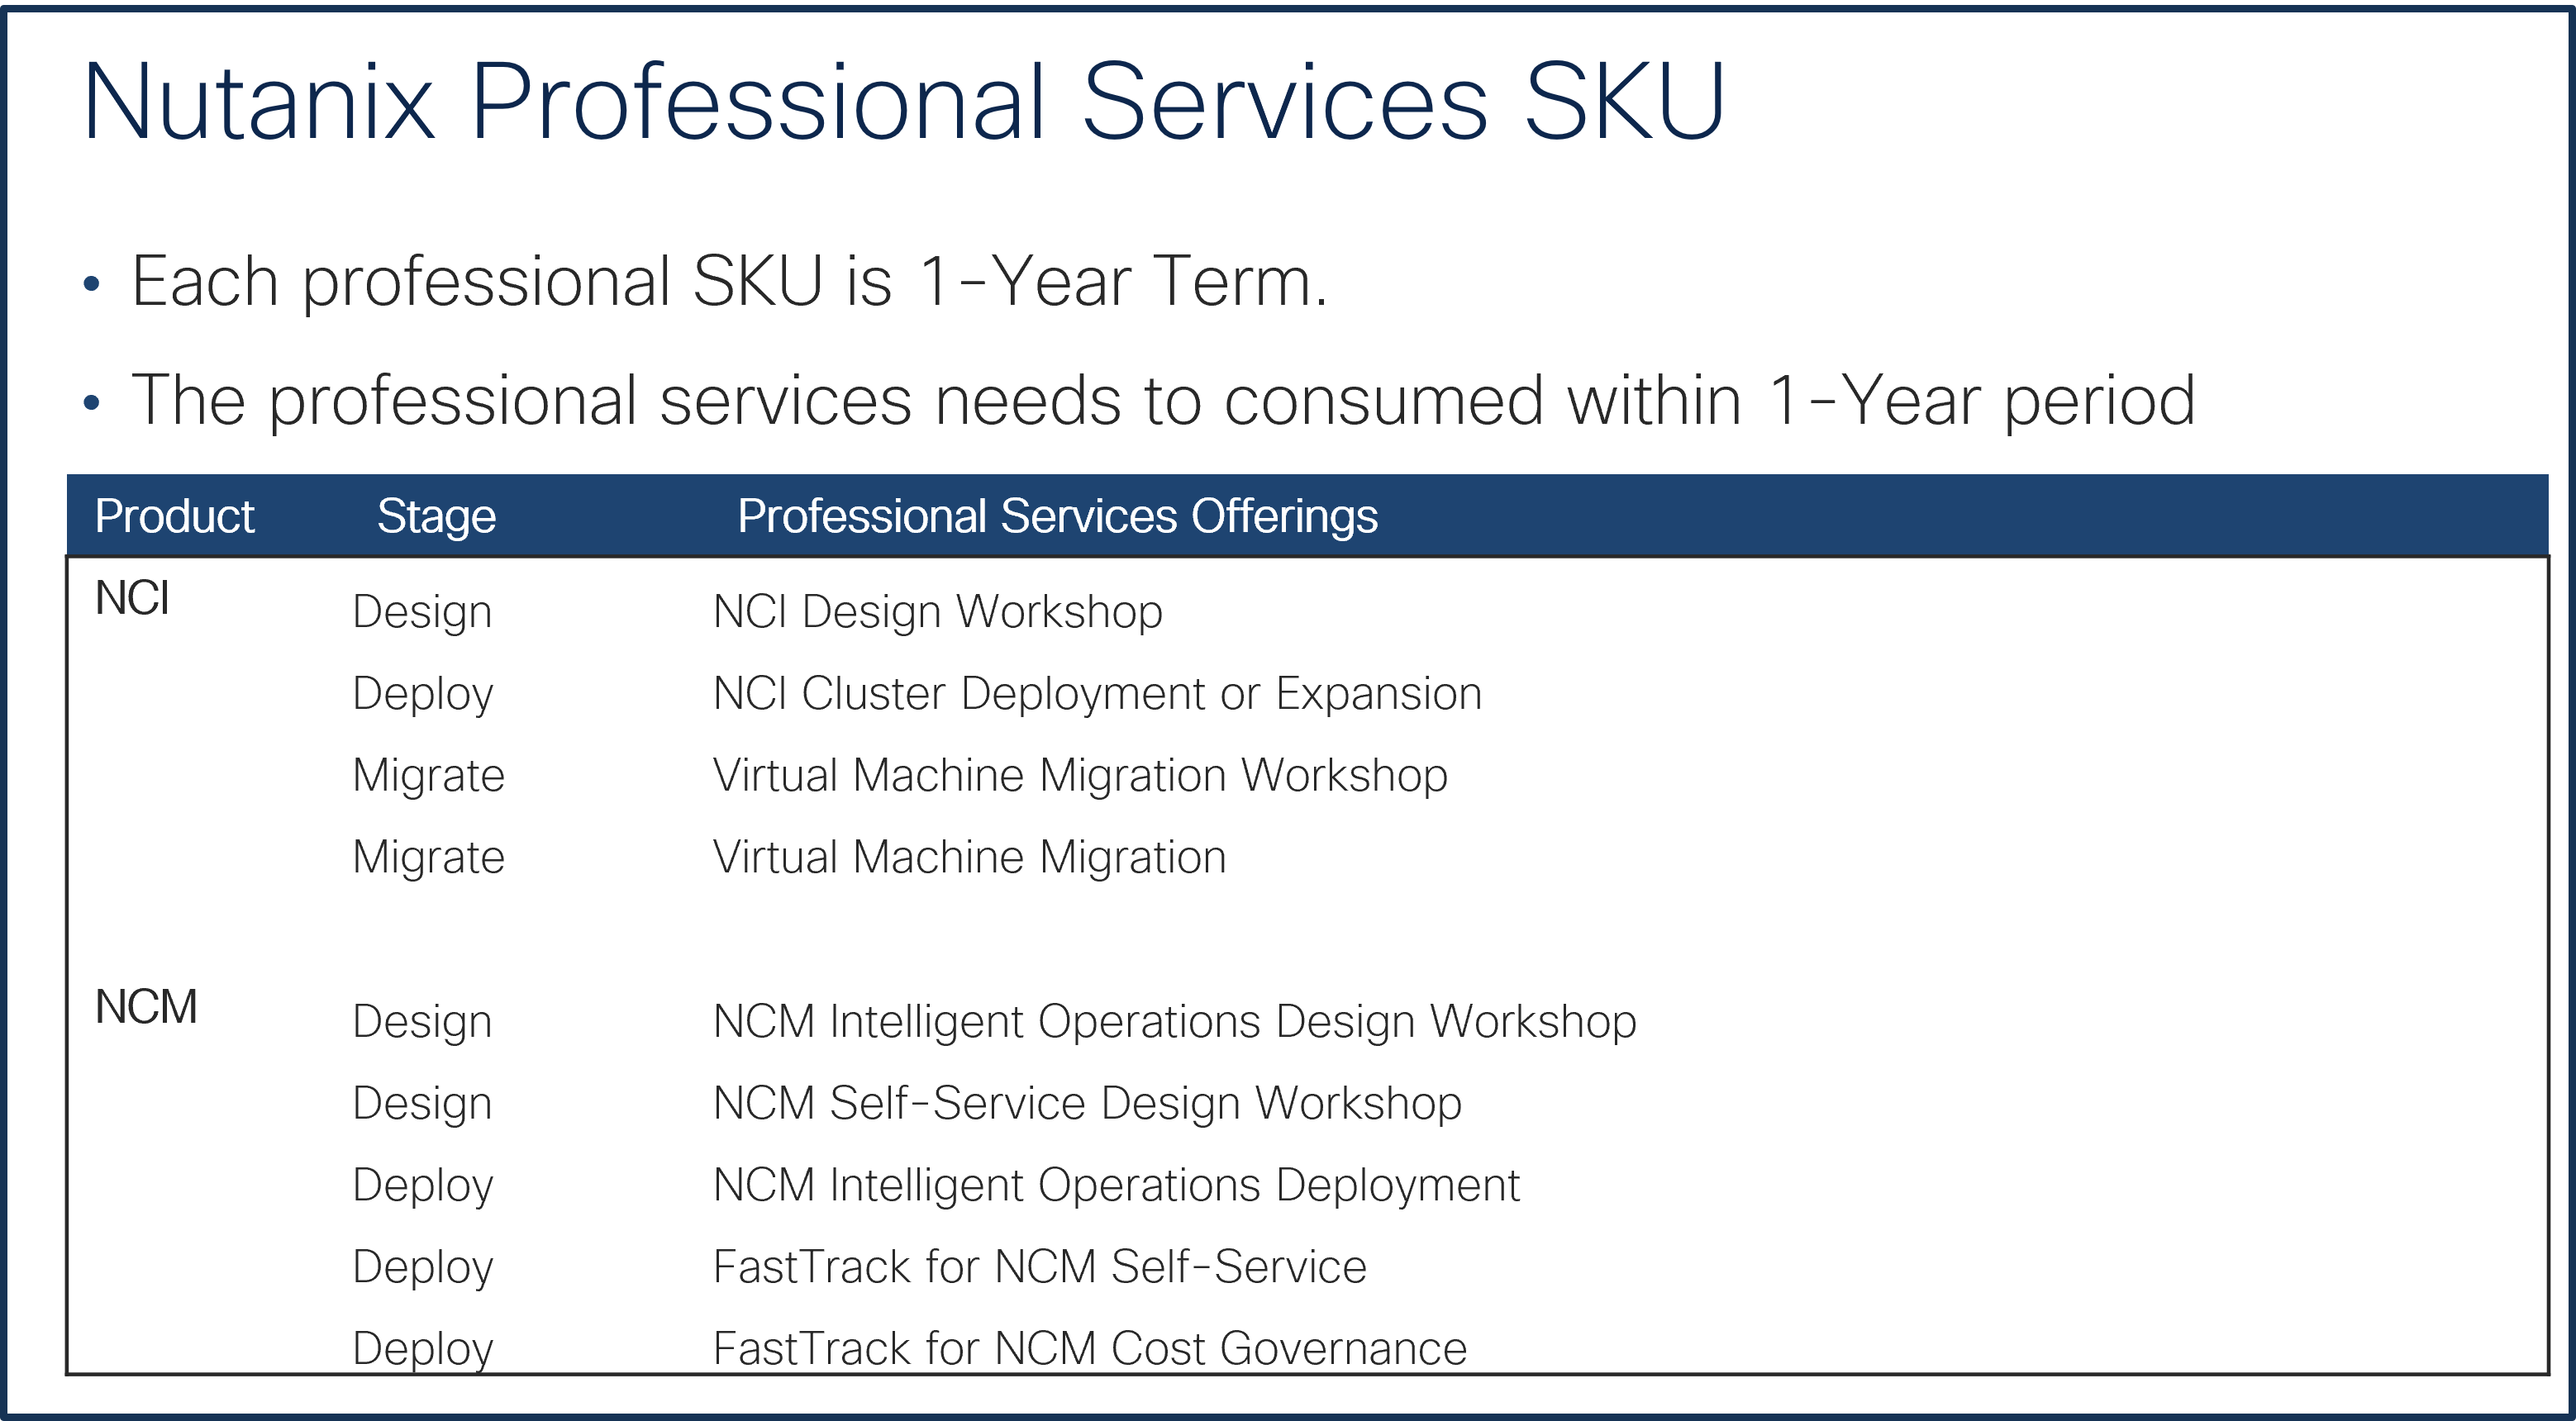
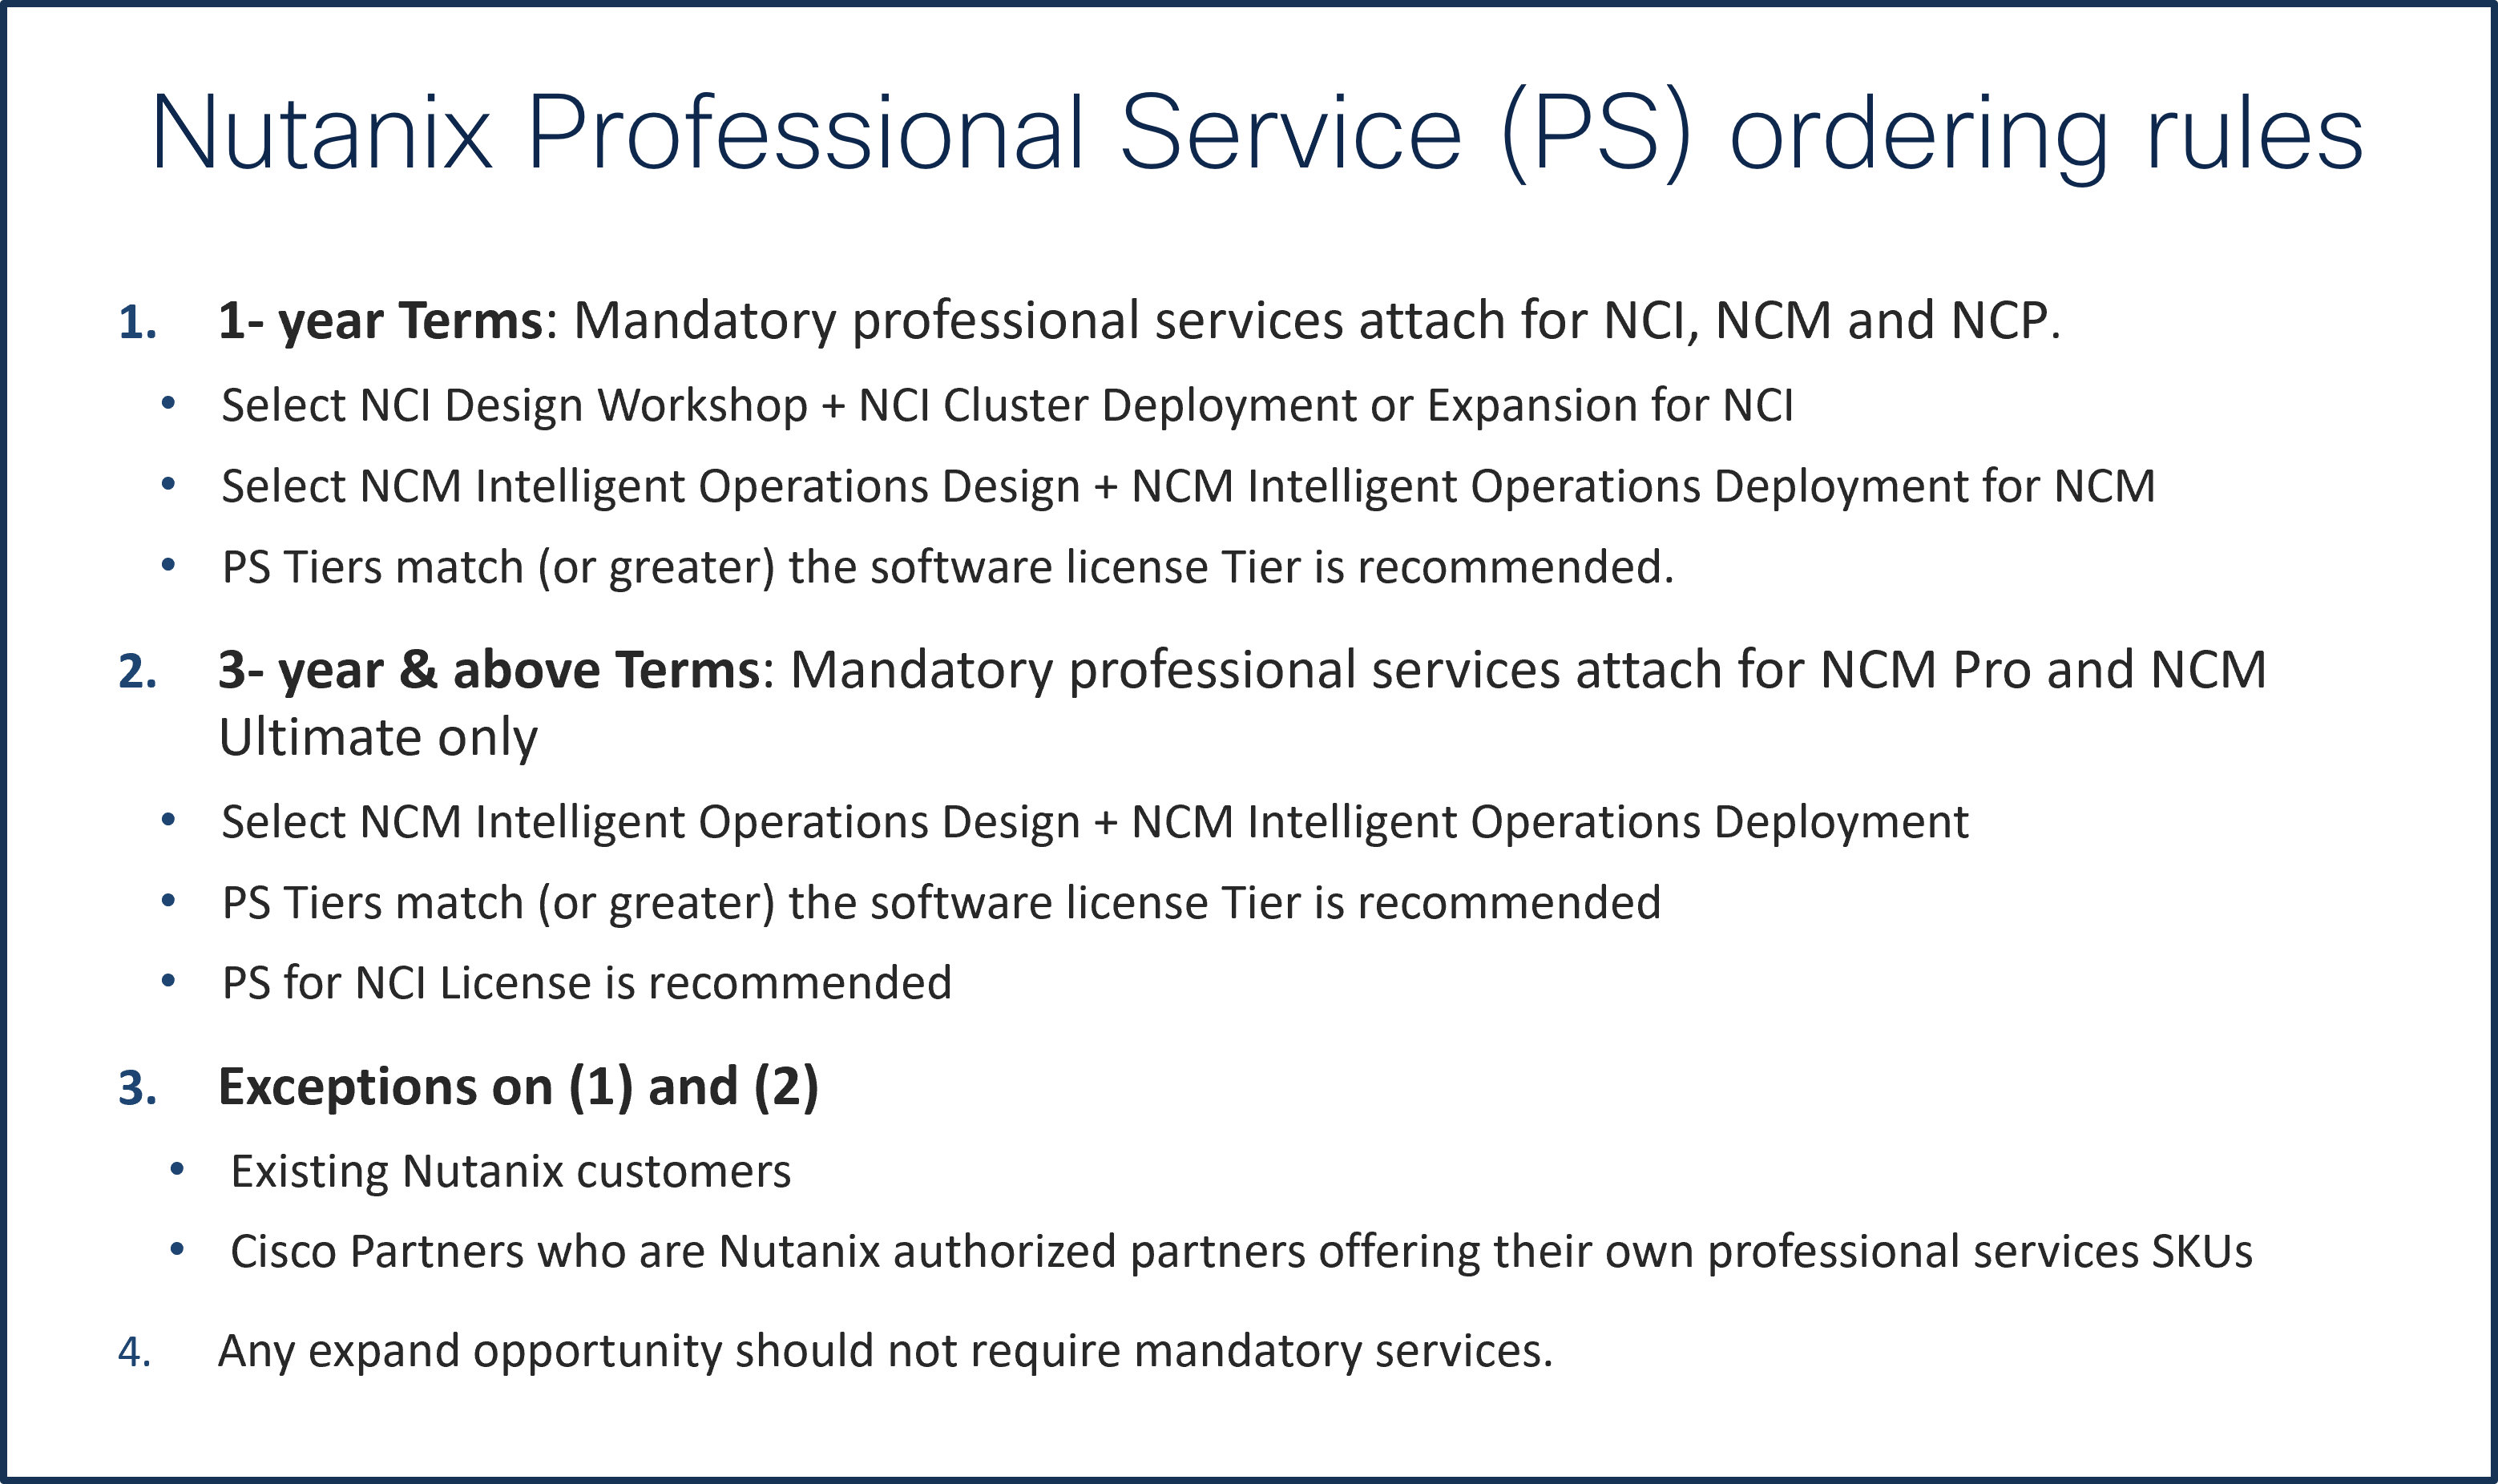
Step 26.
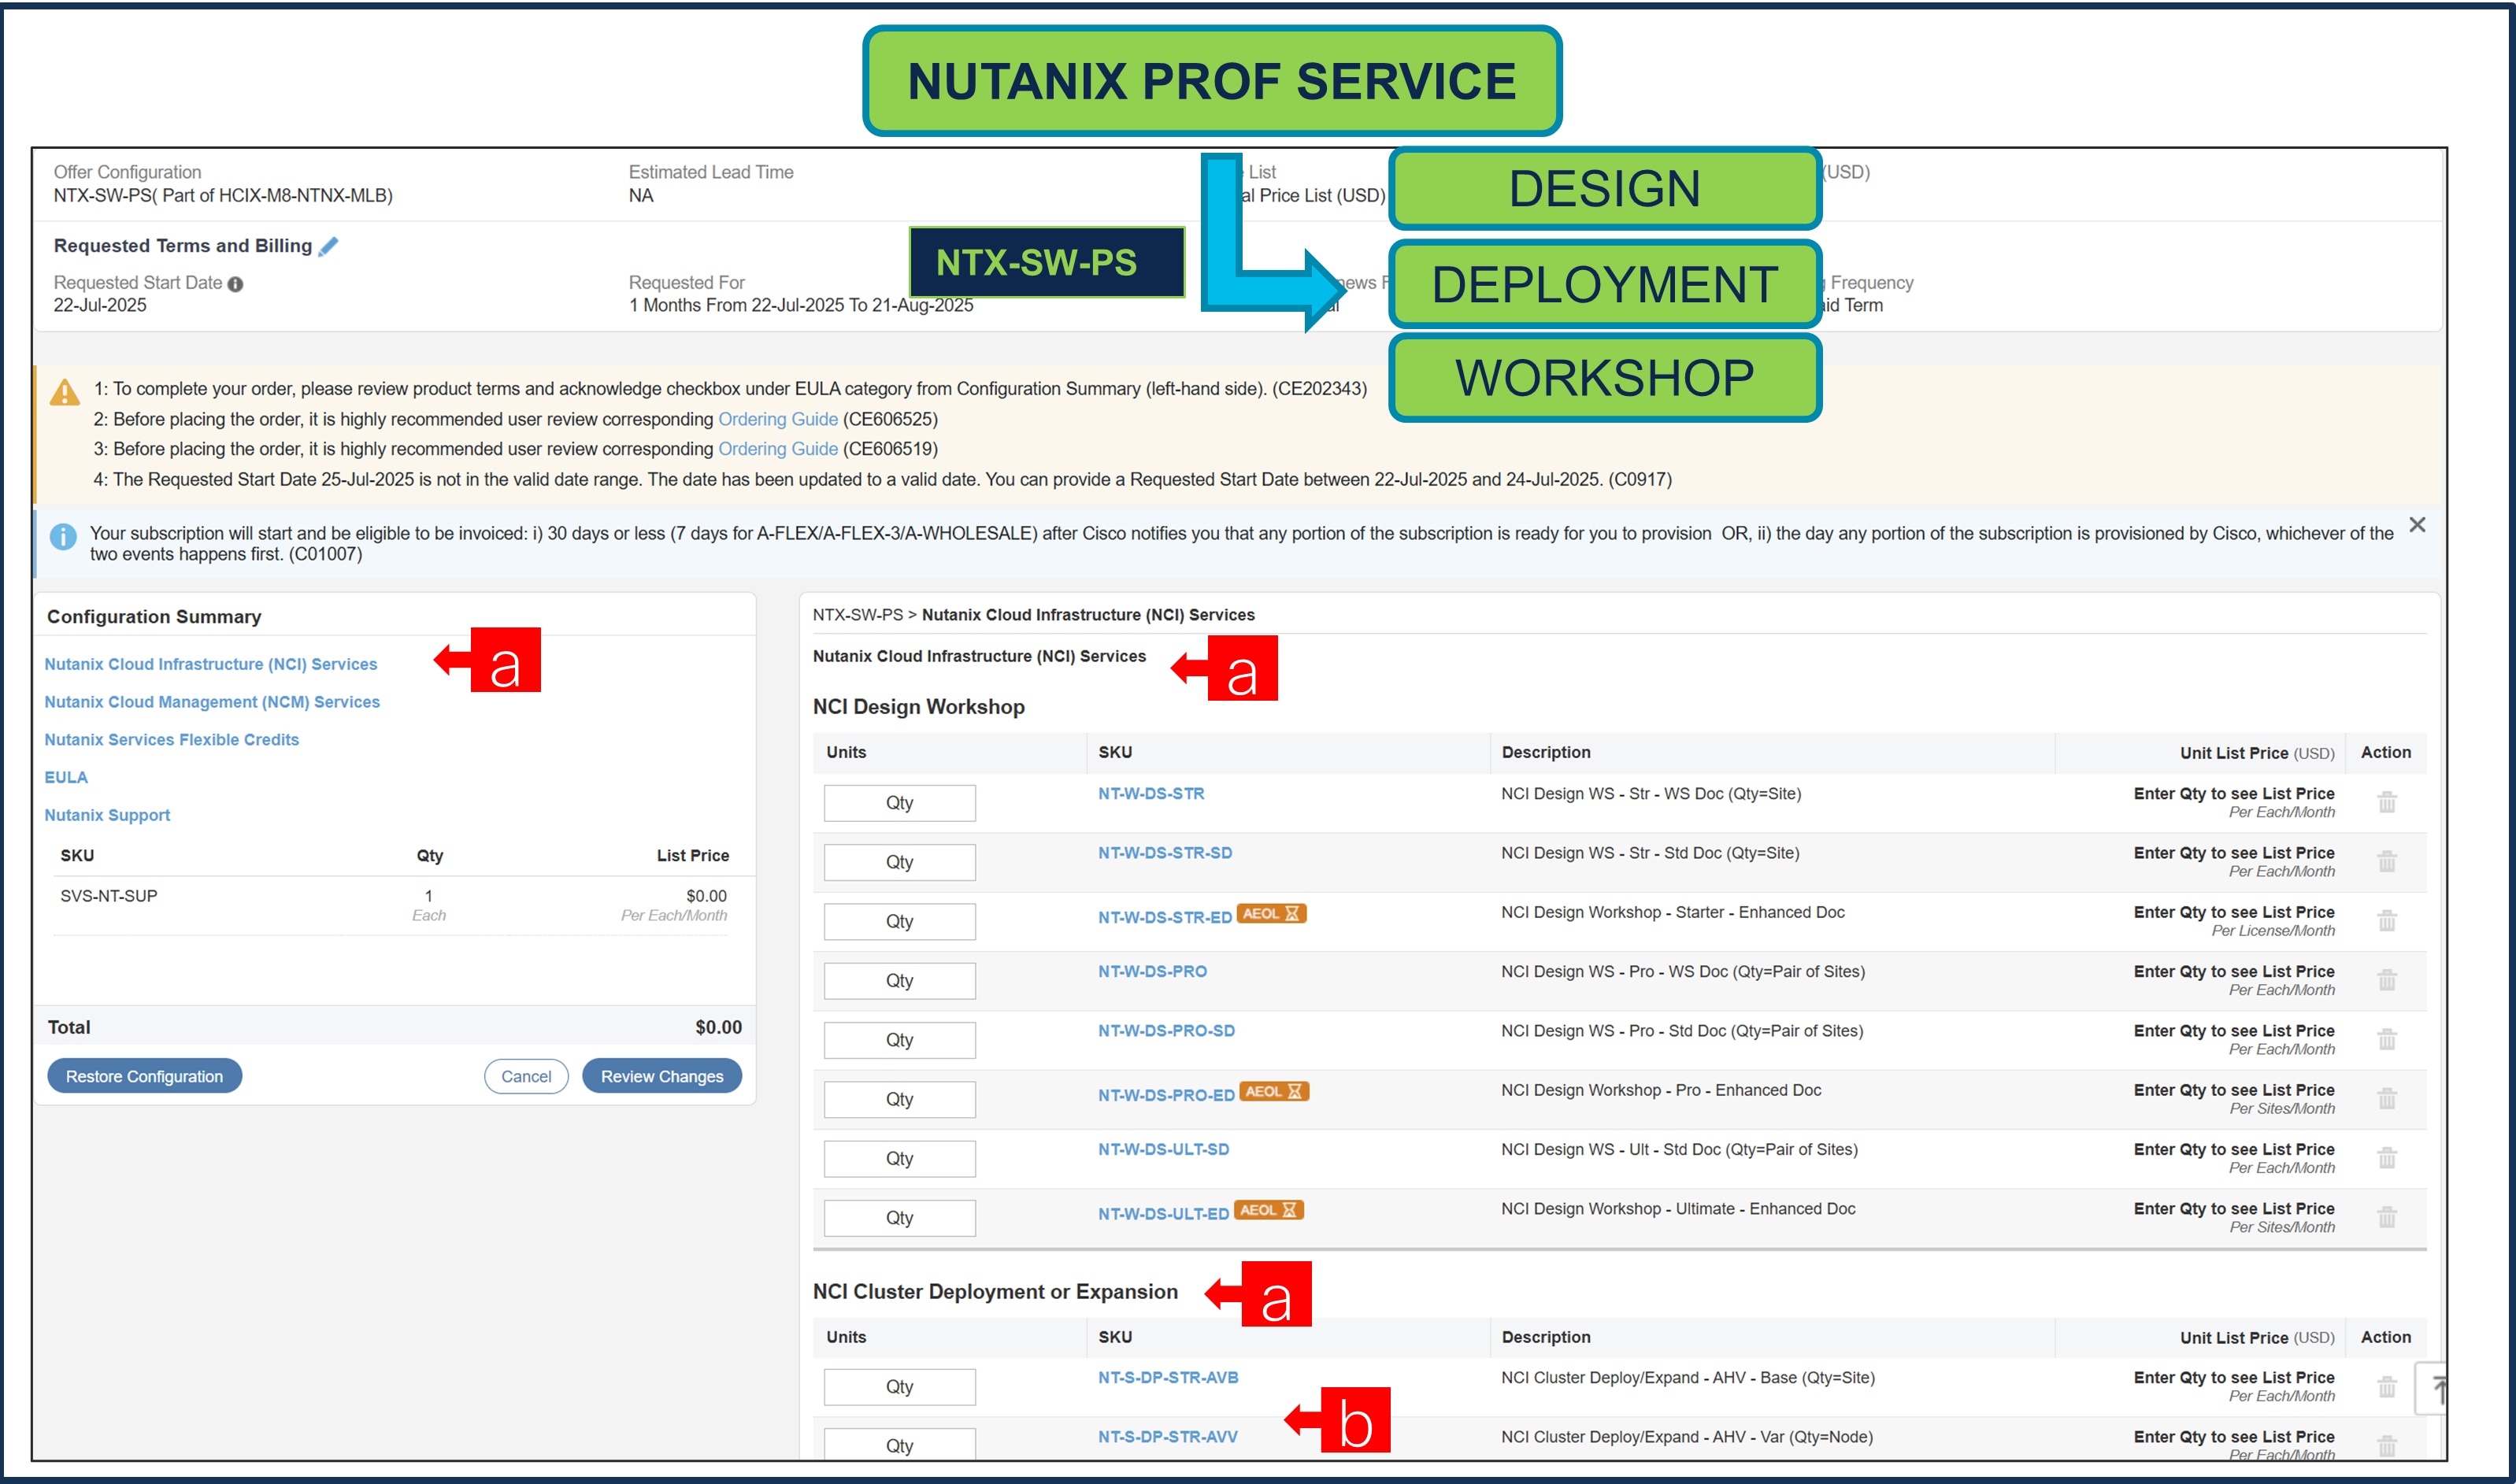
a. We have NCI License selected under NTX-SW and hence, it is recommended that we select Nutanix Professional Services: NCI Design Workshop + NCI Cluster Deployment or Expansion SKUs.
b. QTY of NCI Cluster Deployment or Expansion Variable SKU must match with Server QTY.
Step 27.
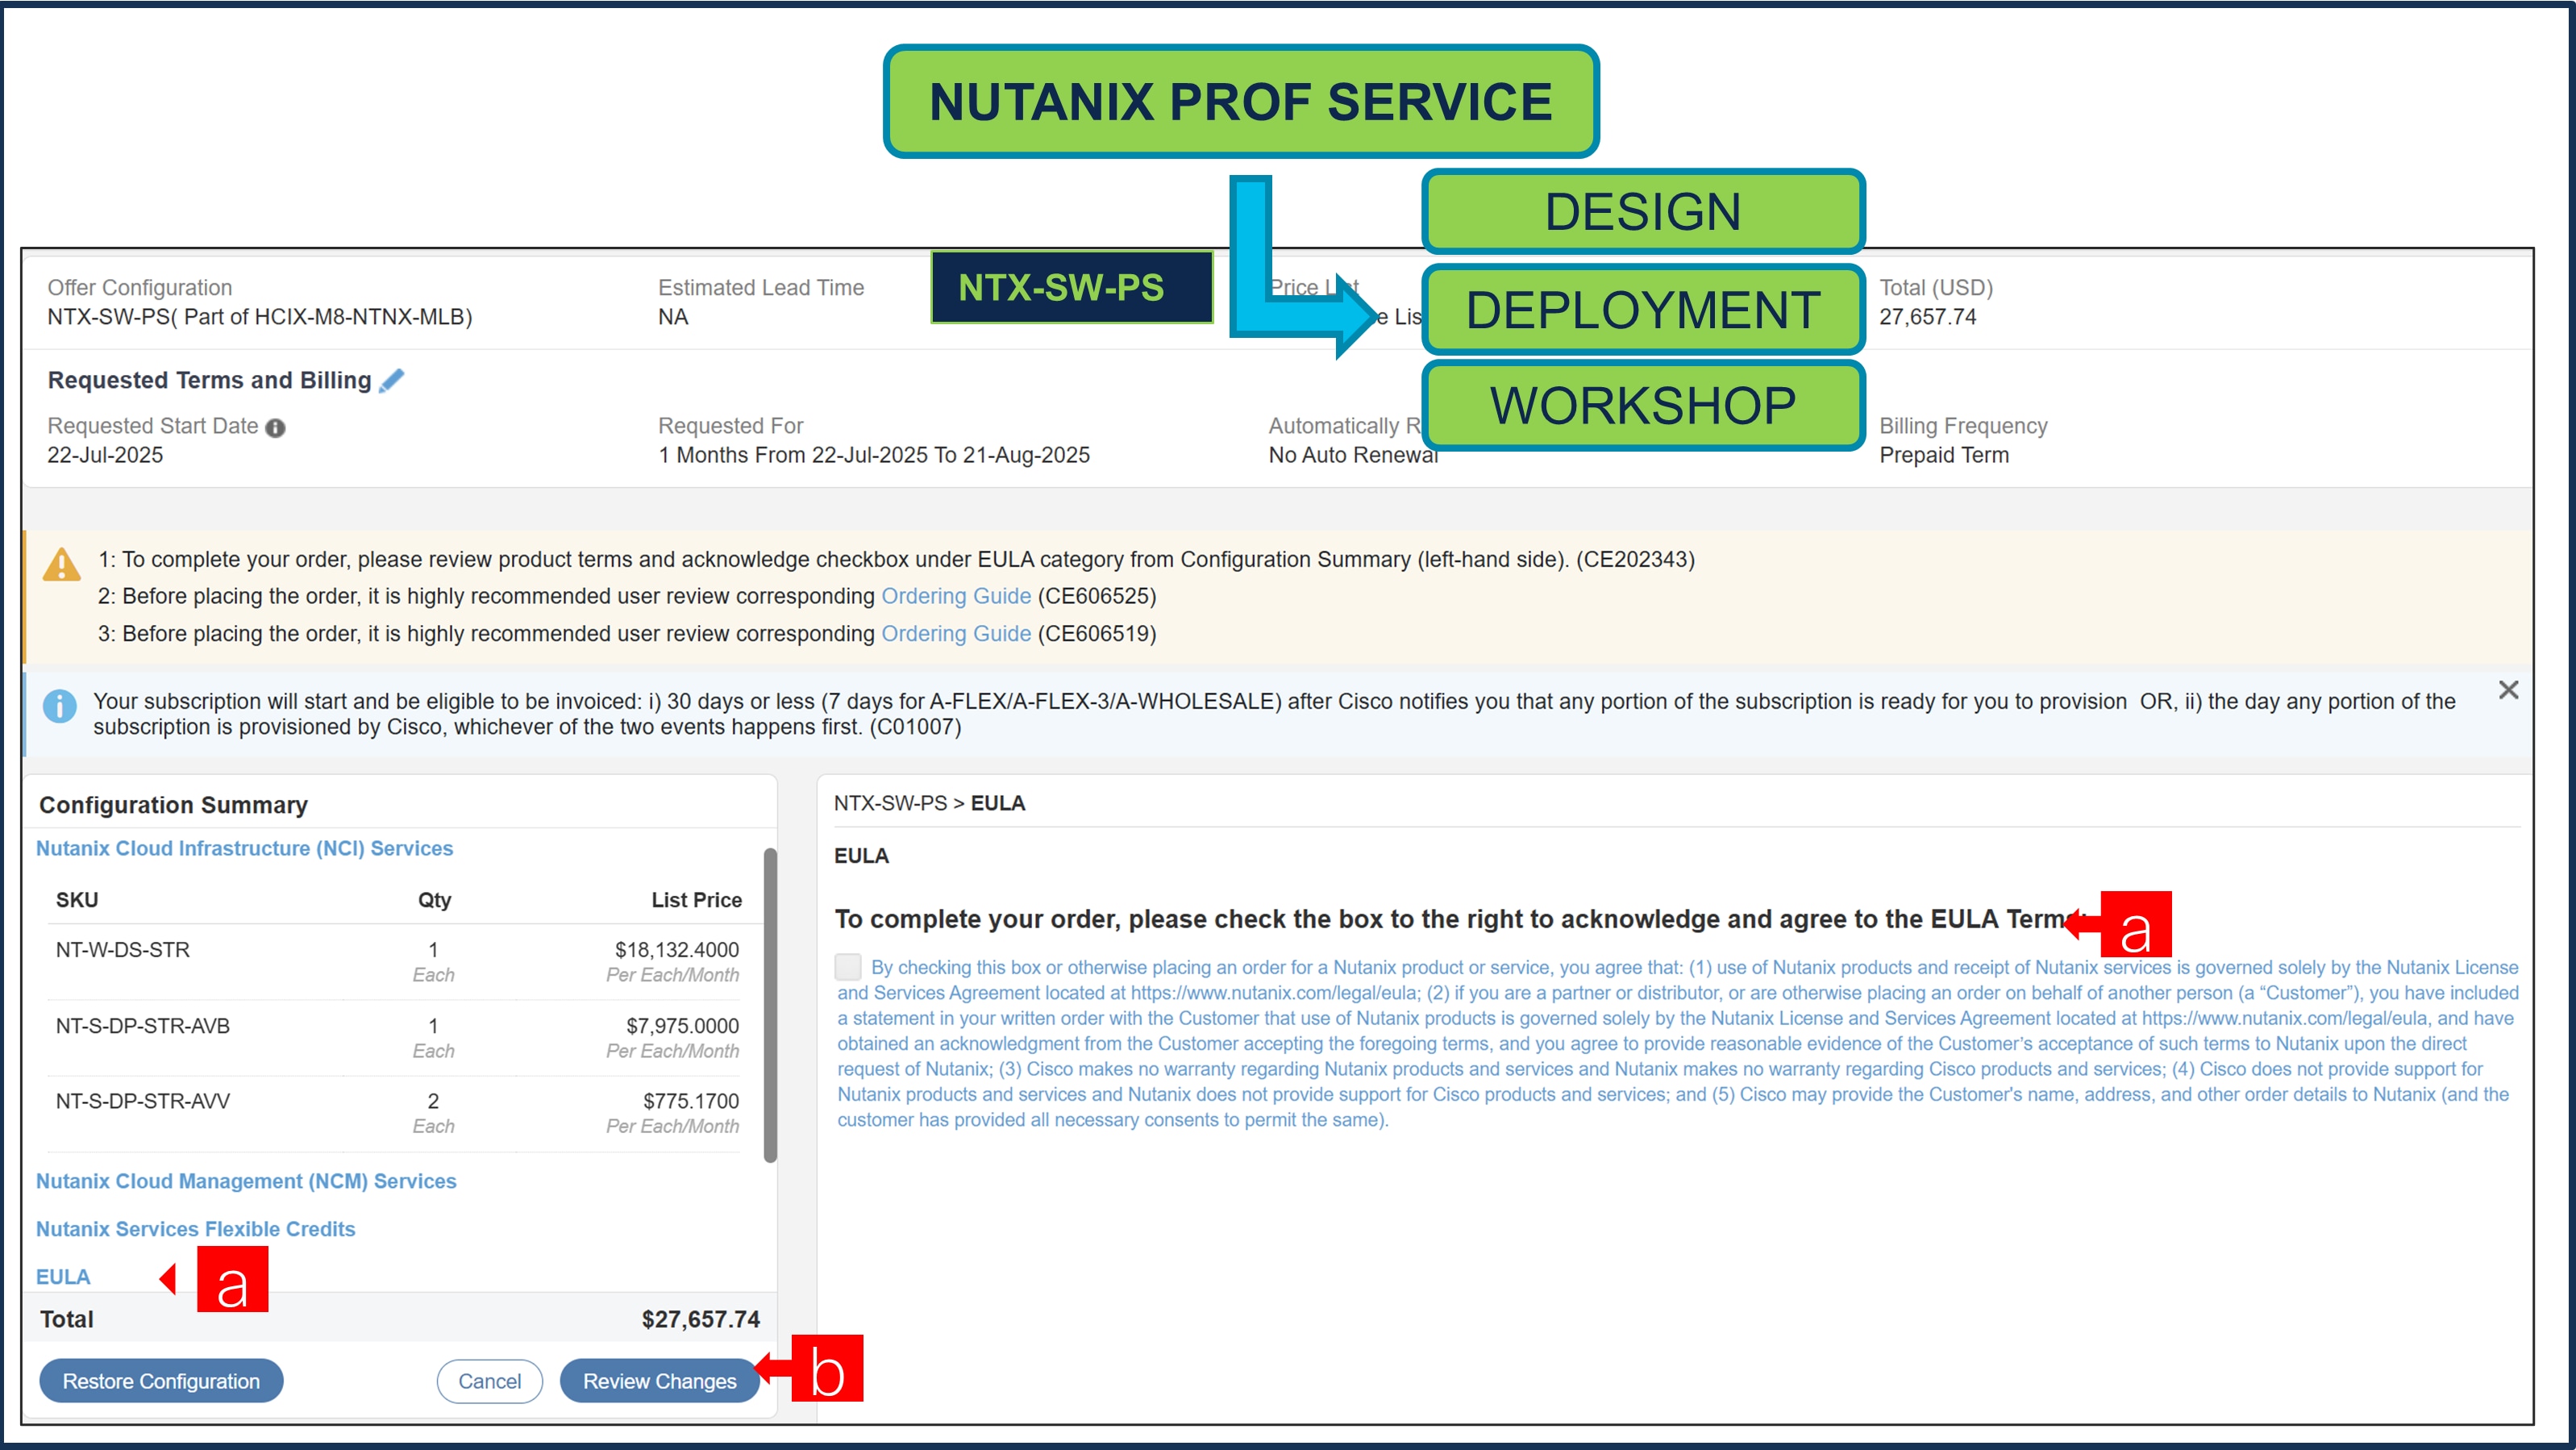
a. To complete the order, please check the box to the right to acknowledge and agree to the EULA Terms
b. Click on Review Changes and Done
Step 28.
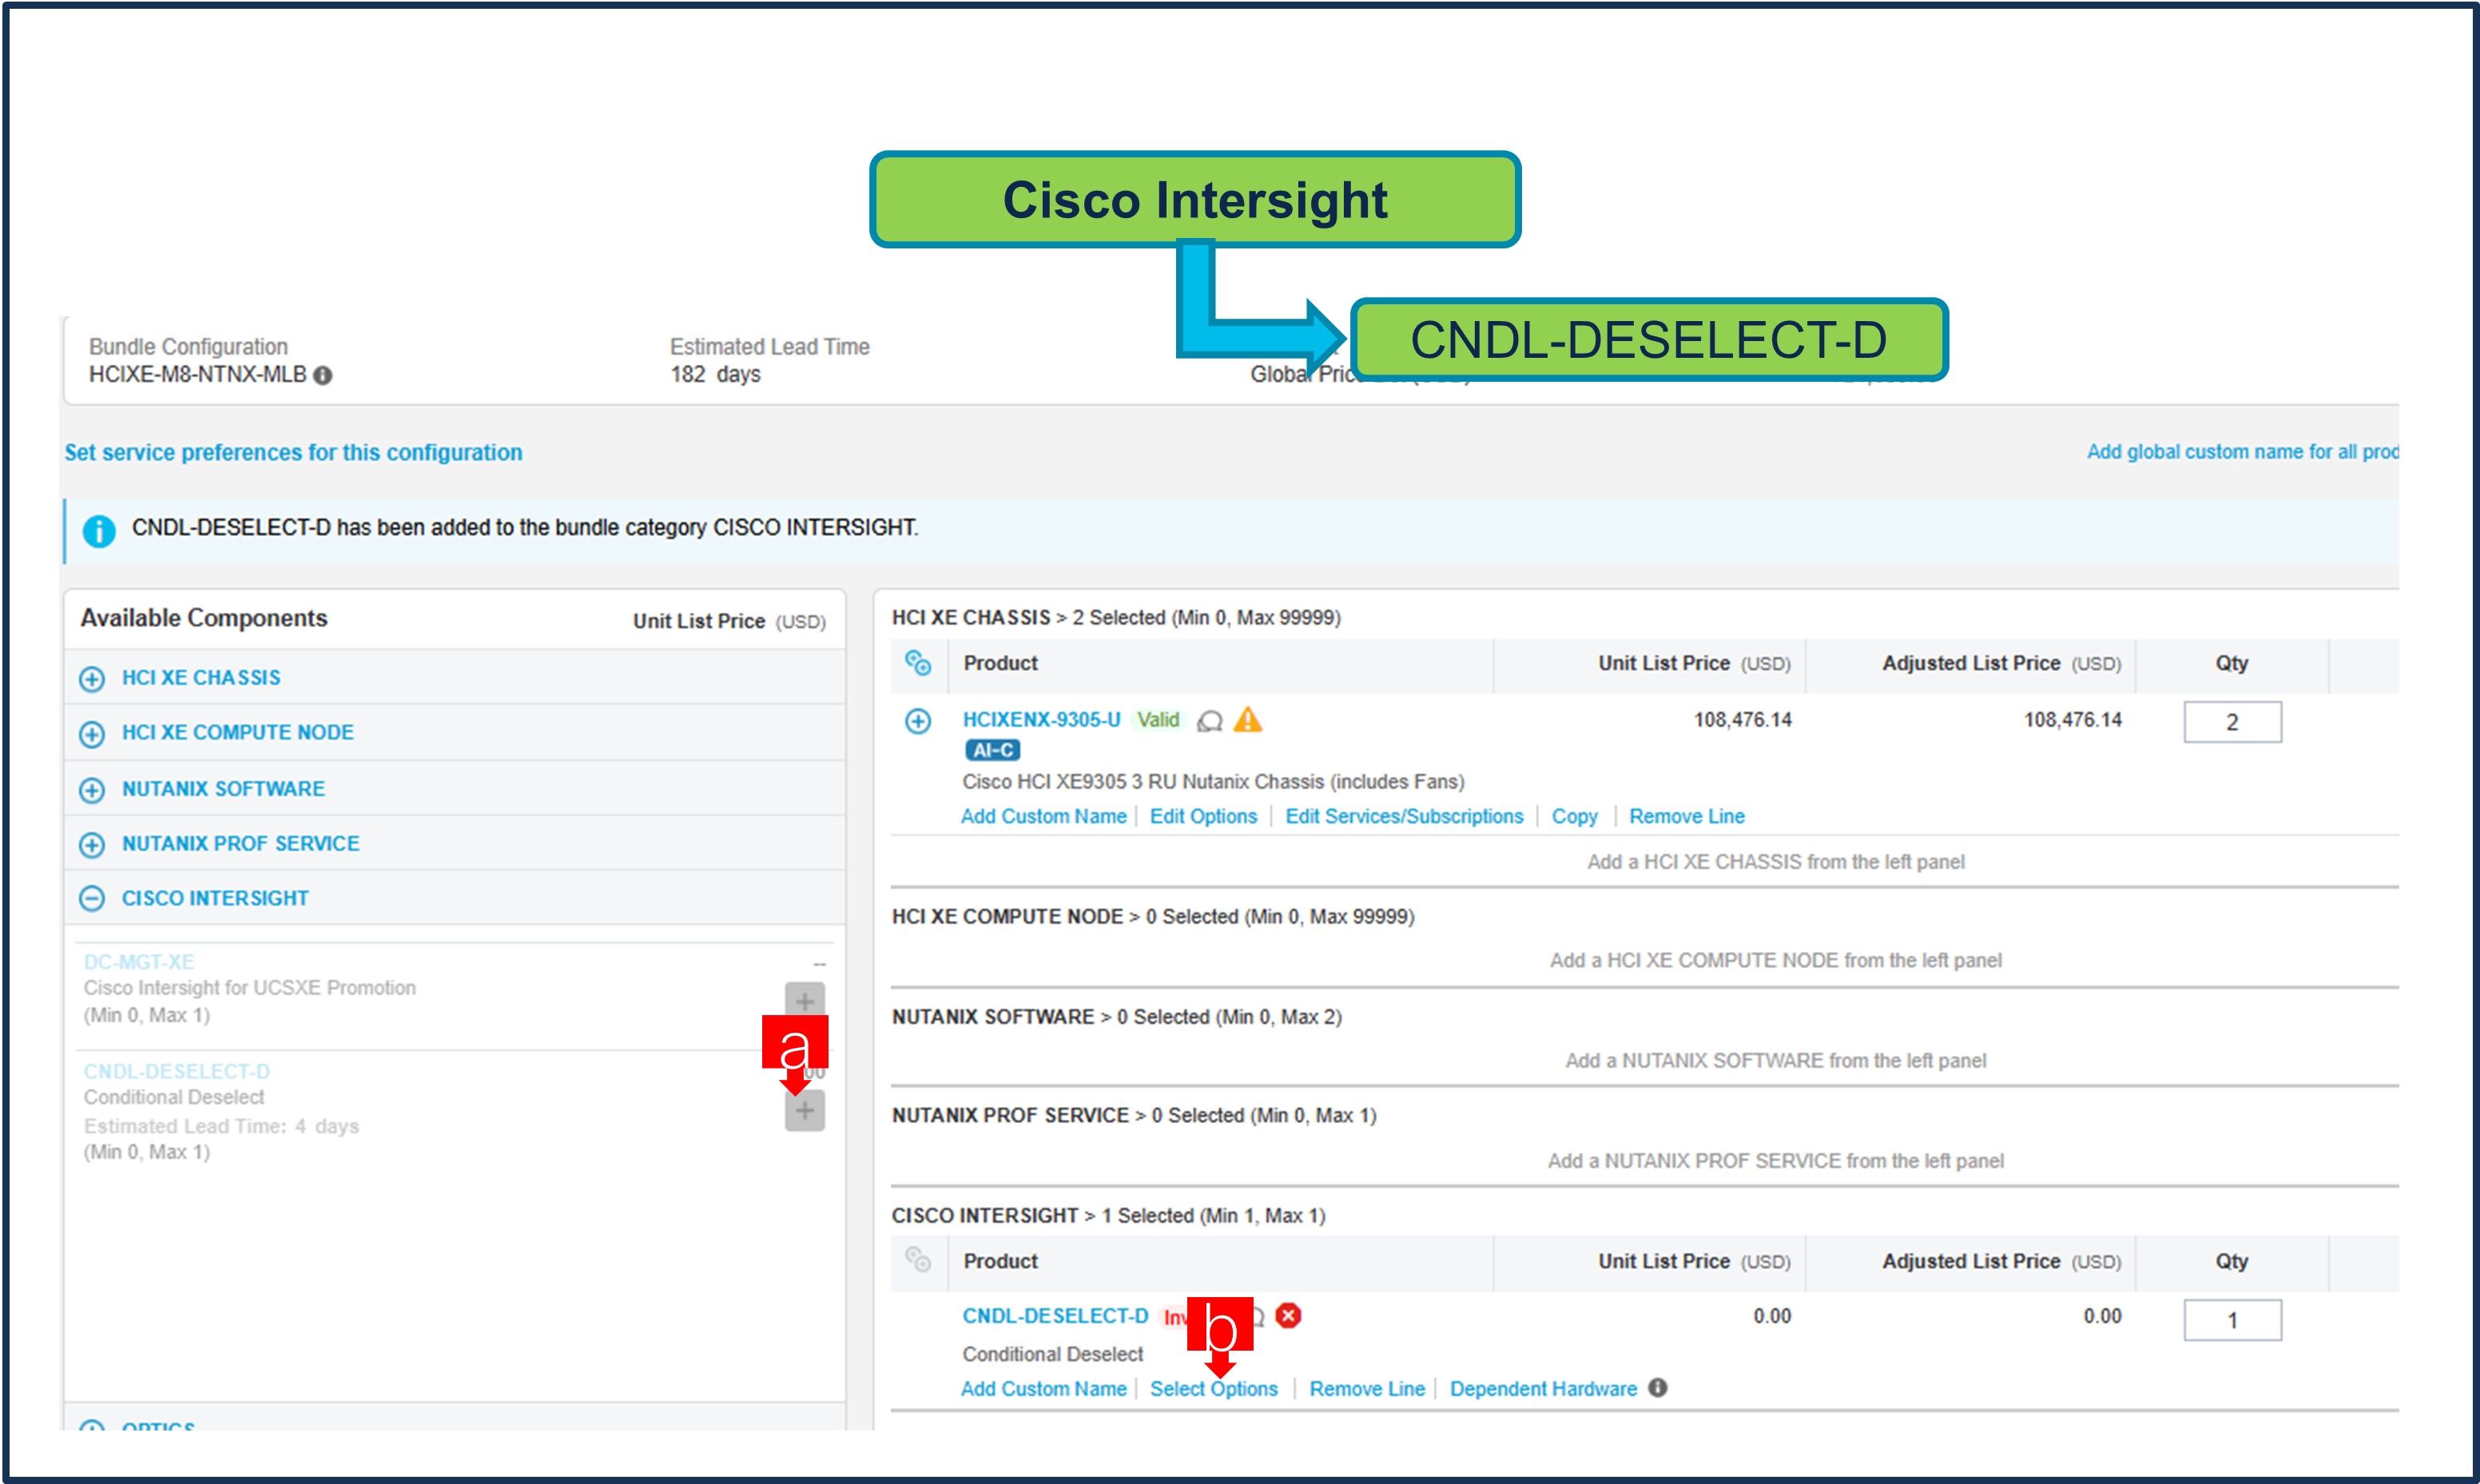
Note: Intersight is required, however CNDL-DESELECT-D can be chosen if one of these criteria apply, it’s meant to select only if:
-order is for Disti Fulfillment.
-customer has already purchased Cisco Intersight License previously.
-or via EA Contract.
a. Click to the sign next to the ‘CNDL-DESELECT-D’, then notice is invalid, further configuration needed.
b. Click to ‘Select Options”.
Step 29.
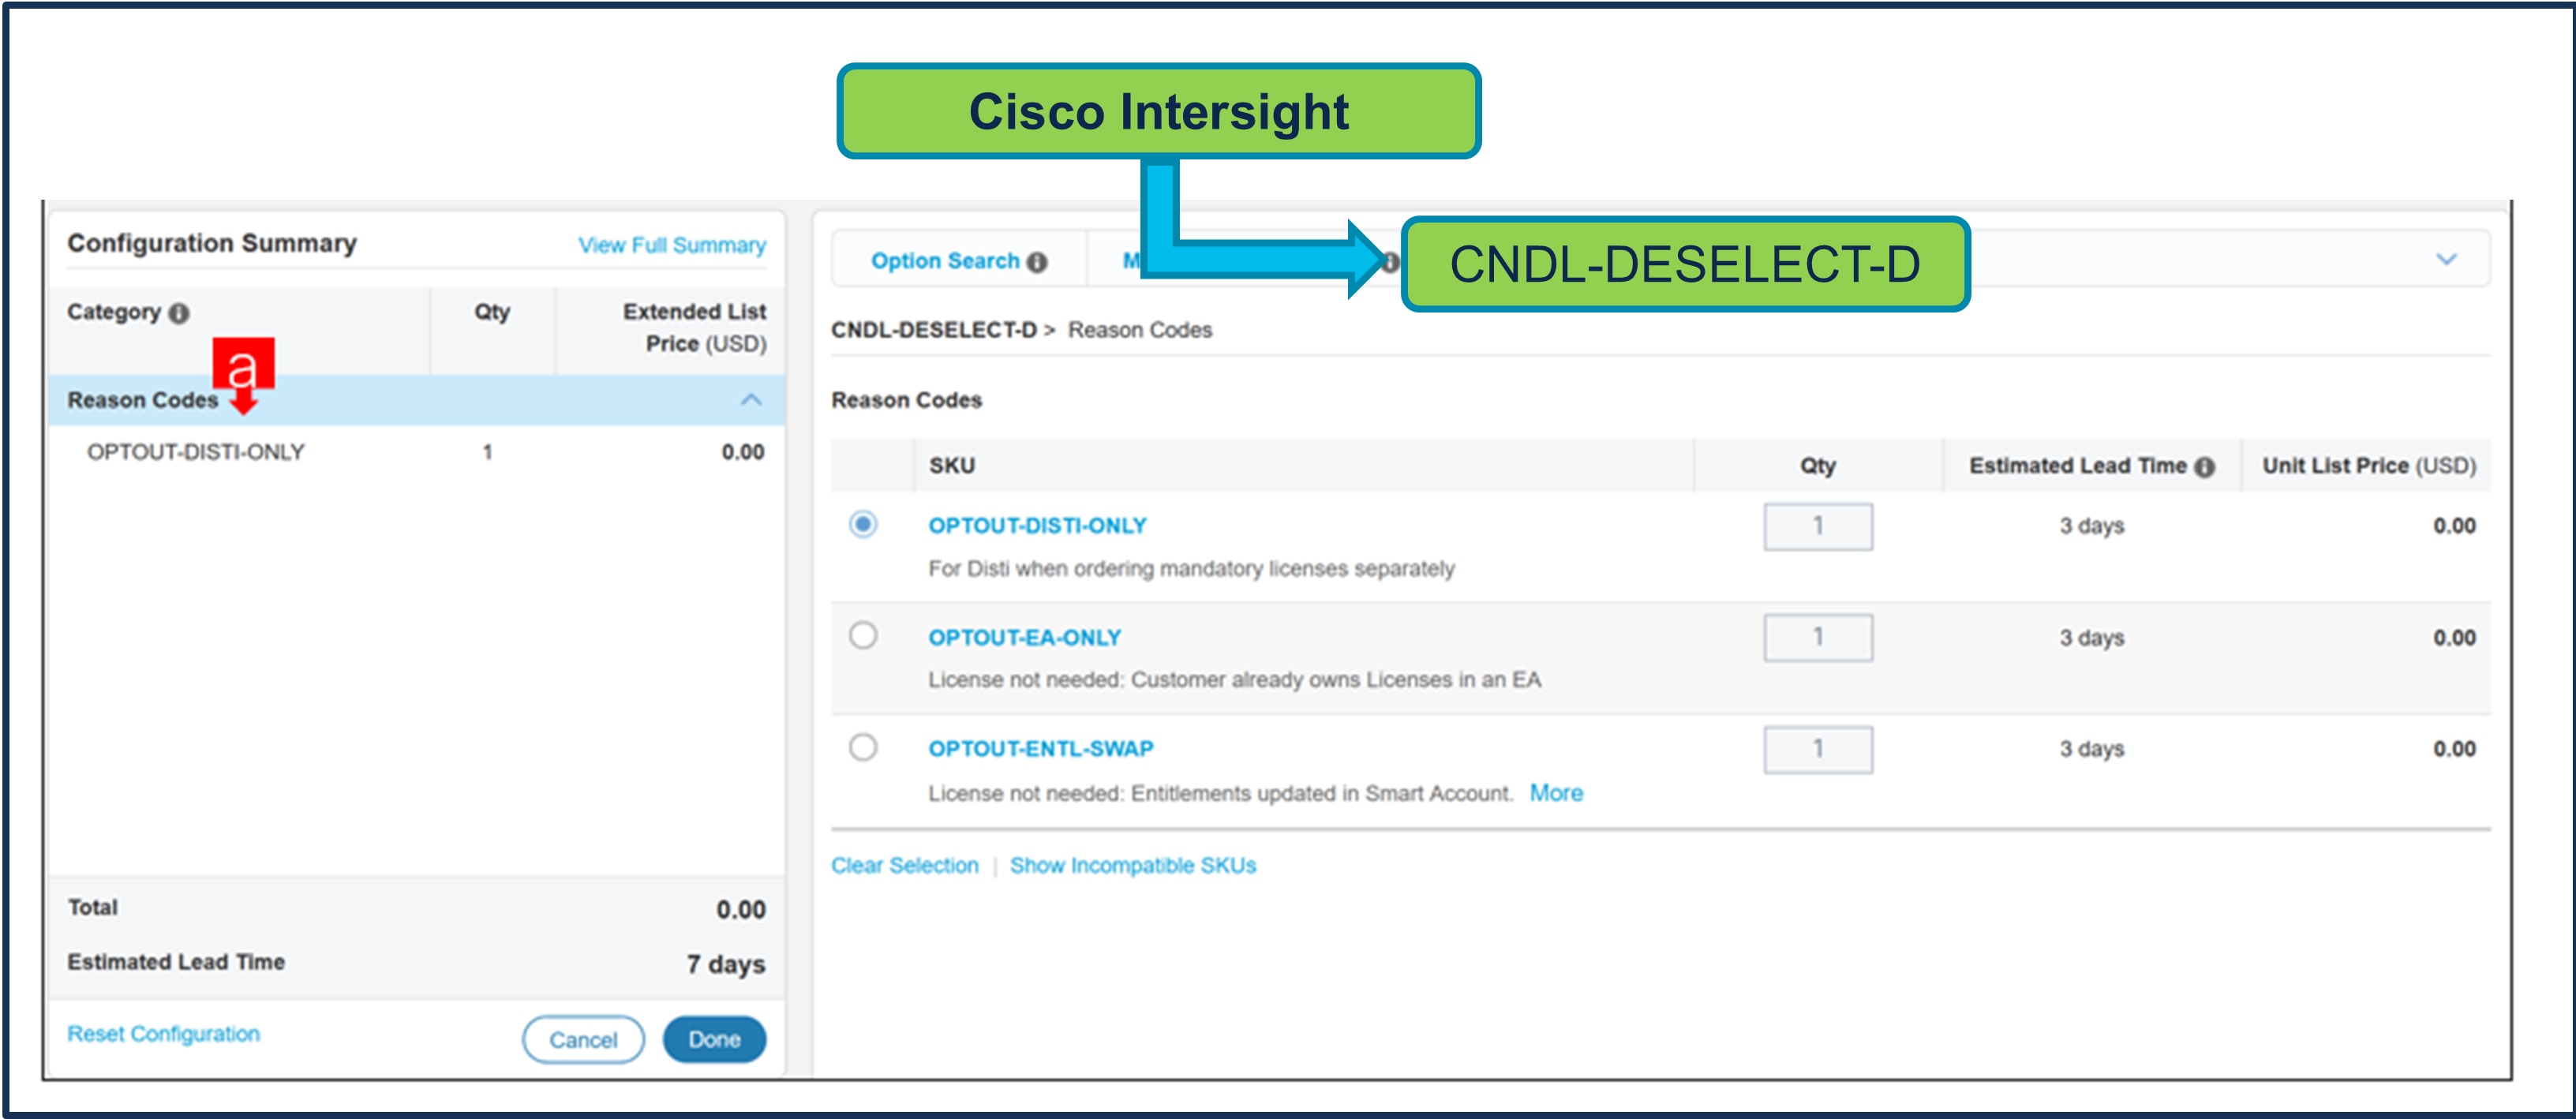
a. Please select appropriate Reason Code.
Step 30.
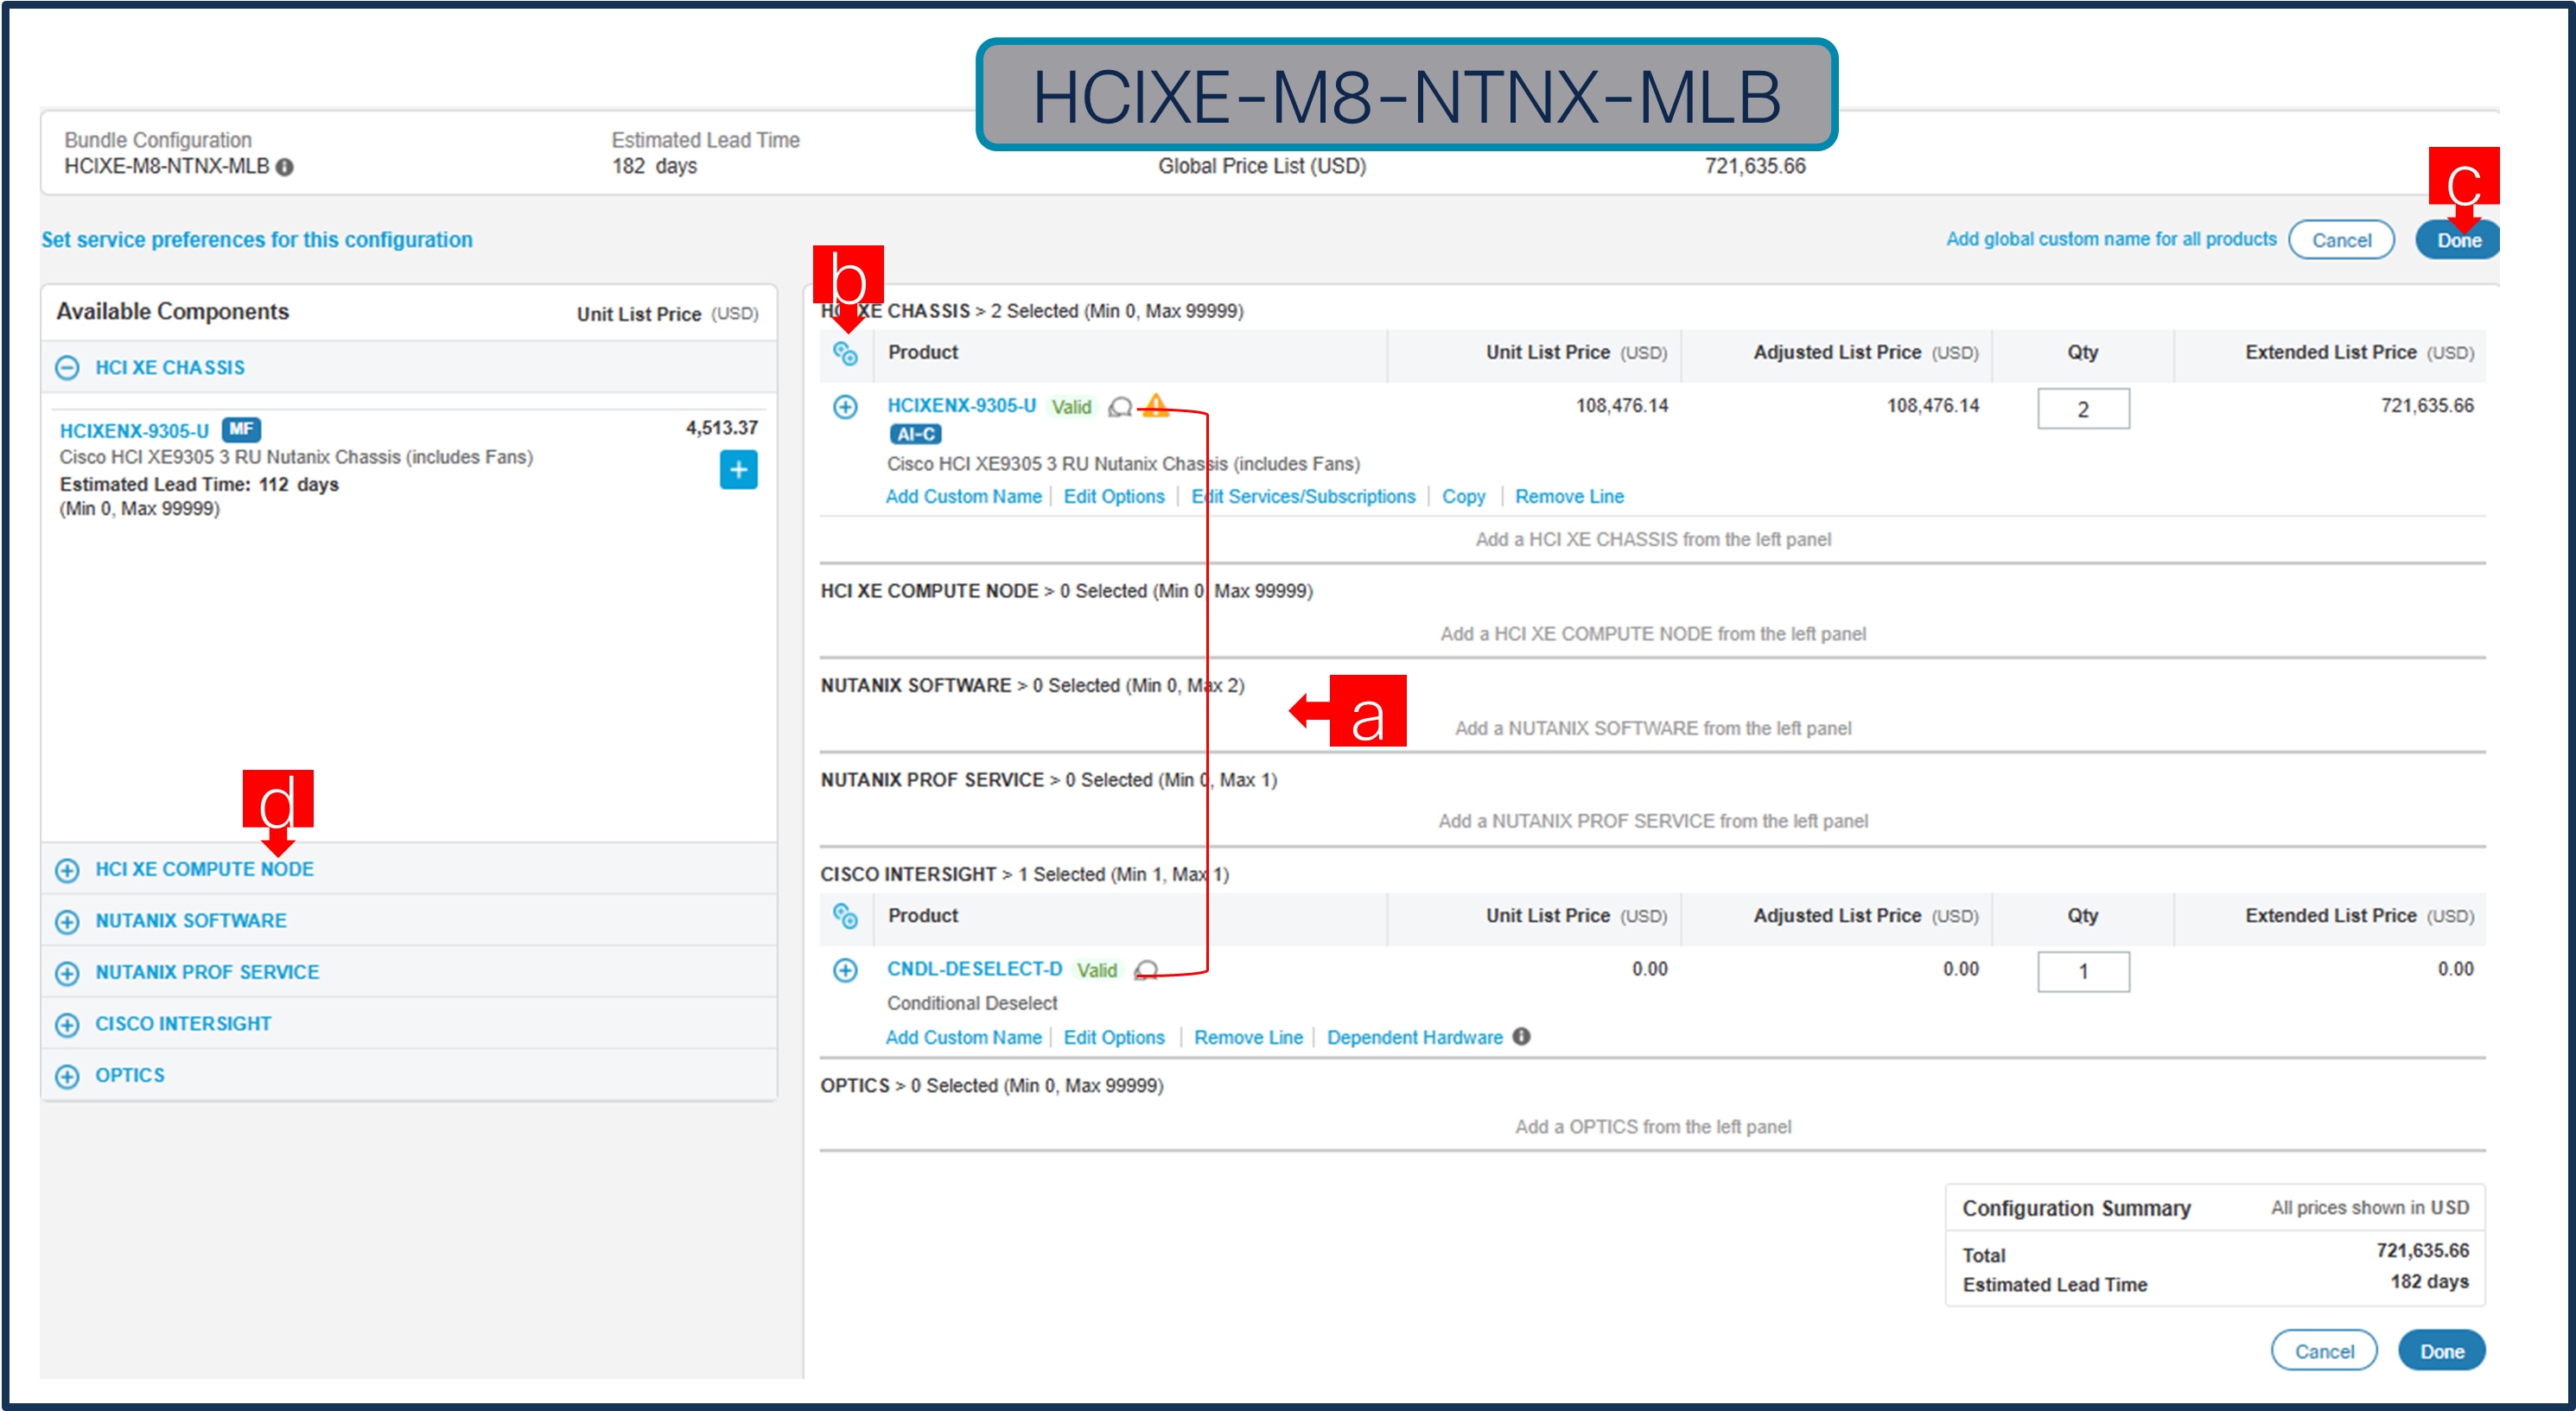
a. Configuration for MLB is completed when status of each Product is Valid and warning messages are cleared.
b. If you Click on the you can expand and view the selections made for each Product.
c. Select DONE to complete MLB configuration.
d. Or you can add non-required items, like “Nutanix SW, Service, Optics..” and others if needed.
Step 31.
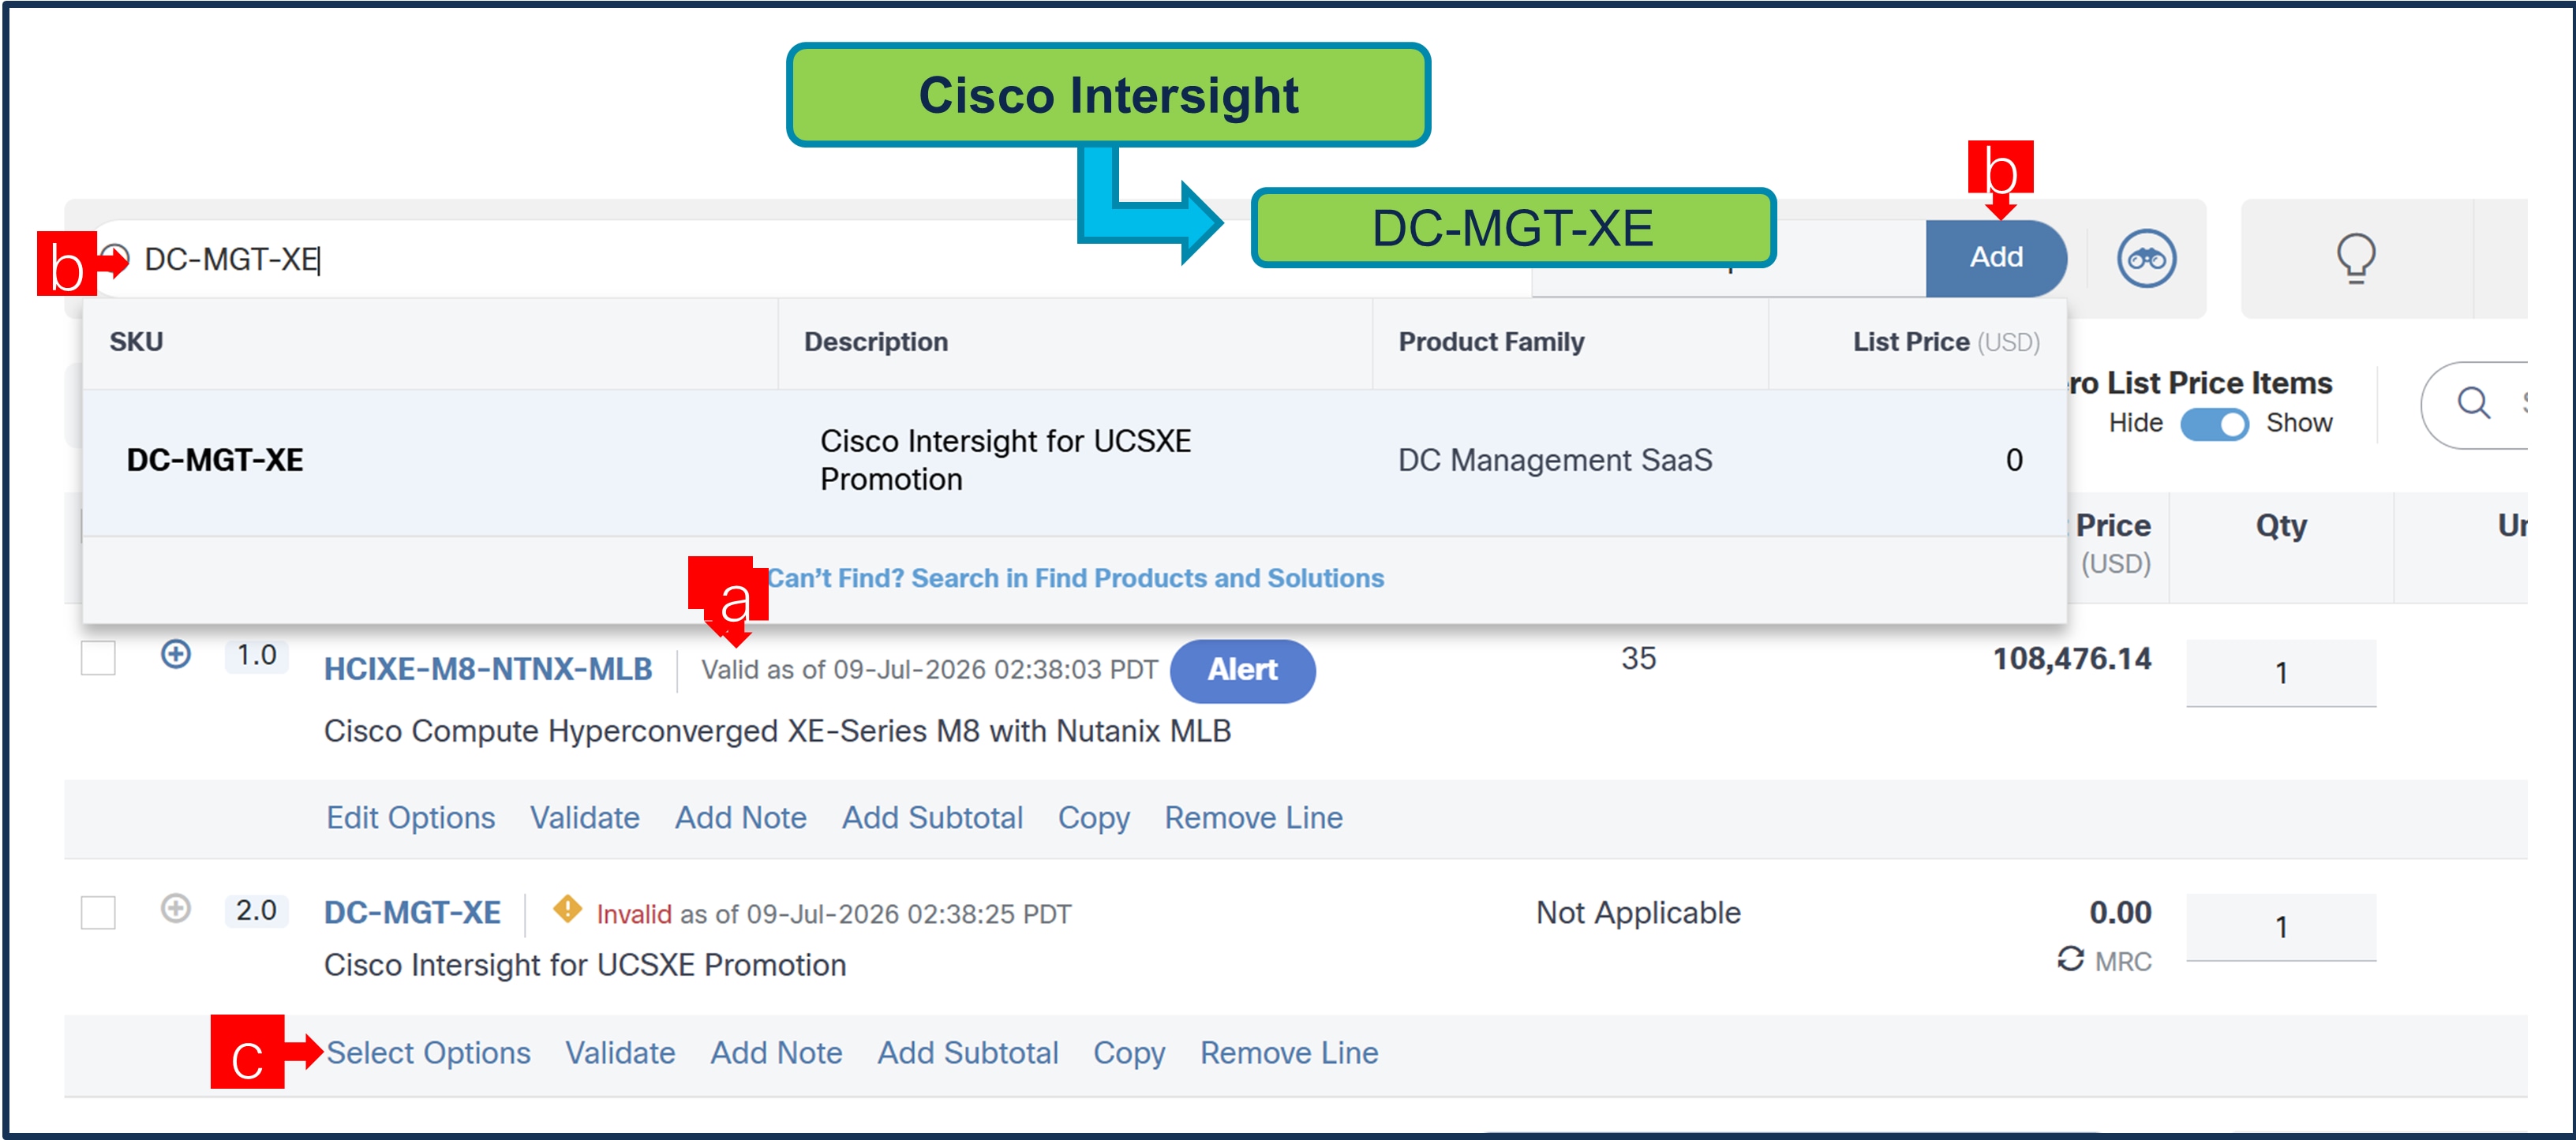
a. Configuration of HCIXE-M8-NTNX-MLB is now Valid and Line No. 1.0 represents HW only Configuration.
b. If customer already purchased Intersight or has an EA agreement, then configuration ends here, DONE and ready.
c. Intersight is a required selection, if customer have not previously purchased Cisco Intersight Software have to be added in Line 2.0 which will represent SW only Configuration (Disti use). In CCW, search for DC-MGT-XE and click on button. Then it will show up as Line # 2.0
d. Click on ‘Select Options’ to enter the configurator.
Step 32.
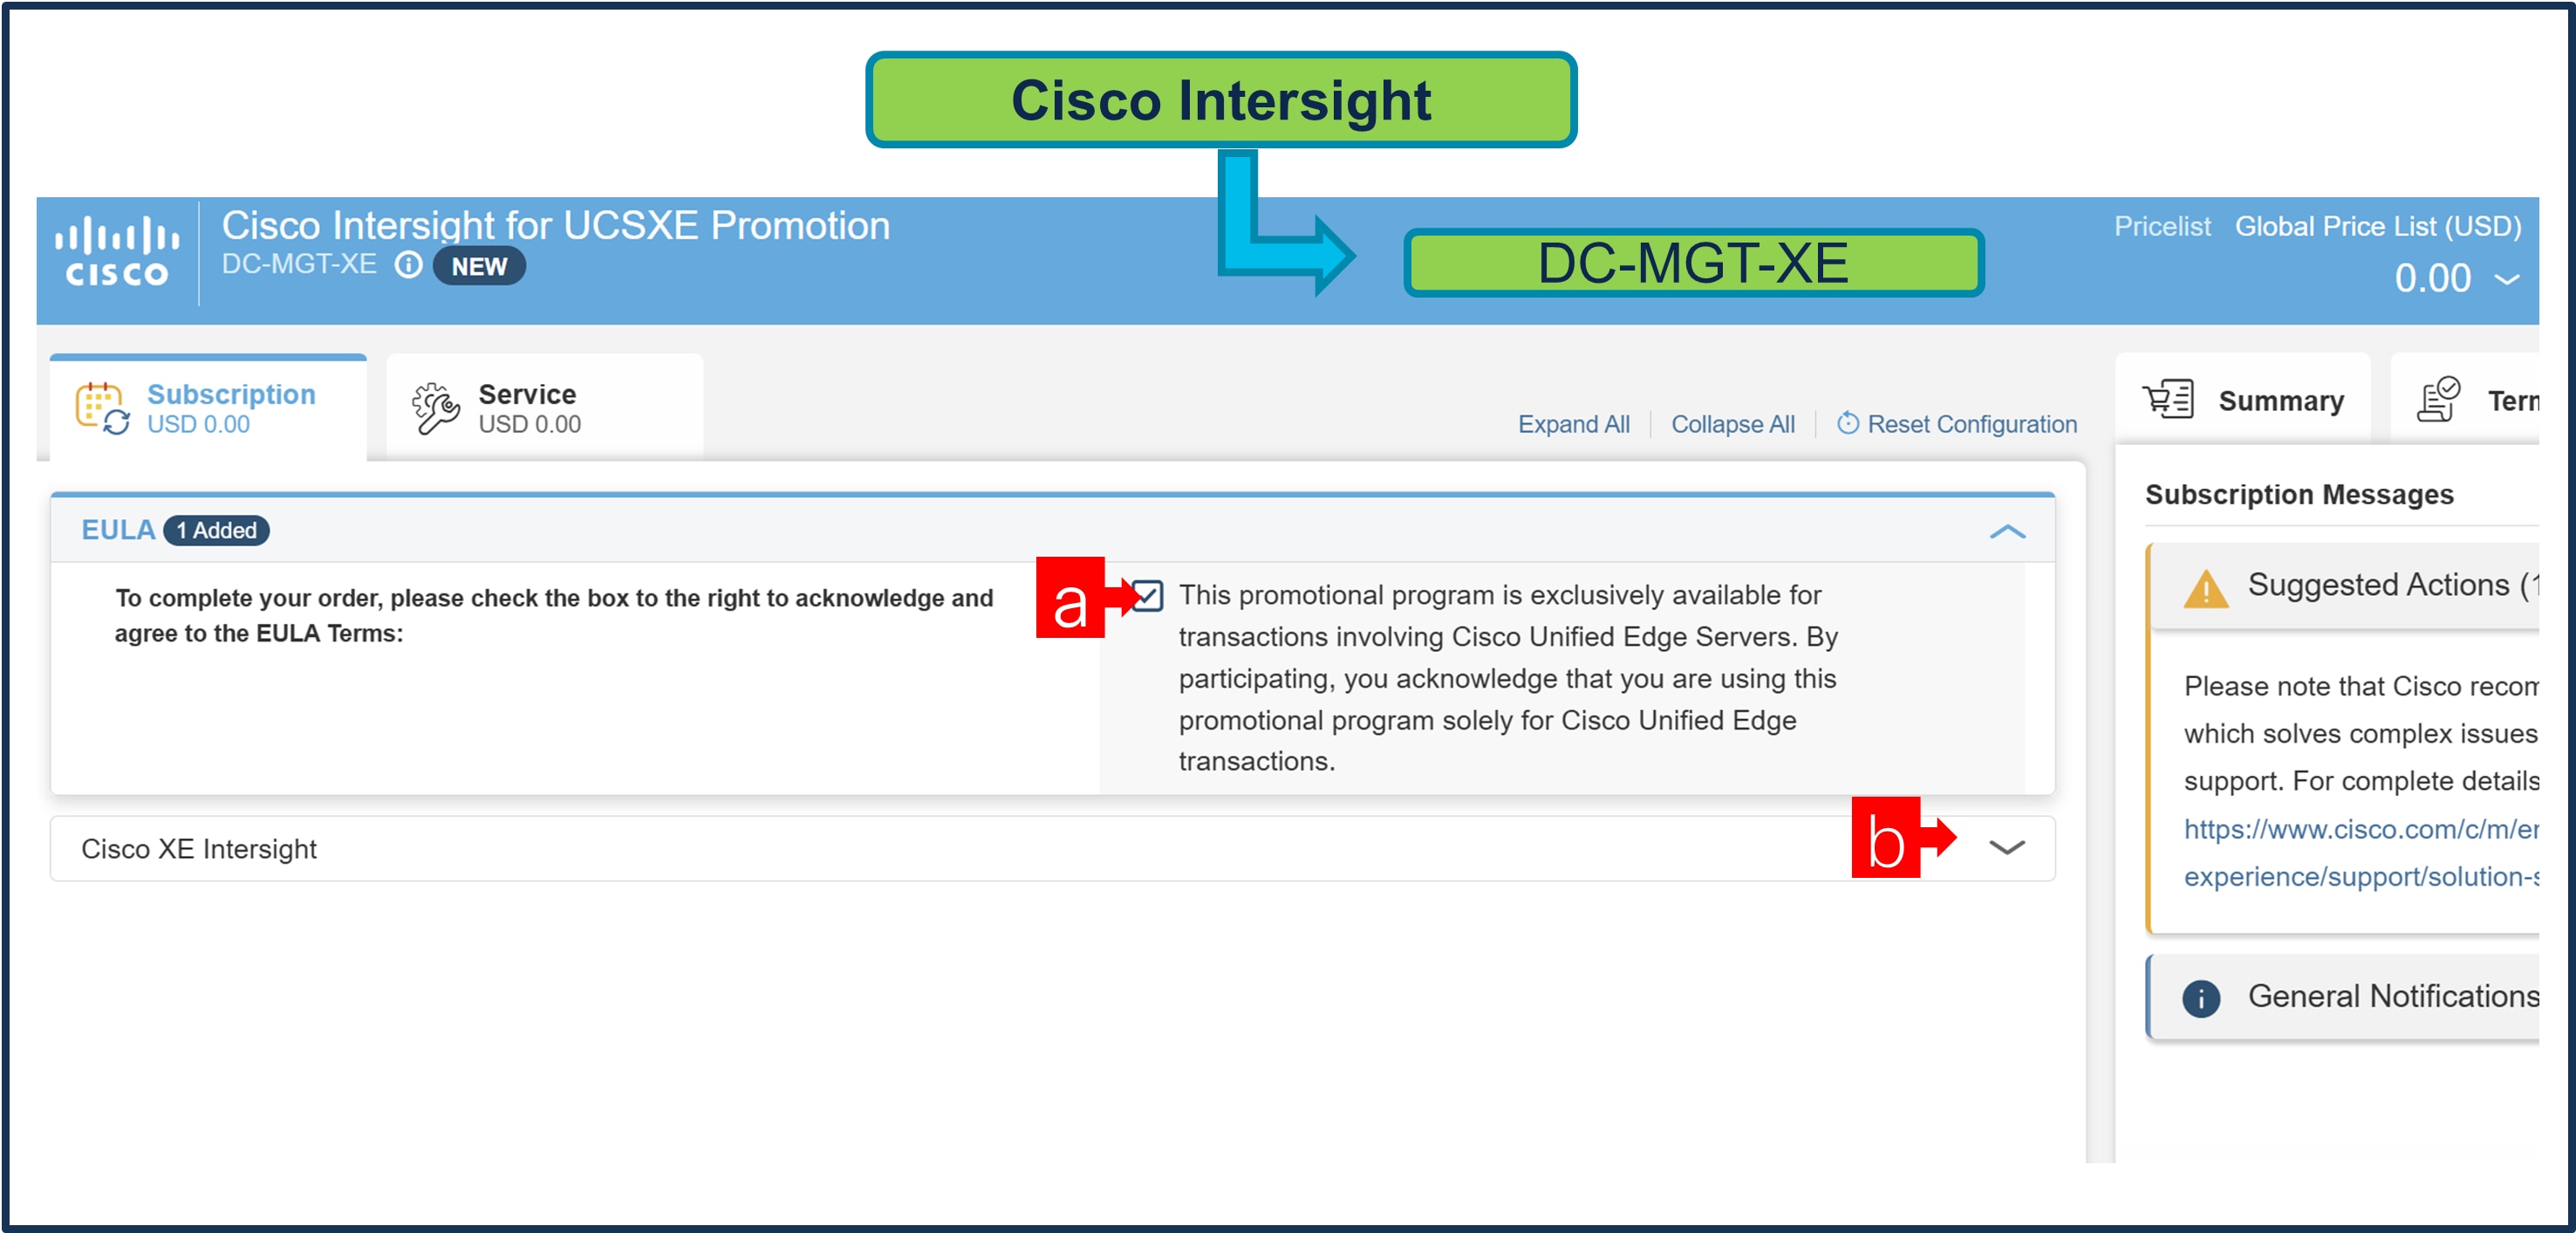
a. Need to accept EULA by clicking on checkmark.
b. Then open up the pid list by clicking the down arrow.
Step 33.
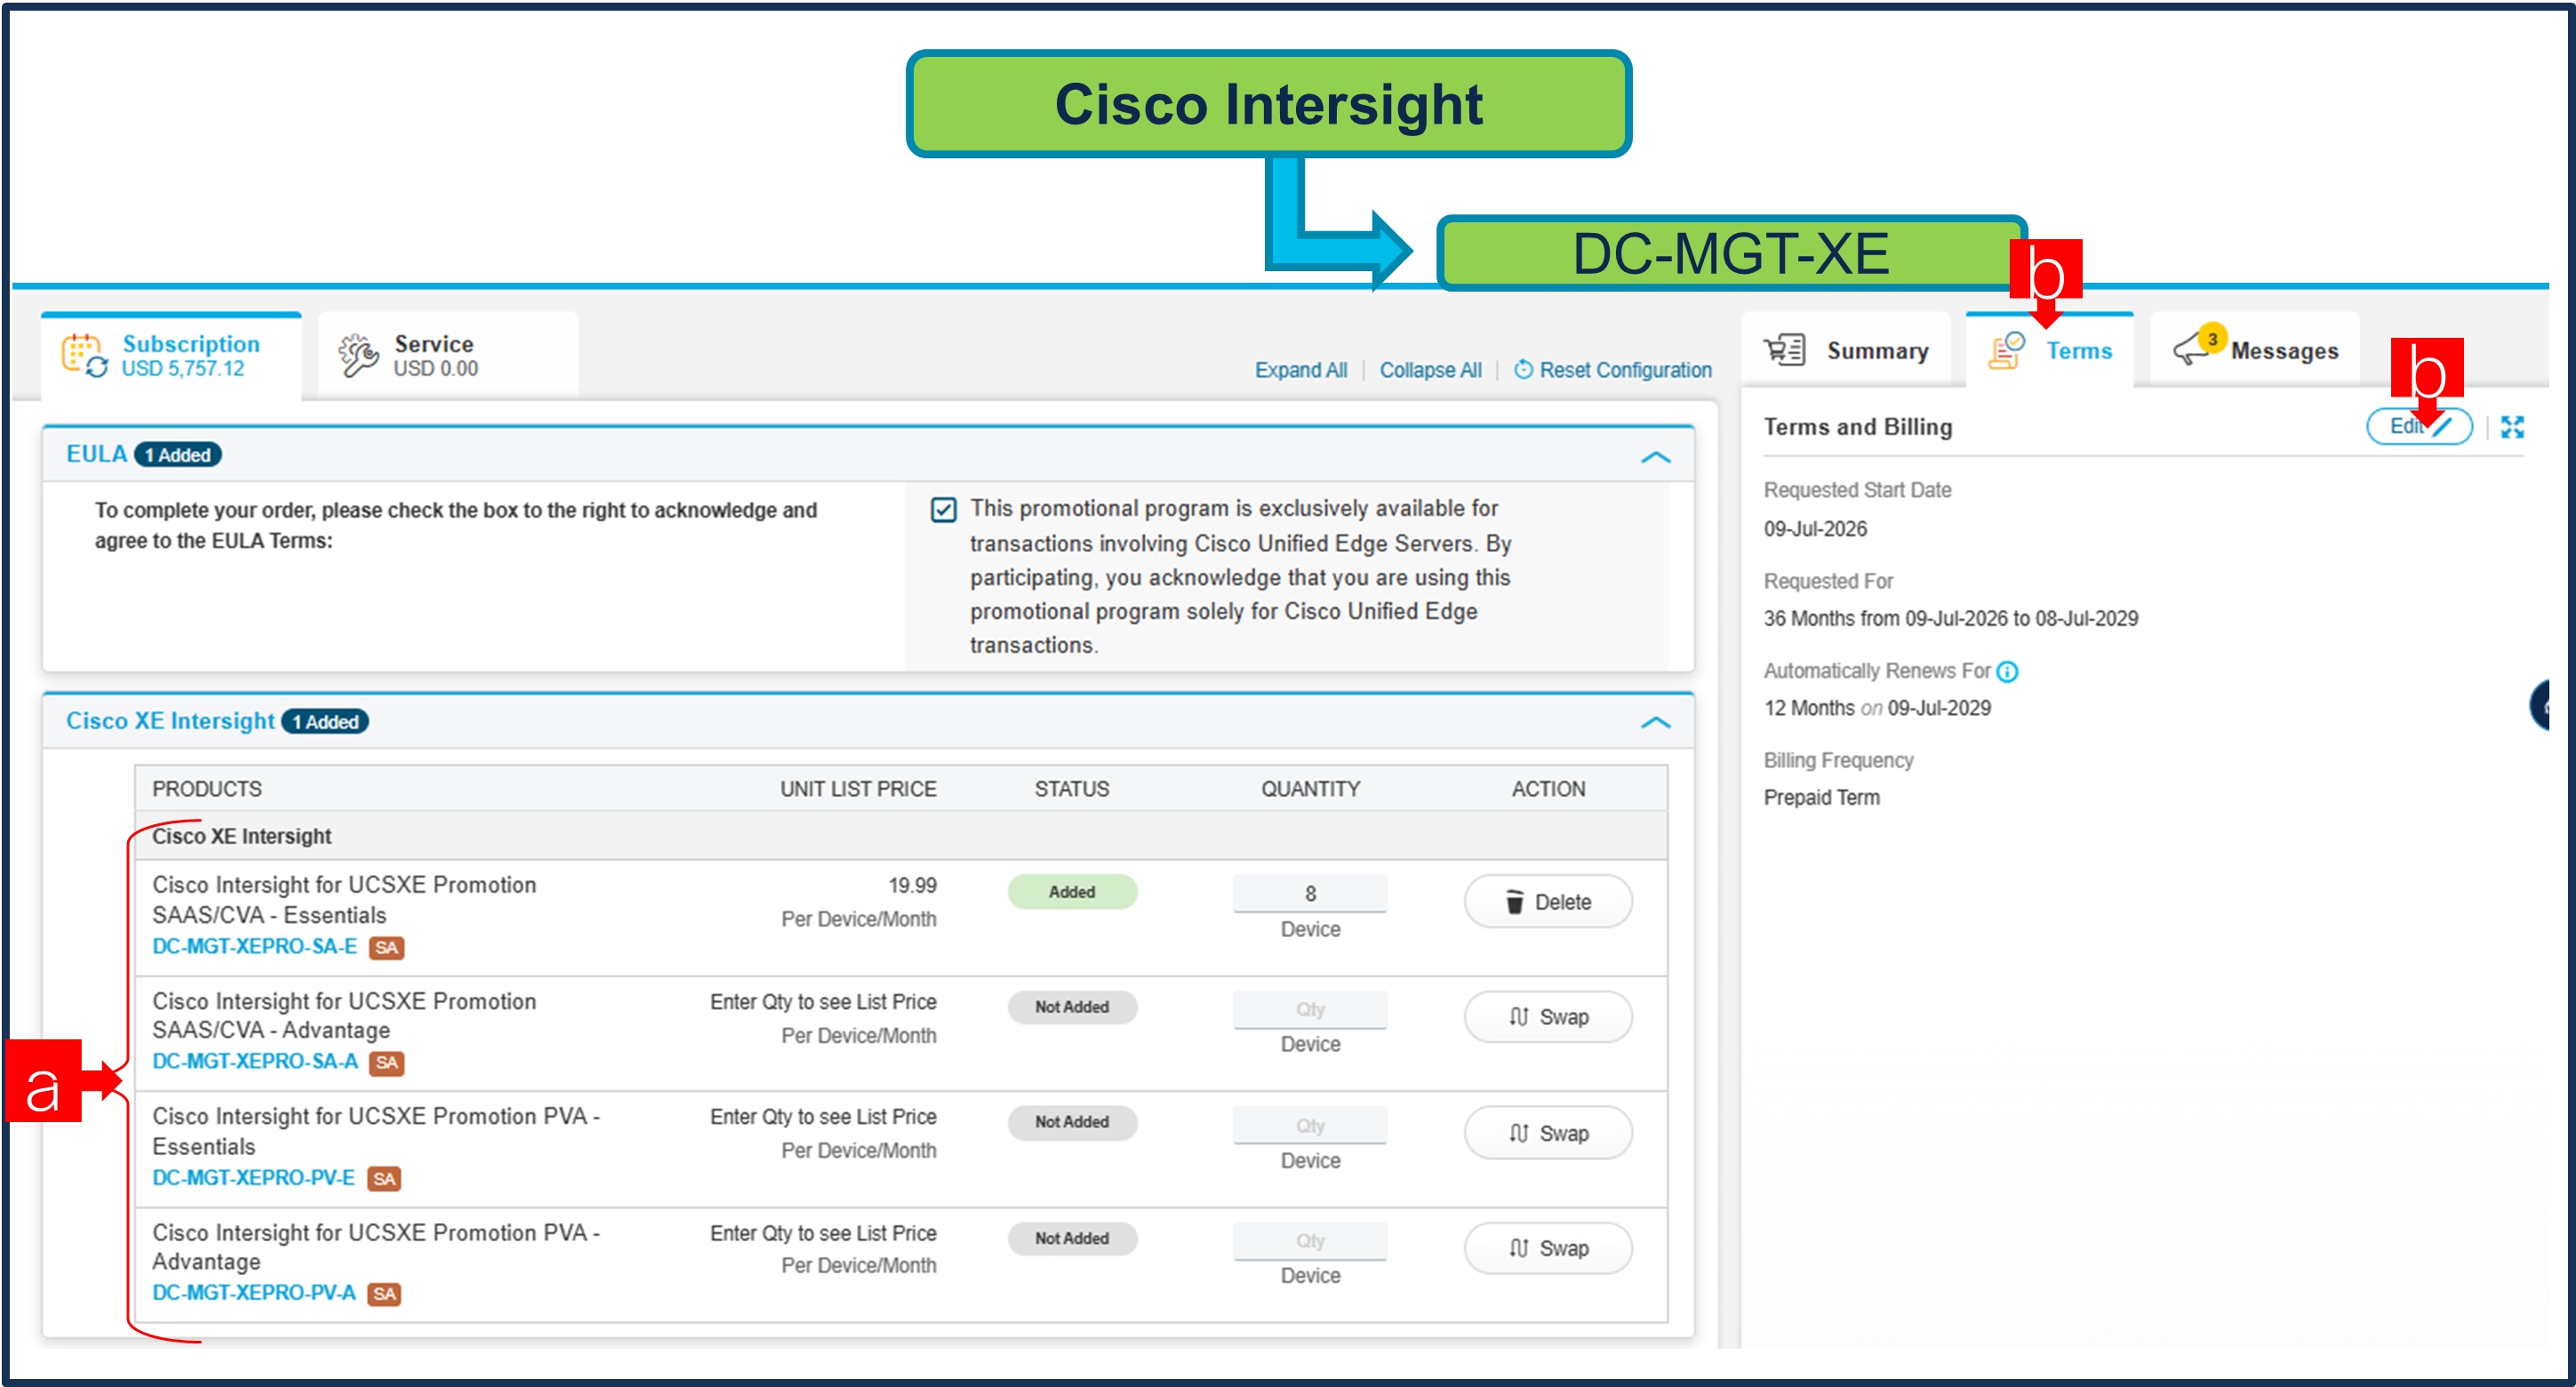
a. Select the type of license required by adding the QTY (here where you assign QTY not to the main pid), the quantity of Cisco Intersight 2.0 Infrastructure Services License under Offer: DC-MGT-XE, next to the type of license (Essentials and/or Advantage) should be equal to the quantity of Server nodes selected. Enter the quantity then hit Enter.
b. Then click ‘Terms’ Tab at right, then ‘Edit’ to see billing terms, and modify if needed
Step 34.
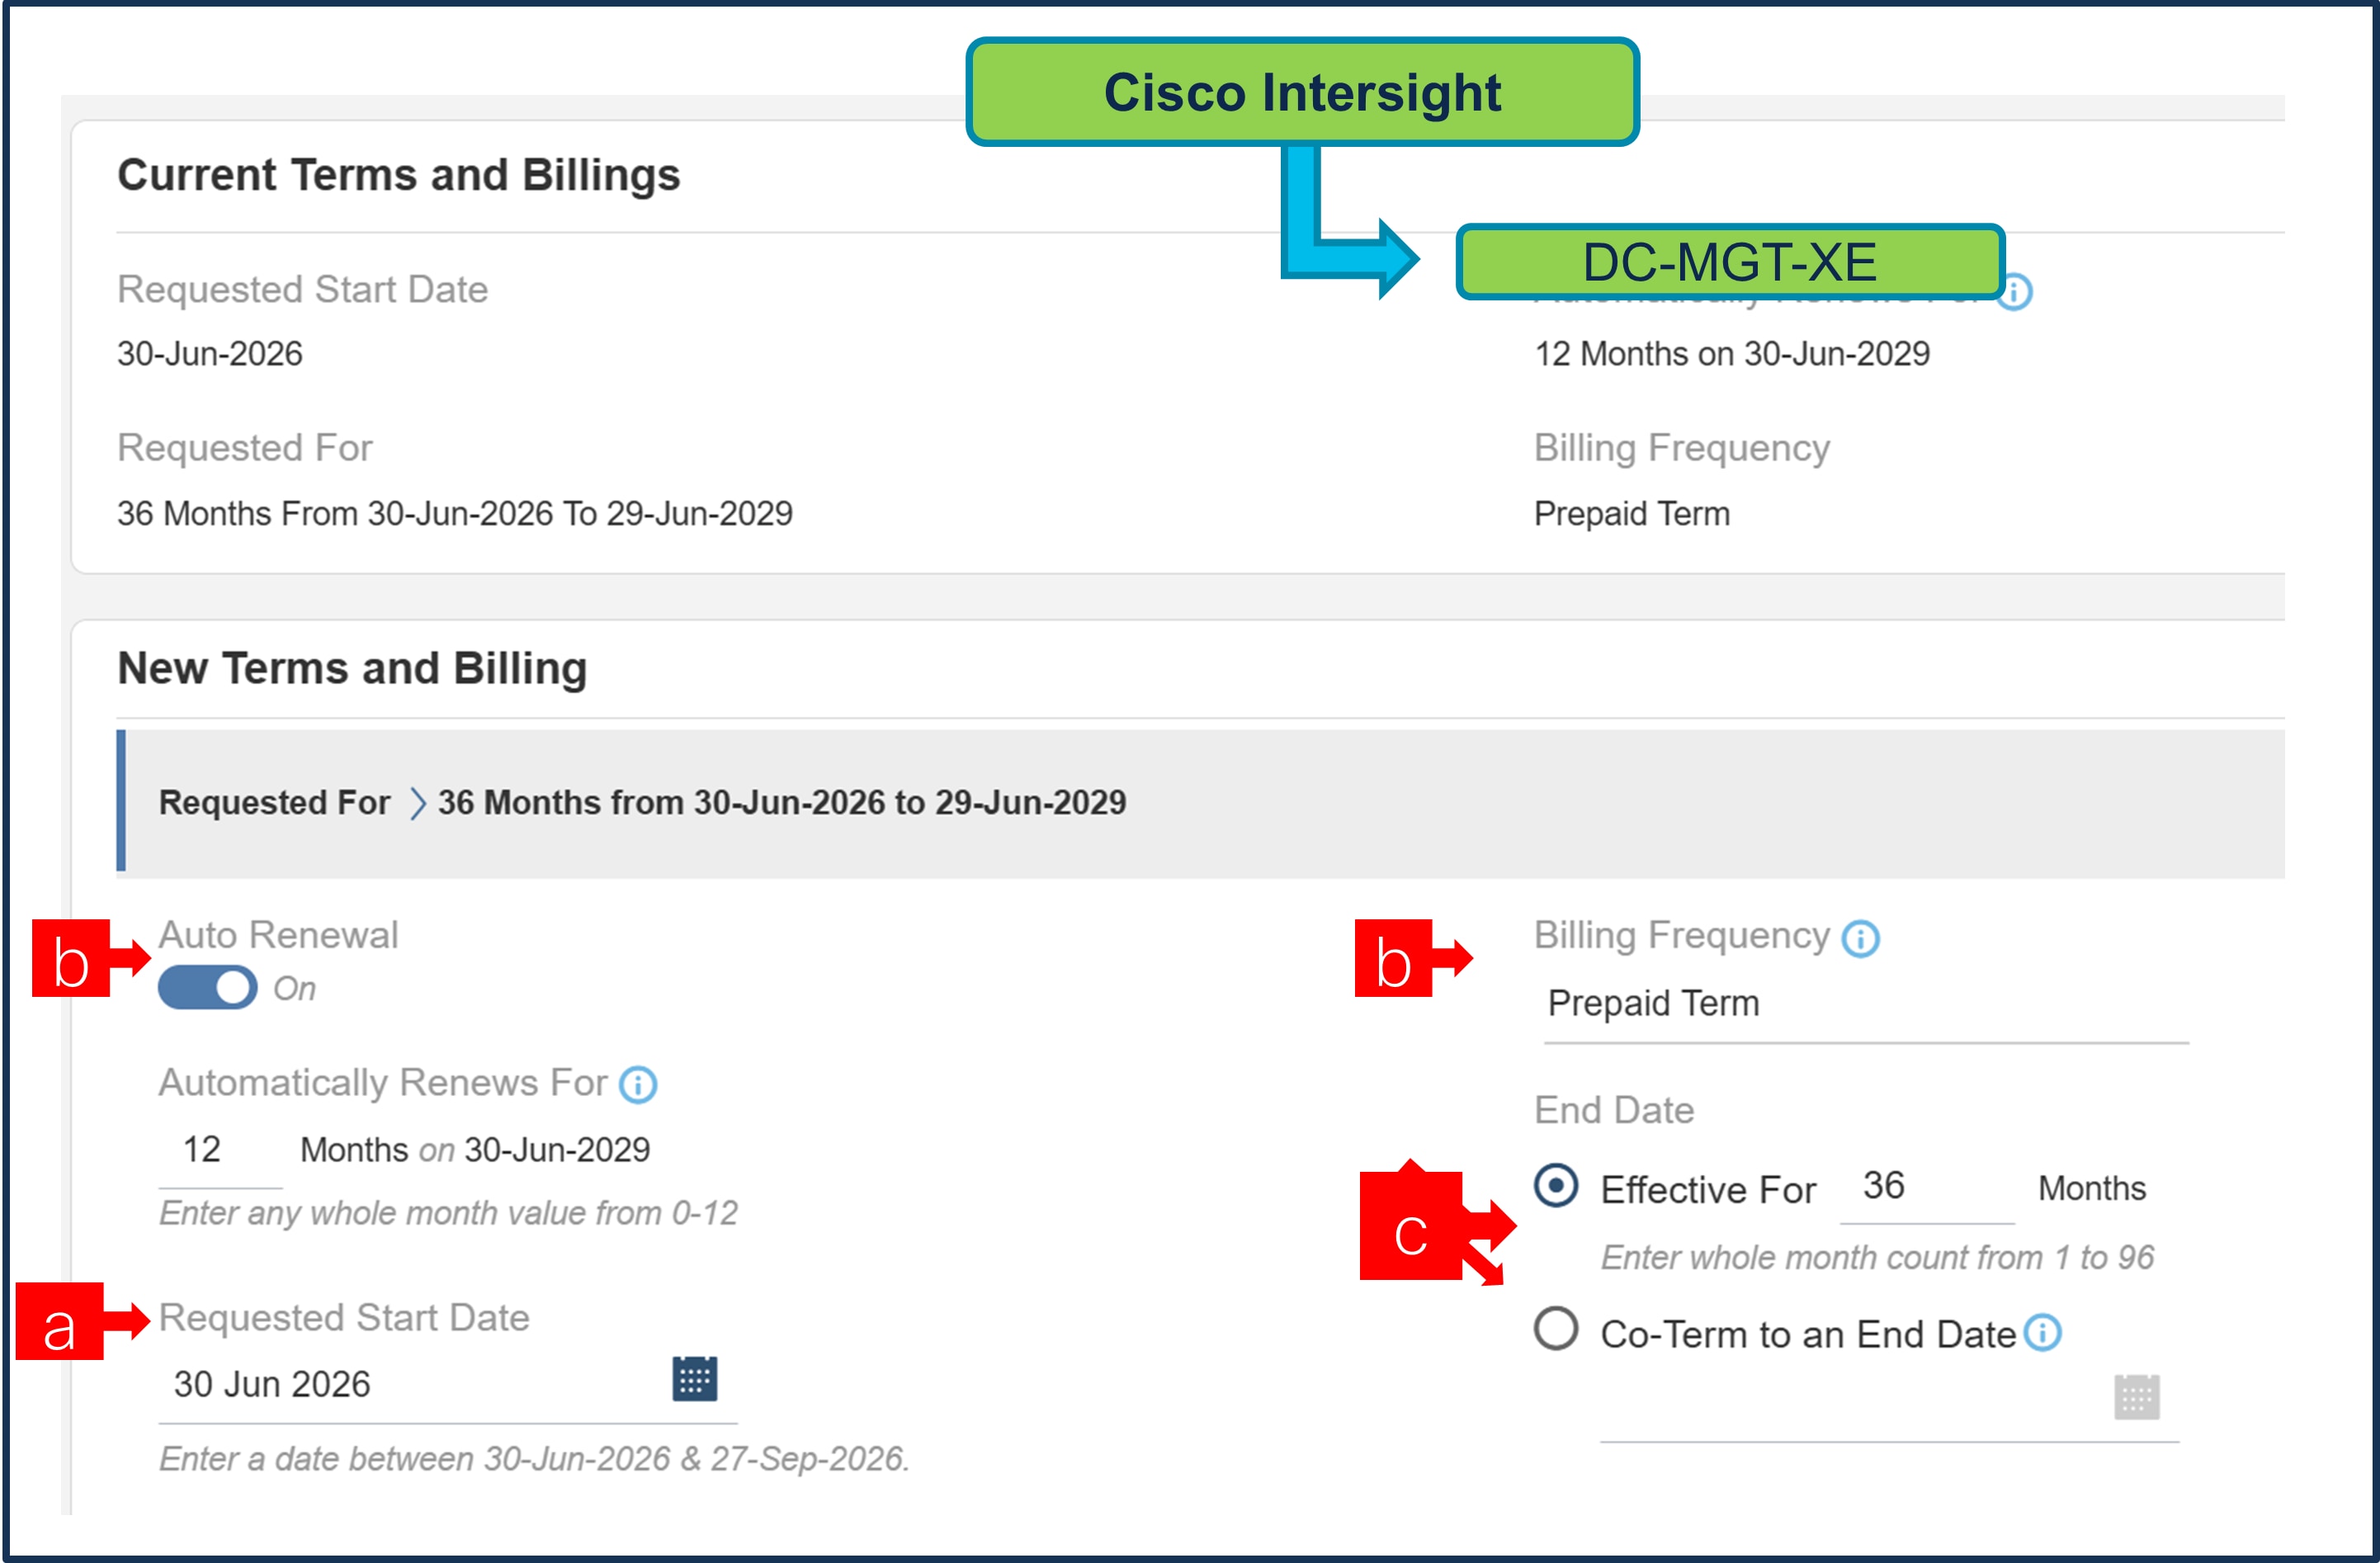
a. Requested Start Date (RSD) is now dependent on HW Ship Date and will automatically starts when the HW ships. If you change the RSD, the Software will start either on the RSD you picked or the HW Ship Date whichever is later.
b. Auto Renewal (on/off) is defaulted to On and Billing Frequency is defaulted to Prepaid Term.
c. End Date (duration in months) is defaulted to 36 Months, you can still change the setting accordingly, select Co-Term date if you like.
Step 35.
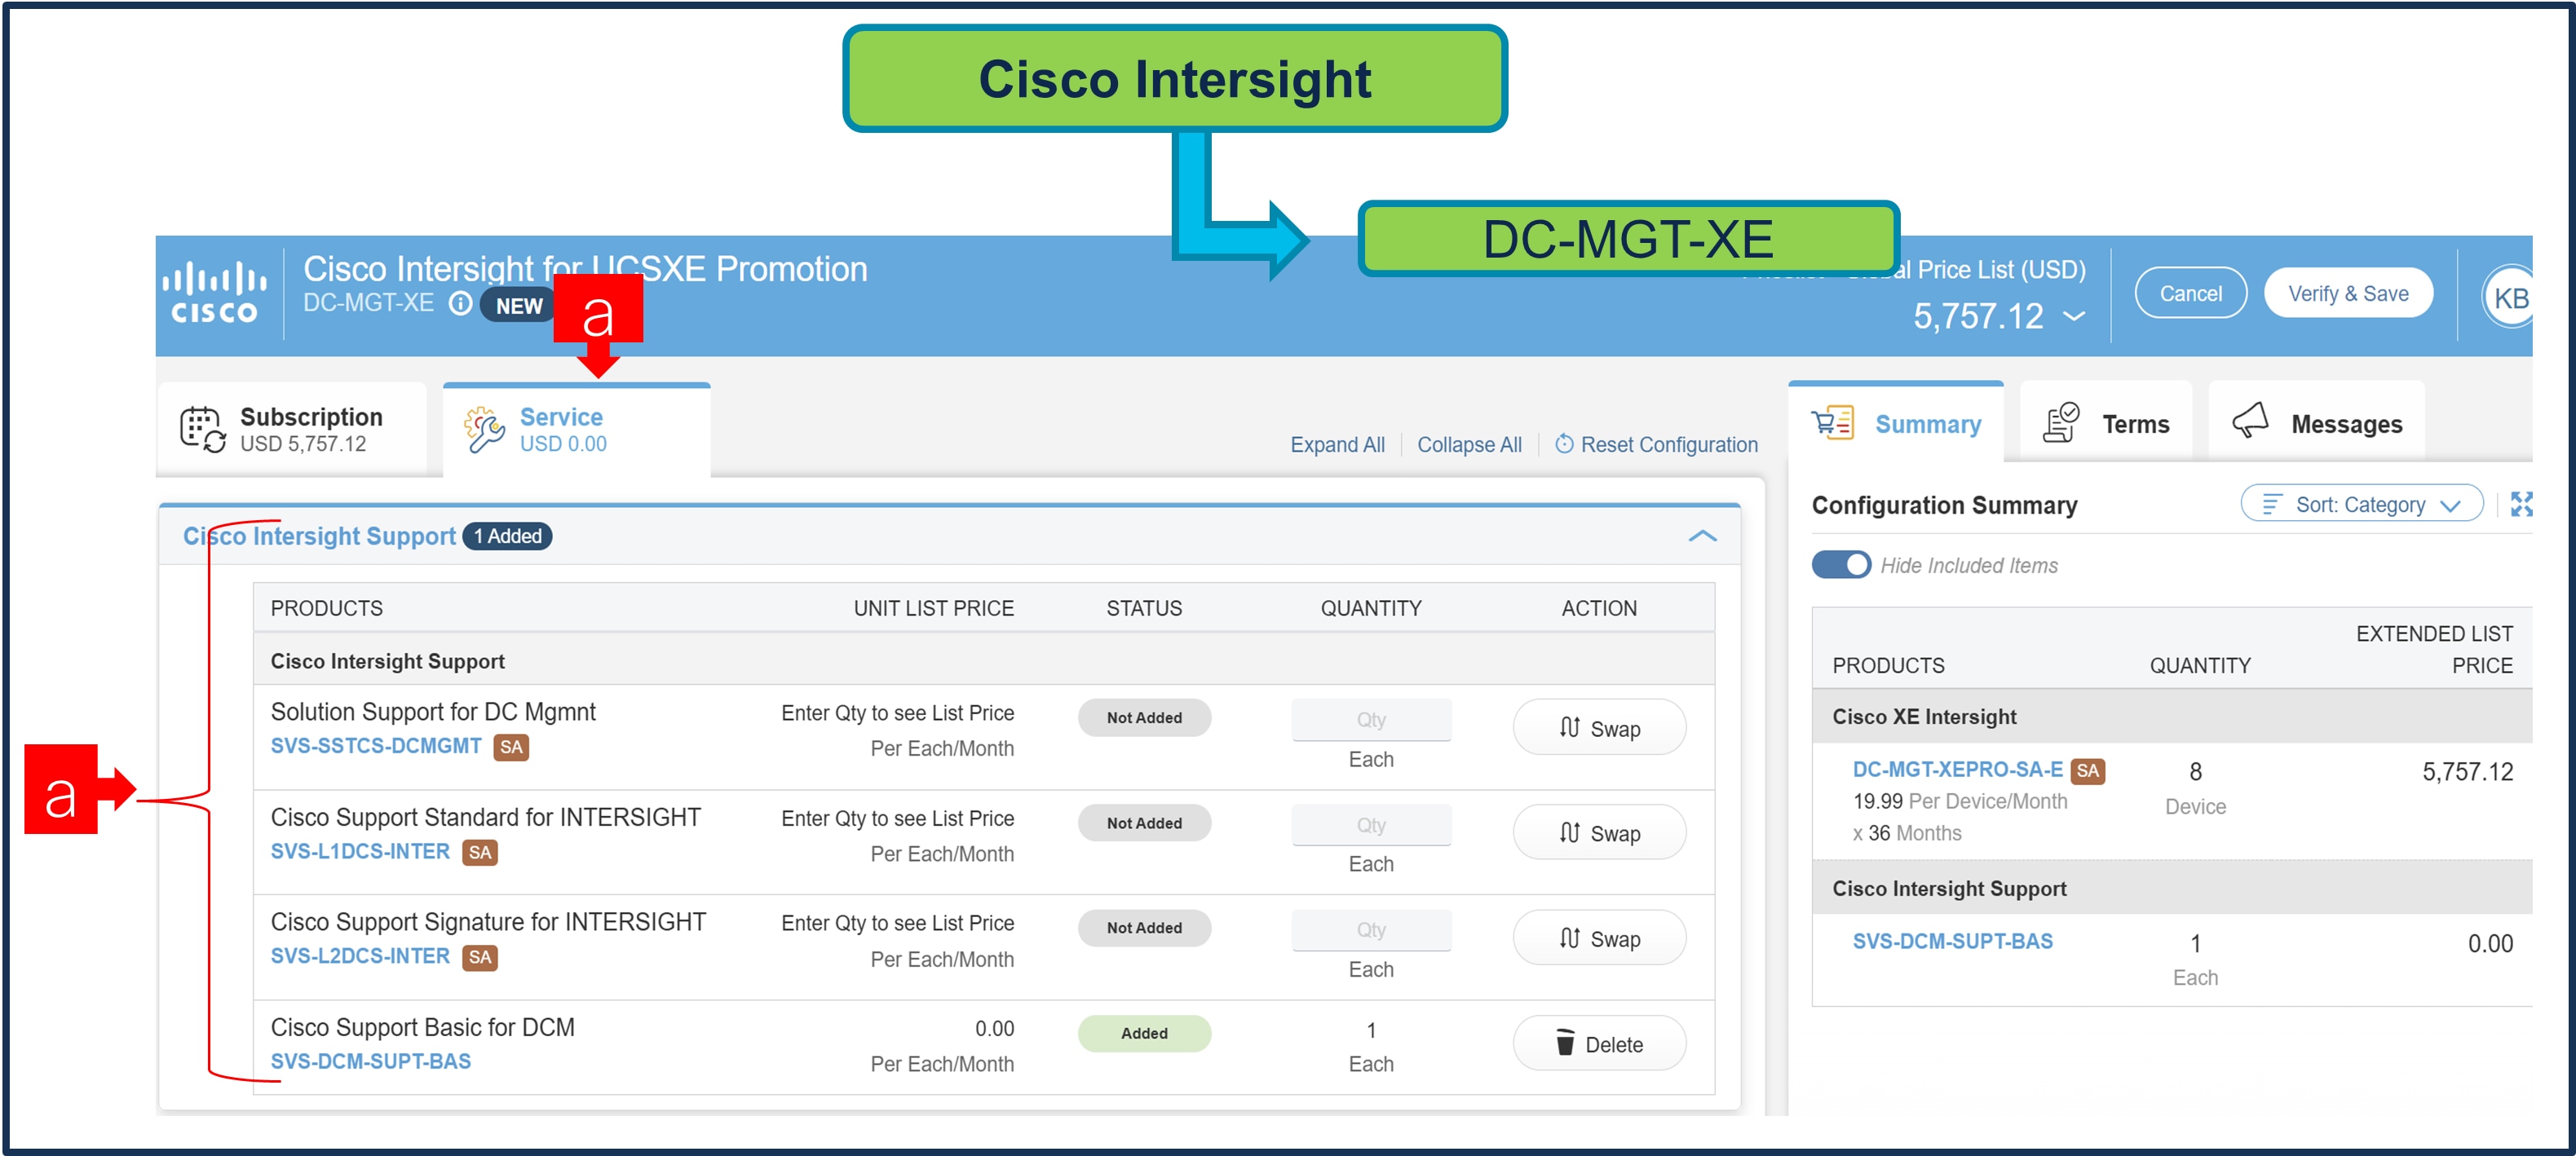
a. Under the ‘Service’ Tab you can modify support. The Cisco Intersight License comes with separate Support. Basic Embedded Support is the default selection. It is recommended that Customer should upgrade to Solution Support or CX Success Track L1 or L2 (Standard, or Signature) for the HW. QTY= always 1 for support, will get apply to all licenses.
Step 36.
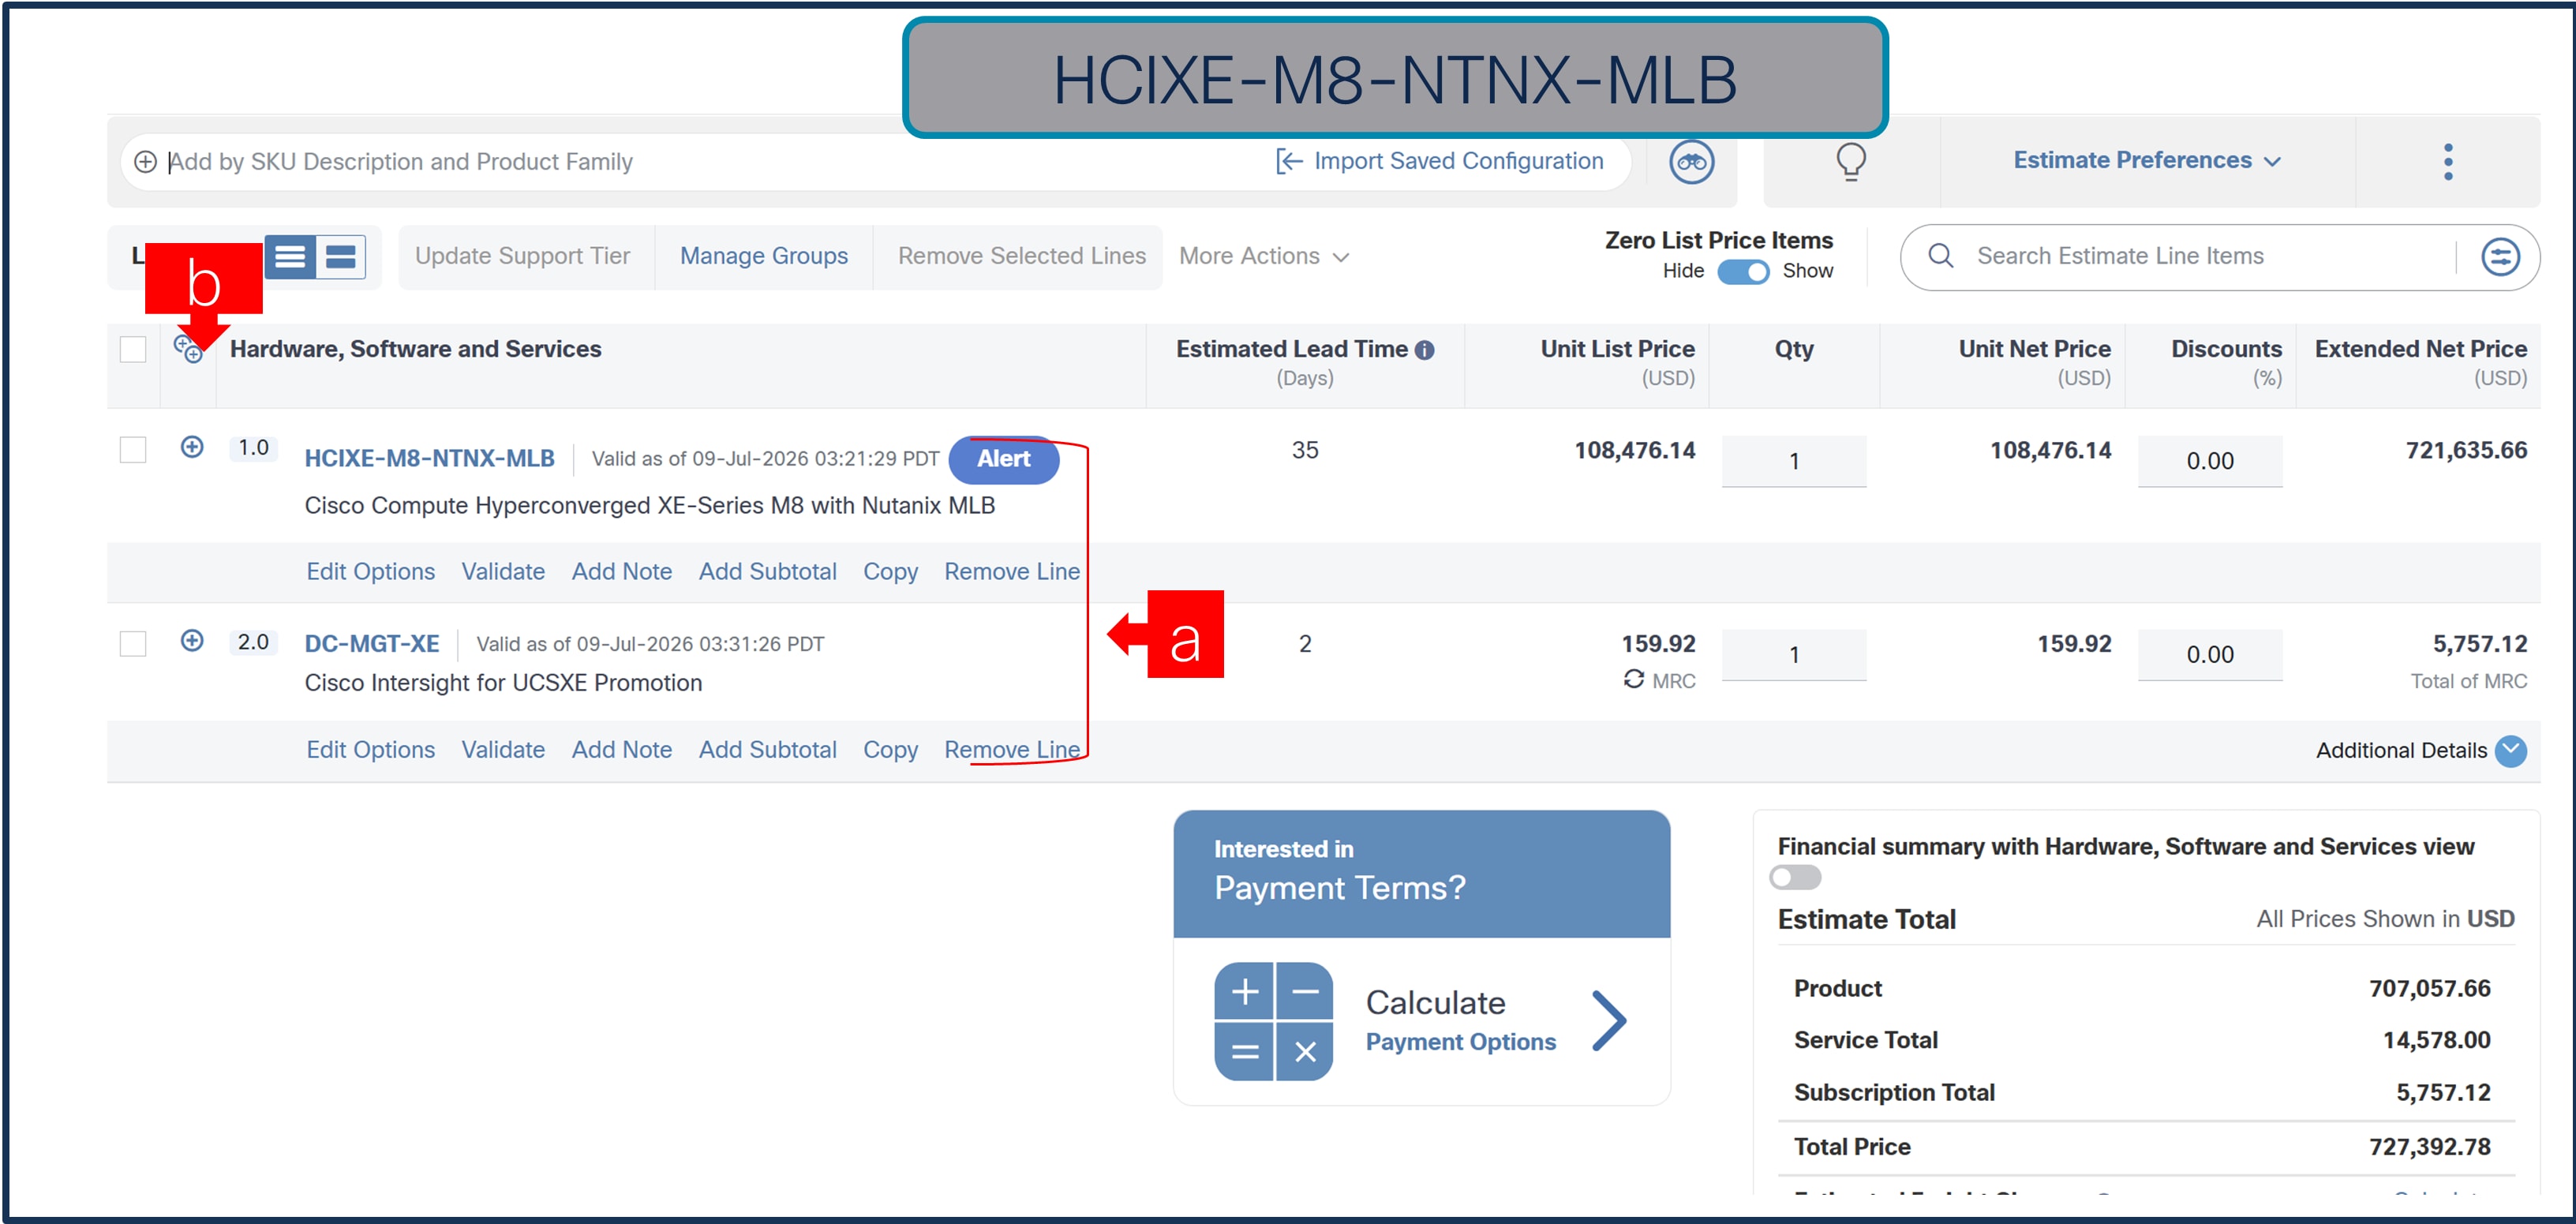
a. Configuration for HCIXE-M8-NTNX-MLB and DC-MGT-XE is now completed, and status of each Product is Valid.
b. You may click on the to expand and view the selections made for each Product.
Step 37.
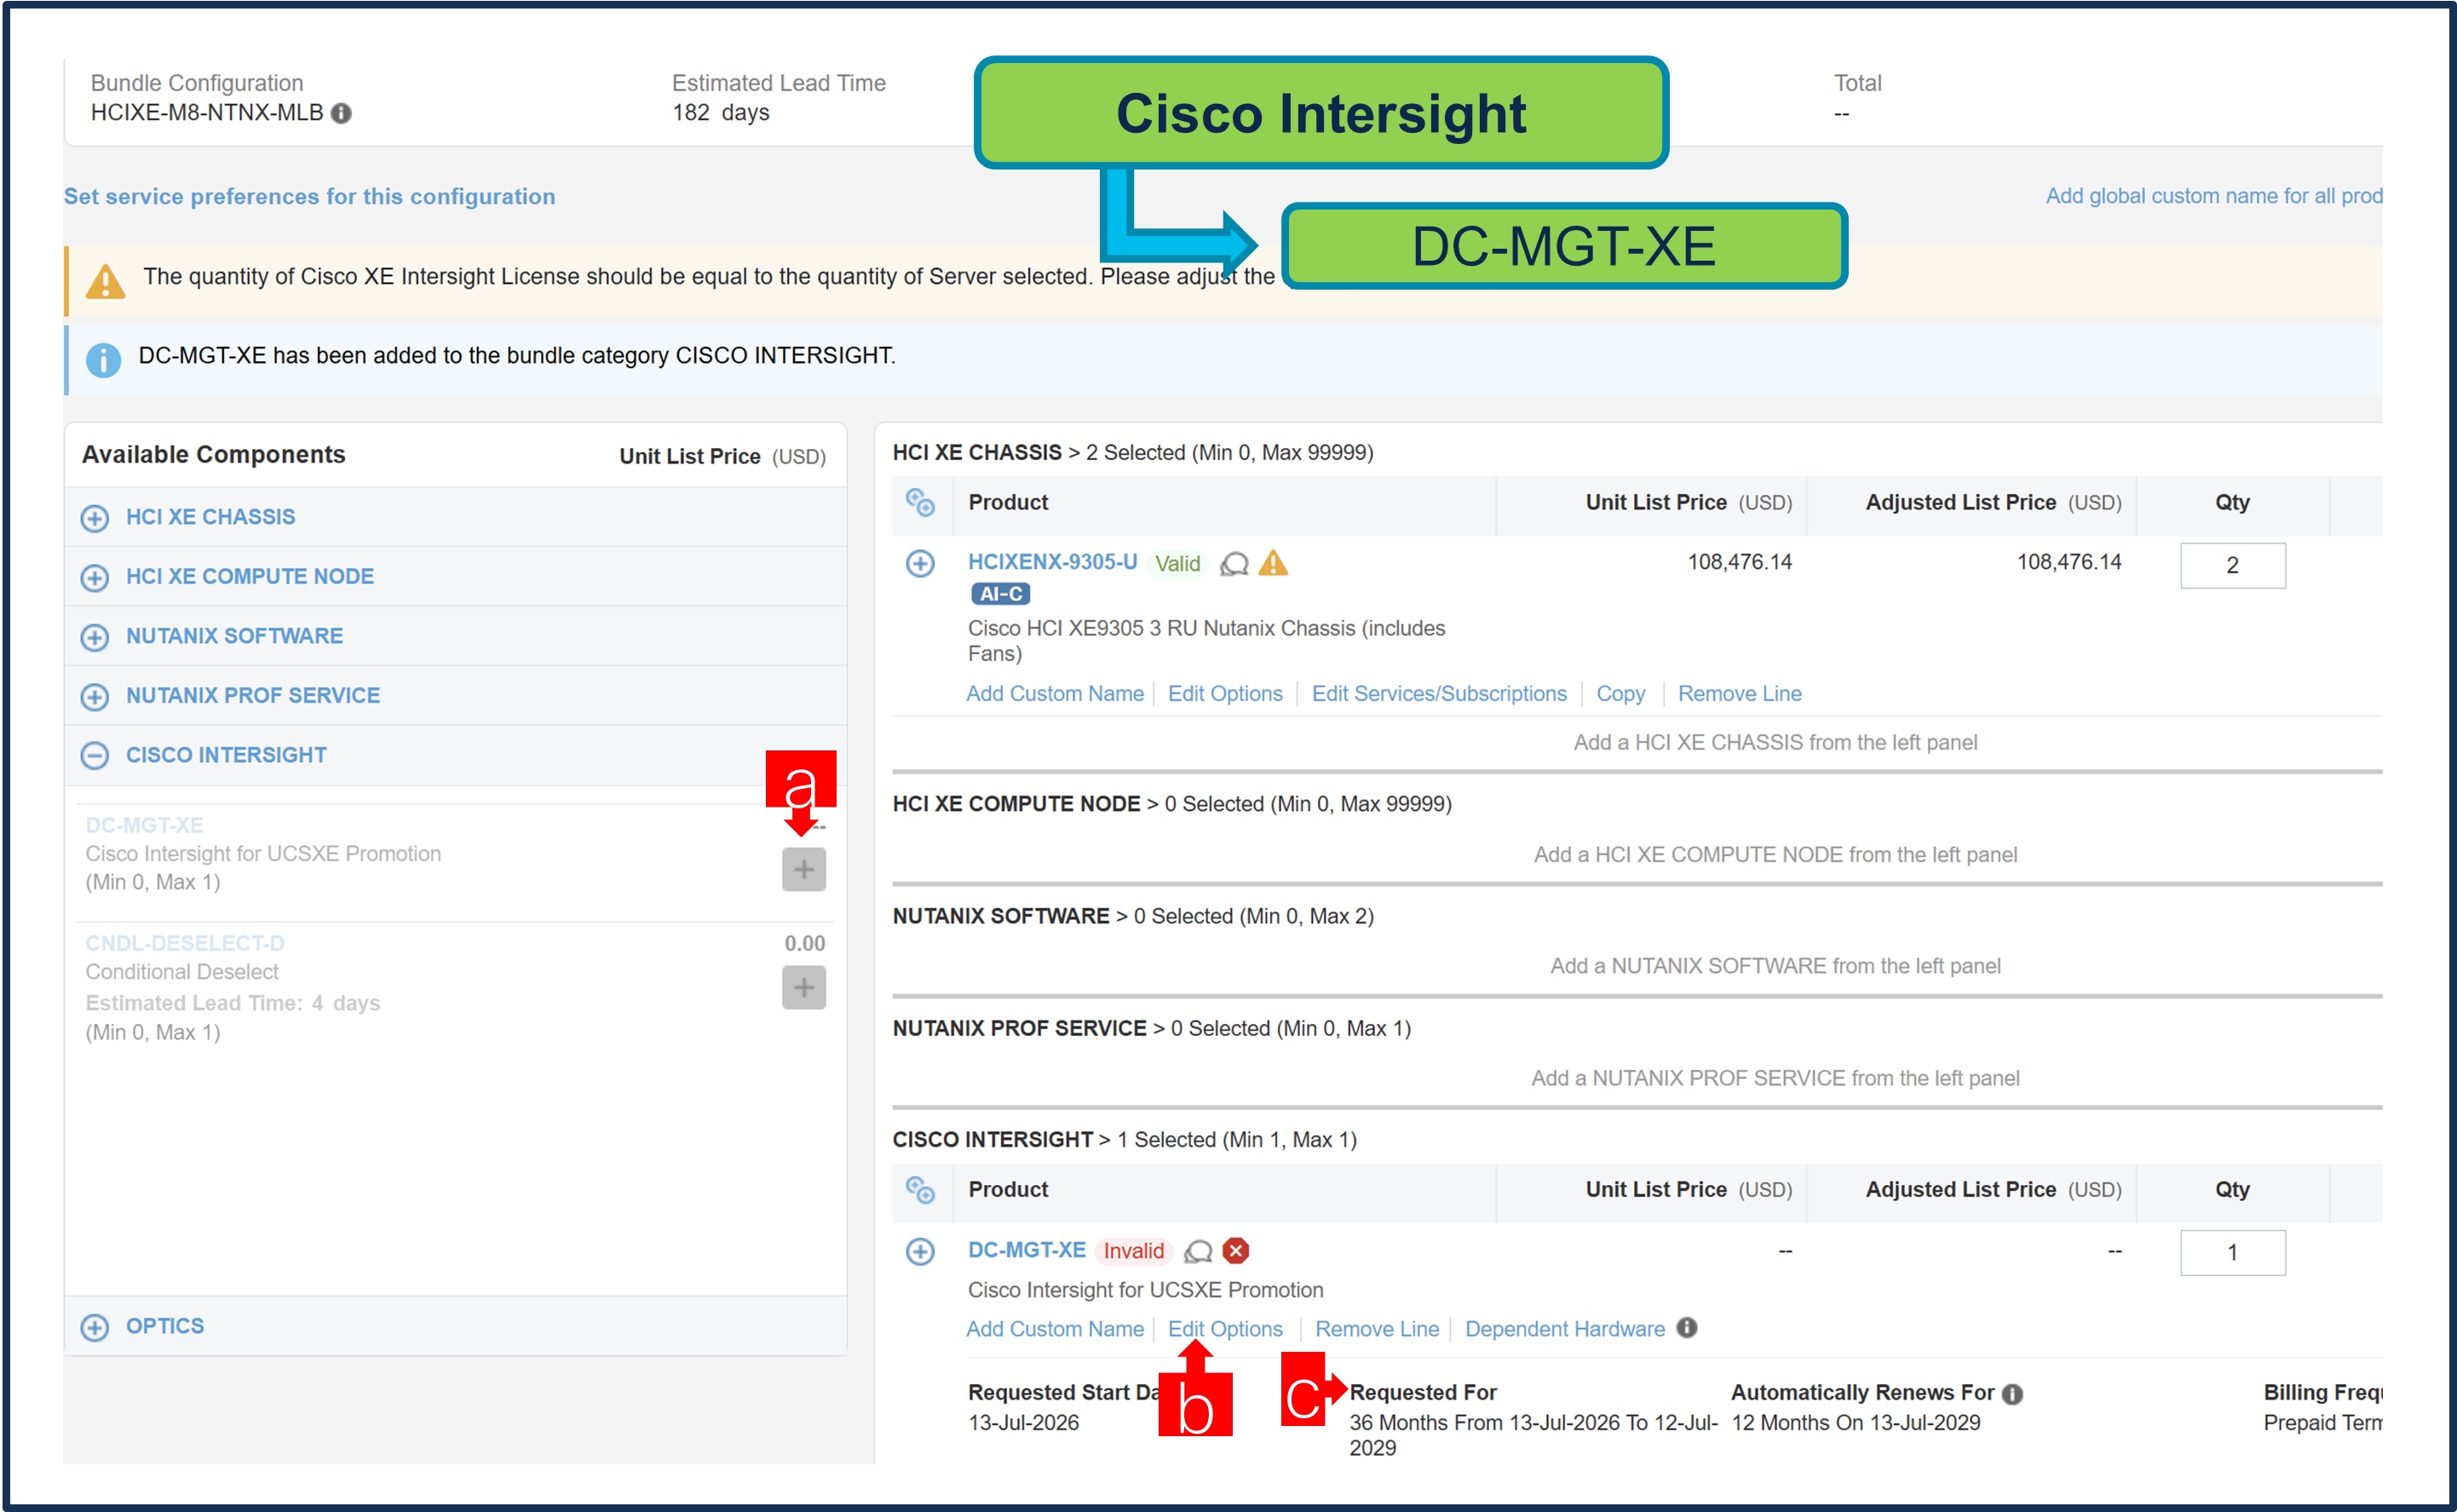
a. If you have not previously purchased Cisco Intersight Software don’t have EA, nor you are a disti (who orders SW separate) then need to get Intersight, it is a required selection.
b. Please make selection by clicking next to DC-MGT-XE.
c. Then click on ‘Edit Options’ to configure.
d. It is recommended that Term Duration for HW Support to be aligned (=) with Software Subscription Duration.
Step 38.
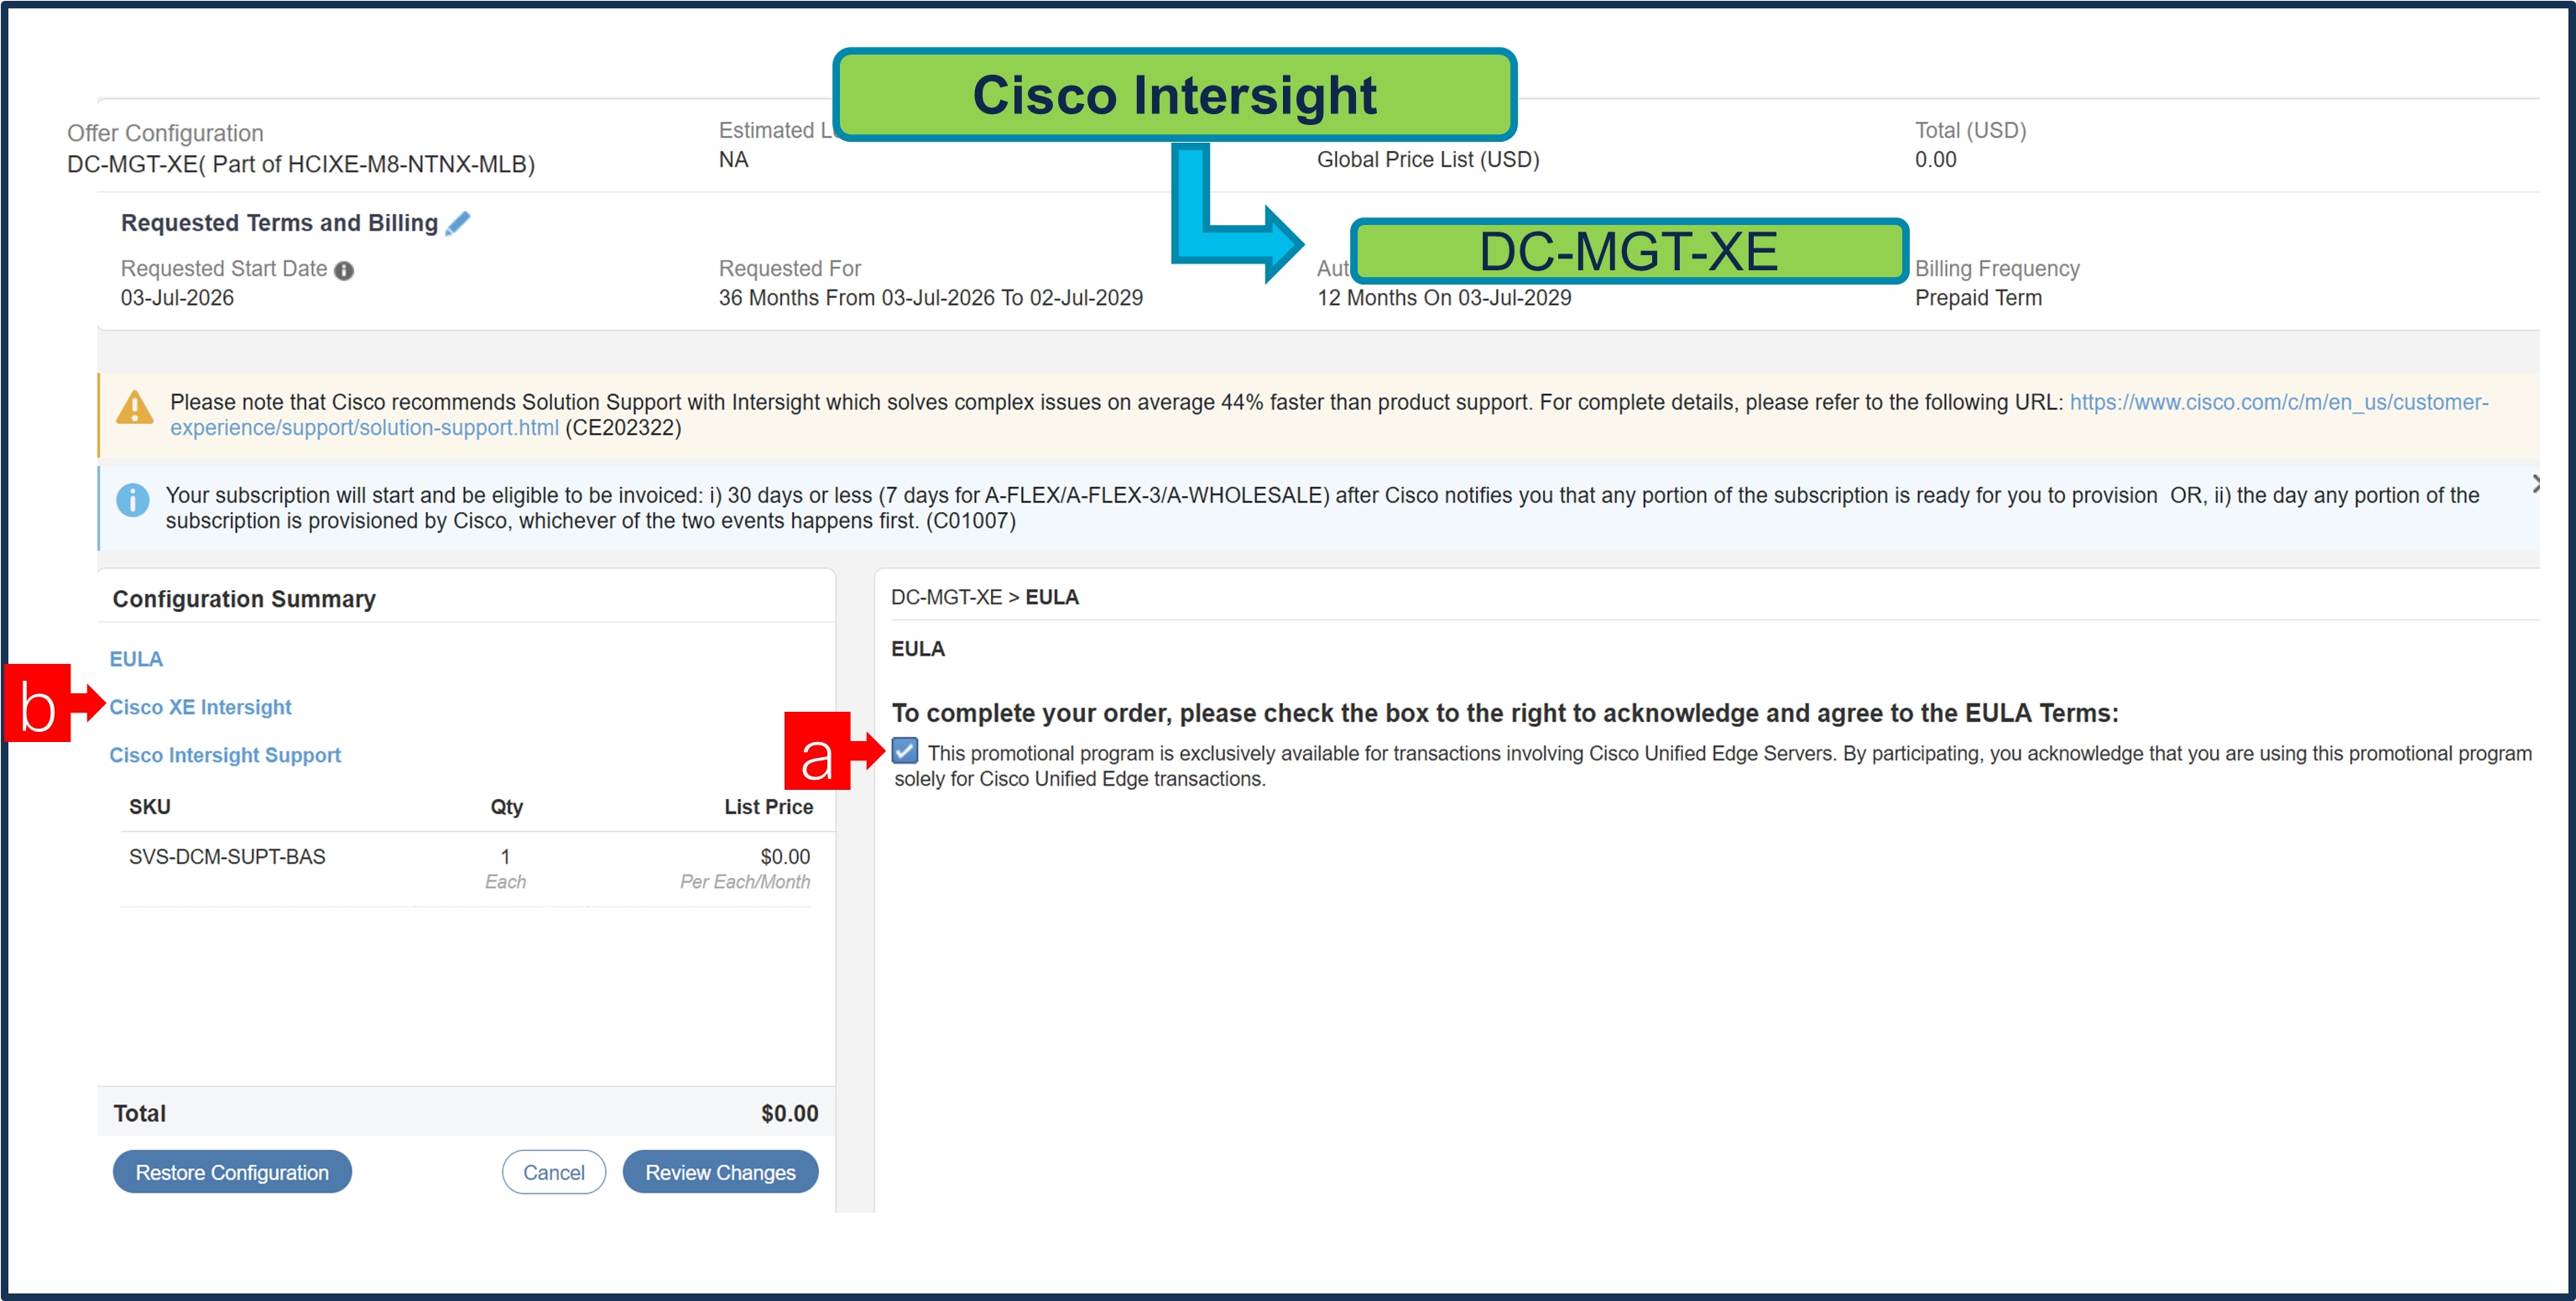
a. Need to accept EULA by clicking on checkmark.
b. Then select the pids by clicking ‘Cisco XE Intersight’.
Step 39.
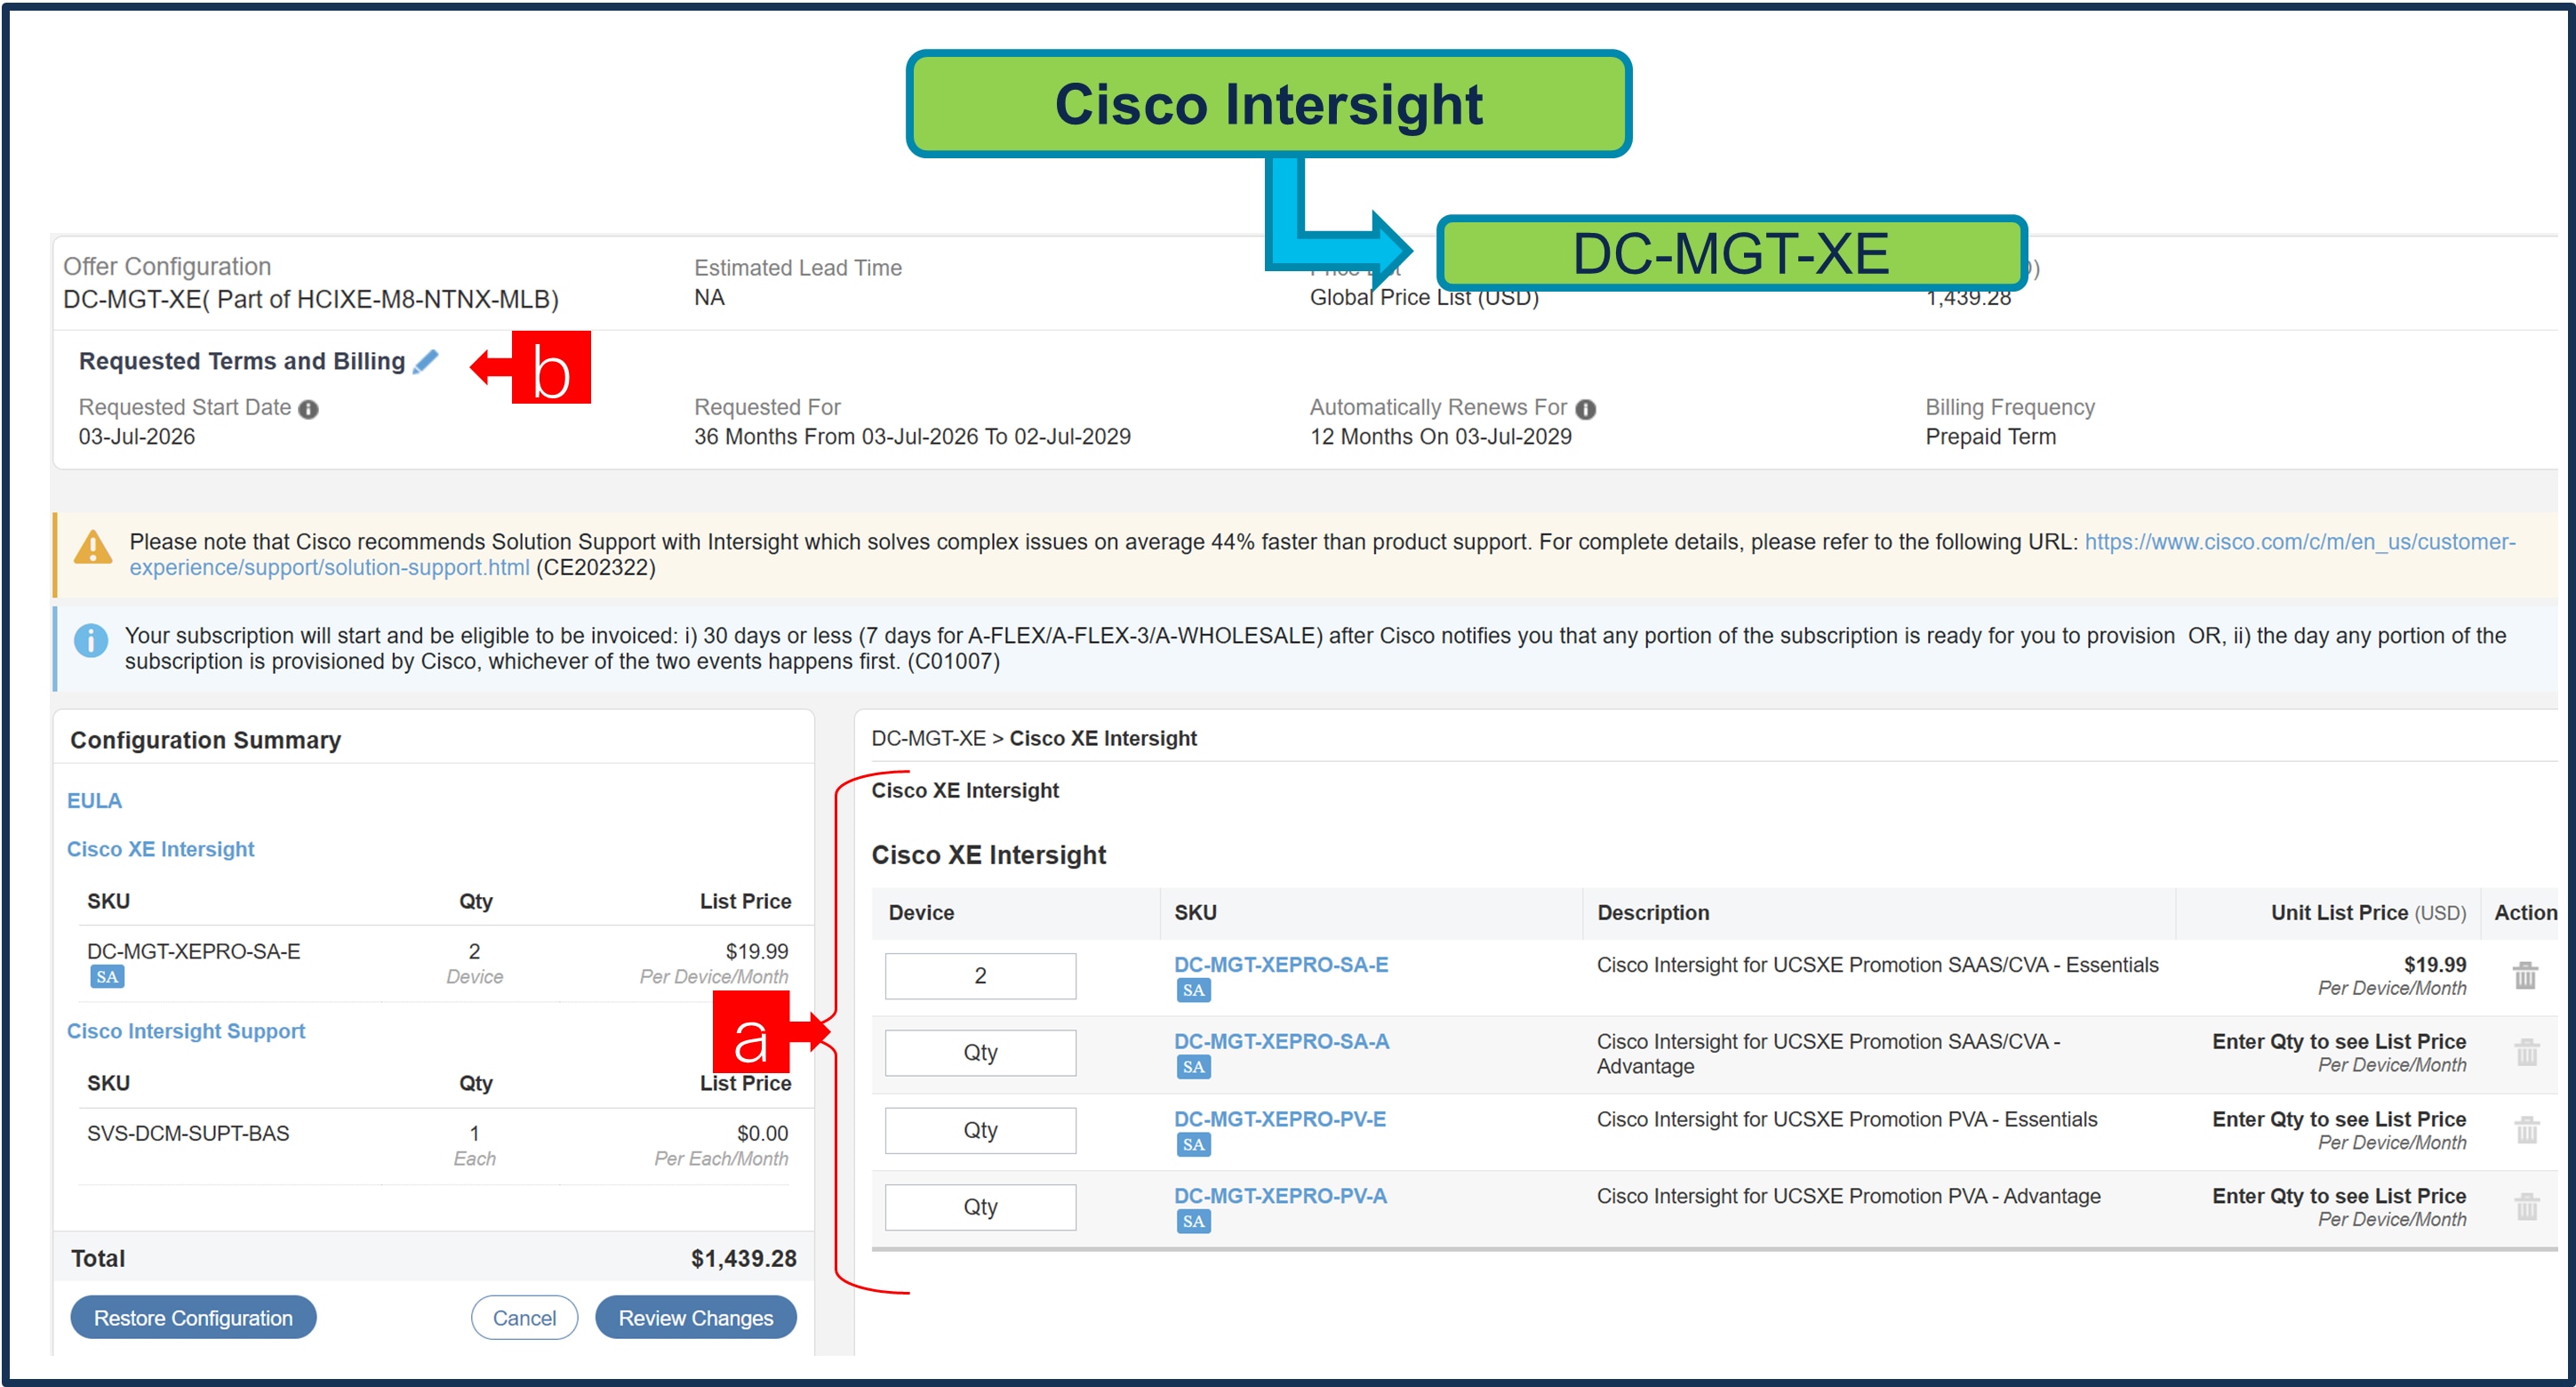
a. Select the type of license required by adding the QTY, the quantity of Cisco XE Intersight Infrastructure Services License under Offer: DC-MGT-XE should be equal to the quantity of Server selected. Enter the quantity then hit Enter.
b. Then click pencil next to ‘Requested Terms and Billing’ at top to edit billing terms, modify if needed
Step 40.
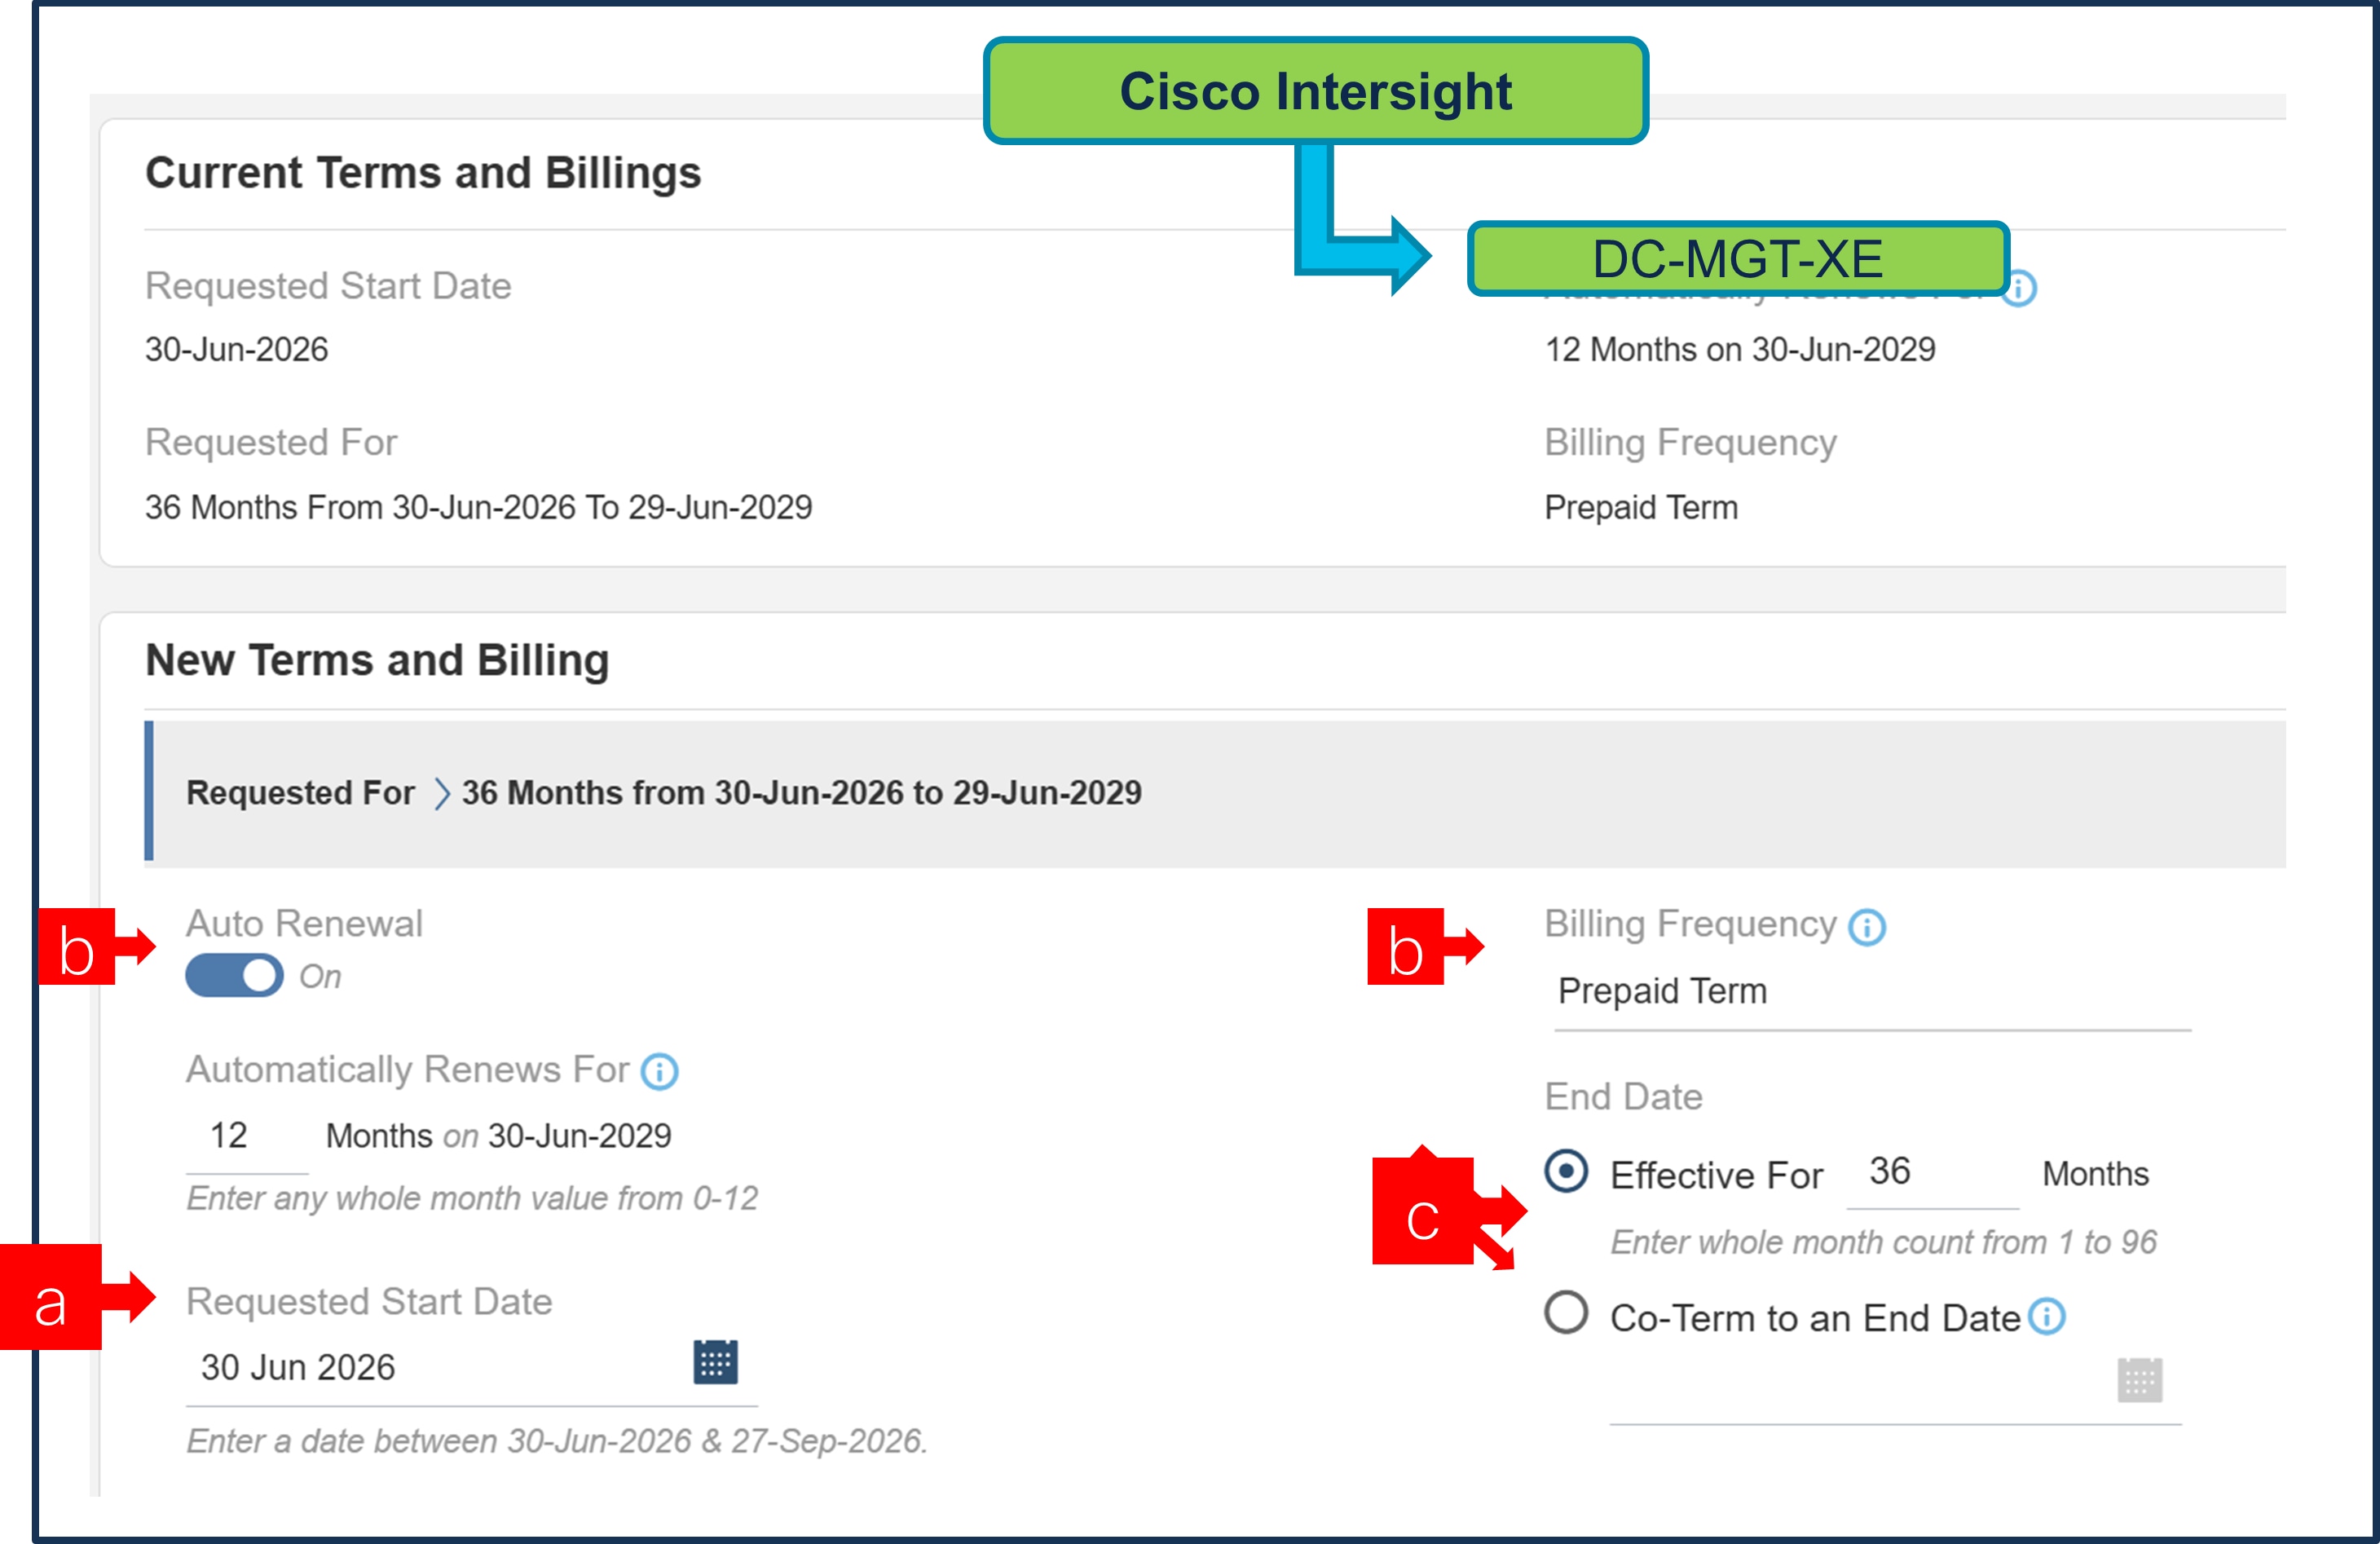
a. Requested Start Date (RSD) is now dependent on HW Ship Date and will automatically starts when the HW ships. If you change the RSD, the Software will start either on the RSD you picked or the HW Ship Date whichever is later.
b. Auto Renewal (on/off) is defaulted to On and Billing Frequency is defaulted to Prepaid Term.
c. End Date (duration in months) is defaulted to 36 Months, you can still change the setting accordingly or select Co-Term date if you like.
d. Once done, click ‘Save Changes’.
Step 41.
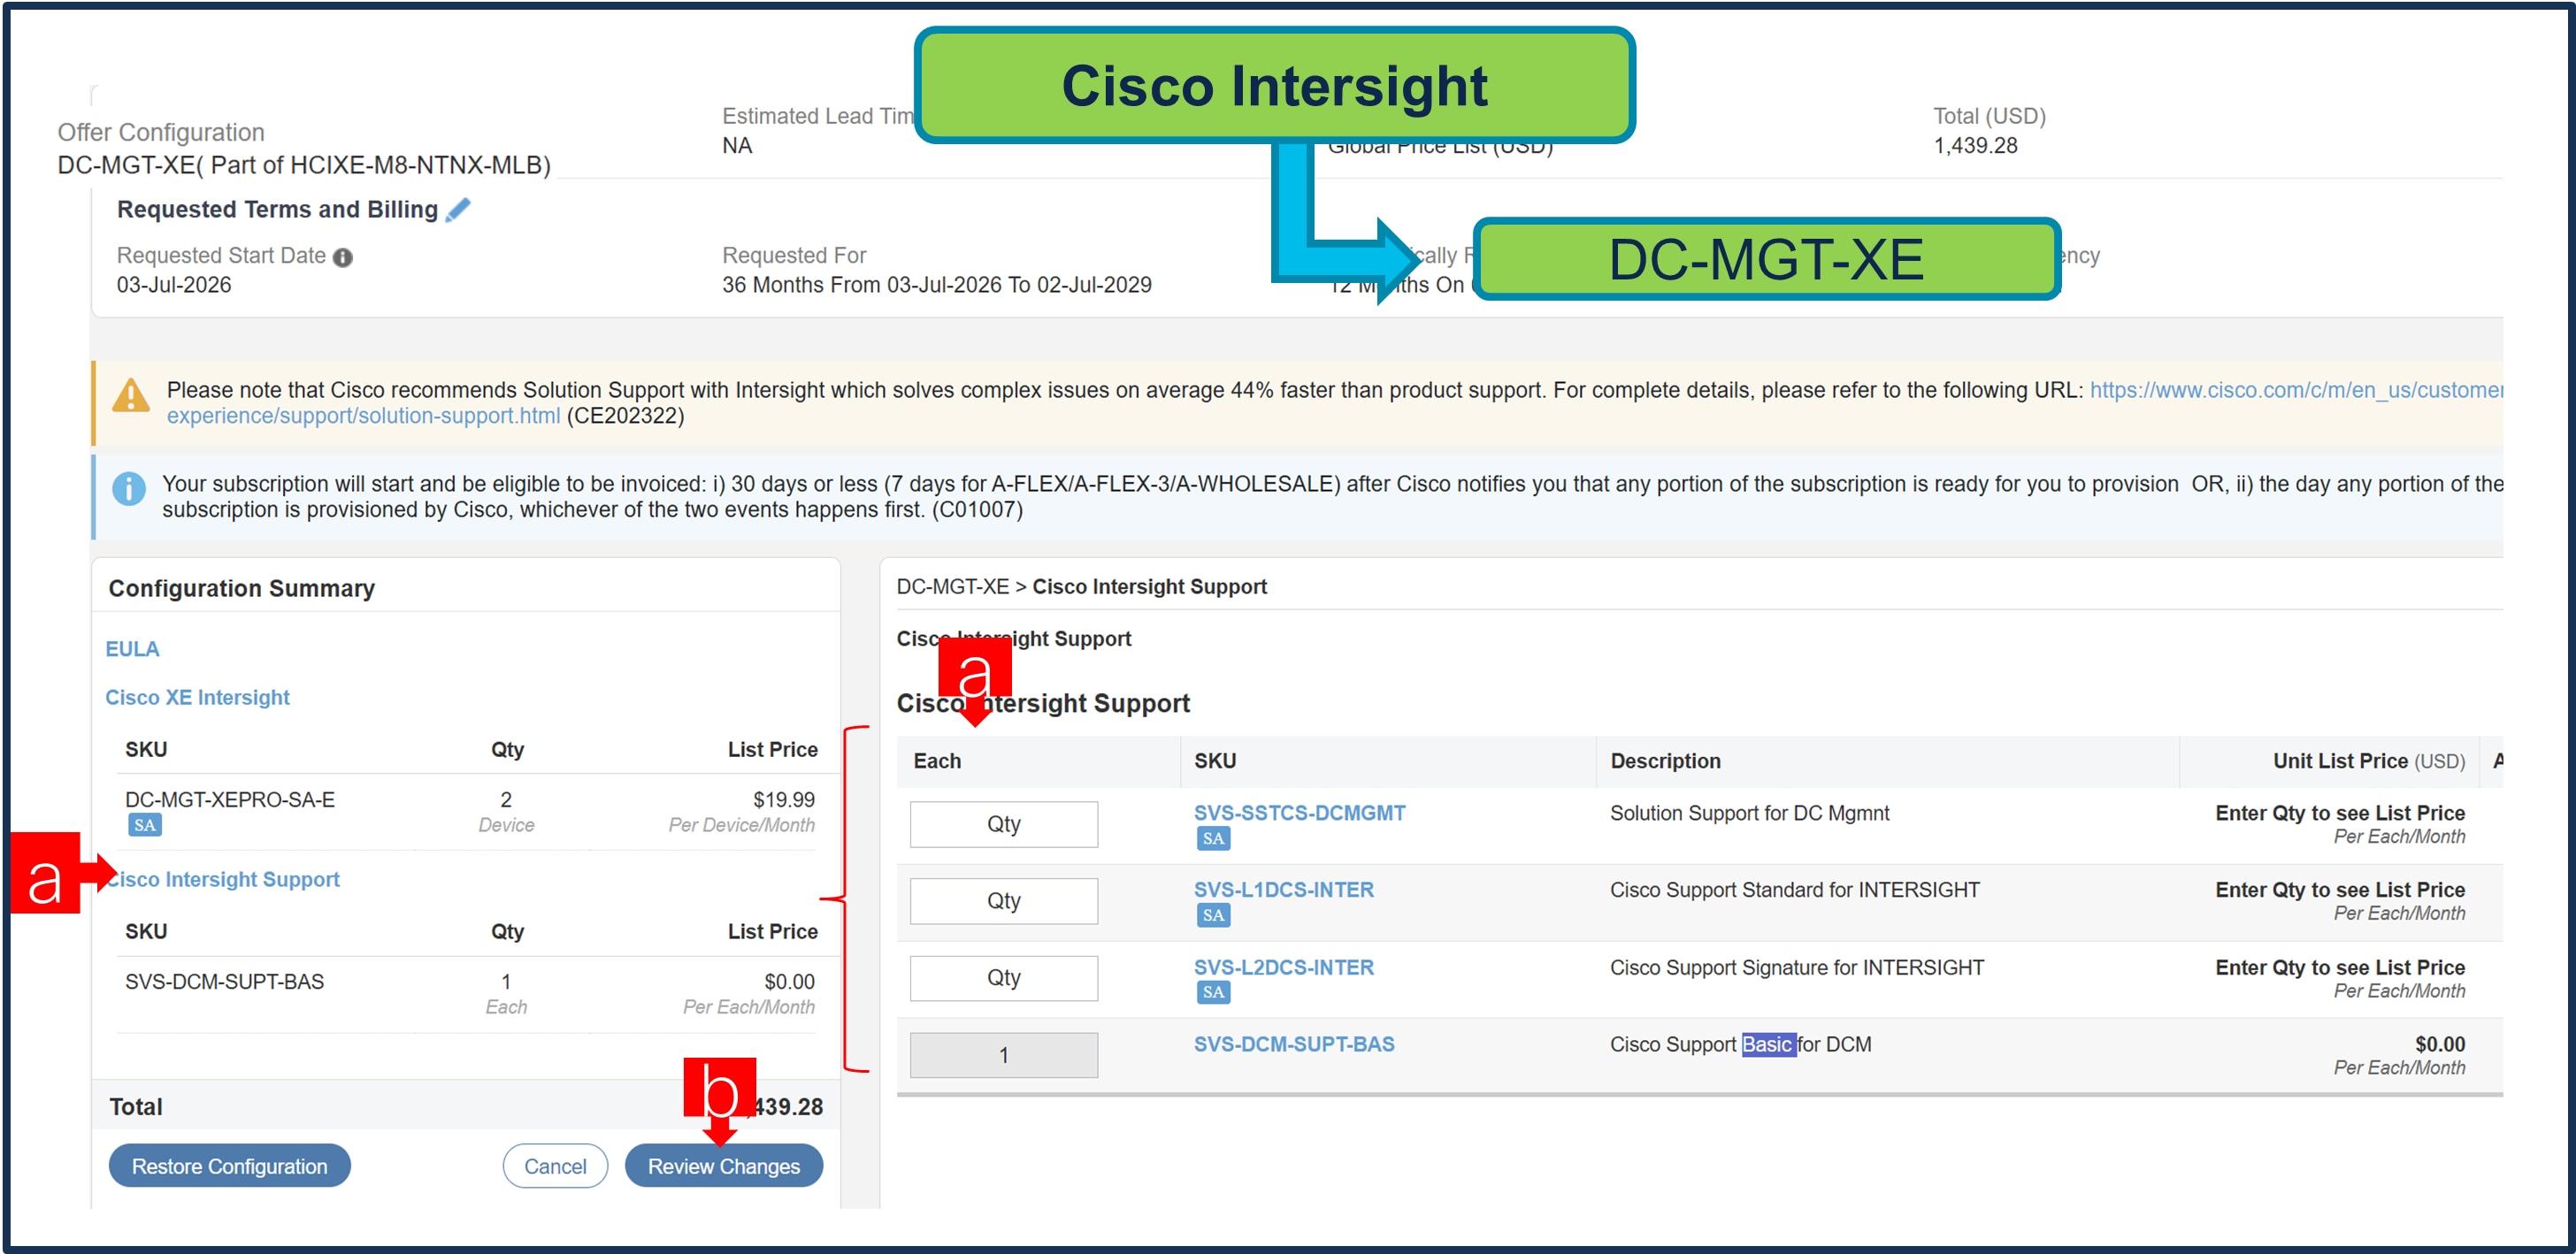
a. Once back to main page left side click to ‘Cisco Intersight Support’ you can modify support. The Cisco Intersight License comes with separate Support. Basic Embedded Support is the default selection. It is recommended that Customer should upgrade to Solution Support or CX Success Track L1 or L2 (Standard, or Signature) for the HW. QTY= always 1 for support, will get apply to all licenses.
b. Then ‘Review Changes’, then ‘Done’.
Step 42.
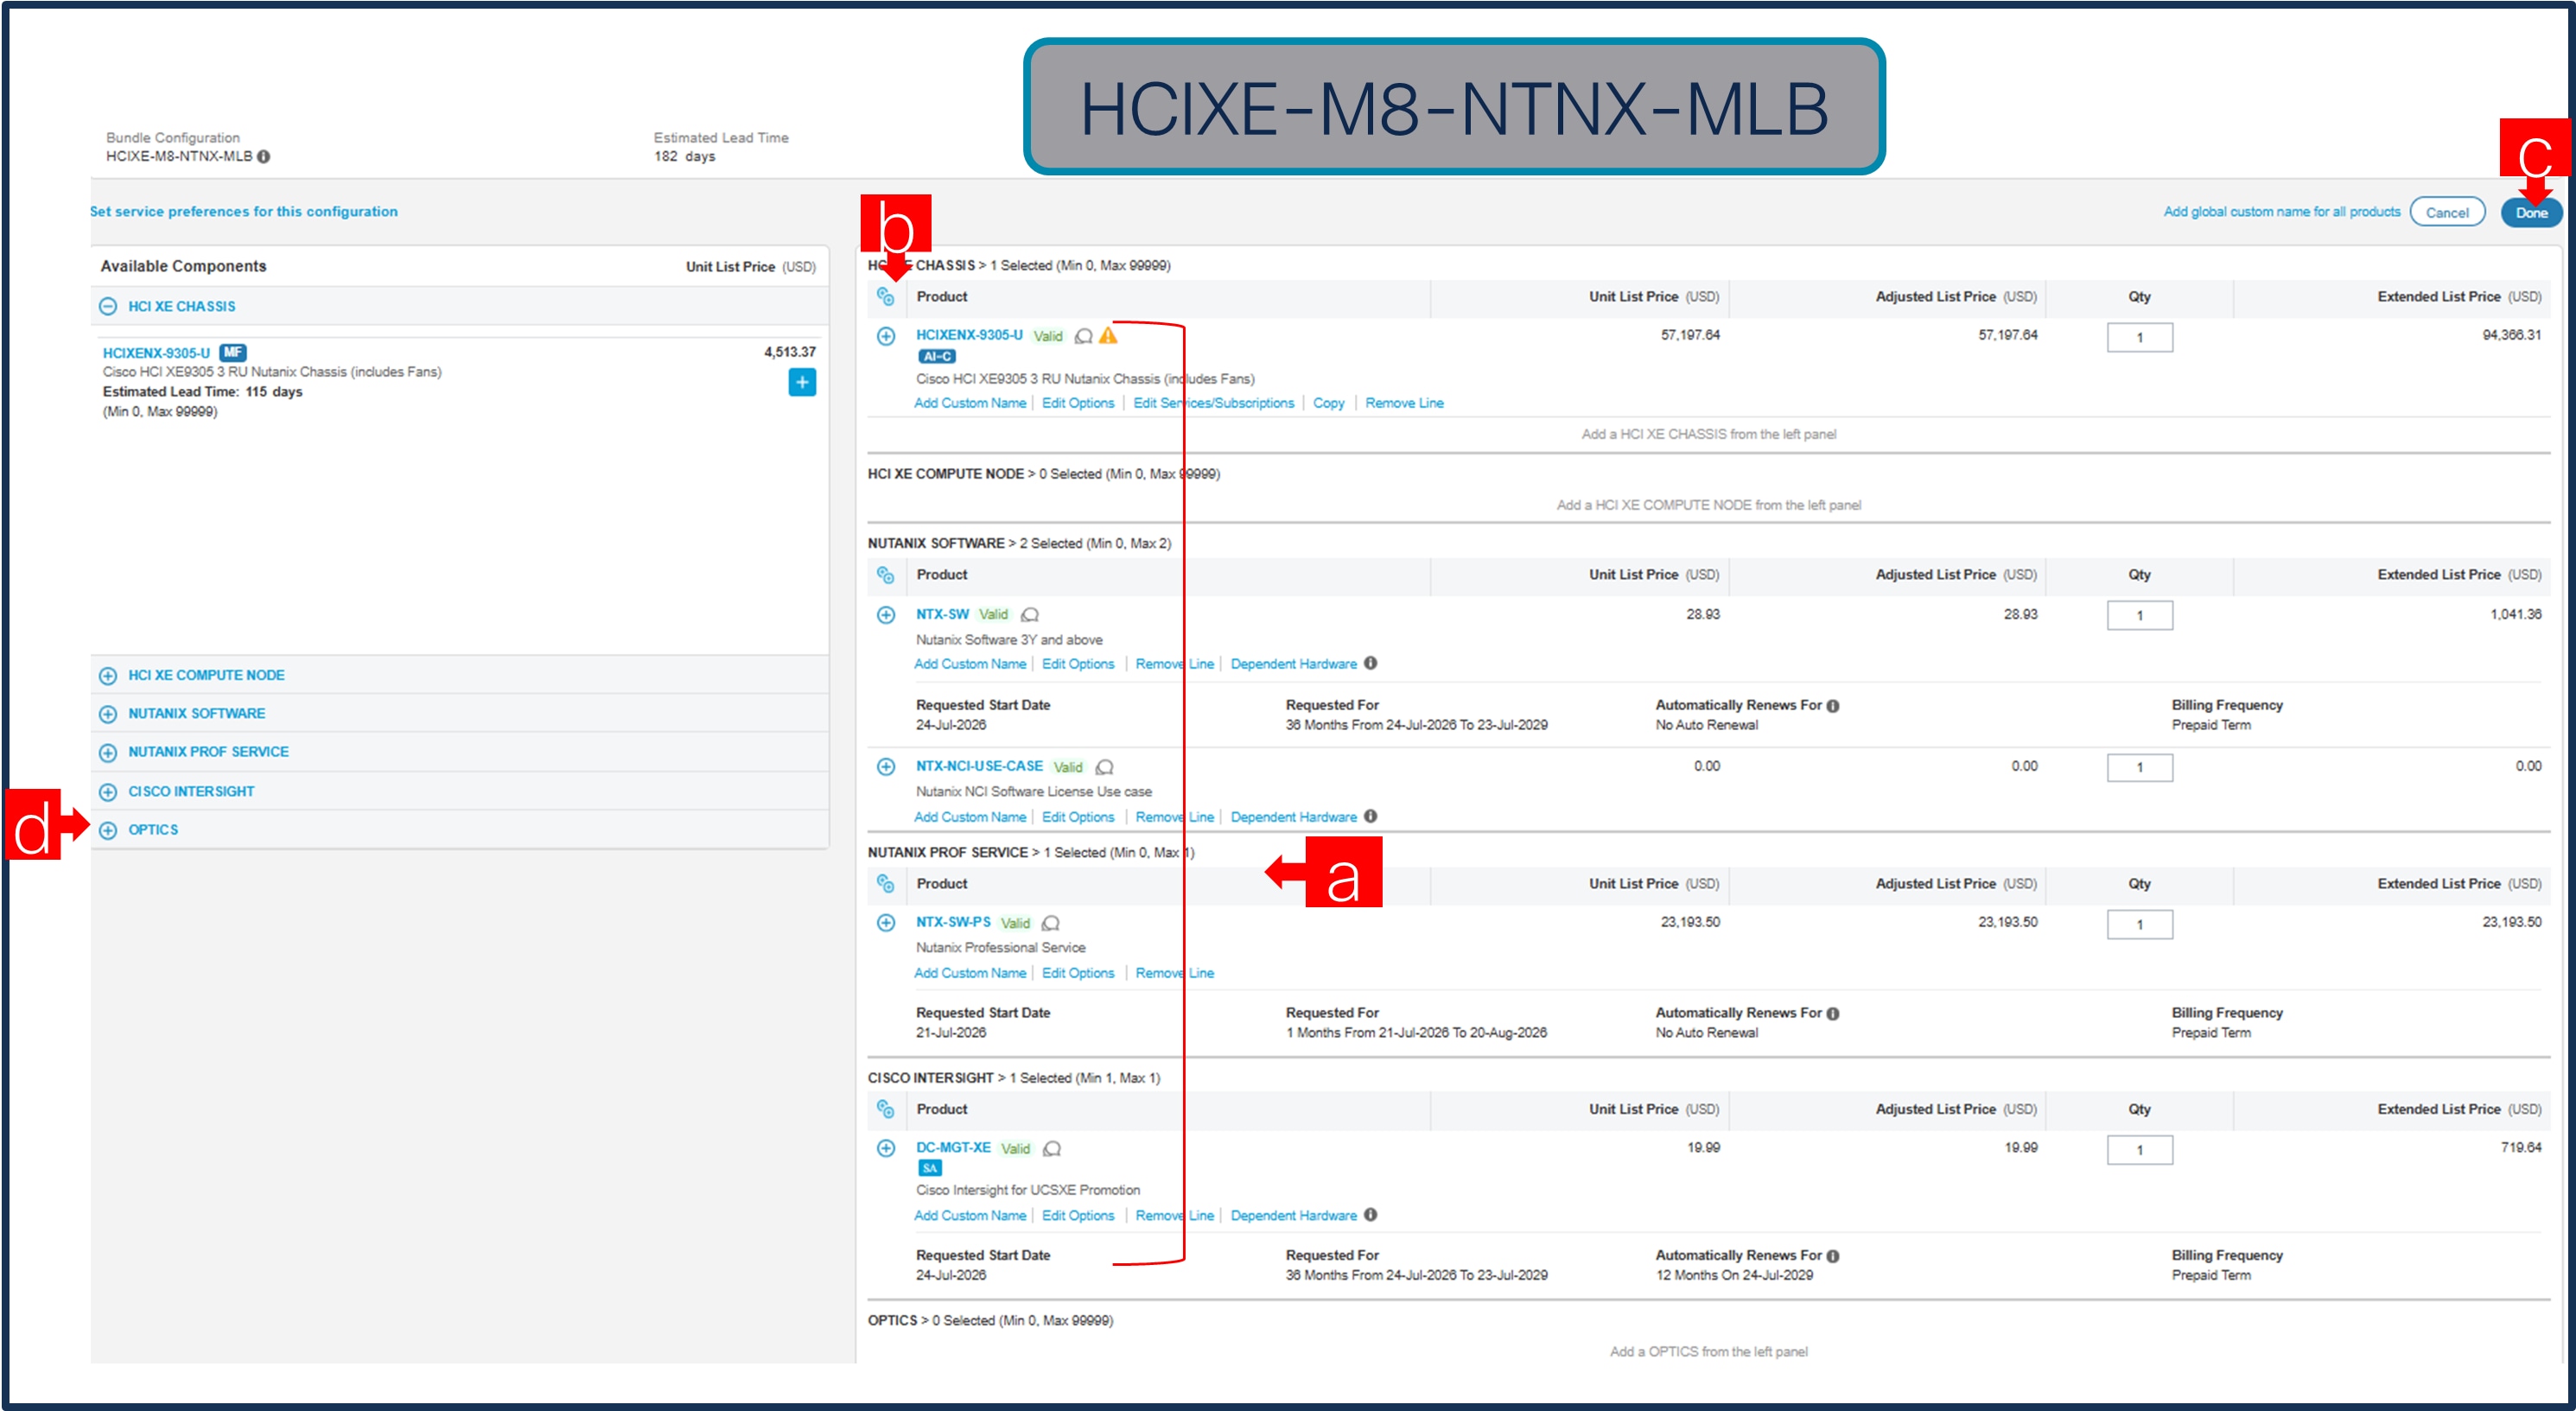
a. Configuration for MLB is completed when status of each Product is Valid and warning messages are cleared.
b. If you Click on the you can expand and view the selections made for each Product.
c. Select DONE to complete MLB configuration.
d. Or you can add non-required items, like “Optics” if needed.
Step 43.
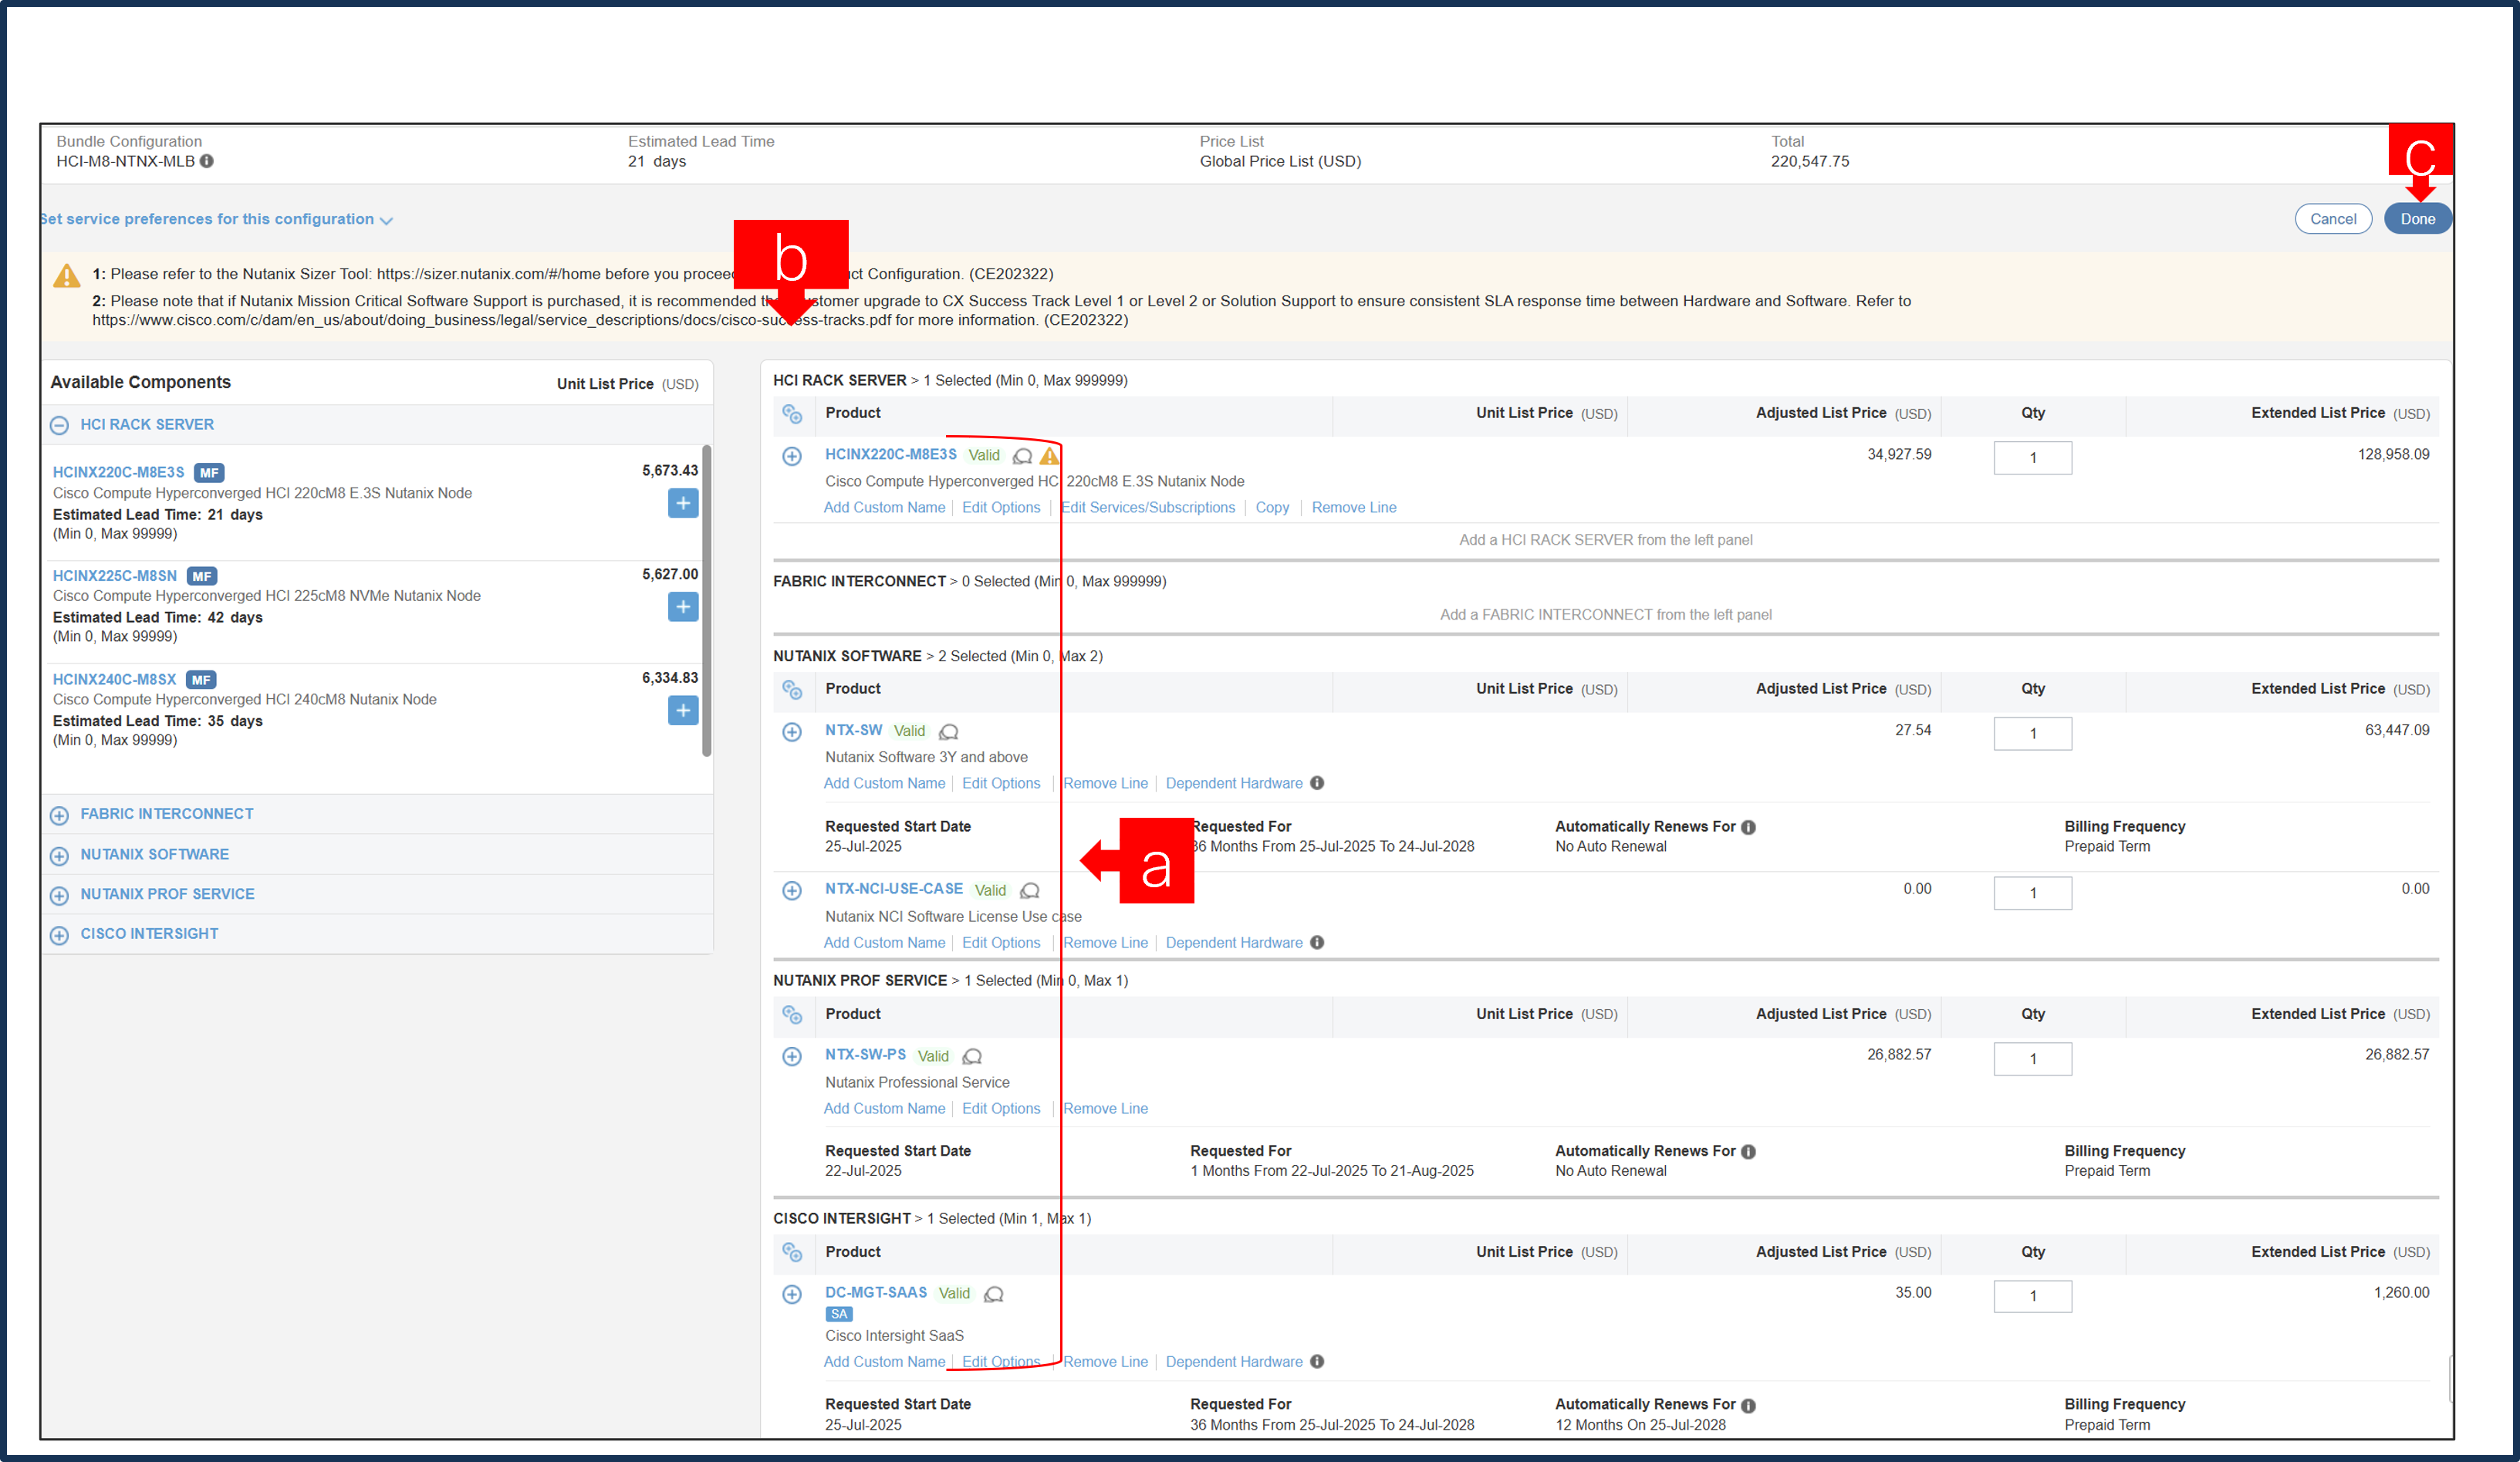
a. Configuration for MLB is completed when status of each Product is Valid, and warning messages are cleared.
b. Click on the “PLUS” to expand and view the selections made for each Product.
c. Click on “Done” to complete MLB configuration.