Introduction
This document describes the detailed process of AP Boot Process, AP Upgrade Path, and AP Image Download Methods.
Prerequisites
Requirements
Cisco recommends that you have knowledge of these topics:
- Basic knowledge of Catalyst Wireless LAN Controllers
Components Used
- Catalyst 9800-CL, Cisco IOS® XE 17.15.3
- Catalyst 9162 Access Point
- Cisco Aironet 3802 Access Point
The information in this document was created from the devices in a specific lab environment. All of the devices used in this document started with a cleared (default) configuration. If your network is live, ensure that you understand the potential impact of any command.
AP Boot Process
U-Boot
U-Boot Startup Sequence
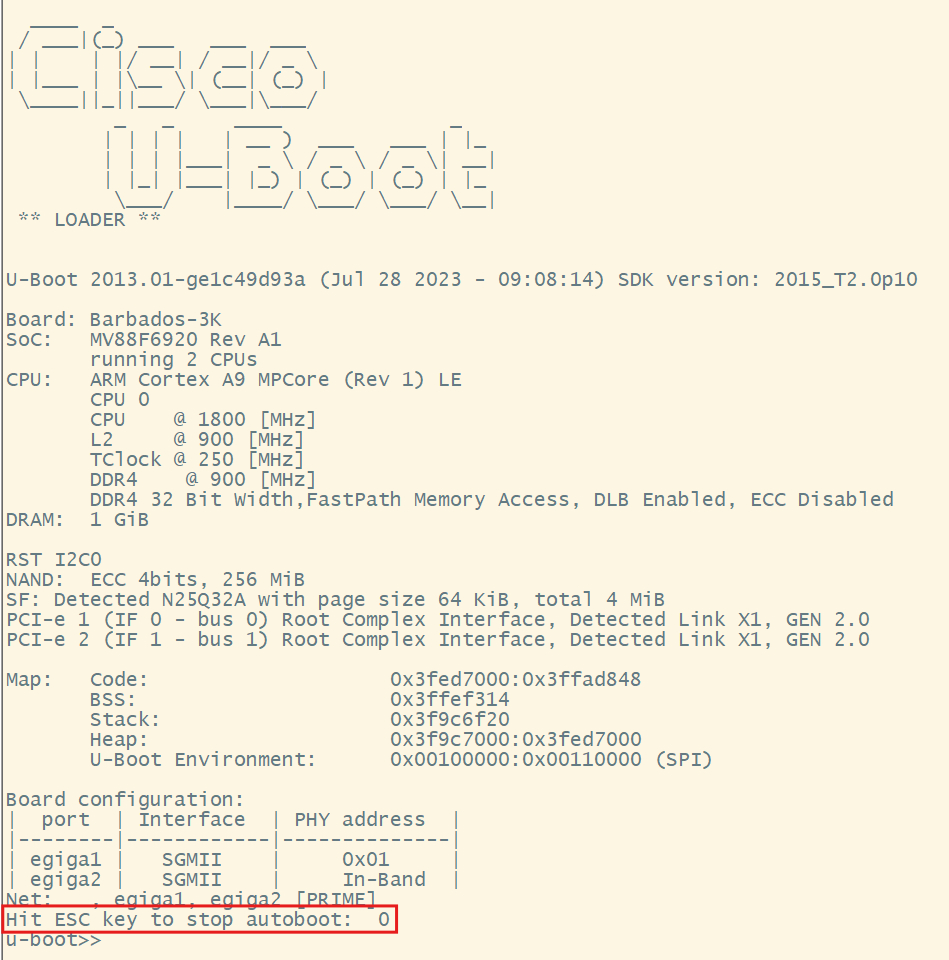
Cisco APs begin the boot process in U-BOOT mode which occurs prior to the main COS shell. To reach U-BOOT mode, review these steps.
- Connect a console cable to the AP console port.
- Open a terminal emulator program on your PC and set the session to the proper serial COM port. Verify the COM port to be used on your device.
- Set the terminal emulator software to use 115200 bps baud rate.

Note: If there is no output from the AP, set the baud rate to 9600.
4. Connect power to the AP.
5. Enter U-Boot mode by via the escape (esc) button on your keyboard, you see the option to Hit ESC to stop autoboot as seen in the screenshot. This message appears upon reboot of the Access Point while connected to the console port.
 U-Boot Startup Screen
Use the command printenv from U-Boot mode to list the various U-Boot environment details for the Access Point.
 U-Boot printenv
This output indicates that the boot partition is part1. This boot partition can be modified within U-Boot mod.
Modify U-Boot Boot Partition
- Adjust the current boot partition with the setenve BOOT part <1-2> command.
- Save the partition adjustment with the command saveenv command.
- Verify the current boot partition with the printenv command.
u-boot>> setenv BOOT part 2
u-boot>> saveenv
Saving Environment to SPI Flash...
SF: Detected N25Q32A with page size 64 KiB, total 4 MiB
Erasing SPI flash....Writing to SPI flash.....done
u-boot>> printenv
BOOT=part 2
4. Boot the AP with the newly configured boot partition with the boot command.
u-boot>> boot
Creating 1 MTD partitions on "nand0":
0x000000200000-0x000010000000 : "mtd=2"
UBI: attaching mtd1 to ubi0
ubifsmount - mount UBIFS volume

Usage:
ubifsmount <volume-name>
    - mount 'volume-name' volume
Unable to ubi mount UBIFS partition part 2
Trying alternate partition part2
UBIFS: mounted UBI device 0, volume 0, name "part2"
5. Access point boots from the selected boot partition.
COS Shell
AP Filesystem Check
Note: It is recommended to reload the AP(s) prior to the upgrade. This allows all cached filesystems to be refreshed and temporary files to be flushed prior to the upgrade.
From CLI on the AP, enter Privilegedmode and run these commands to verify the current AP images and tmp directory size.
show image integrity Command
This output indicates the current versions on the AP.
The Primary partition version indicates the current AP boot version.
The Backup partition version indicates the AP backup version.
AP-CW9162#show image integrity
/part1(primary) 17.15.3.28
    part.bin : Good
    ramfs_data_cisco.squashfs : Good
    iox.tar.gz : Good
/part2(Backup) 17.9.6.40
    part.bin : Good
    ramfs_data_cisco.squashfs : Good
    iox.tar.gz : Good
You can switch between the current AP boot version with the bold commands. The AP boots with the selected partition after the next AP reload:
configure boot path 1 (boots AP with part1 version)
or
configure boot path 2 (boots AP with part2 version)
show filesystems Command
The output indicates the filesystem structure of the AP.
Note: The /tmp row within the Mounted on column shows the filesystem entry that is used for AP image storage for an AP upgrade.
AP-CW9162#show filesystems
Filesystem                Size      Used Available Use% Mounted on
.....
none                    114.4M      4.7M    109.7M   4% /tmp
.....
It is important that the AP /tmp filesystem has a size of 100M or higher. The /tmp filesystem is used to store the AP image upgrade.
Note: If the /tmp filesystem entry is not 100M or larger, there could be issues with AP images that are too large for the partition. You need to upgrade the AP to version 17.6.6 via any of the AP Image Download Methods which expands the partition.
AP Upgrade Path
Cisco APs require a specific upgrade path with reference to the current and destination version. In this guide, Cisco IOS XE version 17.15.3 is used.
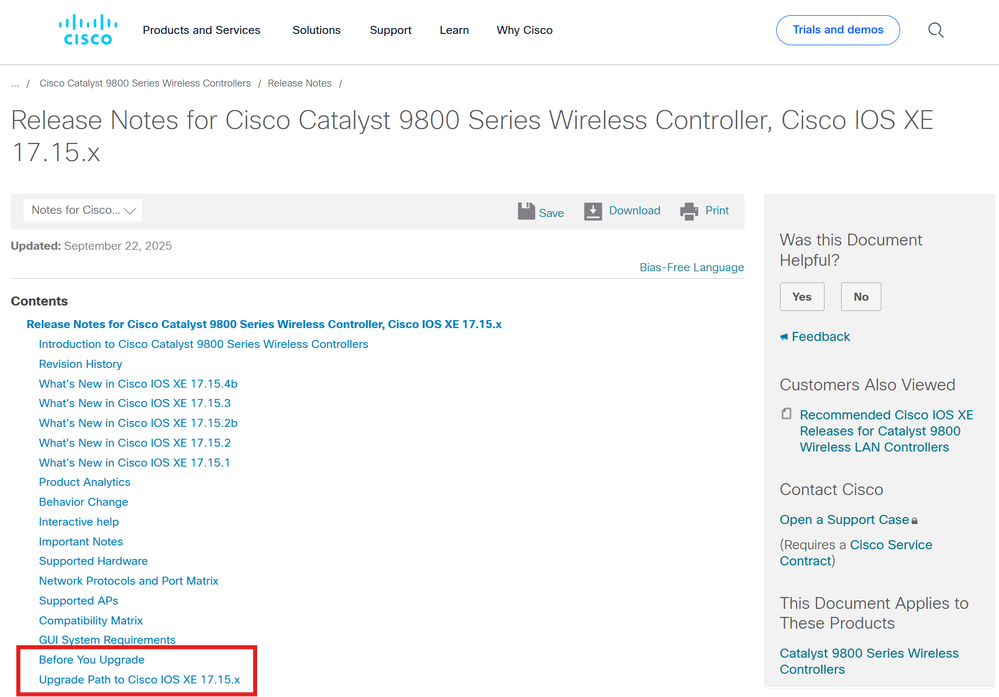
- Browse for the release notes document and Upgrade Path to Cisco IOS XE for your chosen upgrade version.
 Release Notes 17.15.X
2. The Before You Upgrade section provides key details about the upgrade version. It is recommended to review this information.
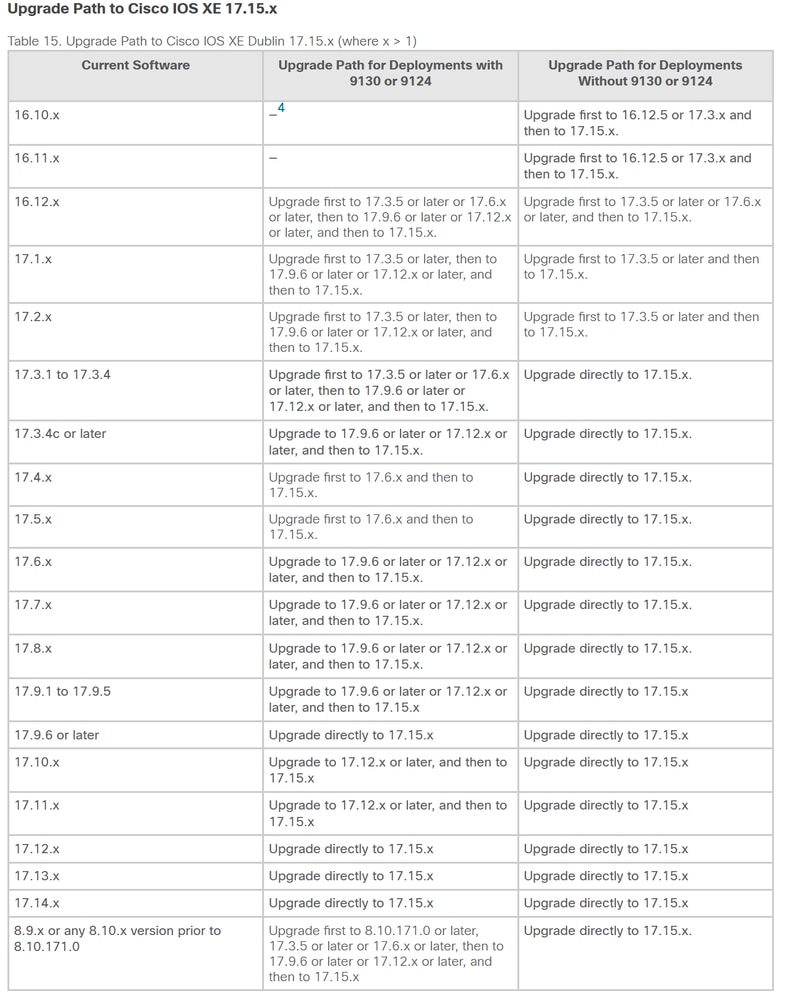
3. The Upgrade Path to Cisco IOS XE Cupertino 17.15.X table contains details about which versions you can directly upgrade from.
 Upgrade Path to 17.15.X
3. The Cisco Wireless Solutions Software Compatibility Matrix indicates which AP models are compatible with your chosen version.
Note: The Access Point Release column corresponds to the AP version codename. This Access Point Release is used via the Manual AP Image Download method and must be notated.
 Wireless Compatibility Matrix 17.9.6 - Table Heading.png
 Wireless Compatibility Matrix 17.15.3
4. Utilize the Software Download webpage to obtain the upgrade package, then proceed with an AP Image Download method .
AP Image Download Methods
Utilize the 9800 WLC to upgrade the AP. This process involves download of the Cisco IOS XE upgrade on the 9800 chassis and initiation of the image download to joined access points.
There are two methods to upgrade AP images: AP Image Predownload and Standard WLC Upgrade.
- AP Image Predownload allows preload of the AP image software prior to reload of the AP.
- Standard WLC Upgrade completes the upgrade on the WLC, reloads the WLC and then APs download the new version upon the AP join process.
AP Image Predownload
AP Image Predownload via GUI
- Download the preferred Cisco IOS XE image version from the Cisco Software Download Site .
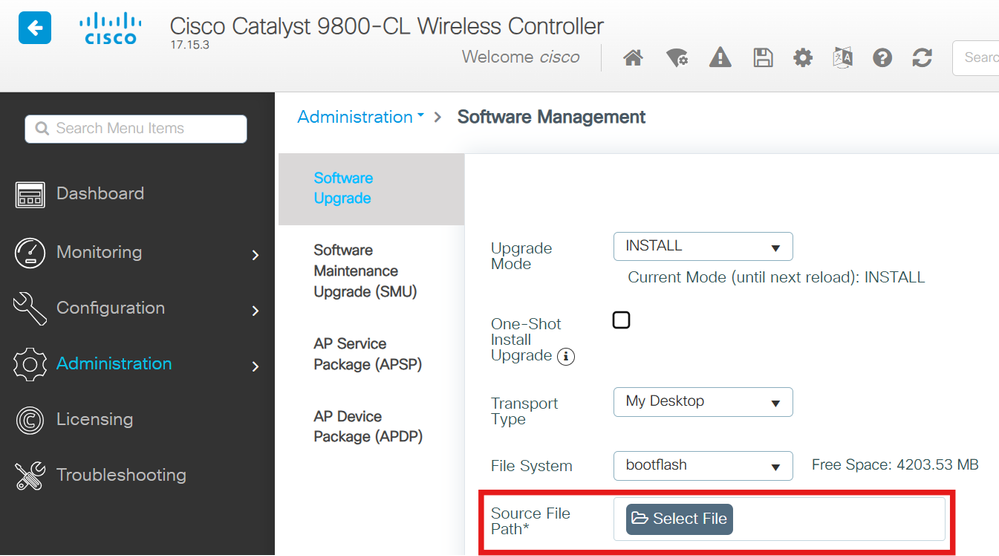
- Upload the Cisco IOS XE image to the WLC via Web GUI Administration > Software Management > Software Upgrade > Source File Path > Select File > Select the 9800 Upgrade File to be uploaded to the controller.
 Software Management GUI
3. Check AP Image Predownload.
4. Click Download & Install.
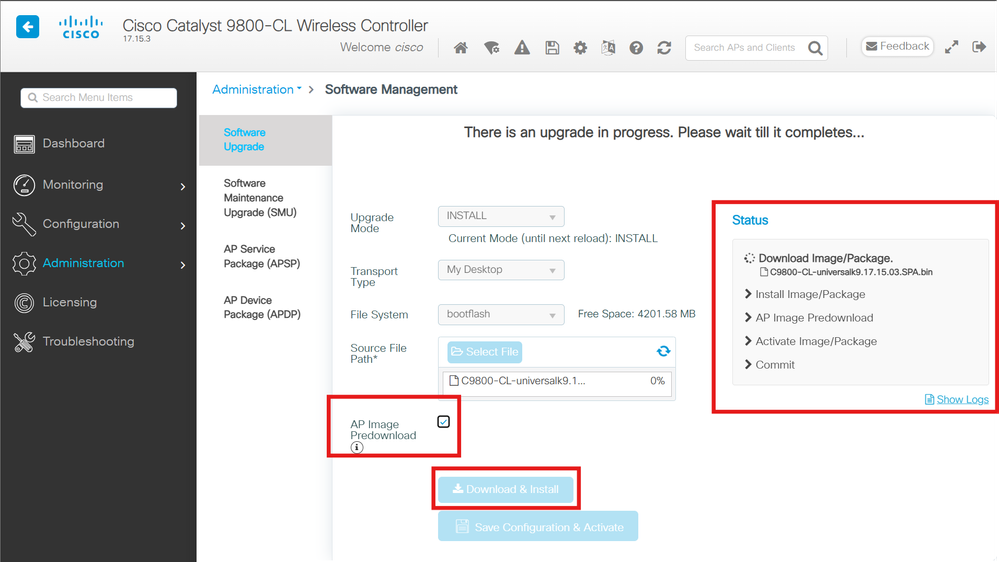 Predownload WLC Upgrade - Install Image
5. APs are upgraded per the AP Image Predownload method.
AP Image Predownload via CLI
- Add and expand the controller image to the WLC.
install add file bootflash:image.bin
2. Download the image to all APs or a specific AP joined to the controller.
ap image predownload
or
ap name <ap-name> image predownload
3. Verify the AP predownload status for all APs or a specific AP .
show ap image
or
show ap name <ap-name> image
4. Swap images of all APs, specific APs, or APs that have completed pre-download.
ap image swap
or
ap name <ap-name> image swap
or
ap image swap completed
5. Activate the newly installed image. This causes the WLC to reload and start with the new version.
6. Once the WLC is online and reachable, commit the image.
Standard WLC and AP Upgrade
Standard WLC and AP Upgrade via GUI
- Download the preferred Cisco IOS XE image version from the Cisco Software Download Site .
- Upload the Cisco IOS XE image to the WLC via Web GUI Administration > Software Management > Software Upgrade > Source File Path > Select File > Select the 9800 Upgrade File to be uploaded to the controller.
 Software Management GUI
3. After the source file is chosen for upload, choose which option best fits your needs: Standard WLC Upgrade or AP Image Predownload .
4. Click Download and Install.
5. The progress bar reaches 100% and Install Image/Package status is reached.
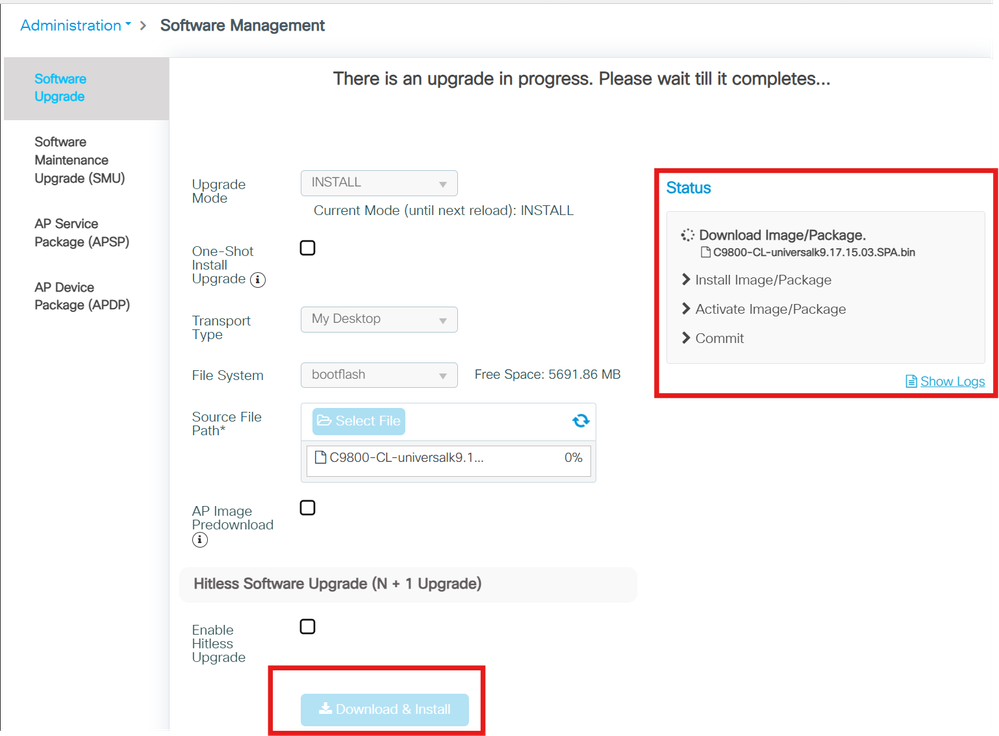 Standard WLC Upgrade - Install Image
6. After the WLC performs the final checks, click Save Configuration & Activate. This causes the WLC to reload and start with the new version.
7. After the WLC is reachable via GUI, commit the upgraded version.
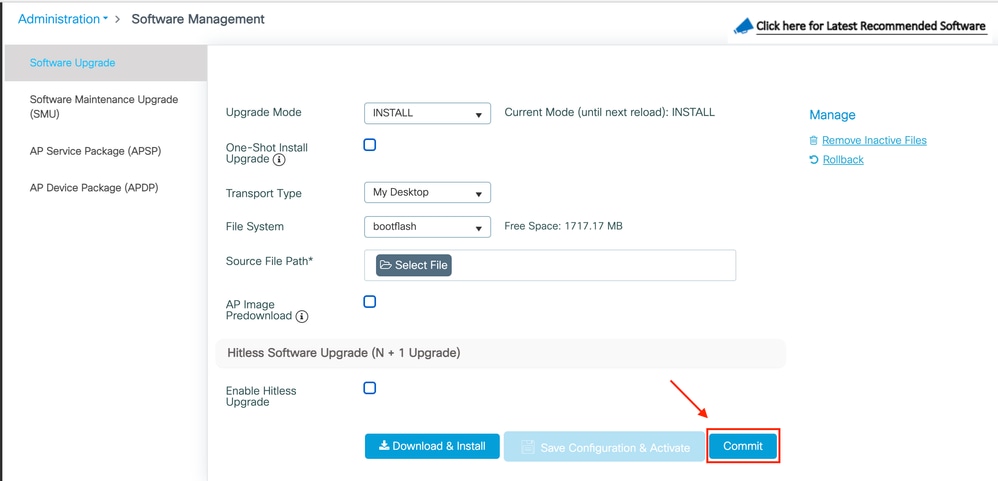 Commit Upgrade
Standard WLC and AP Upgrade via CLI
1. Upload image to the controller.
copy tftp|ftp|sftp://<SERVER_IP>/<IMAGE_PATH> bootflash:
2. Install image on the controller.
install add file bootflash:<IMAGE_NAME>
3. Activate the new image. This causes the WLC to reload and start with the new version.
4. Once the WLC is online and reachable, commit the image.
Manual AP Image Download
Utilize a file server application of your choice on your computer or server. This file server is the server that supplies the AP with the preferred upgrade files.
- Download the preferred AP image version from the Cisco Software Download Site.
- Save the AP software file on your file server directory.
- Utilize the archive download-sw command to initiate the file upgrade from the CLI of your AP.
Note: Transport methods available for the archive download-sw command are limited to TFTP and SFTP
#archive download-sw /reload <tftp|sftp>://[your TFTP server's IP address]/[image filename.tar]
4. AP downloads the .tar upgrade file from the file server as directed. This takes some time dependent on the transfer rate between the AP and the file server.
5. Upon completion of the file transfer, the AP automatically reloads and boots the newly downloaded AP image.
Note: If the archive download-sw command is not accepted by your AP, enter the command debug capwap console cli to enable the archive download-sw command
Verify
After the AP upgrade process has completed, verify the AP version, image integrity, and boot partition with the commands.
1. Verify AP version.
2. Verify image integrity.
3. Verify boot partition.
Related Information
 Feedback