Introduction
This document provides a configuration example for using the Web
Authentication Proxy feature on a Wireless LAN Controller (WLC).
Prerequisites
Requirements
Make sure that you meet these requirements before you attempt this
configuration:
-
Have knowledge of the configuration of Lightweight Access Points
(LAPs) and Cisco WLCs.
-
Have knowledge of Lightweight Access Point Protocol (LWAPP)/Control
and Provisioning of Wireless Access Points (CAPWAP).
-
Have knowledge of web authentication.
Components Used
The information in this document is based on these software and
hardware versions:
The information in this document was created from the devices in a
specific lab environment. All of the devices used in this document started with
a cleared (default) configuration. If your network is live, make sure that you
understand the potential impact of any command.
Conventions
Refer to the
Cisco
Technical Tips Conventions for more information on document
conventions.
Web Authentication Proxy on a WLC
This document assumes that the reader has prior knowledge of web
authentication and those steps involved in configuring web authentication on
Cisco WLCs. If you are a new user, read these documents which explain the web
authentication process in detail:
The Web Authentication Proxy feature was introduced with WLC version
7.0.116.0.
A web browser has three types of Internet settings that can be
configured by the user:
-
Auto Detect
-
System Proxy
-
Manual
This feature enables clients that have manual web proxy enabled in the
browser to facilitate web authentication with the controller.
In a network configured for web authentication, if the client is
configured for manual proxy settings, the controller does not listen to such
proxy ports and hence the client would not be able to establish a TCP
connection with the controller. In effect, the user is unable to get to any log
in page to authentication and get access to the network.
When the client requests any URL with the Web Authentication Proxy
feature enabled, the controller responds with a webpage prompting the user to
change the Internet proxy settings to automatically detect the proxy
settings.
This process prevents the browser's manual proxy settings from getting
lost. After configuring this feature, the user can get access to the network
through the web authentication policy.
By default, this functionality is provided for ports 80, 8080, and 3128
because these are the most commonly used ports for the web proxy server.
Configure Web Authentication Proxy on a WLC
In this section, you are presented with the information to configure
the features described in this document.
Configurations
Complete these steps in order to configure Web Authentication Proxy
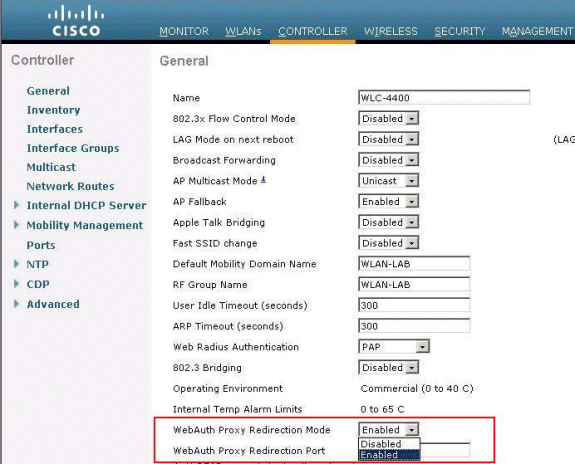
using the controller GUI:
-
From the controller GUI, choose Controller >
General.
-
In order to enable WebAuth Proxy, choose Enabled
from the WebAuth Proxy Redirection Mode drop-down
list.
-
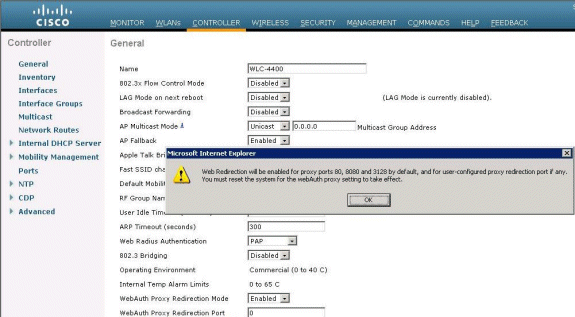
In the WebAuth Proxy Redirection Port text box, enter the port number
of the web authentication proxy. This text box consists of the port numbers on
which the controller listens for web authentication proxy redirection. By
default, the three ports 80, 8080, and 3128 are assumed. If you configured the
web authentication redirection port to any port other than these values, you
must specify that value.
-
Click Apply.
In order to configure WebAuth Proxy from the CLI, issue this
command:
config network web-auth proxy-redirect {enable | disable}
Set the web authentication port number using the config
network web-auth port <port-number>
command.
Once the WLC is configured, save the configuration and reboot the
controller in order for the configuration to take effect.
Verify
To see the current status of the web authentication proxy
configuration, issue either the show network summary
or show running-config command.
(Cisco Controller) >show network summary

RF-Network Name............................. WLAN-LAB
Web Mode.................................... Disable
Secure Web Mode............................. Enable
Secure Web Mode Cipher-Option High.......... Disable
Secure Web Mode Cipher-Option SSLv2......... Enable
Secure Shell (ssh).......................... Enable
Telnet...................................... Enable
Ethernet Multicast Forwarding............... Disable
Ethernet Broadcast Forwarding............... Disable
AP Multicast/Broadcast Mode................. Unicast
IGMP snooping............................... Disabled
IGMP timeout................................ 60 seconds
IGMP Query Interval......................... 20 seconds
User Idle Timeout........................... 300 seconds
ARP Idle Timeout............................ 300 seconds
Cisco AP Default Master..................... Disable
AP Join Priority............................ Disable
Mgmt Via Wireless Interface................. Disable
Mgmt Via Dynamic Interface.................. Disable
Bridge MAC filter Config.................... Enable
Bridge Security Mode........................ EAP

--More-- or (q)uit
Mesh Full Sector DFS........................ Enable
Apple Talk ................................. Disable
AP Fallback ................................ Enable
Web Auth Redirect Ports .................... 80
Web Auth Proxy Redirect  ................... Enable
Fast SSID Change ........................... Disabled
802.3 Bridging ............................. Disable
IP/MAC Addr Binding Check .................. Enabled
Now, let's connect a Wireless Client to the Guest SSID that we have
configured for web authentication.
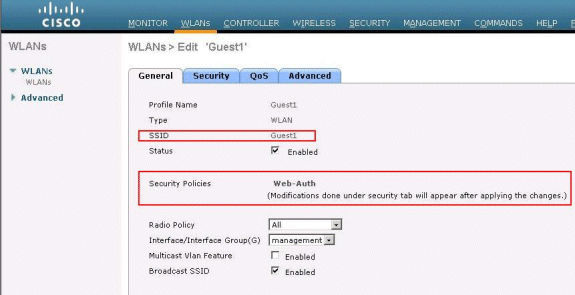
Assuming you have an internal DHCP server, the client connects to the
WLAN Guest1 and acquires an IP address. When the client tries to access a URL
(for example, www.cisco.com), since manual proxy is enabled on the client
browser, the controller using the web authentication proxy feature responds
with a webpage prompting the user to change the Internet proxy settings to
automatically detect the proxy settings.
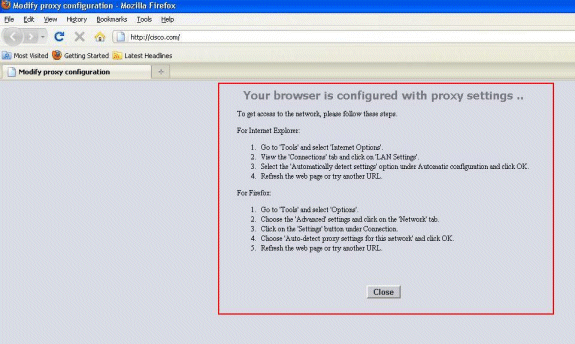
At this point, the client is aware that the manual proxy settings need
to be disabled. Here, you can see how to disable the manual proxy settings on
Firefox version 3.6.
-
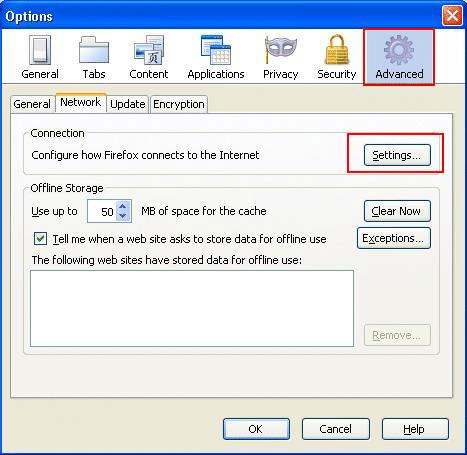
From the Firefox browser, select Tools >
Options, and then select Advanced.
-
Click the Network tab, and then select
Settings.
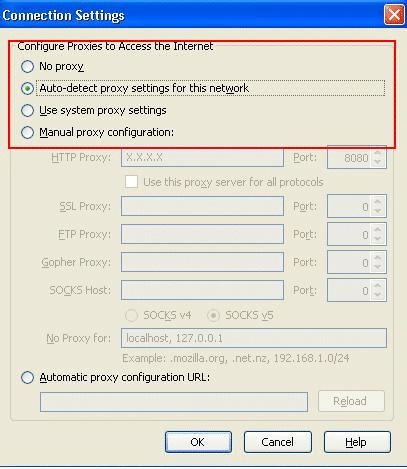
-
In the Connection Settings window, select Auto-detect proxy
settings for this network.
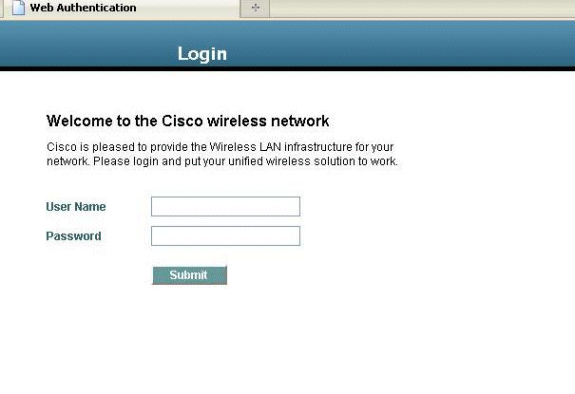
Once this is completed, refresh the browser and try accessing the URL
again. This time, you will be redirected to the Web Authentication page. The
client can provide you with credentials and you can log in to the guest
network.
Related Information


 Feedback