Configure Automatic Certificate Enrollment and Renewal Via CAPF Online CA
Available Languages
Contents
Introduction
This document describes Automatic Certificate Enrollment and Renewal via the CAPF Online feature for Cisco Unified Communications Manager (CUCM).
Prerequisites
Requirements
Cisco recommends that you have knowledge of these topics:
- Cisco Unified Communications Manager
- X.509 certificates
- Windows Server
- Windows Active Directory (AD)
- Windows Internet Information Services (IIS)
- NT (New Technology) LAN Manager (NTLM) Authentication
Components Used
The information in this document is based on these software and hardware versions:
- CUCM version 12.5.1.10000-22
- Windows Server 2012 R2
- IP Phone CP-8865 / Firmware: SIP 12-1-1SR1-4 and 12-5-1SR2.
The information in this document was created from the devices in a specific lab environment. All of the devices used in this document started with a cleared (default) configuration. If your network is live, ensure that you understand the potential impact of any command.
Background Information
This document covers the configuration of the feature and related resources for additional research.
Validate the Server Time and Date
Ensure the Windows server has the correct date, time, and time zone configured as it affects the validity times for the server root Certificate Authority (CA) certificate as well as those certificates issued by it.
Update Server Computer Name
By default, the server computer name has a random name such as WIN-730K65R6BSK. First thing that needs to be done before you enable AD Domain Services is to ensure to update the server computer name to what you want the server hostname and root CA Issuer Name to be by the end of the installation; otherwise it takes a lot of extra steps to change this after AD services are installed.
- Navigate to Local Server, select the Computer name to open the System Properties
- Select the Change button and type in the new Computer name:
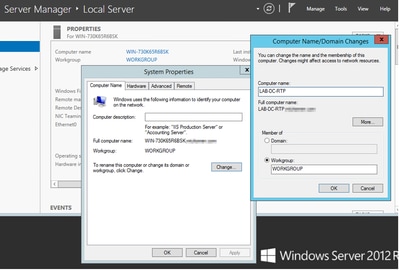
- Restart the server for the changes to get applied.
Configure
AD Services, User and Certificate Template
Enable and Configure Active Directory Services
- In Server Manager, select Add Roles and Features option, select Role-based or feature-based installation and choose the server from the pool (there must only be one in the pool) and then Active Directory Domain Services:
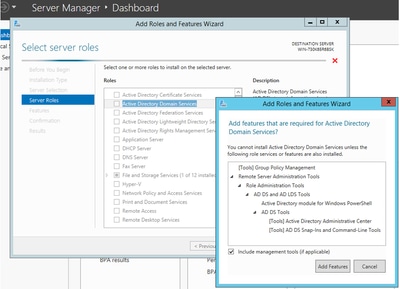
- Continue to select Next button and then Install.
- Select the Close button after it completes the installation.
- A warning tab appears under Server Manager > AD DS with the title Configuration required for Active Directory Domain Services. Select more link and then available action to start the setup wizard:
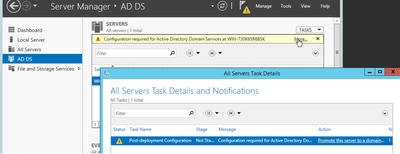
- Complete the prompts in the domain setup wizard, add a new forest with the desired Root Domain Name and uncheck the DNS box when available. Define the DSRM password.
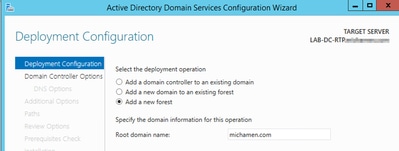
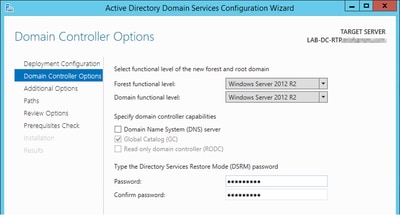
- You need to specify a NetBIOS domain name (used MICHAMEN1 in this lab).
- Complete the wizard. The server then reboots to complete the installation.
- You need to specify the new domain name next time you log in. For example, MICHAMEN1\Administrator.
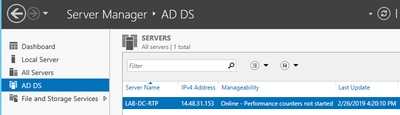
Enable and Configure Certificate Services
- In Server Manager, select Add Roles and Features.
- Select Active Directory Certificate Services and add the required features (all available features were selected from the role services that were enabled for this lab).
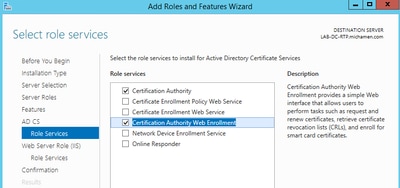
- For Role Services, check Certification Authority Web Enrollment.
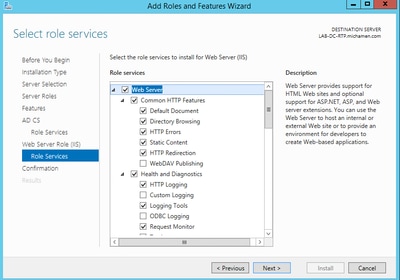
- A warning tab must appear under Server Manager >AD DS with the title Configuration required for Active Directory Certificate Services; Select the more link and then available action:
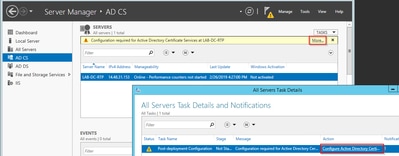
- In the AD-CS Post Install Configuration wizard navigate through these steps:
- Select the Certification Authority and Certification Authority Web Enrollment Roles.
- Choose Enterprise CA with options:
- Root CA
- Create a new private key.
- Use Private Key – SHA1 with default settings.
- Set a Common Name for the CA (Must match the hostname of the server).
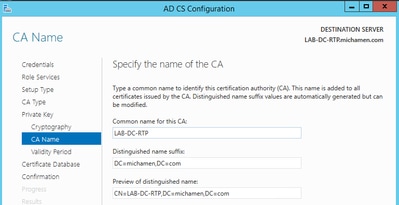
- Set Validity for 5 years (or more if desired).
- Select the Next button through the rest of the wizard.
Certificate Template Creation for CiscoRA
- Open MMC. Select the windows start logo and type mmc from Run.
- Open an MMC window and add the snap-ins (Used at different points of the configuration) then select OK.
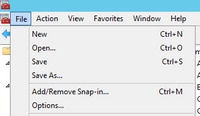
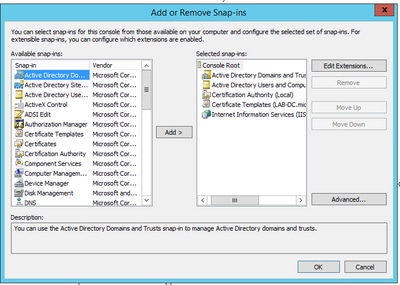
- Select File > Save and save this console session to desktop for quick re-access.
- From the snap-ins, Select Certificate Templates.
- Create or clone a template (preferably the Root Certification Authority template if available) and name it CiscoRA.
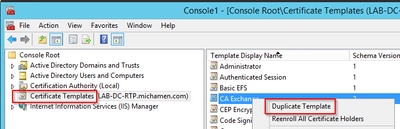
- Modify the template. Right-click on it and select Properties.
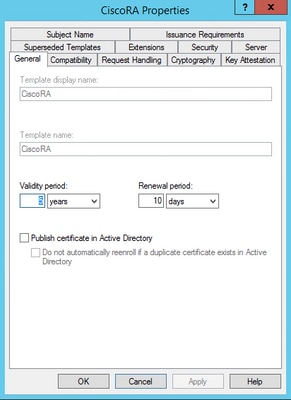
- Select the General tab and set the validity period to 20 years (or other value if desired). In this tab, make sure the template, display name, and name, values match.
- Select the Extensions tab, highlight Application Policies, and then select Edit.
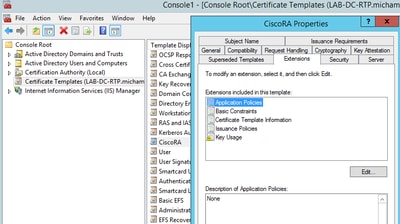
- Remove any policies that are shown in the window that appears.
- Select the Subject Name tab and select the Supply in Request radio button.
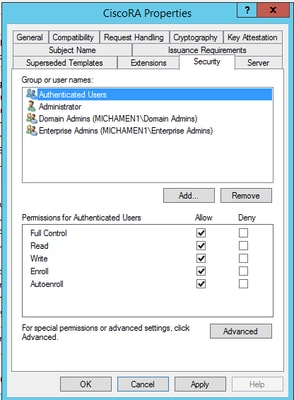
- Select the Security tab and grant permissions according to your needs for groups/user names.

Note: In this example, full permissions were granted across the board for simplicity, but this has security implications. In a production environment, write and enroll permissions must only be granted to those users and groups that require it. Please, refer to the Microsoft documentation for more information.
Make the Certificate Template Available to Issue
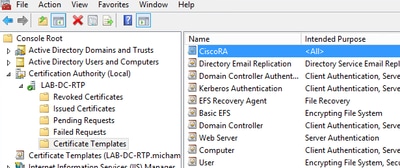
- In the MMC snap-ins select Certification Authority and expand the folder tree in order to locate the Certificate Templates folder.
- Right-click in the white space in the frame that contains Name and Intended Purpose
- Select New and Certificate Template to Issue.
- Select the newly created and edited CiscoRA template.
Active Directory CiscoRA Account Creation
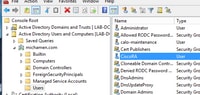
- Navigate to MMC snap-ins and select Active Directory Users and Computers.
- Select the Users folder in the tree in the leftmost pane.
- Right-click in the white space in the frame that contains Name, Type and Description.
- Select New and User.
- Create the CiscoRA account with username/password (ciscora/Cisco123 was used for this lab) and select the Password never expires checkbox when it is shown.
IIS Authentication and SSL Binding Configuration
Enable NTLM Authentication.
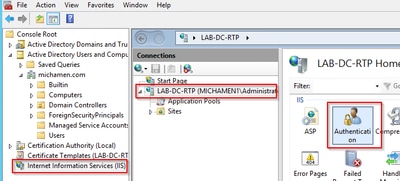
- Navigate to MMC snap-ins and under the Internet Information Services (IIS) Manager snap-in select your server name.
- The features list displays in the next frame. Double-click the Authentication feature icon.
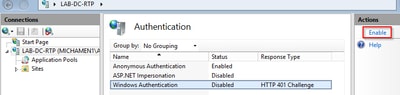
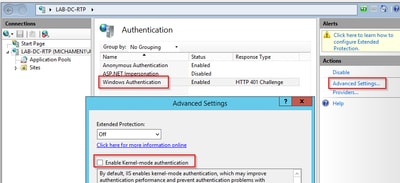
- Highlight Windows Authentication and from the Actions frame (Right pane) select the Enable option.
- Actions pane displays Advanced Settings option; select it and uncheck Enable Kernel-mode authentication.
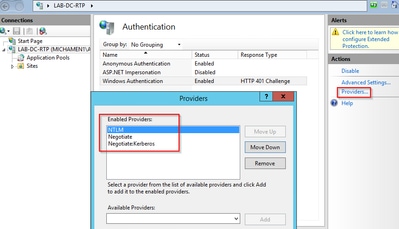
- Select Providers and put in order NTML, then Negotiate.
Generate the Identity Certificate for the Web Server
If not already the case, you need to generate a certificate an identity certificate for your Web service that is signed by the CA because CiscoRA is not able to connect to it if the Web server certificate is Self-Signed:
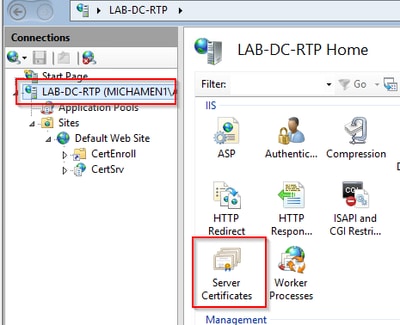
- Select your Web server from the IIS snap-in and double-click the Server Certificates feature icon:
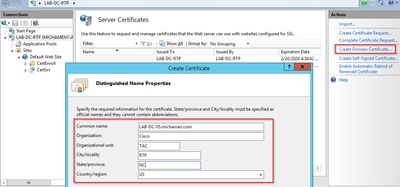
- By default, you are able to see one certificate listed there; which is the self-signed root CA cert; From the Actions menu, select the Create Domain Certificate option. Enter the values in the configuration wizard in order to create your new certificate. Ensure the Common name is a resolvable Fully Qualified Domain Name (FQDN) and then select Next:
- Select your root CA’s certificate to be the issuer and select Finish:
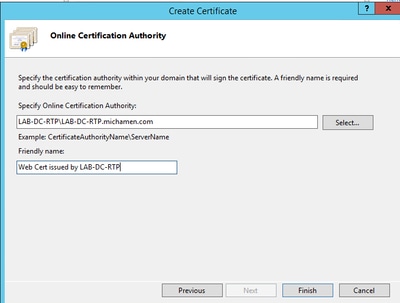
- You are able to see both, the CA certificate and your Web Server Identity certificate listed:

Web Server SSL Binding
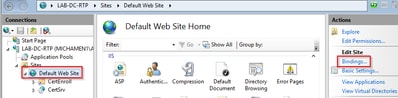
- Select a site in the tree view (you can use the Default Web Site or make it more granular to specific sites) and select Bindings from the Actions pane. This brings up the bindings editor that allows you to create, edit, and delete bindings for your Web site. Select Add in order to add your new SSL binding to the site.
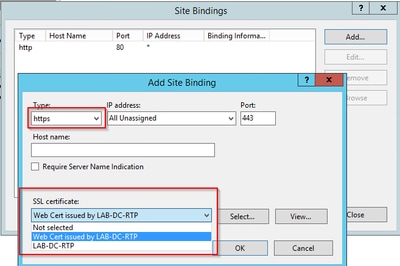
- The default settings for a new binding are set to HTTP on port 80. Select https in the Type drop-down list. Select the self-signed certificate you created in the previous section from the SSL Certificate drop-down list and then select OK.
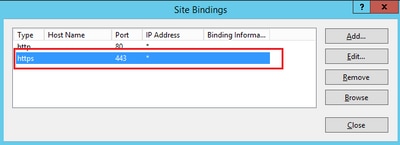
- Now you have a new SSL binding on your site and all that remains is to verify that it works by selecting Browse *:443 (https) option from the menu and ensure the default IIS Web page uses HTTPS:
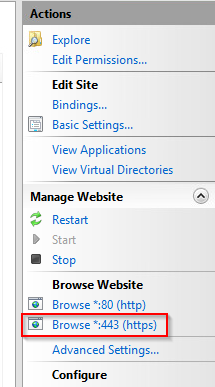
- Remember to restart the IIS service after configuration changes. Use the Restart option from the Actions pane.
CUCM Configuration
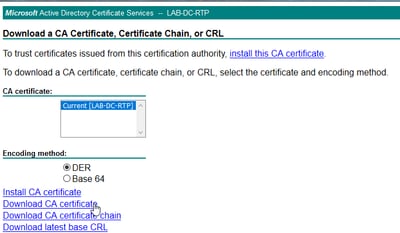
- Navigate to your AD CS Web page (Your Server FQDN) and download the CA certificate.
- Navigate to Security > Certificate Management from the OS Administration page and select the Upload Certificate/Certificate chain button in order to upload the CA certificate with the purpose set to CAPF-trust.
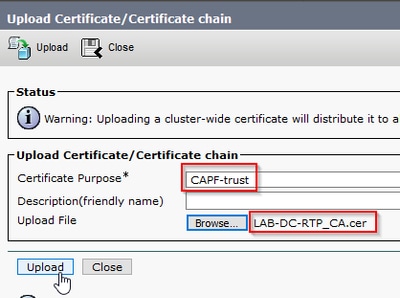
At this point it is also be a good idea to upload that same CA certificate as CallManager-trust because it is needed if secure signaling encryption is enabled for the endpoints; which is likely if the cluster is in Mixed-Mode.
- Navigate to System > Service Parameters. Select the Unified CM Publisher server in the server field and Cisco Certificate Authority Proxy Function in the Service field.
- Set the value of Certificate Issuer to Endpoint to Online CA and enter the values for the Online CA Parameters fields. Ensure to use the Web server FQDN, the name of the certificate template created earlier (CiscoRA), the CA type as Microsoft CA and use the credentials of the CiscoRA user account created earlier.
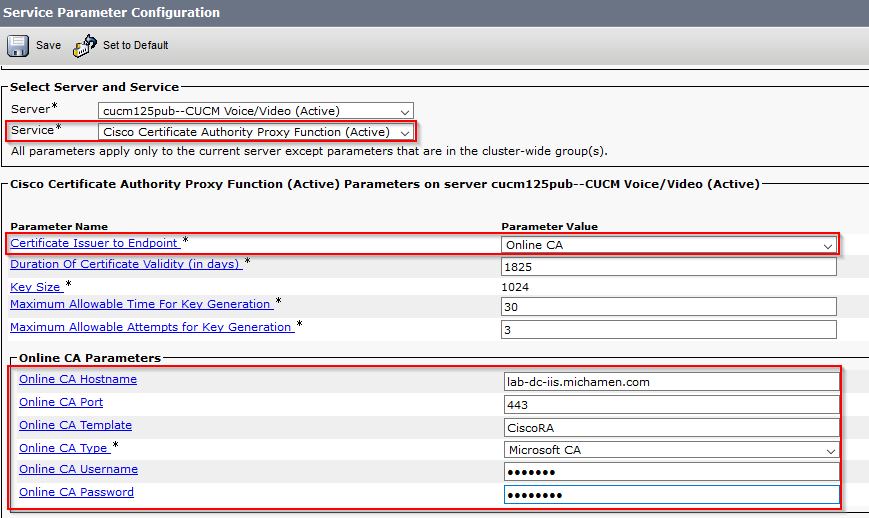
- A pop window informs you that the CAPF service needs to be restarted. But first, activate the Cisco Certificate Enrollment Service through Cisco Unified Serviceability > Tools > Service Activation, select the Publisher in the server field and check the Cisco Certificate Enrollment Service checkbox, and then select the Save button:

Verify
Verify IIS Certificates
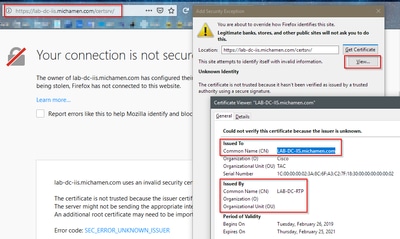
- From a Web browser in a PC with connectivity to the server (preferably in the same network as the CUCM Publisher) navigate to URL
- Certificate not-trusted alert is displayed. Add the exception and check the certificate. Ensure it matches the expected FQDN:
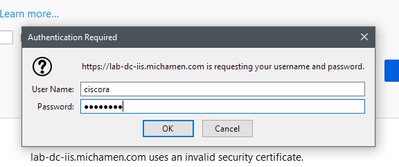
- After you accept the exception, you need to authenticate; at this point you need to use the credentials configured for the CiscoRA account earlier:
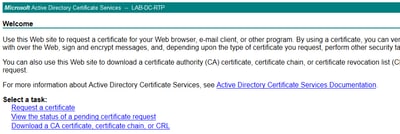
- After authentication you must be able to see the AD CS (Active Directory Certificate Services) Welcome page:
Verify CUCM Configuration
Perform the steps you do in order to install an LSC certificate on one of the phones.
Step 1. Open the CallManager Administration page, Device and then Phone.
Step 2. Select the Find button to display the phones.
Step 3. Select the phone you wish to install the LSC on.
Step 4. Scroll down to Certification Authority Proxy Function (CAPF) Information.
Step 5. Select the Install/Upgrade from the Certificate Operation.
Step 6. Select the Authentication Mode. (By Null String is fine for test purposes.)
Step 7. Scroll to the top of the page and select save then Apply Config for the phone.
Step 8. After the phone restarts and registers back, use the LSC Status filter to confirm the LSC installed successfully.
- From the AD server side, open MMC and expand the Certification Authority snap-in to select the Issued Certificates folder.
- The entry for the phone is displayed Inside the summary view, these are some of the details displayed:
- Request ID: Unique sequence number
- Requester Name: The username of the configured CiscoRA account must be displayed.
- Certificate Template: The name of the CiscoRA template created must be displayed.
- Issued Common Name: The phone’s model appended by the device name must be displayed.
- Certificate Effective Date and Certificate Expiration Date

Related Links
Revision History
| Revision | Publish Date | Comments |
|---|---|---|
3.0 |
01-Oct-2026
|
Added Alt Text. Updated Target Links, Style Requirements, and Formatting to Comply with Cisco's Guidelines for Externalization. |
2.0 |
08-Jun-2023
|
Confirmed with BU that kerbeos is not supported so taking out any configuration suggested related to it. |
1.0 |
05-Jun-2019
|
Initial Release |

 Feedback
Contact Cisco
- Open a Support Case

- (Requires a Cisco Service Contract)