Configuring VLAN Settings on the RV160 and RV260
Available Languages
Objective
The objective of this document is to show you how to configure IPv4 Virtual Local Area Network (VLAN) settings on the RV160 and RV260.
Introduction
A VLAN allows you to logically segment a Local Area Network (LAN) into different broadcast domains. In scenarios where sensitive data may be broadcast on a network, VLANs can be created to enhance security by designating a broadcast to a specific VLAN. Only users that belong to a VLAN are able to access and manipulate the data on that VLAN. VLANs can also be used to enhance performance by reducing the need to send broadcasts and multicasts to unnecessary destinations. You can create a VLAN, but this has no effect until the VLAN is attached to at least one port, either manually or dynamically. Ports must always belong to one or more VLANs.
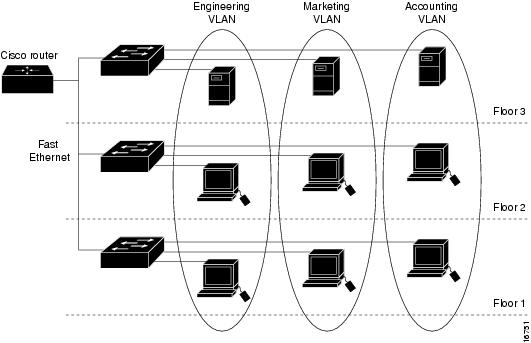
Below is an example of three VLANs that were created for an Engineering, Marketing, and Accounting team.
Applicable Devices
- RV160
- RV260
Software Version
- 1.0.00.13
VLAN Configuration
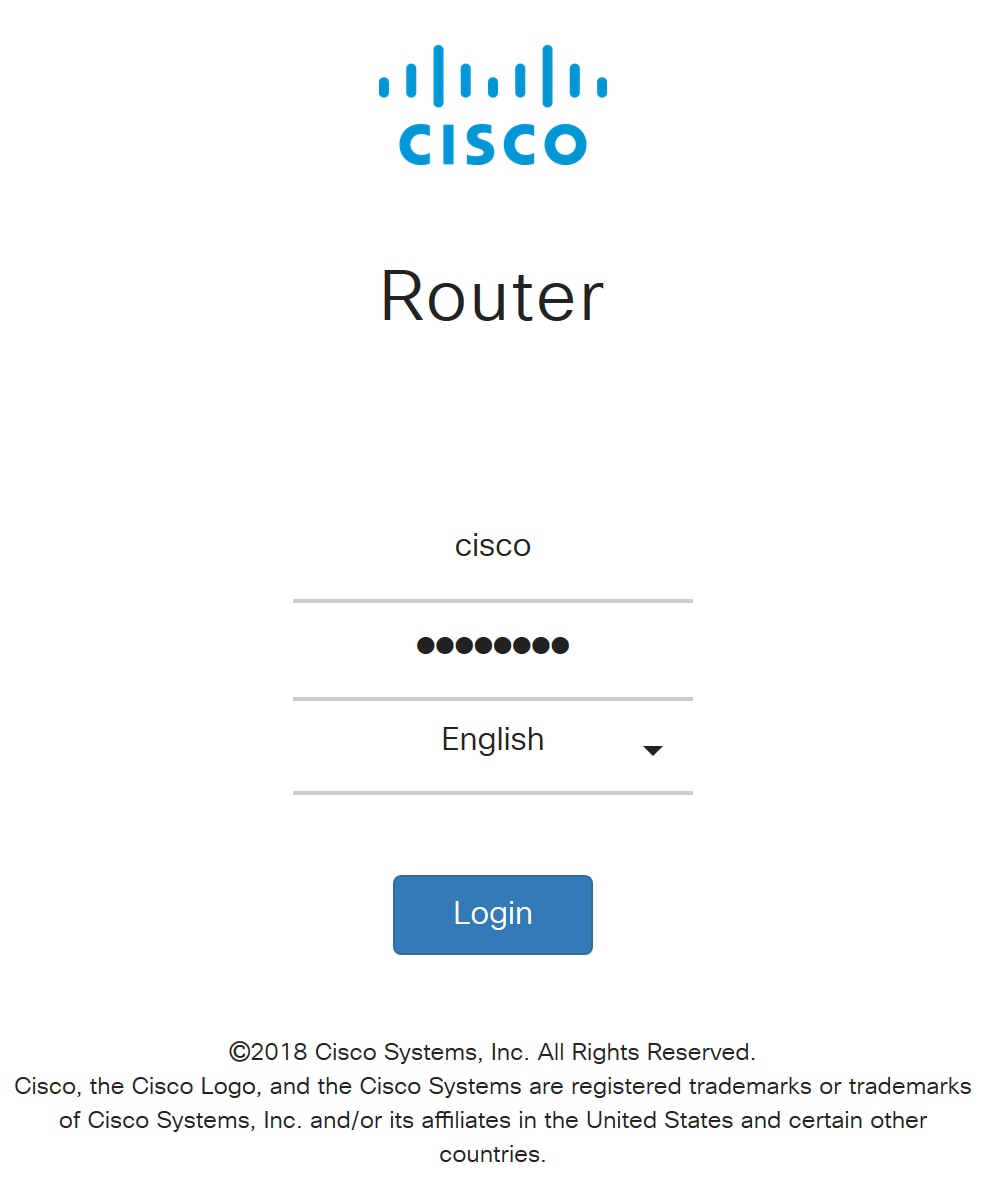
Step 1. Log in to the Graphical User Interface (GUI) of the router.
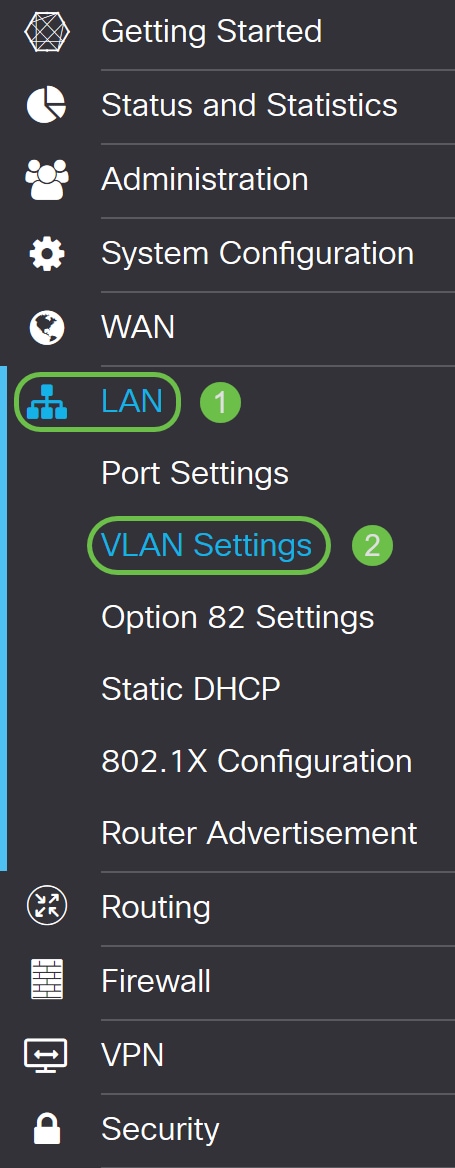
Step 2. Navigate to LAN > VLAN Settings.
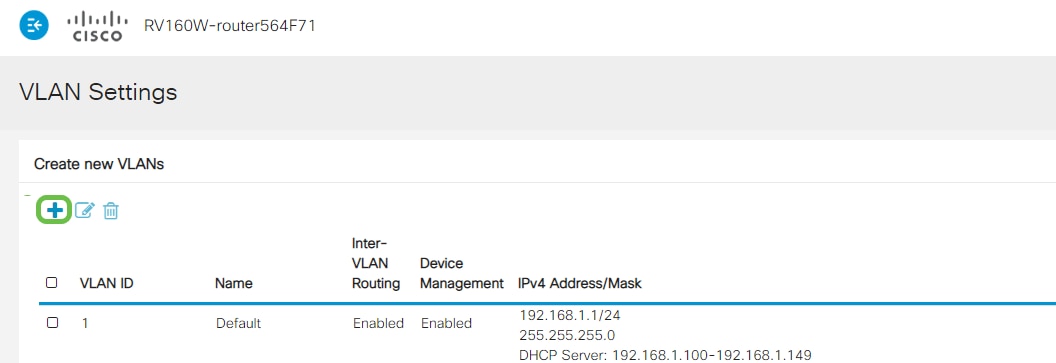
Step 3. Click Add to create a new VLAN.
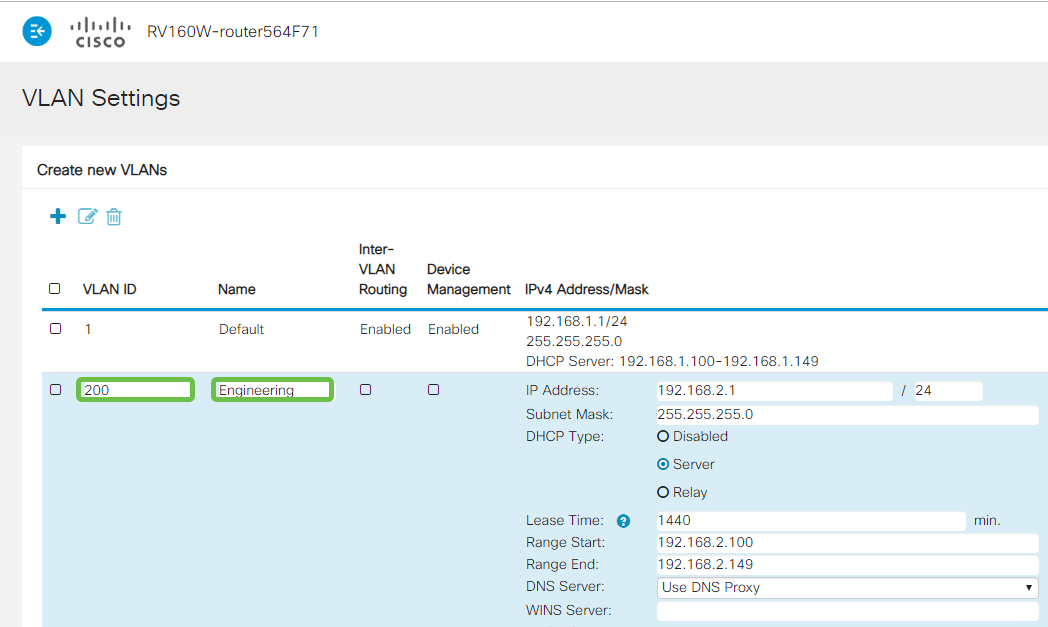
Step 4. Enter the VLAN ID that you want to create and a Name for it. The VLAN ID range is from 1-4093.
We entered 200 as our VLAN ID and Engineering as the Name for the VLAN.
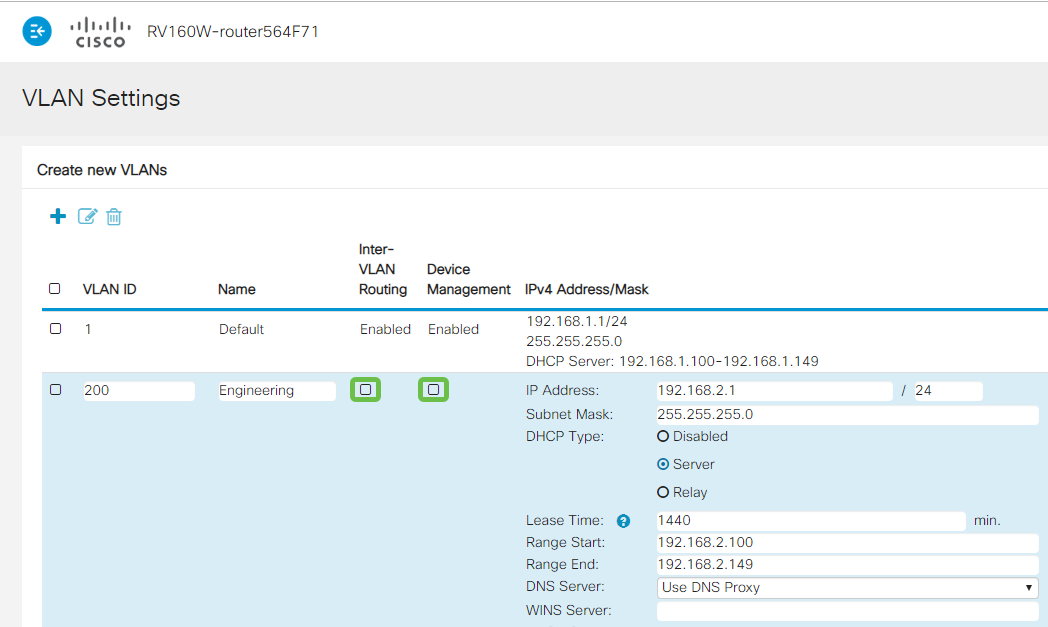
Step 5. Uncheck the Enabled box for both Inter-VLAN Routing and Device Management.
Inter-VLAN routing is used to route packets from one VLAN to another VLAN. In general, this is not recommended as it leaves VLANs less secure. There are times when it may be necessary for VLANs to route between each other. If this is the case, check out Inter-VLAN Routing on an RV34x Router with Targeted ACL Restrictions for more information.
Device Management is the software that allows you to use your browser to log into the GUI of the device, from the VLAN, and manage the device.
In this example, we did not enable either the Inter-VLAN Routing or Device Management to keep the VLAN more secure.
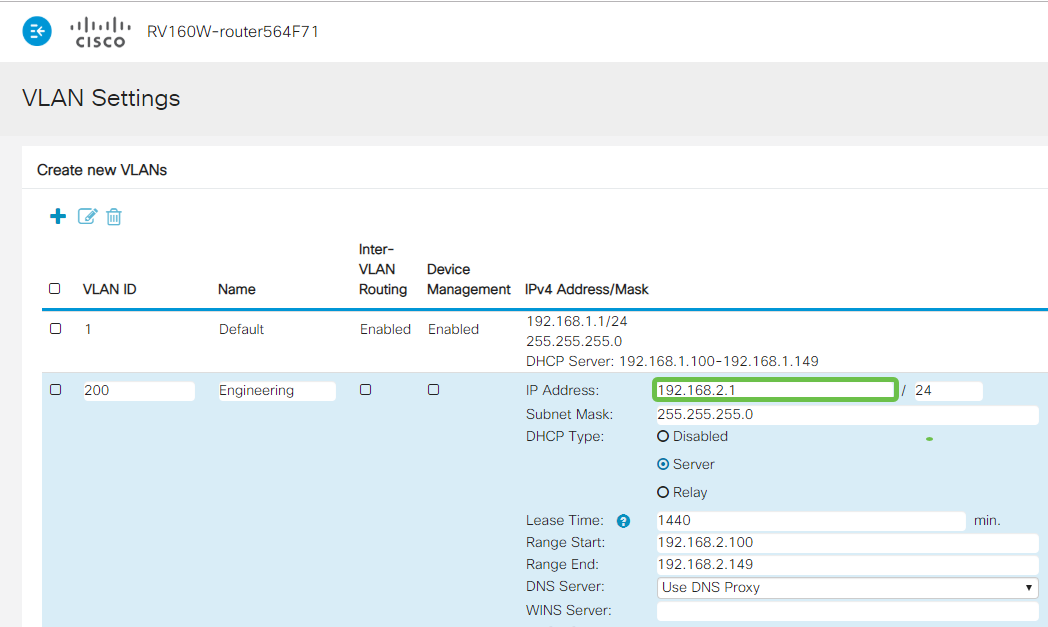
Step 6. The private IPv4 address will auto-populate in the IP Address field. You can adjust this if you choose.
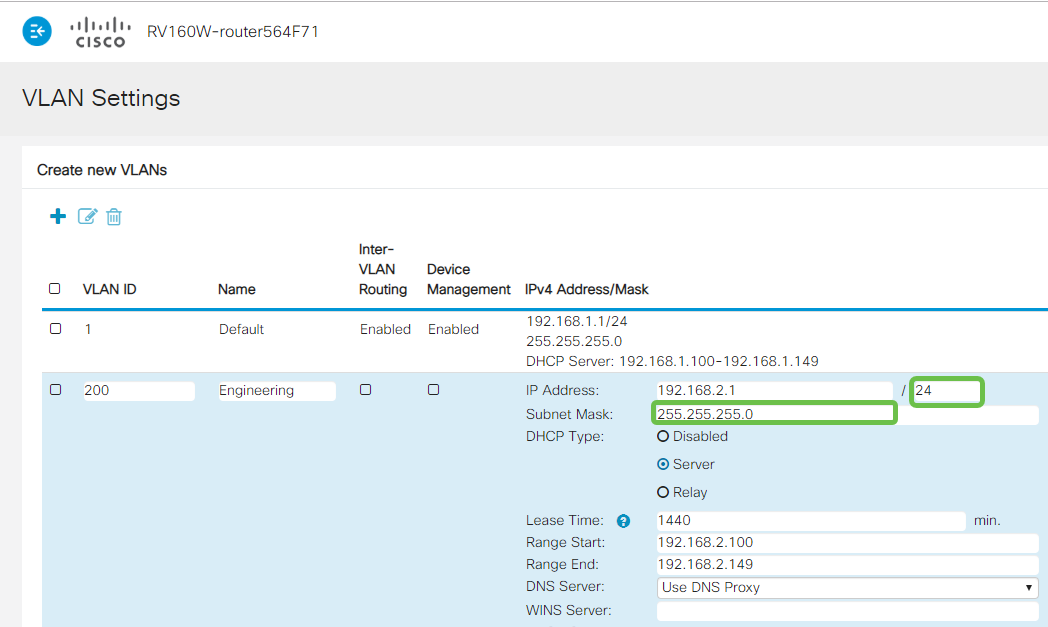
Step 7. The subnet mask under Subnet Mask will auto-populate. If you make changes, this will automatically adjust the field.
For this demonstration, we will be leaving the Subnet Mask as 255.255.255.0 or /24.
Step 8. Select a Dynamic Host Configuration Protocol (DHCP) Type. The following options are:
Disabled – Disables the DHCP IPv4 server on VLAN. This is recommended in a test environment. In this scenario, all IP addresses would need to be manually configured and all communication would be internal.
Server - This is the most often used option.
- Lease Time – Enter a time value of 5 to 43,200 minutes. Default is 1440 minutes (equal to 24 hours).
- Range Start and Range End – Enter the range start and end of IP addresses that can be assigned dynamically.
- DNS Server – Select to use DNS server as proxy, or from ISP from the drop-down list.
- WINS Server – Enter the WINS server name.
- DHCP Options:
- Option 66 – Enter the IP address of the TFTP server.
- Option 150 – Enter the IP address of a list of TFTP servers.
- Option 67 – Enter the configuration filename.
- Relay – Enter the remote DHCP server IPv4 address to configure the DHCP relay agent. This is a more advanced configuration.
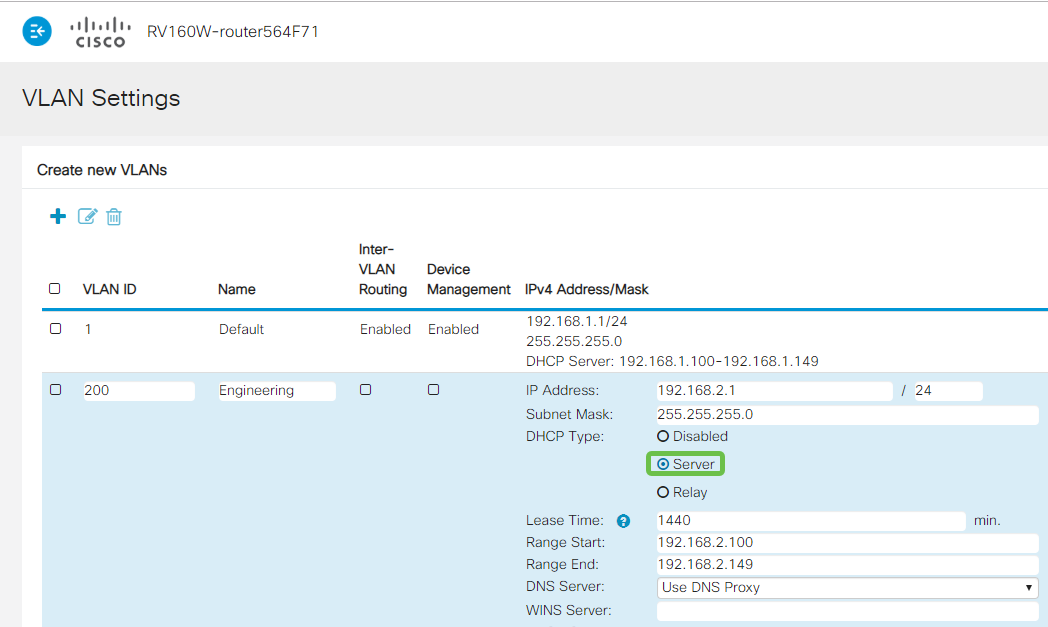
Step 9. Click Apply to create the new VLAN.

Assign VLANs to Ports
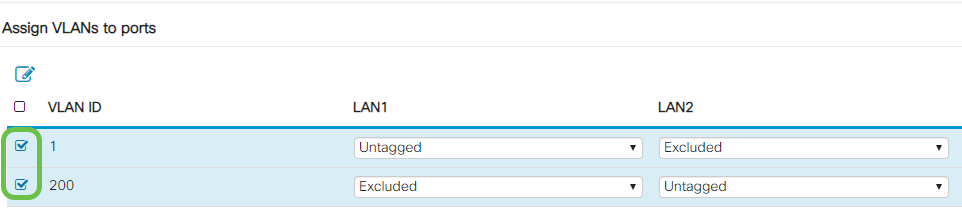
16 VLANs can be configured on the RV160 or RV260, with one VLAN for the Wide Area Network (WAN). VLANs that are not on a port should be Excluded. This keeps the traffic on that port exclusively for the VLAN/VLANs the user specifically assigned. It is considered a best practice.
Ports can be set to be an Access Port or a Trunk Port:
- Access Port - Assigned one VLAN. Untagged frames are passed.
- Trunk Port - Can carry more than one VLAN. 802.1q. “Trunking” allows for a native VLAN to be Untagged. VLANs that you don’t want on the Trunk should be Excluded.
One VLAN assigned its own port:
- Considered an Access port.
- The VLAN that is assigned this port should be labeled Untagged.
- All other VLANs should be labeled Excluded for that port.
Two or more VLANs that share one port:
- Considered a Trunk Port.
- One of the VLANs can be labeled Untagged.
- The rest of the VLANs that are part of the Trunk Port should be labeled Tagged.
- The VLANs that are not part of the Trunk Port should be labeled Excluded for that port.
Note: In this example, there are no trunks.
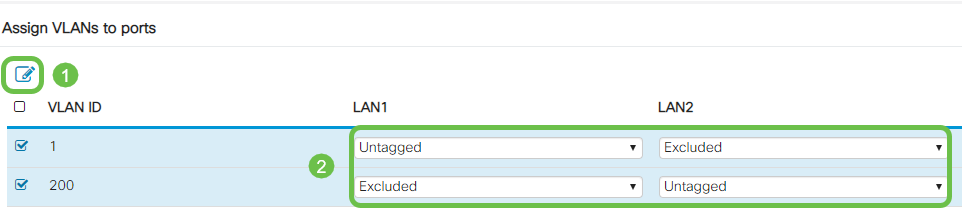
Step 10. Select the VLAN IDs to edit. Click Edit.
In this example, we have selected VLAN 1 and VLAN 200.
Step 11. Click Edit to assign a VLAN to a LAN port and specify each setting as Tagged, Untagged, or Excluded.
In this example, on LAN1 we assigned VLAN 1 as Untagged and VLAN 200 as Excluded. For LAN2 we assigned VLAN 1 as Excluded and VLAN 200 as Untagged.
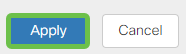
Step 12. Click Apply to save the configuration.
Conclusion
You should now have successfully created a new VLAN and configured VLANs to ports on the RV160 and RV260. Repeat the process to create other VLANs.
 Feedback