Configure Secure LDAP Access for Fabric Interconnects in Intersight Managed Mode (HTTP Device Console and SSH)
Available Languages
Introduction
This document describes how to configure Domain LDAP authentication in an Intersight SaaS instance using the LDAP Policy.
Prerequisites
Requirements
Knowledge of these topics:
- Lightweight Directory Access Protocol (LDAP) protocol.
- Domain Name Server (DNS) Server.
- Cisco Intersight
Components Used
- Cisco Intersight SaaS instance
- Microsoft Active Directory
- DNS Server
- Microsoft Active Directory Certificate Services (AD CS)
The information in this document was created from the devices in a specific lab environment. All of the devices used in this document started with a cleared (default) configuration. If your network is live, ensure that you understand the potential impact of any command.
Background Information
LDAP is a well known protocol used to access resources from a directory over the network. These directories store information about users, organizations, and resources. LDAP provides a standard process to access and manage that information that can be used for authentication and authorization processes.
This document describes the configuration process for remote authentication through secure LDAP to the Device Console or CLI (HTTP or SSH respectively) of a peer of Fabric Interconnects in Intersight Managed Mode.
Configuration
Configure the LDAP Policy
To configure the LDAP policy, log into the Intersight SaaS instance.
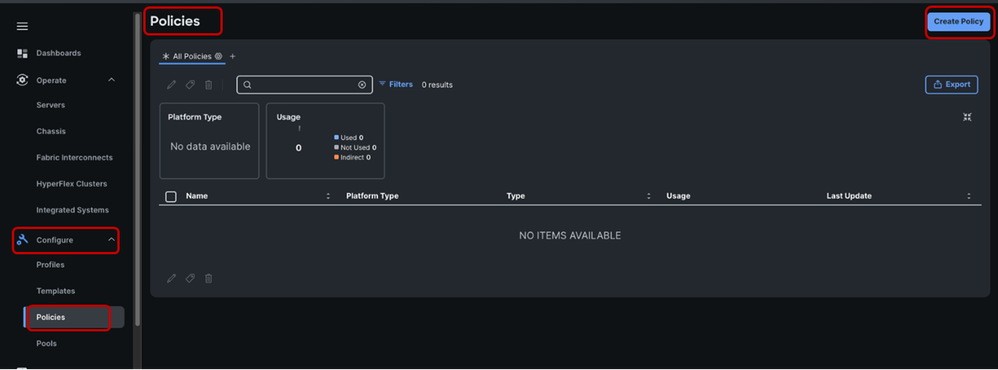
Navigate to the Configure section > Click Policies.
Navigate to the Policies window > Select Create Policy.
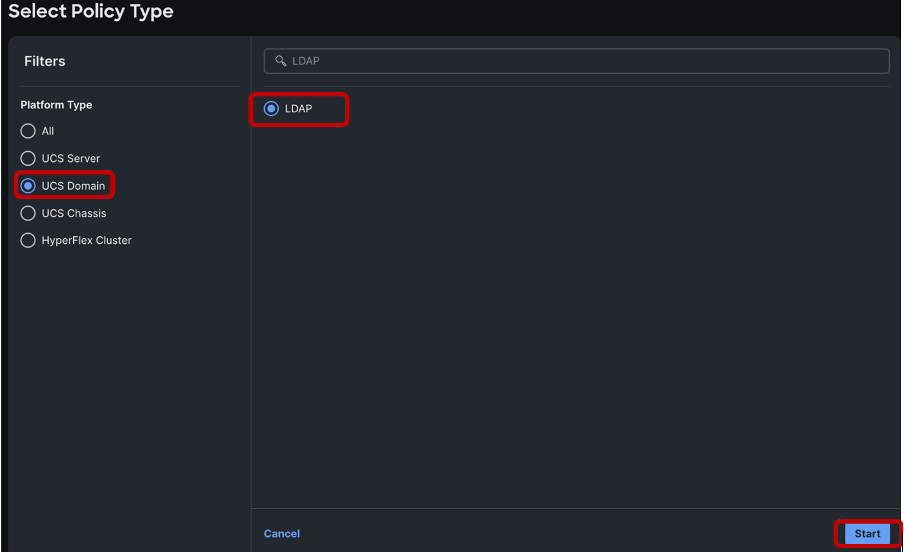
In the search bar, search for “LDAP”.
Select the LDAP radio button > Click Start.
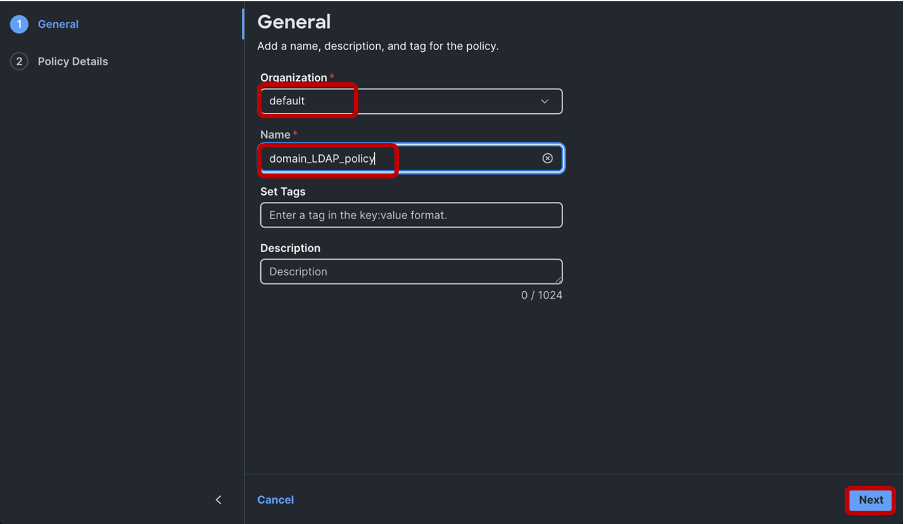
In the Create window > Choose your desired Organization > Name the LDAP policy > Click Next:
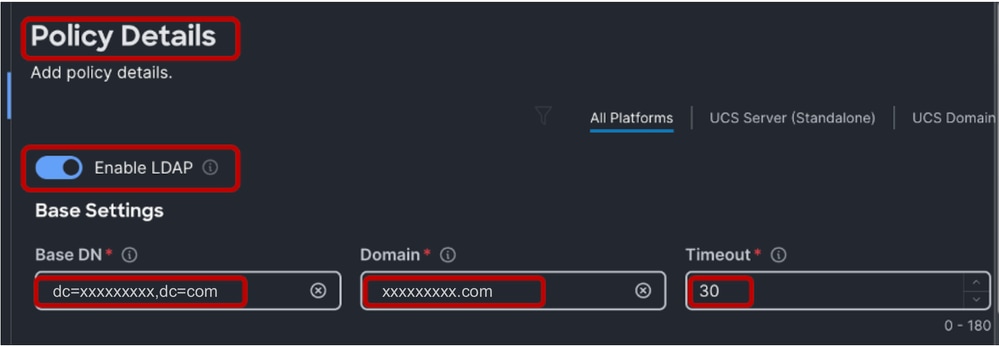
In the Policy Details section > Select the Enable LDAP slider > Populate the Base DN, Domain and Timeout values.
The Timeout values when set between 0 to 29, automatically defaults to 30 seconds. For this demonstration “xxxxxxxxx.com” is the desired domain already configured on the LDAP Server and a 30 second Timeout value has been specified.
To configure Secure LDAP, enable the Enable Encryption radio button.

Note: The usual LDAP configuration can utilise either an IP address or an FQDN, but a Signed Certificate is not a requirement. Therefore, when configuring "Standard" LDAP, the Enable Encryption option, DNS Server Network Connectivity Policy and a Certificate in Certificate Management Policy configurations can be ignored. Secure LDAP requires a DNS Server configured for LDAP server name resolution and a Root Certificate.

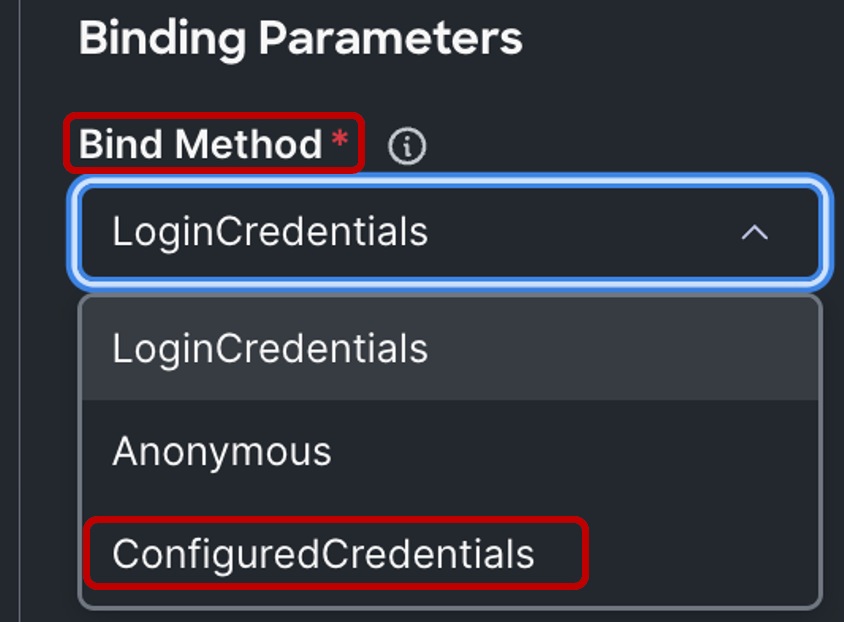
Under the Binding Parameters section, the default setting is LoginCredentials, which utilizes the individual authenticating the user LDAP credentials for the bind operation. This eliminates the need to configure a dedicated Bind User.
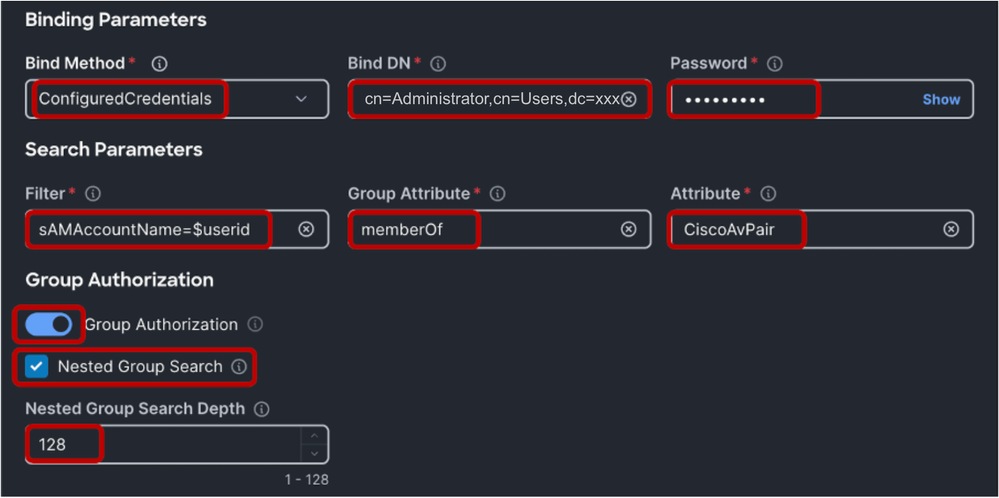
For this demonstration, a Bind user is configured. Therefore, the “Bind Method” is changed to “ConfiguredCredentials”.
Next, add a Bind DN (a Bind User) and the Bind User Password. This can be any user configure on Windows Active Directory. In this demonstration, the Administrator user is used.
‘cn=Administrator,cn=Users,dc=xxxxxxxxx,dc=com’.
In the Search Parameters section, under Filter, input “sAMAccountName=$userid”.
For Group Attributes add “memberOf” and in the Attribute field add “CiscoAvPair”. Depending on your LDAP server configuration, you can enable Group Authorization and Nested Group Search. For this demonstration the default Nested Group Search Depth at 128 is used.
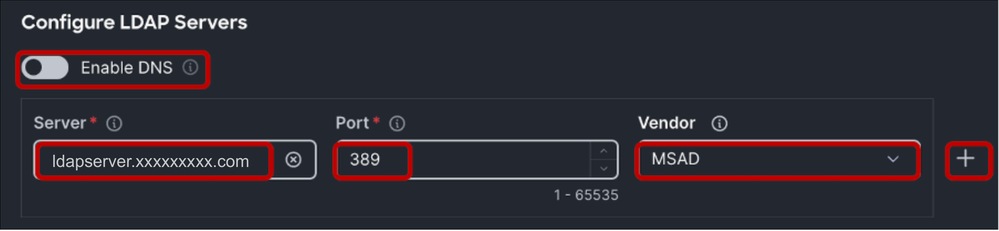
Within the “Configure LDAP Servers” section > Input the LDAP Server IP address or FQDN (required for Secure LDAP) and Port number (389).
Secure LDAP in UCS uses STARTTLS to enable encrypted communication using port 389.
Please note that modifying the port from 389 to 636 can cause authentication errors. Cisco UCS performs TLS negotiation on port 636 for SSL; however, the initial connection is always established unencrypted on port 389.
Select the LDAP Server Vendor. The available vendor options are OpenLDAP and MSAD (Microsoft Active Directory). For this demonstration, since the LDAP server in use is Windows Server 2019, MSAD is used.
Leave the Enable DNS button OFF as this option is not applicable to LDAP configuration in UCS Domain.
Multiple LDAP servers can be configured by clicking on the “+” icon to the extreme right of the Configured LDAP server.
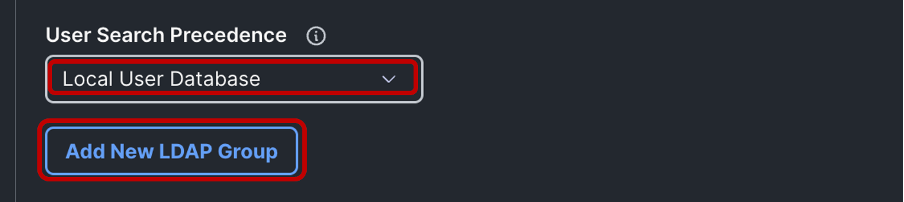
Note: You can keep the User Search Precedence as Local User Database or change it to LDAP User Database depending on your use case.
Next, proceed to add a Group DN corresponding to the group configured in the LDAP server, by clicking on Add New LDAP Group button.
Name the Group, add the Group DN received from the LDAP Server and select the desired End Point Role.
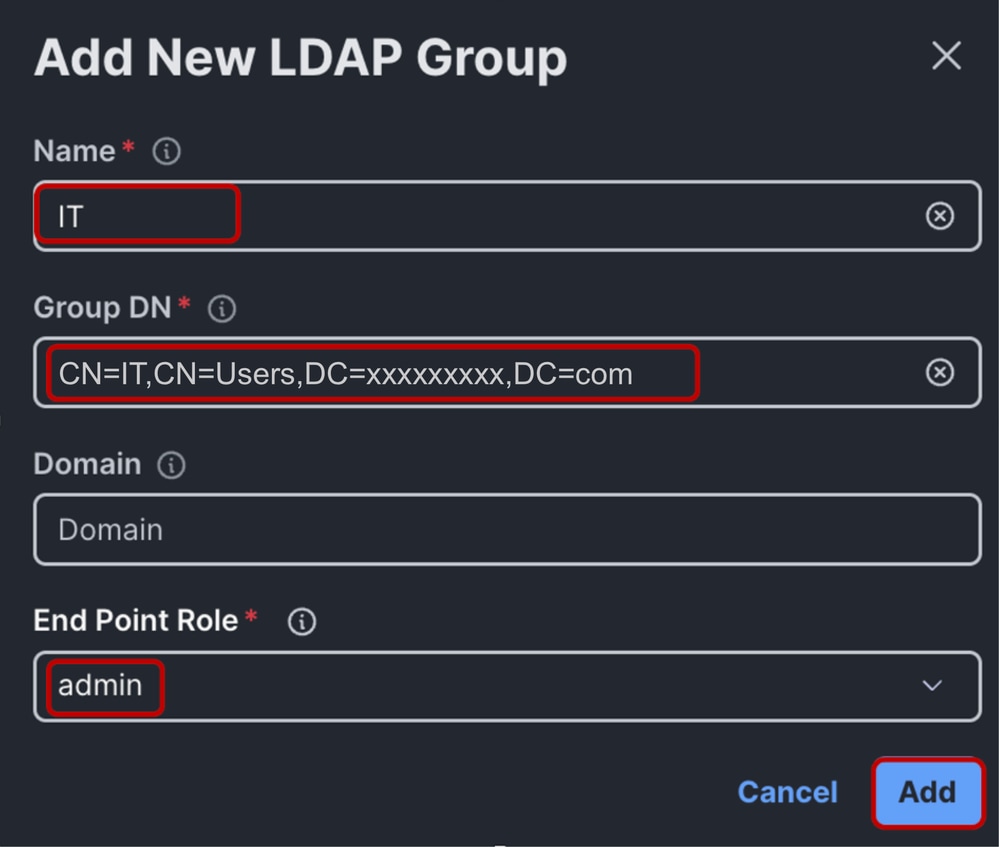
Click Add > Select Create to create the LDAP policy
Note: For Domain LDAP Policy Configuration, the only supported End Point Role is “admin” as of the time of this document creation.
Configure Network Connectivity Policy
Configure a DNS server for the UCS domain by creating a Network Connectivity Policy.
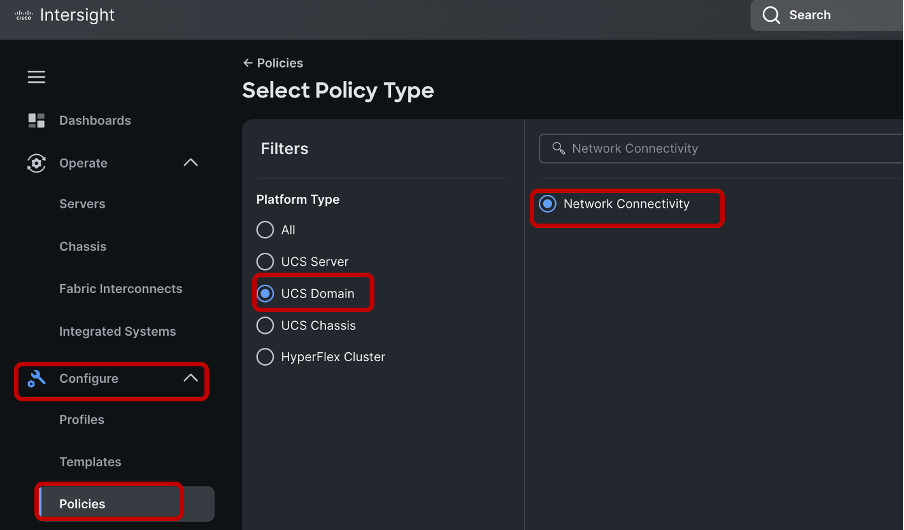
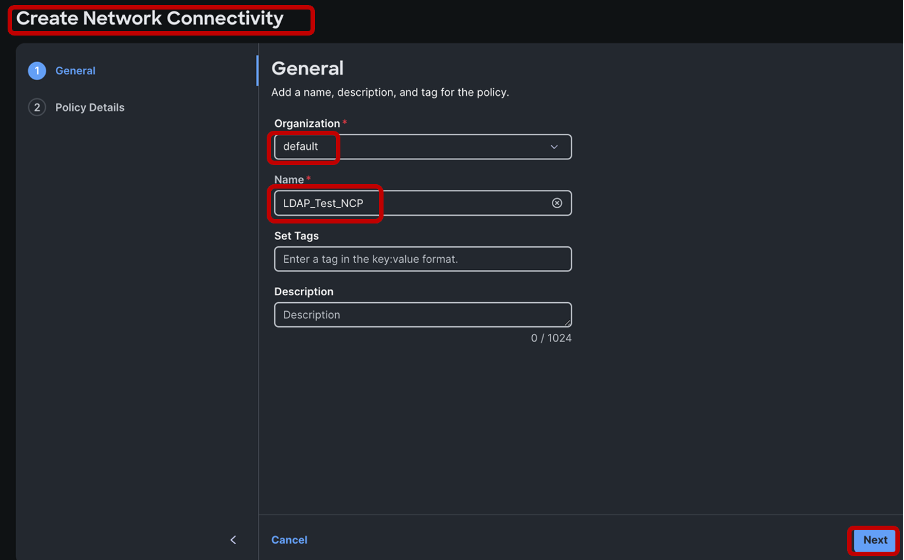
Select the appropriate organization > Enter the name of the policy > Click Next.
Define a Preferred DNS server IPv4 address and click Create to save the policy.
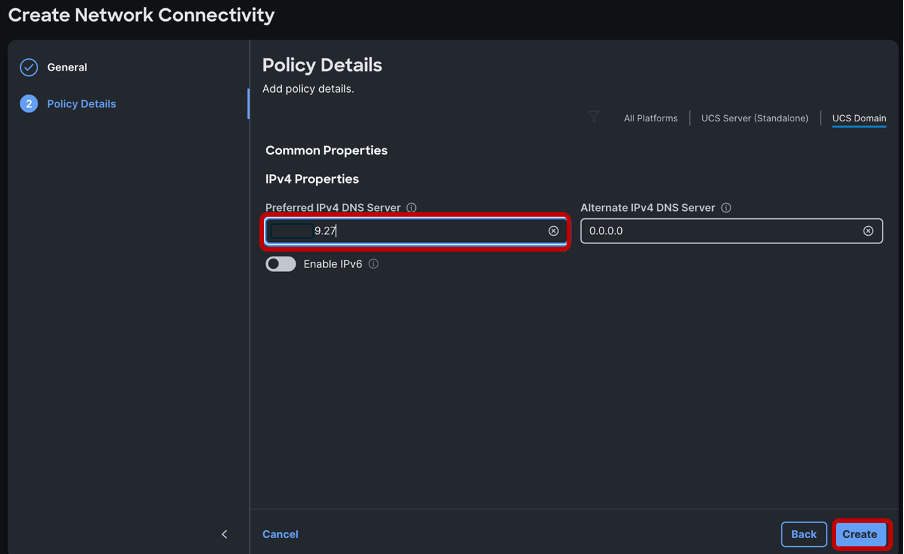
Ensure that a DNS server IP address is configured as well as reachable for name resolution. Ensure that name resolution is functional for the LDAP server and the Fabric Interconnects within the domain. For this demonstration, the DNS server is on the same Windows machine instance as the LDAP server.
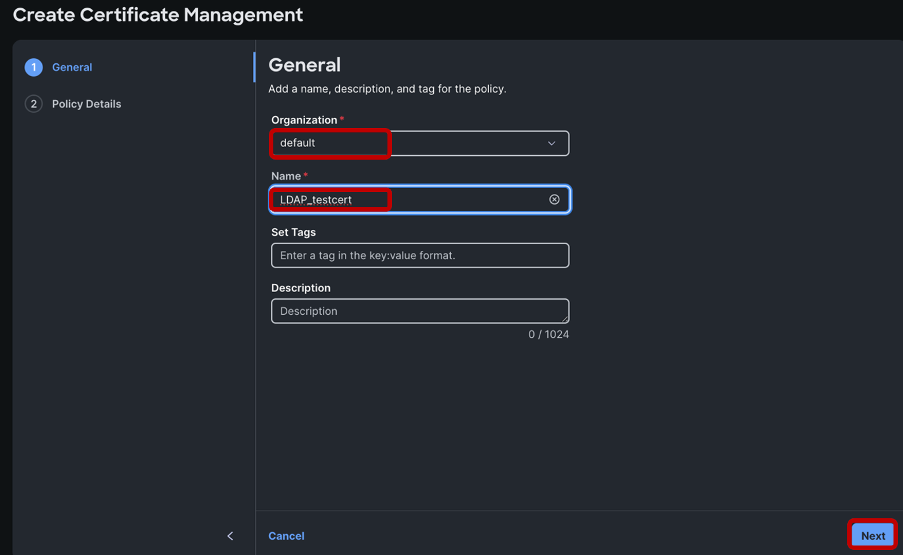
Configure Certificate Management Policy
Next configure a Certificate Management Policy. This is required for LDAP encryption to function.

Select the appropriate organization, name the policy > Click Next
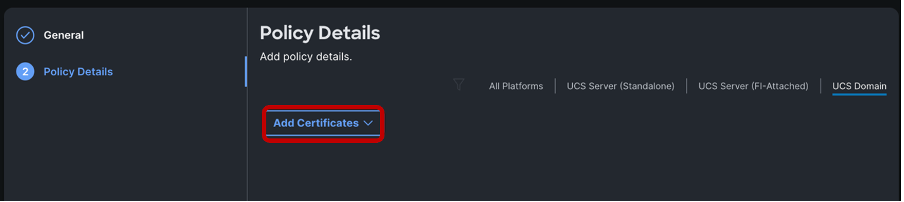
Click on Add Certificates.
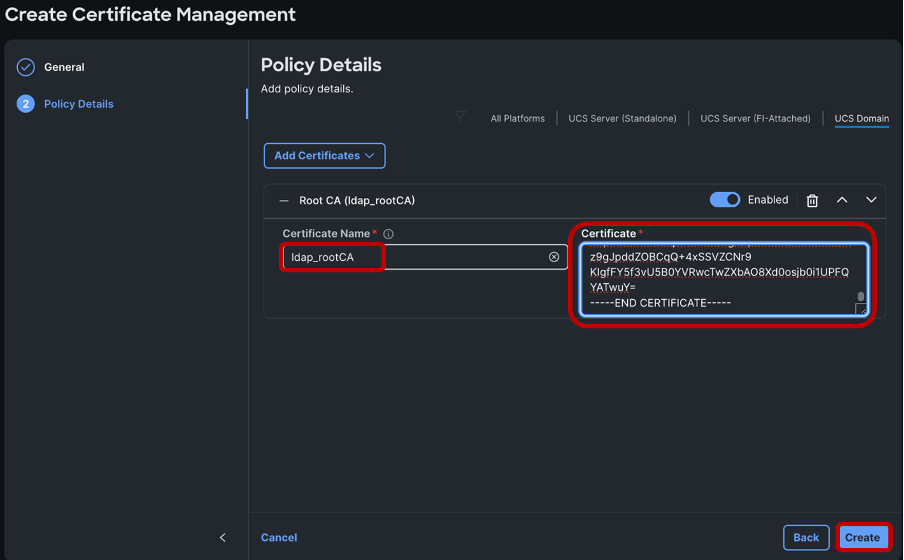
Name the certificate and paste in the Root Certificate from the Microsoft Active Directory Certificate Services.
Click Create.
After the LDAP, Network Connectivity and Certificate Management policies have been created, reference the newly created policies in the desired Domain Profile, under the “UCS Domain Configuration”, section as shown.

Click on Next, Save and Deploy the domain profile.
Upon successful domain profile deployment, secure LDAP configuration for IMM domain is complete.
Verification
To verify, attempt to log into the Device Console GUI and Fabric Interconnects CLI using one of the configured LDAP/Active Directory users.
Test Device Console Login
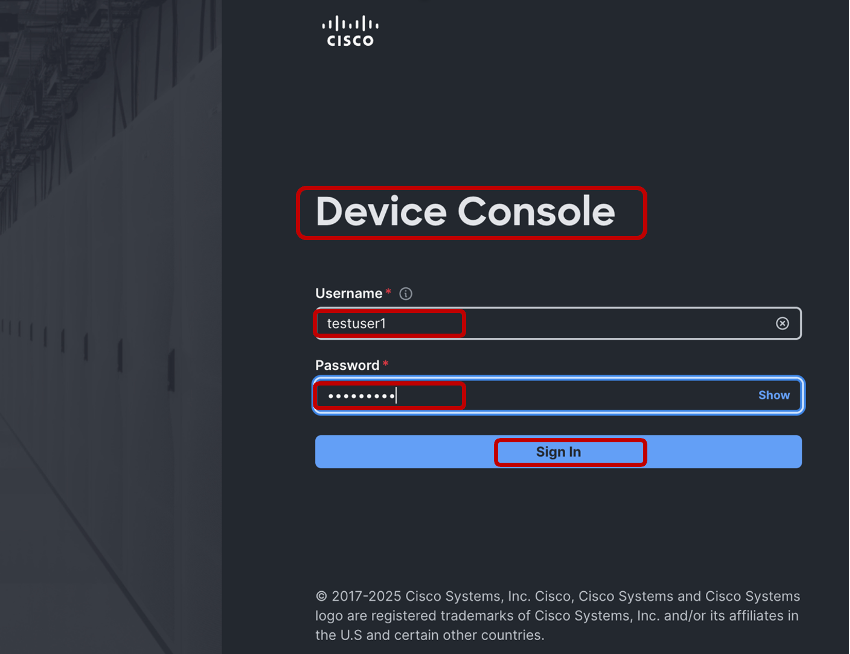
Testuser1 device console login is successful.

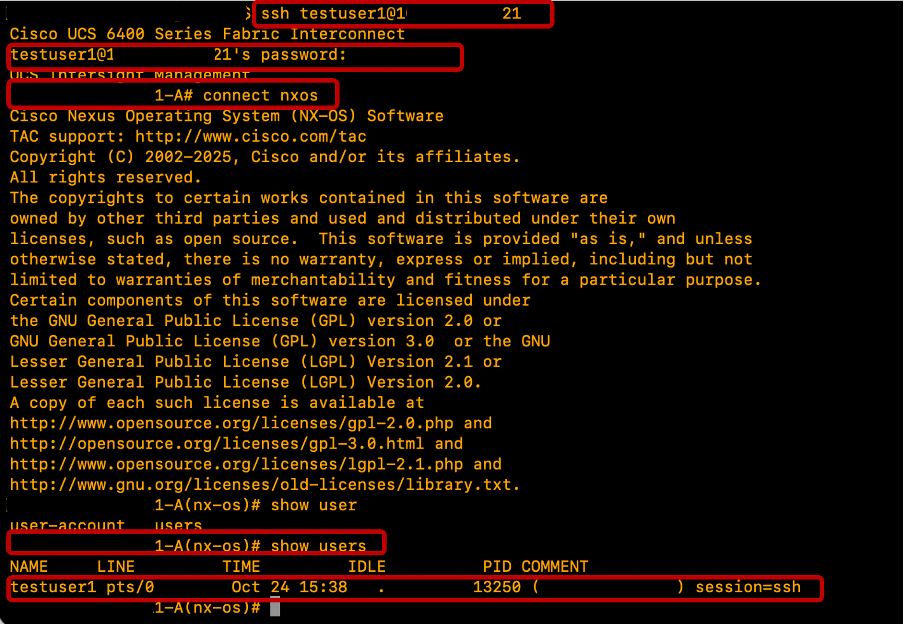
Test FIs SSH Login
Testuser1 SSH login is successful.
Related Information
Revision History
| Revision | Publish Date | Comments |
|---|---|---|
1.0 |
11-May-2026
|
Initial Release |
 Feedback
Contact Cisco
- Open a Support Case

- (Requires a Cisco Service Contract)