Upgrade UCS Server using UCS Manager
Available Languages
Contents
Introduction
This document describes how to upgrade Unified Computing System (UCS) servers through UCS Manager Graphical User Interface (GUI).
Prerequisites
Requirements
Cisco recommends that you have knowledge of these topics:
- UCS B/C/X series
- UCS Manager
Components Used
In the next example these components and versions were used:
- UCS Manager 4.3(6c)
- UCS B200 M5:
- Source server software bundle 4.2(1n)
- Target server software bundle 4.2(3o)
The information in this document was created from the devices in a specific lab environment. All of the devices used in this document started with a cleared (default) configuration. If your network is live, ensure that you understand the potential impact of any command.
Background Information
The process to upgrade a UCS Series Server via UCS Manager can be done in multiple simple ways, however some points need to be reviewed prior to executing a successful firmware upgrade.
UCS Server and UCS Manager Compatibility
The first step before starting a firmware upgrade, is to verify the compatibility of the current UCS Manager version with the target Server Firmware version.
Cisco has enabled a tool to simplify this, the UCS Manager Cross Version Matrix.
This publicly enabled tool simplifies the selection of the target firmware version. Nonetheless, as a best practice, Cisco recommends to set the UCS Server firmware at the same level as the UCS Infrastructure (UCS Manager, Fabric Interconnects or FIs, IOMs) to ensure optimal compatibility. This step is key, as some newer versions often does not support deprecated hardware or firmware versions.
The next information is necessary for this tool:
- Fabric Interconnect model
- Running UCS Manager version - Referred as Infrastructure (A Bundle)
- Target Server Firmware Version. - Referred as Host FW (B/C Bundles)

Note: This tool can be utilized to plan and validate the compatibility for future firmware upgrades.
For this example the next information is used:
- Fabric Interconnect model = Cisco UCS 6454 FI
- Infrastructure (A Bundle) = 4.3(6)
- Host Firmware (FW) = 4.2(3).

Note: In Image 1, under Supported Configuration, the Yes status is displayed with a green checkmark. This confirm the compatibility between the current Fabric Interconnect model, Infrastructure A bundle, and server firmware version.
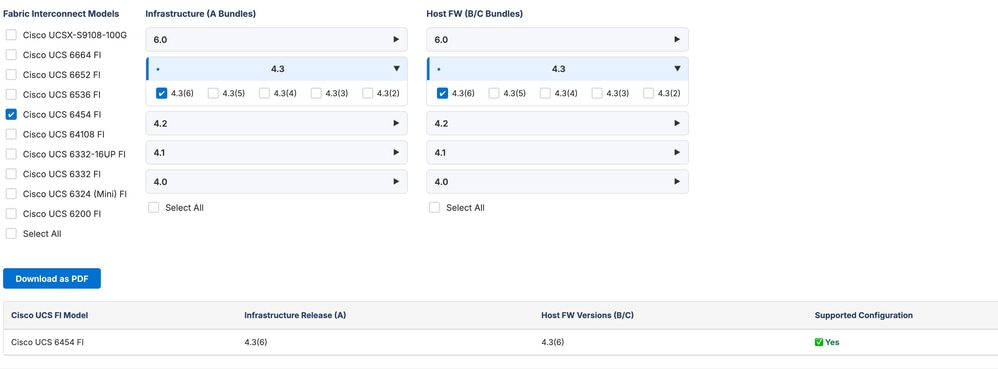
Image 1: UCS Manager Cross Version Matrix Tool
A "No" status, indicates that the Infrastructure A bundle require to be updated to become compatible with the target server firmware version.
Important notes are displayed at the bottom of the screen. This notes are useful to prevent issues in specific scenarios.

Image 2. UCS Manager Cross Version Matrix
The UCS Manager Cross Version Matrix can be used to plan and validate the compatibility between Infrastructure A bundle version and target Server Firmware version.
This tool can be used in 2 more ways.
Validate All Server Firmware (Host FW B/C Bundles) Versions Compatible with Current Infrastructure (A Bundle)
To view all Server Firmware (Host FW B/C Bundles) compatible the existing Infrastructure A, click Select All check box at the Host FW (B/C Bundles)
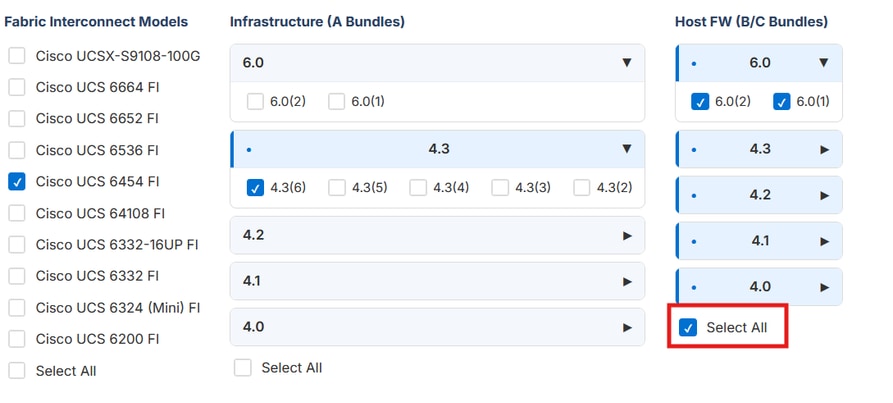
Image 3. UCS Manager Cross Version Matrix - Select all Host FW (B/C Bundle).
The tool presents the compatible Server Firmware (Host FW B/C Bundles) tagged with Yes and a green checkmark in the Supported Configuration column.
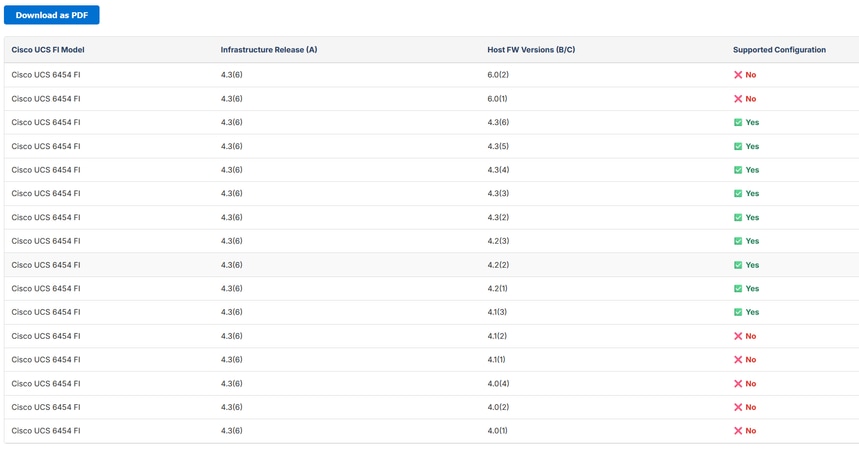
Image 4. UCS Manager Cross Version Matrix - Select all Host FW (B/C Bundle) - Output
Validate All Infrastructure (A Bundle) Versions Compatible with Current Server Firmware (Host FW B/C Bundle)
To view all compatible Infrastructure A bundles for the target server firmware, click Select All within the Infrastructure version section.
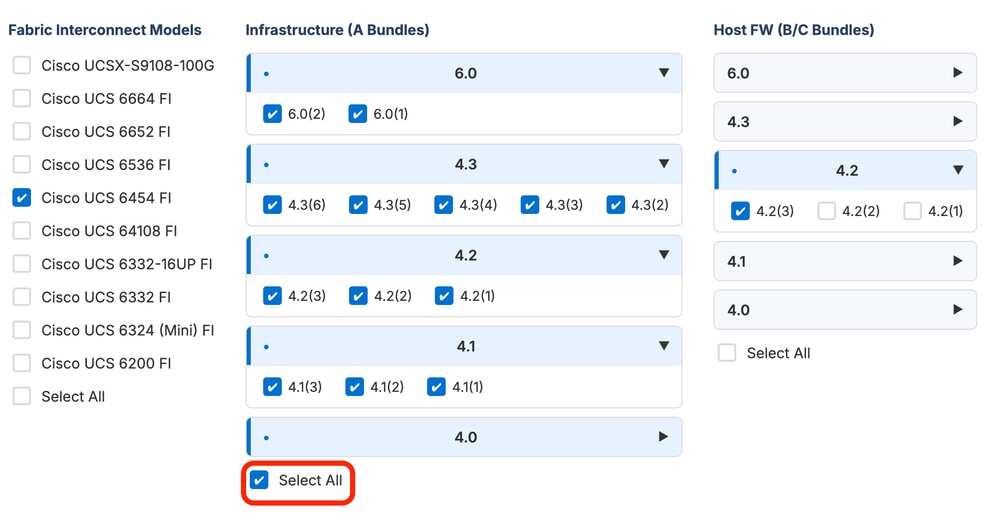
Image 5. UCS Manager Cross Version Matrix - Infrastructure (A Bundle)
The tool presents the compatible Infrastructure versions tagged with Yes and a green checkmark in the Supported Configuration column.
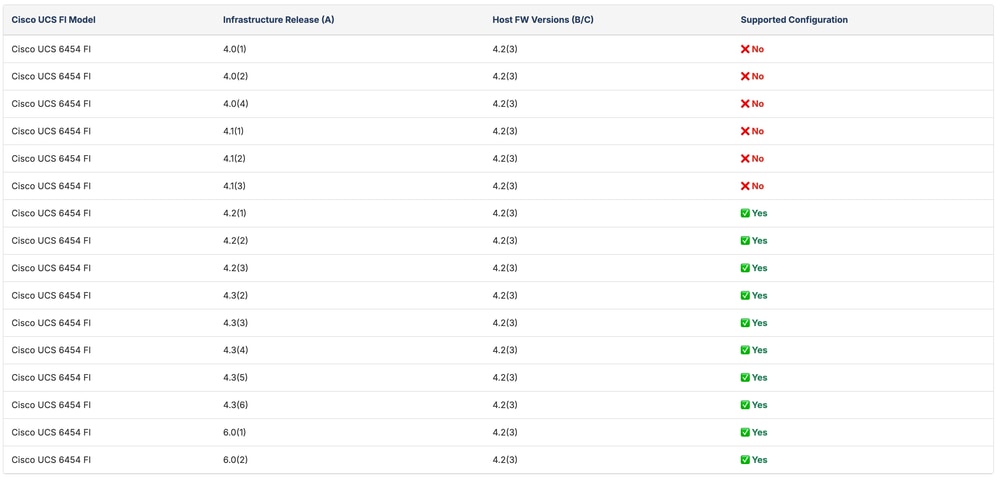
Image 6. UCS Manager Cross Version Matrix - Infrastructure (A Bundle) - Output
Note: If an Infrastructure Bundle upgrade is required, it is recommended to review the Release Notes for UCS Manager, Firmware/Drivers, and Blade BIOS for your target Infrastructure bundle version. Additionally, verify your hardware compatibility using the Related Documentations. Once compatibility is confirmed, proceed with the Infrastructure A Bundle upgrade by following the steps outlined in the Upgrade UCS Manager article.
After all prerequisites are met, the next step is to obtain the Firmware Bundle and upload to UCS Manager.
Manage Server Software Bundle
Download the Server Software Bundle
1. Go to the Cisco Software Download website and select the appropriate server type:
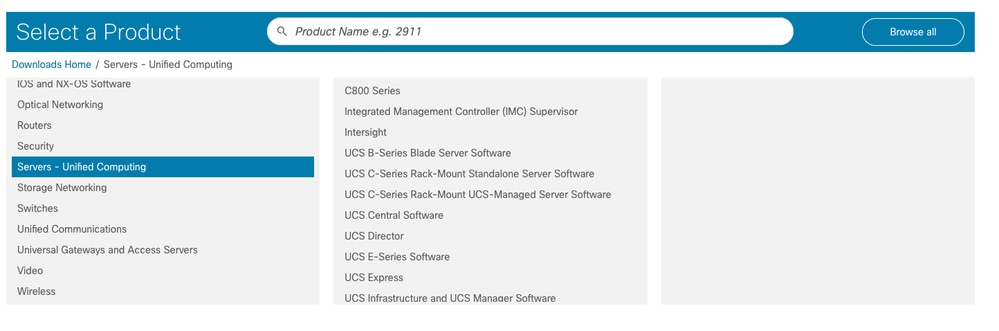
Image 7. Cisco Software Download Website
- For B and X serires: UCS B-Series Blade Server Software
- For C series integrated to UCS Manager: UCS C-Series Rack-Mount UCS-Managed Server Software
2. Select Unified Computing System (UCS) Server Software Bundle, select the target version and download the bundle.
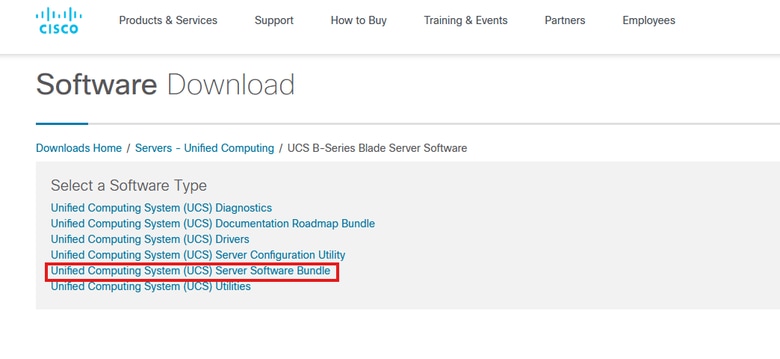
Image 8. Cisco Software Download - Select Unified Computing System (UCS ) Server Software Bundle
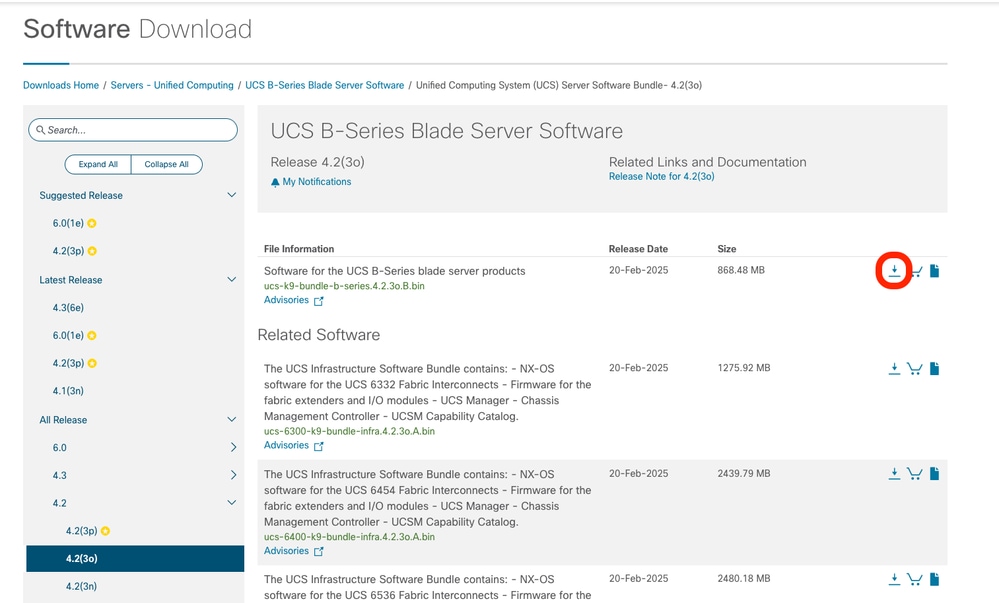
Image 9. Cisco Software Download - Select Firmware Version.
Upload the Server Software Bundle into UCS Manager
1. Log in to UCS Manager.
2. Navigate to Equipment > Firmware Management > Download Tasks and click on Download Firmware.
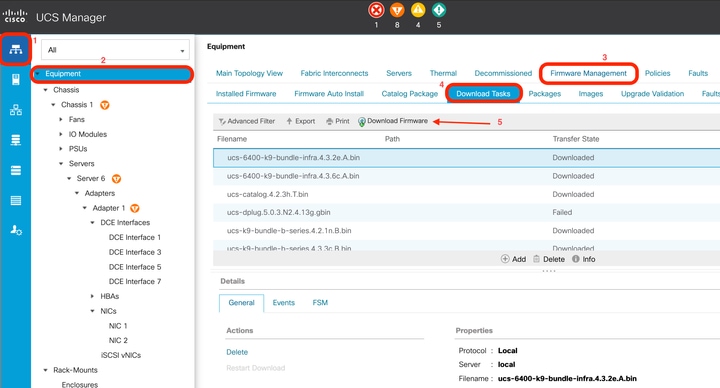
Image 10. Upload Firmware Bundle to UCS Manager.
3. Click on Local File System and Browse.
4. Select the downloaded bundle and click OK.
After the firmware bundle is uploaded, it is copied en each Fabric Interconnect automatically.
The next step is to execute the UCS Server upgrade.
Upgrade UCS Server
For UCS servers managed by UCS Manager, there are three primary upgrade methods available:
- Host Firmware Policy - Upgrades the server IMC, Network Adapters, BIOS and Controllers on the server, using a policy and including it in the service profile associated to the server.
- Firmware Autoinstall - Uses the Cisco UCS Server Software Bundle to upgrade all servers in the Cisco UCS domain. All components are upgraded to the firmware version included in the selected Cisco UCS Infrastructure Software Bundle.
- Manually - Allows the firmware modification of different components individually or in a bundle. It only recommended as a last resort, when the upgrade of the firmware of a specific component is needed. This method is not supported when a Host Firmware Policy is in use. When a service profile is associated with a Host Firmware Policy, the system enforces automated firmware management.
Before the execution of the server firmware upgrade, the next is a best practice to minimize impact of the upgrade.
Create and Apply a Maintenance Policy (Recommended)
A maintenance policy determines a pre-defined action to take when there is a disruptive change made to the service profile associated with a server. The maintenance policy specifies how Cisco UCS Manager deploys the service profile changes. During a firmware upgrade, creating a maintenance policy and selecting a reboot policy defines when the server must reboot once the changes are applied.
- The Immediate option makes the server to reboot without prompting for any user acknowledgement.
- The User acknowledge option accepts manual acknowledgement from user before rebooting the server.
- The Timer Automatic option triggers the reboot at a specific time mentioned in a schedule.
Associating a Maintenance Policy prevents unexpected server reboots during the upgrade process.
Find more about Maintenance Policies in the Cisco UCS Manager Administration Management guide.
To configure a Maintenance Policy:
1. Go to Servers > Maintenance Policies.
2. Click + Add at the bottom of the main pane and fill in the details. Select User Ack in the Reboot Policy and select On Next Boot policy.
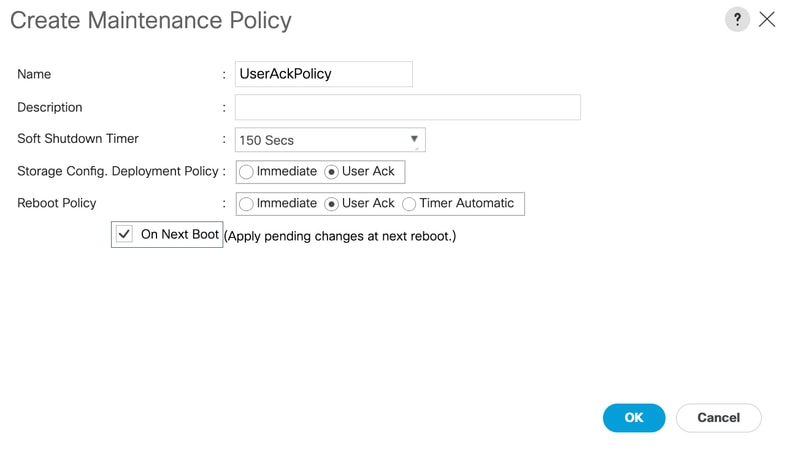
Image 11. Maintenance Policy Wizard
3. Click OK to save.
4. Go to Servers > Service Profile and click Change Maintenance Policy.
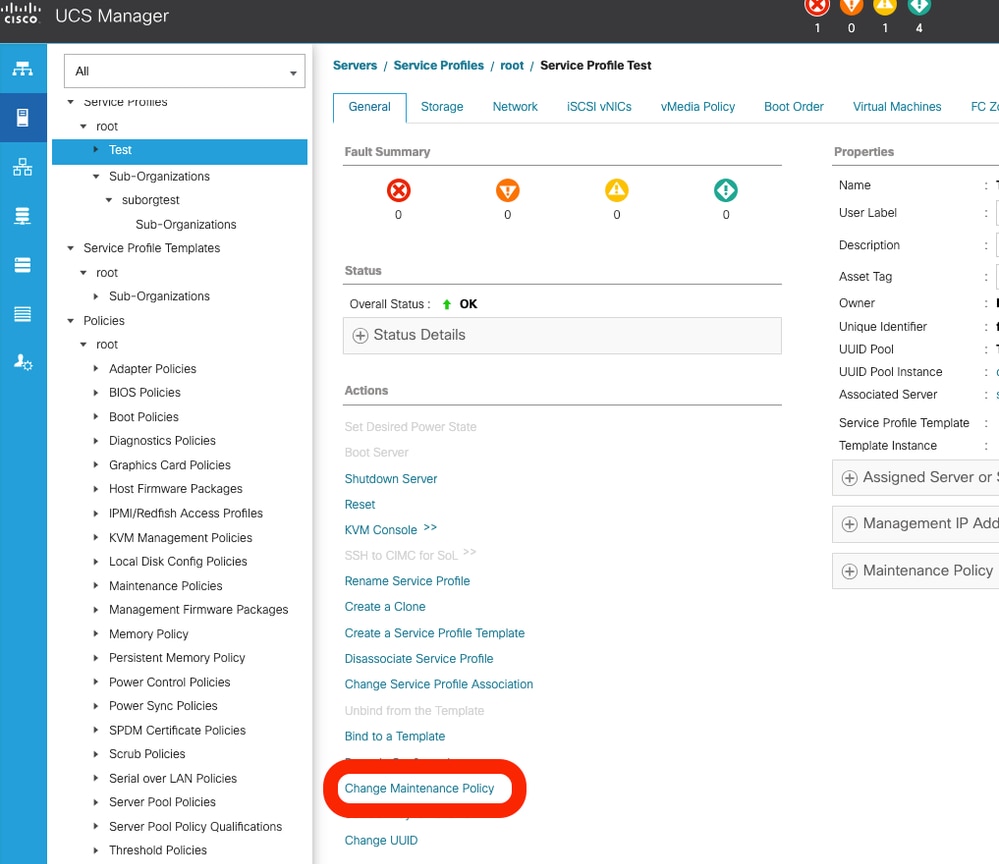
Image 12. Change Maintenance Policy in UCS Manager.
5. Select the Maintenance Policy created and click OK.
When the Maintenance Policy is configured with the Reboot Server - User Ack setting, the system displays an alert in the top-right corner of the interface. This requires manual confirmation before the server reboot sequence is initiated, allowing you to manage downtime according to your operational schedule.
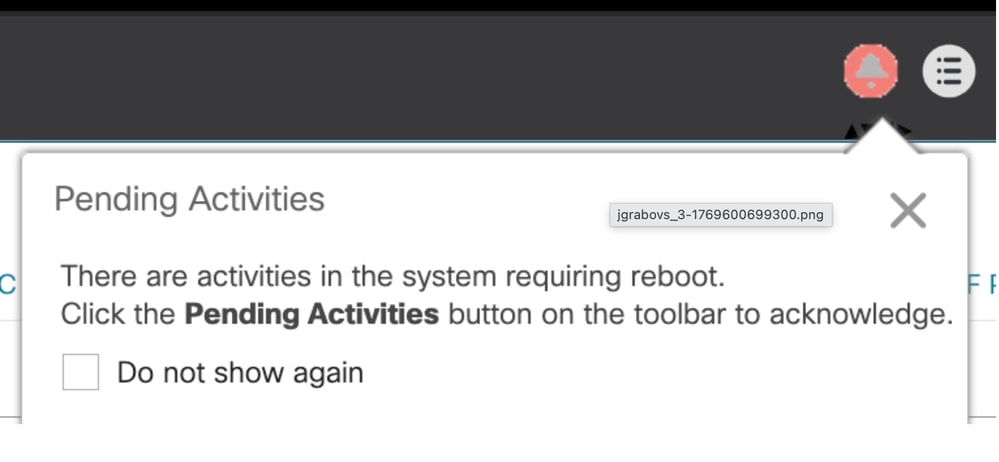
Image 13. Pending Activities - User Ack
Method 1: Upgrade UCS Server Using a Host Firmware Policy
Create the Firmware Policy
1. Go to Servers > Policies > Host Firmware Packages.

Image 14. Host Firwmare Package in UCS Manager
2. Click on + Add in the bottom of the main pane.
3. Create the firmware policy with the details of the bundle uploaded.
4. Select the respective bundle version for the blade and/or rack package.
Note: In this example, only Local Disk was selected in the Excluded Components section. Other components are often selected to exclude them from the upgrade.
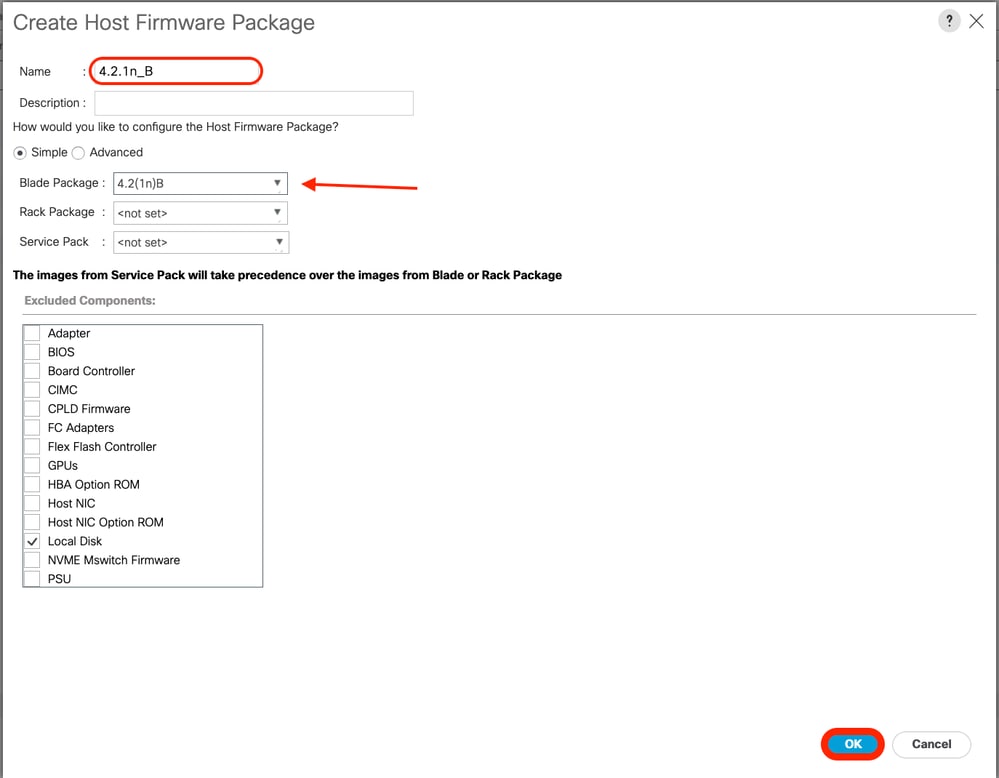
Image 15. Create Host Firmware Package
3. Click OK.
Apply the Firmware Policy
1. Go to Servers > Service Profile > Policies.
2. In Firmware Policies, select the Host Firmware Policy created in Creating the Firmware Policy.
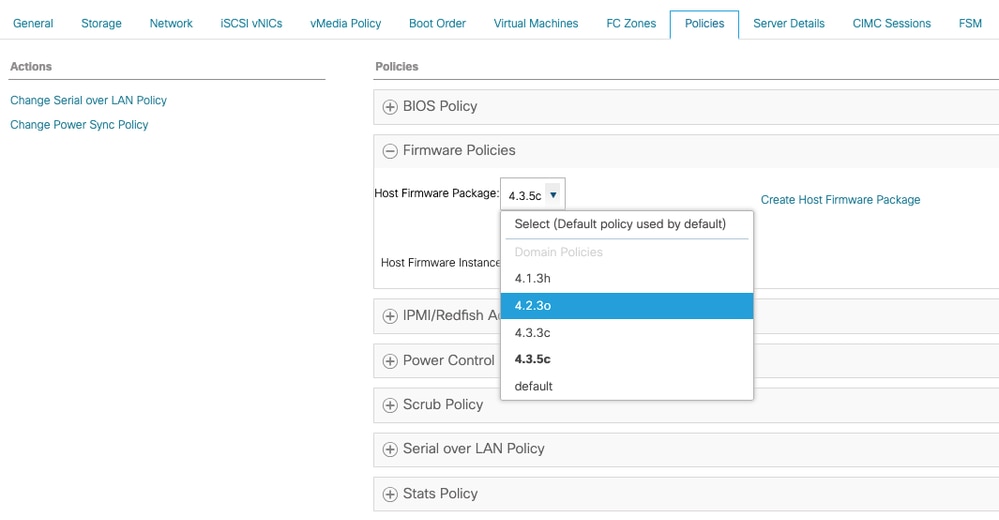
Image 16. Apply Host Firwmare Package
3. Click Save Changes.
The upgrade starts as soon as you save the changes.
Method 2: Upgrade the UCS Server using Auto Install
1. Go to Equipment > Firmware Management > Firmware Auto Install.
2. Select Install Server Firmware to initiate a wizard.
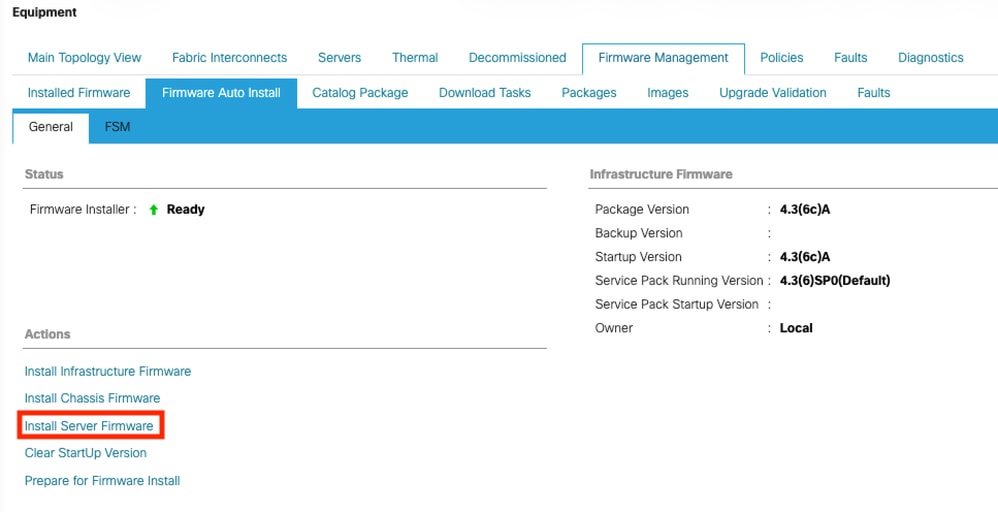
Image 17. UCS Manager - Server Firmware - Auto Install
3. In the Select Package Versions step, select the New Version for B and/or C series servers. In this example 4.2(3o)B series package is selected. Click Next.
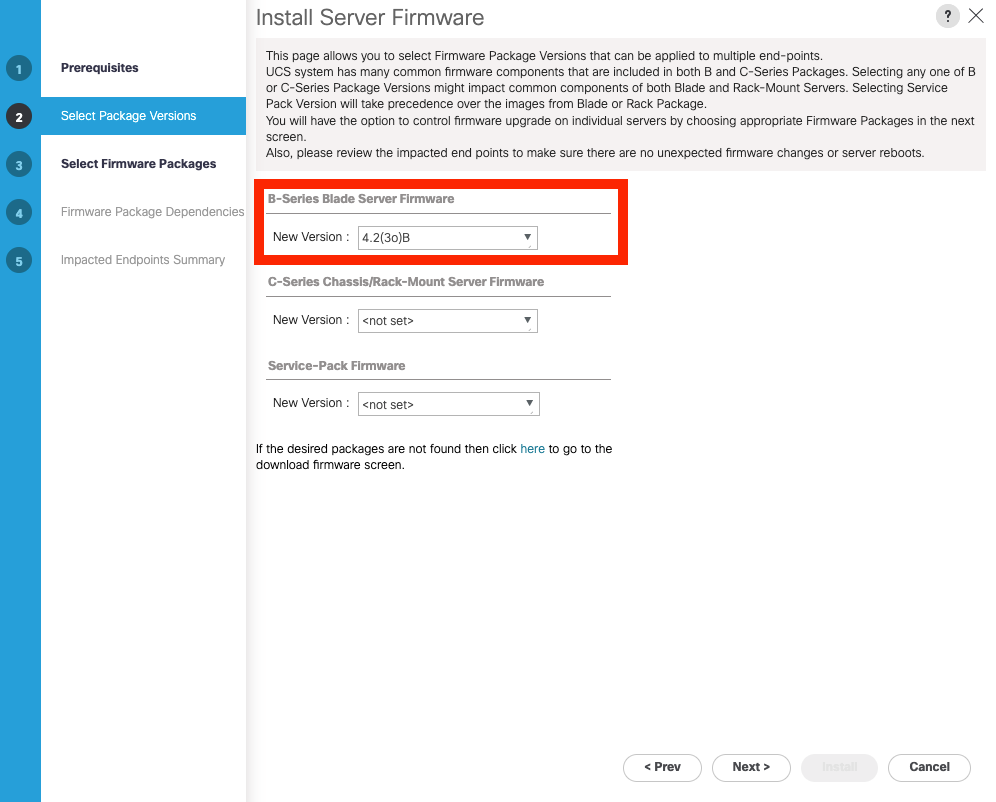
Image 18. Auto-install: Set Blade Server Firmware
4.In the Host Firmware Packages step, select the Organization containing the servers intended for upgrade. Only servers associated with the selected Organization upgrades. In this example, root was selected to upgrade all servers. This upgrade includes servers with and without a service profile associated.
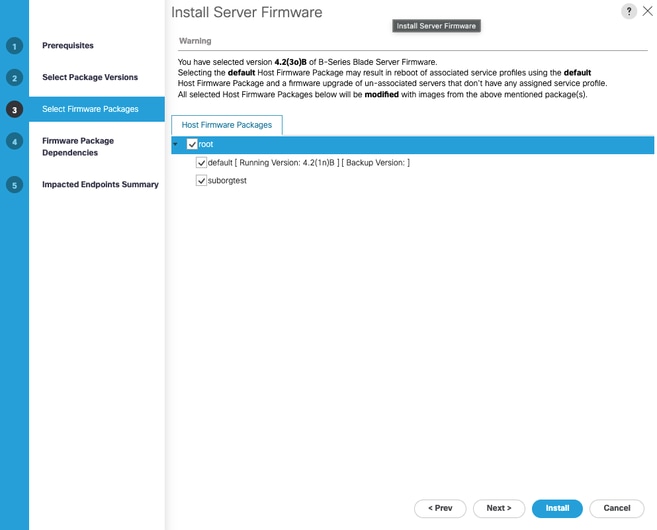
Image 19. Auto-install: Select Firwmare Package
5. Click Next. Section 4 - Firmware Firmware Dependencies shows the Service profiles that are impacted.
6. Click Next. Section 5 - Impacted Endpoint Summary shows the servers that are impacted by the auto install.
7. Click Install.
The upgrade begins.
Method 3: Upgrade the UCS Server Manually
Note: For small environments, this method is OK. In medium and large environments, however, it is generally discouraged as a best practice. Frequent use without proper change registration can lead to loss of firmware version tracking, undermining the consistency required for software compliance and compatibility, particularly in environments where multiple departments manage different layers of the infrastructure, such as the host OS, virtual machines, or other components that often later require updates dependent on the underlying firmware version.
1. Go to Equipment > Chassis > Chassis (id) > Servers > Server (id)
2. Select the Install Firmware tab. This displays a table containing the firmware versions of each component on the server.
3. Click on Update Firmware.
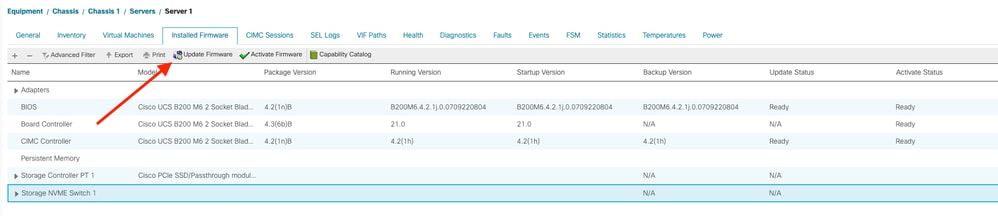
Image 20. Server Installed Firwmare
4. Select the Bundle radio button and select the target version in the dropdown.
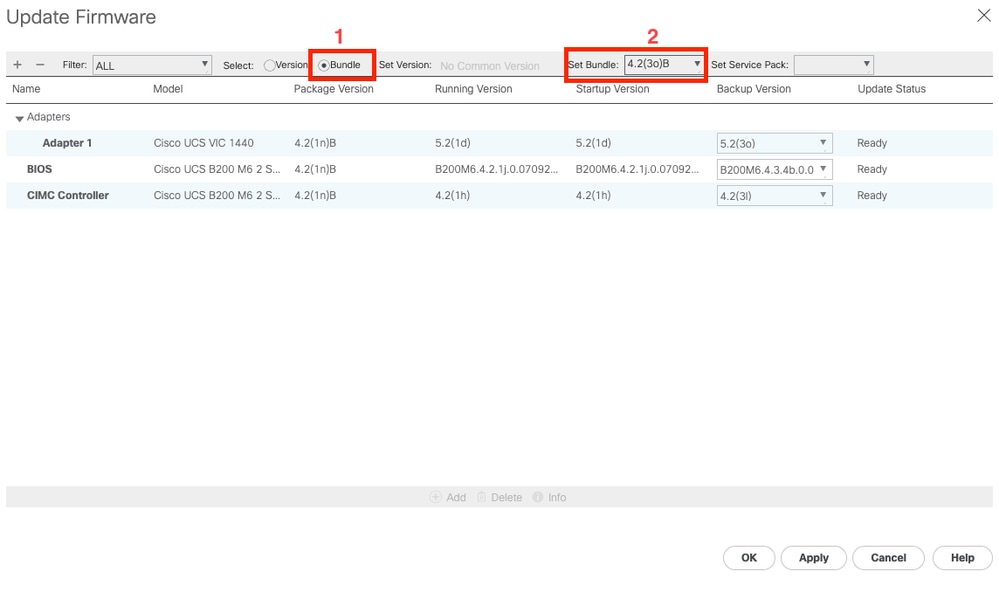
Image 21. Set Firmware Bundle for Backup
Note: The dropdown selector allows the selection of the version of each component individually(Adapter, BIOS, etc).
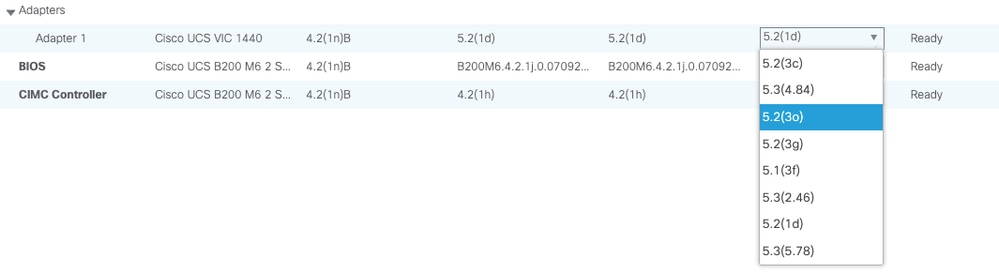
Image 22. Set Individual Component Firmware Version.
5. Click Apply and OK.
6. Navigate to the FSM tab and monitor the progress until the task reaches 100% completion.
7. Go to Installed Firmware tab and click on Activate Firmware.
8. For each component select the version shown in the backup version column from the main pane.
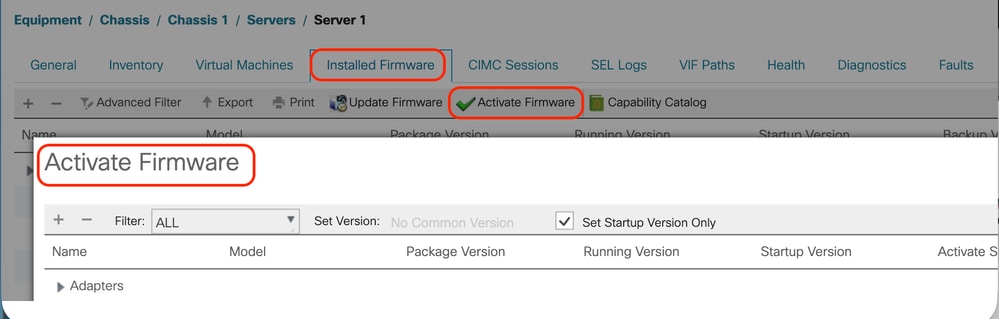
Image 23. Activate Firmware
9. Click Apply and Ok. The upgrade starts.
Verification
Go to Equipment > Chassis > Chassis (id) > Servers > Server (id) > FSM tab and observe the upgrade process. A Progress Status of 100% shows a complete upgrade process.
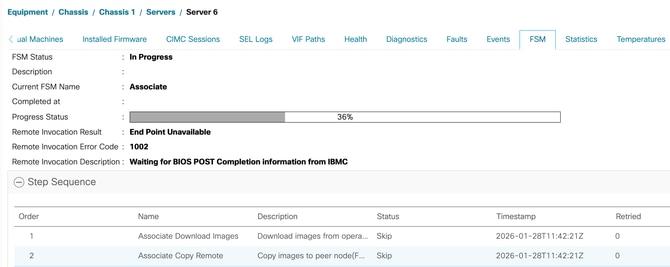
Image 24. FSM
In the Installed Firmware tab, observe the installed firmware on the selected server. The Package Version column contains the target Host Firmware version.
Note: The Board Controller does not support downgrading, but is backwards compatible. The presented server was upgraded to a higher version and downgraded, shown by a higher Package Version for the Board Controller.
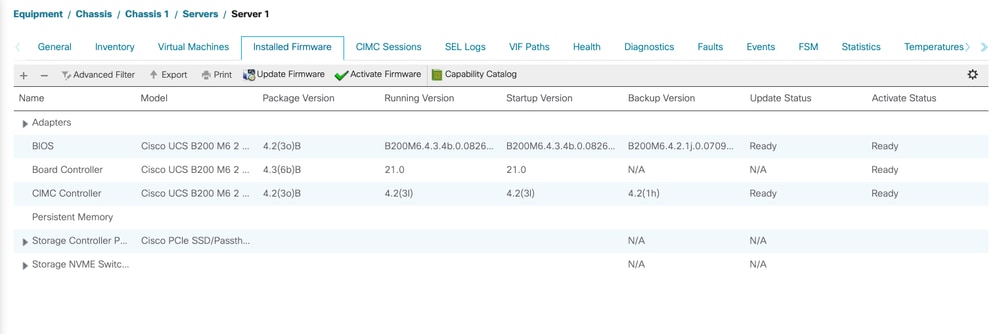
Image 25. Firwmare Installed and Activated.
Revision History
| Revision | Publish Date | Comments |
|---|---|---|
3.0 |
06-Jun-2026
|
Added contributors. |
2.0 |
29-May-2026
|
Updated alt text, trying to republish to fix some formatting, fixed TOC. |
1.0 |
13-May-2026
|
Initial Release |
 Feedback