Introduction
This document describes the process of integrating the Secure Web Appliance (SWA) to Security Management Appliance (SMA).
Prerequisites
Requirements
Cisco recommends knowledge of these topics:
- Access ToGraphic User Interface (GUI)of SWA.
- Administrative Access to the SWA.
- Administrative Access to the SMA.
Components Used
This document is not restricted to specific software and hardware versions.
The information in this document was created from the devices in a specific lab environment. All of the devices used in this document started with a cleared (default) configuration. If your network is live, ensure that you understand the potential impact of any command.
Before you Begin
1. Make sure the SMA and SWA are both licensed.
2. Check the compatibility matrix of the SWA and SMA, use this link: SWA-SMA-ESA Compatibility Matrix.
Note: Make sure the version you are planning to integrate is not deprovisioned.
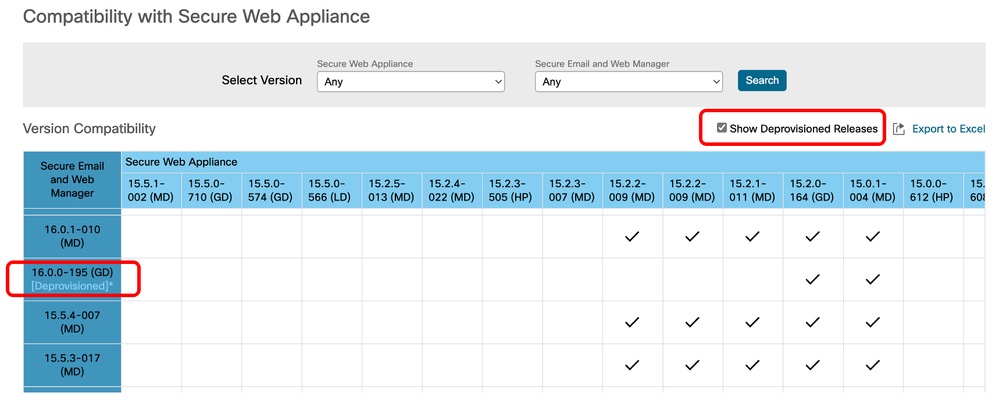 Image - Deprovisioned Releases
Steps to Integrate SWA to SMA
Step 1. Export the Configuration File from SWA
|
Step 1.1. From the GUI, Navigate to System Administration and choose Configuration File.
Step 1.2. Make sure Download file to local computer to view or save is selected.
Step 1.3. Choose Encrypt passwords in the Configuration Files.
Step 1.4. (Optional) Choose a name for the configuration file.
Step 1.5. Click Submit.
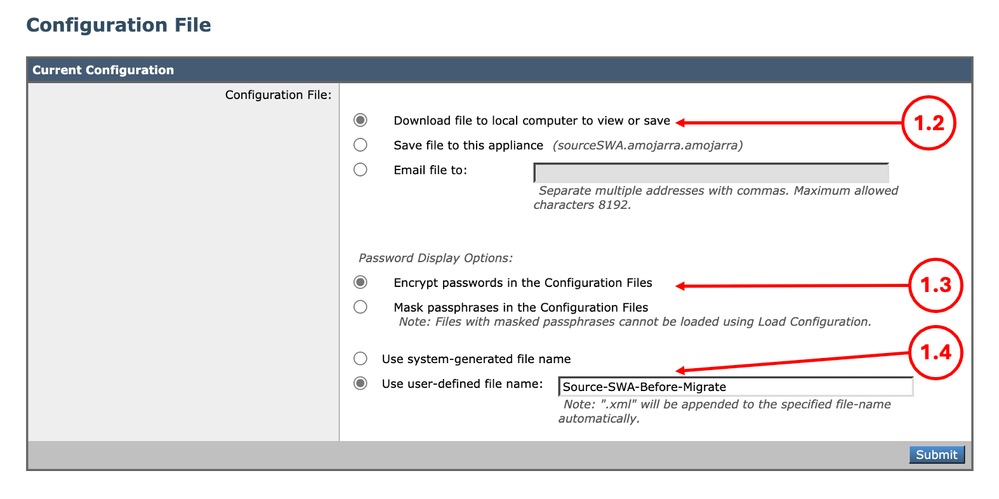 Image - Exporting the configuration File Image - Exporting the configuration File
|
Step 2. Create the Configuration Manager
Note: If the Configuration Manager is already in configured in the SMA, skip to Step 4.
|
Step 2.1. From the SMA GUI Click on the Web tab.
Step 2.2. From Utilities select Configuration Manager.
Step 2.3. If the Configuration manger is not Initialized yet, click on the Initialize link for the desired Configuration Manager, else skip to Step 2.5.
Tip: The Configuration Manager version must align with the first two segments of your SWA version. For example, if your SWA version is 15.5.0-710, you must use Configuration Manager 15.5.
Step 2.4. Select Use default settings and click Initialize.
Step 2.5. Click Import Configuration for the desired Configuration Manager.
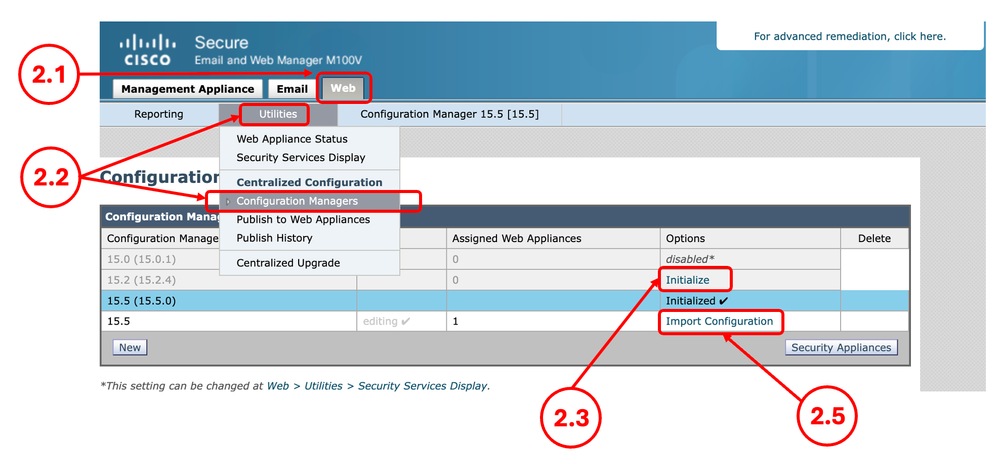 Image - Configuration Manager Image - Configuration Manager
Step 2.6. From the Select Configuration Source choose Web Configuration File.
Step 2.7. Select the configuration file you exported on Step 1.
 Image - Import Configuration Image - Import Configuration
Step 2.8. Click Import.
Step 2.9. Commit the changes.
|
Step 3. Configuration Manager Settings
|
Step 3.1. From the SMA GUI Click on the Web tab.
Step 3.2. From Utilities select Security Services Display.
Step 3.3. Make sure the desired features are configured correctly, you can enable or disable the features from Edit Display Settings.
Step 3.4. If you made any changes, Submit and Commit.
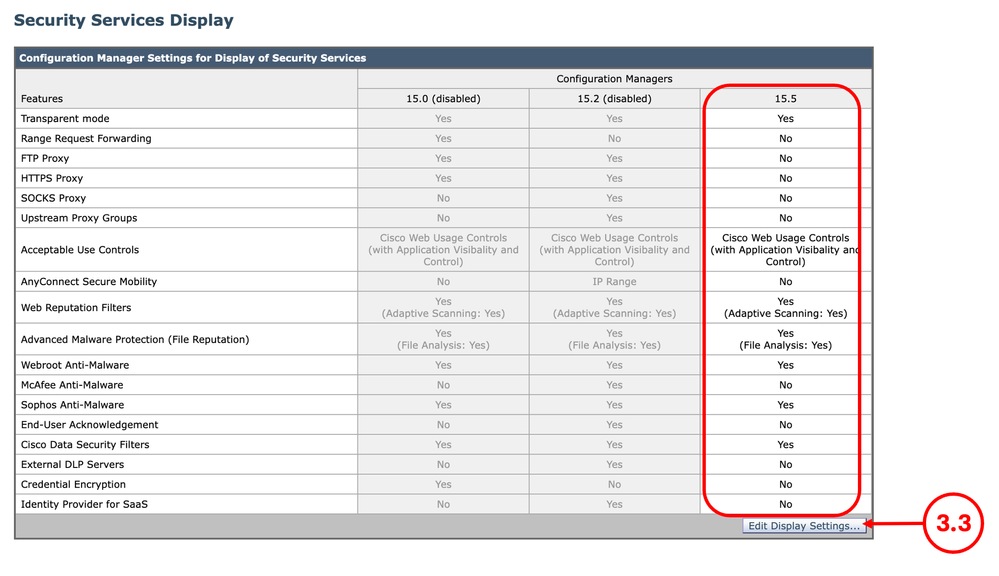 Image - Security Services Display Image - Security Services Display
|
Step 4. Add Web Appliance
|
Step 4.1. From the SMA GUI Click on the Management Appliance tab.
Step 4.2. From Centralized Services select Security Appliances.
Step 4.3. Click Add Web Appliance
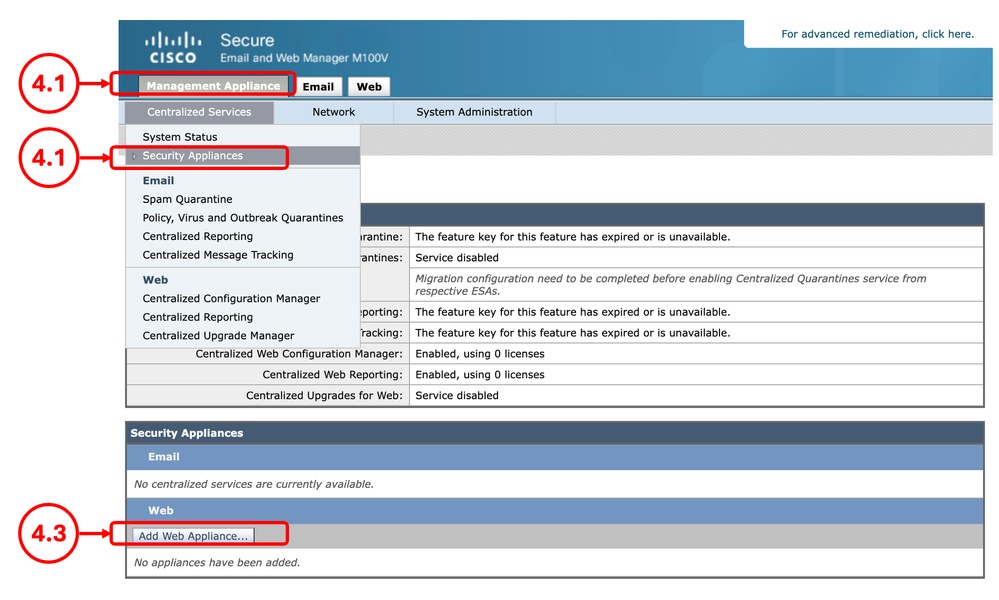 Image - Add Web Appliance Image - Add Web Appliance
Step 4.4. Enter the Appliance Name and the IP address or Hostname.
Step 4.5. Click Establish Connection.
Step 4.6.Enter the Username and Passphrase and click Establish Connection.
Step 4.7. Assign the Configuration Manager.
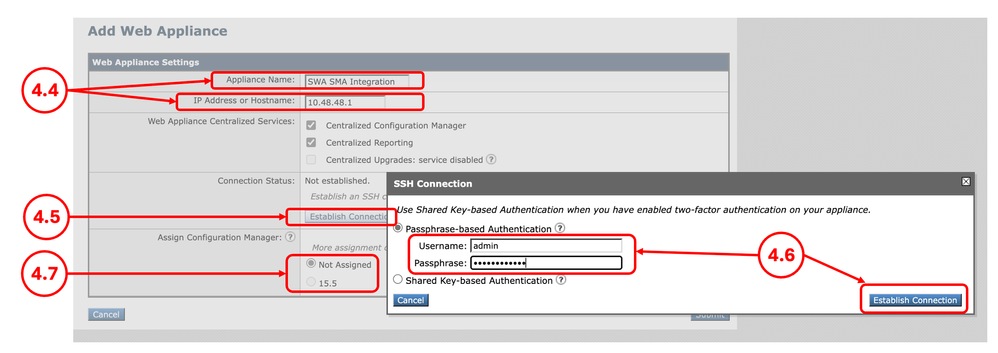 Image - Adding the SWA Image - Adding the SWA
Step 4.8. Submit and Commit the changes.
|
Step 5. Validate the Integration
|
Step 5.1. From the SMA GUI, Click on the Web tab.
Step 5.2. From Utilities, select Web Appliance Status.
Step 5.3. If you are seeing a Warning message Attention Required. Click on the appliance name for details, click the name of the SWA and view the details.
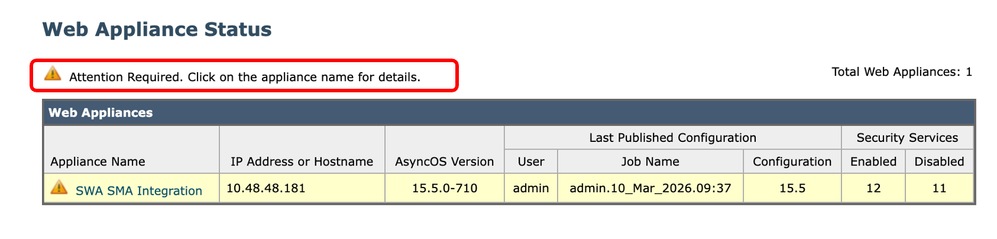 Image - Web Appliance Status Image - Web Appliance Status
Tip: For troubleshooting view the Fixing Errors section in this article.
|
Fixing Errors
"The Centralized Services is Disabled"
While you try to select a Centralized services, if the check box is inactive, click on the question mark (?) and the guide navigates you through the path to enable that service.
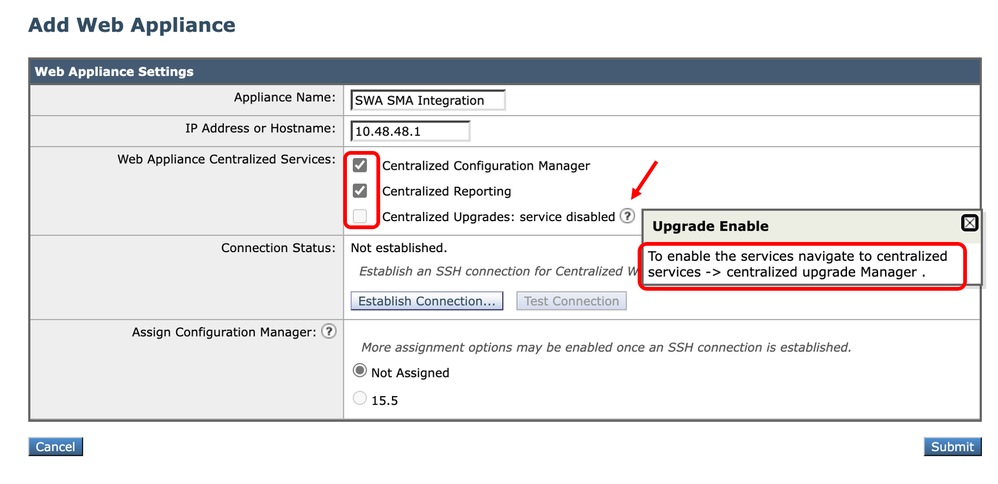 Image - The Centralized Services is Disabled
"Authentication Failed for IP"
While you are integrating the SWA to SMA if you receive this error, make sure the IP address or hostname and the credentials are correct.
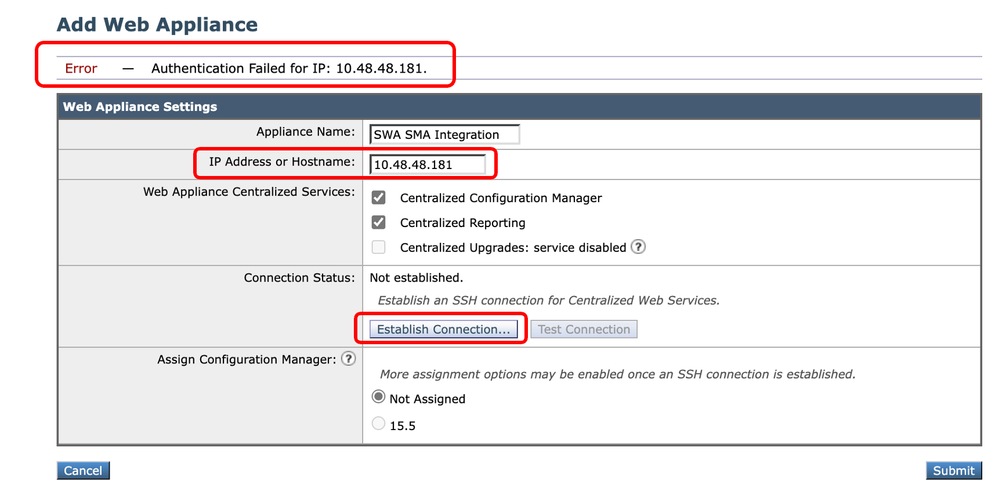 Image - Authentication Failed
"Cisco Centralized Web Reporting is disabled in the SWA"
If the SMA is configured with the Centralized Web Reporting and you assign that feature to the SWA while integrating the SWA to SMA in "Step 4", you need to enable Cisco Centralized Web Reporting:
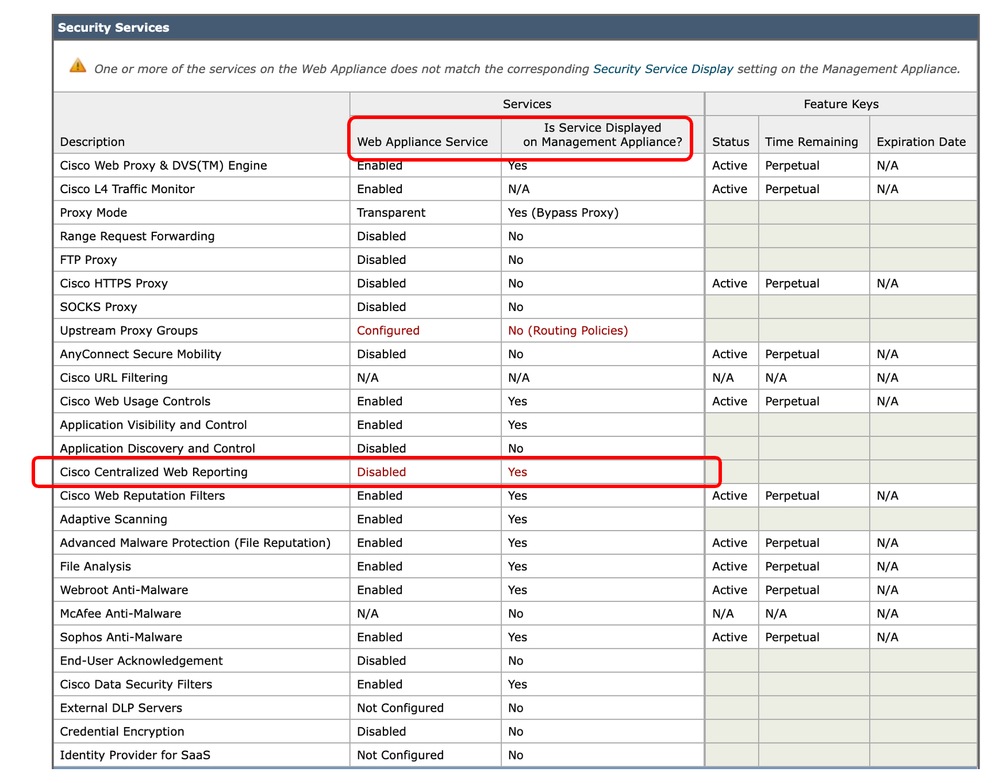 Image - Centeralized Web Reporting is Disabled in the SWA
To fix the issue, connect to the SWA from CLI and type reportingconfig and select CENTRALIZED, follow the wizard to enable the Centralized Reporting and commit the changes.
SWA_CLI> reportingconfig

Choose the operation you want to perform:
- COUNTERS - Limit counters recorded by the reporting system.
- WEBTRACKINGQUERYTIMEOUT - Timeout value for Webtracking Queries.
- AVERAGEOBJECTSIZE - Average HTTP Object Size used for Bandwidth Savings Calculation.
- WEBEVENTBUCKETING - Enable or Disable web transaction event bucketing.
- CTROBSERVABLE - Enable or Disable CTR observable based indexing.
- CENTRALIZED - Enable/Disable Centralized Reporting for this Secure Web Appliance.
[]> CENTRALIZED

Reporting service status: Local Reporting enabled.  (Show usernames in reports.)

Do you want to enable Centralized Reporting for this appliance? [N]> Y

Do you want to anonymize usernames in reports? [N]> N

Reporting service status: Centralized Reporting enabled.  (Show usernames in reports.)


Choose the operation you want to perform:
- COUNTERS - Limit counters recorded by the reporting system.
- WEBTRACKINGQUERYTIMEOUT - Timeout value for Webtracking Queries.
- AVERAGEOBJECTSIZE - Average HTTP Object Size used for Bandwidth Savings Calculation.
- WEBEVENTBUCKETING - Enable or Disable web transaction event bucketing.
- CTROBSERVABLE - Enable or Disable CTR observable based indexing.
- CENTRALIZED - Enable/Disable Centralized Reporting for this Secure Web Appliance.
[]>

SWA_CLI> commit
"The list of URL categories on this WSA was older than the list published from the SMA"
If while you are publishing the configuration to SWA and receiving the Error indicates that the URL category list in SWA and SMA are not the same, make sure both devices are able to connect to Cisco Update Server and there are no Errors in the "updater_logs":
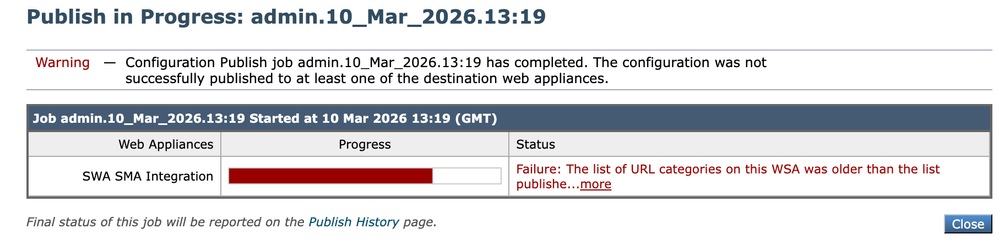 Image - The list of URL categories are not matching
To force the SWA or SMA to download the update, from the CLI, type updatenow.
To view the SMA or SMA, Logs related to update, from the CLI type grep and choose the number associated with updater_logs and follow the wizard
Tip: to view the live logs, type "Y" in the answer to Do you want to tail the logs? [N]>.
"The host key appears to have changed"
If while you are integrating the SWA to the SMA and receiving the Error that the host key has been changed, this is due to the reason that SMA has stored a different host Key for the same IP address in its key store.
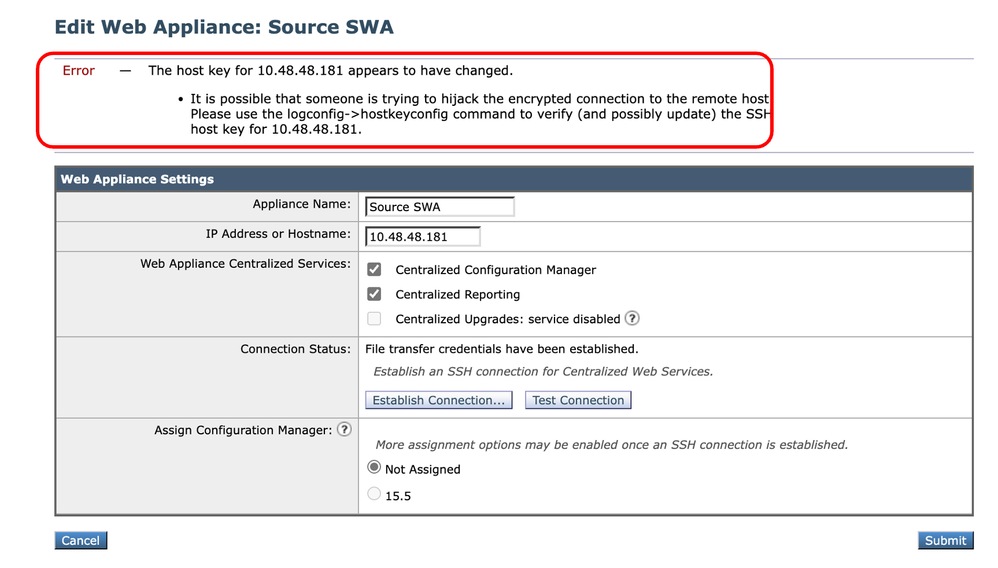 Image -The host key appears to have changed
To fix this Error, log in to CLI of SMA, run logconfig and Enter HOSTKEYCONFIG. Type DELETE and press Enter. Then, select the number associated to the SWA and press enter until the wizard is finished.
Commit the changes:
SMA_CLI> logconfig

Currently configured logs:
    Log Name            Log Type                      Retrieval           Interval
 ---------------------------------------------------------------------------------
 1. aggregatord_logs    Aggregatord Logs              Manual Download     None
 2. authentication      Authentication Logs           Manual Download     None
...

Choose the operation you want to perform:
- NEW - Create a new log.
- EDIT - Modify a log subscription.
- DELETE - Remove a log subscription.
- DELETELOGFILE - Delete log files
- SETUP - General settings.
- LOGHEADERS - Configure headers to log.
- HOSTKEYCONFIG - Configure SSH host keys.
[]> HOSTKEYCONFIG

Currently installed host keys:
1. 10.48.48.182 ssh-rsa AAAAAAAAAAAAAAAAAAAAAAAAAAAAAAAA...ZhW4gEXWE=
2. 10.48.48.181 ssh-rsa BBBBBBBBBBBBBBBBBBBBBBBBBBBBBBBb...4p74b9Q9k=

Choose the operation you want to perform:
- NEW - Add a new key.
- EDIT - Modify a key.
- DELETE - Remove a key.
- SCAN - Automatically download a host key.
- PRINT - Display a key.
- HOST - Display system host keys.
- FINGERPRINT - Display system host key fingerprints.
- USER - Display system user keys.
- REGENERATESCPKEYS - Regenerate SSH Keys for SCP Log Subscription Retrieval.
[]> DELETE

Enter the number of the key you wish to delete.
[]> 2

Currently installed host keys:
1. 10.62.131.143 ssh-rsa AAAAAAAAAAAAAAAAAAAAAAAAAAAAAAAA...ZhW4gEXWE=

...
SMA_CLI> commit
Related Information
 Feedback