Migrate Configuration Between Two SWAs
Available Languages
Download Options
Bias-Free Language
The documentation set for this product strives to use bias-free language. For the purposes of this documentation set, bias-free is defined as language that does not imply discrimination based on age, disability, gender, racial identity, ethnic identity, sexual orientation, socioeconomic status, and intersectionality. Exceptions may be present in the documentation due to language that is hardcoded in the user interfaces of the product software, language used based on RFP documentation, or language that is used by a referenced third-party product. Learn more about how Cisco is using Inclusive Language.
Contents
Introduction
This document describes the process of restoring the configuration from a Secure Web Appliance (SWA) to another.
Prerequisites
Requirements
Cisco recommends knowledge of these topics:
- Access ToGraphic User Interface (GUI)of SWA
- Administrative Access to the SWA
- Administrative Access to the Security Management Appliance (SMA)
- Access to Cisco Software Licensing Portal or the SWA license file
- Active Directory privileged user access to join the SWA to domain and create DNS records
Components Used
This document is not restricted to specific software and hardware versions.
The information in this document was created from the devices in a specific lab environment. All of the devices used in this document started with a cleared (default) configuration. If your network is live, ensure that you understand the potential impact of any command.
Before you Begin
In this article, we outline the steps to migrate from the source SWA to the target SWA. This table lists the specifications for each system.
|
Source SWA |
Target SWA |
|
|
Model |
S396 |
S100v |
|
Version |
15.5.0-710 |
15.5.0-710 |
|
License |
Smart License |
Smart License |
|
Active Directory |
Joined |
Joined |
|
Integrated with Identity Services Engine (ISE) |
Yes |
Yes |
|
Number of Network Interface Card (NIC) |
5 |
5 |
|
HTTPS Decryption |
Enabled with Self Signed Certificate |
Enabled with Self Signed Certificate |
|
Transparent Redirection |
WCCP |
WCCP |
|
Managed by SMA |
Yes |
Yes |
|
External Log Server |
SCP Push |
SCP Push |
|
High Availability |
Enabled |
Enabled |
Note: Always ensure that, when installing a new virtual SWA, all network interfaces recommended by Cisco are present and configured on the Virtual Machine(VM). The interfaces can remain disconnected, but they must be available within the VM.
There are two possible scenarios when migrating the SWA from one device to another:
[Scenario-1] Replacing the existing SWA: The original SWA is decommissioned and the IP address of the Target SWA is same as the source SWA.
[Scenario-2] Adding a new SWA: The original SWA remains in service while the new SWA is configured.
Preparing and Backing Up the Source SWA
Use these steps to collect the necessary files and configuration from the Source SWA:
Step 1. Export the Configuration File |
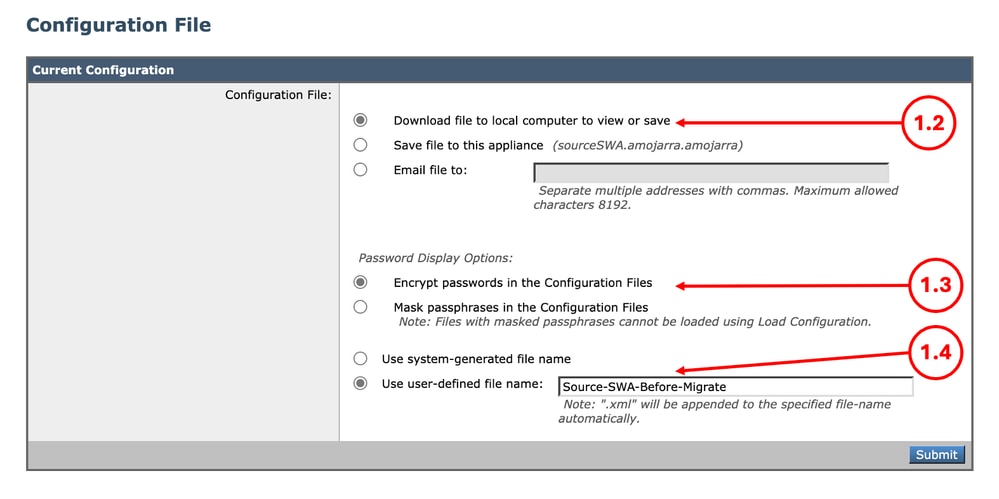
Step 1.1. From the GUI, Navigate to System Administration and choose Configuration File. Step 1.2. Make sure Download file to local computer to view or save is selected. Step 1.3. Choose Encrypt passwords in the Configuration Files Step 1.4. (Optional) Choose a name for the configuration file. Step 1.5. Click Submit.
|
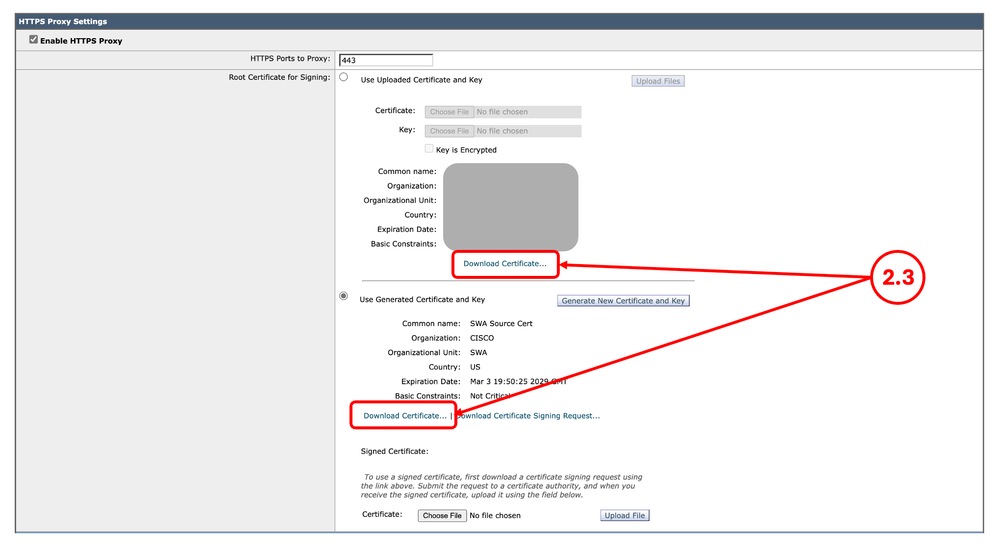
Step 2. Export the Decryption CertificateNote: If the HTTPS Decryption is disabled, skip to Step 3. |
Step 2.1. From the GUI, Navigate to Security Services and click HTTPS Proxy. Step 2.2. Click Edit Settings. Step 2.3. Download the HTTPS Decryption Certificate, by clicking Download Certificate... link.
Note: In this example, both types of HTTPS Decryption certificates are illustrated; however, in your network, you can have only one type deployed. |
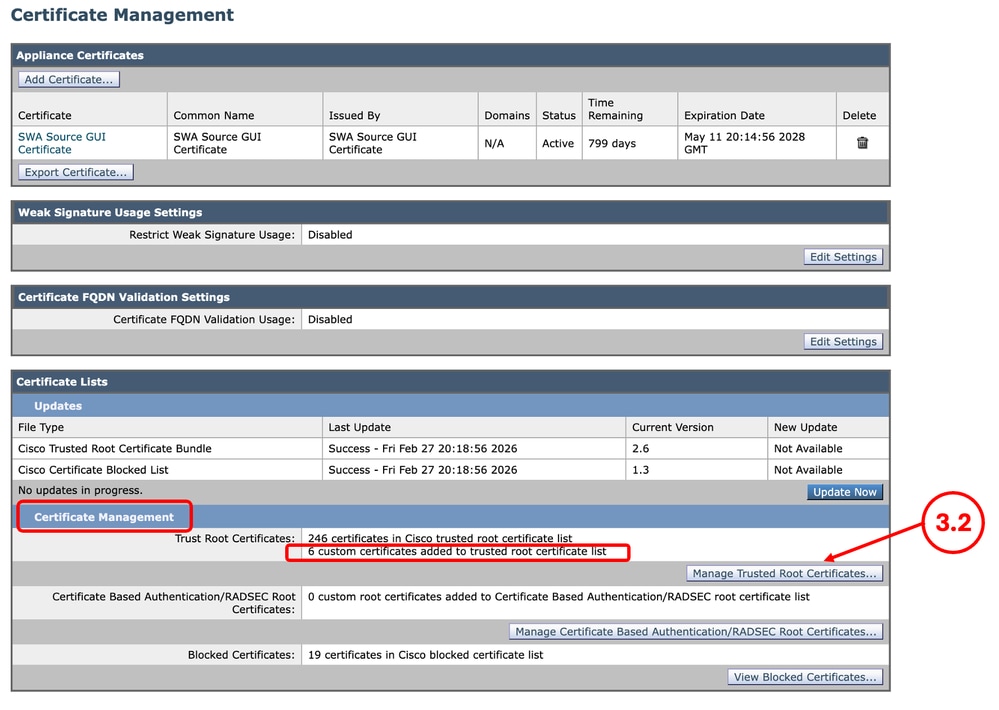
Step 3. Export the Custom Trust Root CertificatesNote: If there no custom trusted root certificate added on the SWA skip to Step 4. |
Step 3.1. From the GUI, navigate to Network and click Certificate Management. Step 3.2. In the Certificate Management section, click Manage Trusted Root Certificates.
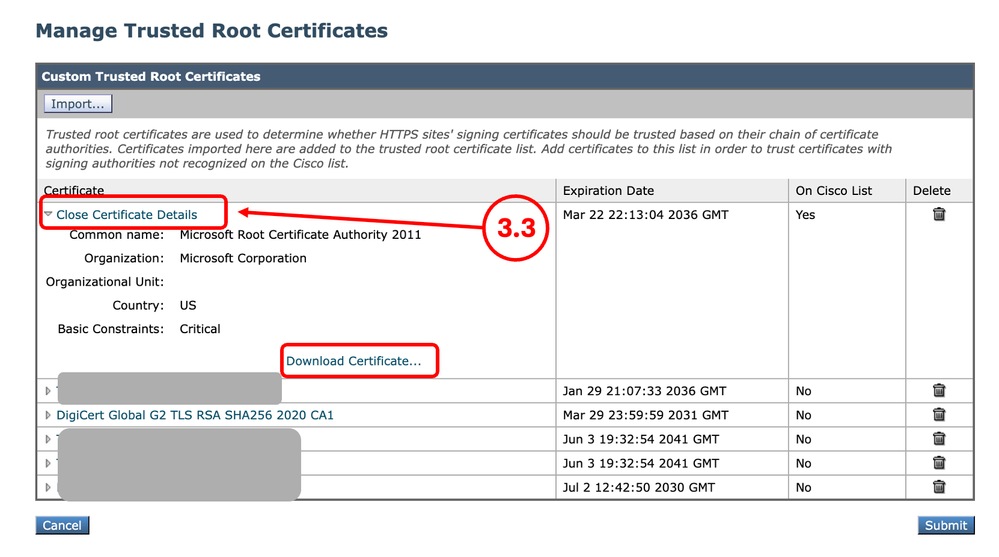
Step 3.3. Expand each Custom Trusted Root Certificates by clicking their name and click Download Certificate... |
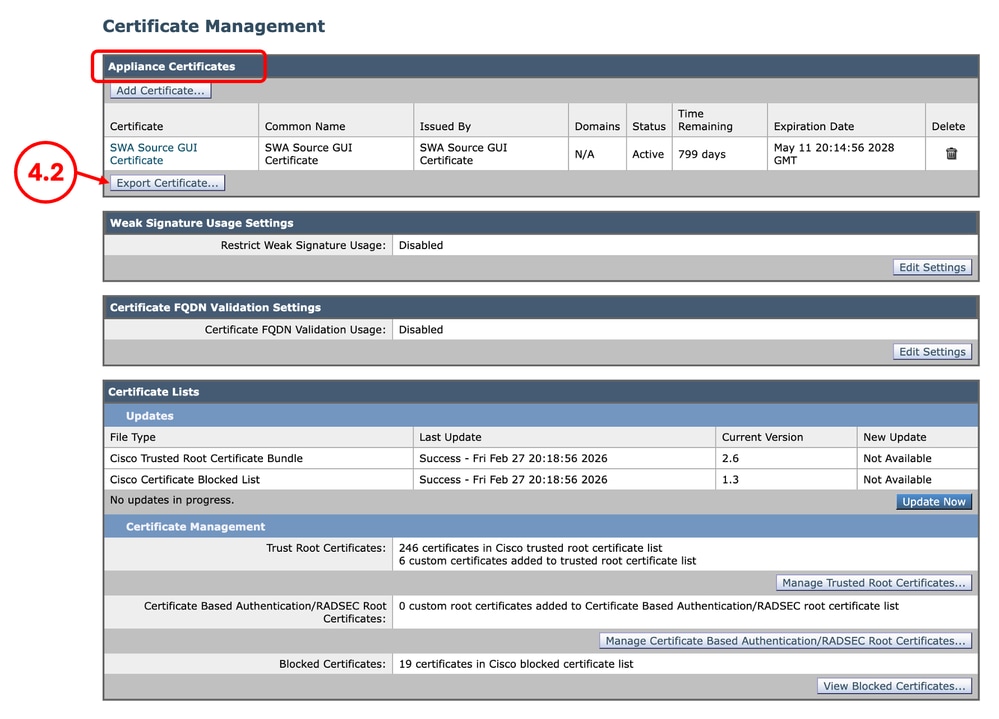
Step 4. Export the GUI CertificateNote: If you are using built-in GUI certificate, skip to Step 5. |
Step 4.1. From the GUI, Navigate to Network and click Certificate Management. Step 4.2. In the Appliance Certificates section, click Export Certificate.
|
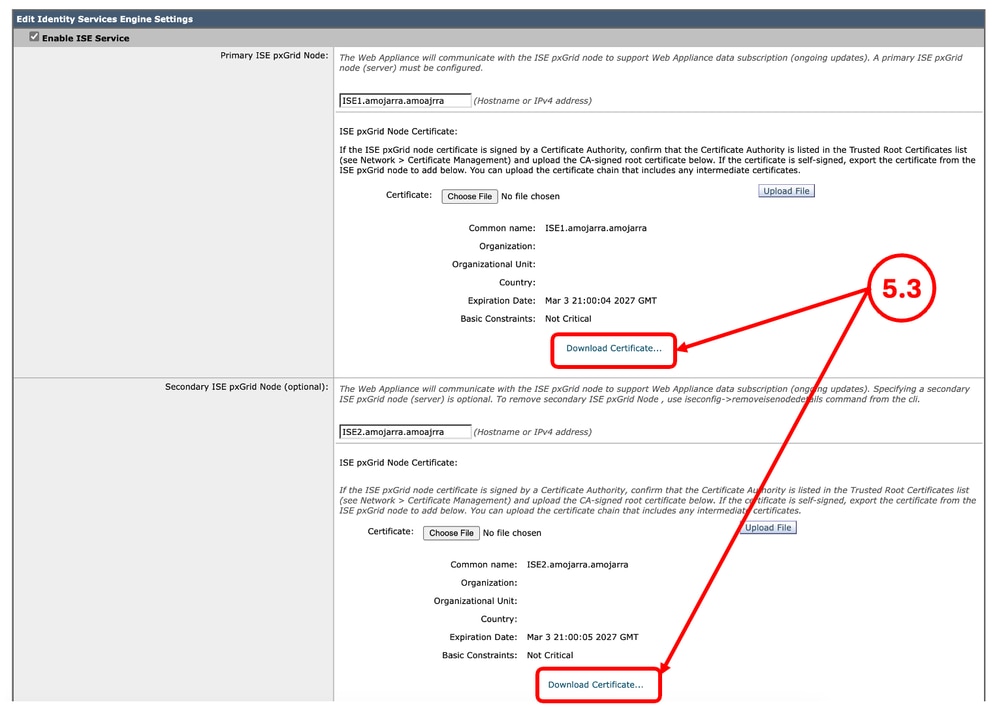
Step 5. Export the ISE CertificatesNote: If there are no SWA, ISE integration, skip to Step 6. |
Step 5.1. From the GUI, Navigate to Network and click Identity Services Engine. Step 5.2. Click Edit Settings. Step 5.3. Download all available certificates.
|
Step 6. Licences / Features |
Step 6.1. From the GUI, Navigate to System Administration and click Licenses or Features depends on the type of the license you are using. Step 6.2. Take a screenshot of your Licenses / Features. |
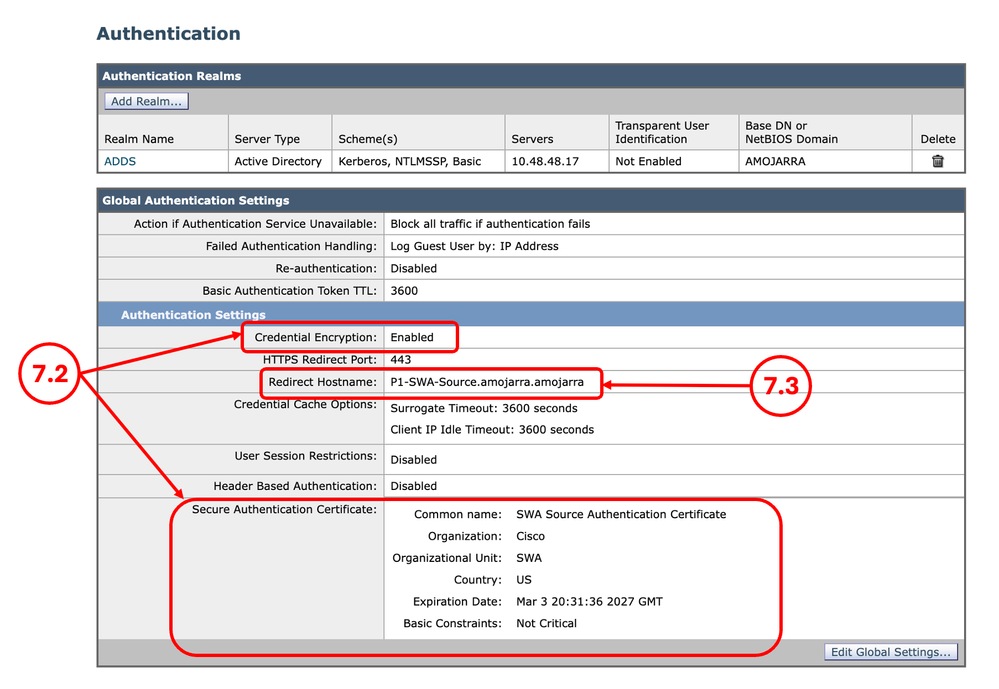
Step 7. Authentication Redirection Certificate |
Step 7.1. From the GUI, Navigate to Network and click Authentication. Step 7.2. If the Credential Encryption is enabled, Make sure you have the Certificate and the Key. Step 7.3. Take a screenshot of the current configuration.
Note: You cannot download the Authentication certificate from the GUI. |
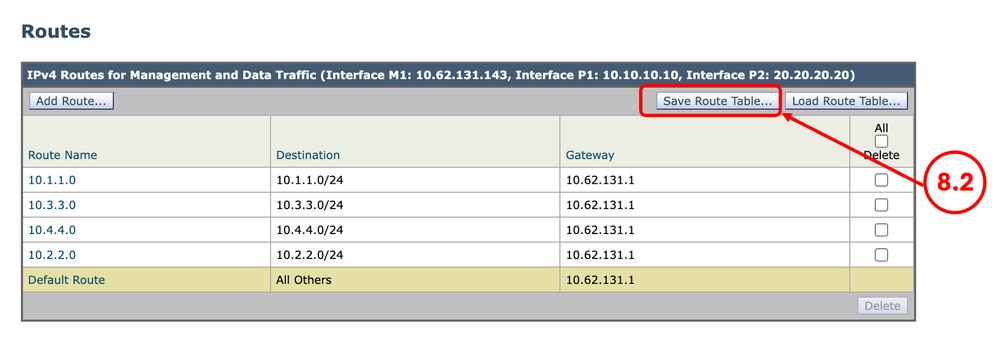
Step 8. Exporting Static RoutesNote: If you are planning to use the same Network configuration and IP address for the target SWA, skip to Step 10. |
Step 8.1. From the GUI, Navigate to Network and click Routes. Step 8.2. For each routing table, click Save Route Table.
|
Step 9. DNS SettingsNote: If you are planning to use the same Network configuration and IP address for the target SWA, skip to Step 10. |
Step 9.1. From the GUI, Navigate to Network and click DNS. Step 9.2. Take a screenshot of the DNS configuration. |
Preparing the Target SWA
Step 10. Installing the Virtual SWANote: If the target SWA is physical you can skip to Step 11. |
Step 10.1. Use these guides to install the virtual SWA: Step 10.2. Make sure the new SWA has the recommended network access: |
Step 11. Initial SWA Setup |
Step 11.1. Configure the IP address. Step 11.2. Configure the default Gateway. Step 11.3. Configure the DNS server. Step 11.4. license the Appliance. Step 11.5. Enable the Features. Step 11.6. Run the system setup wizard. You can find the detailed steps in this article: Secure Web Appliance Initial Setup |
Step 12. Sanitizing the Configuration fileNote: If you are not integrating ISE with the SWA, you can skip to Step 13. |
Step 12.1. Review the Fixing Errors section in this article to remove the ISE certificate configuration from the XML backup file. |
Importing the Configuration File to Target SWA
Step 13. Import Custom Trusted Root CertificatesNote: If you are not using any Custom Trusted Root Certificate, skip to Step 14. |
Step 13.1. From the GUI, Navigate to Network and click Certificate Management. Step 13.2. In the Certificate Management section, click Manage Trusted Root Certificates. Step 13.3. Click Import. Step 13.4. Upload the certificates that previously was downloaded in Step 3. Caution: When both root and intermediate certificates are available, begin by uploading the root CA certificate. After submitting and committing the changes, proceed to import the intermediate certificate. |
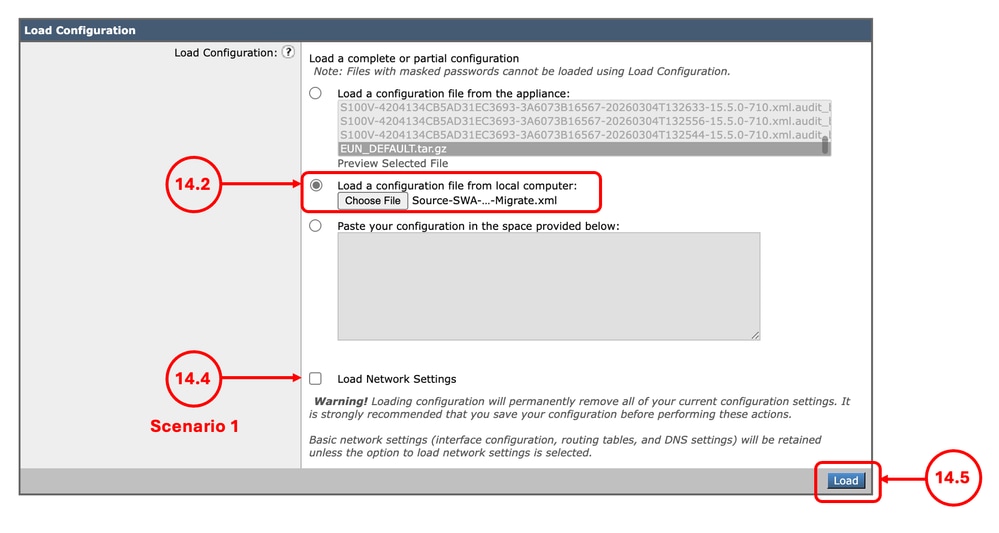
Step 14. Import the Configuration File |
Step 14.1. From the GUI, Navigate to System Administration and choose Configuration File. Step 14.2. In the Load Configuration section, Select Load a configuration file from local computer. Step 14.3. Click Choose File and select the XML configuration file. Step 14.4. If the migration matches the Scenario 1 and the previous IP address must be use in the new SWA, Select the check box Load Network Settings, else do not select this option. Step 14.5. Click Load. Step 14.6. Click Continue in the Confirm Load Configuration pop up.
|
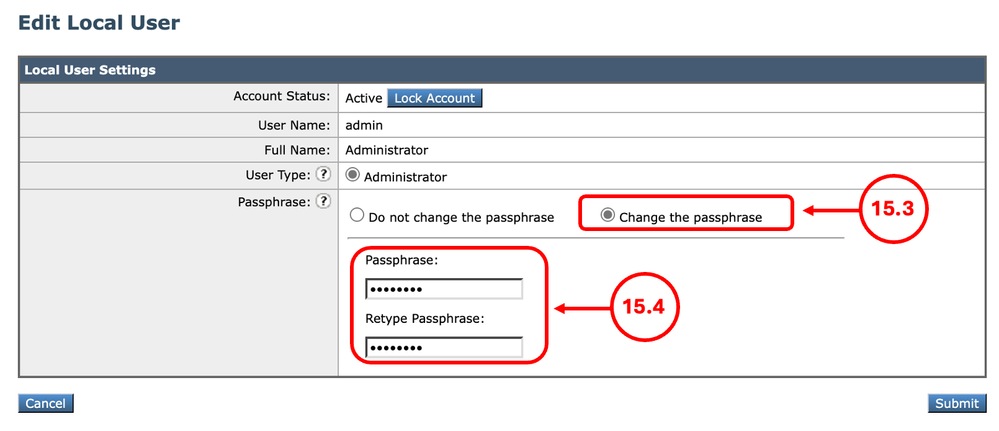
Step 15. Changing the admin PasswordNote: If you have the Source SWA admin password, Skip to Step 16. |
15.1. From the GUI, Navigate to System Administration and choose Users. 15.2. click the admin user name. 15.3. Select Change the passphrase. 15.4. Enter the password. 15.5. click Submit.
|
Step 16. Commit |
Step 16.1. Now you can Commit the changes. |
Step 17. Importing the RoutesNote: If you Load Network Settings while importing the configuration, skip to Step 19. |
Step 17.1. From the GUI, Navigate to Network and click Routes. Step 17.2. For each routing table, click Load Route Table. Step 17.3. Choose the file you exported on Step 8. Step 17.4. Click Submit. Step 17.5. Commit the changes. |
Step 18. Configuring the DNS SettingsNote: If you Load Network Settings while importing the configuration, skip to Step 19. |
Step 18.1. From the GUI, Navigate to Network and click DNS. Step 18.2. Click Edit Settings. Step 18.3. Use the screenshot from Step 9 Step 18.4. Click Submit. Step 18.5. Commit the changes. |
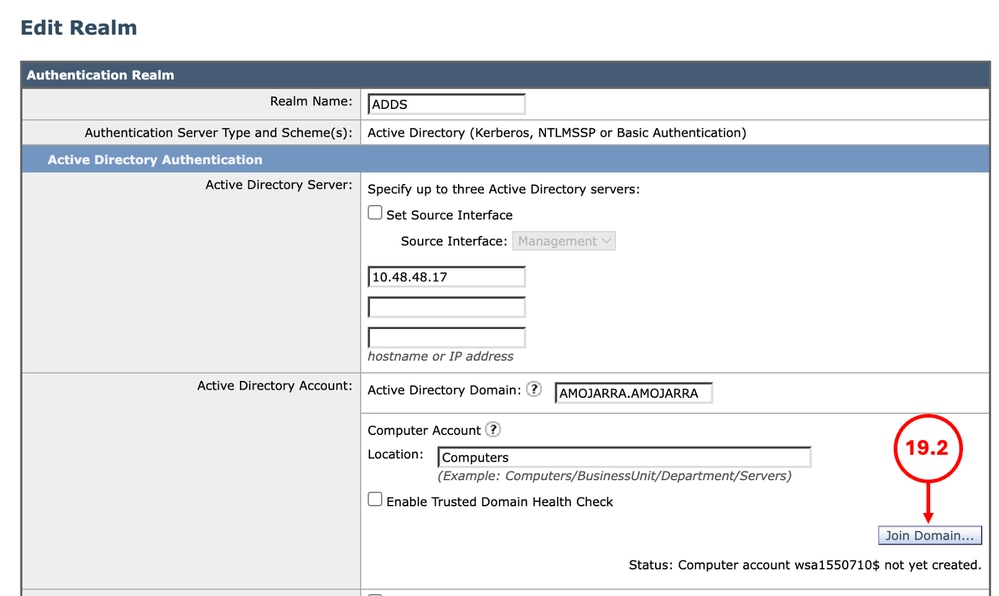
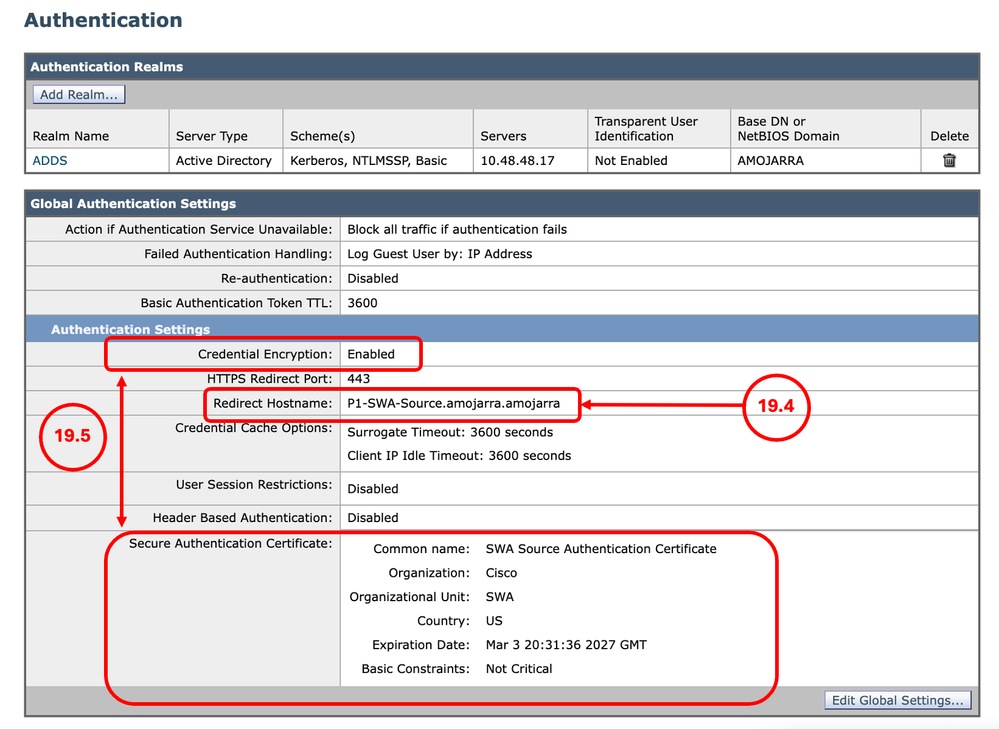
Step 19. Join/Rejoin the SWA to the Active Directory |
Step 19.1. From the GUI, Navigate to Network and click Authentication. Step 19.2. click the name of the Authentication Realm Name. Tip: If the SWA is assigned a new IP address and host-name, ensure that the necessary DNS records are created in the Active Directory DNS service. Step 19.2. Click Join Domain and enter the credentials:
Step 19.3. Click Submit. Step 19.4. Make sure the Redirect Hostname is correct. Step 19.5. If the Credential Encryption is enabled, Make sure the Secure Authentication Certificate is correct.
Step 19.6. Commit the changes. |
Step 20. Re-join to SMANote: If the SWA is not managed by SMA, skip this step. |
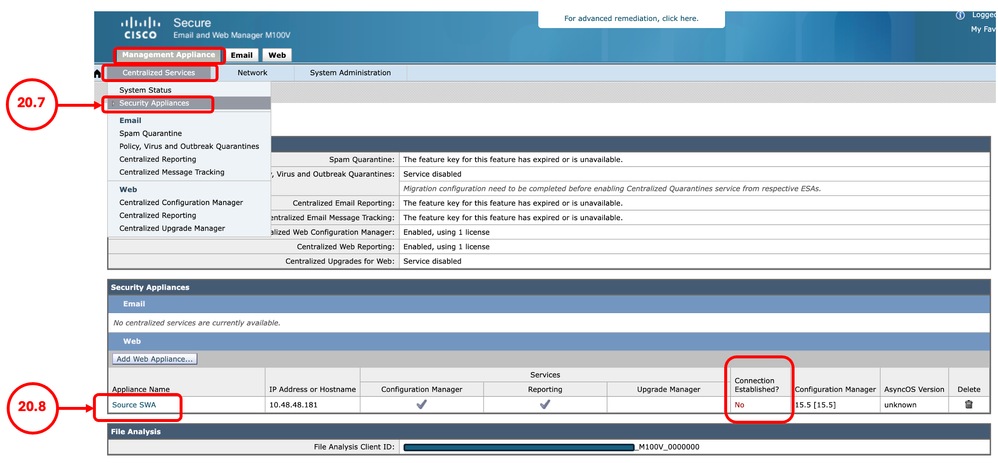
Note: If you did not replace the existing SWA (Scenario-2), and the migrated SWA having a new IP address, add the SWA as a new device to SMA and skip Step 20. Step 20.1. Connect to CLI of the SMA. Step 20.2. run logconfig. Step 20.3. Enter HOSTKEYCONFIG. Step 20.4. Type DELETE and press Enter. Step 20.5. Type the number associated to the SWA that has been recently migrated and press Enter until the wizard is finished. Step 20.6. Type commit and press Enter to save the changes. Step 20.7. From the SMA GUI, navigate to Management Appliance. Select Centralized Services and click Security Appliances. Step 20.8. click the name of the SWA that recently were migrated. Tip: You can see the Connection Established column is set to No.
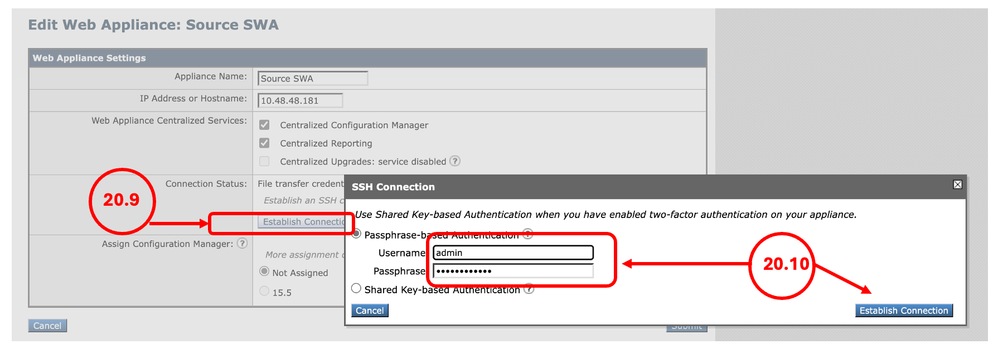
Step 20.9. click Establish Connection. Step 20.10. Enter the Username and Passphrase and click Establish Connection.
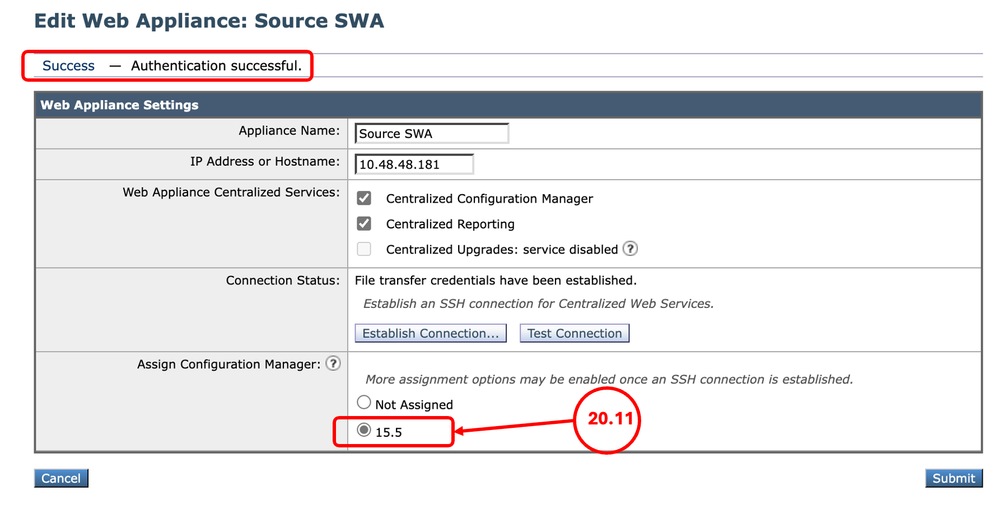
Step 20.11. Assign the configuration Manager.
Step 20.12. Submit and Commit the changes. Step 20.13. (Optional) you can test by publishing configuration to the SWA. Tip: The SMA retains all Reporting and Tracking data from the previous SWA. |
Fixing Errors
Parse Error on Element port_name
The network port name must be one of ['Management', 'P1', 'P2', 'T1', 'T2']:
 Image - Network Interface Naming Error
Error — Configuration File was not loaded. Parse Error on element "port_name" line number 85 column 18 with value "M2": The network port name must be one of ['Management', 'P1', 'P2', 'T1', 'T2'] (with optional "_v6" suffix), or start with "VLAN" or "Loopback".This error happens when you are migrating from physical SWA to Virtual. the Virtual SWA has only 5 NICs and the M2 interface is invalid. To fix the error, edit the XML configuration file in a text editor and remove these lines:
<port_interface>
      <port_name>M2</port_name>
      <direct>
        <jack>M2</jack>
      </direct>
</port_interface>
<ethernet>
<ethernet_interface>M2</ethernet_interface>
<media>autoselect</media>
<media_opt></media_opt>
<macaddr>aa:bb:cc:00:00:00</macaddr>
</ethernet>
Parse Error on Element ise_service
 Image - ISE Certificate Error
Error - Configuration File was not loaded. Parse Error on element "ise_service" line number 548 column 17: AA11AA.crt.pem ISE certificate not present in /data/db/isecerts/.Since the ISE certificates are not included in the SWA configuration export, and are uploaded on the device directly, you need to remove the certificates configuration from the XML file and after successful import, configure ISE manually. to fix this issue, edit the XML configuration file in the text editor and search for the certificate name in the error ( in this example, search for AA11AA ) and delete it from the configuration file:
Before:
      <ise_service_pxgrid_certs>
         <pxgrid_cert>AA11AA</pxgrid_cert>
         <pxgrid_cert>BB22BB</pxgrid_cert>
      </ise_service_pxgrid_certs>

After:
      <ise_service_pxgrid_certs></ise_service_pxgrid_certs>
Other than the certificate name, you need to remove the Web Appliance Client Certificate name as well.
In this example, the Web Appliance Client Certificate is a self signed certificate:
Before:
<ise_service_cert_generated>1</ise_service_cert_generated>
<ise_service_generated_name>xAcK6T</ise_service_generated_name>

After:
<ise_service_cert_generated>0</ise_service_cert_generated>
<ise_service_generated_name></ise_service_generated_name>
Failover is not Working on New Virtual SWA
If the High Availability (Failover) is not working on the target virtual SWA, ensure that the Hypervisor is configured correctly. For more information, visit: Ensure Proper Virtual WSA HA Group Functionality in a VMware Environment
Related Information
- User Guide for AsyncOS 15.2 for Cisco Secure Web Appliance
- Install Secure Web Appliance on Vmware ESXi
- Install Secure Web Appliance on Microsoft Hyper-V
- Cisco Secure Email and Web Virtual Appliance Installation Guide
- Configure Custom URL Categories in Secure Web Appliance - Cisco
- Troubleshoot Secure Web Appliance DNS Service
- Ensure Proper Virtual WSA HA Group Functionality in a VMware Environment
Revision History
| Revision | Publish Date | Comments |
|---|---|---|
1.0 |
11-Mar-2026
|
Initial Release |
Contributed by Cisco Engineers
- Amirhossein MojarradTechnical Consulting Engineer
 Feedback
Contact Cisco
- Open a Support Case

- (Requires a Cisco Service Contract)