Install and Renew Certificates on ASA Managed by ASDM

Available Languages
Contents
Introduction
This document describes how to request, install, trust, and renew certain types of certificates on Cisco ASA Software managed with ASDM.
Prerequisites
Requirements
- Before you start to verify that the Adaptive Security Appliance (ASA) has the correct clock time, date, and time zone with certificate authentication, it is recommended to use a Network Time Protocol (NTP) server to synchronize the time on the ASA. Check Related Information for reference.
- To request a certificate that uses Certificate Signing Request (CSR), it is required to have access to a trusted internal or third-party Certificate Authority (CA). Examples of third-party CA vendors include, but are not limited to, Entrust, Geotrust, GoDaddy, Thawte, and VeriSign.
Components Used
The information in this document is based on these software and hardware versions:
- ASAv 9.18.1
- Cisco Adaptive Security Device Manager - ASDM - 7.24(1)
- For PKCS12 creation, OpenSSL is used.
The information in this document was created from the devices in a specific lab environment. All of the devices used in this document started with a cleared (default) configuration. If your network is live, ensure that you understand the potential impact of any command.
Background Information
The type of certificates this document addresses are:
- Self-signed certificates
- Certificates signed by a third-party Certificate Authority or internal CA
The Secure Socket Layer (SSL), Transport Layer Security (TLS) and IKEv2 rfc7296 for EAP authentication protocols mandate that the SSL/TLS/IKEv2 server provides the client with a server certificate for the client to perform server authentication. It is recommended to use trusted third-party CAs to issue SSL certificates to the ASA for this purpose.
Cisco does not recommend use of a self-signed certificate because of the possibility that a user could inadvertently configure a browser to trust a certificate from a rogue server. Users can encounter security warnings when connecting to the secure gateway, which can disrupt their workflow.
Trusted CA Security Considerations
Certificate Authentication Risks and Recommendations
Default Trustpoint Validation-Usage Behavior
When a trusted CA certificate is installed, it can be used to authenticate different types of VPN connections using certificate authentication. It is controlled with validation-usage trustpoint command (Configuration > Device Management > Certificate Management >CA Certificates >Add -> More Options... > Advanced > select Validation Usage options).
The validation-usage types are:
ipsec-client: Validates IPsec client connections.ssl-client: Validates SSL client connections.ssl-server: Validates SSL server certificates.
Default Configuration Risks
- By default, a CA certificate installed as trusted can be used to authenticate incoming client identity certificate for any tunnel group using certificate authentication.
- This default setting can be a security risk if you are not aware of it.
Recommended Action
- Disable validation-usage for unintended trustpoints. If a CA certificate is not meant to authenticate VPN peers or users, disable validation-usage for that trustpoint.
Example Configuration
Navigate to:
Configuration > Device Management > Certificate Management > CA Certificates.
a) Select a wanted trustpoint and click Edit.
b) Navigate to Advanced and uncheck all Validation Usage options.

trustpoint public-root-ca
 no validation-usage
Authorization Risks and Recommendations
By default, a trusted CA certificate can be used to authenticate VPN IPSEC peer or Remote Access VPN user connecting to any tunnel-group. Proper authorization needs to be designed.
Recommended Action
Use certificate and tunnel-group maps to ensure only authorized certificates are used for specific tunnel groups. Set a default tunnel group map rule that points to a no-access tunnel group to restrict unauthorized access.
Example Configuration
Certificate authentication is only allowed for:
- Machines with a certificate issued by CN=example.com and having OU=machines in certificate subject.
- Users with a certificate issued by CN=example.com and having OU=users in certificate subject.
Users with other certificates are assigned to no_access tunnel-group by default, thanks to the tunnel-group-map default-group no_access command. The Certificate Map Rules have priority over group-url thanks to tunnel-group-map enable rules command. Knowing group-url does not help to bypass the Certificate Map Rules.
- Configure group-policy preventing VPN access:
Navigate to:
Configuration > Remote Access VPN > Network (Client) Access > Group Policies > Add > General > More Options
a) Uncheck Inherit next to Simultaneous Logins and set the value 0.
b) Uncheck Inherit next to Banner and set a wanted massage, for example NO ACCESS GROUP POLICY.

group-policy no_access_gp internal
group-policy no_access_gp attributes
 banner value NO ACCESS GROUP POLICY
 vpn-simultaneous-logins 0
 Simultaneous Logins set to 0
2. Configure tunnel-groups for users and tunnel-group preventing VPN access.
Navigate to:
Configuration > Remote Access VPN > Network (Client) Access > Secure Client Connection Profiles. Click Add and configure:
a) Authentication method as Certificate.
b) Group Policy - for the no_access tunnel group use no_access_gp where simultaneous logins is set to 0.

tunnel-group mgmt-tunnel type remote-access
tunnel-group mgmt-tunnel general-attributes
 address-pool vpn_pool
 default-group-policy mgmt-tunnel
tunnel-group mgmt-tunnel webvpn-attributes
 authentication certificate
!
tunnel-group users_access type remote-access
tunnel-group users_access general-attributes
 default-group-policy user_access_gp
 address-pool vpn_pool
tunnel-group users_access webvpn-attributes
 authentication certificate
!
tunnel-group no_access type remote-access
tunnel-group no_access general-attributes
 default-group-policy no_access_gp
 address-pool vpn_pool
tunnel-group no_access webvpn-attributes
 authentication certificate
 No Access tunnel group
3. Create certificate maps for users and use the certificate maps for tunnel-group mapping:
Navigate to: Configuration > Remote Access VPN > Advanced > Certificate to Secure Client and Clientless SSL VPN Connection Profile Maps.
a) Click Add to configure Certificate to Connection Profile Maps.
b) Select New and configure a certificate group map name, for example mgmt_tunnel_map or users_access_map.
c) Select a corresponding connection profile/tunnel group from the drop-down menu at Mapped to Connection Profile.
d) Click Add to configure Mapping Criteria.
e) Select: Field: Subject, Component: Organizational Unit (OU), Operator: Equals, Value: machines or users.
d) Select: Field: Issuer, Component: Common Name (CN), Operator: Equals, Value: example.com.

crypto ca certificate map mgmt_tunnel_map 10
 issuer-name attr cn eq example.com
 subject-name attr ou eq machines
crypto ca certificate map users_access_map 10
 issuer-name attr cn eq example.com
 subject-name attr ou eq users
!
webvpn
 (...)
 certificate-group-map mgmt_tunnel_map 10 mgmt-tunnel
 certificate-group-map users_access_map 10 users_access
 Certificate to Secure Client Connection Profile Maps
4. Enable tunnel-group maps and configure a default tunnel-group to deny access if a user certificate does not match any other certificate map.
Navigate to: Configuration > Remote Access VPN > Network (Client) Access > Advanced > IPsec > Certificate to Connection Profile Maps > Policy.
a) Check Use the configure rules to match a certificate to a Connection Profile.
b) Check Default to Connection Profile and select from the drop-down menu the no-access connection profile/tunnel group.

tunnel-group-map enable rules
tunnel-group-map default-group no_access
 Enable Certificate Maps and Default Connection Profile
Additional Resources
For more detailed configuration instructions, refer to Cisco documentation:
- Validation Usage Configuration -Cisco Secure Firewall ASA Series Command Reference, T - Z Commands
- Certificate Map Configuration -Cisco Secure Firewall ASA Series Command Reference, T - Z Commands
- Tunnel-Group Map Configuration -Cisco Secure Firewall ASA Series Command Reference, T - Z Commands
- Tunnel-Group-Map Enable Configuration -Cisco Secure Firewall ASA Series Command Reference, T - Z Commands
- Cisco Security Advisory - Cisco ASA Software and FTD Software Trustpoint Configuration Defaults
Request and Install a new Identity Certificate with ASDM
A certificate can be requested from a Certificate Authority (CA) and installed on an ASA in two ways:
- Use a Certificate Signing Request (CSR). Generate a Key Pair, request an Identity Certificate from CA with a CSR, install the signed Identity Certificate obtained from the CA.
- Use a PKCS12 file obtained from a CA, or exported from a different device. The PKCS12 file contains Key Pair, Identity Certificate, CA certificate(s).
Request and Install a New Identity Certificate with Certificate Signing Request (CSR)
A CSR is created on the device that needs an Identity Certificate, use a Key Pair created on the device.
A CSR contains:
- Certificate request information - requested subject and other attributes, public key from the Key Pair.
- Signature algorithm information.
- Digital signature of certificate request information, signed with the private key from the Key Pair.
The CSR is passed to the Certificate Authority (CA) for signing in PKCS#10 form.
The signed certificate is returned from CA in a PEM form.
Generate a CSR with ASDM
Create a Trustpoint with a Specific Name
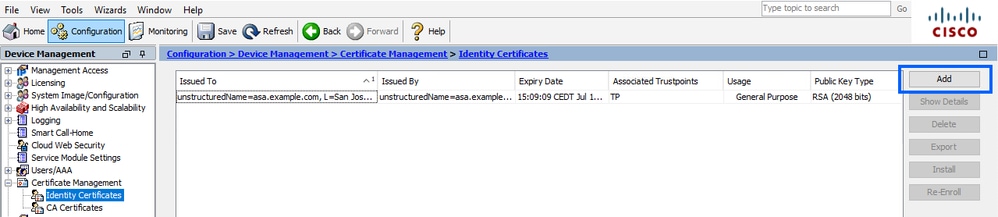
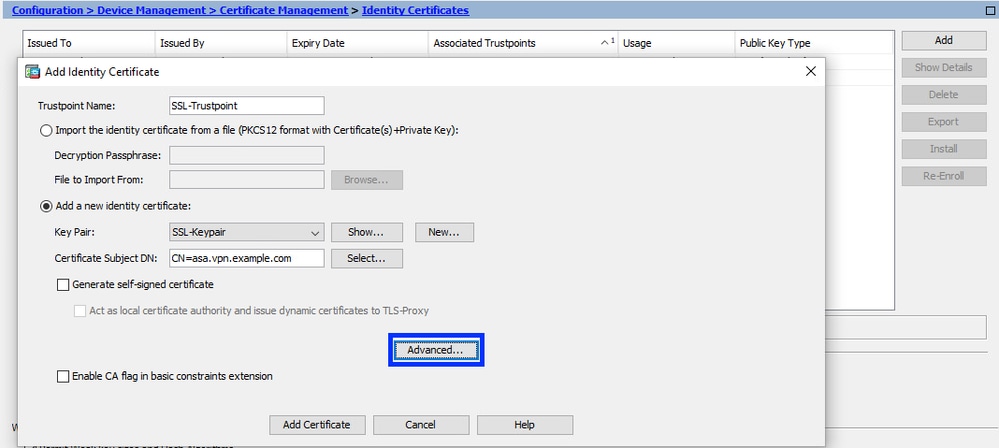
- Navigate to Configuration > Device Management > Certificate Management > Identity Certificates
- Click Add.
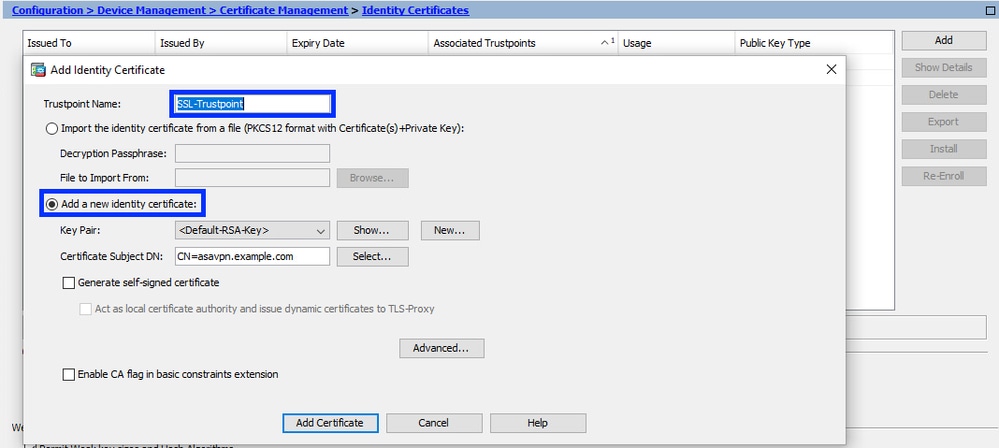
- Define a trustpoint name.
- Click the Add a New Identity Certificate radio button.
Create a New Key Pair (optional)
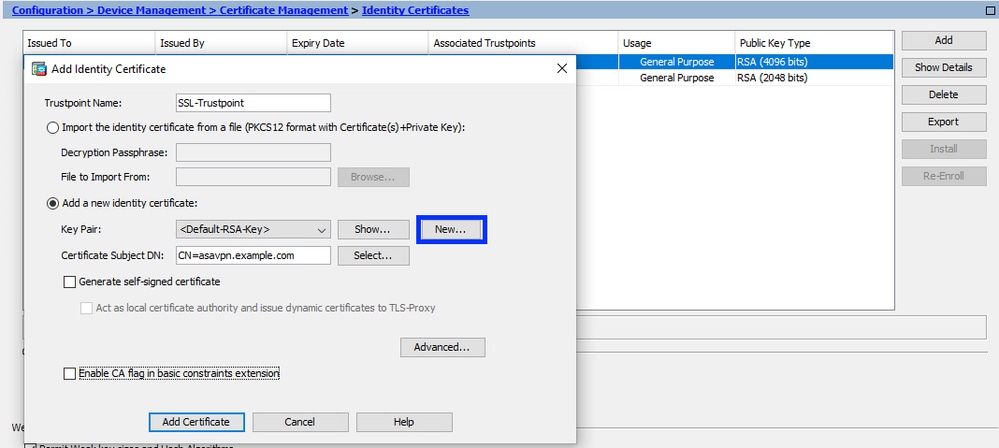
- Click New to generate a new Key Pair.
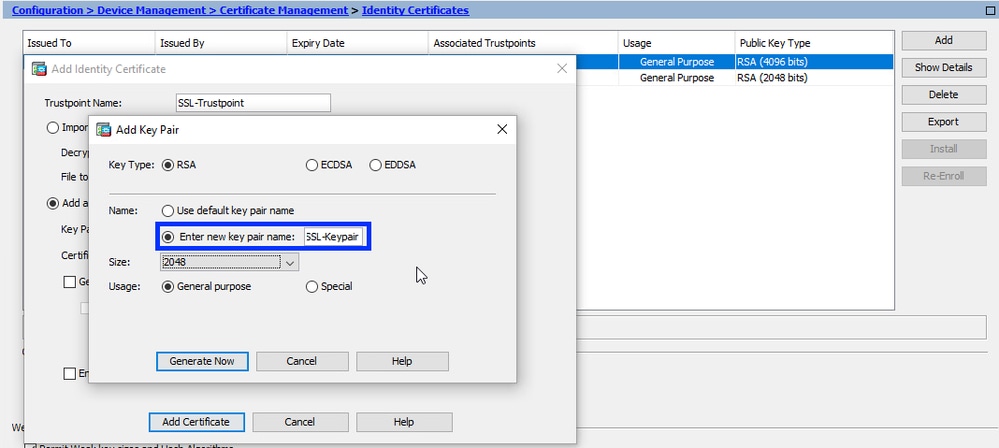
- Choose the option Enter new Key Pair name and enter a name for the new Key Pair.
- Choose the Key Type - RSA or ECDSA.
- Choose the Key Size; for the RSA, choose General purpose for Usage.
- Click Generate Now. The Key Pair is now created.
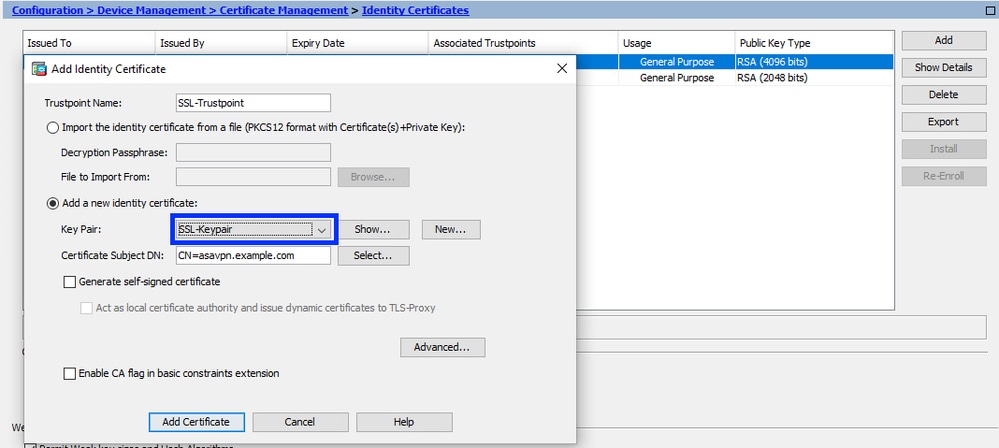
Choose the Key Pair Name
- Choose the Key Pair to sign the CSR with and to be binded with the new certificate.
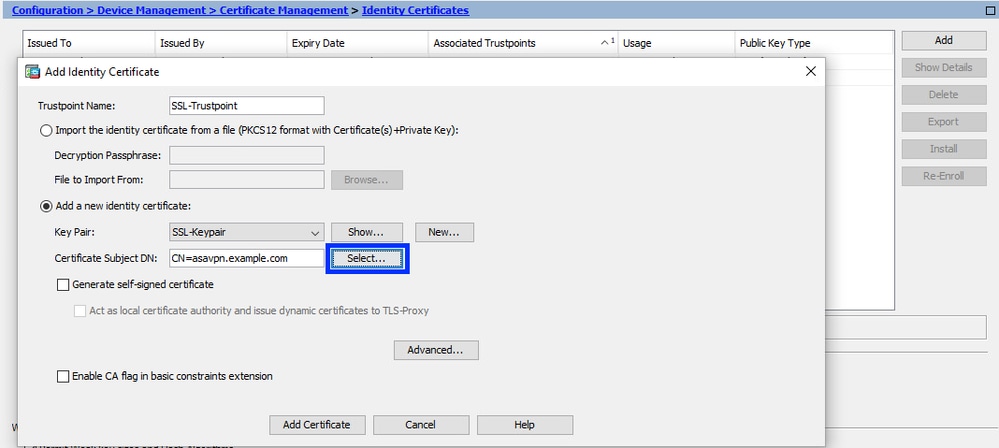
Configure the Certificate Subject and Fully Qualified Domain Name (FQDN)
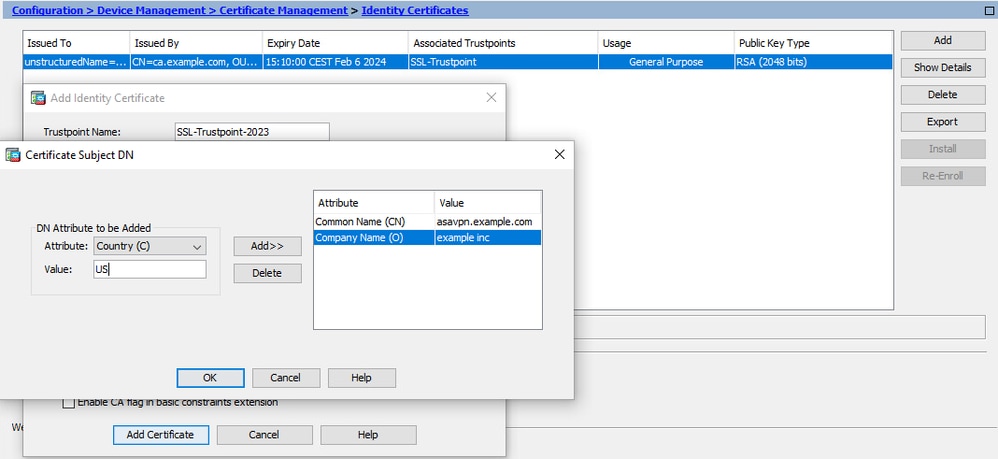
- Click Select.
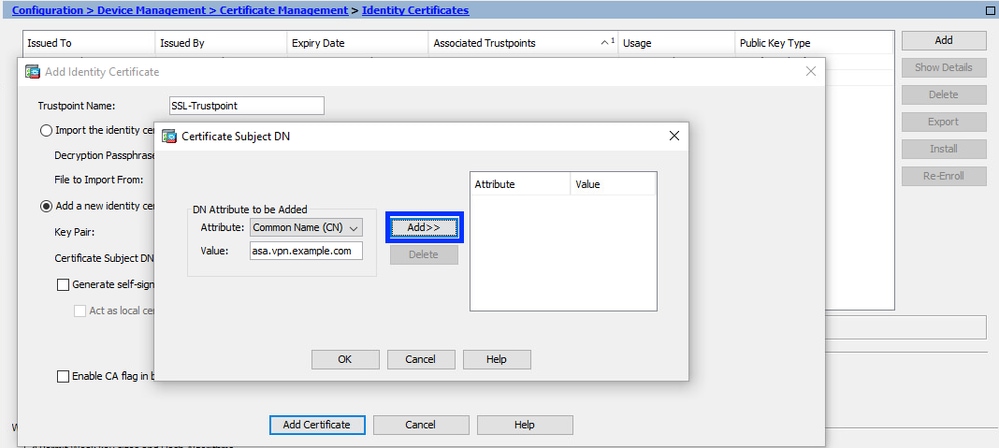
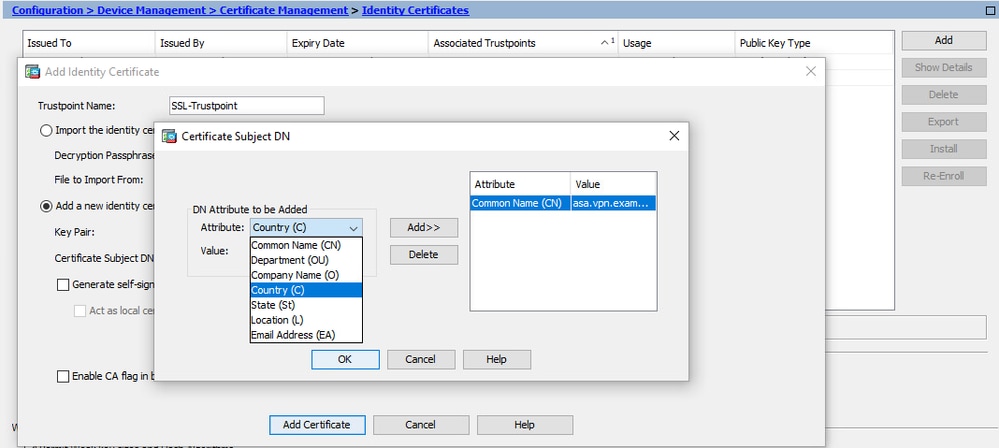
- In the Certificate Subject DN window, configure certificate attributes - choose the attribute from the drop-down list, enter the value and click Add.


| Attribute | Description |
|---|---|
| CN | The name through which the firewall can be accessed (usually the fully-qualified domain name, for example, vpn.example.com). |
| OU | The name of your department within the organization. |
| O | The legally registered name of your organization/company. |
| C | Country code (2 letter code without punctuation). |
| ST | The state in which your organization is located. |
| L | The city in which your organization is located. |
| EA | Email address |
- Click OK after all attributes are added.
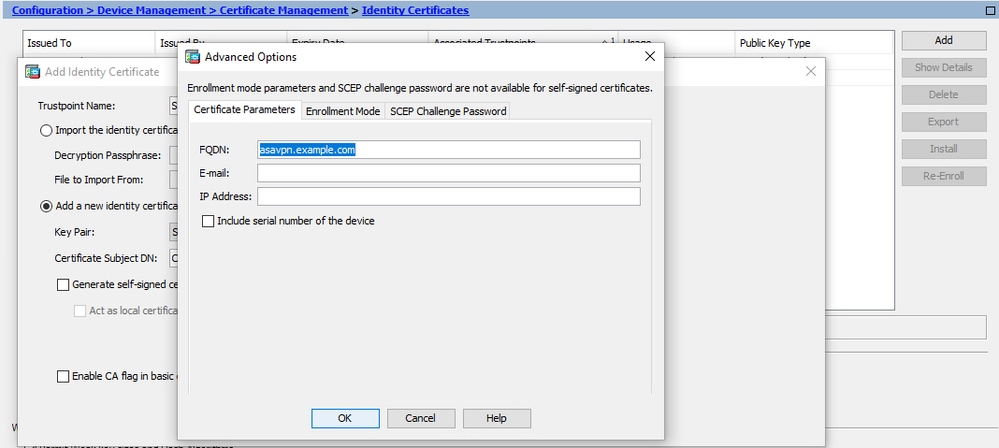
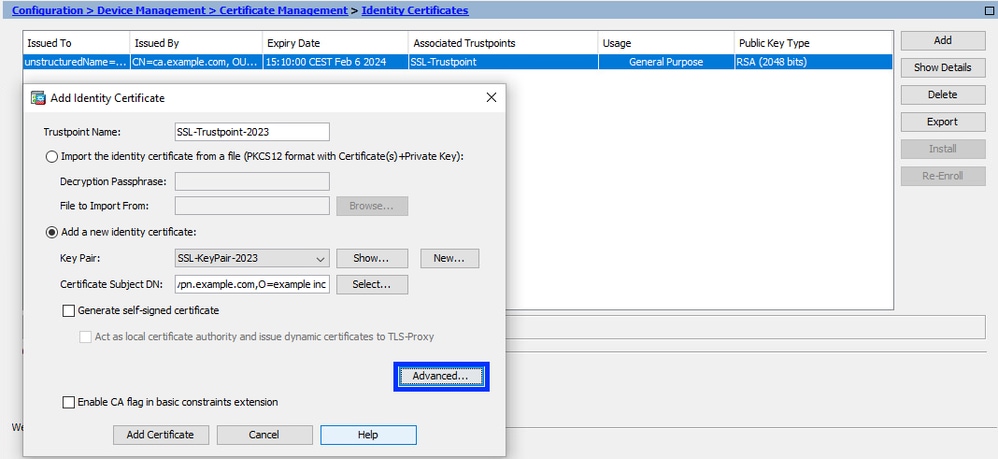
- Configure the device FQDN - click Advanced.
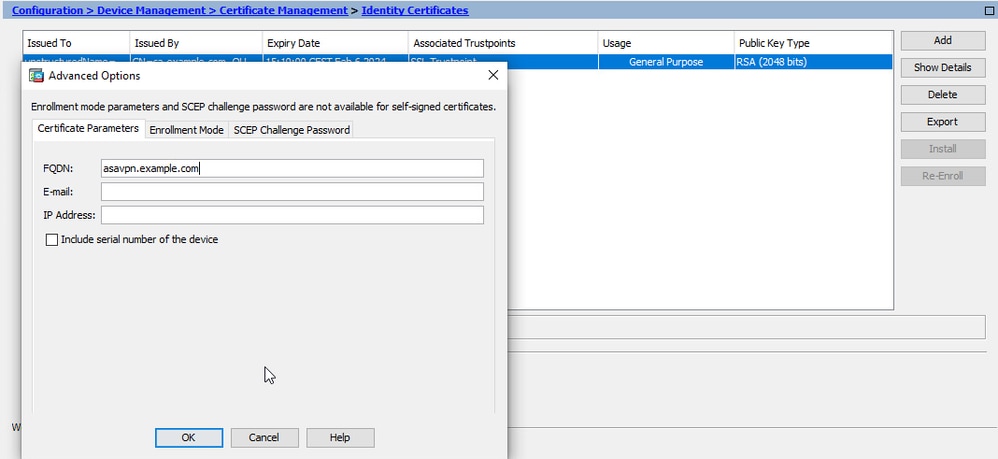
- In the FQDN field, enter the fully-qualified domain name where the device is accessible from the Internet.
- Click OK.
Generate and Save the CSR
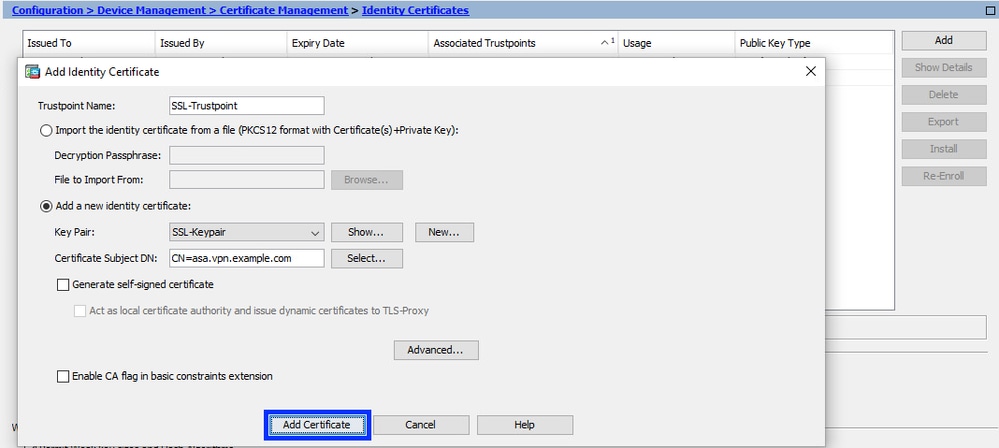
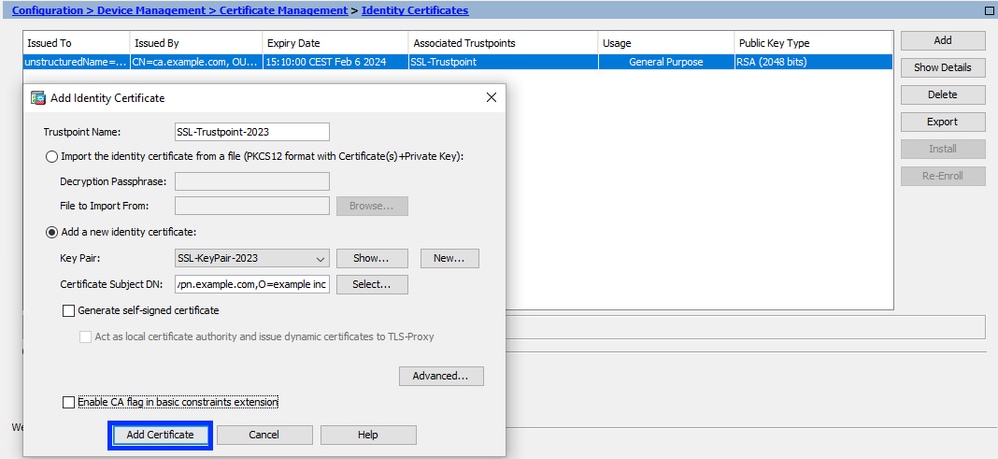
- Click Add Certificate.

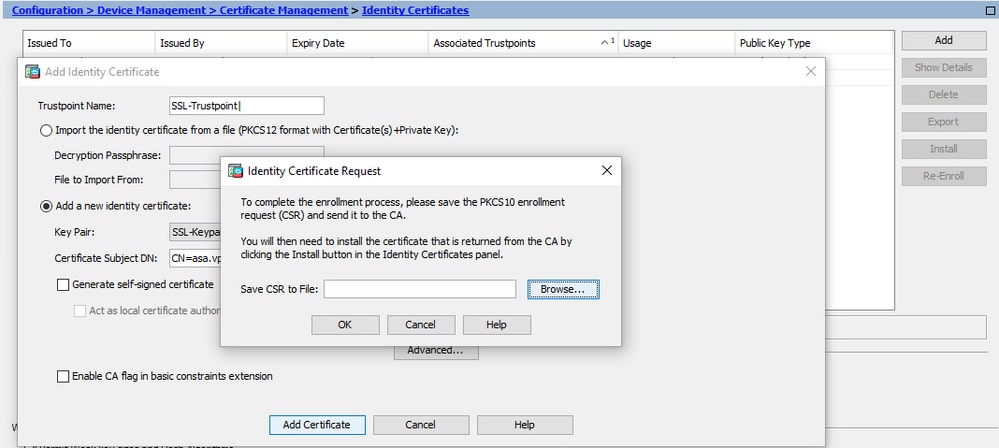
- A prompt displays to save the CSR to a file on the local machine.
- Click Browse and choose a location to save the CSR. Ensure you save the file with the .txt extension.
- Now the new trustpoint is displayed in a Pending state.
Install the Identity Certificate in PEM format with ASDM
The installation steps assume that the CA signed the CSR, and provided a PEM encoded (.pem,.cer, .crt) Identity Certificate and CA certificate bundle.
Install CA Certificate that Signed the CSR
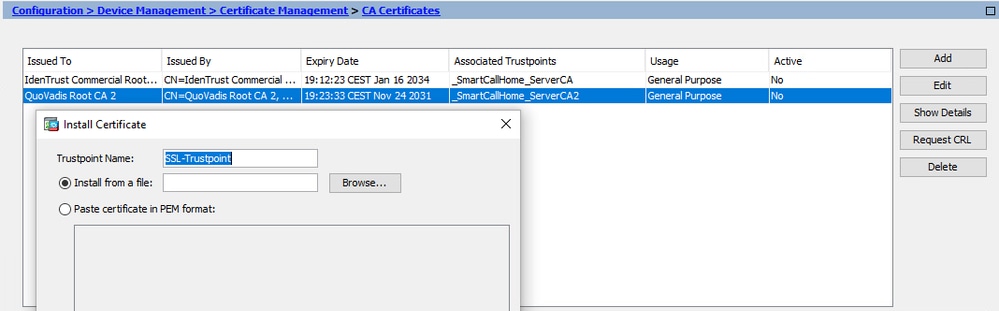
- Navigate to Configuration > Device Management > Certificate Management and choose CA Certificates.
- Click Add.
- Enter the Trustpoint name and select Install From File, click the Browse button, and select the intermediate certificate. Alternatively, paste the PEM encoded CA certificate from a text file into the text field.

- Click Install Certificate.
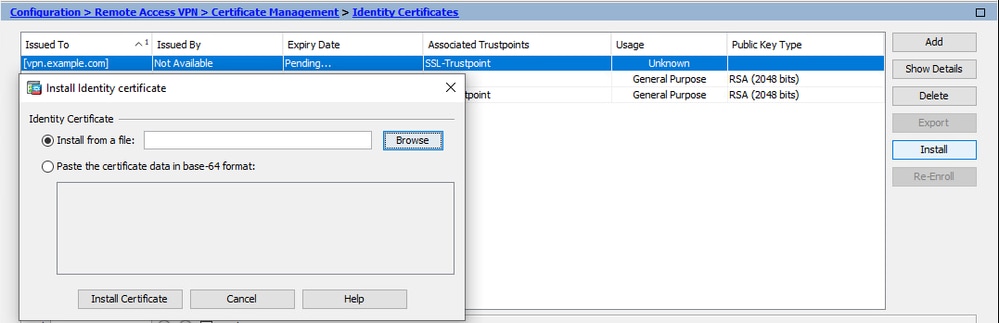
- Install the Identity Certificate
- Choose the Identity Certificate created previously during the CSR generation.
- Click Install.
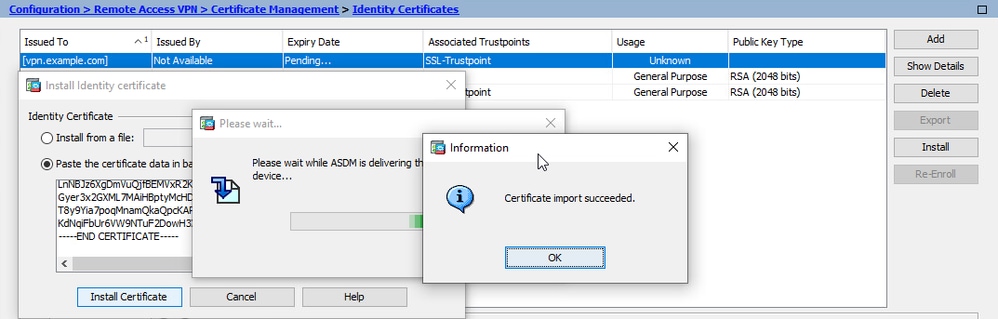
- Choose a file that contains the PEM encoded Identity Certificate received from the CA, or open the PEM encoded certificate in a text editor and copy and paste the Identity Certificate provided by the CA into the text field.
- Click Install Certificate.
Bind the New Certificate to Interface with ASDM
The ASA must be configured to use the new Identity Certificate for WebVPN sessions that terminate on the interface specified.
- Navigate to Configuration > Remote Access VPN > Advanced > SSL Settings.
- Under Certificates, choose the interface that is used to terminate WebVPN sessions. In this example, the outside interface is used.
- Click Edit.
- In the Certificate drop-down list, choose the newly installed certificate.

- Click OK.
- Click Apply.
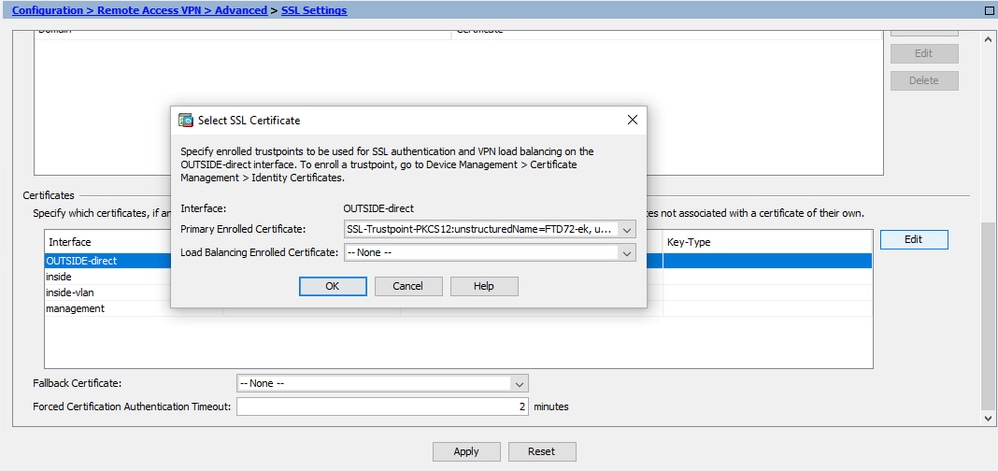
Now the new Identity Certificate is in use.
Install an Identity Certificate Received in PKCS12 Format with ASDM
The PKCS12 file (.p12 or .pfx format) contains Identity Certificate, Key Pair, and CA certificate(s). It is created by the CA, in case of a wildcard certificate, or exported from a different device. It is a binary file, and cannot be viewed with a text editor.
Install the Identity and CA Certificates from a PKCS12 File
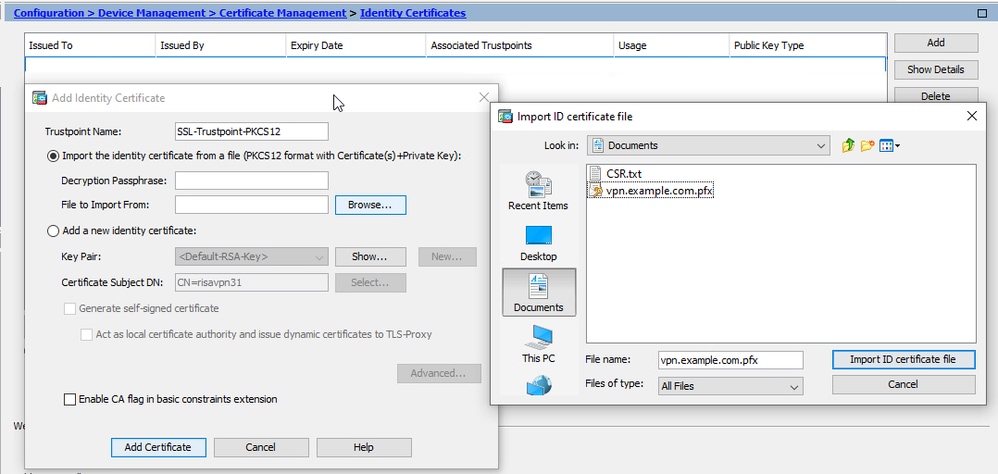
The Identity Certificate, CA certificate(s) and Key Pair must be bundled into a single PKCS12 file.
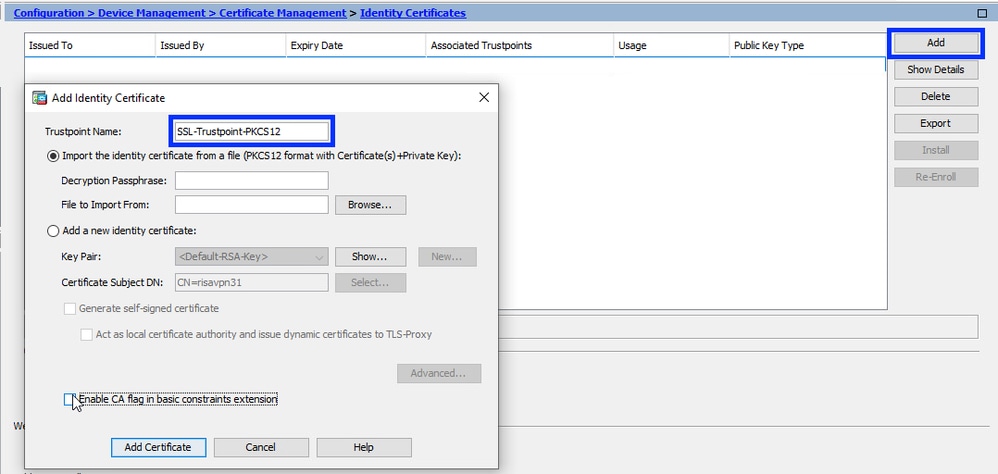
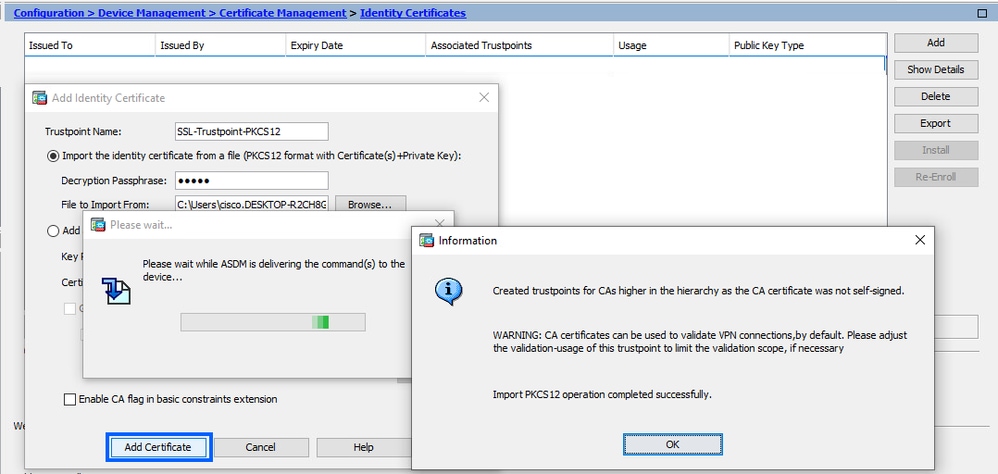
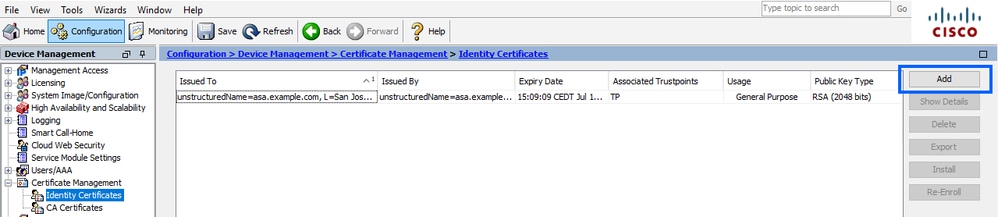
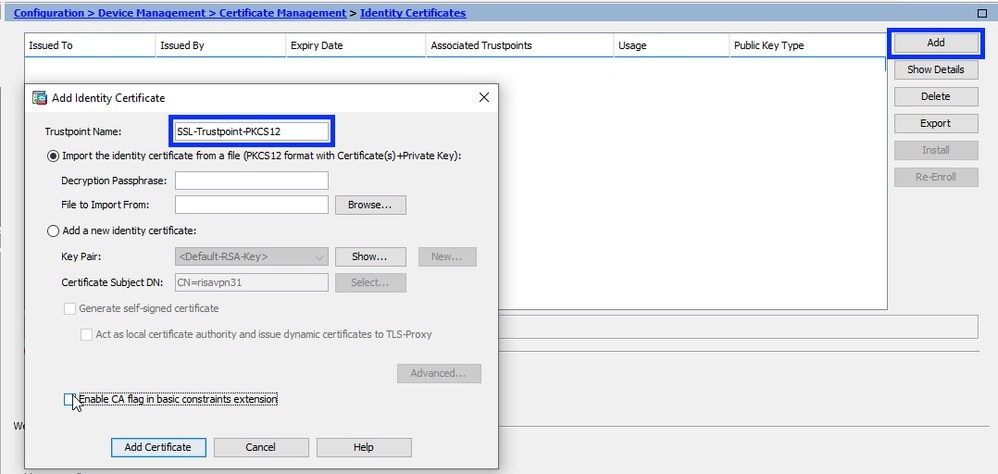
- Navigate to Configuration > Device Management > Certificate Management and choose Identity Certificates.
- Click Add.
- Specify a Trustpoint Name.

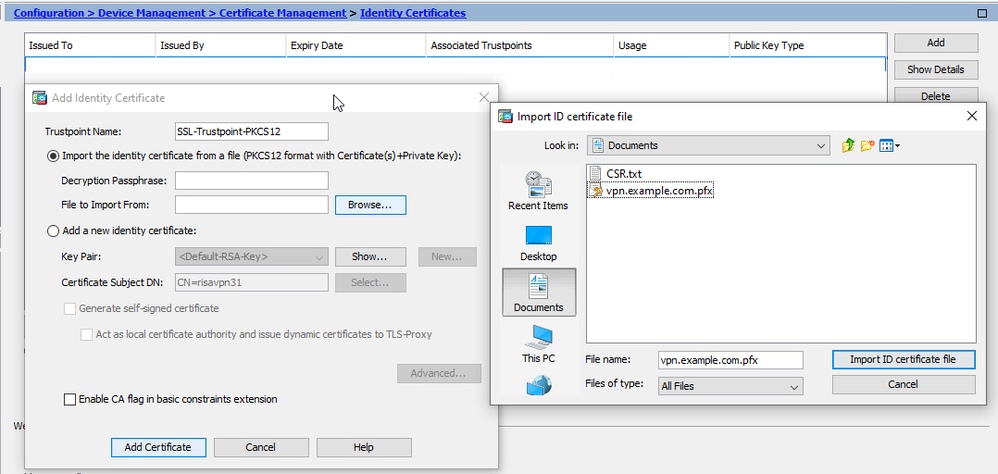
- Click Import the Identity Certificate from a file radio button.
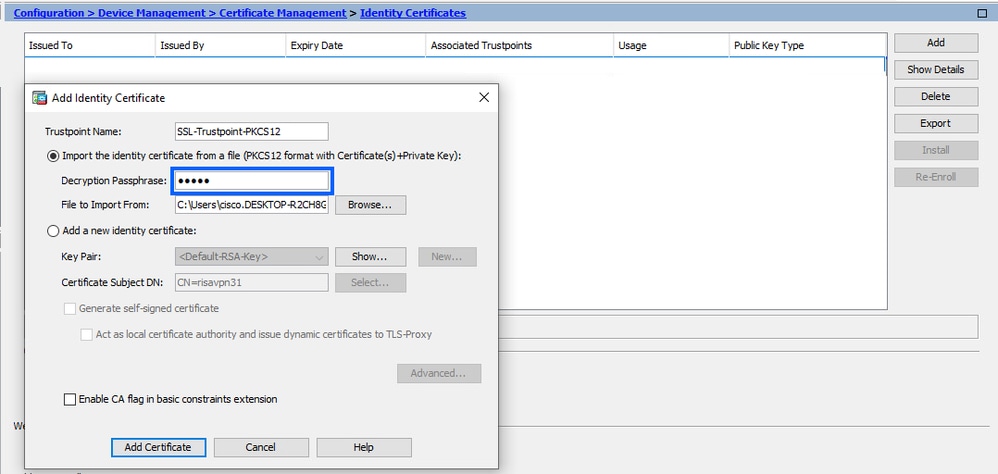
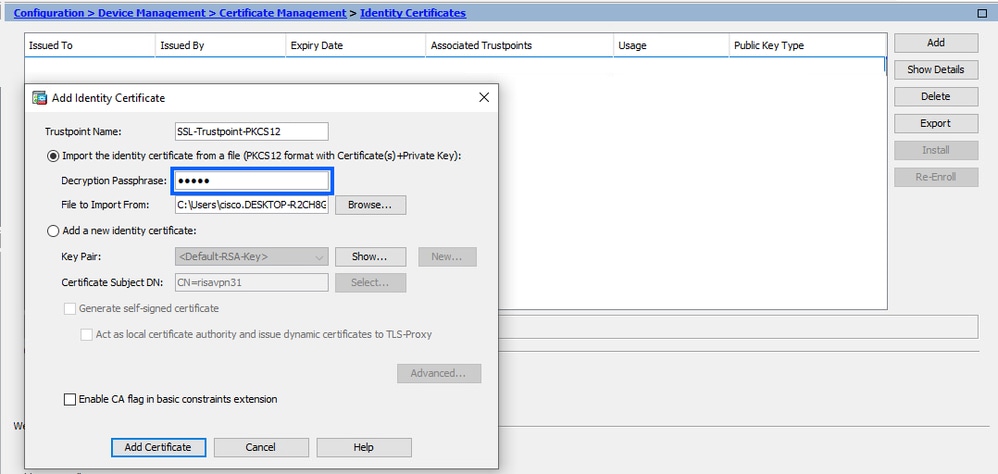
- Enter the passphrase used to create the PKCS12 file.
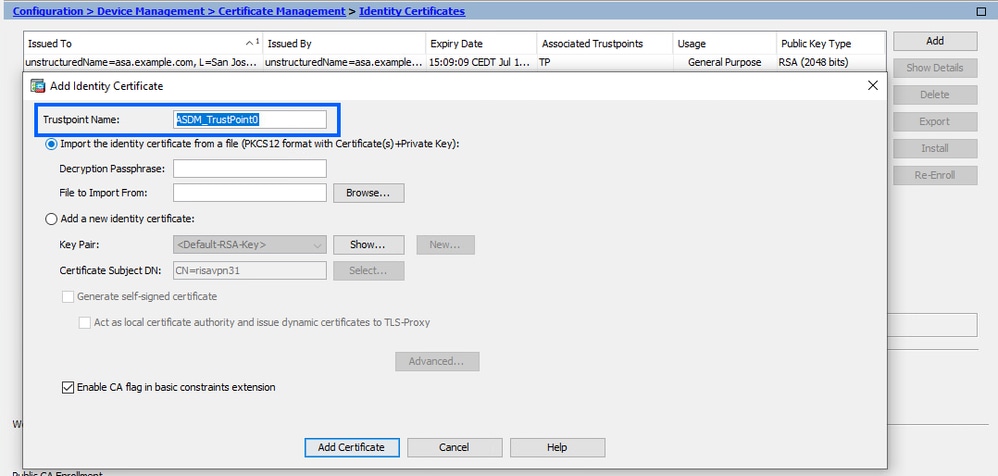
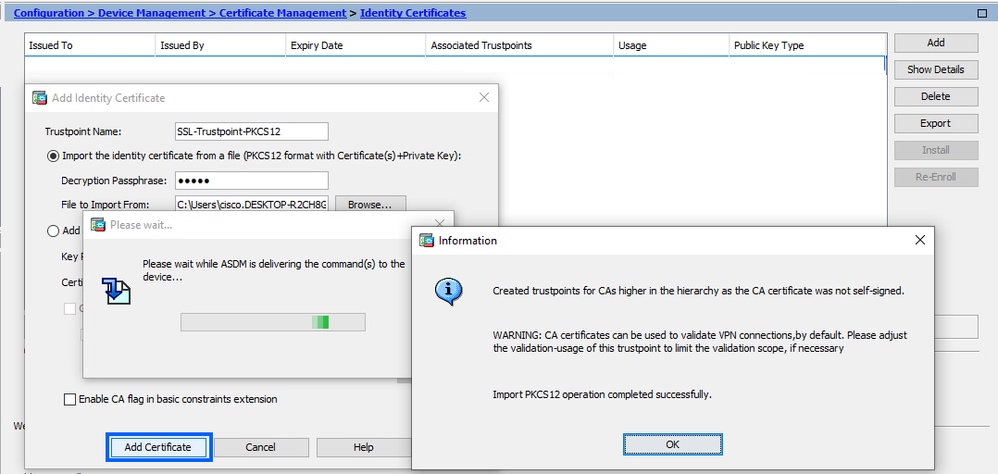
- Click Add Certificate.
Bind the New Certificate to Interface with ASDM
The ASA must be configured to use the new Identity Certificate for WebVPN sessions that terminate on the interface specified.
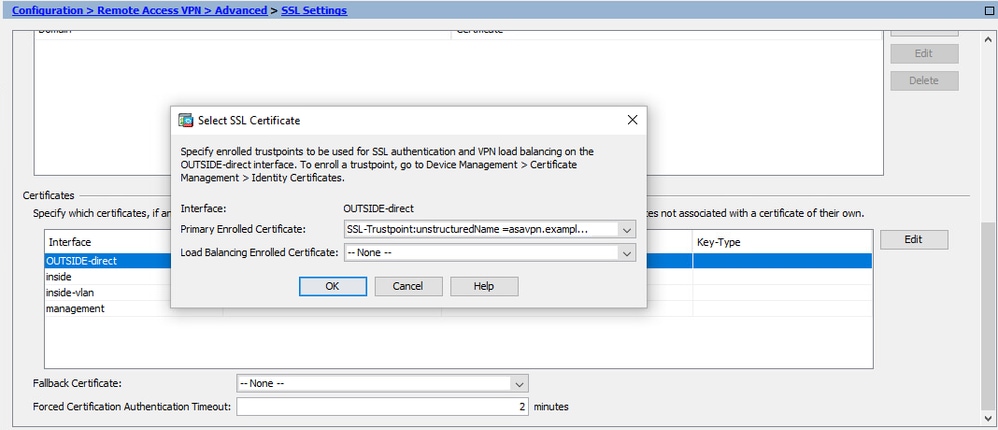
- Navigate to Configuration > Remote Access VPN > Advanced > SSL Settings.
- Under Certificates, select the interface that is used to terminate WebVPN sessions. In this example, the outside interface is used.
- Click Edit.
- In the Certificate drop-down list, choose the newly installed certificate.
- Click OK.
- Click Apply.
- Now the new Identity Certificate is in use.
Certificate Renewal
Renew a Certificate Enrolled with Certificate Signing Request (CSR) with ASDM
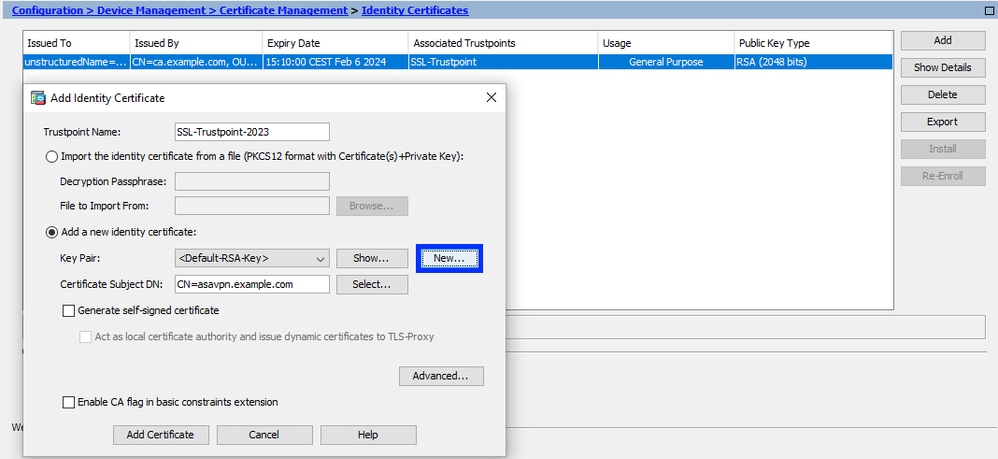
Certificate renewal of CSR enrolled certificate requires you to create and enroll a new Trustpoint. It must have a different name (for example, an old name with the enrollment year suffix). It can use the same parameters and Key Pair as the old certificate, or it can use different ones.
Generate a CSR with ASDM
Create a New Trustpoint with a Specific Name
- Navigate to Configuration > Device Management > Certificate Management > Identity Certificates
- Click Add.
- Define a Trustpoint Name.
- Click Add a New Identity Certificate radio button.
Create a New Key Pair (optional)
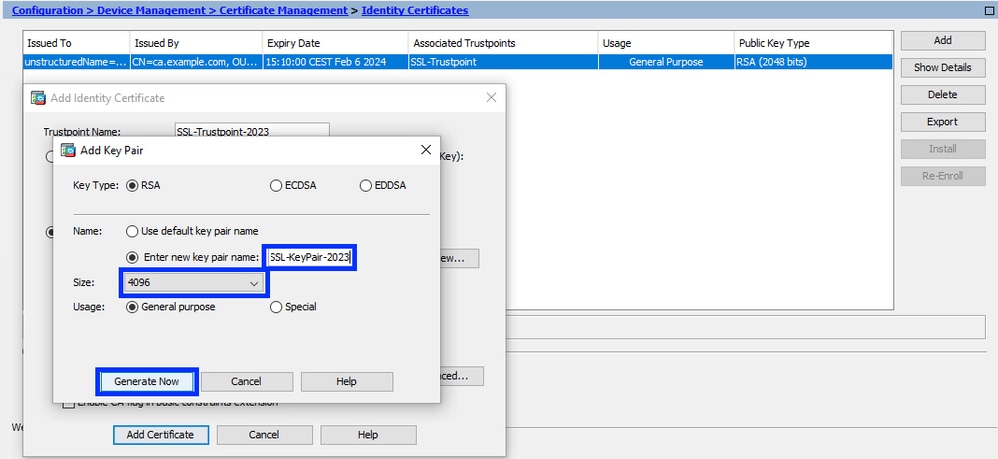
- Click New to generate a new Key Pair.
- Choose the option Enter new Key Pair name and enter a name for the new Key Pair.
- Choose the Key Type - RSA or ECDSA.
- Choose the Key Size - for RSA, choose General purpose for Usage.
- Click Generate Now. The Key Pair is now created.
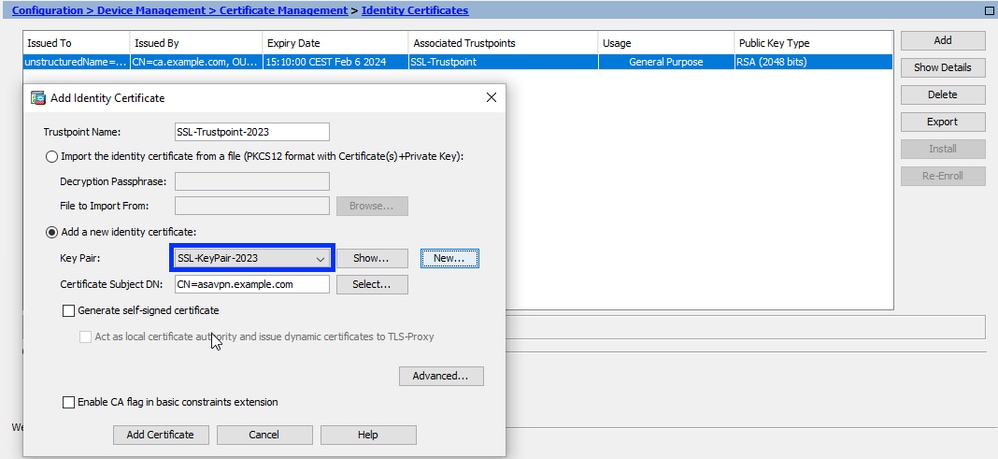
Select the Key Pair Name
- Choose the Key Pair to sign the CSR with and to be binded with the new certificate.
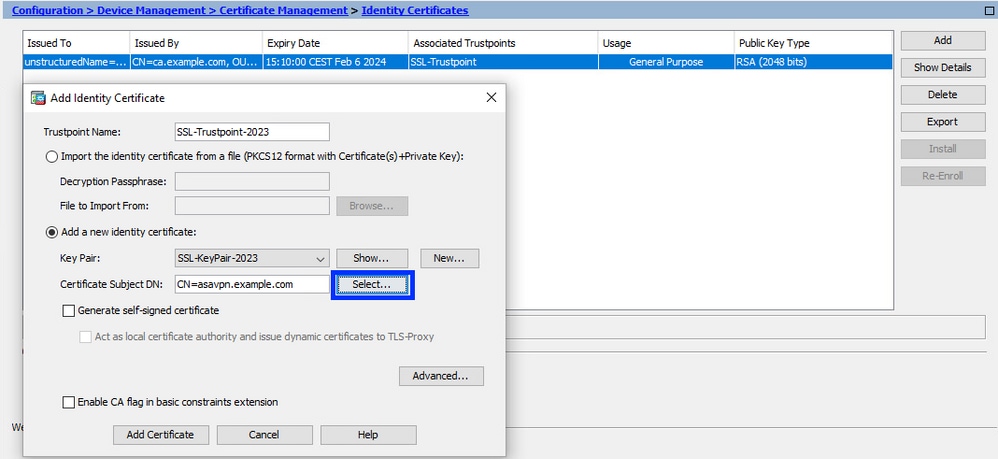
Configure the Certificate Subject and Fully Qualified Domain Name (FQDN)
- Click Select.
- In the Certificate Subject DN window, configure the certificate attributes - select the attribute from the drop-down list, enter the value.
- Click Add.

Attribute
Description CN
The name through which the firewall can be accessed (usually the fully-qualified domain name, for example, vpn.example.com).
OU
The name of your department within the organization.
O
The legally registered name of your organization/company.
C
Country code (2 letter code without punctuation)
ST
The state in which your organization is located.
L
The city in which your organization is located.
EA
Email address
- Click OK after all attributes are added.
- To configure device FQDN, click Advanced.
- In the FQDN field, enter the fully-qualified domain name where the device is accessible from the Internet.
- Click OK.
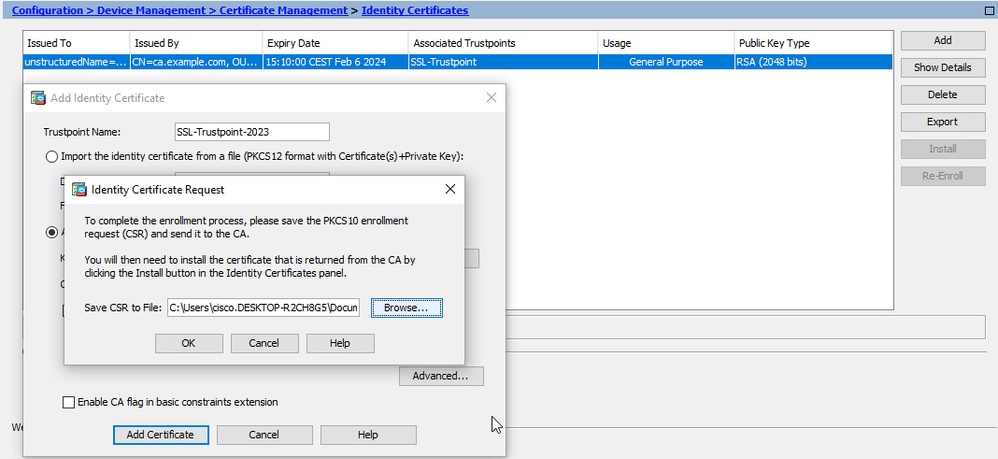
Generate and Save the CSR
- Click Add Certificate.

- A prompt displays to save the CSR to a file on the local machine.

- Click Browse. Choose a location to save the CSR and save the file with the .txt extension.
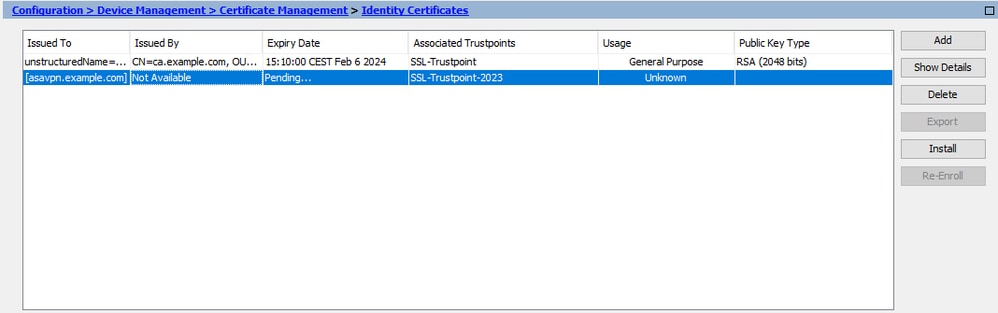
- Now the new trustpoint is displayed in a Pending state.
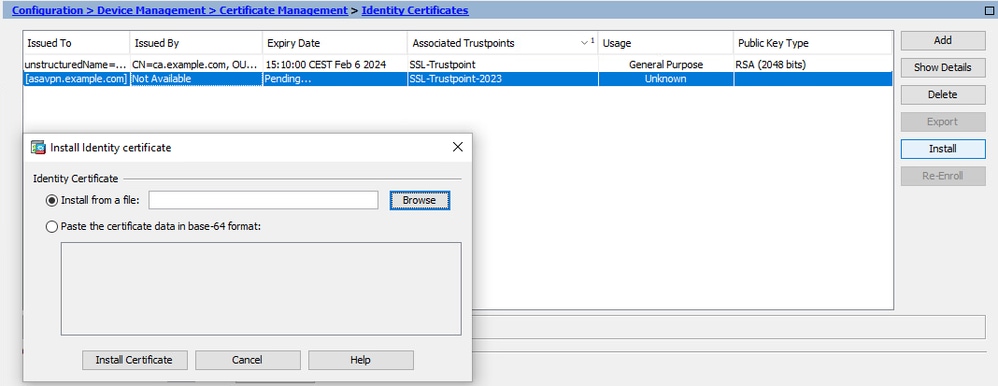
Install the Identity Certificate in PEM Format with ASDM
The installation steps assume that the CA signed the CSR, and provided a PEM encoded (.pem, .cer, .crt) new Identity Certificate and CA certificate bundle.
Install CA Certificate that Signed the CSR
The CA certificate that signed the Identity Certificate can be installed in the Trustpoint created for Identity Certificate. If the Identity Certificate is signed by intermediate CA, then this CA certificate can be installed in the Identity Certificate Trustpoint. All CA certificates upstream in the hierarchy and can be installed in separate CA Trustpoints.
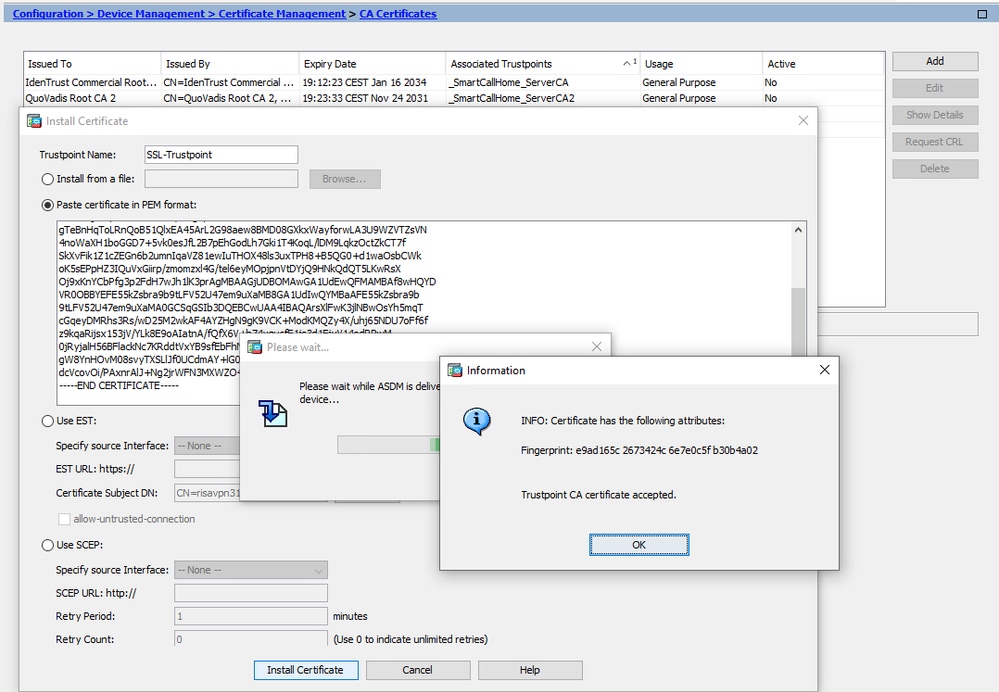
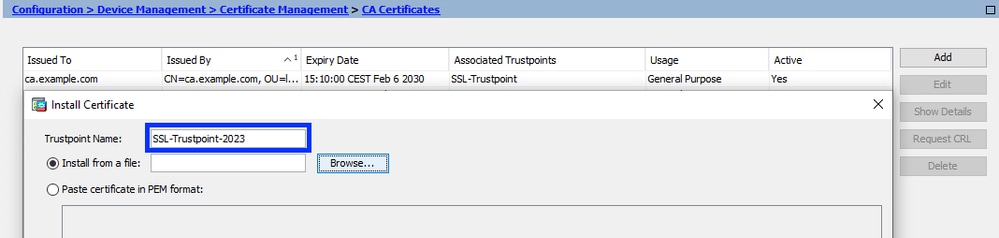
- Navigate to Configuration > Device Management > Certificate Management > and choose CA Certificates.
- Click Add.
- Enter the Trustpoint name and choose Install From File.
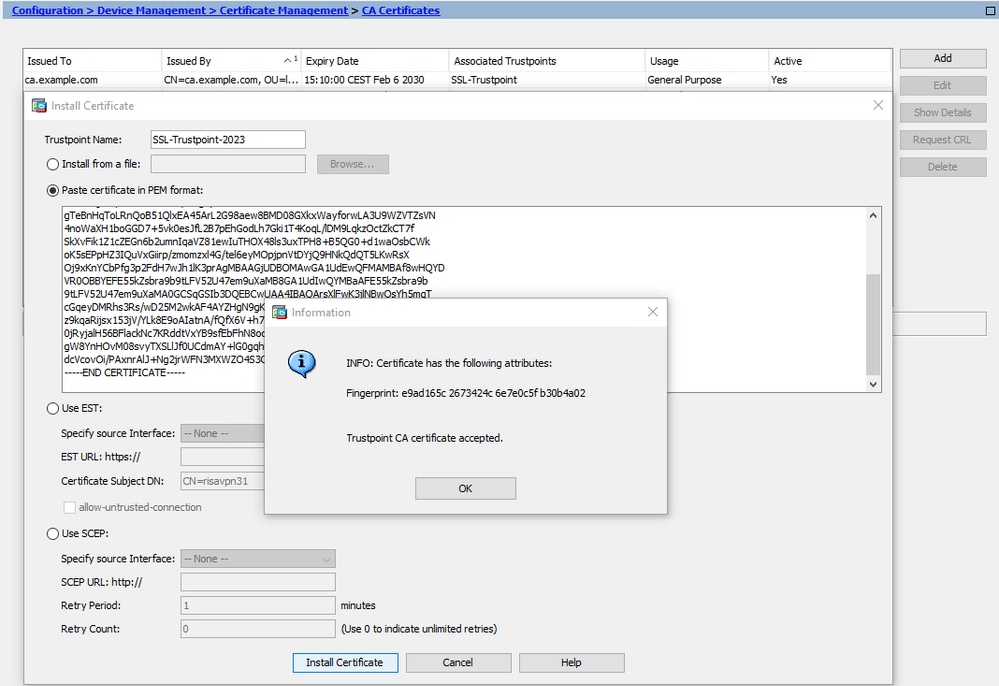
- Click Browse and choose the intermediate certificate. Alternatively, paste the PEM encoded CA certificate from a text file into the text field.

- Click Install Certificate.
In this example, the new certificate is signed with the same CA certificate as the old one. The same CA certificate is associated with two Trustpoints.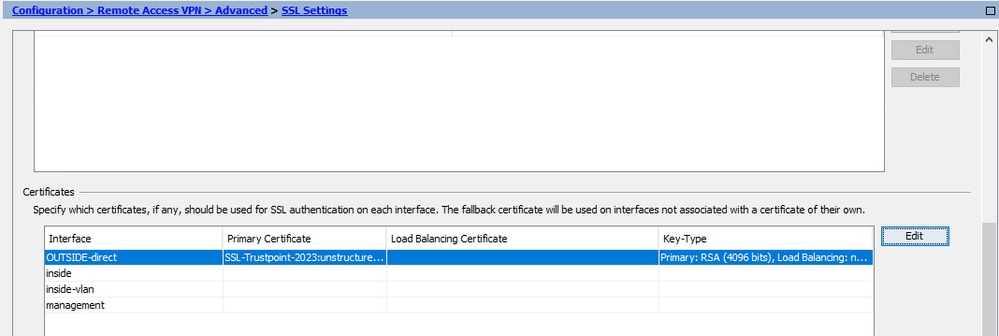
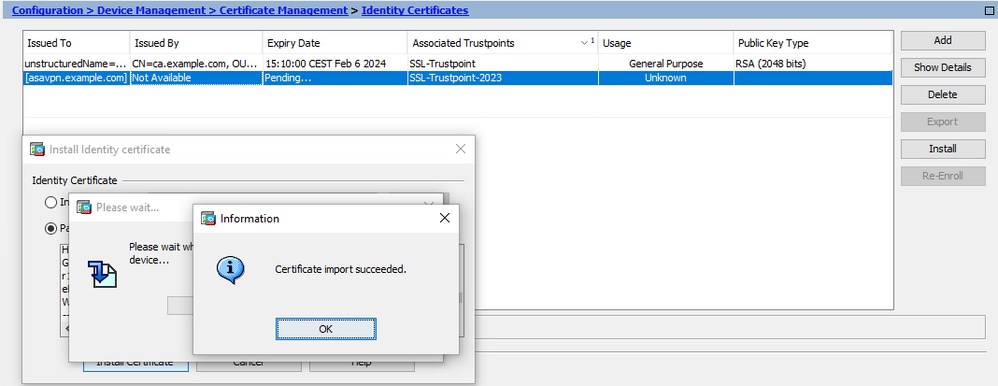
Install the Identity Certificate
- Choose the Identity Certificate created previously with the CSR generation.
- Click Install.
- Choose a file that contains the PEM encoded Identity Certificate received from the CA, or open the PEM encoded certificate in a text editor, and copy and paste the Identity Certificate provided by the CA into the text field.
- Click Install Certificate.
- After the installation, there are old and new Identity Certificates present.
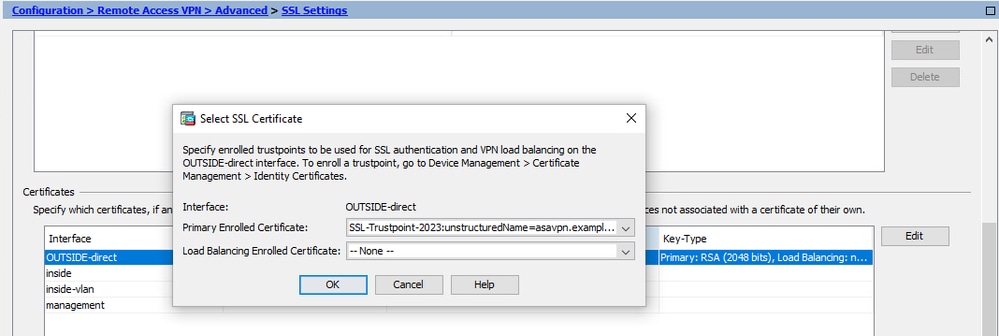
Bind the New Certificate to Interface with ASDM
The ASA must be configured to use the new Identity Certificate for WebVPN sessions that terminate on the interface specified.
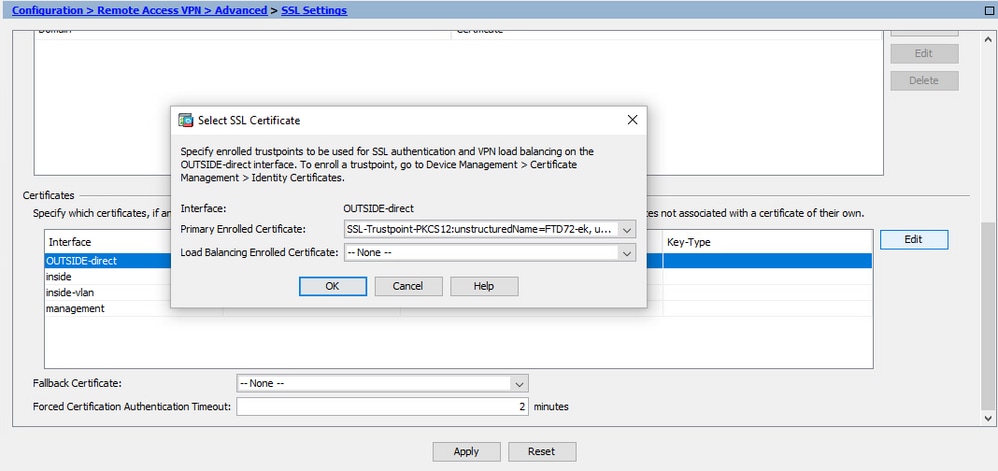
- Navigate to Configuration > Remote Access VPN > Advanced > SSL Settings.
- Under Certificates, choose the interface that is used to terminate WebVPN sessions. In this example, the outside interface is used.
- Click Edit.
- In the Certificate drop-down list, choose the newly installed certificate.

- Click OK.
- Click Apply. Now the new Identity Certificate is in use.
Renew a Certificate Enrolled with PKCS12 File with ASDM
Certificate renewal of PKCS12 enrolled certificate requires you to create and enroll a new Trustpoint. It must have a different name (for example, an old name with the enrollment year suffix).
The PKCS12 file (.p12 or .pfx format) contains Identity Certificate, Key Pair, and CA certificate(s). It is created by the CA, for example, in case of a wildcard certificate, or exported from a different device. It is a binary file, and cannot be viewed with text editor.
Install the Renewed Identity Certificate and CA Certificates from a PKCS12 File
The Identity Certificate, CA certificate(s) and Key Pair must be bundled into a single PKCS12 file.
- Navigate to Configuration > Device Management > Certificate Management and choose Identity Certificates.
- Click Add.
- Specify a new Trustpoint Name.

- Click the Import The Identity Certificate from a file radio button.

- Enter the passphrase used to create the PKCS12 file.
- Click Add Certificate.

Bind the New Certificate to Interface with ASDM
The ASA must be configured to use the new Identity Certificate for WebVPN sessions that terminates on the interface specified.
- Navigate to Configuration > Remote Access VPN > Advanced > SSL Settings
- Under Certificates, choose the interface that is used to terminate WebVPN sessions. In this example, the outside interface is used.
- Click Edit.
- In the Certificate drop-down list, choose the newly installed certificate.
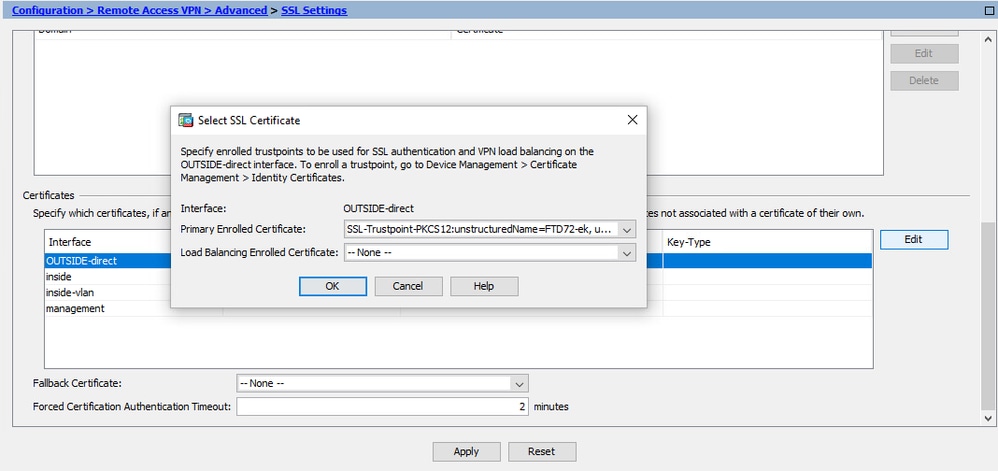
- Click OK.
- Click Apply.

- Now the new Identity Certificate is in use.
Verify
Use these steps to verify the successful installation of third-party Vendor Certificate(s) and use for SSL VPN connections.
View Installed Certificates via ASDM
- Navigate to Configuration > Remote Access VPN > Certificate Management and choose Identity Certificates.
- The Identity Certificate issued by the third-party vendor is visible.

Troubleshoot
If an SSL certificate installation fails, this debug command is collected on the CLI to gather diagnostic information.
- debug crypto ca 14
Frequently Asked Questions
Q. What is a PKCS12?
A. In cryptography, PKCS12 defines an archive file format created to store many cryptography objects as a single file. It is commonly used to bundle a private key with its X.509 certificate or to bundle all members of a chain of trust.
Q. What is a CSR?
A. In public key infrastructure (PKI) systems, a certificate signing request (also CSR or certification request) is a message sent from an applicant to a registration authority of the public key infrastructure to apply for a digital Identity Certificate. It usually contains the public key for which the certificate can be issued, information that is used to identify the signed certificate (such as a domain name in Subject) and integrity protection (for example, a digital signature).
Q. Where is the password of the PKCS12?
A. When certificates and Key Pairs are exported to a PKCS12 file, the password is given in the export command. For importing a PKCS12 file, the password must be delivered by the owner of the CA Server or a person that exported the PKCS12 from another device.
Q. What is the difference between the root and the identity?
A. In cryptography and computer security, a root certificate is a public key certificate that identifies a root certificate authority (CA). Root certificates are self-signed (and it is possible for a certificate to have multiple trust paths, say, if the certificate was issued by a root that was cross-signed) and form the basis of an X.509-based public key infrastructure (PKI). A public key certificate, also known as a digital certificate or Identity Certificate, is an electronic document used to prove the ownership of a public key. The certificate includes information about the key, information about the identity of its owner (called the subject), and the digital signature of an entity that has verified the certicates contents (called the issuer). If the signature is valid, and the software that examines the certificate trusts the issuer, then it can use that key to communicate securely with the certificates subject.
Q. I installed the certificate, why does it not work?
A. This could be due to many reasons, for example:
1. The certificate and trustpoint are configured, however, they have not been bound to the process that uses it. For example, the trustpoint used is not binded to the outside interface which terminates Cisco Secure Access AnyConnect VPN clients connections.
2. A PKCS12 file is installed, but gives errors due to the intermediate CA certificate missing in the PKCS12 file. The clients that have the intermediate CA certificate as trusted, but do not have root CA certificate as trusted, and cannot verify the whole certificate chain and report the server Identity Certificate as not trusted.
3. A certificate populated with incorrect attributes can cause installation failure, or client side errors. For example, certain attributes are encoded using the wrong format. Another reason is that the Identity Certificate is missing Subject Alternative Name (SAN), or the domain name used to access the server is not present as a SAN.
Q. Does an installation of a new certificate require a maintenance window or causes downtime?
A. Installation of a new certificate (identity or CA) is not intrusive and does not cause downtime or requre a maintenance window. To enable a new certificate to be used for a service that exists is a change and requires a change request / maintenance window.
Q. Can adding or changing a certificate disconnect the connected users?
A. No, users that are currently connected stay connected. The certificate is used at connection establishment. Once the users reconnect, the new certificate is used.
Q. How can I create a CSR with a wildcard? Or a Subject Alternative Name (SAN)?
A. Currently, the ASA/FTD cannot create a CSR with a wildcard; however, this process can be done with OpenSSL. In order to generate the CSR and ID key, you can run the commands:
openssl genrsa -out id.key 2048
openssl req -out id.csr -key id.key -new
When a trustpoint is configured with a Fully Qualified Domain Name (FQDN) attribute, the CSR created by ASA/FTD contains the SAN with that value. More SAN attributes can be added by the CA when it signs the CSR, or the CSR can be created with OpenSSL
Q. Does a certificate replacement take effect immediately?
A. The new server Identity Certificate is used only for new connections. A new certificate is ready to be used immediately after the change, but is used with new connections.
Q. How can I check if the installation worked?
A. The CLI command to verify: show crypto ca cert <trustpointname>
Q. How do I generate PKCS12 from The Identity Certificate, CA certificate, and private key?
A. PKCS12 can be created with OpenSSL, with the command:
openssl pkcs12 -export -out p12.pfx -inkey id.key -in id.crt -certfile ca.crt
Q. How do I export a certificate to install it in a new ASA?
A.
-
With CLI: use the command: crypto ca export <trustpointname> pkcs12 <password>
-
With ASDM:
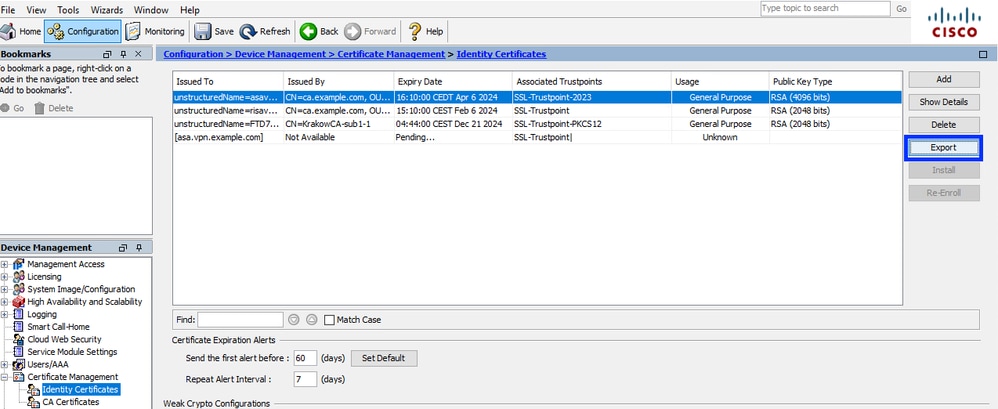
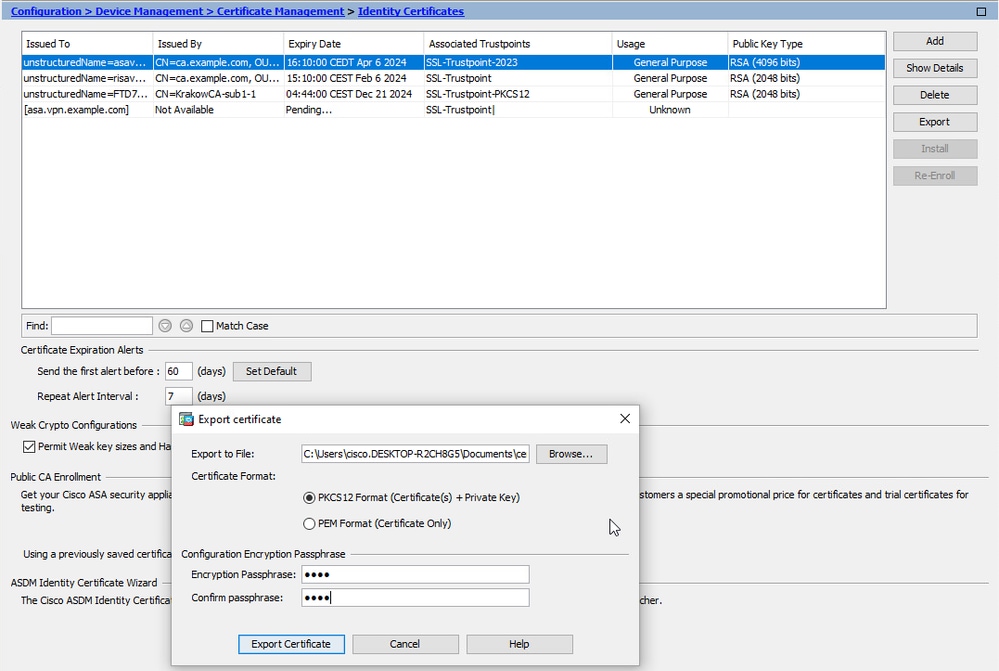
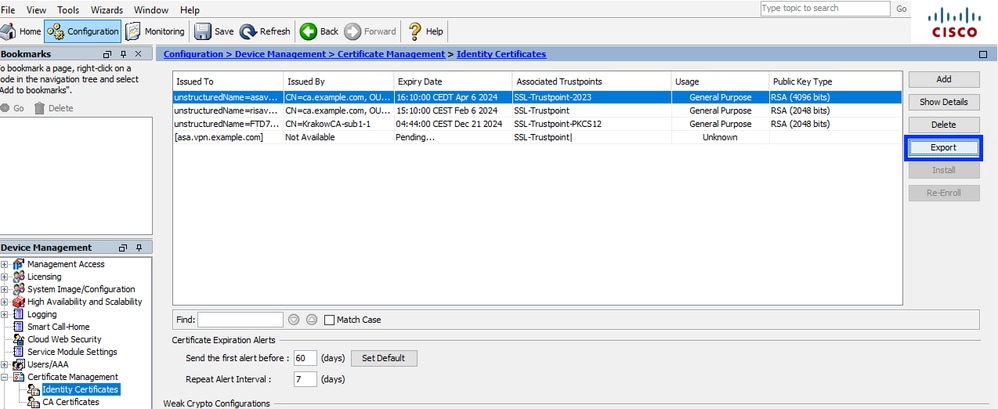
- Navigate to Configuration > Device Management > Certificate Management > Identity Certificates and choose the Identity Certificate.
- Click Export.
- Choose where to export the file, specify the export password, click Export Certificate.
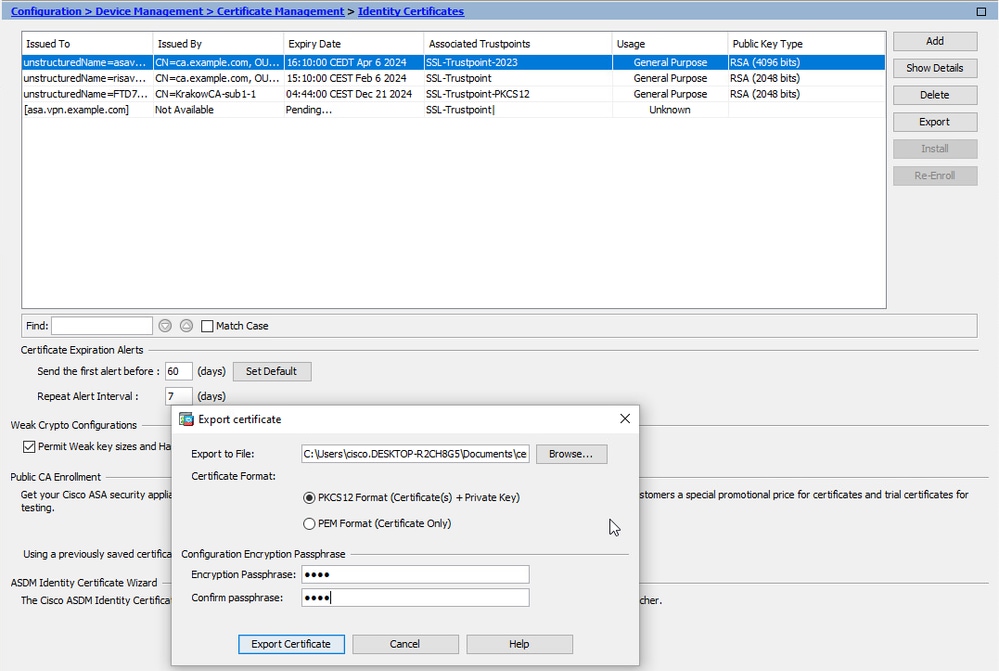
- The exported certificate can be saved on the local computer disk. Please put the passphrase in a safe place as the file is useless without it.
Q. If ECDSA keys are used, is the SSL certificate generation process different?
A. The only difference in configuration is the key pair generation step, where an ECDSA key pair can be generated instead of an RSA key pair. The rest of the steps remain the same.
Q. Is it always required to generate a new Key Pair?
A.The Key Pair generation steps are optional. The Existing Key Pair can be used, or if the PKCS12 Key Pair is imported with the certificate. Please see the Select the Key Pair Name section for the respective enrollment / re-enrollment type.
Q. Is it safe to generate a new Key Pair for a new Identity Certificate?
A. This process is safe as long as a new Key Pair name is used. In such a case, the old Key Pairs are not changed.
Q. Is it required to generate the key again when a firewall is replaced (like RMA)?
A. The new firewall by design does not have Key Pairs present on the old firewall.
The backup of running-configuration does not contain the Key Pairs. The full backup done with ASDM can contain the Key Pairs.
The Identity Certificates can be exported from an ASA with ASDM or CLI, before it fails. In case of failover pair, the certificates and Key Pairs are synchronized to a standby unit with a write standby command. If one node of failover pair is replaced, it is enough to configure the basic failover and push the configuration to the new device.
If a Key Pair is lost with the device and there is no backup, a new certificate must be signed with a Key Pair present on the new device.
Revision History
| Revision | Publish Date | Comments |
|---|---|---|
5.0 |
29-May-2026
|
Updated spacing, headers, and rewrote a couple sentences due to structure/grammar. |
4.0 |
15-Nov-2024
|
Updated Machine Translation, and Formatting. |
3.0 |
25-Jul-2024
|
Updated Alt Text, style issues, expressions, and punctuation/capitalization. |
2.0 |
22-Apr-2023
|
Updated Contributor List. |
1.0 |
19-Apr-2023
|
Initial Release |
 Feedback