CSM - How to install Third-Party SSL Certificates for GUI access
Available Languages
Download Options
Bias-Free Language
The documentation set for this product strives to use bias-free language. For the purposes of this documentation set, bias-free is defined as language that does not imply discrimination based on age, disability, gender, racial identity, ethnic identity, sexual orientation, socioeconomic status, and intersectionality. Exceptions may be present in the documentation due to language that is hardcoded in the user interfaces of the product software, language used based on RFP documentation, or language that is used by a referenced third-party product. Learn more about how Cisco is using Inclusive Language.
Contents
Introduction
Cisco Security Manager (CSM) provides an option to use security certificates issued by third-party Certificate Authorities (CAs). These certificates can be used when the organizational policy prevents from using CSM self-signed certificates or requires systems to use a certificate obtained from a particular CA.
TLS/SSL uses these certificates for communication between CSM Server and the client browser. This document describes the steps to generate a Certificate Signing Request (CSR) in CSM and how to install the identity and root CA certificates in the same.
Prerequisites
Requirements
Cisco recommends that you have knowledge of these topics:
- Knowledge of SSL Certificates Architecture.
- Basic Knowledge of Cisco Security Manager.
Components Used
The information in this document is based on these software and hardware versions:
- Cisco Security Manager version 4.11 and later.
CSR creation from the User Interface
This section describes how to generate a CSR.
Step 1. Run the Cisco Security Manager home page and select Server Administration > Server > Security > Single-Server Management > Certificate Setup.
Step 2. Enter the values required for the fields described in this table:
|
Field |
Usage Notes |
|
Country Name |
Two character country code. |
|
State or Province |
Two character state or province code or the complete name of the state or province. |
|
Locality |
Two character city or town code or the complete name of the city or town. |
|
Organization Name |
Complete name of your organization or an abbreviation. |
|
Organization Unit Name |
Complete name of your department or an abbreviation. |
|
Server Name |
DNS name, IP Address or hostname of the computer. Enter the server name with a proper and resolvable domain name. This is displayed on your certificate (whether self-signed or third party issued). Local host or 127.0.0.1 should not be given. |
|
Email Address |
E-mail address to which the mail has to be sent. |
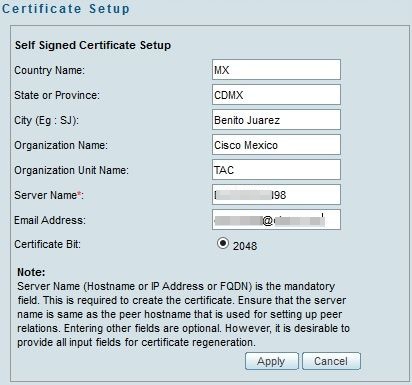
Step 3. Click Apply to create the CSR.
The process generates the following files:
- server.key—Server's private key.
- server.crt—Server's self- signed certificate.
- server.pk8—Server's private key in PKCS#8 format.
- server.csr—Certificate Signing Request (CSR) file.
Note: This is the path for the generated files.
~CSCOpx\MDC\Apache\conf\ssl\chain.cer
~CSCOpx\MDC\Apache\conf\ssl\server.crt
~CSCOpx\MDC\Apache\conf\ssl\server.csr
~CSCOpx\MDC\Apache\conf\ssl\server.pk8
~CSCOpx\MDC\Apache\conf\ssl\server.key
Note: If the certificate is a self-signed certificate, then you cannot modify this information.
Identity Certificate Upload into CSM Server
This section describes how to upload the Identity Certificate provided by the CA to the CSM Server
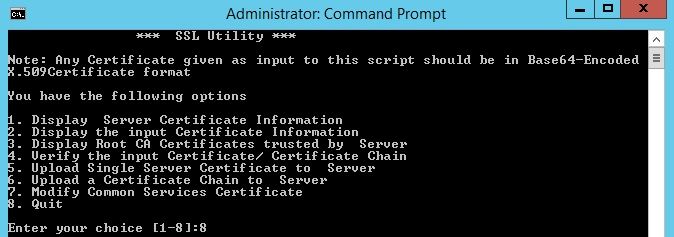
Step 1 Find the SSL Utility Script available at this location
NMSROOT\MDC\Apache
Note: NMSROOT must be replaced by the directory where CSM is installed.
This utility has these options.
|
Number |
Option |
What it Does... |
|
|
1 |
Display Server certificate information |
For third party issued certificates, this option displays the details of the server certificate, the intermediate certificates, if any, and the Root CA certificate.
|
|
|
2 |
Display the input certificate information |
This option accepts a certificate as an input and:
|
|
|
3 |
Display Root CA certificates trusted by Server |
Generates a list of all Root CA Certificates. |
|
|
4 |
Verify the input certificate or certificate chain |
Verifies whether the server certificate issued by third party CAs, can be uploaded. When you choose this option, the utility:
After the verification is successfully completed, you are prompted to upload the certificates to CSM Server. The utility displays an error:
You must contact the CA who issued the certificates to correct these problems before you upload the certificates to CSM. |
|
|
5 |
Upload single server certificate to Server |
You must verify the certificates using option 4 before you select this option. Select this option, only if there are no intermediate certificates and there is only the server certificate signed by a prominent Root CA certificate. If the Root CA is not one trusted by CSM, do not select this option. In such cases, you must obtain a Root CA certificate used for signing the certificate from the CA and upload both the certificates using option 6. When you select this option, and provide the location of the certificate, the utility:
After the verification is successfully completed, the utility uploads the certificate to CiscoWorks Server. The utility displays an error:
You must contact the CA who issued the certificates to correct these problems before you upload the certificates in CSM again. |
|
|
6 |
Upload a certificate chain to Server |
You must verify the certificates using option 4 before you select this option. Select this option, if you are uploading a certificate chain. If you are also uploading the root CA certificate also, you must include it as one of the certificates in the chain. When you select this option and provide the location of the certificates, the utility:
After the verification is successfully completed, the server certificate is uploaded to CiscoWorks Server. All the intermediate certificates and the Root CA certificate are uploaded and copied to the CSM TrustStore. The utility displays an error:
You must contact the CA who issued the certificates to correct these problems before you upload the certificates in CiscoWorks again. |
|
|
7 |
Modify Common Services Certificate |
This option allows you to modify the Host Name entry in the Common Services Certificate. You can enter an alternate Hostname if you wish to change the existing Host Name entry. |
Step 2 Use Option 1 to get a copy of the current certificate and save it for future reference.
Step 3 Stop the CSM Daemon Manager using this command on Windows Command Prompt before starting the certificate upload process.
net stop crmdmgtd
Note: CSM services goes down using this command. Make sure there are no deployments active during this procedure.
Step 4 Open SSL Utility one more time. This Utility can be opened using the Command Prompt by navigating to the previously mentioned path and using this command.
perl SSLUtil.pl
Step 5 Select Option 4. Verify the input Certificate/ Certificate Chain.
Step 6 Enter the certificates location (server certificate and intermediate certificate).
Note: The script verifies if the server certificate is valid. After the verification is complete, the utility displays the options. If the script reports errors during validation and verification, the SSL Utility displays instructions to correct these errors. Follow the instructions to correct those problems and then try the same option one more time.
Step 7 Select any of the next two options.
Select Option 5 if there is only one certificate to upload, that is if the server certificate is signed by a Root CA certificate.
OR
Select Option 6 if there is a certificate chain to upload, that is if there is a server certificate and intermediate certificate.
Note: CiscoWorks does not allow to proceed with the upload if CSM Daemon Manager hasn't been stopped. The utility displays a warning message if there are hostname mismatches detected in the server certificate being uploaded, but the upload can be continued.
Step 8 Enter these required details.
- Location of the certificate
- Location of intermediate certificates, if any.
SSL Utility uploads the certificates if all the details are correct and the certificates meet CSM requirements for security certificates.
Step 9 Restart the CSM Daemon Manager for the new change to take effect and enable CSM services.
net start crmdmgtd
Note: Await for an overall of 10 minutes for all of the CSM services to be re-started.
Step 10 Confirm the CSM is using the identity certificate installed.
Note: Don't forget to install the root and intermediate CA certificates in the PC or server from where the SSL connection is being stablished to the CSM.
Contributed by Cisco Engineers
- David RomanCisco TAC
- Christian HernandezCisco TAC
- Cesar Lopez ZamarripaCisco TAC
 Feedback
Contact Cisco
- Open a Support Case

- (Requires a Cisco Service Contract)