Configure Azure Entra Captive Portal on Secure Firewall
Available Languages
Contents
Introduction
This document describes the configuration of Microsoft Azure Entra ID for use with captive portal (active authentication) on Cisco Secure Firewall.
Prerequisites
Requirements
Cisco recommends knowledge of these topics:
- Security Assertion Markup Language (SAML)
- Microsoft Azure
- Cisco Secure Firewall Management Center (FMC)
- Cisco Secure Firewall Threat Defense (FTD)
You must have the Standard pricing tier available in Azure for Event Hub creation. Additionally, devices must be activated with Smart Licensing enabled with export-controlled functionality.
Components Used
The information in this document is based on these software and hardware versions:
- Cisco Secure FTD version 10.0
- Cisco Secure FMC version 10.0
The information in this document was created from the devices in a specific lab environment. All of the devices used in this document started with a cleared (default) configuration. If your network is live, ensure that you understand the potential impact of any command.
Background Information
As traditional IP-based security architectures struggle to keep pace with dynamic, hybrid work environments, Cisco Secure Firewall Active Authentication with SAML integration offers a robust, identity-centric solution. By leveraging Microsoft Entra ID (Azure AD) as a centralized identity provider, this configuration enables administrators to move beyond static network rules and enforce granular access control based on verified user identity rather than volatile network addresses. This integration streamlines the user experience through seamless Single Sign-On (SSO) and mandatory Multi-Factor Authentication (MFA), while also ensuring a unified security posture that maintains strict visibility and policy enforcement across a perimeter-less network.
Diagram
Captive Portal Between Endpoint, FTD, and Azure Entra
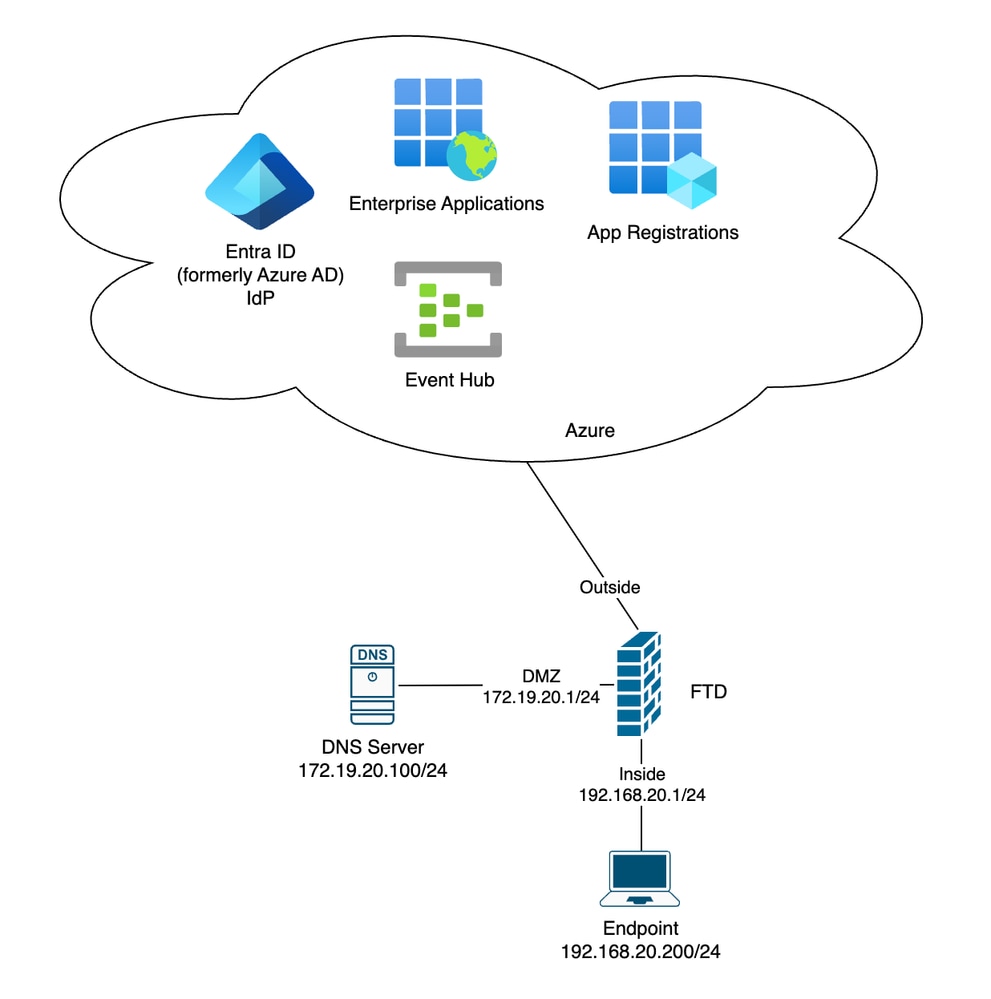 Captive Portal Between EndPoint And Azure Entra
Configure
Phase 1: Initial FMC and DNS Configuration

Note: This lab uses cloud-delivered Firewall Management Center (cdFMC); however, the steps remain the same for on-premises FMC.
Step 1: Enable the Cisco Dynamic Attributes Connector (CSDAC)
1) Choose Integrations > Dynamic Attributes Connector.
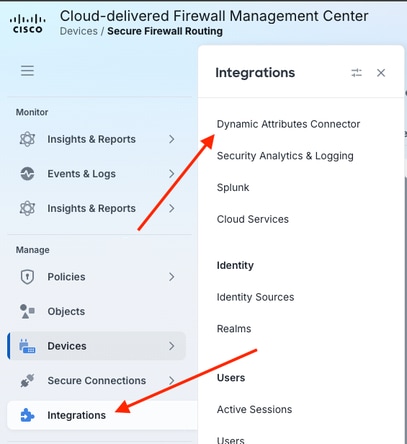 Choose Integrations Dynamic Attributes Connector
2) Click the control adjacent to the Disabled string to enable CSDAC.
 Enable Cisco Dynamic Attributes Connector
c) Click Done once CSDAC enablement completes.
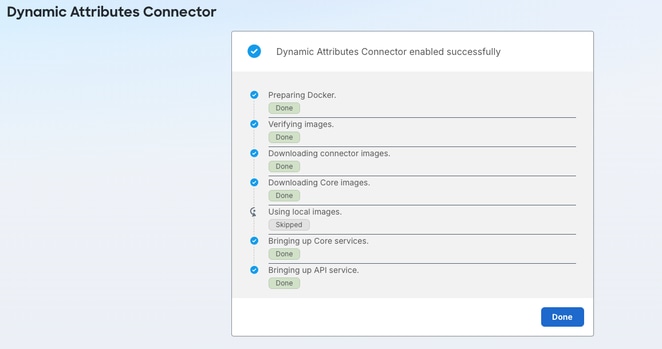 Enable Cisco Dynamic Attributes Connector Status
Step 2: Create a Fully Qualified Domain Name Network Object Representative of the FTD Ingress Interface
1) Choose Objects > Add Network > Add Object.
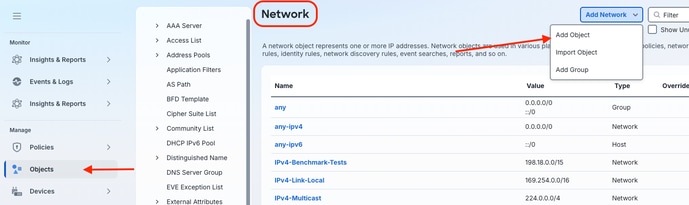 Create New Fully Qualified Domain Name Network Object
2) Name the Network Object configured with the Fully Qualified Domain Name (FQDN). Enter the FQDN, and assign the Network Object as an FQDN type by clicking the appropriate radio button. Click Save.
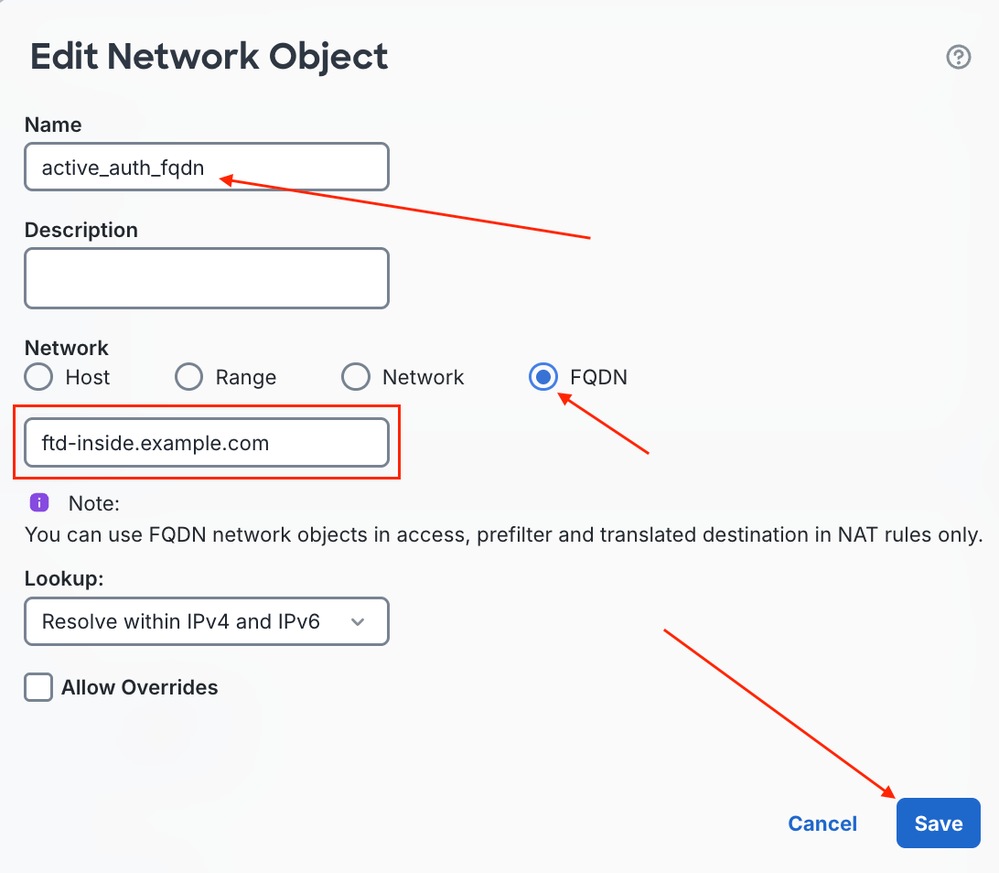 Configure FQDN Network Object Variables
Step 3: Configure the DNS A Record
1) The example shown here uses Windows Server 2025; see the documentation for the specific name resolution server as needed.
 Windows Server DNS A Record Configuration
Note: The client that performs Active Authentication must be able to resolve this DNS A record.
Phase 2: Public Key Infrastructure Configuration
An internal Certificate Authority (CA) can be used as the Public Key Infrastructure (PKI) for the Active Authentication configuration. Cisco FMC and FTD require the internal CA public key and paired Private Key to be uploaded as an Internal CA object to perform the necessary SSL interception and Decrypt-Resign operations. In addition, the internal CA must be trusted within the client browser from which Active Authentication is performed. See the client browser documentation to check how to confirm that the browser trusts the certificate.
Step 1: Import the Internal CA Certificate to the FMC
1) Choose Objects > PKI > Internal CAs. Click Import CA.
Note: The Internal CA can also be created directly on the FMC.
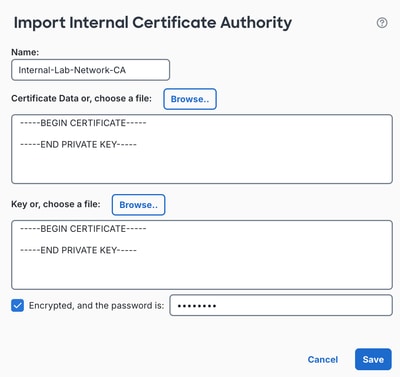 Import Internal Certificate Authority To Firewall Management Center
Note: Within the content of this document, white space appears covering the various field values in the images and is intentional per the publishment of this document. Actual values are reflected for your environment as you configure.
Step 2: Sign the Service Provider Certificate with the CA
1) The Service Provider (SP) certificate must be signed by a trusted Certificate Authority (CA) and returned in a PKCS#12 (.p12) format.
Note: This CA can be internally signed. The only caveat is that the Internal CA must be trusted by the client device.
Step 3: Deploy the SP Certificate to the FTD
1) Choose Devices > Certificates.
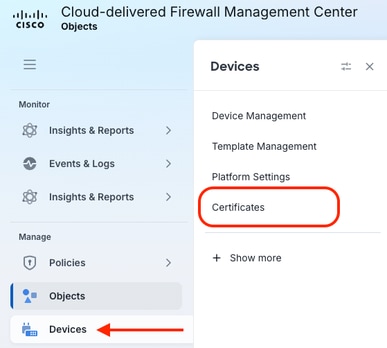 Navigate To Devices And Certificates
2) Click Add Certificates.
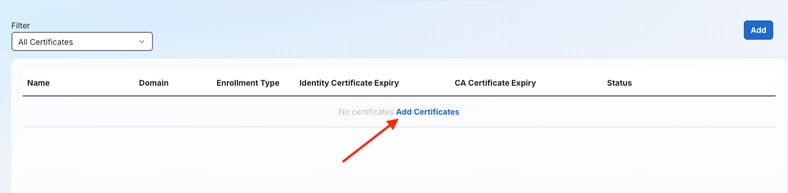 Add New Device Certificate
3) Click the device from the drop-down list that executes Active Authentication, then click the + icon to create a new Certificate Enrollment.
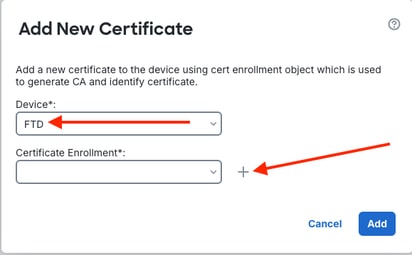 Select FTD And Add Add New Certificate Enrollment
4) Name the Certificate Enrollment, and from the Enrollment Type drop-down list, choose PKCS12 file.
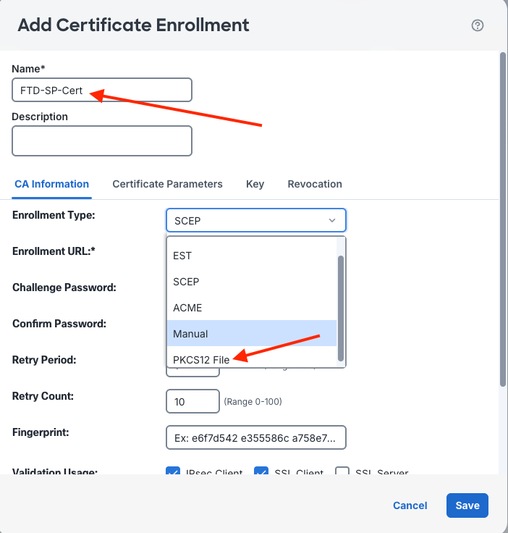 Certificate Enrollment Settings And Type
5) Import the PKCS#12 file by clicking Browse PKCS12 File and enter the required passphrase. Click Save.
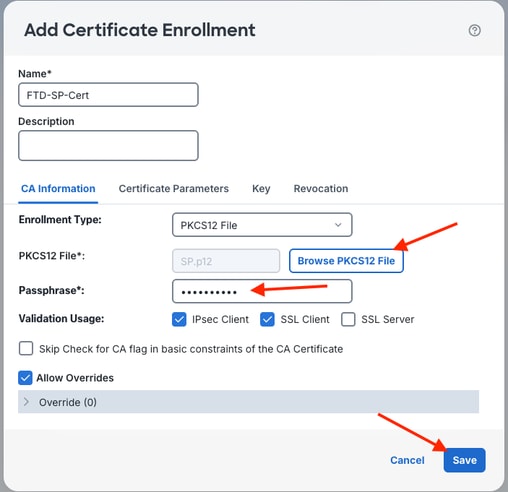 Browse And Import PKCS12 File
6) Confirm that the enrollment details are correct and click Add.
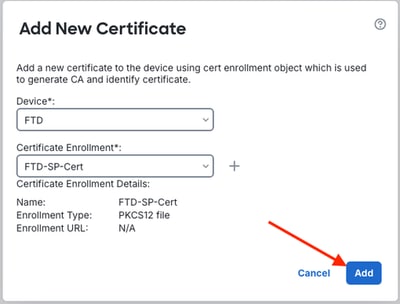 Confirm Certificate Enrollment Details
7) The import reflects In progress.

 Certificate Import In Progress Status
Phase 3: Azure Configuration
Step 1: Create the Entra Enterprise Application for the SAML Toolkit
1) Search for and click Enterprise Applications.
 Search And Access Enterprise Applications
2) Click + New Application.
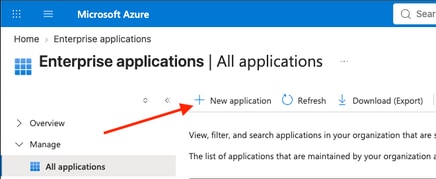 Select New Application Within Enterprise Applications
3) Search for the Microsoft Entra SAML Toolkit and click the thumbnail for it.
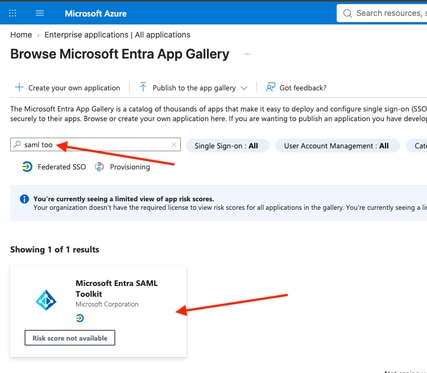 Search And Select Microsoft Entra SAML Toolkit
4) Assign a Name to the Microsoft Entra SAML Toolkit Enterprise Application and click Create. (Reference from Microsoft: Read our step-by-step Microsoft Entra SAML Toolkit integration tutorial).
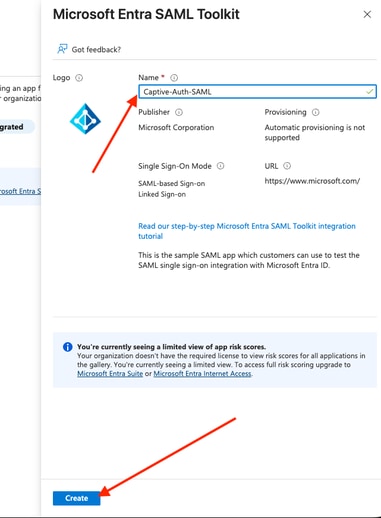 Assign Name To SAML Toolkit Application
5) On the Overview page, assign the specific users and groups to the SAML Toolkit Enterprise Application. In this example, the test account (captive-portal-user) is a member of the active-auth-lab group.
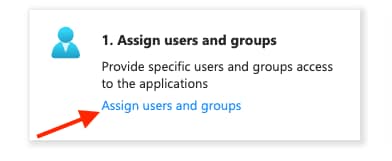 Assign Users And Groups To Application
6) Configuration of this Enterprise Application continues in later steps.
Step 2: Configure Entra ID App Registrations
1) Navigate back to Entra ID and from the left navigation menu, choose App registrations. Click the All applications filter and search for the name given to the Enterprise Application. Click the appropriate application.
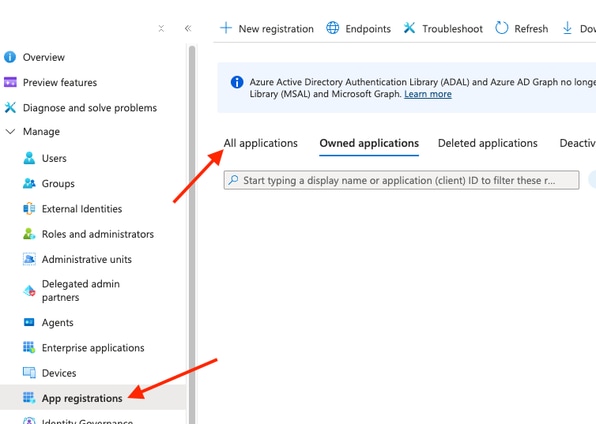 Navigate To App Registrations And All Applications
2) Collect and Note the Essentials Values Under the Enterprise App Registration.
Important: Hover over the values to reveal Copy to Clipboard and collect the values under Essentials on the Overview page:
- Display Name
- Application (Client) ID
- Directory (Tenant) ID
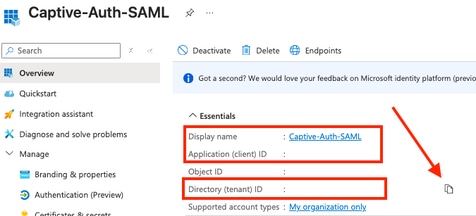 Collect Display And Application And Directory ID Values
3) Click the Add a certificate or secret hyperlink.
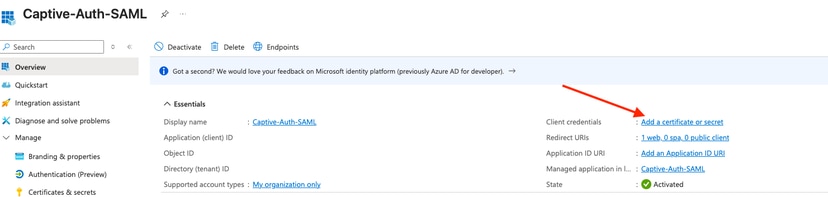 Add Certificate Or Secret Hyperlink
4) Click + New client secret.
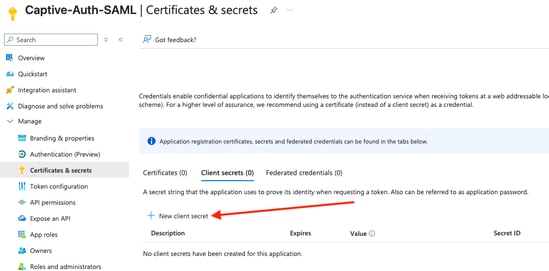 Add New Client Secret
5) Provide a Description for the secret and adjust the expiration as necessary. Click Add.
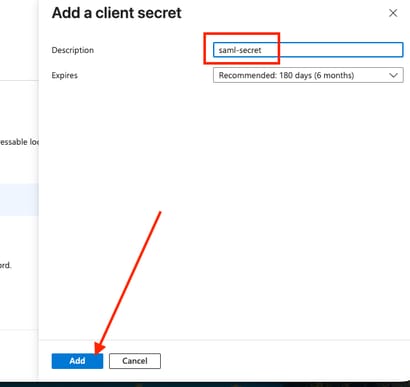 Provide Description For Client Secret
6) Copy the Secret.
Important: Take note of the secret value copied to clipboard.
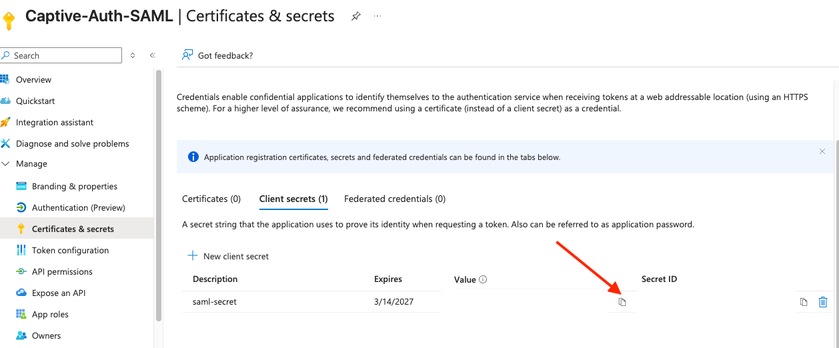 Copy Client Secret Value
Step 3. Configure Microsoft Graph API Permissions for the App Registration.
1) Choose API Permissions from the left navigation menu, then click + Add a permission.
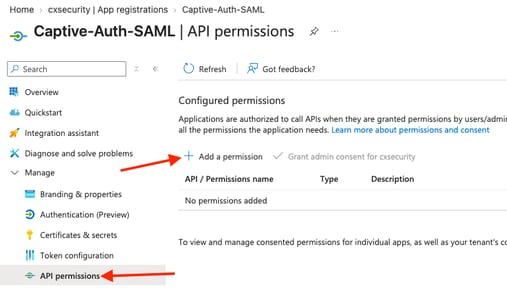 Configure API Permissions
2) Click Microsoft Graph API.
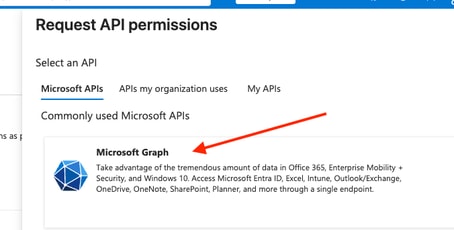 Select Microsoft Graph API
3) Grant Delegated User.Read permissions, then click Add permissions.
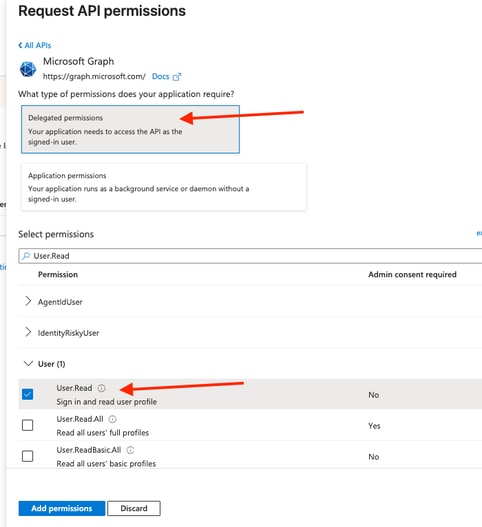 Grant Delegated User Read Permissions
4) Grant Application User.Read.All permissions (check the check box).
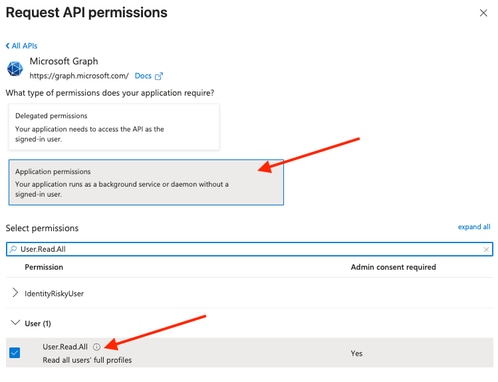 Grant Application Read All Permissions
5) Search for and check the Group.Read.All check box to grant Group Read permissions as well. Click Add permissions.
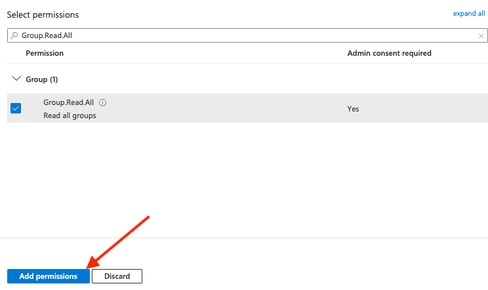 Save API Permissions
6) Confirm that the configured permissions align, and grant administrative consent for them.
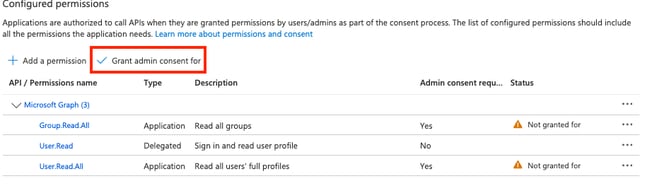 Grant Administrative Consent For Permissions
7) The output, once admin consent is granted, is shown.
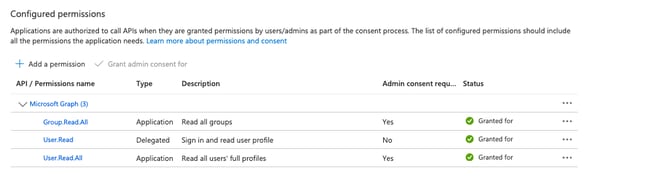 Administrative Consent Granted Output
Step 4: Configure the Event Hub (EH) Namespace
1) Search for and click Event Hubs.
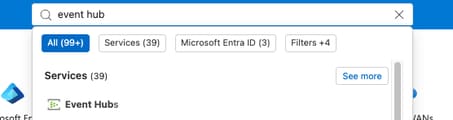 Search Event Hub Configuration
2) Create a new EH Namespace.
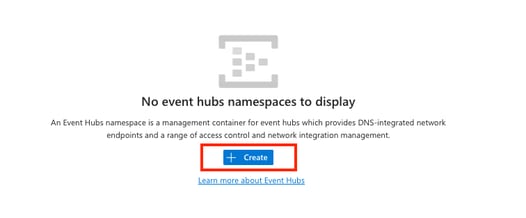 Create Event Hub Namespace
3) Configure the EH Namespace.
Note: The Standard pricing tier or higher must be chosen. Basic pricing tier prevents realm usage.
See the Azure Event Hub Documentation for further evaluation of Event Hub Advanced Settings and applicability to specific needs.
Click Review + Create.
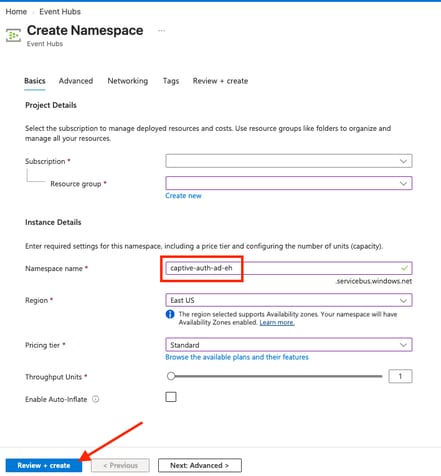 Configure Event Hub Namespace Settings
4) Once validation succeeds, click Create.
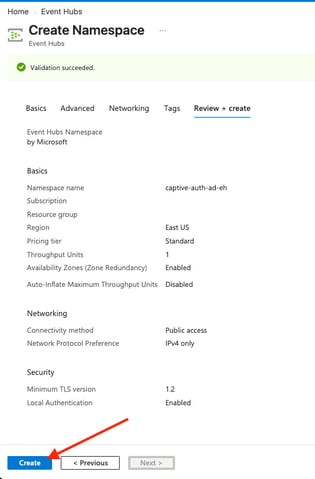 Create Event Hub Namespace Deployment
5) Confirm the deployment completes, then click Go to resource.
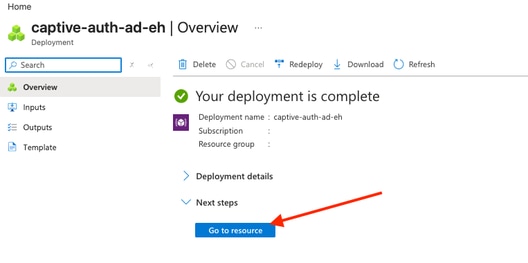 Go To Event Hub Namespace Resource
Step 5: Choose or Create Shared Access Policies in the Event Hub Namespace
1) From the left navigation menu, choose Settings > Shared access policies.
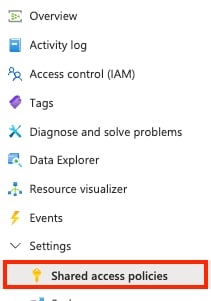 Navigate To Shared Access Policies
2) Click + Add and enter the new Policy name, and check the Manage check box. Click Create at the bottom of the Add SAS Policy menu panel.
 Add New Shared Access Policy
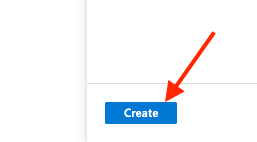 Create Shared Access Policy
Step 6: Collect and Note Shared Access Signature (SAS) Information from the EH Namespace
1) Click the new Shared access policy; the EH SAS Policy appears in the side panel on the right.
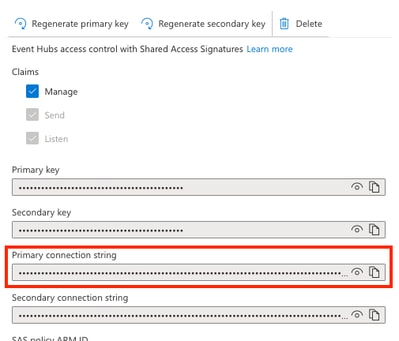 Copy Primary Connection String
Important: Copy and note the Primary connection string.
Step 7: Create an Event Hub Instance Within the Event Hub Namespace
1) From the Namespace menu, choose Entities > Event Hubs. Click + Event Hub to create a new EH instance.
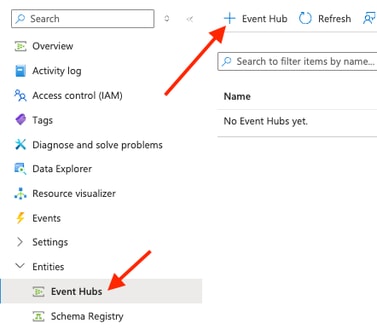 Create New Event Hub Instance
2) Assign a name to the new EH instance, then click Review + create.
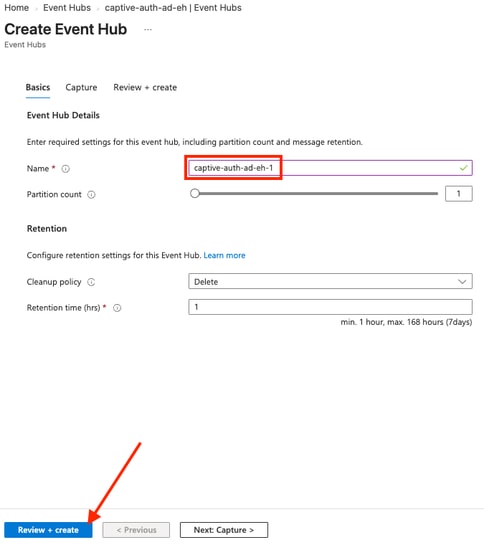 Assign Name To Event Hub Instance
3) Once validation succeeds, click Create to provision the Event Hub instance.
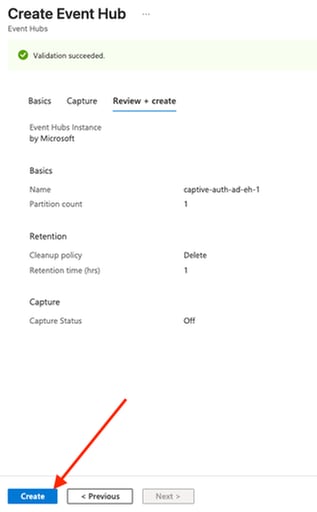 Provision Event Hub Instance
Important: Copy and note the Event Hub instance name.
Step 8: Create an Event Hub Instance Consumer Group Within the Event Hub Namespace
1) Click the new EH instance configured in the previous step.
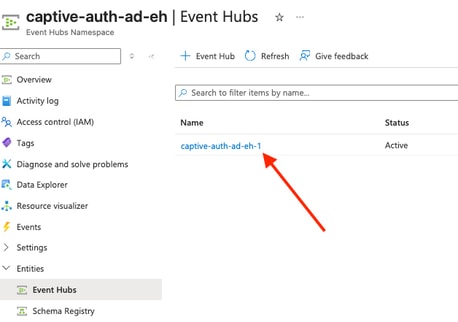 Access Event Hub Instance Configuration
2) From the EH instance, choose Entities > Consumer groups, and create a new Consumer group.
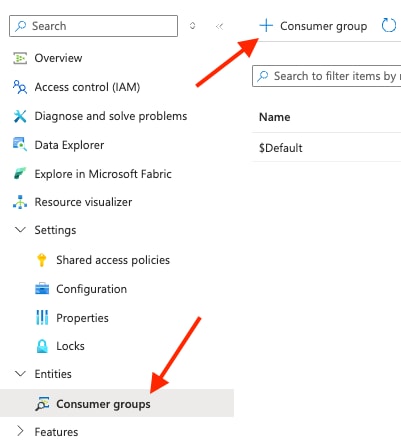 Create Consumer Group
3) Name the consumer group and click Create.
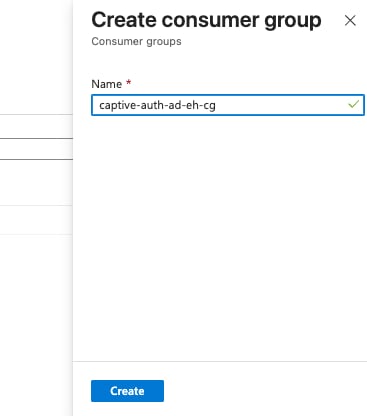 Assign Name To Consumer Group
Important: Copy and note the Event Hub instance Consumer group name.
Step 9: Verify Collected Values
1) At this point, these values from the preceding steps are to be noted. If any value was not recorded, reference the applicable step where it is collected:
- Phase 3 Step 2 - App Registration (of the Enterprise App created for this process, referenced by the collected Display Name)
- Step 2, Sub-Step 2
- Display Name
- Application (client) ID
- Directory (tenant) ID
- Step 2, Sub-Step 6
- Client Secret
- Step 2, Sub-Step 2
- Phase 3 Step 6 - Event Hub
- Step 6, Sub-Step 1
- EH Namespace
- Primary Connection String
- EH Namespace
- Step 7, Sub-Step 3
- EH instance (Event Hub) name
- Step 8, Sub-Step 3
- EH Consumer Group name
- Step 6, Sub-Step 1
Step 10: Configure Entra ID Audit Log Streaming to the Event Hub
1) Navigate back to the Entra ID tenant configuration.
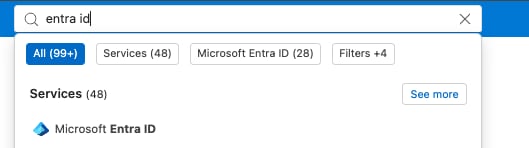 Search And Navigate To Entra ID Tenant Configuration
2) From the left menu, choose Monitoring > Diagnostic Settings.
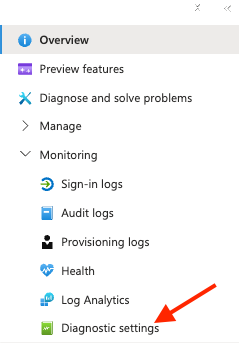 Diagnostic Settings Monitoring
3) Choose Diagnostic settings > General and click + Add diagnostic setting.
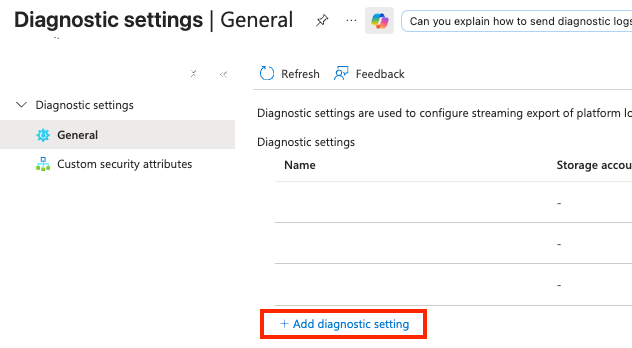 Add New Diagnostic Setting
4) Assign the required name to the diagnostic setting, check the AuditLogs check box to log, and check the Stream to an event hub check box. Reference the values noted from the previous configurations, and click Save when complete.
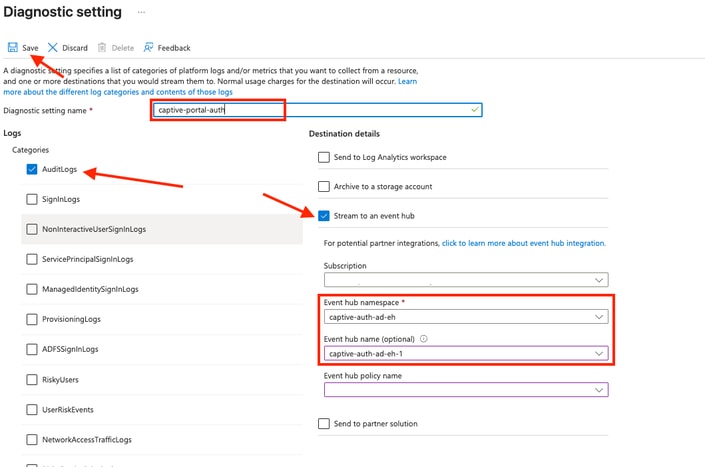 Stream Audit Logs To Event Hub
Phase 4: Consolidate Azure and FMC/FTD Active Authentication Configuration
Step 1: Configure the Azure SAML/Entra ID Realm Using the FMC Wizard
1) Within the FMC, choose Integrations > Identity > Realms.
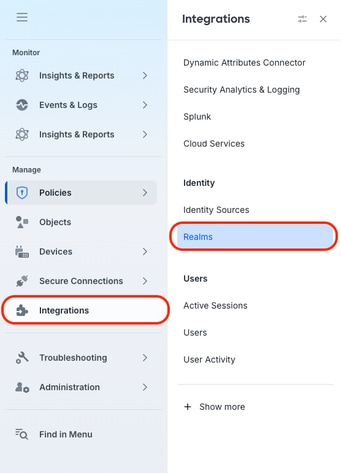 Identity Realms Configuration
2) Click Add Realm drop-down list, and choose SAML - Azure AD.
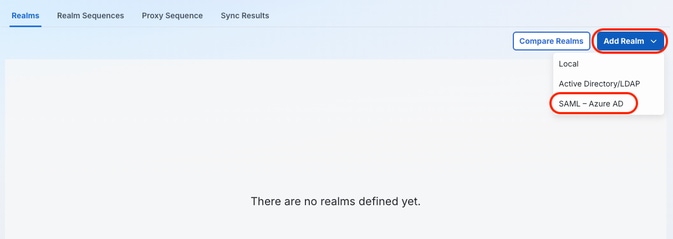 Add SAML Azure AD Realm
3) Assign a name and description to the Azure realm to describe its use, and ensure that Authenticate passively with Azure AD or using captive portal with Azure AD is chosen from the Configuration Type drop-down list. Click Next.
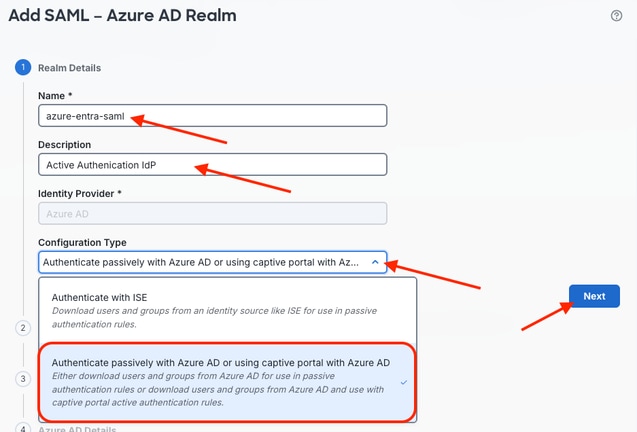 Configure Azure AD Realm Settings
4) Choose the previously configured FQDN object as the Base URL. Enter the Entity ID with the string format shown:
https://<fqdn-base-url>/<uniqueSuffix>
- When the SAML Entity ID suffix is configured (underlined in green in the configuration example next), ensure that the suffix is unique among other SSO implementations within the environment. This value must match the Azure SAML configuration as well. The Base URL remains the same throughout the configuration.
- The Assertion Consumer Services (ACS) URL is populated automatically and is immutable.
- Choose the Service Provider (SP) Certificate enrolled in the previous workflow steps in FMC under Devices > Certificates.
- After these values are entered, click Download Service Provider Metadata to ease the configuration process and confirm that the expected values are written to Azure.
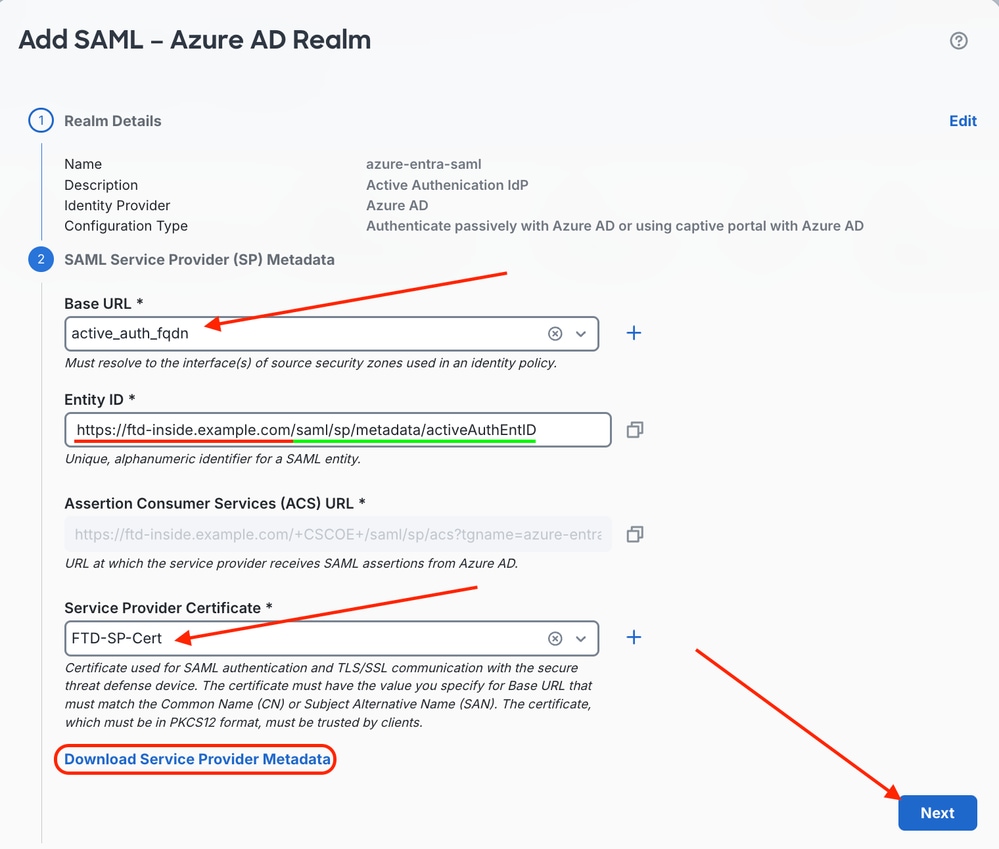 Configure Base URL And Entity ID And Download SAML Metadata
5) Click Next to move to Sequence 3 of the Realm configuration.
Step 2: Implement the FMC-Configured SAML SP Metadata in the Azure Enterprise Application
1) Navigate back to Azure and choose Entra ID > Manage > Enterprise Applications. Search for the previously created instance of the Microsoft Entra SAML Toolkit Enterprise Application.
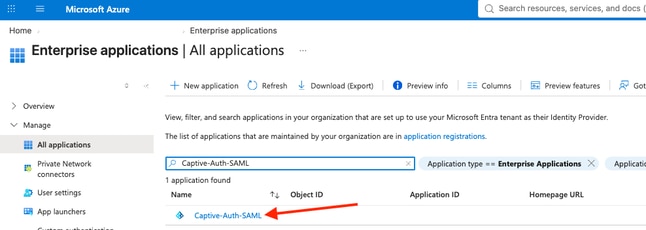 Locate Microsoft Entra SAML Toolkit Application
2) From the side navigation menu, choose Manage > Single Sign-On.
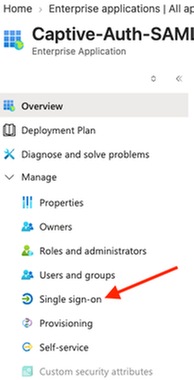 Manage Single Sign On Configuration
3) Click the SAML Single Sign-On (SSO) mode.
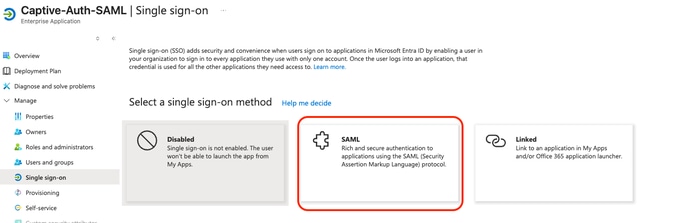 SAML Single Sign On Mode Selection
4) Click Upload metadata file and click the blue folder icon to browse your local filesystem for the SAML metadata file downloaded from the FMC.
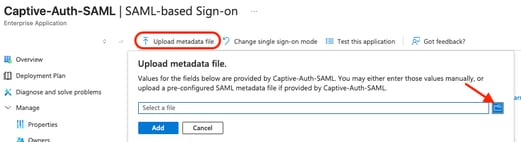 Upload Metadata File From Firewall Management Center
5) Once the upload completes, click Add.
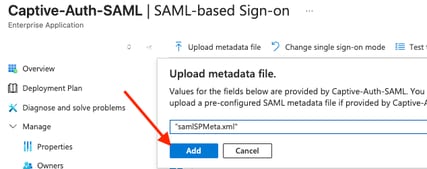 Add SAML Configuration Application
6) The side panel for Basic SAML Configuration appears, and values such as the Identifier (Entity ID) and the ACS URL are extracted from the FMC-originated SP metadata XML file uploaded and applied automatically. However, the Sign on URL is not populated and is required before saving.
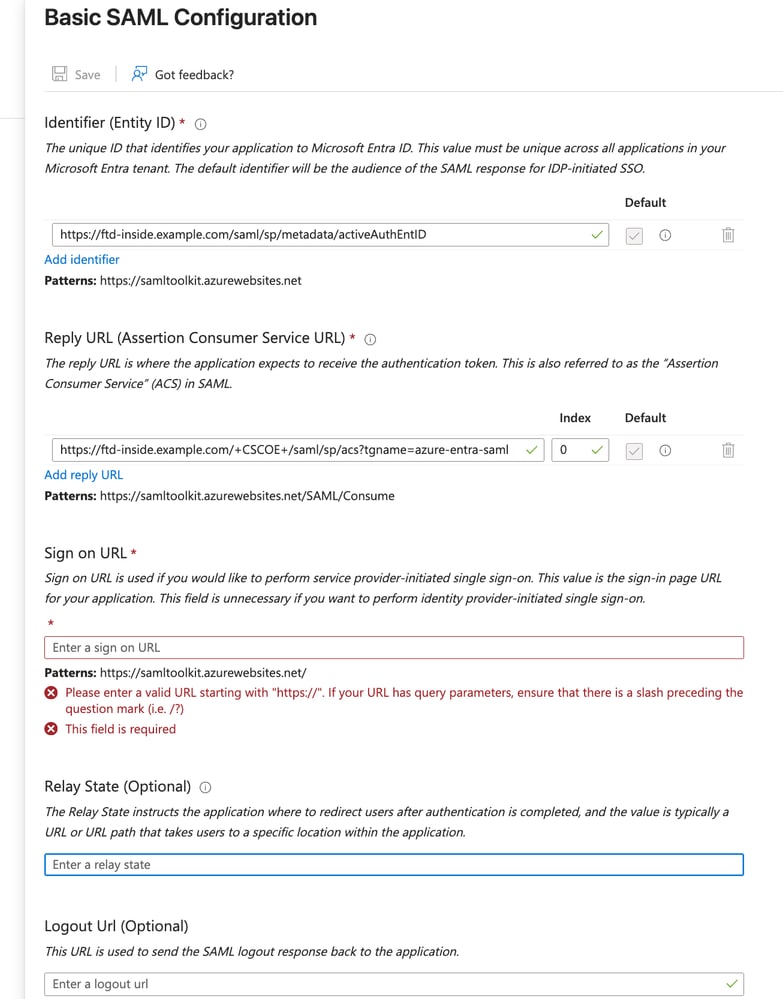 Basic SAML Configuration Extraction
7) Use the Sign-On URL pattern given, copy and paste the value, and click Save at the top when complete.
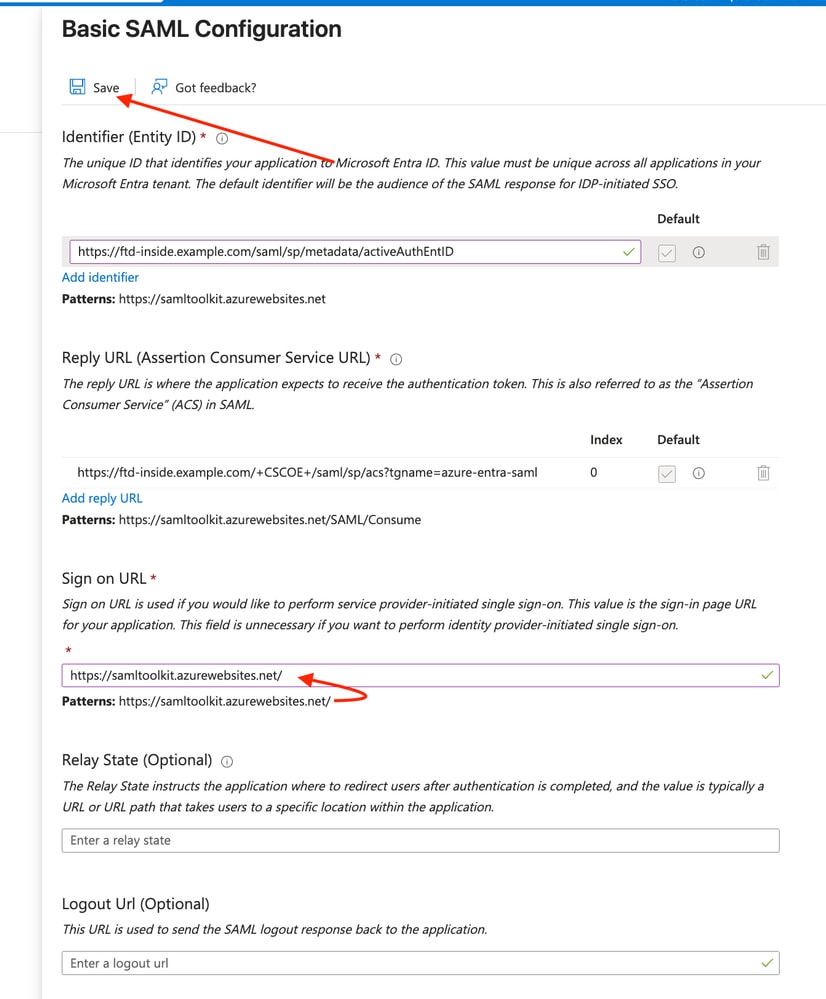 Sign On URL Configuration Entry
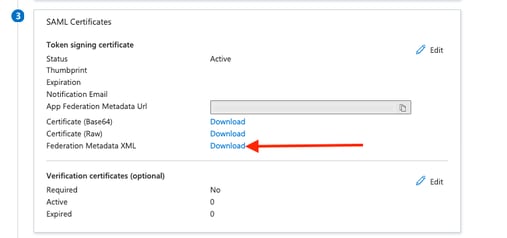 Export Federation Metadata XML File
Step 3: Configure the Azure SAML/Entra ID Realm Using the FMC Wizard (Continued)
1) Navigate back to the FMC. Under Sequence 3, SAML Identity Provider (IdP) Metadata, upload the exported Federation Metadata XML file downloaded from Azure to the FMC to auto-populate the necessary values.
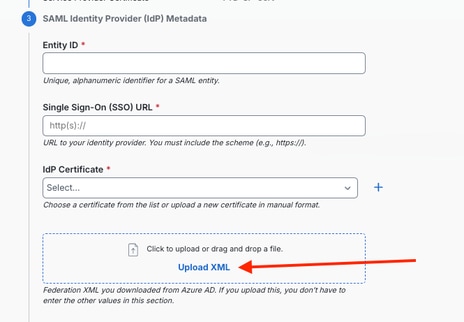 Upload Federation Metadata XML File
2) Once uploaded, the values populate as shown.
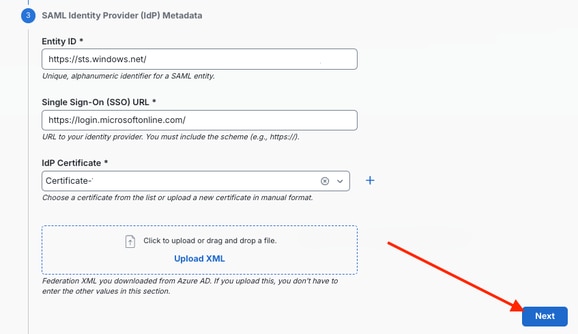 Auto Populated SAML Identity Provider Values
Note: Partial output is shown in the image.
3) Input the values collected throughout the implementation process up to this point:
- App Registration
- Application (Client) ID
- Client Secret
- Directory (Tenant) ID
- Event Hub
- EH Namespace Hostname
- EH Namespace Primary Connection String
- EH Instance (Event Hub) name
- EH Consumer Group name
- EH Namespace Hostname
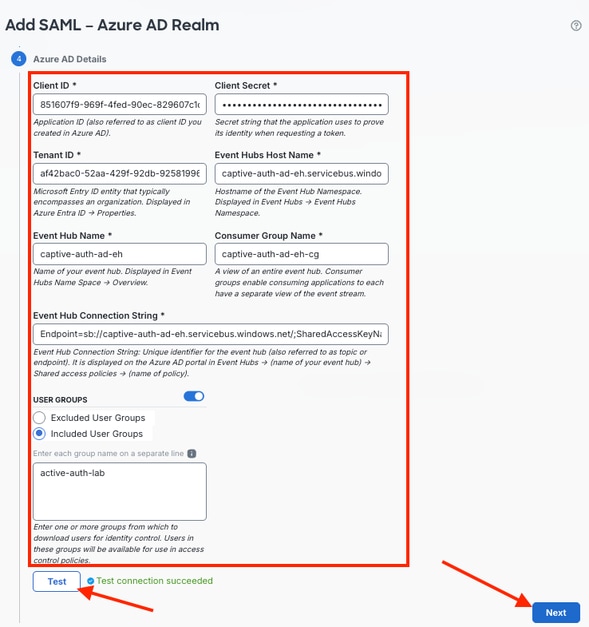 Enter Application And Event Hub Information
Once entered, click Test to check the connection and confirm that Azure is reachable with the information provided.
Note: If applicable, ensure the Excluded/Included User Groups align with your Entra configuration
4) The final step of the wizard allows you to configure SAML Captive Portal Users timeout. The default is 1440 minutes.
 Configure Captive Portal Timeout
5) Click Next to continue.
 Move Forward With Azure AD Realm Configuration
6) The wizard gives a summary of the configuration implemented. Click Save at the end of the summary after the entered values are validated and confirmed.
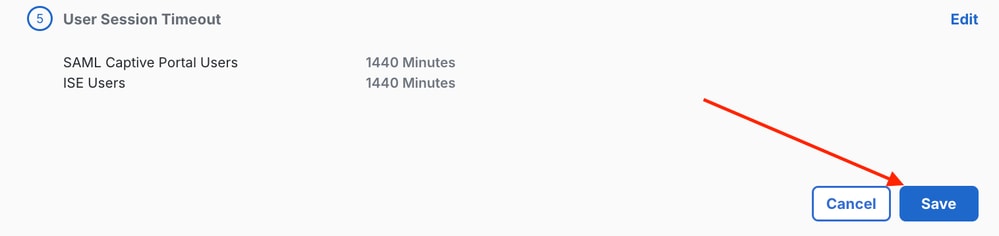 Realm Configuration Summary Save Button
Step 4: Check Downloaded Users
1) Confirm that users can be downloaded from Azure Entra with the Download Now button within Integrations > Identity > Realms workflow.
 Download Users From Azure AD
2) Click Yes in response to the dialog prompt.
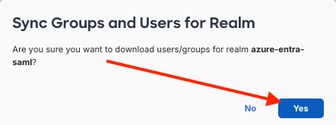 Confirm Download Of Users From Azure AD
3) The download task yields 1 user and 1 group downloaded, as confirmed under Notifications > Tasks.
 Notification Entry For Download Of Users From Azure AD
Phase 5: Configure Policies in the FMC
Step 1: Configure Decryption Policy
1) In the FMC, choose Policies > Security Policies > Decryption.
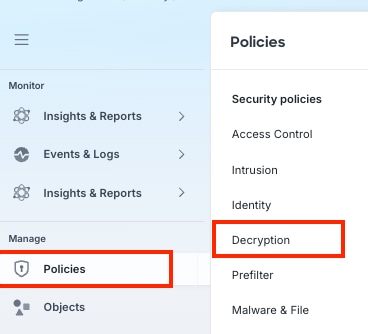 Navigate To Decryption Policy
2) Click the Create New drop-down list and choose Decryption Policy (Rule-Based).
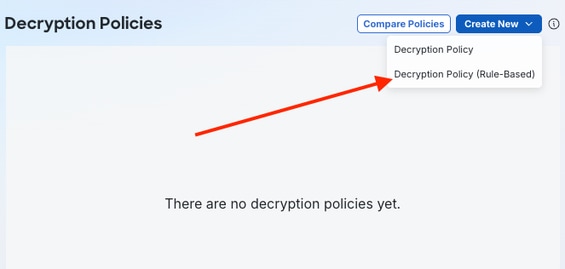 Create New Rule Based Decryption Policy
3) Assign a name and, if desired, a description to the new rule-based Decryption Policy, and click the Outbound Connections (User Protection) tab option to implement the Decrypt-Resign functionality required for captive portal authentication (Active Authentication).
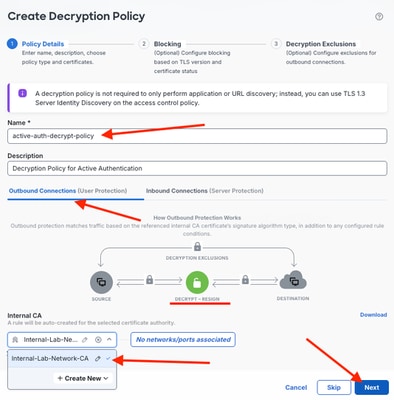 Implement Outbound Connections Policy Details
4) Choose the previously applied Internal CA from its applicable drop-down list in the same dialog. Click Next.
5) Customize options as needed.
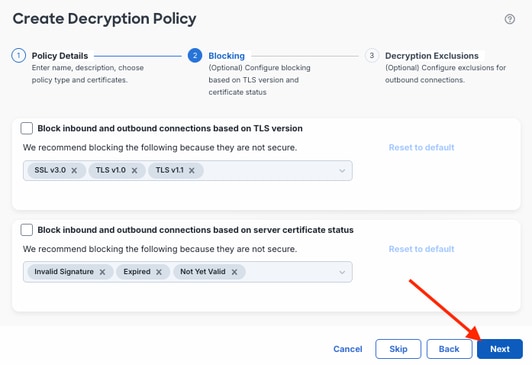 Customize Decryption Policy Options
6) In this example, defaults are used with the exception of the required Policy Details. Complete the configuration wizard by clicking Create Policy.
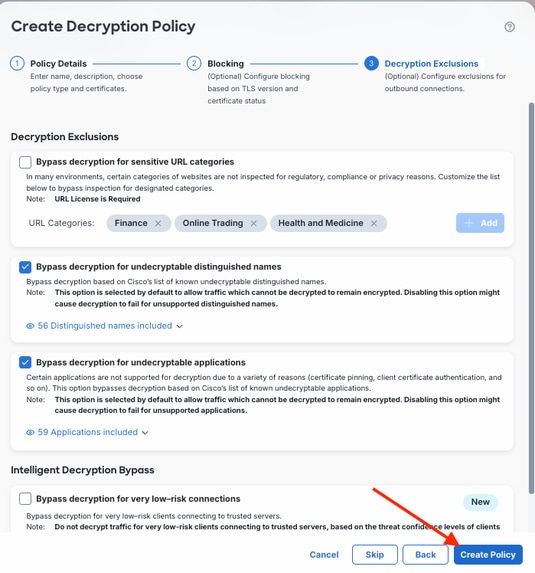 Create Final Decryption Policy
Step 2: Configure Decryption Policy Rules
1) The default layout of a rule-based Decryption Policy is shown here. Traffic that does not match the default enabled rules, such as rule 3 (which references a pre-allocated list of undecryptable domain names) and rule 6 (which references applications tagged as undecryptable), is subject to the Decrypt - Resign action under Rule 7. These defaults, along with the Default Action, can be modified as needed. By default, traffic that matches no other rule is configured as Do Not Decrypt.
The Azure Authentication Service traffic must not be decrypted for inspection, so a dedicated rule is created for it. Click + Add Rule to begin.
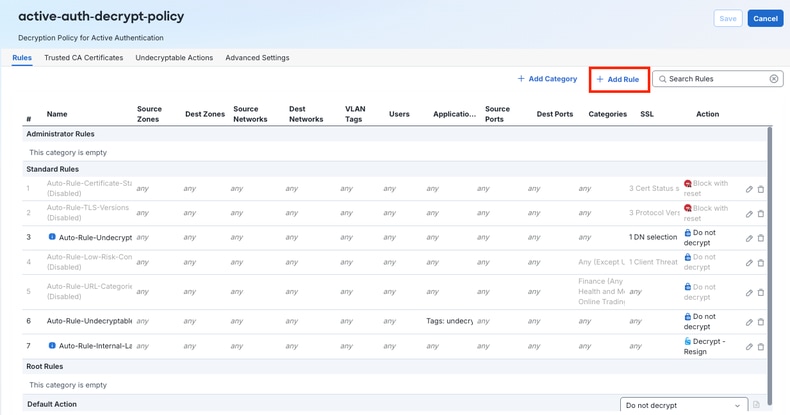 Add Rule And Showing Default Rule Based Decryption Layout
2) Assign a name to the new Decryption Policy rule entry, choose Do not decrypt from the Action drop-down list, and place the rule at the top, less-specific rules. Source/Destination zones are also implemented to narrow the rule further.
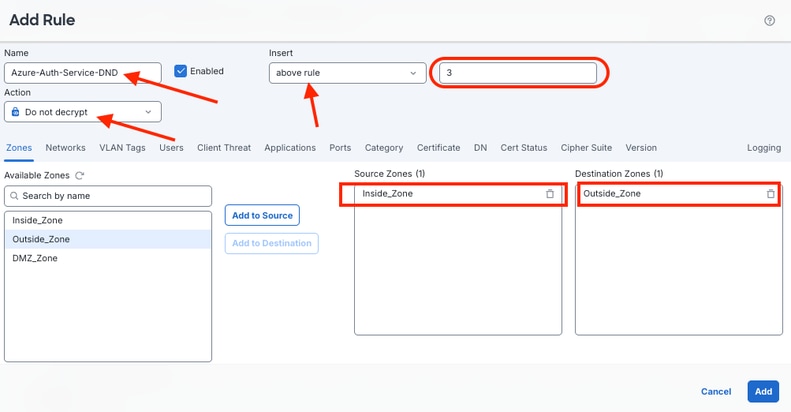 Configure Do Not Decrypt Rule
3) Before the rule is added, click the Applications tab, search for and click the Azure Authentication Service application. Click Add to Rule, then click Add.
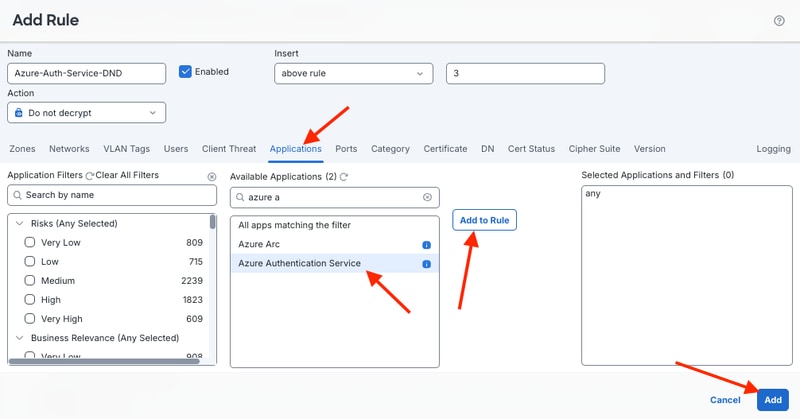 Add Azure Authentication Service Application Rule
4) Click Save.
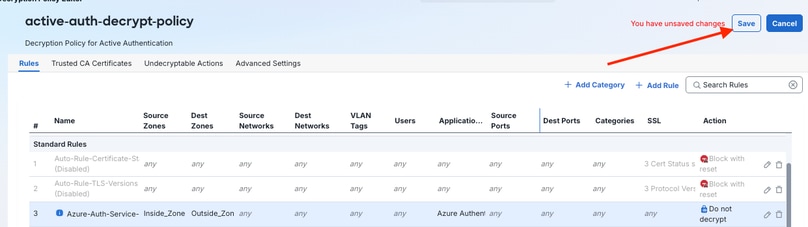 Save Decryption Policy
Step 3: Create Identity Policy
1) Choose Policies > Security Policies > Identity to create an Identity Policy.
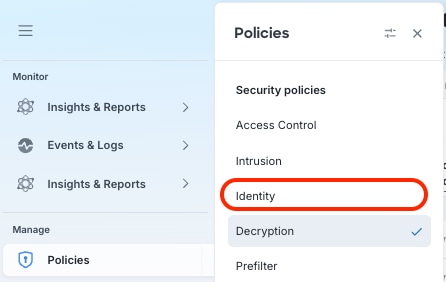 Create Identity Policy
2) Create a new Identity Policy and click Add a new policy.
 Add New Identity Policy Configuration
3) Assign a name and, if applicable, a description to the new Identity Policy. Click Save.
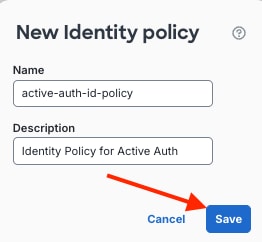 Name New Identity Policy
Step 4: Configure Identity Policy Rules
1) Add a new rule by clicking + Add Rule.
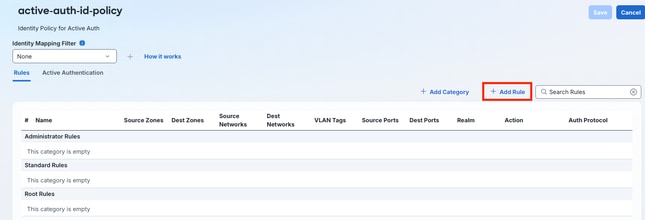 Add New Identity Policy Rule
2) Name the new rule, choose Active Authentication from the Action drop-down list, and narrow the specific zones/networks that must match the rule to perform Active Authentication.
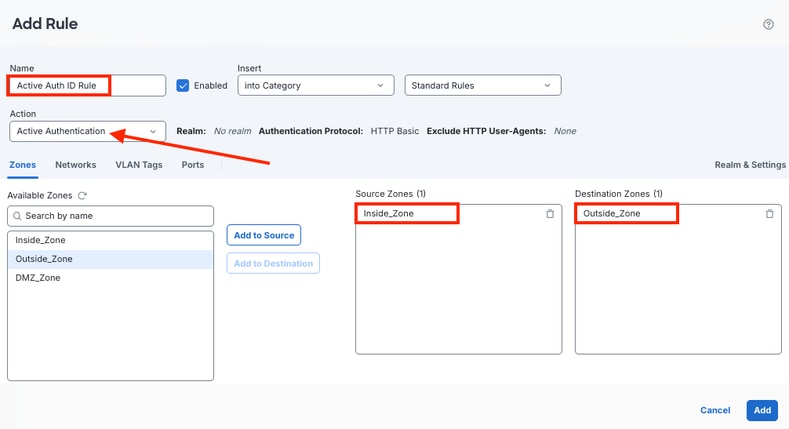 Configure Active Authentication Rule Settings
3) Before clicking Add, click the Realm and Settings tab within the Rule Editor. Confirm that the realm configured in the previous steps is chosen as the Authentication Realm, then click Add.
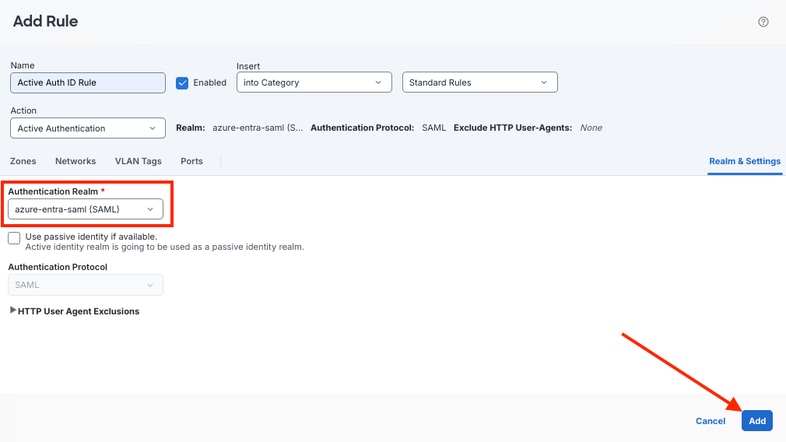 Configure Realm And Settings For Identity Rule
4) The rule is added and configured. Click Save.
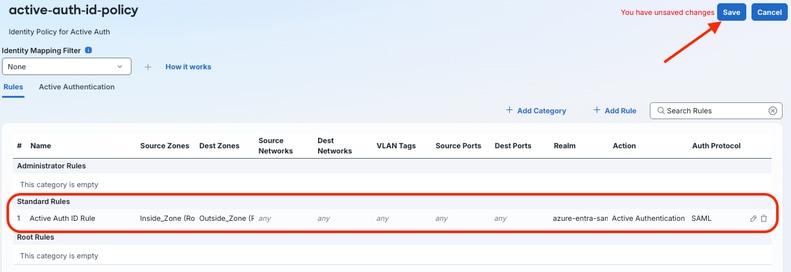 Save Identity Policy Rule Configuration
Step 5: Configure the Access Control Policy
1) Choose Policies > Security Policies > Access Control, and click the Access Control Policy to which the FTD is assigned.
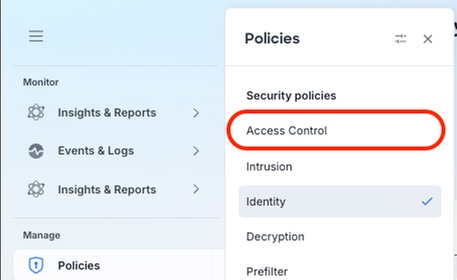 Access Control Policy Configuration
2) Confirm that the Decryption Policy configured in the previous steps is applied to the Access Control Policy.
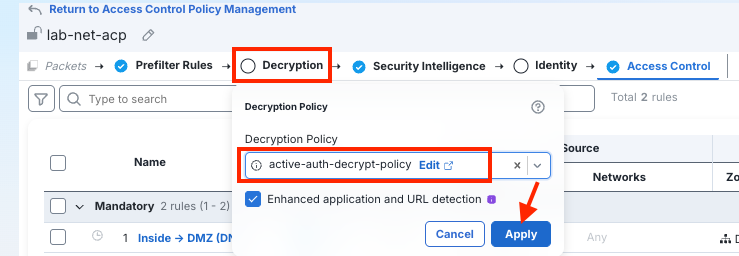 Apply Decryption Policy To Access Control
3) Confirm that the Identity Policy configured in the previous steps is also applied to the Access Control Policy. Save the policy changes.
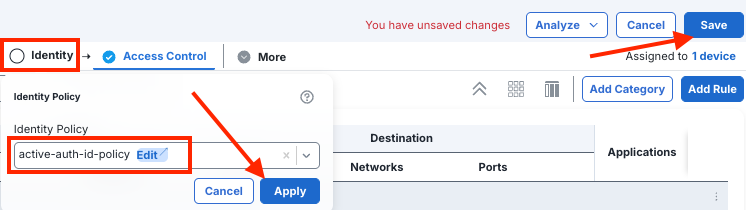 Apply Identity Policy To Access Control
4) Confirm that rules exist that allow client data plane traffic through the Secure Firewall after successful Active Authentication. The example shown here uses a wider rule set given the lab environment.
 User Data Plane Traffic Rule Set
Step 6: Deploy Configurations to the Cisco Secure Firewall Devices
Once deployed, clients that send traffic are prompted with a Microsoft Sign-in webpage to perform Active Authentication with Azure Entra.
For additional context on the process documented here, see Create a Microsoft Azure AD (SAML) realm for active authentication (captive portal) - Chapter: Realms in FMC Device Config Guide 10.x.
Verify
Use this section to help confirm that the configuration works properly.
GUI
Validate user sessions and activity in the FMC:
- Choose Integrations > Users > Active Sessions.
 FMC Active Sessions Output
- Choose Integrations > Users > User Activity.
 FMC User Activity Output
On Azure, navigate to the Microsoft Entra Admin Center:
- Filter Enterprise Apps, search for/click the applicable app.
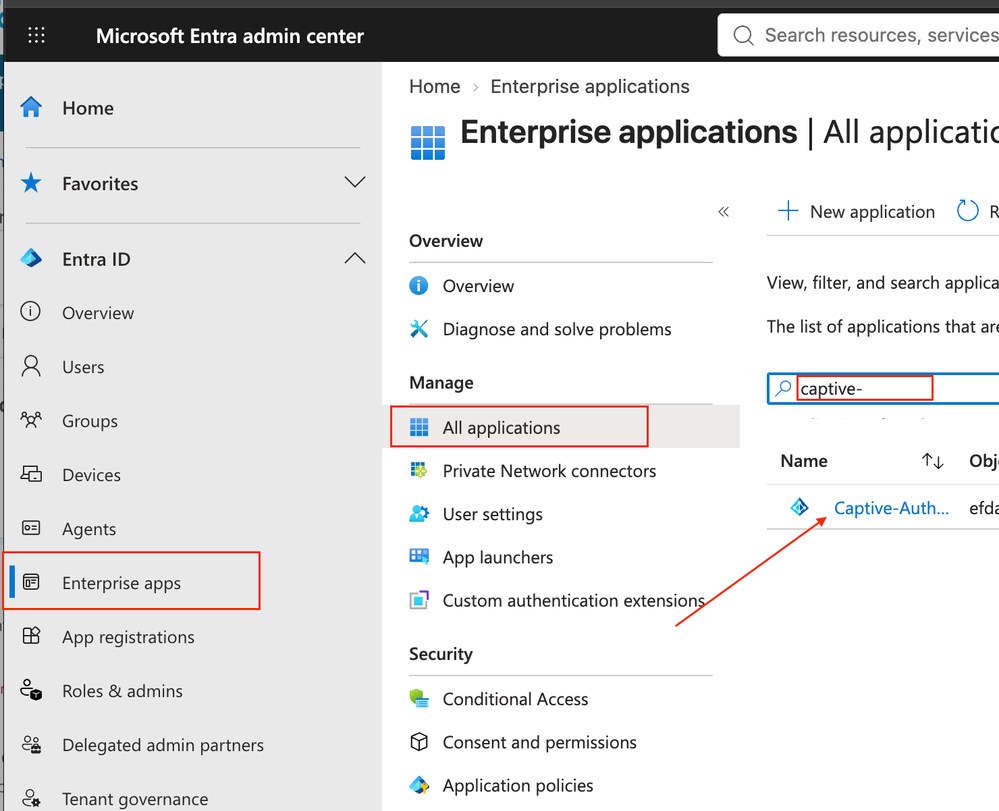 Azure Entra Admin Center Enterprise Apps Navigation
- Choose Activity > Sign-in logs.
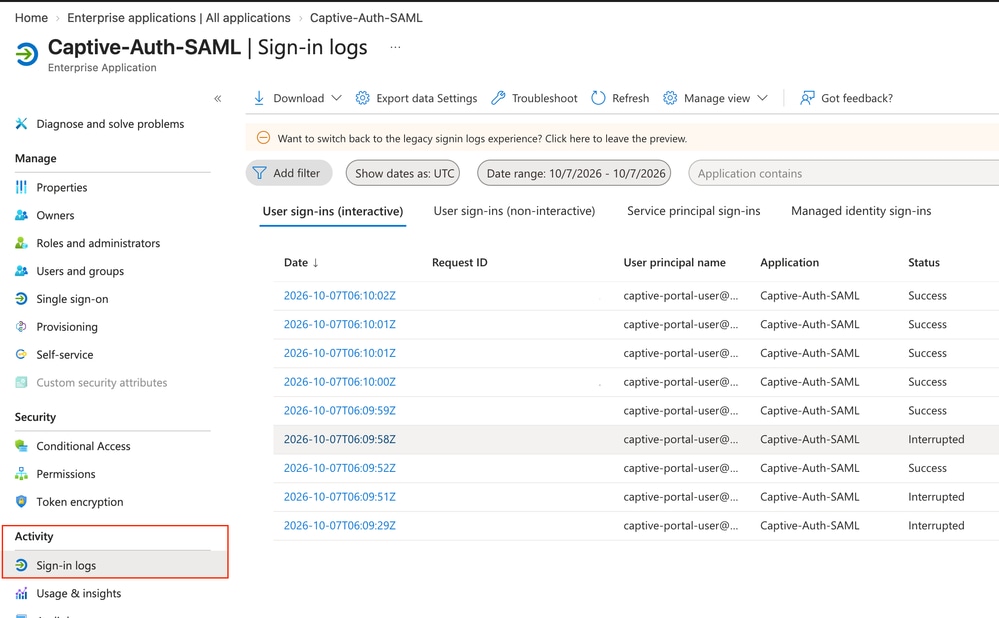 Azure Enterprise Application Sign In Activity Logs
CLI
- In the FTD CLI, you can see statistics related to SAML and captive portal responses:
> debug menu captive-portal 6
SAML passed requests captive-portal 14
SAML failed requests captive-portal 0
SAML passed responses captive-portal 4
SAML failed responses captive-portal 0
Total captive-portal bee-client messages processed 4
Total captive-portal bee-client messages successful 4
Total captive-portal bee-client messages failed 0
Total bee-client reconnects 0
Troubleshoot
Captive Portal Debug
- The system support captive-portal-debug command can be used on the FTD. The output shows how to enable the debug and also notes key segments of the output to help understand Captive Portal flow.
> system support captive-portal-debug

Enable firewall-debug too? [n]: y
Enable identity-debug too? [n]: y
Please specify an IP protocol: tcp
Please specify a client IP address: 192.168.20.200
Please specify a client port:
Please specify a server IP address:
Please specify a server port:
Enable daq-debug too? (WARNING: current packet debug configs and logs will be overwritten) [n]:
Monitoring captive_portal and firewall and identity debug messages

!--- Baseline output pending user Captive Portal authentication
...
192.168.20.200 53650 -> 198.51.100.1 443 6 AS=0 ID=1 GR=1-1 match rule order 1, id 1 action Captive portal, active auth realm id 2

192.168.20.200 53650 -> 198.51.100.1 443 6 AS=0 ID=1 GR=1-1 didn't find active binding, initiating captive portal

192.168.20.200 53650 -> 198.51.100.1 443 6 AS=0 ID=1 GR=1-1 captive portal authentication started

192.168.20.200 53650 -> 198.51.100.1 443 6 AS=0 ID=1 GR=1-1 defer trust until captive portal redirect is sent.

192.168.20.200 53650 -> 198.51.100.1 443 6 AS=0 ID=1 GR=1-1 Current state = S_INIT, Event = EVT_CP_RULE, Next state = S_PENDING_USER
...
!--- Captive Portal probe intercepted and redirected to SAML IdP (generate_204)
...
192.168.20.200 53659 -> 198.51.100.2 80 6 AS=0 ID=1 GR=1-1 AppID session with service_id: 676, url: http://browserportal.example.com

192.168.20.200 53659 -> 198.51.100.2 80 6 AS=0 ID=1 GR=1-1 Current state = S_PENDING_USER, Event = EVT_APPID_HTTP_HEADERS, Next state = S_REDIRECTING

192.168.20.200 53659 -> 198.51.100.2 80 6 AS=0 ID=1 GR=1-1 app event changes: service, client, host, url, user-agent, client-info

192.168.20.200 53659 -> 198.51.100.2 80 6 AS=0 ID=1 GR=1-1 using ipv4 address 192.168.20.1 for redirect

192.168.20.200 53659 -> 198.51.100.2 80 6 AS=0 ID=1 GR=1-1 encrypted redirect url: https://ftd-inside.example.com/+CSCOE+/saml/sp/login?tgname=azure-entra-saml&s=xxxx=http%3A%2F%2Fbrowserportal.example.com%2Fgenerate_204

192.168.20.200 53659 -> 198.51.100.2 80 6 AS=0 ID=1 GR=1-1 Current state = S_REDIRECTING, Event = EVT_FINALIZE, Next state = S_REDIRECTED
...
!--- SAML authentication completes, identity binding created
...

192.168.20.200 54023 -> 198.51.100.2 80 6 AS=0 ID=2 GR=1-1 looked for user_id with realm_id 2 auth_type 2, returning realm_id 2 auth_type 8 user_id 0

192.168.20.200 54023 -> 198.51.100.280 6 AS=0 ID=2 GR=1-1 found active binding for user_id 0 usernames azure-entra-saml\captive-portal-user@onmicrosoft.example.com in realm 2

192.168.20.200 54023 -> 198.51.100.2 80 6 AS=0 ID=2 GR=1-1 IdentityFlowSetupEventHandler Retrieved identity info: user_id 0, username azure-entra-saml\captive-portal-user@onmicrosoft.example.com, authRealmId 2, src sgt 0, src sgt type unknown, dst sgt 0, dst sgt type unknown, deviceType 0, locationIP ::

192.168.20.200 54023 -> 198.51.100.2 80 6 AS=0 ID=2 GR=1-1 New firewall session

192.168.20.200 54023 -> 198.51.100.2 80 6 AS=0 ID=2 GR=1-1 allow action
...
!--- Authenticated binding persists across subsequent, unrelated destinations (no further redirects)
...
192.168.20.200 54024 -> 198.51.100.2 80 6 AS=0 ID=2 GR=1-1 found active binding for user_id 0 usernames azure-entra-saml\captive-portal-user@onmicrosoft.example.com in realm 2

192.168.20.200 54025 ->  198.51.100.1 443 6 AS=0 ID=1 GR=1-1 found active binding for user_id 0 usernames azure-entra-saml\captive-portal-user@onmicrosoft.example.com in realm 2

192.168.20.200 54026 ->  198.51.100.2 80 6 AS=0 ID=1 GR=1-1 found active binding for user_id 0 usernames azure-entra-saml\captive-portal-user@onmicrosoft.example.com in realm 2

192.168.20.200 54027 ->  198.51.100.3 443 6 AS=0 ID=1 GR=1-1 found active binding for user_id 0 usernames azure-entra-saml\captive-portal-user@onmicrosoft.example.com in realm 2

192.168.20.200 19935 ->  198.51.100.4 443 6 AS=0 ID=1 GR=1-1 found active binding for user_id 0 usernames azure-entra-saml\captive-portal-user@onmicrosoft.example.com in realm 2
...
User Identity Dump
- To take a snapshot of the current user identity state data on the FTD, run the system support firewall-engine-dump-user-identity-data command on the FTD CLI:
> system support firewall-engine-dump-user-identity-data

Successfully commanded snort.

>
- In expert mode CLI, while logging in with local admin credentials of the FTD device, view the contents of the dumped file in /ngfw/var/sf/user_enforcement/user_identity.dump
> expert
admin@ftd:~$ sudo su
Password:
root@ftd:/home/admin#
root@ftd:/home/admin# ls -lah /ngfw/var/sf/user_enforcement/user_identity.dump
-rw------- 1 root root 5.6K Oct  7 07:51 /ngfw/var/sf/user_enforcement/user_identity.dump
root@ftd:/home/admin#
root@ftd:/home/admin# less /ngfw/var/sf/user_enforcement/user_identity.dump
...
----------------
IP:USER
----------------

!--- Host IP is aligned with the user authenticated via Captive Portal/Active Authentication
----------------
Host ::ffff:192.168.20.200
----------------
::ffff:192.168.20.200:0 realm 2 type 8, username azure-entra-saml\captive-portal-user@onmicrosoft.example.com
::ffff:192.168.20.200: SXP initialized 0 sgt 0
ABP values: None

-------------------
SXP MAPPING:
-------------------

...
Possible Issues
Captive Portal Unknown Certificate Authority
Issue: The client browser returns an unknown issuer error when authentication is attempted.
Likely Cause: The internal Certificate Authority is untrusted within the client browser.
Resolution: Confirm that the CA is trusted within the browser. The example shown here confirms that the internal CA certificate is trusted.
Captive Portal "Server Not Found
Issue: When the client browser attempts to load the captive portal, it returns "Server Not Found" for the base URL while attempting to reach base URL or similar.
Likely Cause: DNS reachability or DNS misconfiguration.
Resolution: Confirm that the client has the appropriate DNS server configured to resolve the A record. Confirm that the server has an A record mapped to the FQDN and that it is reachable and responsive.
Related Information
- Create a Microsoft Azure AD (SAML) realm for active authentication (captive portal) - FMC Device Config Guide 10.x
- Azure Event Hub Documentation
- Technical Support & Documentation - Cisco Systems
Revision History
| Revision | Publish Date | Comments |
|---|---|---|
1.0 |
15-Oct-2026
|
Initial Release |

 Feedback
Contact Cisco
- Open a Support Case

- (Requires a Cisco Service Contract)