Configure the Passive Identity Agent Using FMC
Available Languages
Contents
Introduction
This document describes how to configure the passive identity agent Source which sends session data to FMC
Prerequisites
Requirements
- Cisco Secure Firewall Management Center running version 7.6+
- Cisco Secure Firewall running version 7.6+
- Windows Active Directory server, the server must run Windows Server 2008 or later.
- You must enable Snort 3 on the Secure Firewall Threat Defense devices.
Components Used
The information in this document is based on these software and hardware versions:
- Cisco Secure Firewall Management Center 7.6.5
- Cisco Secure Firewall 7.6.5
- Microsoft Active Directory running on Windows Server 2022.
The information in this document was created from the devices in a specific lab environment. All of the devices used in this document started with a cleared (default) configuration. If your network is live, ensure that you understand the potential impact of any command.
Configurations
Before configuring the agent, please complete the AD and FMC integration.
Configuring a Passive Identity Agent Source
In the FMC UI, navigate toIntegration > Other Integrations > Identity Sources, click Passive Identity Agent. If the Cisco Secure Dynamic Attributes Connector has not been enabled yet, you are prompted to do so by clicking Enable CSDAC.
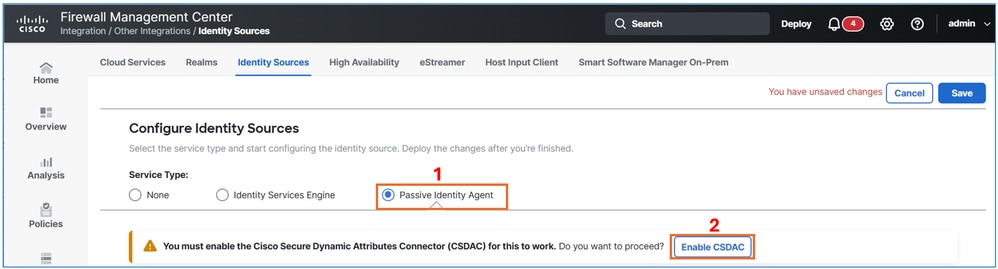 Passive Identity Agent
Click theEnablebutton to enable the CSDAC.
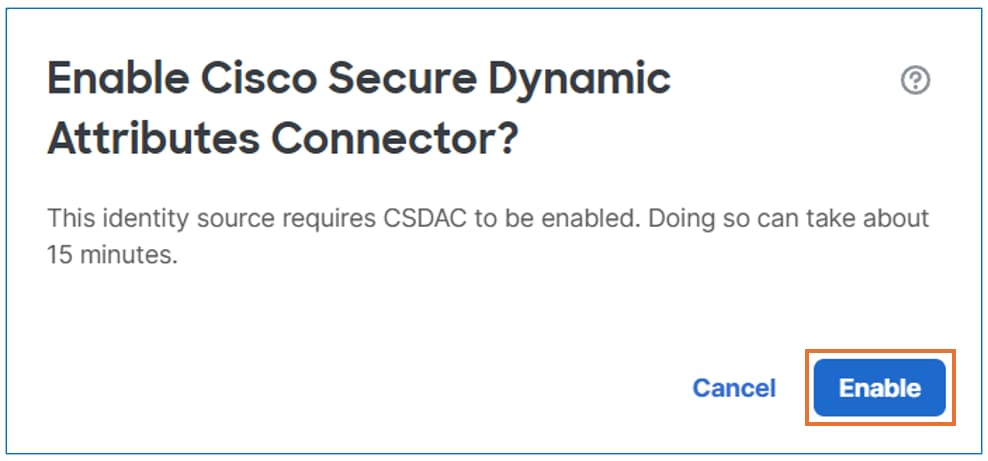 Enable CSDAC
This step takes approximately 10 minutes. Once the CSDAC is properly enabled, click theDonebutton to proceed.
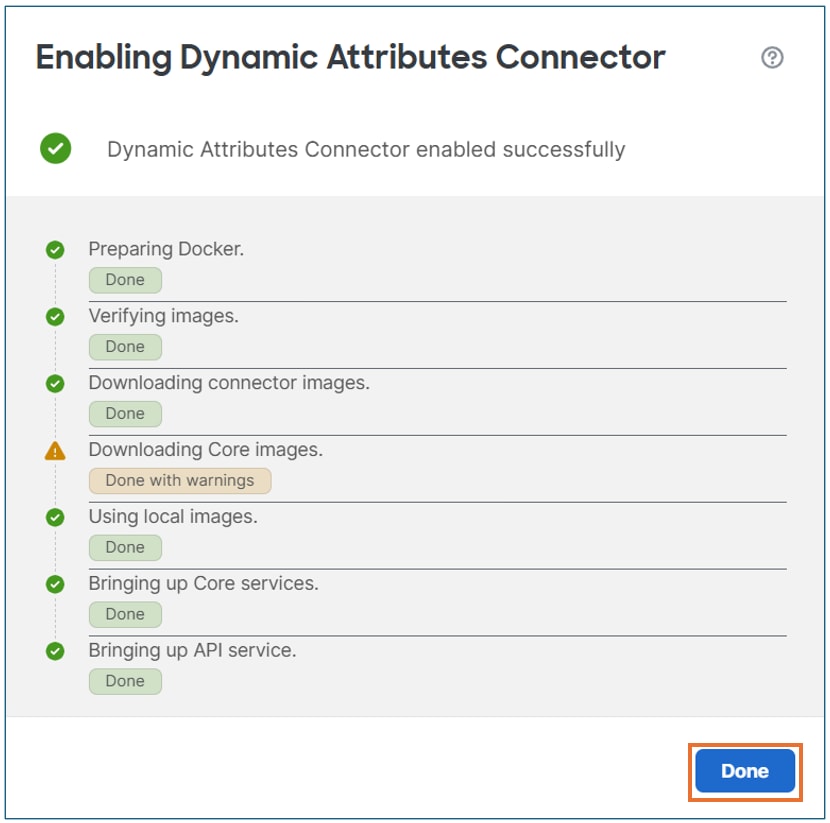 CSDAC Enabled
Click theCreate Agentbutton.
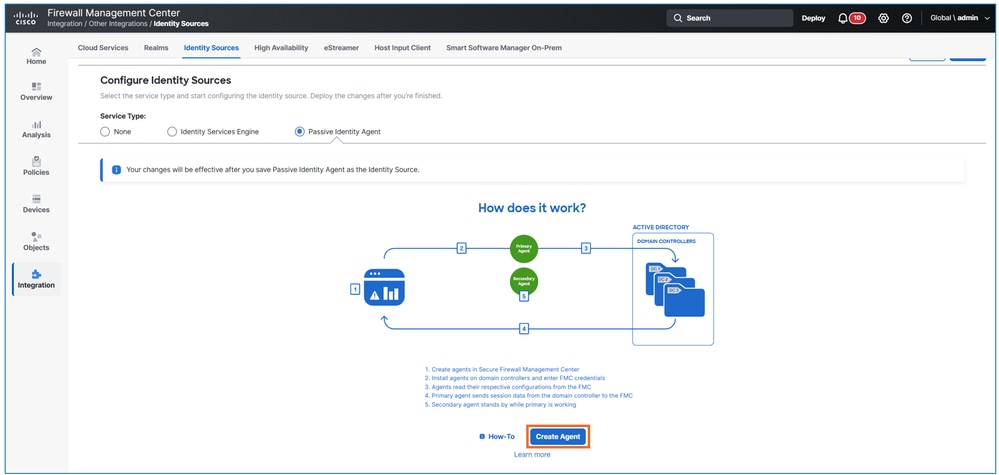 Create agent
Define a name for the agent, select theStandaloneoption, and associate it with the appropriateDomain Controllercreated in the previous task.
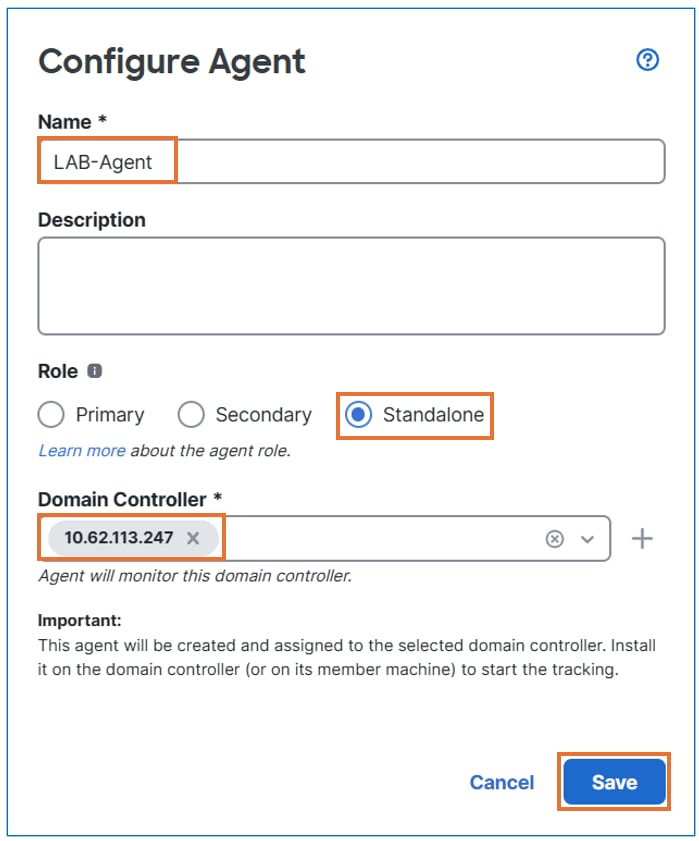 Configure agent
Click theSavebutton.
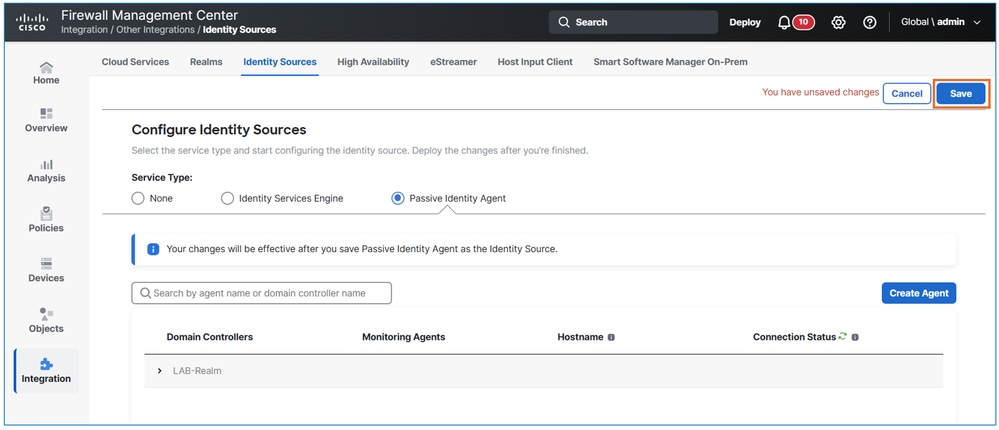 Save the configuration
The result.
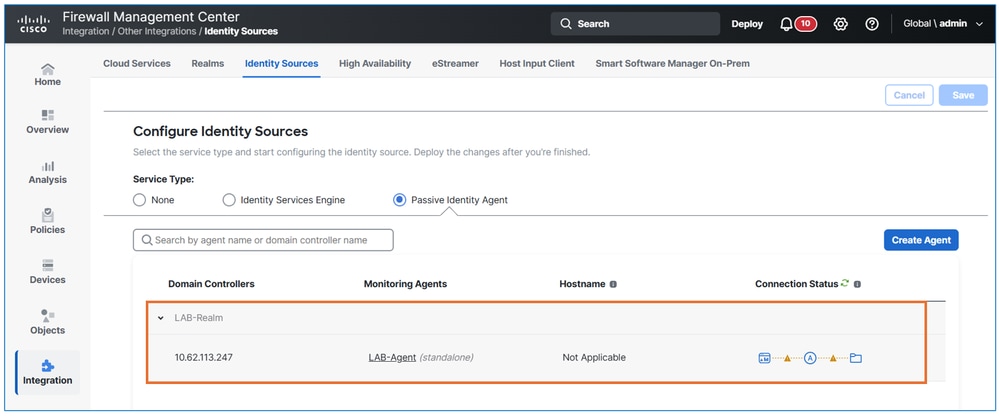 Verify the status

Note: The passive identity agent indicates status using lines, amber means that the agent has never successfully communicated with the Secure Firewall Management Center. A newly created agent line is amber and remains so until configuration is complete.
Creating a Passive Identity Agent User on the Secure Firewall Management Center
Create a Secure Firewall Management Center user with sufficient permissions to communicate with the passive identity agent. This user has limited privileges to perform other tasks; the user is expected only to enable communication with the passive identity agent.
In the FMC UI, navigate toSystem > Usersand clickCreate User. Fill in the user details according to the task requirements.
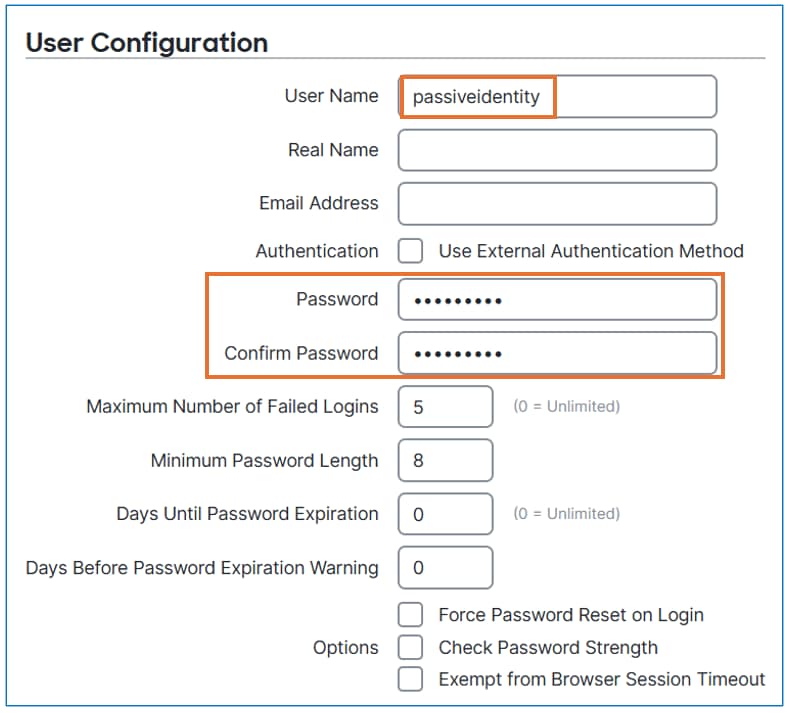 Create user
Assign thePassive Identity Userrole only. Click theSavebutton.
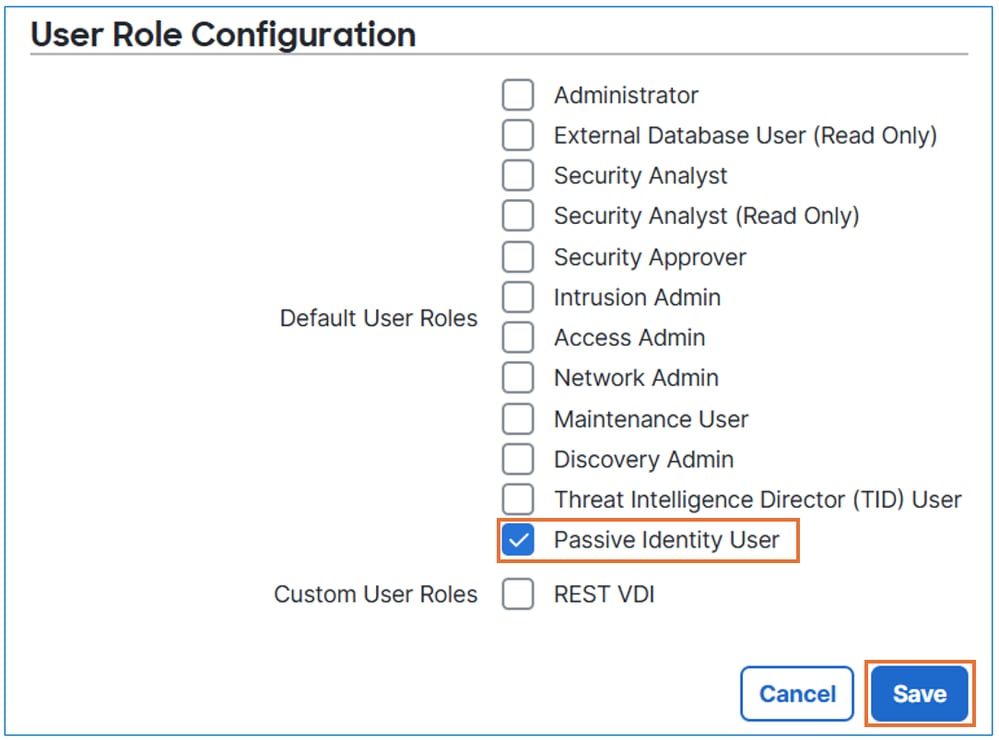 select the passive identity user
Install and Configure the Passive Identity Agent software
Install and configure the Passive Identity Agent software on the designated Domain Controller.
Download the passive identity agent from software.cisco.com.
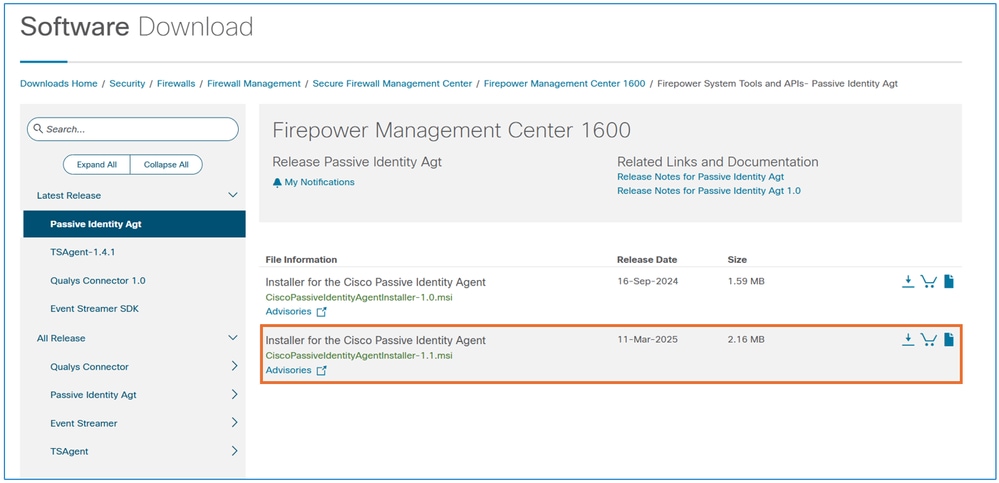 download the software
After downloading the agent, begin the installation process on the domain controller.
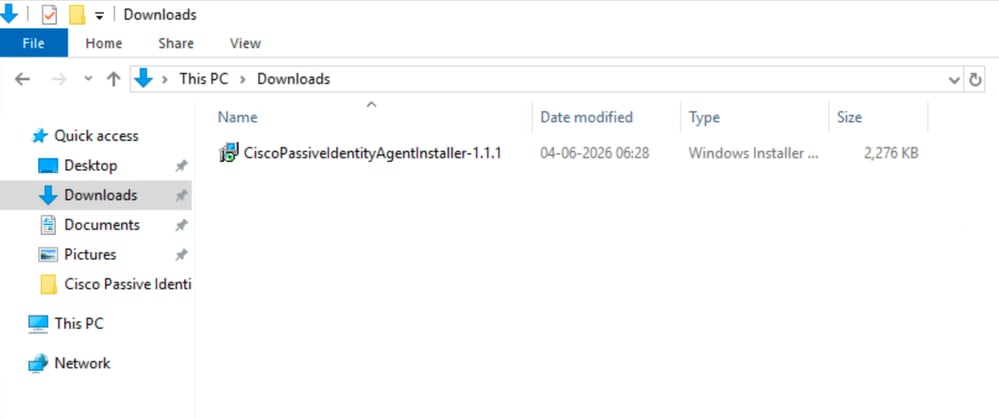 agent]
Refer to the provided installation instructions to complete the setup.
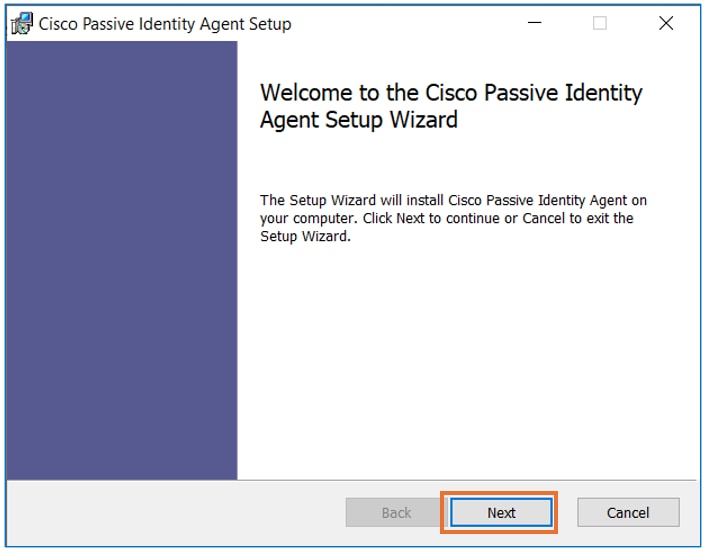 Install
Once the installation is complete, open the Passive Identity Agent software and enter the required information as specified in the task requirements. Click the Test button to verify connectivity with the FMC.
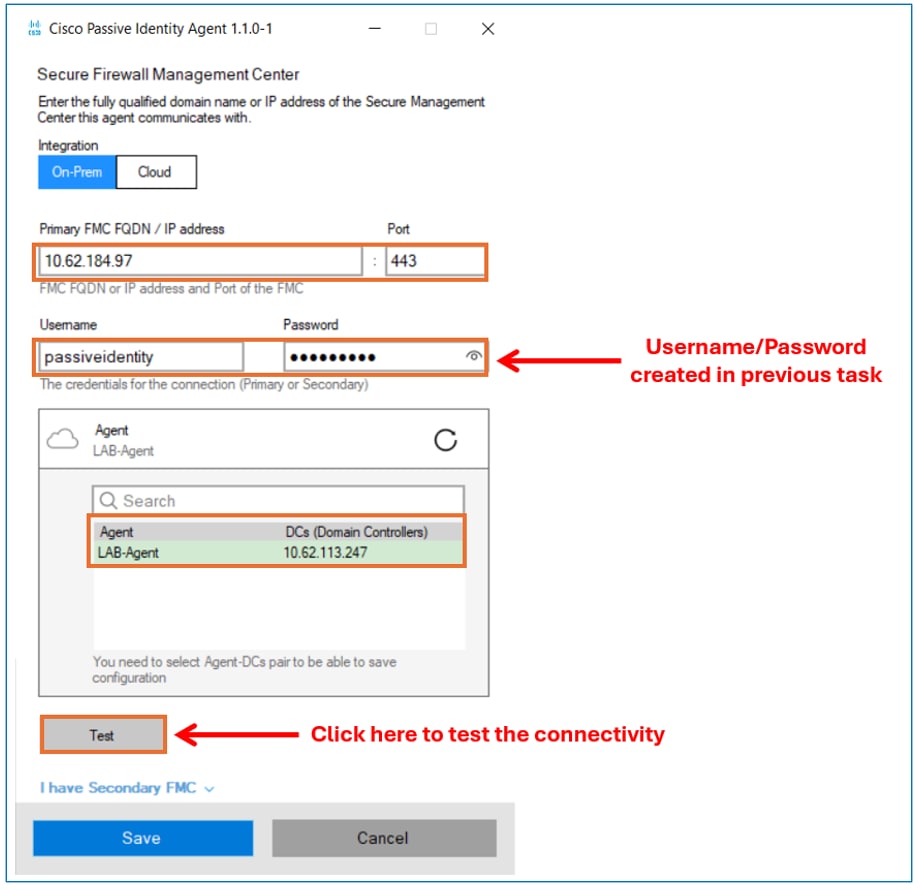 configure the agent.
After successfully testing the connectivity, click theSavebutton.
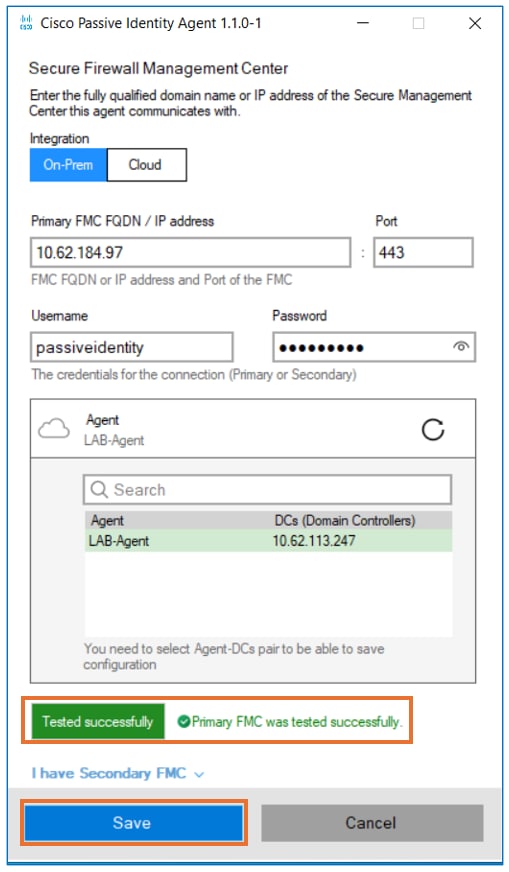 test
test
Click theOKbutton to complete the agent configuration.
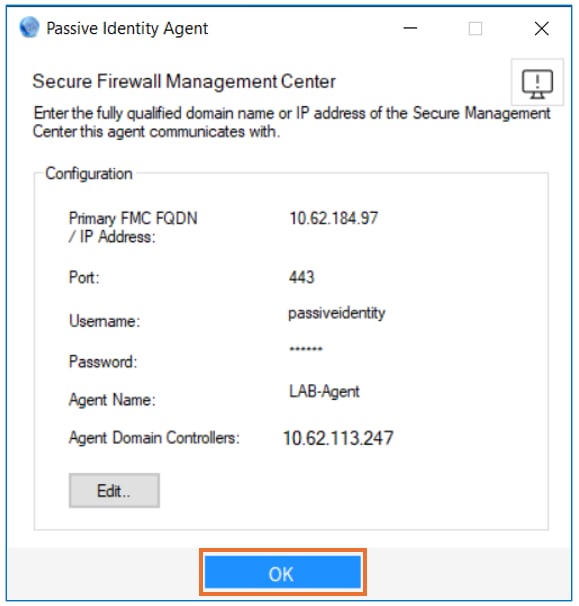 agent is running
In the FMC UI, navigate toIntegration > Other Integrations > Identity Sources > Passive Identity Agent. Confirm that the Passive Identity Agent displays a green status.
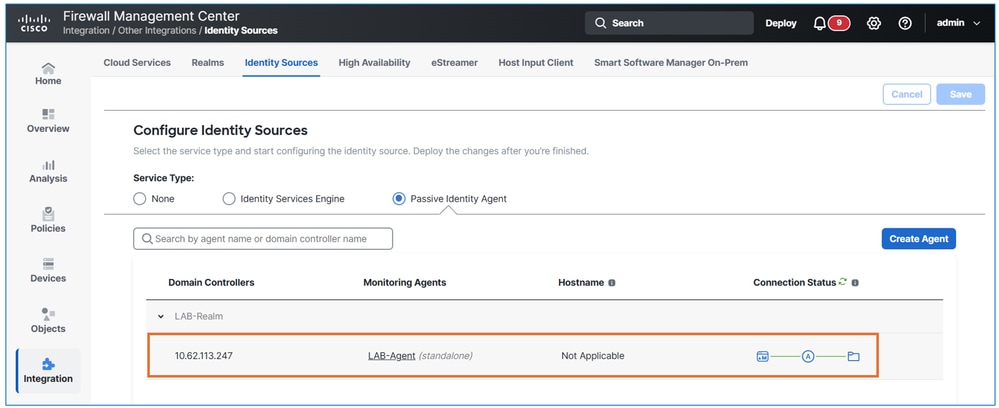 verify the communication from fmc
Configure Identity Policies
Create an Identity Policy based on the table provided.
| Policy Name |
Rule Name |
Authentication Realm |
Remaining settings |
| LAB-Identity-Policy |
Rule1 |
LAB-Realm |
Leave as default |
In the FMC UI, navigate toPolicies > Access Control > Identity. Click theNew Policybutton.
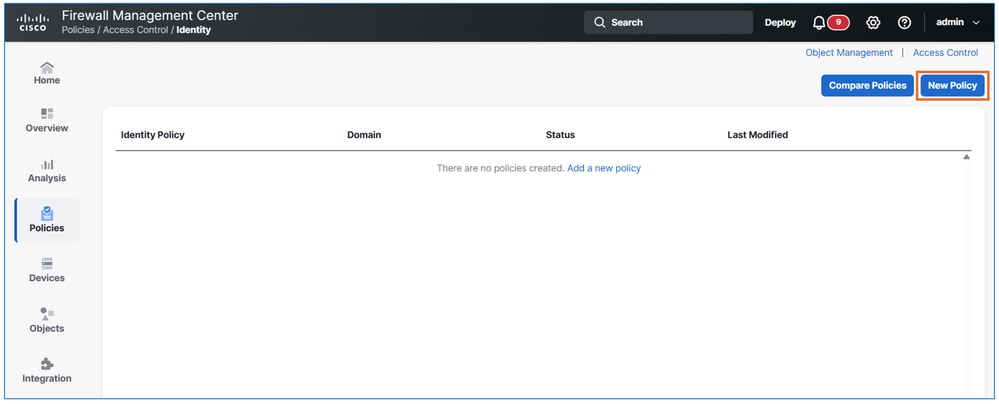 new policy
Enter the policy name according to the task requirements.
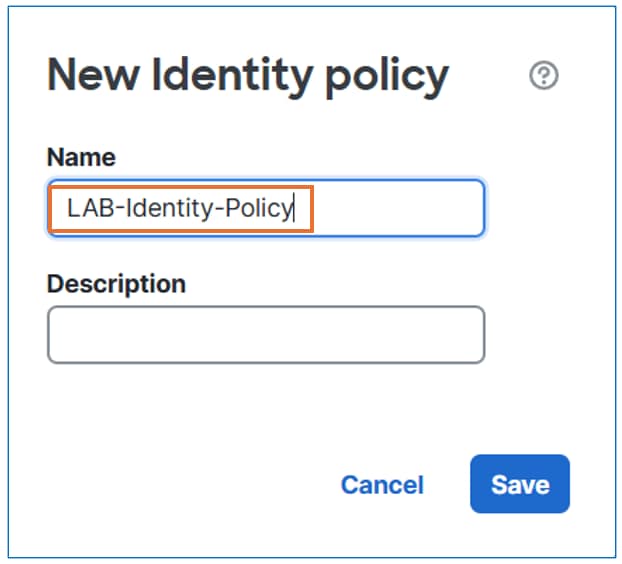 new policy
Click theAdd Rulebutton.
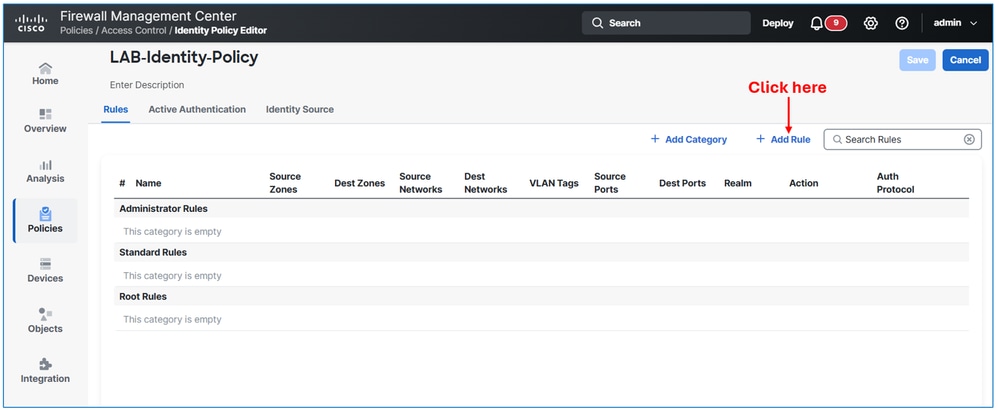 create rule
Navigate to theRealm & Settingstab and select theAuthentication Realmbased on the task requirements. Finally, click theAddbutton.
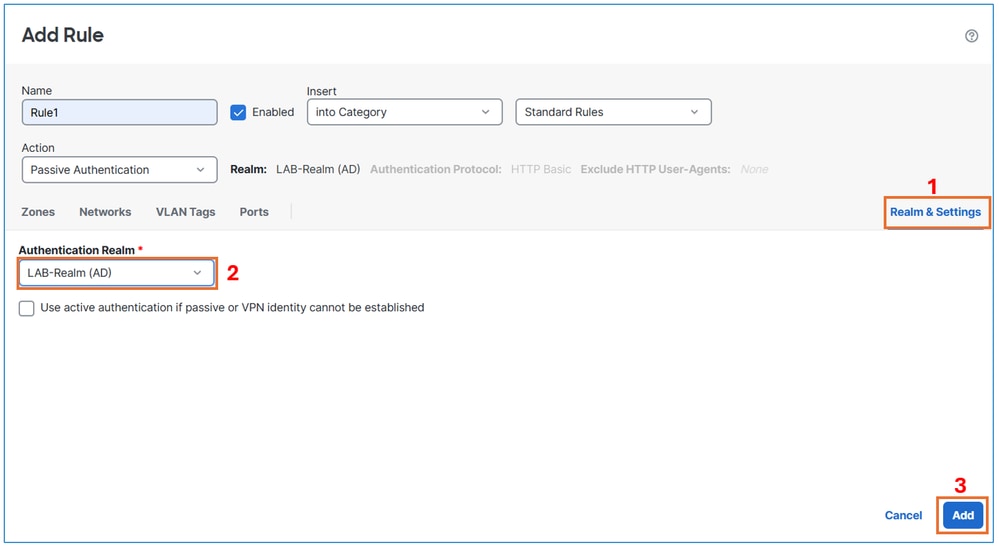 Realm setting
Click theSavebutton.
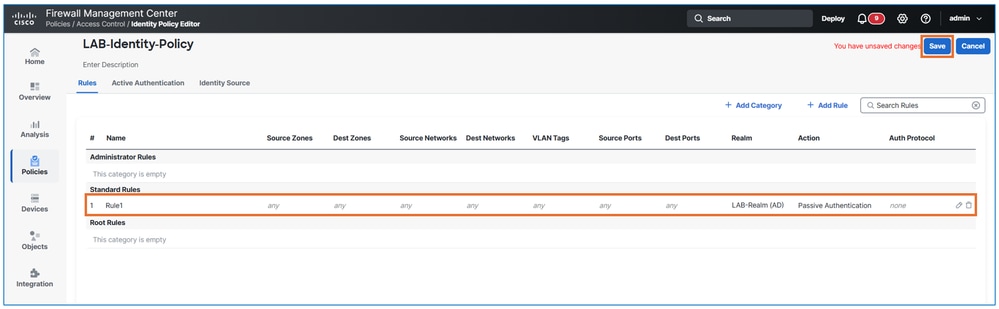 save the config
Configure Access Control Policies
Link the Identity Policy to the Access Control Policy and create an Access Policy Rule with the attributes:
| Attribute name |
Value |
| Rule name |
Rule1 |
| Action |
Allow |
| Source Zone |
Inside |
| Destination Zone |
Outside |
| Source Networks |
10.10.10.0/24 |
| Destination Networks |
10.48.62.98/32 |
| Service |
Dest Port TCP 80 (HTTP) |
| Users |
LAB-Realm/GROUP1 |
| Logging |
At the End of Connection |
Step 1. Link the Identity Policy to the Access Control Policy
In the FMC UI, navigate toPolicies > Access Control > Access Control. Click theEditbutton for your policy.
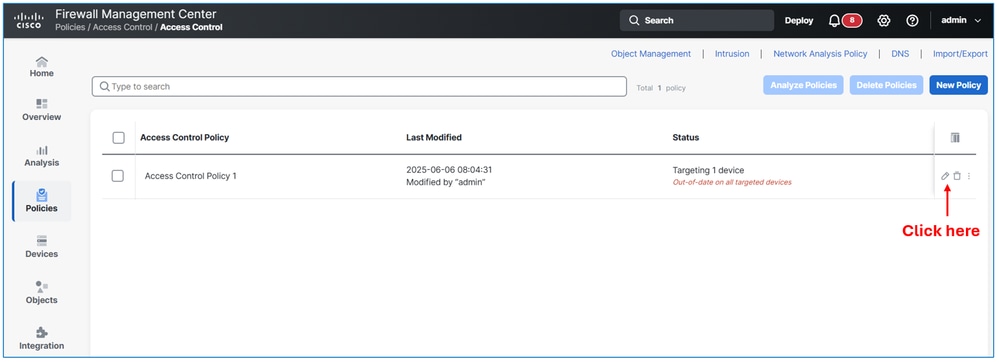 Edit policy
Navigate to theIdentitysection and link the Identity Policy created in the previous task.
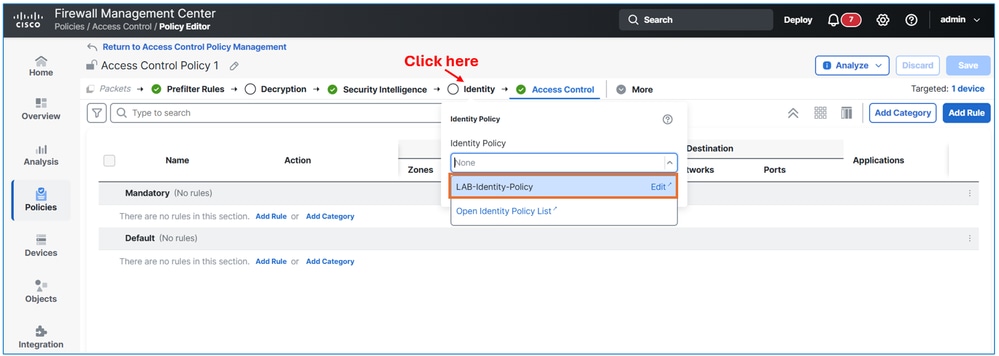 add identity policy
Click theApplybutton
Step 2. Create the Access Control Rule.
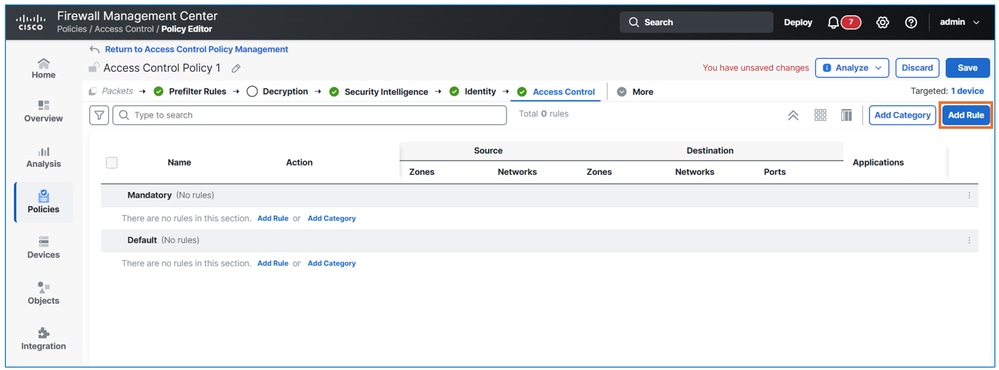 create ACP
Enter the details according to the task requirements, and most importantly, under theUserstab, addGROUP1fromLAB-Realm.
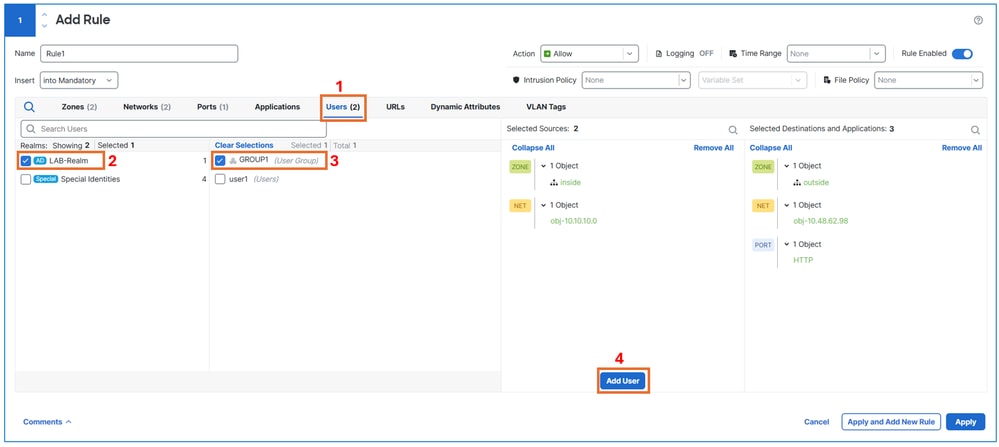 add users in the rule
Enable logging for the rule by selectingLog at end of connection.
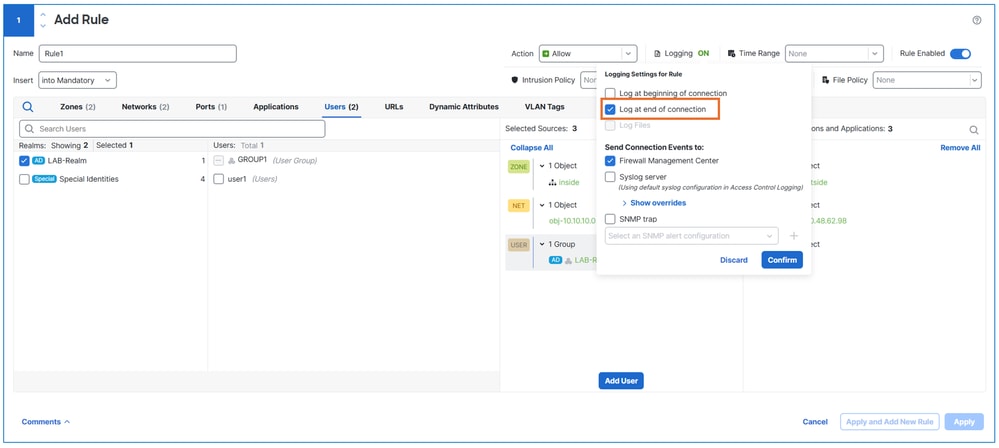 enable logging
Step 3. Enable logging for the Default Action.
Click thesettingsicon to modify theDefault Actionlogging settings.
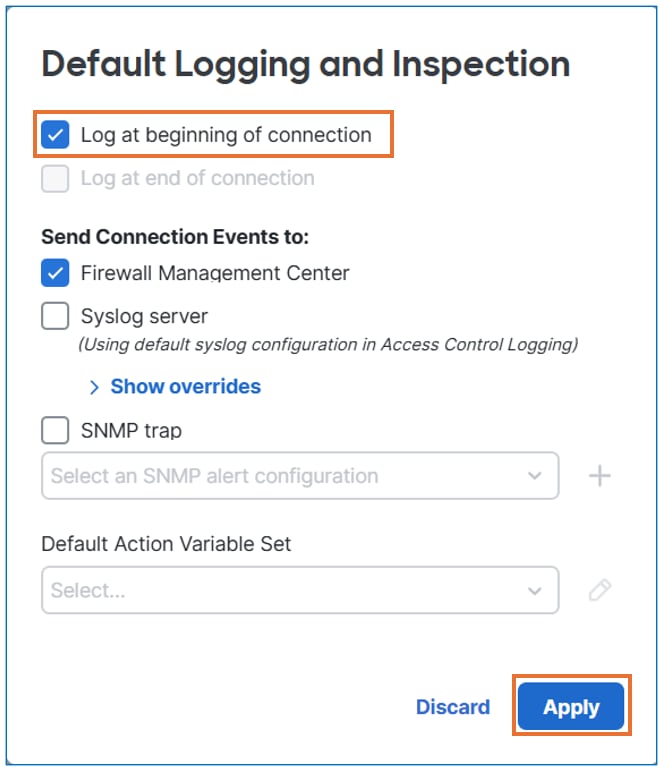 Enable logging
SaveandDeploythe configuration on the FTD.
Verification
Verify the Passive Identity operation by confirming that traffic is allowed exclusively for ftd.
Log in to the domain user from the user machine.
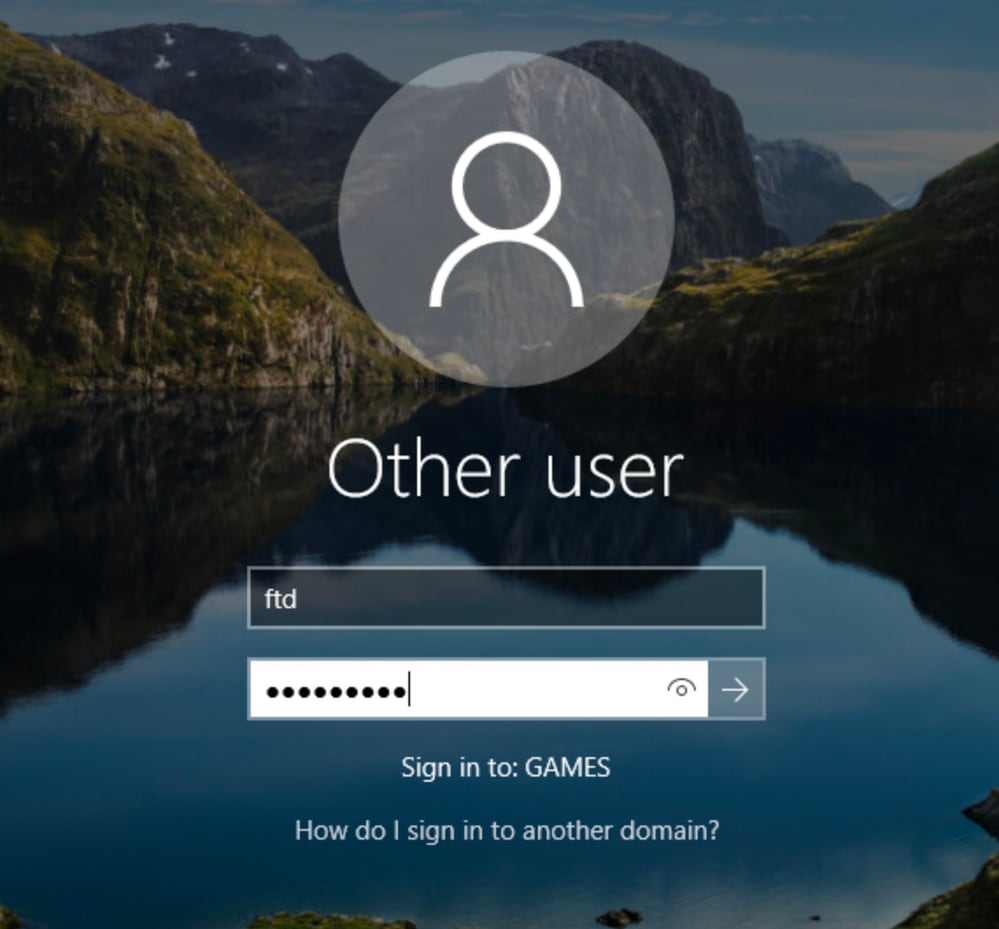 user login
After a user successfully logs in, verify from FMC under Analysis> user >active session to view the active user detail.
 Active sessions
After initiating some traffic verification from the connection events, see the user details in the connection events.
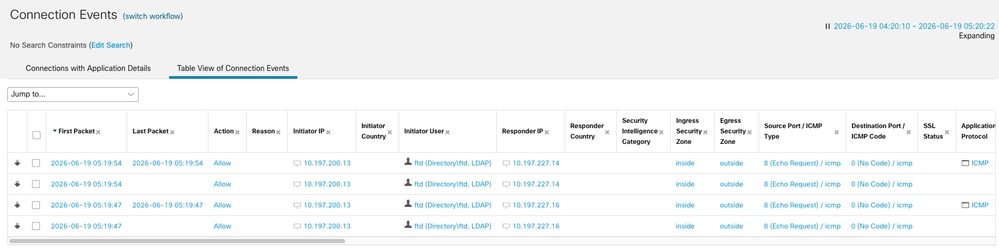 Active sessions
Troubleshooting
Checking Agent Logs
On the Windows machine hosting the Agent, open Task Manager and verify that the background processCiscoPassiveIdentityAgentServiceis running.
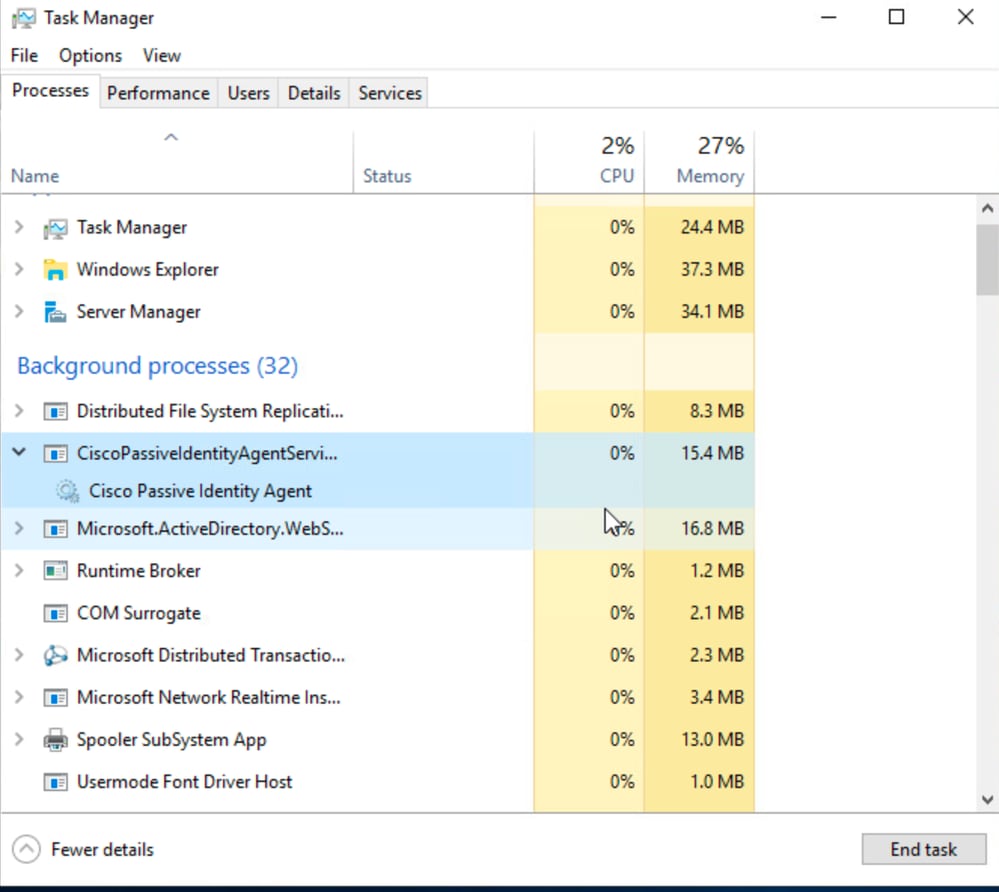 Running task
Agent logs can be found in the CiscoPassiveIdentityAgent files, located by default at: "C:\Program Files (x86)\Cisco\Cisco Passive Identity Agent\".
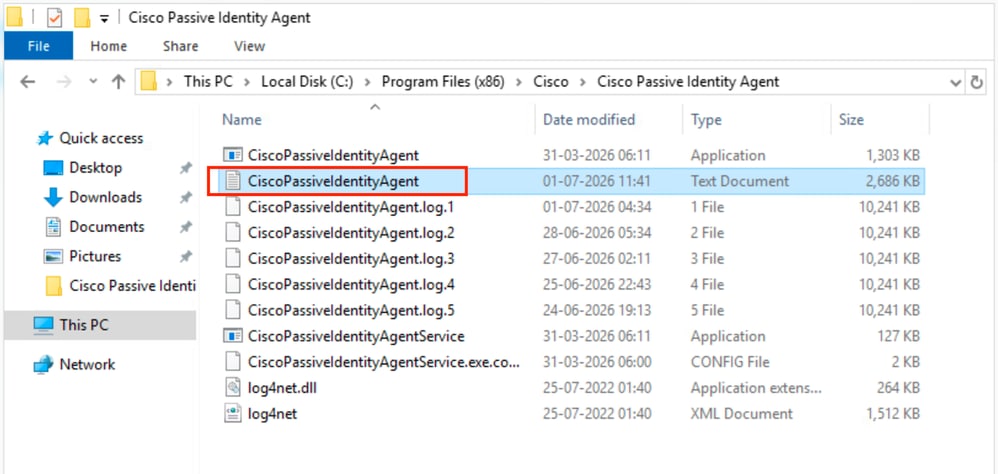 agent
agent
By default, the Agent logs are set to theINFOlevel. To enable DEBUG level logging, modify theCiscoPassiveIdentityAgentService.exe.configfile and set the logging level to eitherALLorDEBUG.
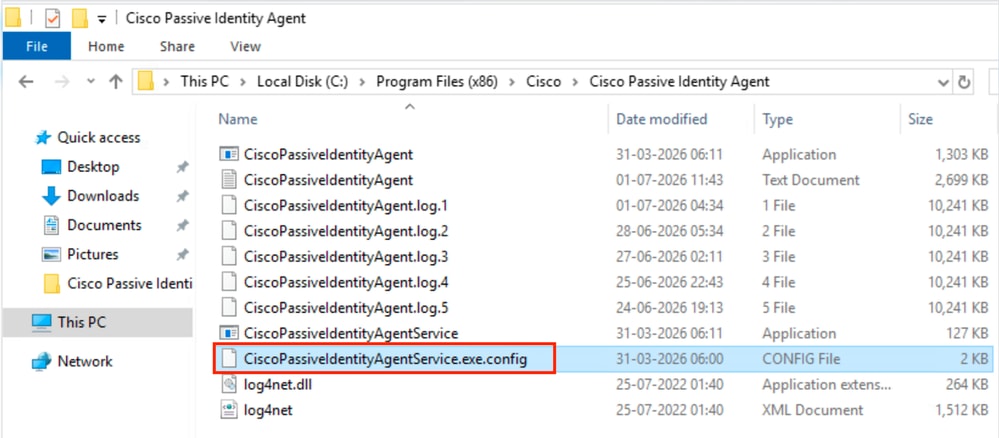 agent config
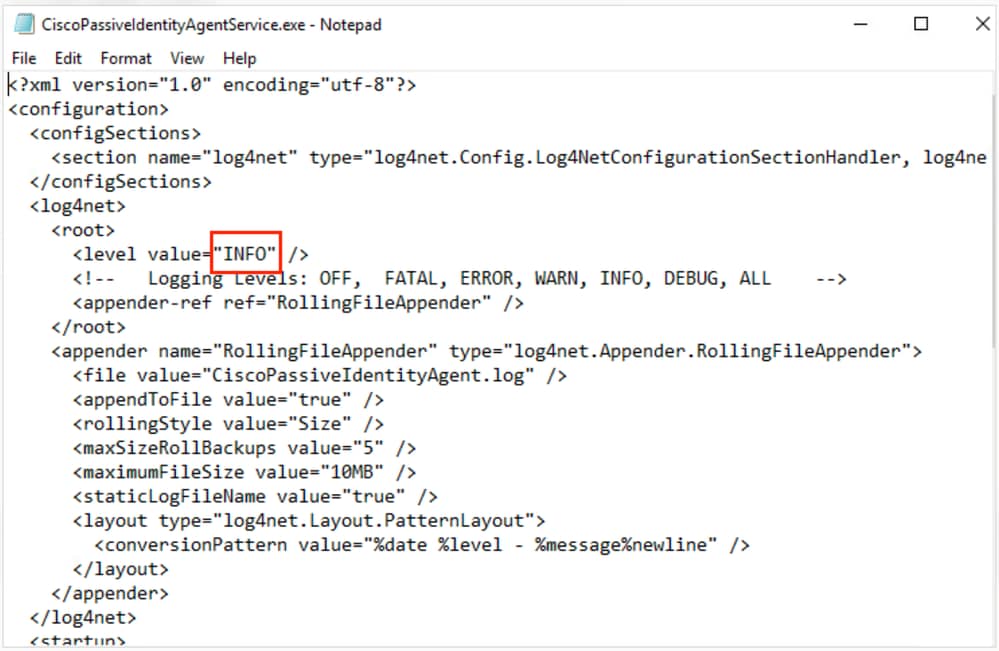 info log
Checking Agent Logs – Fetch Agent Configuration.
INFO Rest Client, Bulk Events: [f"domain":"games.cisco.com", "srcIpAddress": "X.X.X.X", "user": "fdm", "timestamp": "2026-07-01T19
INFO Rest Client, Mapping Status: OK
INFO Rest Client, REST post successful for userBatch fdm, latency = 0, current DC TIME in UTC: 07/01/2026 19:47:34 USER logged at
INFO Rest Client, Requesting agent configuration
FMC Logs
Run this command to see if the user-to-IP mapping has been received from the agent.
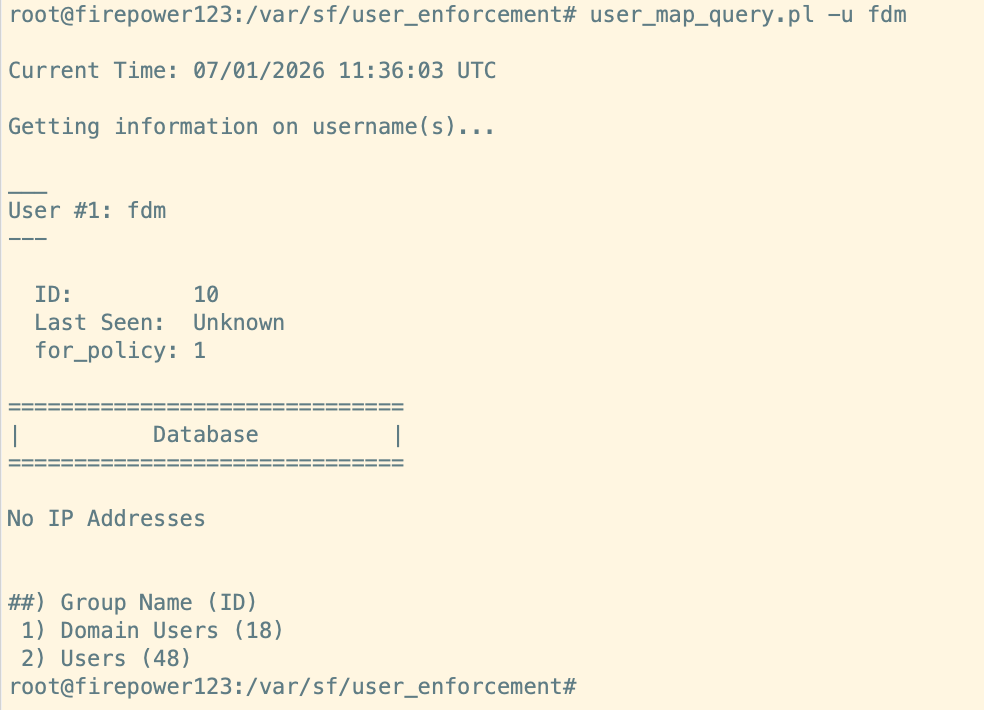 fmc output
If the previous command does not show any mapping, collect these logs and contact Cisco TAC.
This is a list of relevant logs for the FMC API. Thepigtail log encompasses all of them.
- /var/log/auth-daemon.log
- /var/log/messages
- /var/log/process_stdout.log
- /var/log/process_stderr.log
Revision History
| Revision | Publish Date | Comments |
|---|---|---|
1.0 |
16-Jul-2026
|
Initial Release |

 Feedback
Contact Cisco
- Open a Support Case

- (Requires a Cisco Service Contract)