Introduction
This document describes how to go over the Cisco Secure Endpoint Identity Persistence feature.
What is Identity Persistence?
Identity Persistence is a feature that allows you to maintain a consistent event log in virtual environments or when computers are re-imaged. You can bind a Connector to a MAC address or hostname so that a new connector record is not created every time a new virtual session is started or a computer is re-imaged. This feature is designed specifically for non-persistent VM and Lab environments. The recommended method is hostname across business and enable the feature on the policies where you want to sync identities.
Requirements
Cisco recommends that you have knowledge of these topics:
- Access to the Cisco Secure Endpoints portal
- You need to contact Cisco TAC to have them enable the Identity Persistence feature in your organization.
- Identity Persistence is only supported on Windows Operating System (OS)
When Do You Need Identity Persistence?
Identity Persistence is functionality on Secure Endpoints which helps in the identification of Secure Endpoints at the time of initial Connector registration and matches them against previously known entries based on identity parameters like MAC Address or Hostname for that specific connector. The implementation of this feature not only helps to keep a correct license count but most importantly allows for proper tracking of historical data on non-persistent systems.
Virtual Endpoint Deployment
The most common use for Identity Persistence in Virtual Deployments is Non-Persistent Virtual Desktop Infrastructure (VDI) Deployment. VDI host desktop environments are deployed upon end-user requests or need. This includes different vendors like VMware, Citrix, AWS AMI Golden Image Deployment, and so on.
Persistent VDI, also often called 'Stateful VDI' is a setup where each individual user’s desktop is uniquely customizable and ‘persists’ from one session to another. This type of Virtual Deployment does not need the functionality of Identity Persistence, as these machines are intended not to be re-imaged regularly.
As with all software that could possibly interact with the performance of the Secure Endpoint, Virtual Desktop applications need to be evaluated for possible exclusions in order to maximize functionality and minimize impact.
Reference: https://docs.vmware.com/en/VMware-Horizon/2103/horizon-architecture-planning/GUID-AED54AE0-76A5-479B-8CD6-3331A85526D2.html
Physical Endpoint Deployment
There are two scenarios that can apply for the deployment of Identity Persistence on Secure Endpoints physical machines:
- When you deploy or reimage a physical endpoint with a golden image with the Secure Endpoint connector pre-installed, the Goldenimage Flag must be enabled. Identity Persistence can be used to avoid duplication in instances of re-imaged machines but is not required.
- When you deploy or reimage a physical endpoint with a golden image and later install the Secure Endpoint connector, Identity Persistence can be used to avoid duplication in instances of re-imaged machines but is not required.
Overview of Identity Persistence Process
- The connector is downloaded with a token in the policy.xml file, which ties it back to the policy in question on the cloud side.
- The connector is installed, storing the token in local.xml, and the connector makes a POST request to the portal with the token in question.
- The Cloud side goes through this order of operations:
a. The computer checks the policy for the ID sync policy configuration. Without this, registration occurs as normal.
b. Depending on the policy settings, Registration checks the existing database for the hostname or MAC address.
Across Business:All policies are checked for a match on Hostname or MAC, depending on the setting. The matched object GUID is noted and sent back to the end client machine. The client machine then assumes the UUID and assumes any group/policy settings of the previously matched host. This overrides the installed policy/group settings.
Across Policy: The token matches the policy on the cloud side and looks for an existing object with the same hostname or MAC address WITHIN that policy only. If one exists it assumes the UUID. If there is not an existing object tied to that policy, a new object is created. Note: duplicates can exist for the same hostname tied to other groups/policies.
c. If a match can not be made to a group/policy due to a missing token (previously registered, bad deployment practice, and so on) the connector falls to the default connector group/policy set under the business tab. Based on the setting of the group/policy, it attempts to review all policies for a match (across the business), only that policy in question (across policy), or none at all (none). With this in mind, it is generally advised to place your default group to be one that contains their desired ID sync settings so machines sync back correctly in the event of a token issue.
Identify Duplicates in Your Organization
Externally Available GitHub Scripts
Find the Duplicate UUIDs: https://github.com/CiscoSecurity/amp-04-find-duplicate-guids
Reasons Why Duplicates Are Created
There are a few common instances that can cause duplicates to be seen on your end:
1. If these steps have been followed while VDI Pool:
- Initial deployment on a nonpersistent VM/VDI is done with Identity Persistence disabled (use a golden image for example).
- The policy is updated in the cloud to have Identity Persistence enabled, which during the day, updates it on the endpoint.
- Machines get refreshed/reimaged (use the same golden image), which then places the original policy back onto the endpoint without Identity Persistence.
- The policy locally does not have Identity Persistence so the registration server does not check for previous records.
- This flow results in Duplicates.
2. The user deploys the original golden image with Identity Persistence enabled in the policy in one group and then moves an endpoint to another group from the Secure Endpoints portal. It then has the original record in the ‘moved-to’ group but then creates new copies in the original group when the VMs get re-imaged/re-deployed.
Note: This is not an exhaustive list of scenarios that could cause duplicates but some of the most common ones.
Common Issues/Symptoms with Incorrect Identity Persistence Deployment
Incorrect Identity Persistence implementation can cause these issues/symptoms:
- If you deploy endpoint manually via command line switch with Identity Persistence already enabled in the policy and then later uninstall the endpoint and try re-install with package from different Group/Policy the endpoint will automatically switch back to the original policy.
- Output from SFC logs showing policy switch on it’s own with in 1-10sec
(167656, +0 ms) Dec 14 11:37:17 [1308]: Util::VerifyOsVersion: ret 0
(167656, +0 ms) Dec 14 11:37:17 [1308]: ERROR: ETWEnableConfiguration::IsETWEnabled: ETW not initialized due to incompatibile OS
(167656, +0 ms) Dec 14 11:37:17 [1308]: UiPublisher::PublishPolicyInfo: Name -UTMB-WinServer-Protect Serial 819 << ---------------------- Freshly Installed
(167656, +0 ms) Dec 14 11:37:17 [1308]: UiPublisher::PublishLastPolicyUpdateTime: Publish Last Policy Update time 1670439264
(167656, +0 ms) Dec 14 11:37:17 [1308]: UiPublisher::PublishAgentVersion: Agent Version 7.5.7.21234
(167656, +0 ms) Dec 14 11:37:17 [1308]: HeartBeat::PolicyNotifyCallback: EXIT
(167656, +0 ms) Dec 14 11:37:17 [1308]: AmpkitRegistrationHandler::PolicyCallback: EXIT (0)
.
.
.
(173125, +0 ms) Dec 14 11:37:22 [4704]: AmpkitRegistrationHandler::UpdateConfiguration: Enter
(173125, +0 ms) Dec 14 11:37:22 [4704]: AmpkitRegistrationHandler::UpdateConfiguration: Aborting - not registered
(173125, +0 ms) Dec 14 11:37:22 [4704]: AmpkitRegistrationHandler::ConnectionStateChanged: Starting Proxy Discovery
(173125, +0 ms) Dec 14 11:37:22 [4704]: UIPipe::SendPolicyReloaded sending policy reloaded to UI. ui.data.policy.policyName -UTMB-WinServer-Audit << --------- Auto Switch to Old Policy
(173125, +0 ms) Dec 14 11:37:22 [4704]: PipeSend: sending message to user interface: 28, id: 0
(173125, +0 ms) Dec 14 11:37:22 [4704]: UIPipe::SendStatus: notifying UI: No Product
(173125, +0 ms) Dec 14 11:37:22 [4704]: UIPipe::SendStatus: notifying UI: No Product
(173125, +0 ms) Dec 14 11:37:22 [4704]: UIPipe::SendStatus: notifying UI: No Product
(173125, +0 ms) Dec 14 11:37:22 [4704]: UIPipe::SendStatus : engine1 (0, 0), engine2 (0, 0)
(173125, +0 ms) Dec 14 11:37:22 [4704]: PipeSend: sending message to user interface: 1, id: 0
(173125, +0 ms) Dec 14 11:37:22 [4704]: UiStatusHandler::ConnectionStateChangedState: 0
(173125, +0 ms) Dec 14 11:37:22 [4704]: UiPublisher::PublishConnectionStatus: State 0
(173125, +0 ms) Dec 14 11:37:22 [4704]: AmpApiServer.cpp:AmpApiServer::PublishScanAvailable:223: Cloud connection status 0, Tetra Available 0
(173125, +0 ms) Dec 14 11:37:22 [4704]: AmpkitProxyHelper::LoadProxyFromConfig: Enter
(173125, +0 ms) Dec 14 11:37:22 [4704]: AmpkitProxyHelper::LoadProxyFromConfig proxy server is NULL
(173125, +0 ms) Dec 14 11:37:22 [4704]: AmpkitProxyHelper::LoadProxyFromConfig: Direct connection detected
(173125, +0 ms) Dec 14 11:37:22 [4704]: AmpkitProxyHelper::LoadProxyFromConfig: Exit(1)
(173125, +0 ms) Dec 14 11:37:22 [4704]: UiAgentGuidUpdater::ConnectionStateChanged
(173125, +0 ms) Dec 14 11:37:22 [4704]: UiAgentGuidUpdater::RefreshAgentGuidUi: Agent GUID: e1a756e2-65ab-4cd6-a886-ff826d74f05d
(173125, +0 ms) Dec 14 11:37:22 [4704]: UiPublisher::PublishAgentGuid: Agent GUID did not change (e1a756e2-65ab-4cd6-a886-ff826d74f05d)
(173125, +0 ms) Dec 14 11:37:22 [4704]: AmpkitSubscriptionThread::NotificationWorker: Waiting on queue
The other side effect if you try install connector that belongs to different group. You will see in the portal that connector is assigned to the correct group but with “wrong” original policy
This is due to fact how Identity Persistence (ID SYNC) work.
Without ID SYNC once connector is uninstalled completely or by using re-register command line switch. You should see new Created Date and connector GUID in case of un-install or just new connector GUID in case of re-register command. However, with ID SYNC that is not possible ID SYNC overwrites with the old GUID and DATE. That's how we 'sync' the host.
If this issue is observed fix has to be implemented through the policy change. You will need to move affected endpoint(s) back to the original Group/Policy and make sure the policy sync up. Then move the endpoint(s) back to the desired Group/Policy
Deployment Best Practices
Configure snapvol File
In case you use App Volumes for your VDI Infrastructure, it is recommended you make these configuration changes to your snapvol.cfg configuration
These exclusions must be implemented into snapvol.cfg file:
Paths:
- C:\Program Files\Cisco\AMP
- C:\ProgramData\Cisco
- C:\Windows\System32\drivers
- C:\Windows\System32\drivers\ImmunetNetworkMonitor.sys
- C:\Windows\System32\drivers\immunetprotect.sys
- C:\Windows\System32\drivers\immunetselfprotect.sys
- C:\Windows\System32\drivers\ImmunetUtilDriver.sys
- C:\Windows\System32\drivers\trufos.sys
Registry Keys:
- HKEY_LOCAL_MACHINE\SOFTWARE\Immunet Protect
- HKEY_LOCAL_MACHINE\SOFTWARE\Microsoft\Windows\CurrentVersion\Uninstall\Immunet Protect
- HKEY_LOCAL_MACHINE\SYSTEM\CurrentControlSet\services\CiscoAMP
- HKEY_LOCAL_MACHINE\SYSTEM\CurrentControlSet\Services\CiscoAMPCEFWDriver
- HKEY_LOCAL_MACHINE\SYSTEM\CurrentControlSet\Services\CiscoAMPELAMDriver
- HKEY_LOCAL_MACHINE\SYSTEM\CurrentControlSet\Services\CiscoAMPHeurDriver
- HKEY_LOCAL_MACHINE\SYSTEM\CurrentControlSet\Services\CiscoOrbital
- HKEY_LOCAL_MACHINE\SYSTEM\CurrentControlSet\Services\CiscoSAM
- HKEY_LOCAL_MACHINE\SYSTEM\CurrentControlSet\Services\CiscoSCMS
- HKEY_LOCAL_MACHINE\SYSTEM\CurrentControlSet\services\ImmunetProtectDriver
- HKEY_LOCAL_MACHINE\SYSTEM\CurrentControlSet\services\ImmunetSelfProtectDriver
- HKEY_LOCAL_MACHINE\SYSTEM\CurrentControlSet\services\Trufos
On x64 systems, add these:
- HKEY_LOCAL_MACHINE\SOFTWARE\Wow6432Node\Immunet Protect
- HKEY_LOCAL_MACHINE\SOFTWARE\Wow6432Node\Microsoft\Windows\CurrentVersion\Uninstall\Immunet Protect
References:
Portal Policy Planning
These are some of the best practices that must be followed when you implement Identity Persistence on the Secure Endpoint Portal:
1. It is highly recommended to use separate policies/groups for Identity Persistence endpoints for easier segregation.
2. If you plan to use Endpoint Isolation and implement the Move Computer to Group upon compromise action. The destination group must also have Identity Persistence enabled and must only be used for VDI computers.
3. It is not recommended to enable Identity Persistence on the Default Group/Policy on your organization settings unless Identity Persistence has been enabled Across All policies with Across Organization as the settings scope.
Configuration
Follow these steps in order to deploy the Secure Endpoint connector with Identity Persistence:
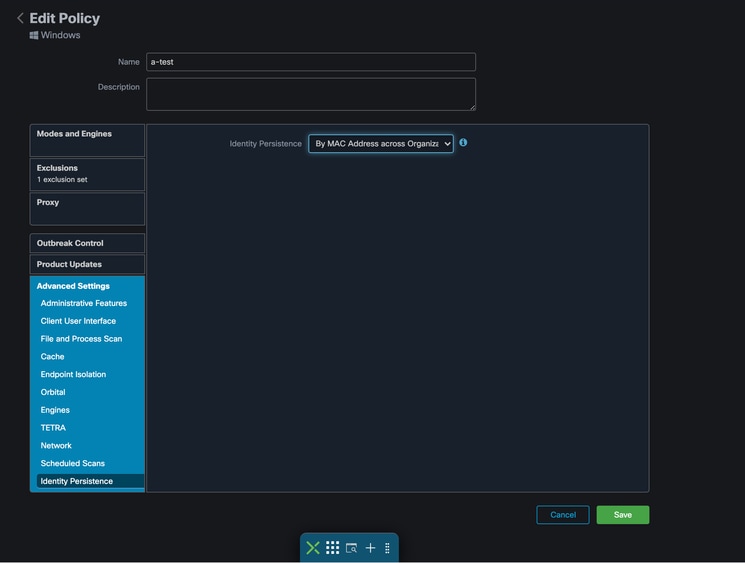
Step 1. Apply the desired Identity Persistence setting to your policies:
- In the Secure Endpoint portal, navigate to Management > Policies.
- Select the desired policy you want to enable Identity Persistence on and then clickEdit.
- Navigate to theAdvanced Settingstab and then click the Identity Persistence tab at the bottom.
- Select the Identity Persistence drop-down and choose the option that makes the most sense for your environment. Refer to this image.
 Test - 123
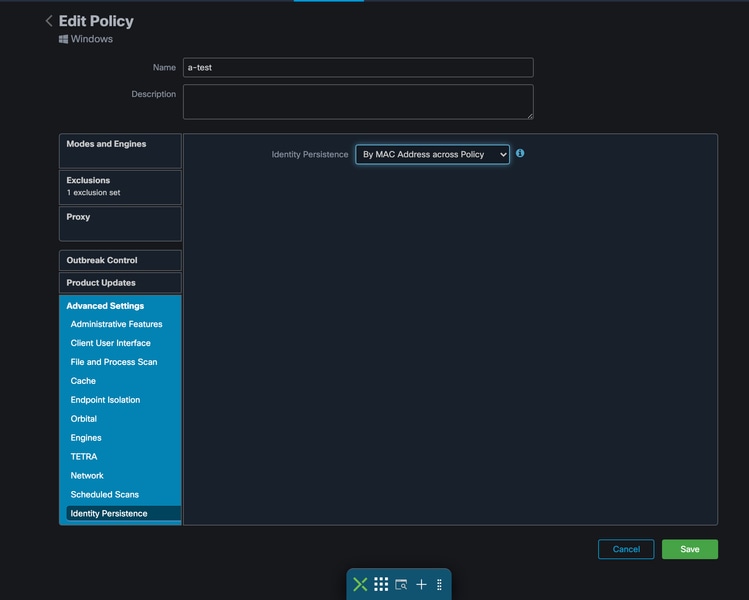
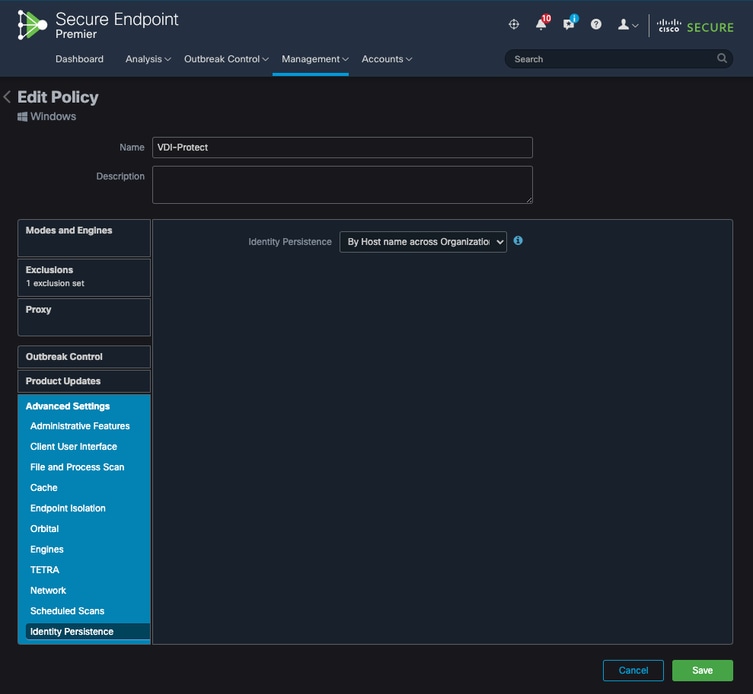
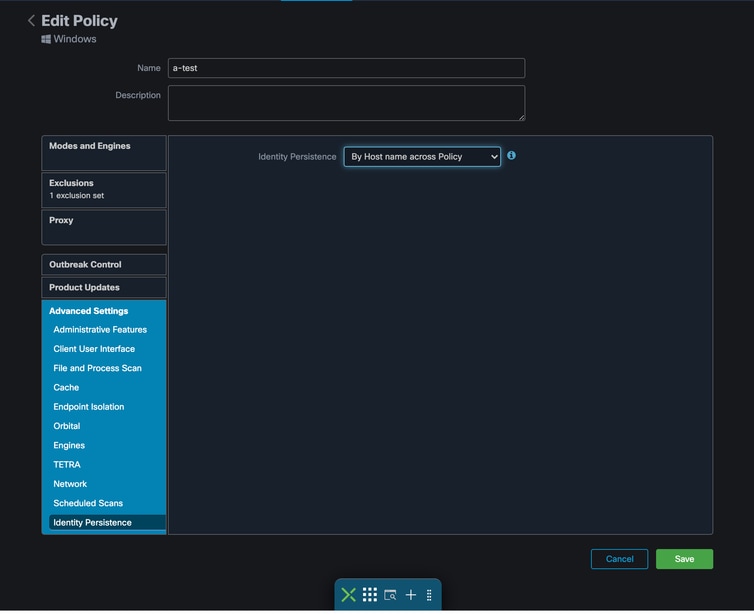
There are five options you can choose from.
Note: If you choose to use Identity Persistence, Cisco suggests that you use By Hostname across Business or Policy. A machine has one hostname but can have more than one MAC address and many VMs clone the MAC Addresses.
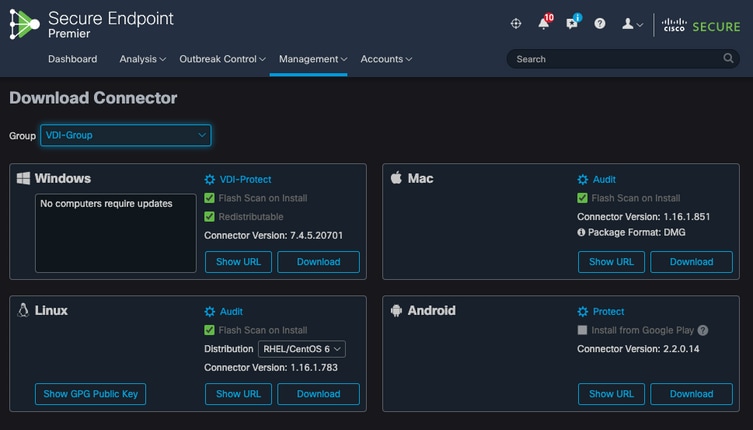
Step 2. Download the Secure Endpoint Connector.
- Navigate toManagement > Download Connector.
- Select the group for the policy you edited in Step 1.
- ClickDownload for the Windows Connector as shown in the image.
Step 3. Deploy Connector to endpoints.
- You can now use the downloaded connector to install Secure Endpoint (with Identity Persistence now enabled) manually on your endpoints.
- Otherwise, you can also deploy the connector using a golden image (see image)
Note: You need to select the redistributable installer. This is a ~57 MB (size can vary with newer versions) file that contains both the 32- and 64-bit installers. In order to install the connector on multiple computers, you can place this file on a network share or push it to all the computers accordingly. The installer contains a policy.xml file that is used as a configuration file for the installation.
Golden Image Creation
Secure Endpoint Version 8.4.4+:
New process for versions of Secure Endpoint 8.4.4. We recommend updating to this version at a minimum to get started with your golden image process as this method is both easier and quicker. These switches are intended for use when creating a Windows operating system image as a deployable golden image (Secure Endpoint Windows connector version 8.4.4 and later):
-
sfc.exe -enablegoldenimage <password>- Stops the connector service, deletes the registry keys and local xml nodes associated with query connections, and adds hostname to local.xml for golden image recognition where <password> is theConnector Protection Password.
Virtual Machine(VMware,Citrix,AWS, and Azure)
Follow the best practices guidelines from the Vendor document (VMware, Citrix, AWS, Azure, and so on.) when you create a Golden Image to be used for the VDI Cloning process.
For example, VMware Golden Image Process: https://docs.vmware.com/en/VMware-Horizon/2106/virtual-desktops/GUID-D9C46AEF-1C41-4711-BF9E-84362EBE6ABF.html.
As you have identified the VMware, AWS composition process restarts the Cloned (Child VMs) multiple times before the finalization of the VM configuration, this causes issues with the Secure Endpoint registration process as at this time the Cloned (Child VMs) do not have the final/correct hostnames assigned and that causes the Cloned (Child VMs) to use the Golden Image Hostname and registers to the Secure Endpoint Cloud. This breaks the cloning process and causes issues.
This is not an issue with the Secure Endpoint connector process but incompatibility with the Cloning Process and Secure Endpoint registration. In order to prevent this issue, we have identified a few changes to be implemented in the cloning process which help resolve these issues.
These are the changes that need to be implemented on the Golden Image VM before the image is frozen to clone
1. Always use the Goldenimage flag on the Golden Image at the time of the installation of Secure Endpoint.
2. Implement the Golden Image Setup Script and Golden Image Startup Script section to find the scripts that would help turn ON the Endpoint service only when we have a final hostname implemented on the Cloned(Child VMs). Refer to the section VMware Horizon Duplication Issues for more details.
Outdated - Golden Image Override Flag for versions before 8.4.4
When you use the installer, the flag to use for golden images is /goldenimage 1.
The golden image flag prevents the connector from starting and registering on the base image; and, so on the next start of the image, the connector is in the functional state it was configured to be in by the policy assigned to it.
For information on other Flags, you can use, please see this article.
When you use the installer, the new flag to use for golden images is /goldenimage [1|0]
0 - Default Value - this value will not trigger the golden image option, and operates just as if the installer was run without the option at all. Do not skip Initial Connector registration and startup on install.
C:\> CiscoInstaller_goldenimage.exe /R /S /goldenimage 0 [other options…]
1 -Install as a golden image. This is the typical option used with the flag and is the only expected usage. Skips initial Connector registration and Startup on installation.
C:\> CiscoInstaller_goldenimage.exe /R /S /goldenimage 1 [other flags here…]
Golden Image Creation Steps
It is best practice to install the connector last for the preparation of the Golden Image.
Please also refer to our recommendation in the section above (Secure Endpoint Version 8.4.4+) as we heavily encourage utilizing version 8.4.4 and up
- Prepare the Windows image to your requirements; install all your required software, and configurations for the Windows imageexcept for the connector.
- Install the Cisco Secure Endpoint connector.
- sfc.exe -enablegoldenimage <password>- Stops the connector service, deletes the registry keys and local xml nodes associated with query connections, and adds hostname to local.xml for golden image recognition where <password> is theConnector Protection Password.
- Freeze Golden Image

Note: Please note you can utilize the following command if you no longer want it to keep monitoring for hostname changes as it stops the connector and deletes the golden image host name from local.xml to return it to the regular operating state.
sfc.exe -disablegoldenimage <password if connector is running>
If the connector is running, you will need to enter the Connector Protection Password.
*Outdated method Prior to 8.4.4 steps below*
- Prepare the Windows image to your requirements; install all your required software, and configurations for the Windows imageexcept for the connector.
- Install the Cisco Secure Endpoint connector.
Use the/goldenimage 1flag in order to indicate to the installer that this is a golden image deployment.
C:\> CiscoInstaller_goldenimage.exe /R /S /goldenimage 1
3. Implement the Script Logic(If needed) as described here
4. Complete installation
5. Freeze your golden image
After the Golden Image has had applications installed, the system prepped and Secure Endpoint has been installed with the/goldenimageflag, the host is ready to be frozen and distributed. Once the cloned host boots up, Secure Endpoint then starts and registers to the cloud. No further action is required with regard to configuring the connector unless there are changes that you want to make to the policy or host. If changes are made after the golden image has completed registration, this process must be restarted. The flag prevents the connector from starting and registering on the base image. On the next start of the image, the connector will be in the functional state it was configured to be in by the policy assigned to it.
Note: If the Golden Image gets registered to the Secure EndpointCloud before you are able to freeze the VM, it is recommended to uninstall and re-install Secure Endpoint on the Golden Image VM and then freeze the VM again to prevent registration and duplicate connector issues. It is not suggested to modify any registry values for Secure Endpoint as part of this uninstallation process.
Note: If you are deploying the Secure Endpoint connector utilizing version 8.4.4 and up, please see the section right above "8.4.4+ Update"
Update the Golden Image
You have two options when you need to update a Golden Image in order to retain an unregistered connector.
Recommended Process
- Uninstall the connector.
- Install the host updates / upgrades.
- Reinstall the connector after the golden image process using the golden image flags.
- The host should not start the connector if the process is followed.
- Freeze the image.
- Verify before spinning up clones that the Golden Image did not register to the Portal to prevent unwanted duplicate hosts.
Alternate Process
- Ensure the host has no connectivity to the internet to prevent the connector from registering.
- Stop the connector service.
- Install updates.
- Freeze the image once the updates have been completed
- The connector needs to be prevented from registering in order to prevent duplicate hosts from occurring. When you remove connectivity, this prevents it from reaching out to register to the cloud. Also, the connector being stopped will keep it in that state until the next reboot which will allow the clones to register as unique hosts.
- Verify before spinning up clones that the Golden Image did not register to the Portal to prevent unwanted duplicate hosts.
Golden Image Code
This section consists of the code snippets that can help support the Golden Image Process and would help prevent connector duplicates when implementing Identity Persistence.
Golden Image Setup Script
Setup Script Description
The first script, 'Setup', is executed on the Golden Image before cloning it. It has to be manually executed just one time. Its main purpose is to establish initial configurations that will allow the following script to function correctly on the cloned virtual machines. These configurations include:
- Changing the Cisco Secure Endpoint service startup to manual to avoid auto-start.
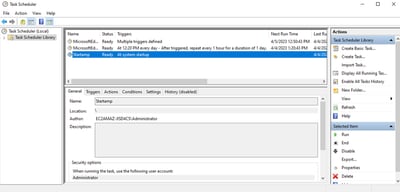
- Creating a scheduled task that executes the following script (Startup) at system startup with the highest privileges.
- Creating a system environment variable called "AMP_GOLD_HOST" that stores the hostname of the Golden Image. That would be used by the Startup script to verify if we have to revert the changes
Setup script code
rem Turn AMP to manual start
sc config CiscoAMP start=demand

rem Add host name to a system variable that we can check on startup
setx -m AMP_GOLD_HOST %COMPUTERNAME%

rem Add the startup script to the startup scripts
rem /rp password when there is a password
schtasks /create /tn "Startamp" /tr "C:\Users\XXXXXX\Desktop\VMWareHorizonAMPStartup.bat" /sc onstart /rl highest /np
The Setup script code is quite straightforward:
Line 2: Changes the startup type of the malware protection service to manual.
Line 5: Creates a new environment variable called "AMP_GOLD_HOST" and saves the current computer's hostname in it.
Line 9: Creates a scheduled task named "Startamp" that runs the specified 'Startup' script during system startup with the highest privileges, without needing a password.
Golden Image Startup Script
Startup Script Description
The second script, 'Startup', runs on each system startup on the cloned virtual machines. Its main purpose is to check if the current machine has the hostname of the 'Golden Image':
- If the current machine is the Golden image, no action is taken and the script ends. Secure Endpoint will continue running at system startup since we maintain the scheduled task.
- If the current machine is NOT the 'Golden' image, the changes made by the first script are reset:
- Changing the Cisco Secure Endpoint service startup configuration to automatic.
- Starting the Cisco Secure Endpoint service.
- Removing the "AMP_GOLD_HOST" environment variable.
- Deleting the scheduled task that executes the startup script and deleting the script itself.
Startup script code
echo "Current hostname: %COMPUTERNAME% vs %AMP_GOLD_HOST%"

if "%COMPUTERNAME%" == "%AMP_GOLD_HOST%" ( goto same ) else ( goto notsame )

:same
rem Do nothing as we are still the golden image name
goto exit

:notsame
rem Turn AMP to autostart
sc config CiscoAMP start=auto

rem Turn on AMP
sc start CiscoAMP

rem Remove environment variable
REG delete "HKLM\SYSTEM\CurrentControlSet\Control\Session Manager\Environment" /F /V AMP_GOLD_HOST
schtasks /delete /tn Startamp

goto exit
:exit
Line 2: Compares the current hostname with the stored "AMP_GOLD_HOST" value; if they are the same, the script jumps to the "same" label, otherwise, it jumps to the "notsame" label.
Line 4-6: When the "same" label is reached, the script does nothing since it is still the Golden Image and proceeds to the "exit" label.
Line 8-16: If the "notsame" label is reached, the script performs the following actions:
- Changes the startup type of the malware protection service to automatic.
- Starts the malware protection service.
- Removes the "AMP_GOLD_HOST" environment variable.
- Deletes the scheduled task named "Startamp"
Note: Please note the scripts contained in this document are not officially supported by TAC.
Note: These two scripts allow the Cisco AMP service startup in cloned virtual machine environments. By properly configuring the Golden image and using the startup scripts, it ensures that the Cisco Secure Endpoint runs on all cloned virtual machines with the correct configuration.
AWS Workspace Process
This solution consists of a 'Setup' script executed on the Golden Image prior to cloning and a 'Startup' script that runs on each cloned virtual machine during system startup. The primary objective of these scripts is to ensure the proper configuration of the service while reducing manual intervention. These two scripts allow the Cisco Secure Endpoint service startup in cloned virtual machine environments. By properly configuring the Golden image and using the startup scripts, it ensures that the Cisco Secure Endpoint connector runs on all cloned virtual machines with the correct configuration
Refer to the Golden Image Setup Script Code and Golden Image Startup Script Code section for the script code required for implementing Golden Image on AWS Workspace.
After executing the Setup Script we can verify that the configuration changes have been successfully deployed.
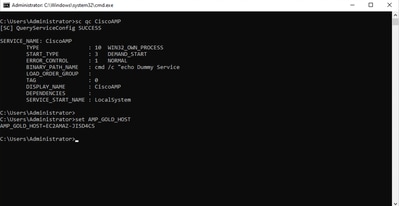
Since we performed this action on the golden image all the new instances will have this configuration and will execute the Startup Script at startup.
VMware Horizon Duplication Issues
With VMware Horizon, we were able to identify that the Child VM machines when they are being created are rebooted multiple times as part of the Horizon compose process. This causes issues as the Secure Endpoint services get enabled when the Child VMs are not ready (they do not have the final/correct NetBios Name assigned). This causes further issues with Secure Endpoint getting confused and hence the process breaks. To avoid running into this issue, we came up with a solution for this incompatibility with Horizon Process and this involves implementing the attached scripts on the Golden Image VM and using the post-synchronization script Functionality for VMware Horizon: https://docs.vmware.com/en/VMware-Horizon/2103/published-desktops-applications.pdf.
No Longer Needed Configuration/Changes
- You no longer need to uninstall and re-install Secure Endpoint if you want to make any changes to the Golden Image after the first deployment.
- No need to set the Secure Endpoint Service to Delayed Start.
Script Methodology
Examples of the scripts can be found below.
- Golden Image Setup Script: This script must be implemented once the Secure Endpoint connector is installed as described previously with the flags as documented earlier. This script modified the Secure Endpoint service to Manual Start and saves the Golden Image Hostname as an Environment Variable for reference in the next step.
VMware Horizon Configuration
- Golden Image VM is prepped and all the required applications for the initial deployment of the pool are installed on the VM.
- A secure Endpoint is installed with this Command-Line Syntax to include the goldenimage Flag. For example, <ampinstaller.exe> /R /S /goldenimage 1. Please note that The Golden Image Flag ensures that the Secure Endpoint service does not run until a reboot which is critical for this process to work correctly. Refer to https://www.cisco.com/c/en/us/support/docs/security/sourcefire-fireamp-endpoints/118587-technote-fireamp-00.html
- After the Secure Endpoint Installation, execute the VMWareHorizonAMPSetup.bat script on the Golden Image VM first. Essentially, this script changes the Secure Endpoint Service to Manual Start and creates an Environment Variable that stores the Golden Image Hostname for later use.
- You need to copy the VMWareHorizonAMPStartup.bat to a universal path on the Golden Image VM like "C:\ProgramData" as this would be used in the later steps.
- The Golden Image VM can now be Shutdown and the composition process can be initiated on VMware Horizon.
- This is the step-by-step information on what it looks like from the VMware Horizon perspective:
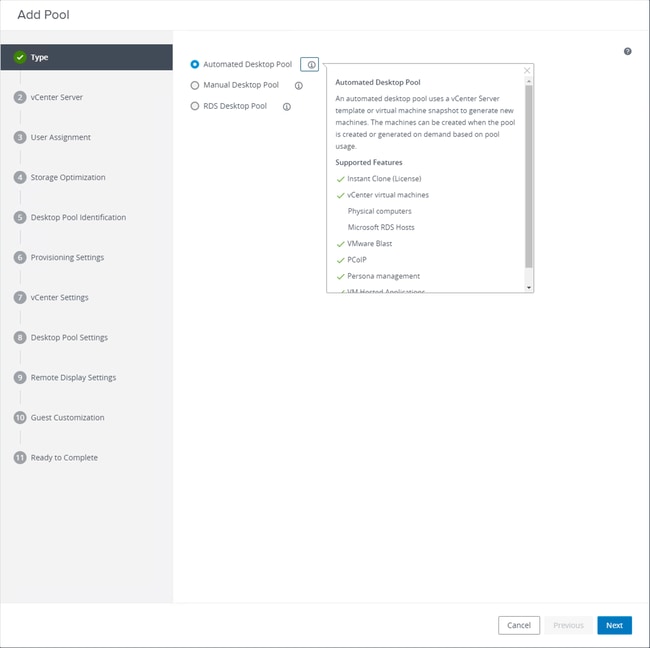 Selecting "Automated Desktop Pool"
Refer to: https://docs.vmware.com/en/VMware-Horizon/2106/virtual-desktops/GUID-6C3AB7F3-0BCF-4423-8418-30CA19CFC8FC.html
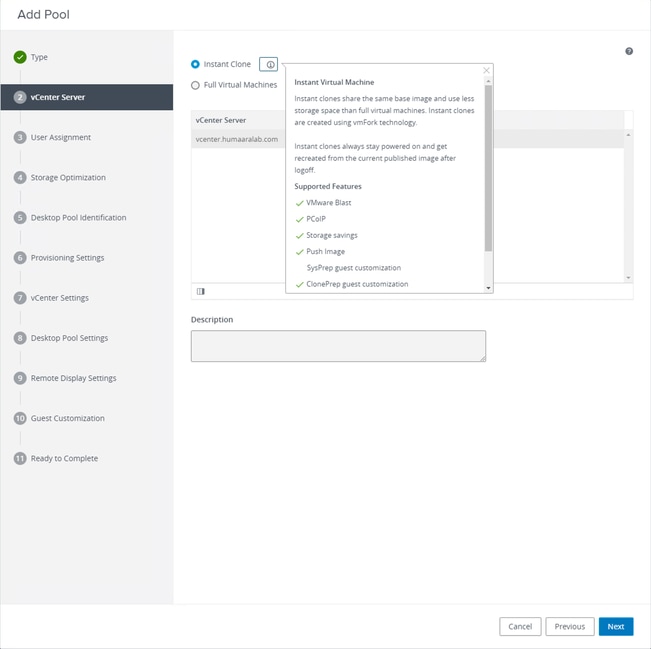 Selecting "Instant Clones"
Refer to: https://docs.vmware.com/en/VMware-Horizon-7/7.13/virtual-desktops/GUID-D7C0150E-18CE-4012-944D-4E9AF5B28347.html
 Selecting "Floating" type
Refer to: https://docs.vmware.com/en/VMware-Horizon-Cloud-Service-on-IBM-Cloud/21.1/horizoncloudhosted.deploy/GUID-34C260C7-A63E-452E-88E9-6AB63DEBB416.html
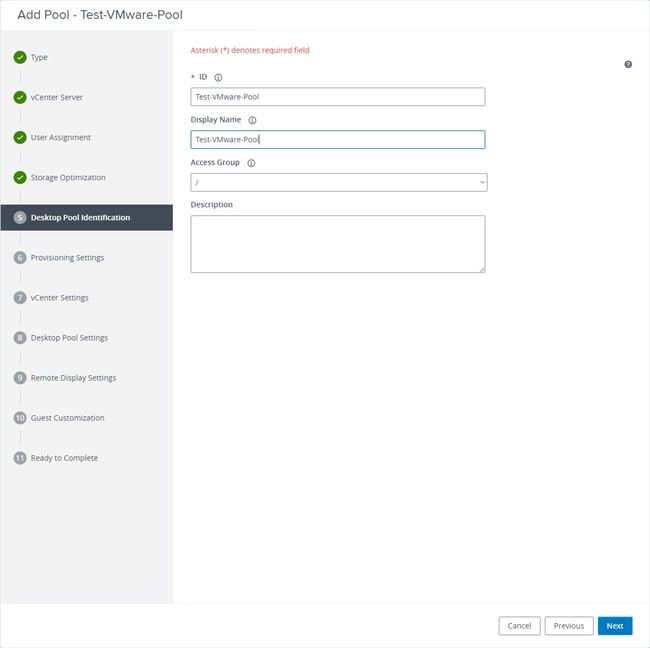 Desktop Pool Names
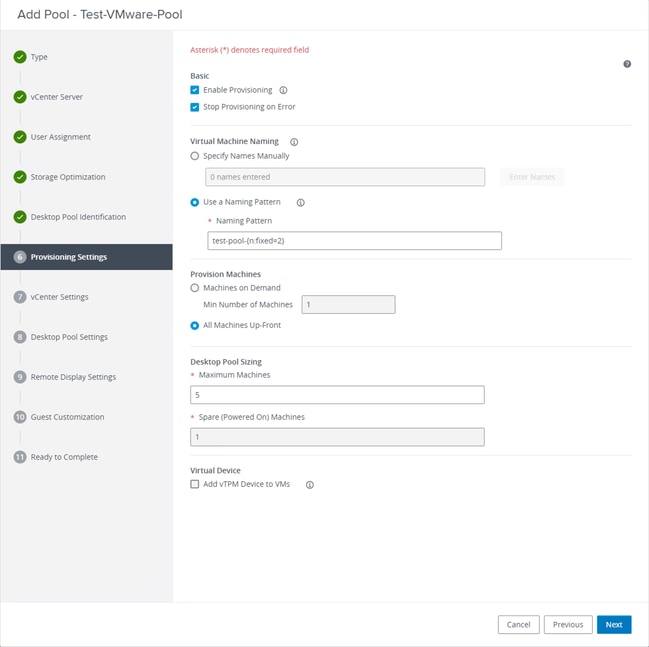
VMware Horizon Naming Pattern: https://docs.vmware.com/en/VMware-Horizon/2103/virtual-desktops/GUID-26AD6C7D-553A-46CB-B8B3-DA3F6958CD9C.html
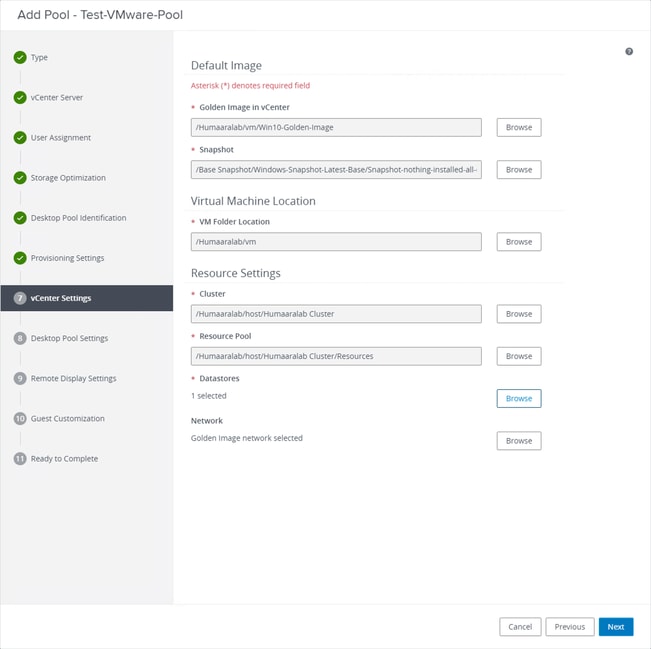
Golden Image: This is the actual Golden Image VM.
Snapshot: This is the image that you want to use in order to deploy the child VM. This is the value that is updated when you update the Golden Image with any changes. Rest are some of the VMware Environment-specific settings.
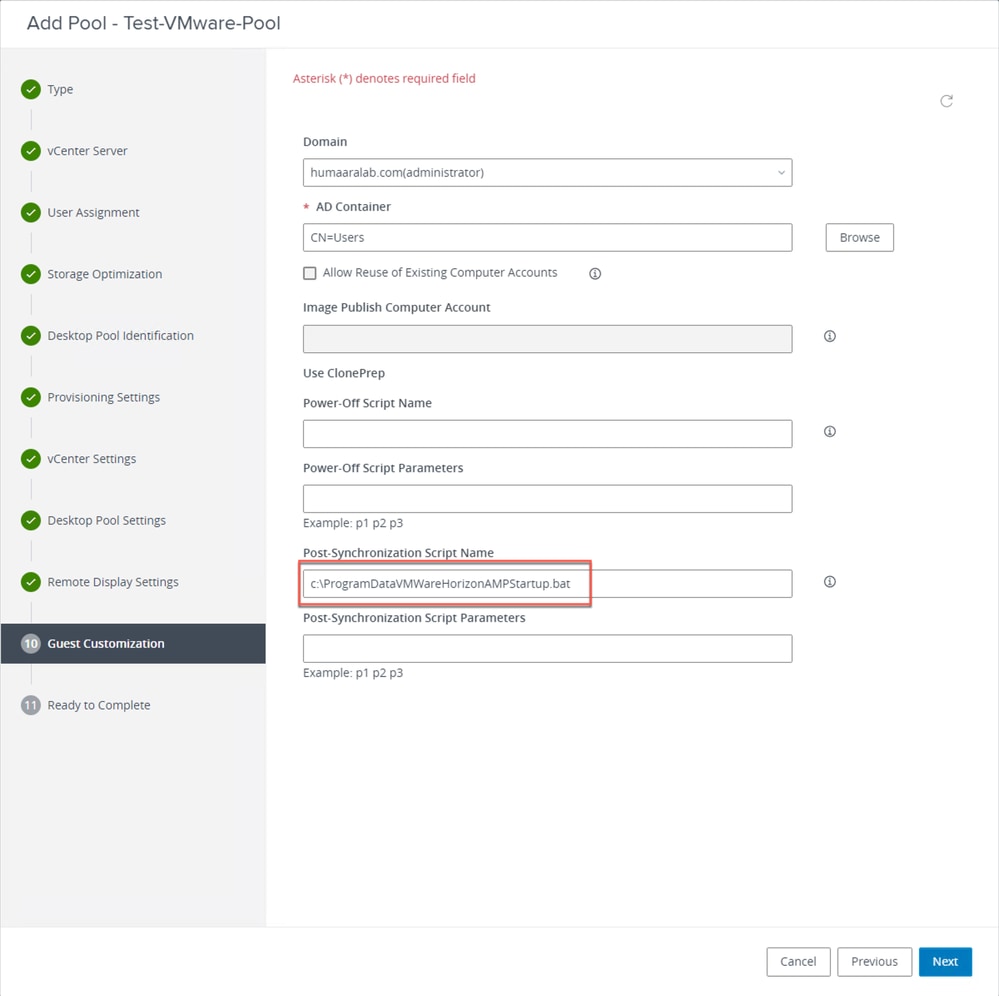
7. As mentioned previously, Step 10. in the wizard is where you set the script path.
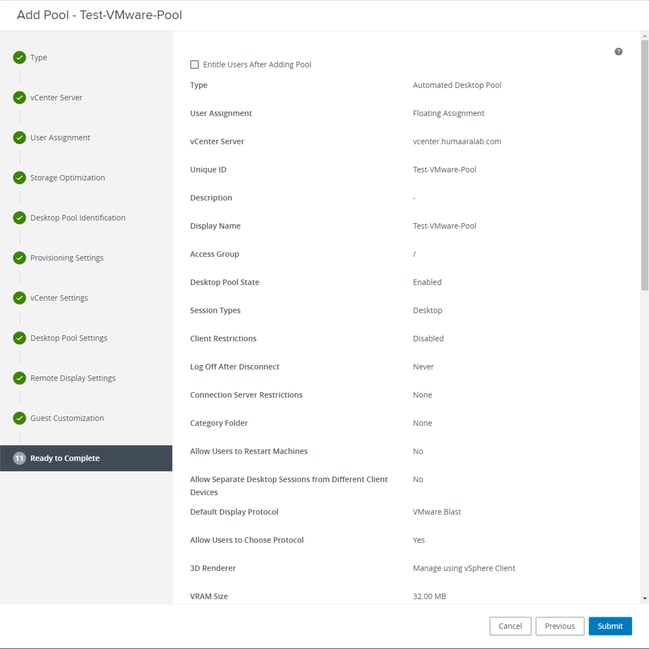
8. Once, completed and submitted, VMware Horizon begins the composition and the Child VMs will be created.
Note: Refer to the VMware guide for information on these steps but they are self-explanatory.
Removing Duplicate Entries
There are some available ways by which we can remove the Connector Duplicate Entries:
1. Utilize the Automated Removal Feature on the Secure Endpoint Portal to remove Duplicate(Inactive) Entries:
You will be able to find this setting under Admin > Organization Settings
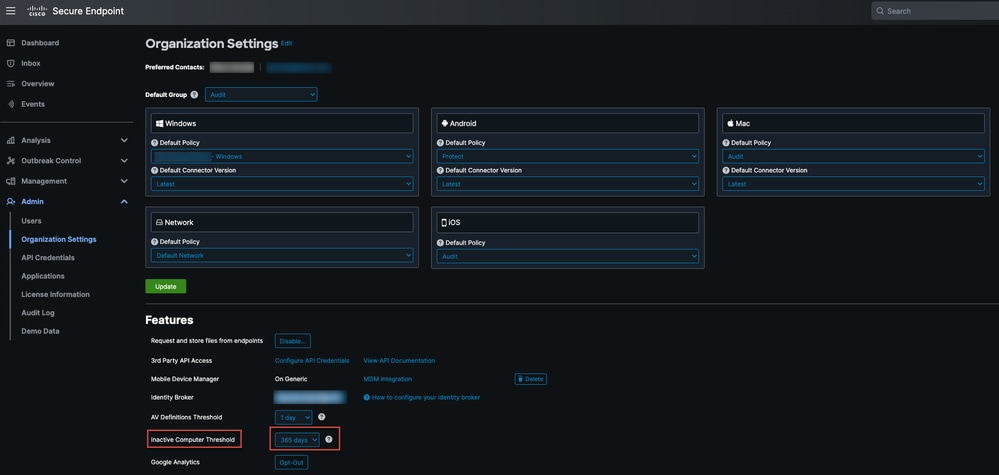
The Inactive Computer Threshold allows you to specify how many days a connector can go without checking in to the Cisco cloud before it is removed from theComputer Management page list. The default setting is 90 days. Inactive computers will only be removed from the list and any events they generate will remain in your Secure Endpoint organization. The computer will reappear in the list if the connector checks in again.
2. Utilize the available Orchestration Workflows: https://ciscosecurity.github.io/sxo-05-security-workflows/workflows/secure-endpoint/0056-remove-inactive-endpoints
3. Use the Externally available script to remove the Stale/Old UUIDs: https://github.com/CiscoSecurity/amp-04-delete-stale-guids
 Feedback