Configure and Troubleshoot Azure SFTP Blob Storage Repository on ISE
Available Languages
Introduction
This document describes configuring Azure Blob Storage as SFTP server with Public Key Infrastructure authentication with Identity Services Engine.
Prerequisites
Requirements
Cisco recommends that you have knowledge of these topics:
- General ISE knowledge
- ISE repository configuration
- Public Key Infrastructure (PKI) authentication
Components Used
The information in this document is based on these software versions:
- ISE 3.3, 3.4, 3.5 VM on Azure
- Azure Subscription to access Storage Center
The information in this document was created from the devices in a specific lab environment. All of the devices used in this document started with a cleared (default) configuration. If your network is live, ensure that you understand the potential impact of any command.
Background Information
As a cloud-native service, the Azure Blob Storage SFTP repository is easy to deploy and ideal for Azure-based ISE implementations. It eliminates on-premises connectivity issues, automatically scales to meet fluctuating storage demands, and ensures high availability and durability for large datasets — all while removing the need for manual infrastructure management.
Configure
ISE Pre-Configuration
1. Generate key pairs on ISE: Login to Primary admin node GUI. Navigate to Administration > System > Maintenance > Repository.
2. Under Repository List, click the option Generate Key Pairs.
3. Enter passphrase (greater than 13 characters) and click OK. This is required to protect the key pair.
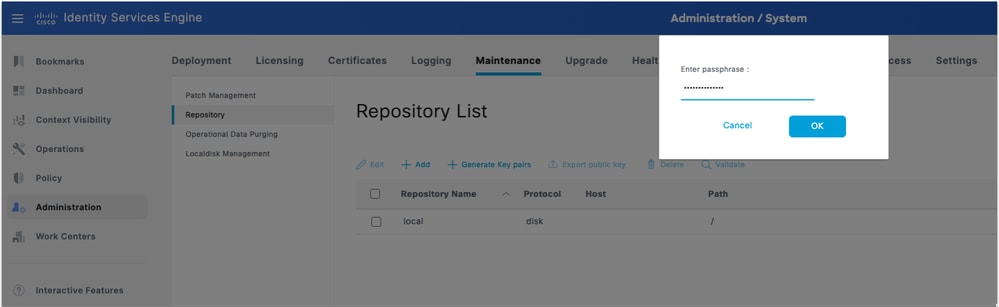 Generate key pair on ISE
4. Click on Export public key and download the id_rsa.pub key on your computer (Ensure this is saved for future references).
Azure SFTP configuration
1. Create and Configure Azure Storage Account: Log in to the Azure Portal and navigate to Storage accounts. Under Resources tab, click Create to create a new storage account. Fill in the details:
| Field |
Value |
| Subscription |
Your Azure subscription |
| Resource Group |
Select existing or create new |
| Storage Account Name |
Must be globally unique |
| Region |
Select your preferred region |
| Redundancy |
Locally Redundant Storage (LRS) — acceptable for lab/non-prod |
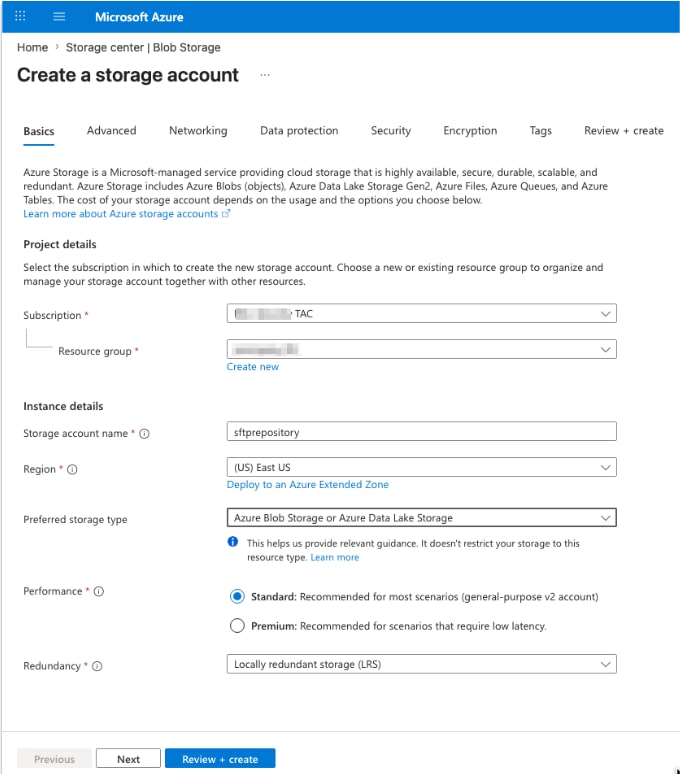 Create a Storage Account
2. Click Next and under Advanced tab, select the checkbox Enable Hierarchical Namespace. This option is mandatory. SFTP can only be enabled for hierarchical namespace accounts.
3. Select the checkbox Enable SFTP.
4. Leave rest of the options as default or tweak as per your requirements.
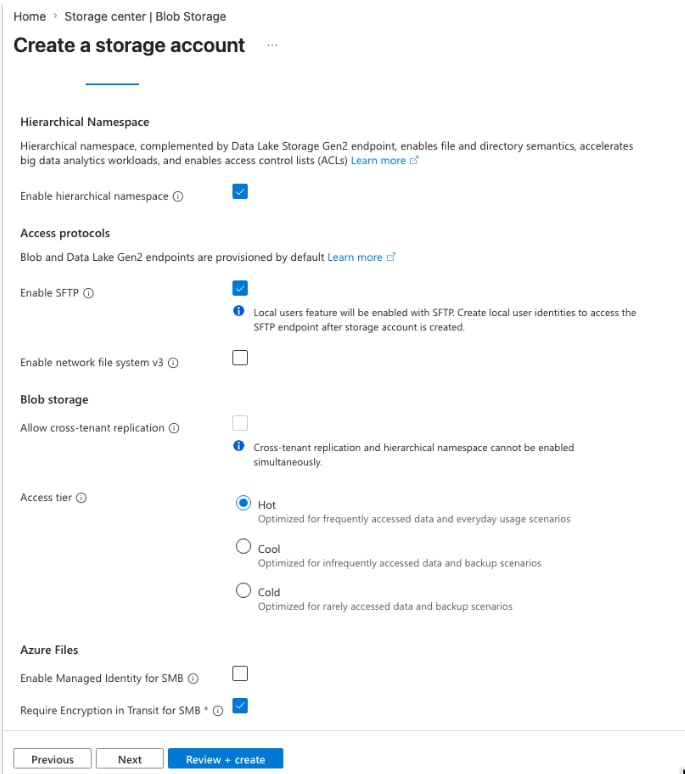 Configure Storage account
5. Click Next to configure Networking.
6. Set Network access to Enable public access from all networks.
7. Set Routing preference to Microsoft network routing.

Note: Note: In production environments, consider restricting access to specific IP ranges (the ISE node IP addresses) using firewall rules on the storage account.
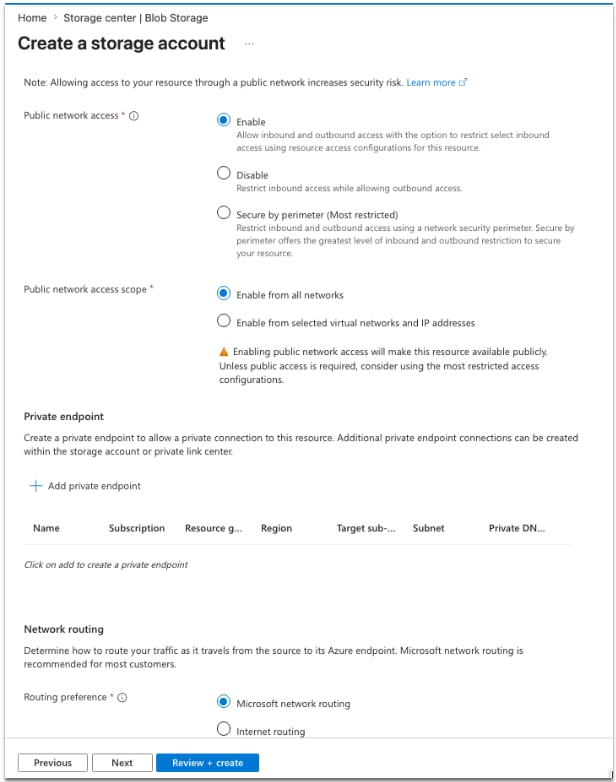 Network setting
8. Click Next and leave the Data protection, Security and Encryption as default. No additional configuration is required for lab or standard deployments.
9. Click Review + create. Once validation passes, click Create.
10. Wait for deployment to complete, then click Go to resource.
11. Configure SFTP on Azure Storage Account: In your newly created storage account, add a container by navigating to Data storage > Containers > Add container
12. Provide a container name. Click Create.
13. Add sftp user by navigating to Settings > SFTP in the left-hand menu. Click Add local user and configure the following:
| Field |
Value |
| Username |
A descriptive name |
| Authentication method |
SSH key pair — do NOT use password |
| SSH public key source |
Use existing key (Generated in step 1, the id_rsa.pub key) |
Note: In a multi-node deployment, when primary PAN and primary MnT are separate nodes, the id_rsa.pub file have RSA public keys from both primary PAN and primary MnT nodes.
14. For using existing public key under SSH keys option, open the id_rsa.pub file in a text editor of your choice and copy paste both the nodes key (starting with ssh-rsa and ending with root@your_node_name) separately by clicking Add key option twice.
Sample key: ssh-rsa AAAAB3NzaC1yc2EAAAADAQABAAACAQCdjUFU6QaMQfxuR/yzbw1QWZ8EwUJjN/C0cNNMlkMOQE9flJQ6GoClguU2UkBiRCZ0Y5vm2sYy/2WWtl+Byg+qH+TL85I4XNdC9eS/o44e+YuePUtXPWVe+cLVHKNFIhV7fA2SH8PscmWAsz7W0U7vRee9qrWQhDWcW+h3V+i7bHgU0SWnhq5RjEYK2AwwqmCnLG8uaPA9NOlvI0J2qB/M5Z8Vht+RN7AoxpdPySTg/AbUtLrZcCDTfV+qfCTAY62QSqmuwQ6E8z8/HbEKAe8h9awL2YfO0p1jdqsIOCajWHW18foI1HoJ6A0AWsphONL6tELifsGgYxdkGfNjaH8Z5mWM7JxDgQrrQnIIwN6dNhKOFOaKAUYrDQmgtYt9kPQ46s/5B/HnTgdiZfdlIHP6hgN+bw5RYAEN3Xdx9Jjz2jpWF0KVqlODCIMFRYLzEuH3/aHV9Rmbmn5AR0mnuRcErRbt4Yesyn1hVx6WV1jy7t+0AbZ+QuvovTCfmpuV3dou6tJ9/B9PNzVB3TuJk/ZY3GE5A9kZ/67PPjw/R6rudiQ8b+eAzM0+kPooLCbVz/ATO46gNy9QpEOqW41MSi/4lUeWLiOdgQ4sNUdxzIK6BgXYVyf2H85q2f8lwa7t+nA2NSN4XpiwJRDmuQ/J/hv27kbTx9bLHyUPZkg4ZcNnCQ== root@isexxx
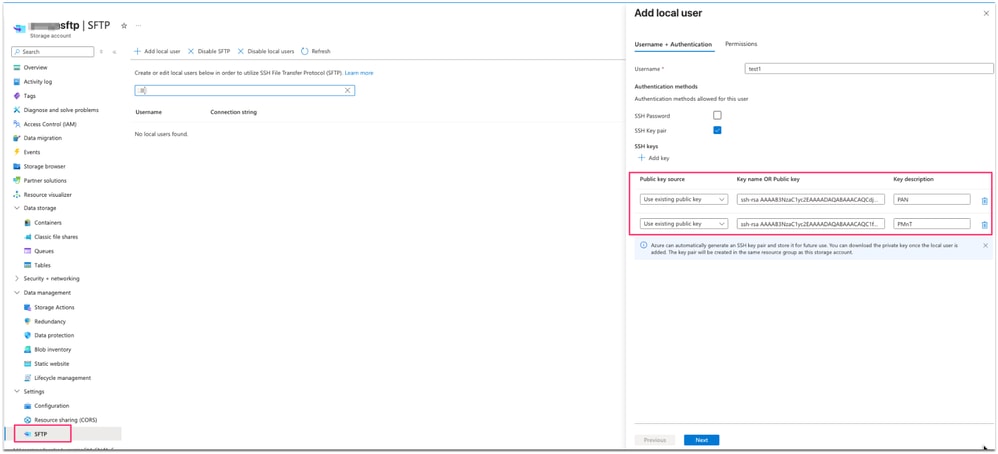 Adding public key on Azure
15. Click on Permissions. Select the Container created in this step initially and set the permission for the container to Read, Write, List, Delete and Create.
16. Set the Home directory to the root of the container.
17. Save the user.
ISE GUI Repository configuration
1. Navigate to Administration > System > Maintenance > Repository and click Add. Fill in the fields as follows:
| Field |
Value |
| Repository Name |
A descriptive label (like, Azure-SFTP) |
| Protocol |
SFTP |
| Server Name |
<storage_account_name>.blob.core.windows.net |
| Path |
/ (root directory) |
| Authentication |
PKI |
| User Name |
<storage_account_name>.<container_name>.<sftp_local_useraname> |
| Password |
Leave blank |
2. Click Submit to save the repository.
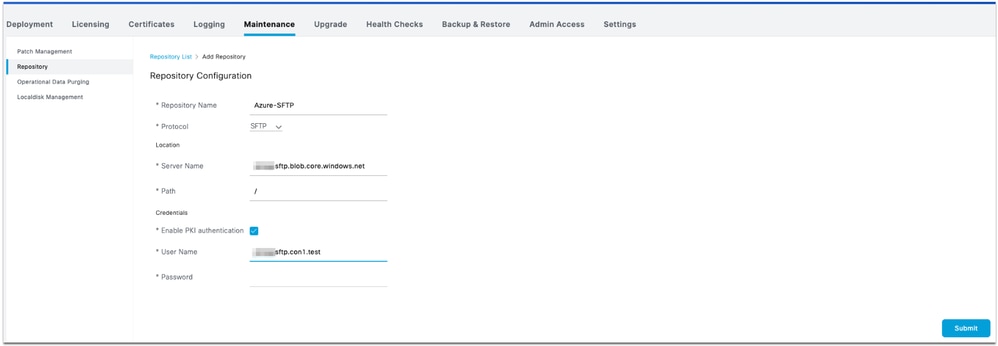 ISE SFTP repository Configuration

Warning: Host key of sftp server must be added through CLI using the crypto host_key add executable command before this repository can be used. Also ensure that the host key string matches the host name used in the URL of the repository configuration. To access the PKI enabled repository, generate key pairs from the GUI and export the public key onto your local machine. Copy this public key onto the PKI enabled SFTP server and add it to the 'authorized_keys' file.
3. Log in to both of the Primary admin node and Primary monitoring node and add the crypto host key using the crypto host_key ad host <sftp server > command. Make sure that ISE node is able to resolve the sftp hostname.
isenode1/iseadmin#crypto host_key add host xxxxxsftp.blob.core.windows.net
host key fingerprint added
# Host xxxxxsftp.blob.core.windows.net found: line 1
xxxxxsftp.blob.core.windows.net RSA SHA256:sP18dIvbSZgtEa5a2ea+Fy4P54Wd2ocEkToBq6xG74g
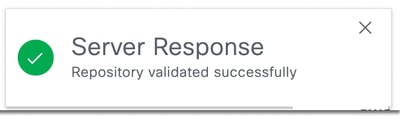
4. Go back to ISE GUI under Repository and Select the newly created repository and click on Validate. Repository validated successfully.
 Successful repository validation
Note: Repository validation option validates repository configuration only on Primary admin node.
Note: In case of SFTP repository created with RSA public key, the repositories created through the GUI do not get replicated in the CLI and the repositories created through the CLI do not get replicated in the GUI. To configure same repository on the CLI and GUI, generate RSA public keys on both CLI and GUI and export both the keys to the SFTP server.
ISE CLI Repository configuration
1. SSH into the CLI (command line interface) of Primary admin node. Add the crypto key on each node in the deployment where you would like to access the PKI based SFTP repository from CLI.
2. Generate rsa public key for CLI.
isenode1/iseadmin#crypto key generate rsa passphrase <passphrase>
3. Export the generated public key file to local disk repository (any repository that you have access to download the file).
isenode1/iseadmin#crypto key export <give a name for this file> repository <repository name>
4. Download this file from repository and open it in text editor to copy the public key for CLI access.
5. Upload SSH Public Key to Azure, same as GUI key added under Azure SFTP local user creation screen (from Step 3).
6. Click Add key and Paste the full SSH public key ( into the SSH public key field).
7. Optionally, provide a key description (For example, ISE-CLI-Key).
8. Click Next and Save.
Verify
1. Verify CLI access to sftp repository using the command "show repository <Repository name>". It shows the stored files on this sftp server.
isenode1/iseadmin#show repository Azure-SFTP
SB-pk-260522-2236.tar.gpg
ops-OPS10-260525-1026.tar.gpg
2. Verify GUI access to sftp repository by navigating to Repository and Select the newly created repository and click on Validate. Repository validated successfully.
3. Navigate to Administration > System > Backup and Restore . Take a Configuration backup and then Go to the bottom of this page, select the SFTP repository and under Configuration, the recent backup is visible to restore.
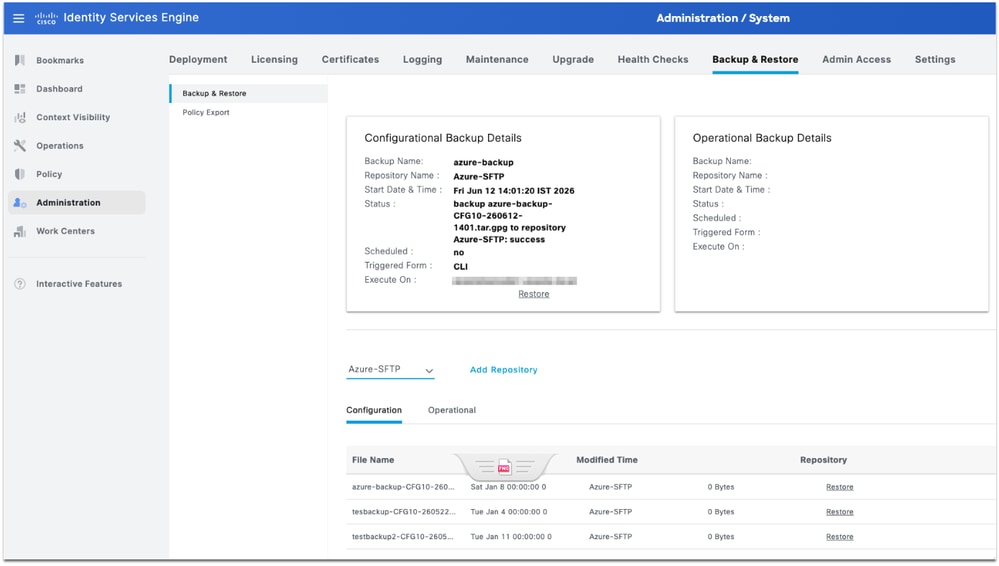 sftp repository validation
Note: Due to cosmetic Cisco bug IDCSCwu68863, the size of backups on Azure storage are seen here as 0 bytes but there is no functional impact. These backups can be restored successfully if needed.
Troubleshoot
1. In the ISE GUI, repository validation gives this error:
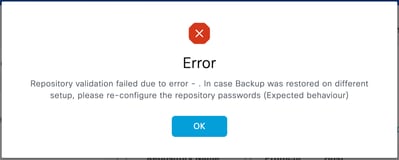 Error message
Resolution
Check the right public key is imported on SFTP server under SSH keys (Refer Step 2 of Configure SFTP on Azure Storage Account). This error occurs if the user had generated a new key pair again on GUI after successful validation of repository.
2. GUI repository validation successful but no output from show repository <sftp repository> command.
 Error screenshot
Resolution
Check the RSA public key generated from CLI is added under Azure ssh configuration.
3. In order to further troubleshoot the SFTP repository issue, enable the debug command:
isenode1/iseadmin#debug transfer 7
 Debug logs
Revision History
| Revision | Publish Date | Comments |
|---|---|---|
1.0 |
06-Jul-2026
|
Initial Release |

 Feedback
Contact Cisco
- Open a Support Case

- (Requires a Cisco Service Contract)