Configure SAML SSO External Authentication for ESA and SMA Administration
Available Languages
Contents
Introduction
This document describes how to configure SAML 2.0 SSO external authentication for ESA and SMA system administration.
Environment
- Products: Email Security Appliance (ESA), Security Management Appliance (SMA)
- Applies to: ESA and SMA system administration
- Cluster behavior: Service Provider (SP) and IdP profiles are configured at the machine level; external authentication mapping is configured at the cluster level.
Prerequisites
- Administrative access to the ESA/SMA web interface
- X.509 certificate and private key available in PKCS #12 (PFX) or PEM format (self-signed or CA-signed)
- Access to a third-party Identity Provider (IdP) application and its SAML metadata/SSO URL
Preconfiguration Checklist
- Verify the management interface hostname/FQDN that administrators use to access the appliance; confirm the Assertion Consumer Service (ACS) URL matches that hostname.
- If the appliance is in a cluster, plan to configure SAML at the machine level for each member before enabling SAML external authentication.
- Determine whether the IdP requires a separate application or realm per appliance.
- Confirm that the required certificates and keys are available.
- Confirm the IdP sends the group or role attribute required for ESA/SMA role mapping.
Background Information
-
Cisco TAC does not provide technical support for third-party IdP configuration. Sample configuration references are provided for common IdPs.
SSO SAML IdPs
-
Duo Access Gateway(DAG) adds two-factor authentication, complete with popular cloud services using SAML 2.0 federation.
-
Active Directory Federation Services (ADFS) - tested with ADFS 2,3,4, Azure Active Directory (Azure AD), SecureAUTH, and PingFederate
-
Additional two-factor authentication can be used if the IdP supports it within the SAML 2.0 Single Sign-On framework.
-
Okta supports authentication with an IdP which supports the service.
Configure the ESA/SMA as a Service Provider
Navigate to System Administration > SAML > (Machine Level) > Add Service Provider.
- If the option at the bottom of the page, Share this configuration across machines in the cluster, is selected, these conditions apply:
- All fields are replicated to the cluster members except the Assertion Consumer URL.
- The Assertion Consumer URL auto-populates the hostname of the management interface as the ACS.
- Environments that use an alternate hostname to access the host require manual configuration for each host, for example, CES hosted appliances.
- Profile Name: Name used to label the SP instance in the ESA or SMA interface.
- Entity ID: Name used for the SP instance as the IdP sees it. This name is the label used by the IdP to represent the SP. This can be any name, for example, ESA_SP or ESA_SSO.
- Name ID Format: Non-configurable field.
- Assertion Consumer URL or Assertion Consumer Service (ACS): URL used by the IdP to communicate with this ESA/SMA host.
- SP Certificate:
- Format: X.509 public/private certificates in PFX/PKCS12 or PEM format.
- Option 1: Select from Certificate List: Select from certificates already created on the ESA within Network > Certificates.
- Option 2: Upload Certificate and Key: Upload a PEM-formatted certificate and key.
- Option 3: Upload PKCS #12: Upload a PKCS #12 file.
- Optional: Create a self-signed certificate on the ESA/SMA for SAML Single Sign-On.
- If required, password-protect the private key.
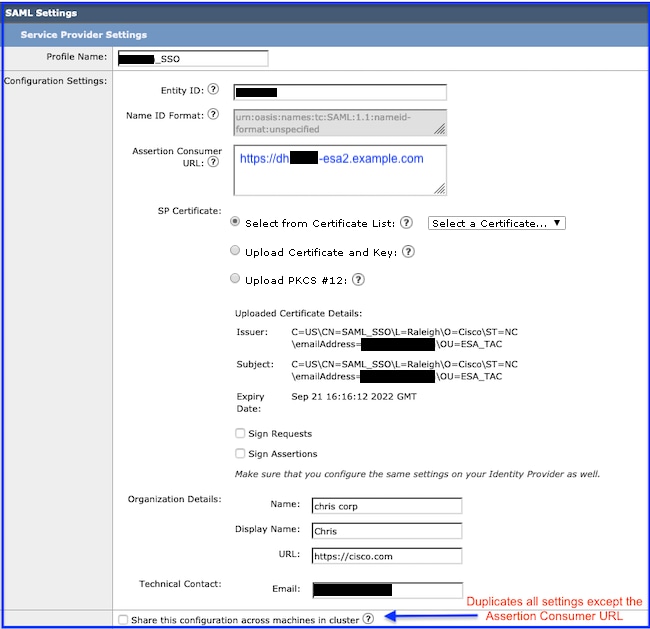 Service Provider Setup PageService Provider Setup Page
- Sign Requests: Option to sign ESA/SMA SAML communication sent to the IdP.
- Sign Assertions: Option to require the IdP to sign assertions sent to the ESA/SMA.
- Organization Details: Can be populated with the appropriate company data.
- Submit and Commit Changes to preserve the settings.
- Download the SP Metadata from the SAML Configuration page.
Configure the Identity Provider (IdP) to work with the ESA/SMA Appliances
Configure IDP settings on the ESA/SMA
1. Navigate to System Administration > SAML.
2. Select Add Identity Provider.
- Two options are available:
- Import IdP Metadata
- Configure Keys Manually:
- Entity ID: Can be any value used to identify the IdP
- SSO URL: URL to which the SP sends SAML authentication requests
- Upload the private key and public certificate in separate files
3. Share this configuration across machines in cluster to replciate he configuration across all ESAs in the cluster:
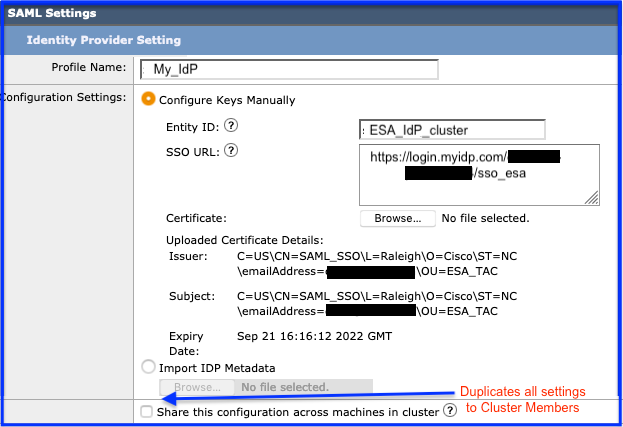 Manually Enter IdP ContentManually Enter IdP Content
4. Upload Metadata from IdP
- Select Import IdP Metadata.
- Browse to the metadata file saved from the IdP and save the configuration.
- The option to Share this configuration across machines in a cluster is available if it applies to the deployment.
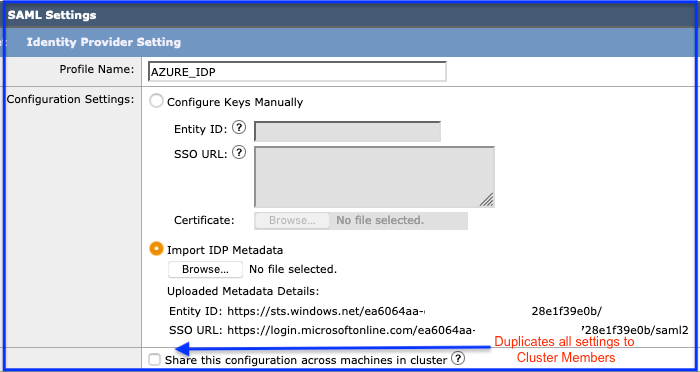 Upload Metadata from IdpUpload Metadata from Idp
Enable External Authentication using SAML on the ESA/SMA
Similar to LDAP external authentication, SAML Single Sign-On requires mapping to assign groups to administrative roles.
1. Navigate to System Administration > Users (Cluster Level) > External Authentication > Enable.
2. Select Authentication Type: SAML.
3. Attribute Name for Matching the Name Map (Optional): Enter the attribute name to search from the group mapping.
4. Enter the group name attribute as defined in the SAML directory based on the predefined or custom user role.
- The Group Mapping field must contain a group attribute. The Unspecified Groups attribute can be added to authenticate SAML assertions or responses.
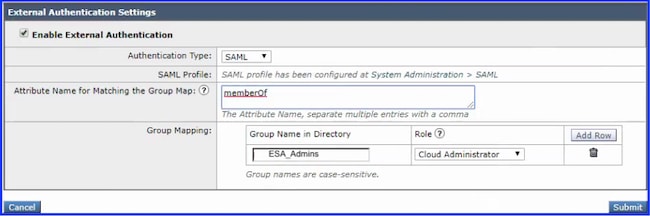 External Authentication SettingsExternal Authentication Settings
5. Submit and Commit Changes.
After successful configuration, a new link is displayed at the bottom of the logon page. The ESA/SMA logon page displays a Use Single Sign-On link that redirects administrators to the corporate Identity Provider (IdP).
When selected, the administrator is redirected to the corporate SAML logon page.
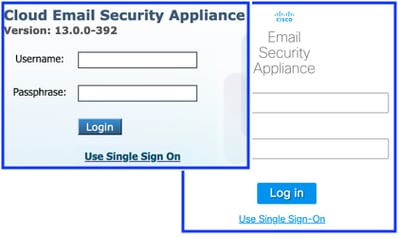 Use Single Sign-On Link will redirect to SAMLUse Single Sign-On Link redirects to SAML
Troubleshoot
Use these indicators to identify whether the issue is related to the appliance configuration or the IdP configuration.
SSO Redirect Link does not Appear on the Login Page ("Use Single Sign-On")
Confirm that System Administration > Users > External Authentication > SAML is configured.
Redirect Returns to ESA/SMA Login Page with "Single Sign-On Authentication Failed! Please contact your administrator."
Error: "Single Sign-On Authentication Failed! Please contact your administrator."
- Authentication failed at the IdP.
- This indicates that the configuration is working to the point of reaching the Single Sign-On authentication page and submitting credentials.
- This failure is often due to the IdP configuration and requires additional verification of IdP settings.
Redirect Returns to ESA/SMA Login Page with "Authorization Failure! Please contact your administrator."
Error: "Authorization Failure! Please contact your administrator."
- Authentication passed, but authorization failed at the ESA/SMA.
- Focus on the settings within Users > External Authentication > SAML.
- Attribute Name, Group Name, and Group Mapping.
- Focus on the settings within Users > External Authentication > SAML.
Related Information
- Cisco Email Security Appliance - User Guides
- Cisco Content Security Management Appliance - User Guides
- Cisco Web Security - User Guides
Revision History
| Revision | Publish Date | Comments |
|---|---|---|
1.0 |
08-Jul-2026
|
Initial Release |

 Feedback
Contact Cisco
- Open a Support Case

- (Requires a Cisco Service Contract)