Configure Microsoft 365 with Secure Email
Available Languages
Contents
Introduction
This document describes the configuration steps to integrate Microsoft 365 with Cisco Secure Email for inbound and outbound email delivery.
Prerequisites
Requirements
Cisco recommends that you have knowledge of these topics:
- Cisco Secure Email Gateway or Cloud Gateway
- Command Line Interface (CLI) access to your Cisco Secure Email Cloud Gateway environment:
Cisco Secure Email Cloud Gateway > Command Line Interface (CLI) Access - Microsoft 365
- Simple Mail Transfer Protocol (SMTP)
- Domain Name Server or Domain Name System (DNS)
Components Used
This document is not restricted to specific software and hardware versions.
The information in this document was created from the devices in a specific lab environment. All of the devices used in this document started with a cleared (default) configuration. If your network is live, ensure that you understand the potential impact of any command.
Background Information
This document can be used for either on-premises Gateways or Cisco Cloud Gateways.
If you are a Cisco Secure Email administrator, your welcome letter includes your Cloud Gateway IP addresses and other pertinent information. In addition to the letter you see here, an encrypted email is sent to you that provides you with additional details on the number of Cloud Gateway (also known as ESA) and Cloud Email and Web Manager (also known as SMA) provisioned for your allocation. If you have not received or do not have a copy of the letter, contact ces-activations@cisco.com with your contact information and domain name under service.
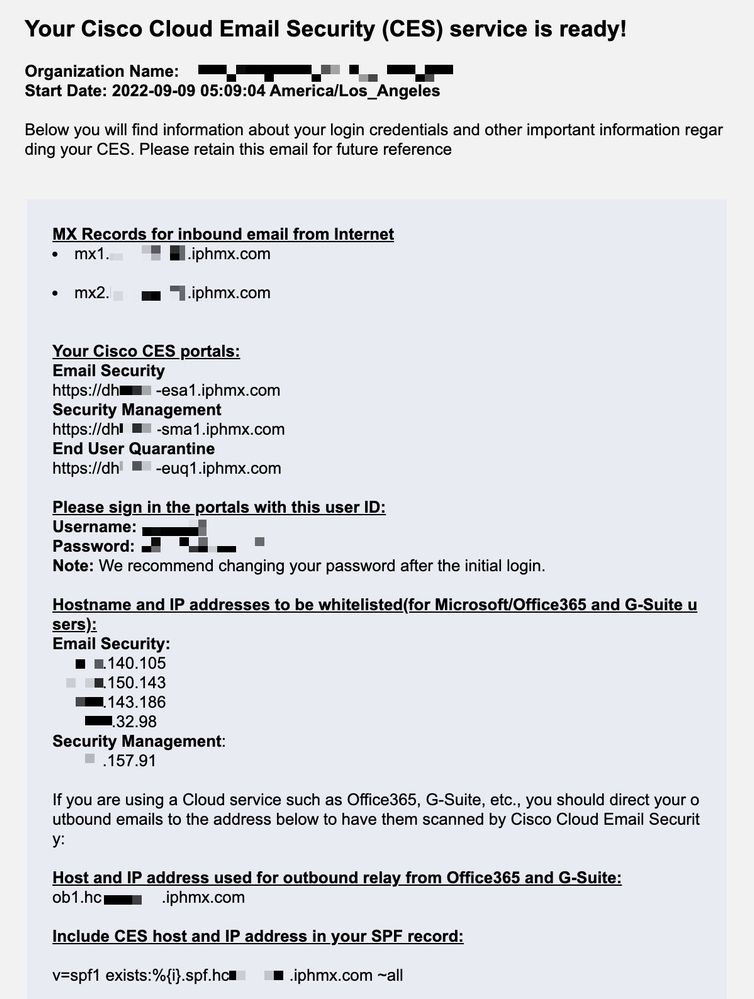
Each client has dedicated IPs. You can use the assigned IPs or hostnames in the Microsoft 365 configuration.
Configure Microsoft 365 with Secure Email
Configure Incoming Email in Microsoft 365 from Cisco Secure Email
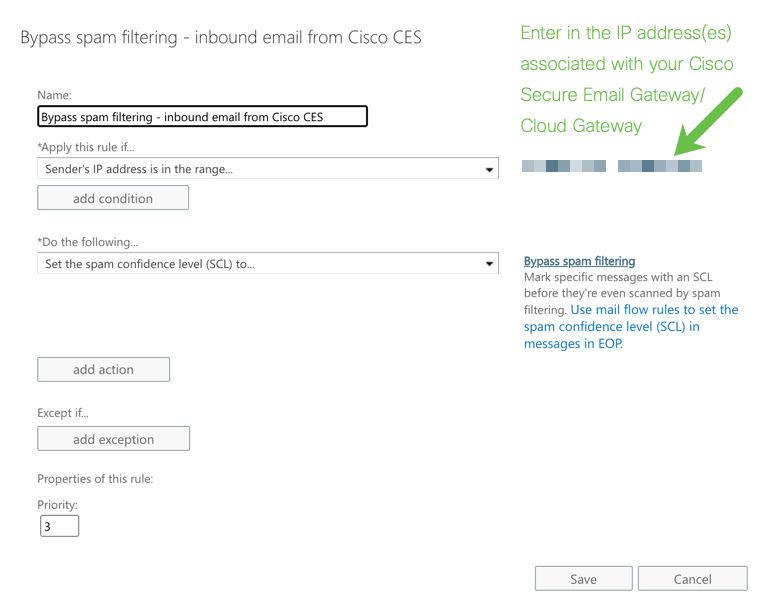
Bypass Spam Filtering Rule
- Log in to the Microsoft Exchange Admin Center
- From the left-hand menu, navigate to
Mail flow > Rules. - Click on
Add a ruleto create a new rule. - Enter a name for your new rule:
Bypass spam filtering - inbound email from Cisco CES. - For *Apply this rule if..., choose
The sender - IP address is in any of these ranges or exactly matches.- For the specify IP address ranges pop-up, add the IP addresses provided in your Cisco Secure Email welcome letter.
- Click
OK.
- For *Do the following..., select
Modify the message propertiesand chooseset the spam confidence level (SCL)usingBypass spam filtering. - Click
Next. - Select
Enforceand click onNext. - And
Finish.
An example of how your rule looks:
 Bypass Rule
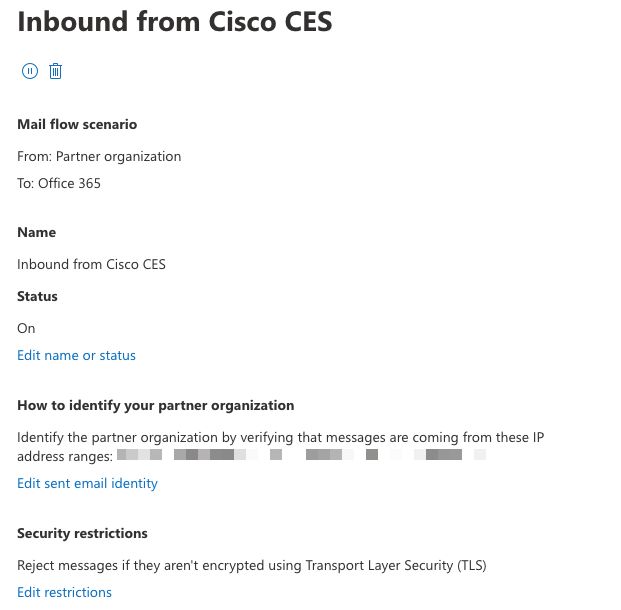
Receiving Connector
- Remain in the Exchange Admin Center.
- From the left-hand menu, navigate to
Mail flow > Connectors. - Click
[+ Add a connector]to create a new connector. - In the Select your mail flow scenario pop-up window, choose:
- From:
Partner organization - To:
Office365
- From:
- Click
Next. - Enter a name for your new connector:
Inbound from Cisco CES. - Enter a description, (optional).
- Click
Next. - Select
By verifying that the IP address of the sending... - Click
[+]and add the IP addresses provided in the welcome letter and used in the Bypass Spam filtering rule. - Click
Next. - Choose
Reject email messages if they aren't sent over Transport Layer Security (TLS). - Click
Next. - Click
Save.
An example of how your connector configuration looks:
 Connector inbound
Configure Mail from Cisco Secure Email to Microsoft 365
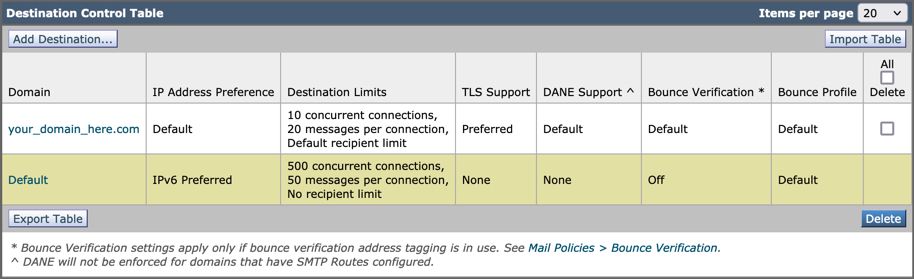
Destination Controls
Impose a self-throttle to a delivery domain in your Destination Controls. Of course, you can remove the throttle later, but these are new IPs to Microsoft 365, and you do not want any throttling by Microsoft due to its unknown reputation.
- Log in to your Gateway.
- Navigate to
Mail Policies > Destination Controls. - Click
Add Destination. - Use:
- Destination: enter your domain name
- Concurrent Connections:
10 - Maximum Messages Per Connection:
20 - TLS Support:
Preferred
- Click
Submit. - Click
Commit Changesin the upper right-hand of the User Interface (UI) to save your configuration changes.
An example of how your Destination Control Table looks:
Recipient Access Table
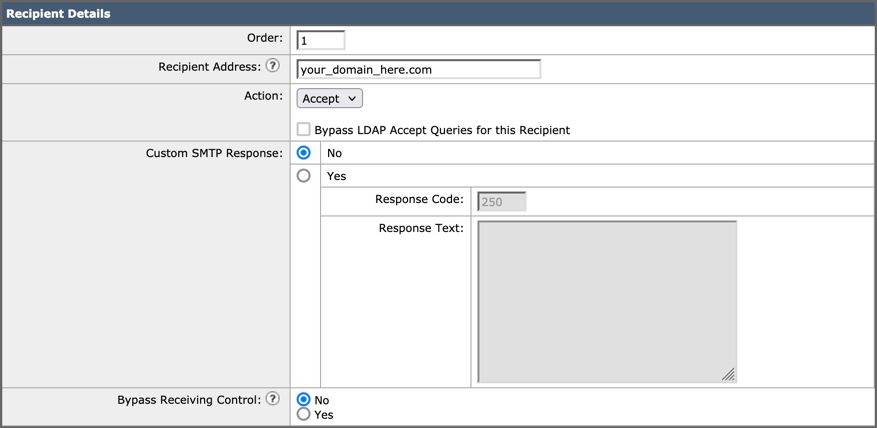
Next, set the Recipient Access Table (RAT) to accept mail for your domains:
- Navigate to
Mail Policies > Recipient Access Table (RAT).
- Click
Add Recipient. - Add your domain(s) in the Recipient Address field.
- Choose the default action of
Accept. - Click
Submit. - Click
Commit Changesin the upper right-hand of the UI to save your configuration changes.
An example of how your RAT entry looks:
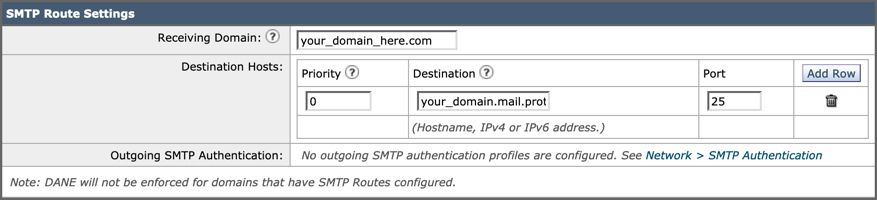
SMTP Routes
Set the SMTP route to deliver mail from Cisco Secure Email to your Microsoft 365 domain:
- Navigate to
Network > SMTP Routes. - Click
Add Route... - Receiving Domain: enter your domain name.
- Destination Hosts: add your original Microsoft 365 MX record.
- Click
Submit. - Click
Commit Changesin the upper right-hand of the UI to save your configuration changes.
An example of how your SMTP Route Settings looks:
DNS (MX Record) Configuration
You are ready to cut over the domain through a Mail Exchange (MX) record change. Work with your DNS administrator to resolve your MX records to the IP addresses for your Cisco Secure Email Cloud instance, as provided in your Cisco Secure Email welcome letter.
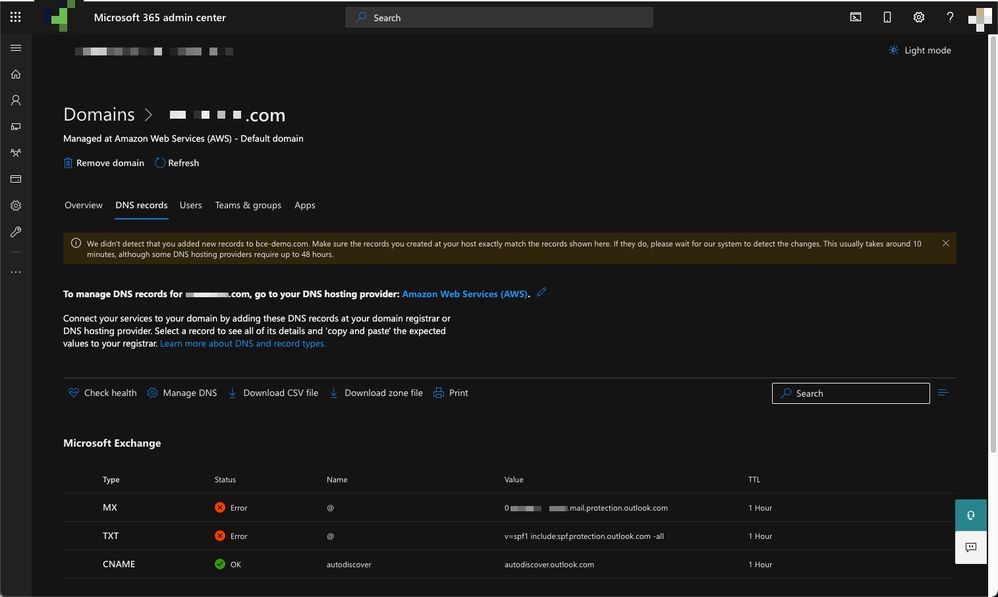
Verify the change to the MX record from your Microsoft 365 console as well:
- Log in to the Microsoft Office 365 Admin Console.
- Navigate to
Home > Settings > Domains. - Choose your default domain name.
- Click
Check Health.
This provides the current MX Records of how Microsoft 365 looks up your DNS and MX records associated with your domain:
Test Inbound Email
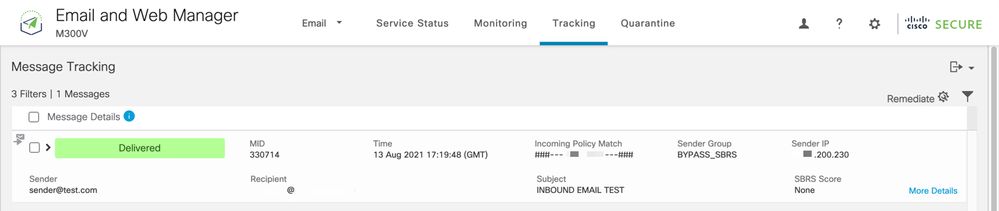
Test inbound mail to your Microsoft 365 email address. Then, check to see that it arrives in your Microsoft 365 email inbox.
Validate the mail logs in Message Tracking on your Cisco Secure Email and Web Manager (also known as SMA) provided with your instance.
To see mail logs on your SMA:
- Log in to your SMA.
- Click
Tracking. - Enter the needed search criteria and click
Search;and expect to see these results:
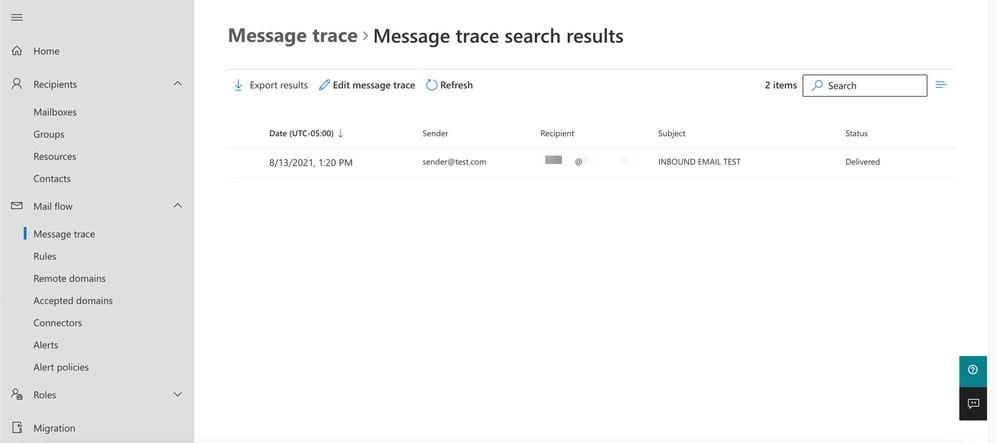
To see mail logs in Microsoft 365:
- Log in to the Microsoft Exchange Admin Center.
- Navigate to
Mail flow > Message Trace. - Microsoft provides default criteria to search with. For example, choose
Messages received by my primary domain in the last dayto start your search query. - Enter the needed search criteria for recipients and click
Searchand expect to see results similar to:
Configure Outgoing Email from Microsoft 365 to Cisco Secure Email
Configure RELAYLIST on the Cisco Secure Email Gateway
Refer to your Cisco Secure Email welcome letter. In addition, a secondary interface is specified for outbound messages via your Gateway.
- Log in to your Gateway.
- Navigate to
Mail Policies > HAT Overview.

Note: Make sure the Listener is set to Outgoing Listener, OutgoingMail, or MailFlow-Ext, based on the actual name of your Listener for your external/outbound mail flow.
- Click
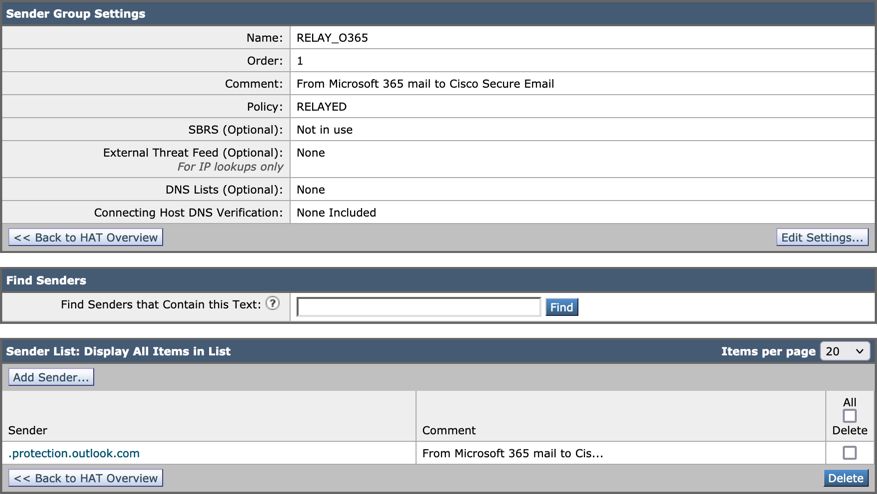
Add Sender Group... - Configure the Sender Group as:
- Name: RELAY_O365
- Comment: <<enter a comment if you wish to notate your sender group>>
- Policy: RELAYED
- Click
Submit and Add Senders. - Sender:
.protection.outlook.com.
- Click
Submit. - Click
Commit Changesin the upper right-hand of the UI to save your configuration changes.
An example of how your Sender Group Settings looks:
Enable TLS
- Click
<<Back to HAT Overview. - Click the Mail Flow Policy named:
RELAYED. - Scroll down and look in the
Security Featuressection forEncryption and Authentication. - For TLS, choose:
Preferred. - Click
Submit. - Click
Commit Changesin the upper right-hand of the UI to save your configuration changes.
An example of how your Mail Flow Policy configuration looks:

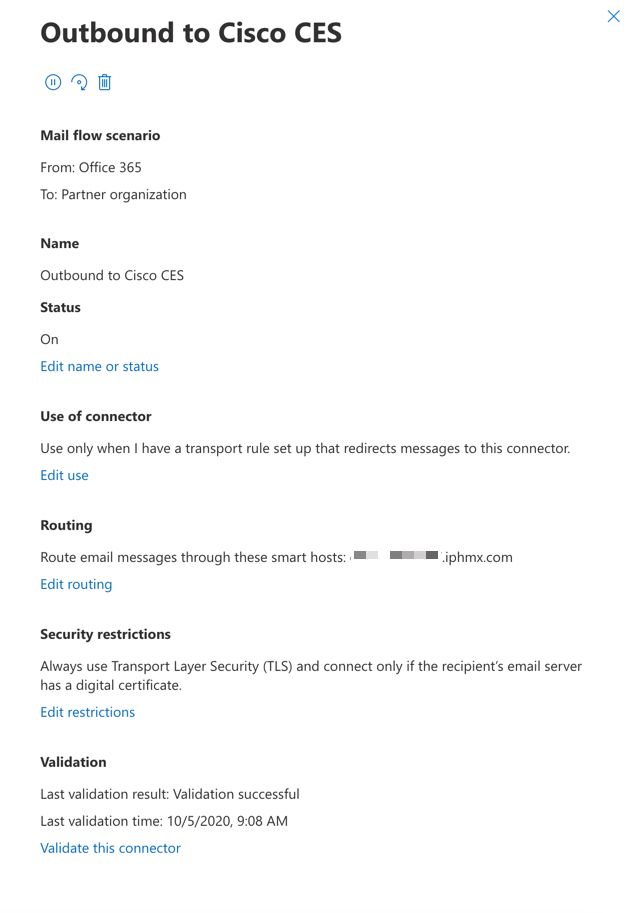
Configure Mail from Microsoft 365 to CES
- Log in to the Microsoft Exchange Admin Center.
- Navigate to
Mail flow > Connectors. - Click
[+ Add a connetor]to create a new connector. - In the Select your mail flow scenario pop-up window, choose:
- From:
Office365 - To:
Partner organization
- From:
- Click
Next. - Enter a name for your new connector:
Outbound to Cisco CES. - Enter a description (optional).
- Click
Next. - For "When do you want to use this connector?":
- Choose:
Only when I have a transport rule set up that redirects messages to this connector. - Click
Next.
- Choose:
- Click
Route email through these smart hosts. - Click
[+]and enter the outbound IP addresses or hostnames provided in your CES welcome letter. - Click
Save. - Click
Next. - For "How Office 365 connect to your partner organization's email server?":
- Choose:
Always use TLS to secure the connection (recommended). - Choose
Any digital certificate, including self-signed certificates. - Click
Next.
- Choose:
- You are presented with the confirmation screen.
- Click
Next. - Use
[+]to enter a valid email address and clickOK. - Click
Validateand allow the validation to run. - Once complete, click
Close. - Click
Save.
An example of how your Outbound Connector looks:
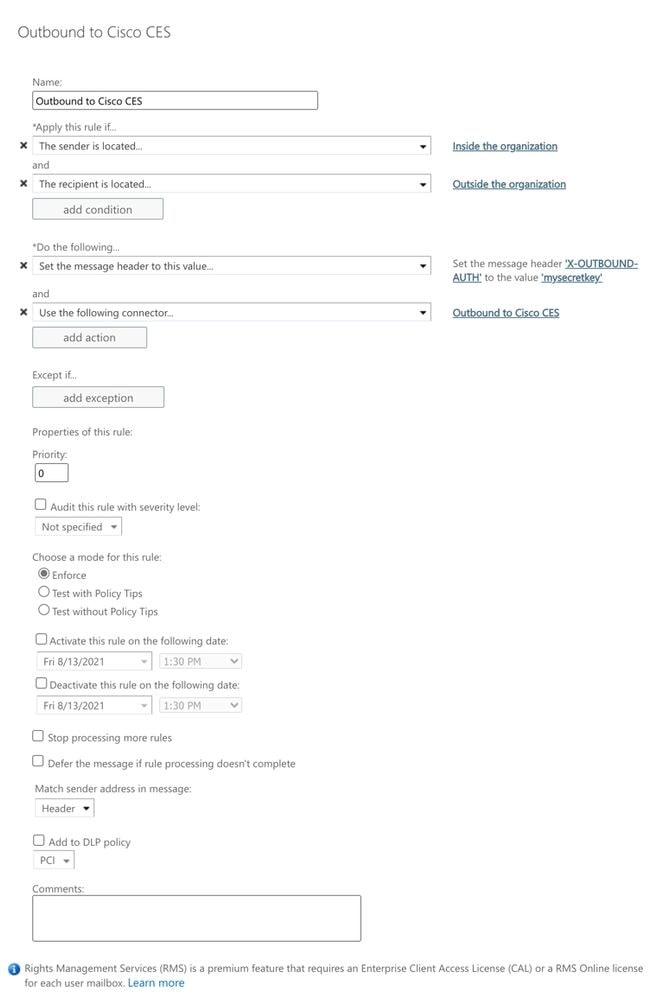
Create a Mail Flow Rule
- Log in to your Exchange Admin Center.
- Click
Mail Flow;and be sure you're on the rules tab. - Click
[+]to add a new rule. - Choose
Create a new rule. - Enter a name for your new rule:
Outbound to Cisco CES. - For *Apply this rule if..., choose:
The sender is located...- For the select sender location pop-up, choose:
Inside the organization. - Click
OK.
- For the select sender location pop-up, choose:
- Click
More options... - Click the
add conditionbutton and insert a second condition:- Choose
The recipient... - Choose:
Is external/internal. - For the select sender location pop-up, choose:
Outside the organization. - Click
OK.
- Choose
- For *Do the following..., choose:
Redirect the message to...- Select: the following connector.
- And select your Outbound to Cisco CES connector.
- Click OK.
- Return to "*Do the following..." and insert a second action:
- Choose:
Modify the message properties... - Choose:
set the message header. - Set the message header:
X-OUTBOUND-AUTH. - Click
OK. - Set the value:
mysecretkey.mysecretkey is simply a placeholder. Please customize this so it is specific to your environment.
- Click
OK.
- Choose:
- Click
Save.
An example of how your Microsoft 365 Routing configuration looks:
Prevent Open Relay

Warning: This is a crucial step. Securing the Outgoing Listener is essential to prevent unauthorized users from relaying email through the device.
There are two options listed below. It is recommended to use the Message Filter (CLI) or the Content Filter (GUI) for those less familiar with CLI (Command Line Interface).
Option 1: Prevent Open Relay via GUI
Create two Content Filters in the GUI:
- The first filter takes action on any emails that either do not have the X-OUTBOUND-AUTH header or do not contain the value previously configured in Microsoft Office 365.
- The second filter applies to legitimate emails sent from the Microsoft Office 365 tenant. This filter removes the X-OUTBOUND-AUTH header so it cannot be misused in the future.
- From the GUI, navigate to Mail Policies >> Outgoing Content Filters >> select Stop_O365_OpenRelay (select Add Filter... if this is not available).
- Make sure the first Content Filter is configured:
- Name: <this can be anything>
- Description: <this can be anything>
- Apply rule: Only if all conditions match
- Conditions
- Other Header:
- Header Name: <Enter header name previously listed during creation of Mail Flow Rule on Microsoft Office 365) (for example,
X-OUTBOUND-AUTH).- Some customers may have this configuration predefined using a header value of X-IronPort-Tenant. While this can also be used, the crucial part is simply to make sure the header value entered in the Content Filter condition matches the header value that was configured in the Mail Flow Rule on Microsoft Office 365.
- Header value (Does Not Equal): <Enter the value of the header previously listed during the creation of the Mail Flow Rule on Microsoft Office 365 (such as, mysecretkey).
- Header Name: <Enter header name previously listed during creation of Mail Flow Rule on Microsoft Office 365) (for example,
- Receiving Listener (Is): Outgoing
- Other Header:
- Actions
- Add Log Entry: $Header["X-OUTBOUND-AUTH"]
- Some customers may have this configuration predefined using a header value of X-IronPort-Tenant. While this can also be used, the crucial part is to ensure the header value entered in the Content Filter condition matches the header value that was configured in the Mail Flow Rule on Microsoft Office 365.
- Quarantine: <select respective quarantine>
- Add Log Entry: $Header["X-OUTBOUND-AUTH"]
- Please avoid using any special characters other than those previously listed (such as *, (, |, etc.), as they may cause false positive matches and could result in legitimate emails being quarantined.
- Click Submit.
- Next, select the Strip_Secret_Header Content Filter and configure: (select Add Filter... if not available):
- Name: <this can be anything>
- Description: <this can be anything>
- Conditions
- Other Header:
- Header Name: <Enter the header name previously listed during the creation of Mail Flow Rule on Microsoft Office 365) (for example,
X-OUTBOUND-AUTH).- Some customers may have this configuration predefined using a header value of X-IronPort-Tenant. While this can also be used, the crucial part is to ensure the header value entered in the Content Filter condition matches the header value that was configured in the Mail Flow Rule on Microsoft Office 365.
- Header value (Equals): <Enter the value of the header previously listed during the creation of the Mail Flow Rule on Microsoft Office 365 (such as, mysecretkey).
- Header Name: <Enter the header name previously listed during the creation of Mail Flow Rule on Microsoft Office 365) (for example,
- Other Header:
- Actions
- Strip Header
- Header Name: <Enter header name previously listed during creation of Mail Flow Rule on Microsoft Office 365) (such as,
X-OUTBOUND-AUTH).- Some customers may have this configuration predefined using a header value of X-IronPort-Tenant. While this can also be used, the crucial part is simply to make sure that the header value entered in the Content Filter condition, matches the header value that was configured in the Mail Flow Rule on Microsoft Office 365.
- Click Submit, then navigate to Mail Policies >> Outgoing Mail Policies.
- Header Name: <Enter header name previously listed during creation of Mail Flow Rule on Microsoft Office 365) (such as,
- Strip Header
- Ensure that the newly created Content Filters are now enabled under the Default Policy, and any other required policies.
- Make sure that the Strip_Secret_Header Content Filter is in the proper order on the Mail Policy(s). It must be placed after the Stop_O365_OpenRelay Content Filter, or you may impact the mail flow and/or the Content Filters may not work as intended.
- Submit >> Commit your changes.
- Proceed with testing your Outgoing email traffic.

Tip: After your tests have completed successfully and mail delivery is working as expected, it is recommended to change the action in the Content Filter from "quarantine" to "drop."
 Stop_O365_OpenRelay Content Filter
 Strip_Secret_Header Content Filter
Option 2: Prevent Open Relay via CLI
Access the CLI for your Cisco Secure Email Gateway.
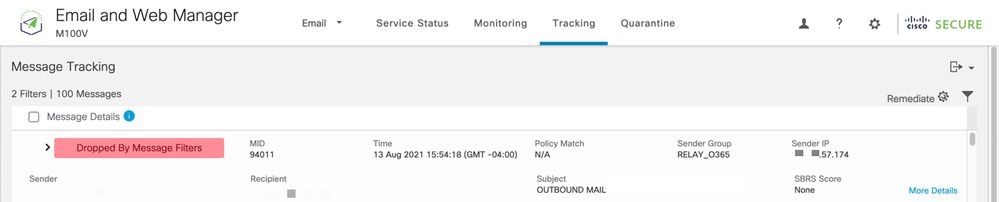
Create a message filter to inspect the presence and value of the x-header and remove the header if it exists. If no header exists, drop the message.
- Log in to your Gateway via the CLI.
- Run the
filterscommand. - If your Gateway is clustered, hit return to edit the filters in Cluster mode.
- Use the
Newcommand to create a Message Filter, copy, and paste:
office365_outbound: if sendergroup == "RELAYLIST" {
if header("X-OUTBOUND-AUTH") == "^mysecretkey$" {
strip-header("X-OUTBOUND-AUTH");
} else {
drop();
}
} - Hit return one time to create a new, blank line.
- Enter
[.]on the new line to end your new message filter. - Click
returnone time to exit the Filters menu. - Run the
commitcommand to save the changes to your configuration.
Note: Avoid special characters for the secret key. The ^ and $ shown in the message filter are regex characters and are used as provided in the example.
Note: Please review the name of how your RELAYLIST is configured. It can be configured with an alternative name, or you can have a specific name based on your relay policy or mail provider.
Test Outbound Email
Test outbound mail from your Microsoft 365 email address to an external domain recipient. You can review Message Tracking from your Cisco Secure Email and Web Manager to ensure it is appropriately routed outbound.
HIGH:MEDIUM:@STRENGTH:!aNULL:!eNULL:!LOW:!DES:!MD5:!EXP:!PSK:!DSS:!RC2:!RC4:!SEED:!ECDSA:!ADH:!IDEA:!3DES:!SSLv2:!SSLv3:!TLSv1:-aNULL:-EXPORT:-IDEA
An example of Tracking with successful delivery:

ClickMore Detailsto see the complete message details:
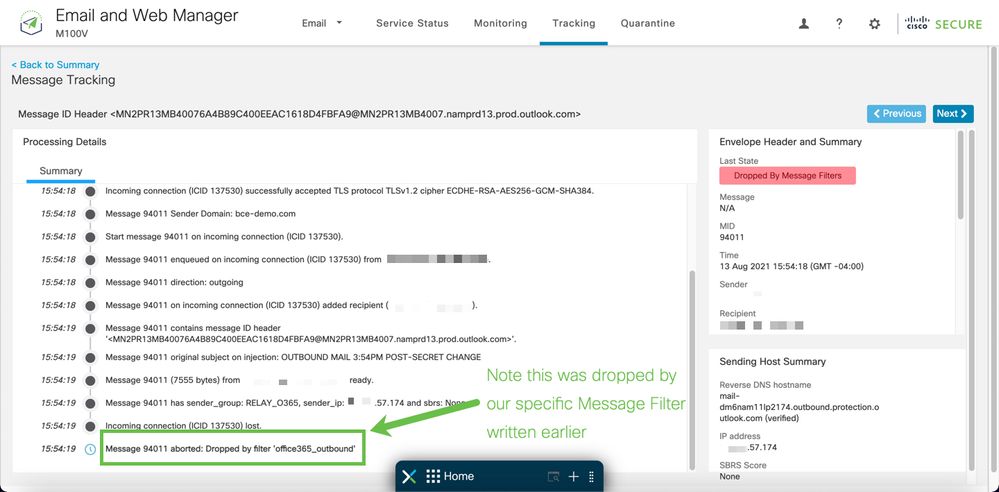
An example of Message Tracking where the x-header do not match:

Related Information
Cisco Secure Email Gateway Documentation
- Release Notes
- User Guide
- CLI Reference Guide
- API Programming Guides for Cisco Secure Email Gateway
- Open Source Used in Cisco Secure Email Gateway
- Cisco Content Security Virtual Appliance Installation Guide (includes vESA)
Secure Email Cloud Gateway Documentation
Cisco Secure Email and Web Manager Documentation
- Release Notes and Compatibility Matrix
- User Guide
- API Programming Guides for Cisco Secure Email and Web Manager
- Cisco Content Security Virtual Appliance Installation Guide (includes vSMA)
Cisco Secure Product Documentation
Revision History
| Revision | Publish Date | Comments |
|---|---|---|
8.0 |
01-Jun-2026
|
Updated spelling, grammar, spacing. |
7.0 |
13-Dec-2024
|
Updated Machine Translation, and Formatting. |
6.0 |
28-Nov-2023
|
Machine Translation and Formatting. |
5.0 |
01-Dec-2022
|
Product naming updates, screenshot updates |
1.0 |
13-Aug-2021
|
Initial Release |
 Feedback
Contact Cisco
- Open a Support Case

- (Requires a Cisco Service Contract)