Introduction
This document describes a configuration example for AnyConnect Single Sign-On (SSO) with Duo and LDAP mapping for authorization on Secure Firewall.
Prerequisites
Requirements
Cisco recommends that you have knowledge of these topics:
- Cisco AnyConnect Secure Mobility Client
- Cisco Secure Firepower Threat Defense (FTD)
- Cisco Secure Firewall Management Center (FMC)
- Fundamentals of Duo Security
- Security Assertion Markup Language (SAML)
- Configuration of Active Directory (AD) services on Microsoft Windows Server
Components Used
The information in this document is based on these software versions:
- Cisco Secure FMC version 7.4.0
- Cisco Secure FTD version 7.4.0
- Duo Authentication Proxy
- Anyconnect Secure Mobility Client version 4.10.06079
- Windows Server 2016, configured as an AD server
The information in this document was created from the devices in a specific lab environment. All of the devices used in this document started with a cleared (default) configuration. If your network is live, ensure that you understand the potential impact of any command.
Configure
Network Diagram
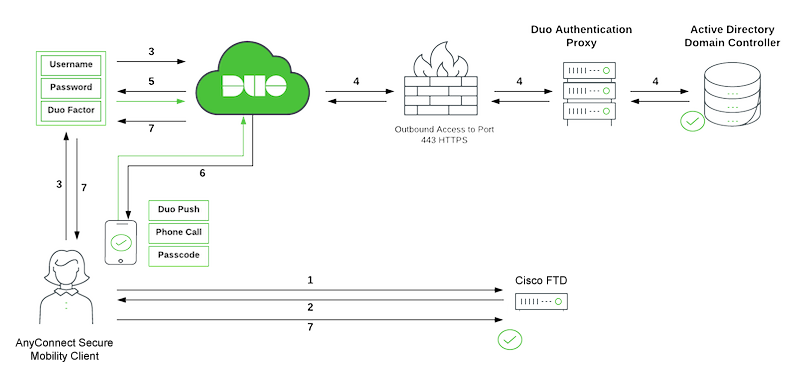 DUO SSO Traffic Flow
Duo Traffic Flow
- AnyConnect Client initiates a Secure Sockets Layer (SSL) Virtual Private Network (VPN) connection to Cisco Secure FTD.
- Secure FTD redirects the embedded browser in the AnyConnect client to Duo SSO for SAML authentication.
- AnyConnect user logs in with primary on-prem Active Directory credentials.
- Duo SSO performs primary authentication via an on-premises Duo Authentication Proxy to on-prem Active Directory.
- Once the primary authentication is successful, Duo SSO begins two-factor authentication (2FA).
- AnyConnect user completes Duo 2FA.
- Duo SSO redirects the user back to the FTD with a response message indicating success.
SAML with External LDAP
External authorization of the SAML user depends on the NameID value returned by the IdP. The Secure Firewall maps the NameID field to the username and this username can be used to query LDAP.

Note: The configuration used in this document is to allow users that belong to an AD group to establish a Remote Access (RA) VPN connection. Connection is prohibited for users from different AD groups not defined on the map.
Configurations
Duo Admin Portal Configuration
Configure an AD or a SAML identity provider that can be used as your primary authentication source for Duo SSO.
Also, you need a Duo Authentication Proxy (recommended three authentication proxy servers for high availability) that has reachability to your on-premise AD or SAML identity provider.
For more information, refer to Duo Single Sign-On.
Step 1. Configure the Cisco Secure FTD on the Duo Admin Portal.
- Log in to the Duo Admin Portal and navigate to
Applications > Protect an Application.
- Search for FTD with the Protection Type of
2FA with SSO hosted by Duo.
- Click
Protecton the far right in order to configure the Cisco FTD VPN.
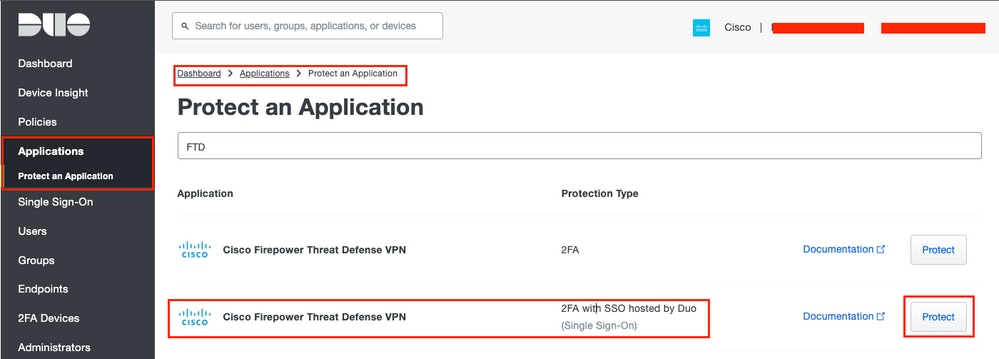 Duo Protect Application
Step 2. Configure the Service Provider information on the Duo Admin Portal.
These attributes are used:
- Cisco Firepower Base URL:
fj-ftdv.example.com
- Connection Profile Name:
SSO-AD_Split-tunnel
- Mail attribute:
<Email Address>
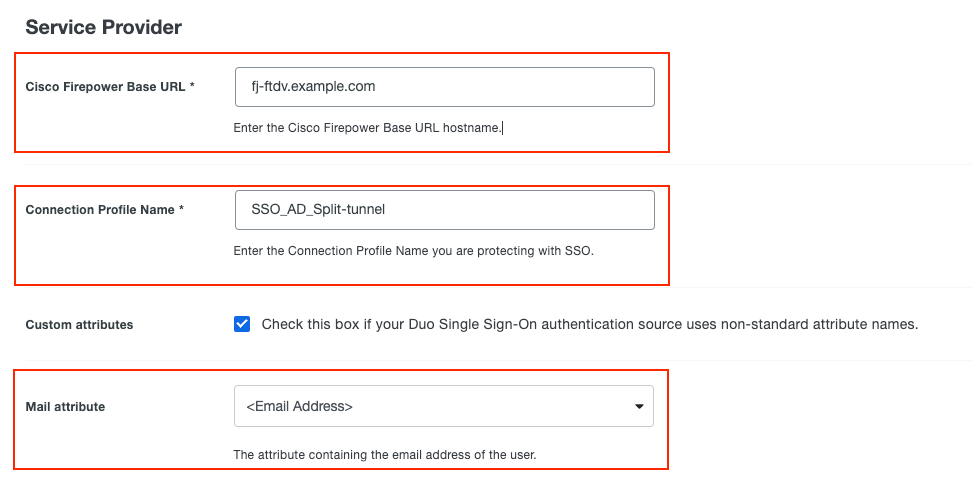 Duo Service Provider
Note: Mail attribute can be set to <Username>. If this is the case, the configuration for ldap-naming-attribute changes from userPrincipalName to sAMAccountName on the Cisco Secure FTD.
Step 3. Click the Save button at the end of the page in order to save the configuration.
Step 4. Navigate to Users > Add User as shown in the image:
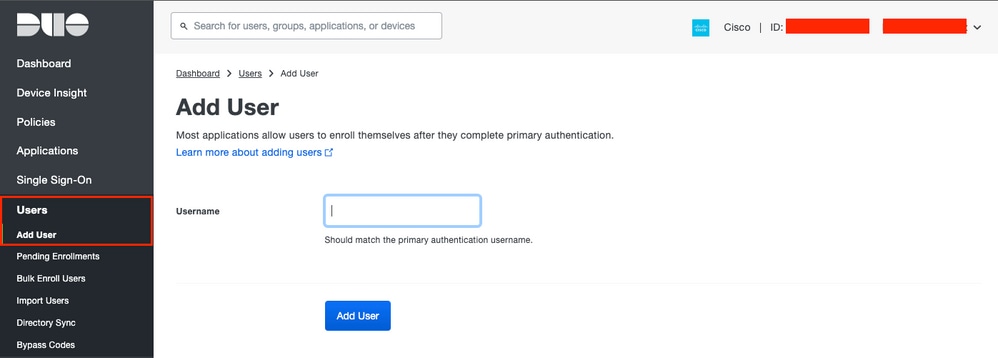 Duo Add User
Step 5. Fill in the blank with all the necessary information for the new user.
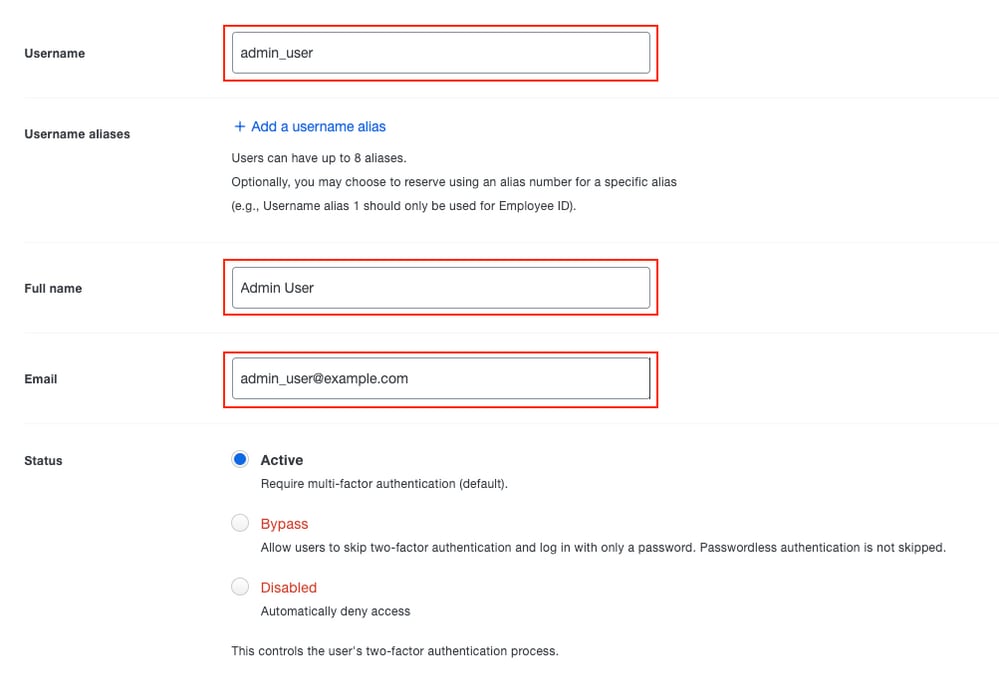 Duo User Information
Note: Username data and Email data must match the information provided in the Active Directory server.
Step 6. Add Phone in order to add the phone number of the user. This is needed for the user to authenticate via 2FA with Duo Push.
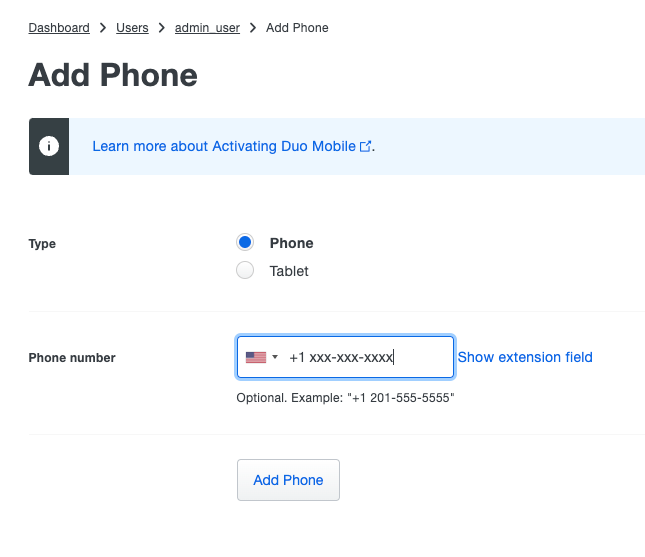 Duo Add Phone
Step 7. Activate Duo Mobile for the particular user.
 Activate Duo Mobile Phone
Note: Ensure to have Duo Mobile installed on the end-user device:
Step 8. Generate Duo Mobile Activation code.
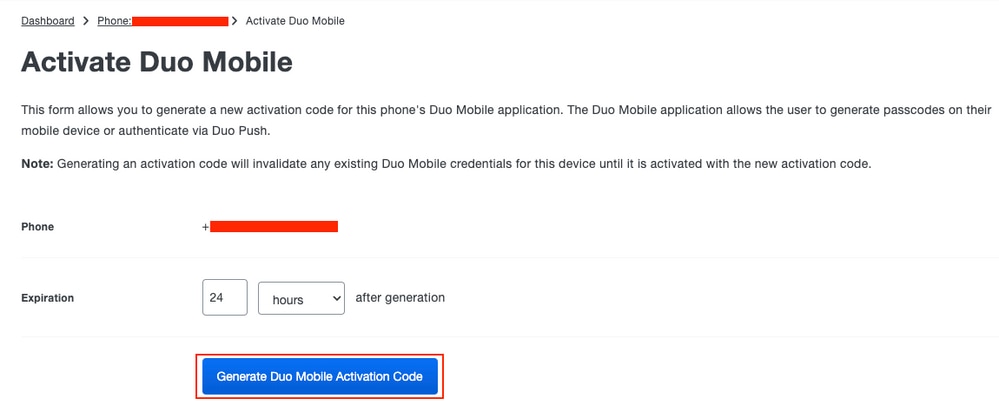 Duo Activation Code
Step 9. Send instructions by SMS.
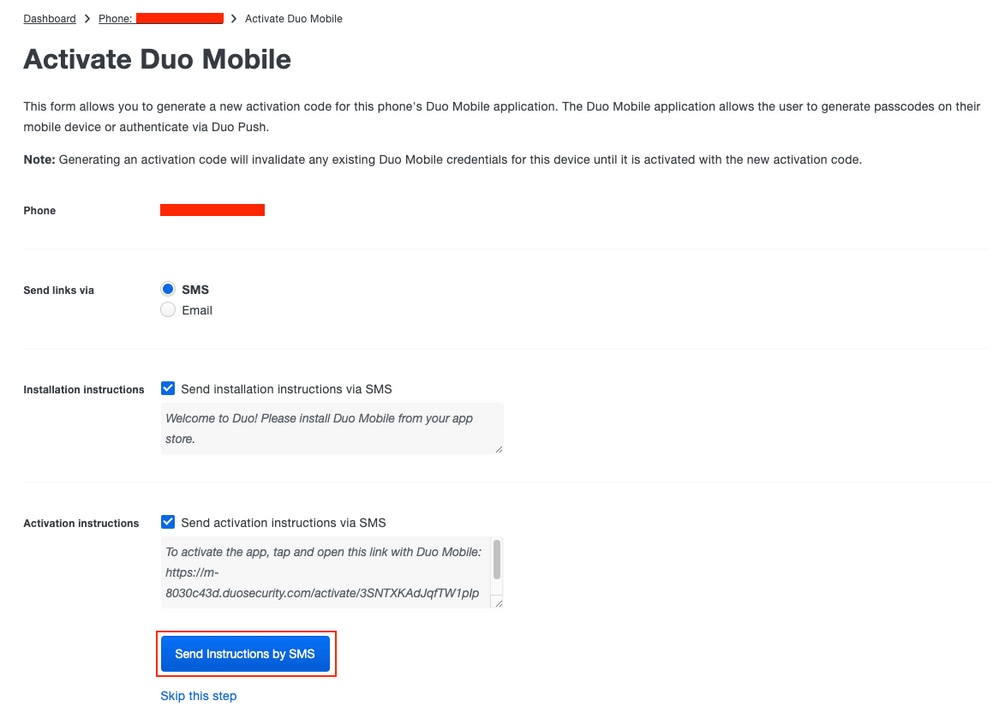 Duo SMS
Step 10. Click the link sent via SMS, and the Duo app gets linked to the user account in the Device info section.
 Duo Info Section
Step 11. Repeat the process for all the users to be added.
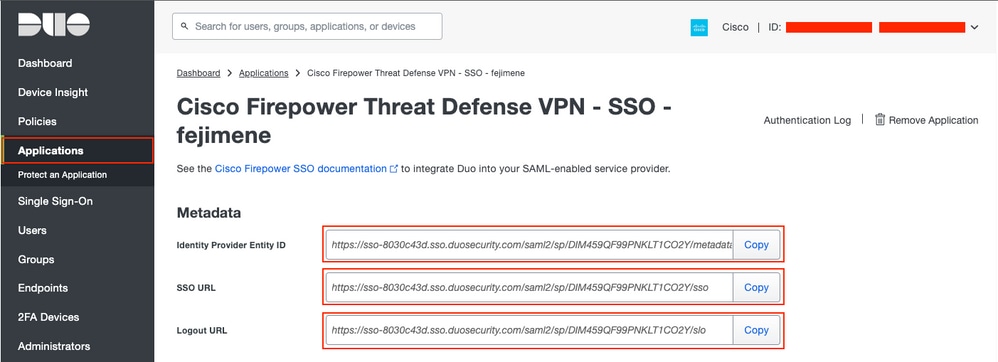
Step 12. Retrieve application metadata:
- Navigate to
Applications and click the Service Provider application that was created in Step 1.
- Copy the
Identity Provider Entity ID URL, SSO URL, and Logout URL from the metadata.
 Duo IdP Information
Step 13. Download the Identity Provider Certificate.
 Duo Download IdP Certificate
Configuration on the FTD via FMC
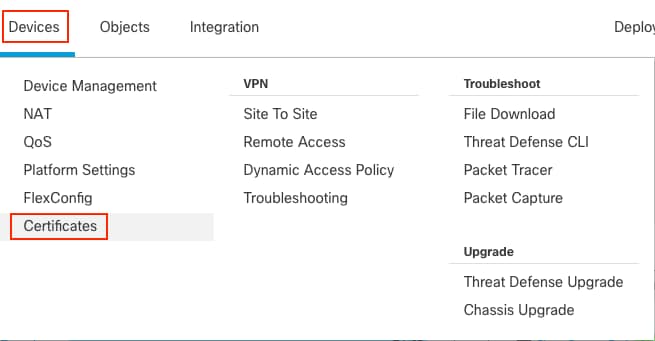
Step 1. Install and enroll the Identity Provider (IdP) certificate on the FMC.
- Navigate to
Devices > Certificates.
 FMC Certificate 1
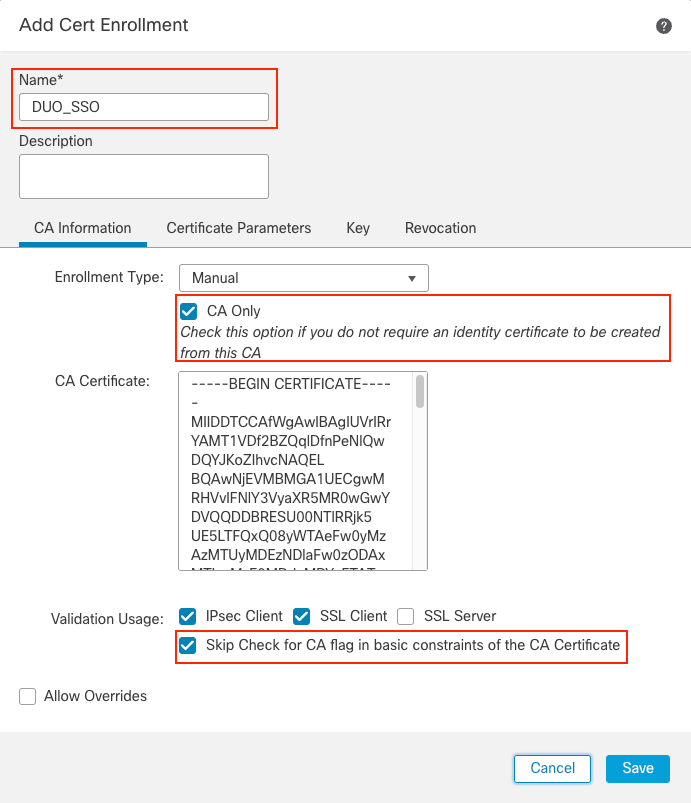
- Click
Add. Choose the FTD to enroll in this certificate.
- In the
Add Cert Enrollment section, use any name as a label for the IdP certificate.
- Click
Manual.
- Check the
CA only and Skip Check for CA flag fields.
- Paste the base64 format IdP CA certificate.
- Click Save and then click Add.
 FMC Cert Enrollment
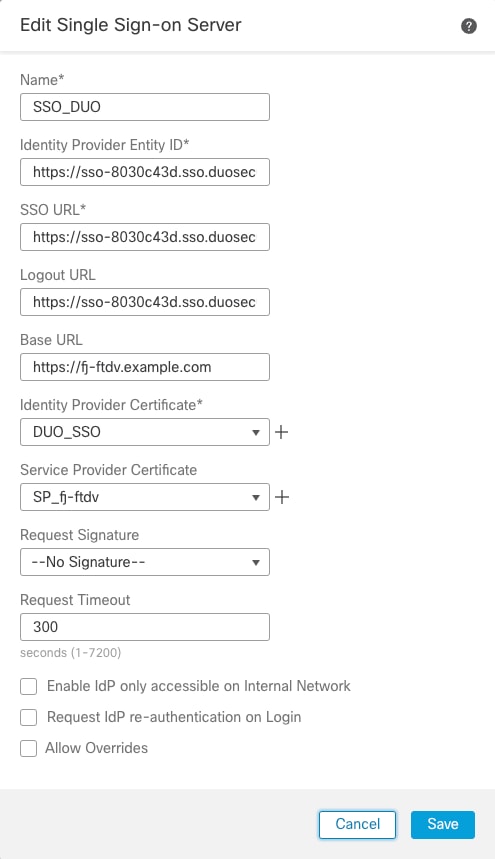
Step 2. Configure SAML server settings:
- Navigate to
Objects > Object Management > AAA Servers > Single Sign-on Server.
- Choose
Add Single Sign-on Server.
 FMC SSO
- Based on the metadata collected from Duo, configure the SAML values on the New SSO Server:
- Identity Provider Entity ID: entityID from Duo application
- SSO URL: SSO Service from Duo application
- Logout URL: SingleLogoutService from Duo application
- Base URL: FQDN of your FTD SSL ID Certificate
- Identity Provider Certificate: IdP Signing Certificate
- Service Provider Certificate: FTD Signing Certificate
 FMC SSO Information
Note: Request Timeout is set to 300 as Duo push is sent during the authentication process and user interaction is needed. Modify the Request Timeout value according to the network design.
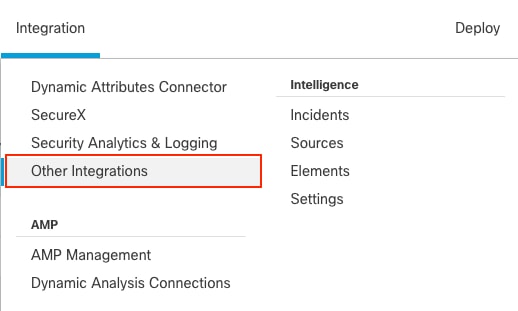
Step 3. Configure REALM/LDAP server configuration.
- Navigate to
Integration > Other Integrations.
 FMC Realm
 FMC Add Realm
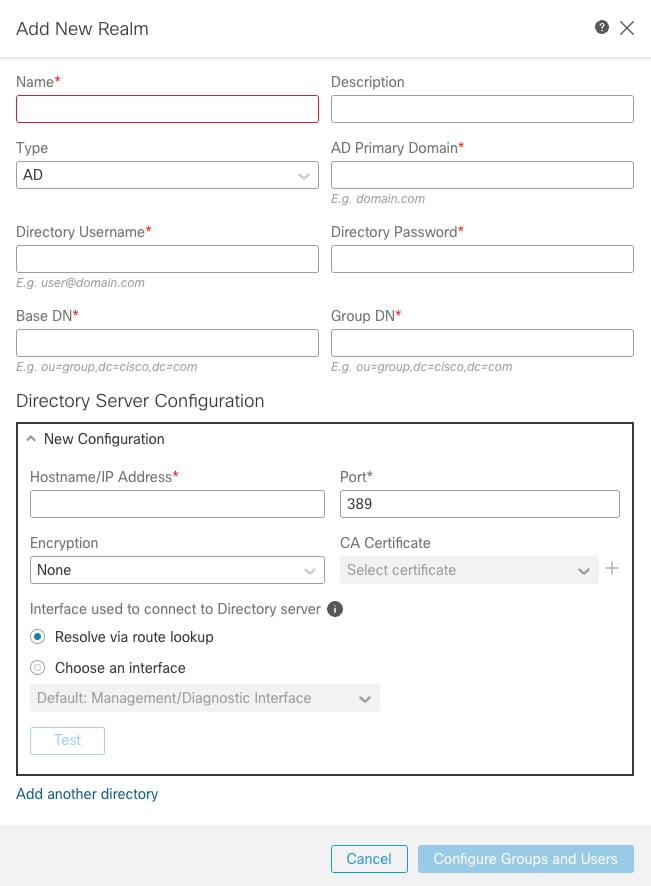
- Provide the details of the Active Directory server and directory. Click OK.
For the purpose of this demonstration:
- Name:
ActiveDirectory_SSO
- Type: AD
- AD Primary Domain:
example.com
- Directory Username:
administrator@example.com
- Directory Password:
<Hidden>
- Base DN: DC=example, DC=com
- Group DN: DC=example, DC=com
 FMC Realm Information
Note: LDAPS (LDAP over SSL) can be used. The port must be changed from 389 to 636.
Note: AD server must have user data that has been uploaded to Duo.
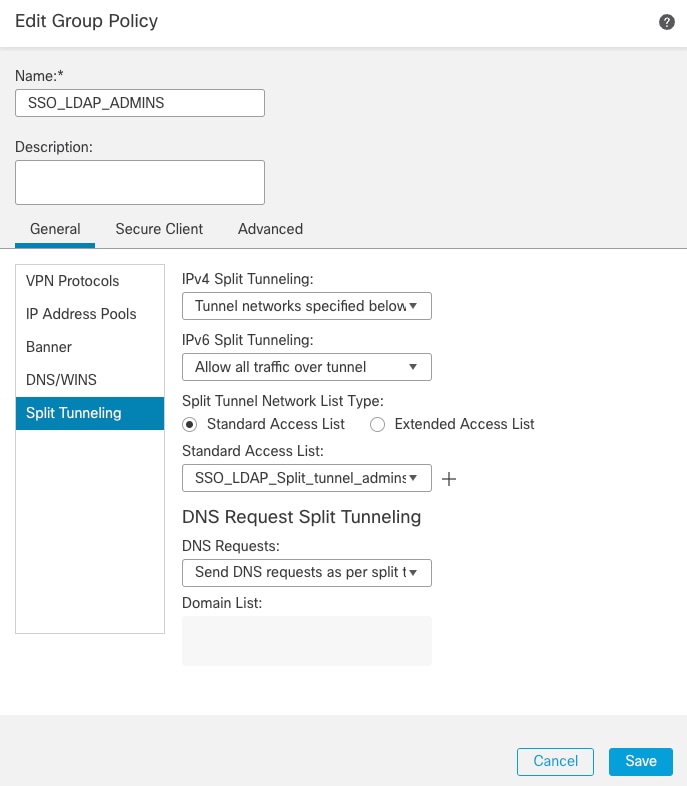
Step 4. Create Group Policies as needed.
- Navigate to
Objects > Object Management > VPN > Group Policy.
- Click
Add Group Policy .
- Create Group Policy with its respective parameters.
For the purpose of this demonstration, three Group Policies have been configured:
- SSO_LDAP_ADMINS Group Policy is the group for users that belong to the
AnyConnect Admins group.
 Group Policy 1
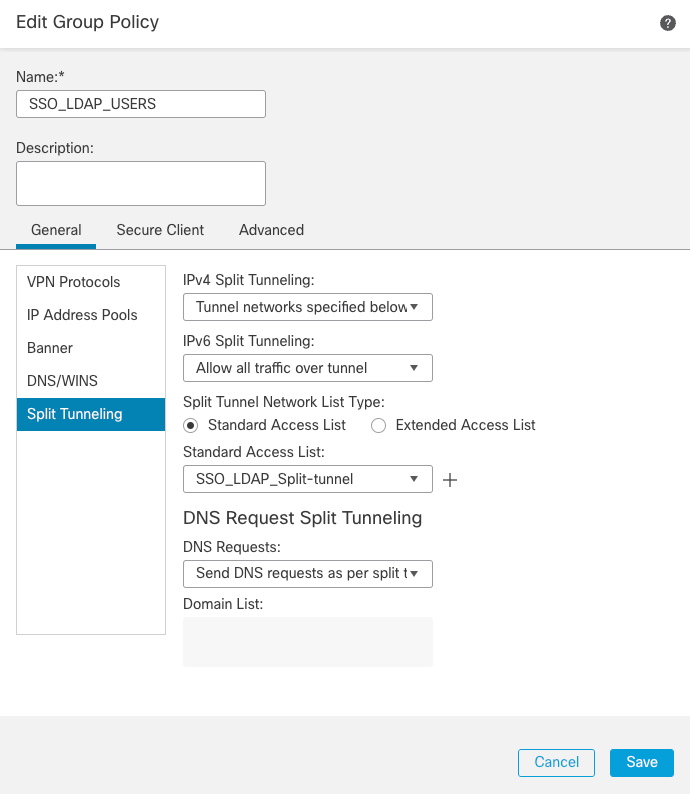
2. SSO_LDAP_USERS Group Policy is the group for users that belong to the AnyConnect Users group.
 Group Policy 2
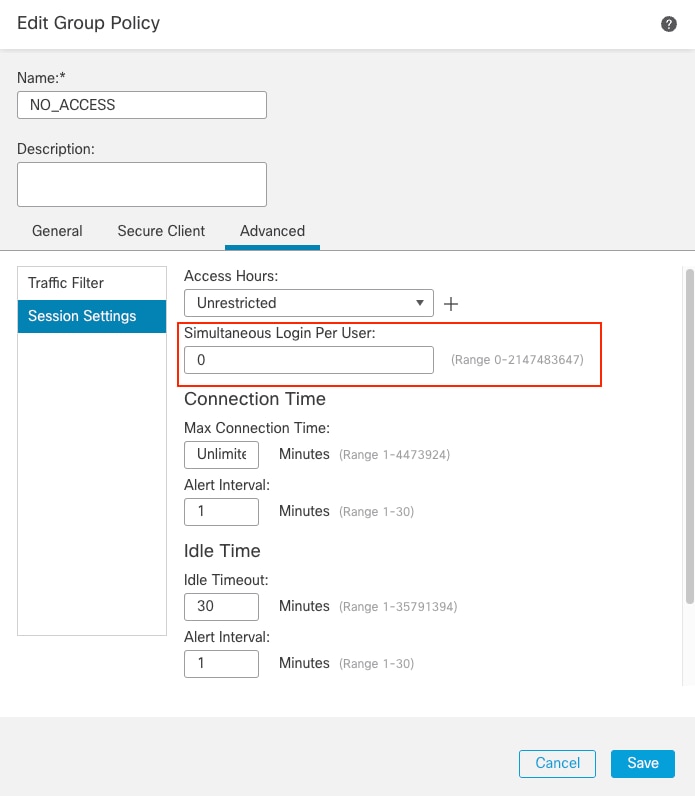
3. The NO_ACCESS Group Policy is the group for users that do not belong to any of the previous Group Policy. It has the Simultaneous Login Per User parameter must be set to 0.
 Group Policy 3
Step 5. Configure LDAP Attribute Mapping.
For the purpose of this demonstration, LDAP attribute map configuration:
- LDAP Attribute Name:
memberOf
- Cisco Attribute Name:
Group-Policy
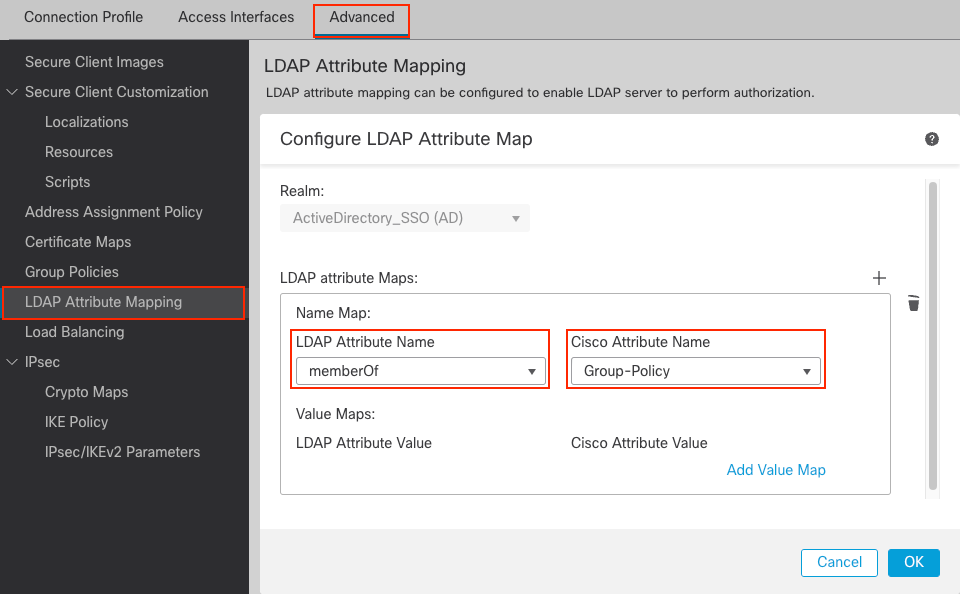 LDAP Attribute Map
- Provide the
LDAP Attribute Value and the Cisco Attribute Value. Click OK .
For the purpose of this demonstration:
LDAP Attribute Value: CN=AnyConnect Admins, CN=Users, DC=example, DC=com
Cisco Attribute Value: SSO_LDAP_ADMINS
LDAP Attribute Value: CN=AnyConnect Users, CN=Users, DC=example, DC=com
Cisco Attribute Value: SSO_LDAP_USERS
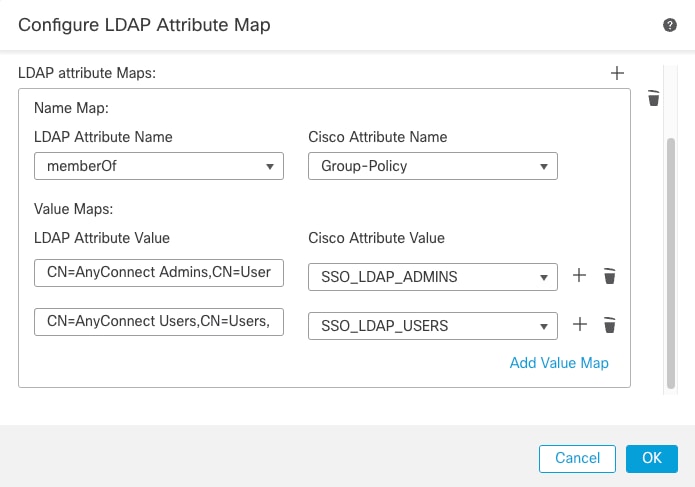 Configure LDAP Attribute Map
Step 6. Configure the Connection Profile.
- Navigate to
Devices > Remote Accessand then edit your current VPN Remote Access configuration.
- Create a new connection profile with its attributes. Choose the
NO_ACCESSGroup Policy as the Group Policy for this connection profile.
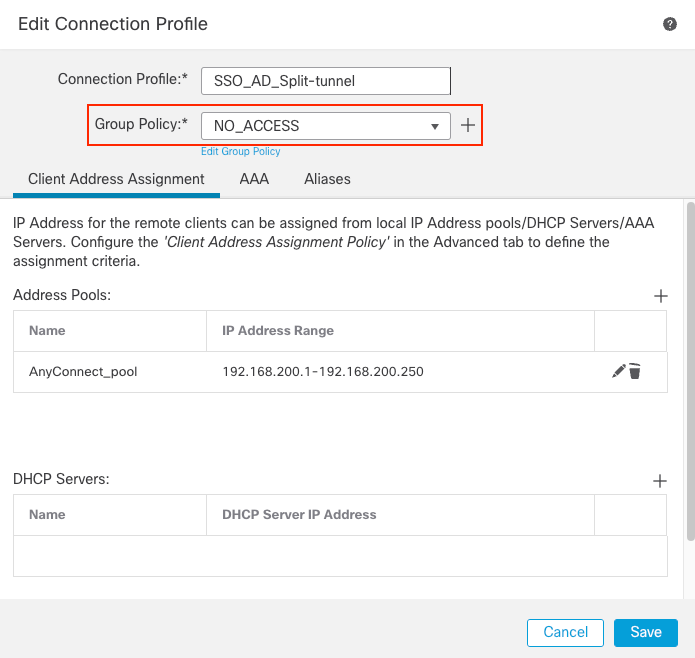 FMC Connection Profile 1
- Choose the
AAA tab. Under the Authentication Method option, choose SAML, and for Authorization Server option, choose the AD server that was created in Step 3.
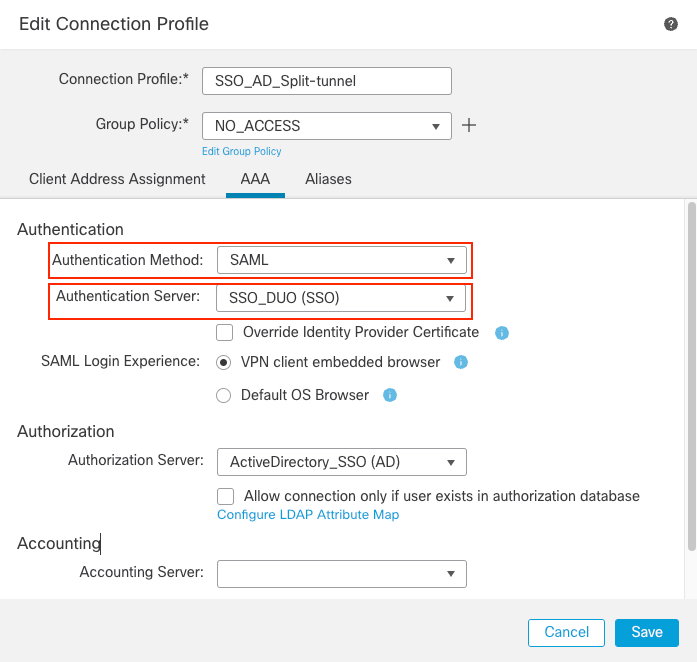 FMC Connection Profile AAA
- Create a group alias to map the connections to this connection profile. This is the tag that users can see on the AnyConnect Software drop-down menu.
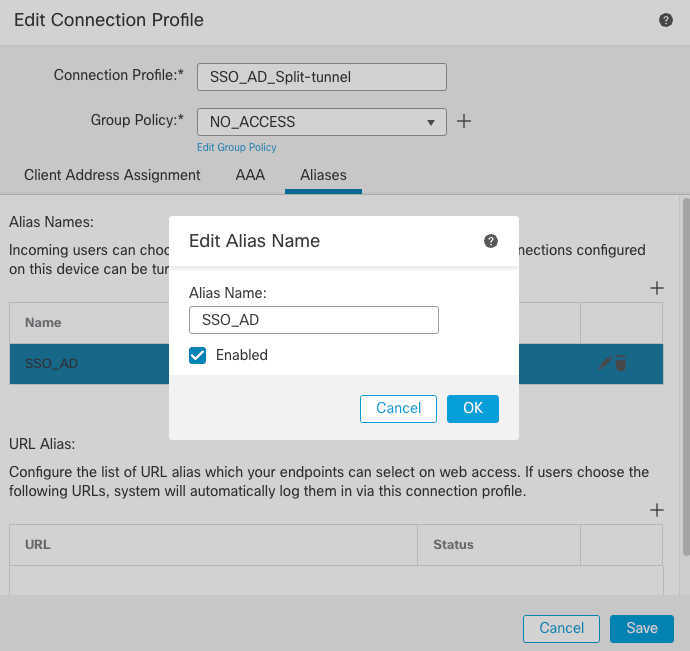 FMC Group Alias
- Click OK and save the complete connection profile VPN configuration.
Step 7. Configure FlexConfig Policy in order to modify the LDAP naming attribute.
As the Service Provider Mail attribute is set to Email Address, then the ldap-naming-attribute for the AD server must be changed from sAMAccountName to userPrincipalName.
Note: If IdP sends the NameID value as sAMAccountName, this step is not needed.
- Navigate to
Devices > FlexConfig and then choose or create the FlexConfig Policy in order to modify.
- Click
FlexConfig Object in order to add a new object.
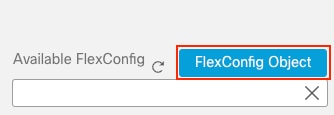 FMC FlexConfig Object
- Modify the
ldap-naming-attributefrom sAMAccountName to userPrincipalname.
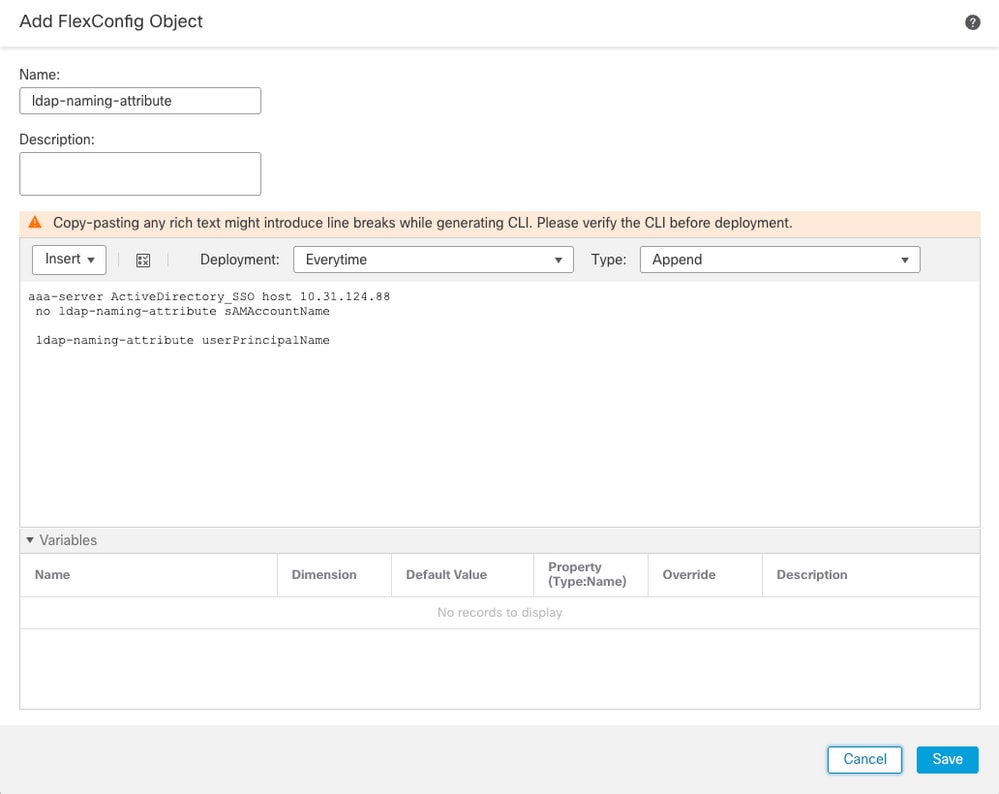 Add FlexConfig Object
Step 8. Navigate to Deploy > Deployment and choose the proper FTD in order to apply the configuration.
Verify
From LDAP debug snippet debug ldap 255, it can be observed that there is a match on the LDAP Attribute Map for Admin User:
[26] LDAP Search:
        Base DN = [DC=example,DC=com]
        Filter  = [userPrincipalName=admin_user@example.com]
        Scope   = [SUBTREE]
<snipped>
[20]    memberOf: value = CN=AnyConnect Admins,CN=Users,DC=example,DC=com
[20]            mapped to Group-Policy: value = SSO_LDAP_ADMINS [20] mapped to LDAP-Class: value = SSO_LDAP_ADMINS
Issue the show vpn-sessiondb anyconnect command in order to ensure that the user is in the defined group.
firepower# show vpn-sessiondb anyconnect

Session Type: AnyConnect

Username     : admin_user@example.com
Index        : 6
Public IP    : XX.XX.XX.XX
Protocol     : AnyConnect-Parent
License      : AnyConnect Premium
Encryption   : AnyConnect-Parent: (1)none
Hashing      : AnyConnect-Parent: (1)none
Bytes Tx     : 0                      Bytes Rx     : 0
Group Policy : SSO_LDAP_ADMINSTunnel Group : SSO_AD_Split-tunnel Login Time : 19:37:28 UTC Thu Jul 20 2023 Duration : 0h:01m:33s Inactivity : 0h:00m:00s VLAN Mapping : N/A VLAN : none Audt Sess ID : 0a1f7c490000600064b98cf8 Security Grp : none Tunnel Zone : 0. From LDAP debug snippet debug ldap 255, it can be observed that there is a match on the LDAP Attribute Map for Test User:
[29] LDAP Search:
        Base DN = [DC=example,DC=com]
        Filter  = [userPrincipalName=test_user@example.com]
        Scope   = [SUBTREE]
<snipped>
[29]    memberOf: value = CN=AnyConnect Users,CN=Users,DC=example,DC=com
[29]            mapped to Group-Policy: value = SSO_LDAP_USERS
[29]            mapped to LDAP-Class: value = SSO_LDAP_USERS
Issue the show vpn-sessiondb anyconnect command in order to ensure that the user is in the correct group.
firepower# show vpn-sessiondb anyconnect

Session Type: AnyConnect

Username     : test_user@example.com
Index        : 6
Public IP    : XX.XX.XX.XX
Protocol     : AnyConnect-Parent
License      : AnyConnect Premium
Encryption   : AnyConnect-Parent: (1)none
Hashing      : AnyConnect-Parent: (1)none
Bytes Tx     : 0                      Bytes Rx     : 0
Group Policy : SSO_LDAP_USERS        Tunnel Group : SSO_AD_Split-tunnel
Login Time   : 19:37:28 UTC Thu Jul 20 2023
Duration     : 0h:08m:07s
Inactivity   : 0h:00m:00s
VLAN Mapping : N/A                    VLAN         : none
Audt Sess ID : 0a1f7c490000600064b98cf8
Security Grp : none                   Tunnel Zone  : 0
From LDAP debug snippet debug ldap 255, it can be observed that there is no match on the LDAP Attribute Map for NOACCESS User and with debug webvpn that NO_ACCESS Group Policy is chosen, therefore, the user is unable to authenticate.
[32] LDAP Search:
        Base DN = [DC=example,DC=com]
        Filter  = [userPrincipalName=noaccess_user@example.com]
        Scope   = [SUBTREE]
<snipped>
User Policy Access-Lists:
user_acl[0] = NULL
user_acl[1] = NULL
tunnel policy attributes:
  1     Filter-Id(11)      8    ""
  2     Session-Timeout(27)      4    0
  3     Idle-Timeout(28)      4    30
  4     Simultaneous-Logins(4098)      4    0
  5     Primary-DNS(4101)      4    IP: 0.0.0.0
  6     Secondary-DNS(4102)      4    IP: 0.0.0.0
  7     Primary-WINS(4103)      4    IP: 0.0.0.0
  8     Secondary-WINS(4104)      4    IP: 0.0.0.0
  9     Tunnelling-Protocol(4107)      4    96
 10     Banner(4111)      0    0x000014e304401888   ** Unresolved Attribute **
 11     Group-Policy(4121)      9    "NO_ACCESS"
Troubleshoot
Most SAML troubleshooting involves a misconfiguration which can be found by checking the SAML configuration or debugs:
debug webvpn saml 255debug webvpn 255debug webvpn anyconnect 255debug webvpn session 255debug webvpn request 255
For LDAP mapping authorization issues the useful debugs are:
debug aaa common 255debug ldap 255
Related information

 Feedback