Configure FMC and FTD External Authentication with ISE as a RADIUS Server
Available Languages
Contents
Introduction
This document describes an example of external authentication configuration for Secure Firewall Management Center and Firewall Threat Defense.
Prerequisites
Requirements
It is recommended to have knowledge of these topics:
- Cisco Secure Firewall Management Center initial configuration via GUI and/or shell.
- Configuring authentication and authorization policies on ISE.
- Basic RADIUS knowledge.
Components Used
The information in this document is based on these software and hardware versions:
- vFMC 7.4.2
- vFTD 7.4.2
- ISE 3.3
The information in this document was created from the devices in a specific lab environment. All of the devices used in this document started with a cleared (default) configuration. If your network is live, ensure that you understand the potential impact of any command.
Background Information
When you enable external authentication for management and administrative users of your Secure Firewall system, the device verifies the user credentials with a Lightweight Directory Access Protocol (LDAP) or RADIUS server as specified in an external authentication object.
External authentication objects can be used by the FMC and FTD devices. You can share the same object between the different appliance/device types, or create separate objects.
External Authentication for FMC
You can configure multiple external authentication objects for web interface access. Only one external authentication object can be used for CLI or shell access.
External Authentication for FTD
For the FTD, you can only activate one external authentication object.
Network Topology
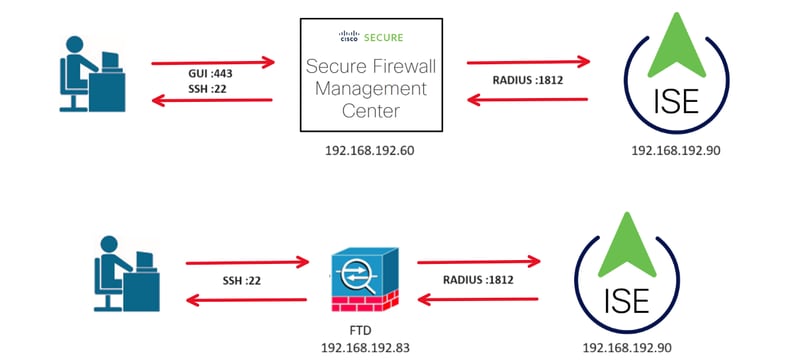
Configure
ISE Configuration

Note: There are multiple ways to setup ISE authentication and authorization policies for Network Access Devices (NAD) such as FMC. The example described in this document is a point of reference in which we create two profiles (one with Admin rights and the other Read-Only) and can be adapted to meet the baselines to access your network. One or more authorization policies can be defined on ISE with returning RADIUS attribute values to the FMC that are then mapped to a local user group defined in the FMC system policy configuration.
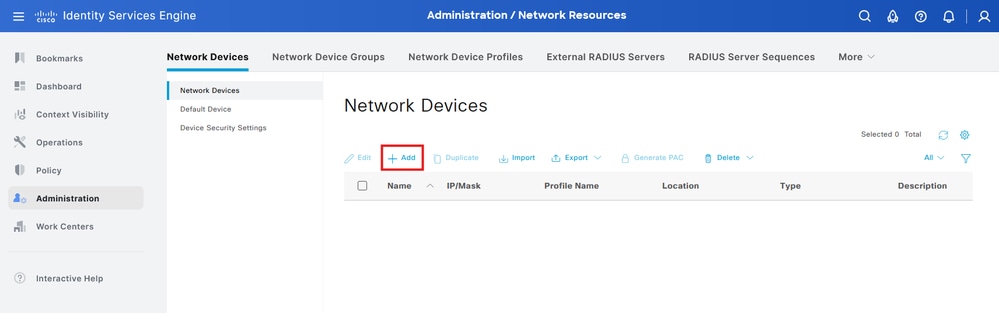
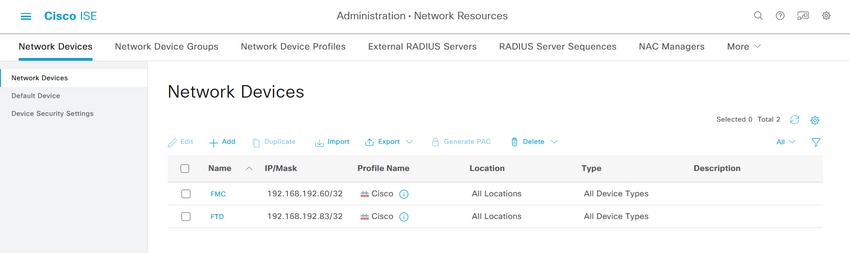
Add your Network Devices
Step 1. Navigate to the burger icon  located in the upper left corner >Administration > Network Resources > Network Devices > +Add.
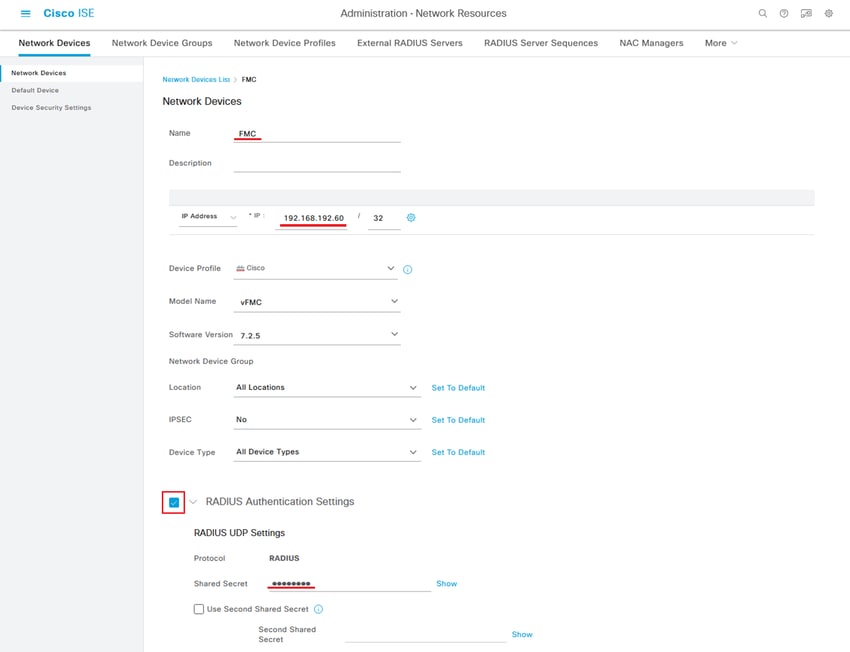
Step 2. Assign a Name to the network device object and insert the FMC IP address.
Check the RADIUS checkbox and define a Shared Secret.
The same key must be used later to configure the FMC.
Once done, click Save.
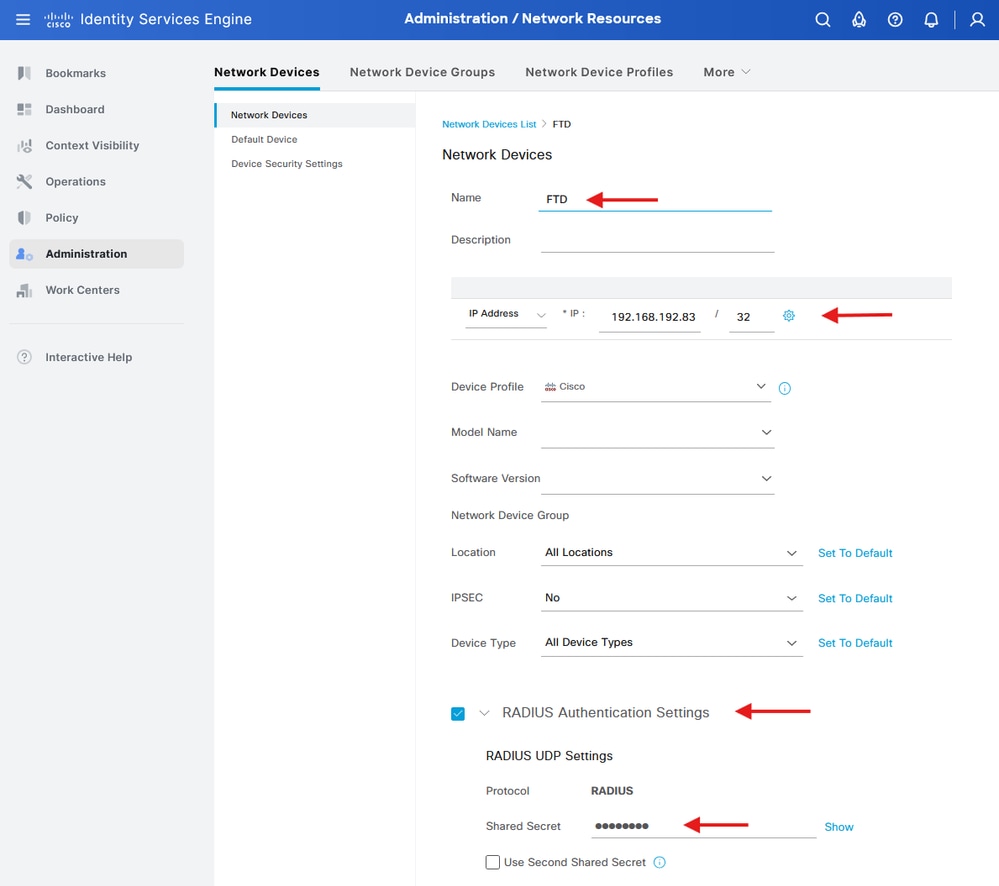
Step 2.1. Repeat the same to add the FTD.
Assign a Name to the network device object and insert the FTD IP address.
Check the RADIUS checkbox and define a Shared Secret.
Once done, click Save.
Step 2.3. Validate both devices are shown under Network Devices.
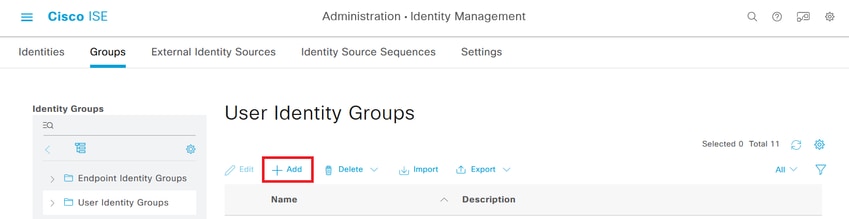
Create the Local User Identity Groups and Users
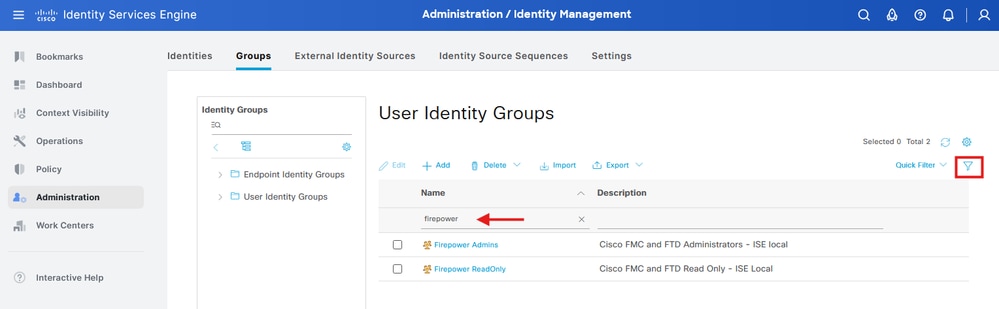
Step 3. Create the required User Identity Groups. Navigate to the burger icon  located in the upper left corner > Administration > Identity Management > Groups > User Identity Groups > + Add
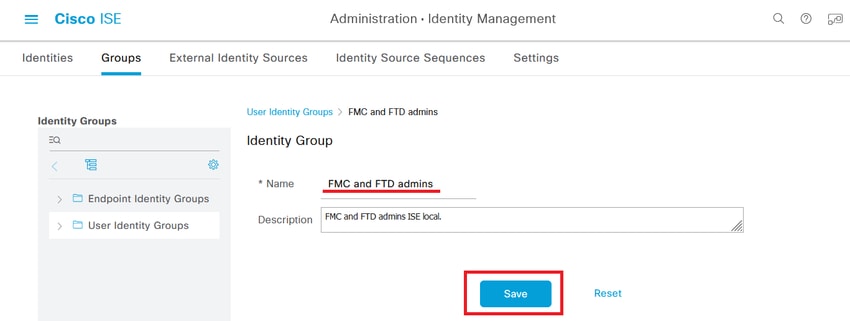
Step 4. Give each group a name and Save individually. In this example we are creating a group for Administrator users and another one for Read-Only users. First, create the group for the user with Administrator rights.
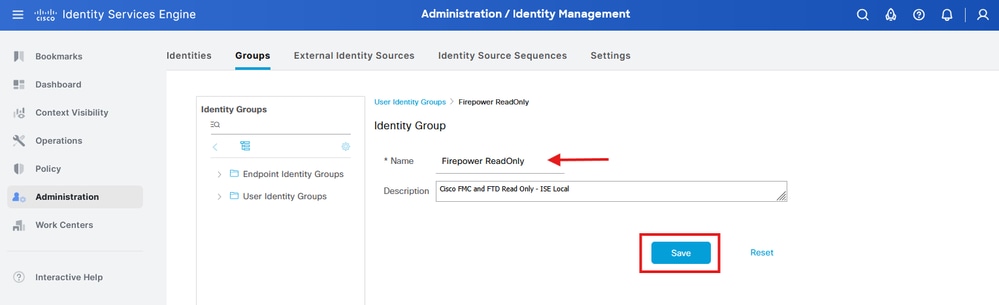
Step 4.1. Create the second group for the ReadOnly user.
Step 4.2. Validate both groups are shown under the User Identity Groups List. Use the filter to find them easily.
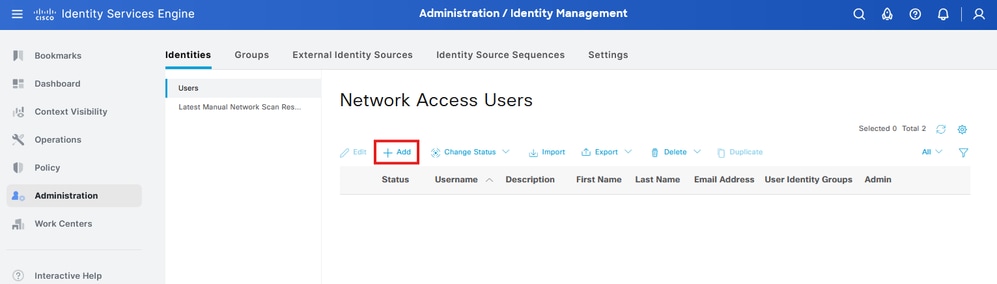
Step 5. Create the local users and add them to their correspondent group. Navigate to  > Administration > Identity Management > Identities > + Add.
Step 5.1. First create the user with Administrator rights. Assign a name to it, password and the group Firepower Admins.

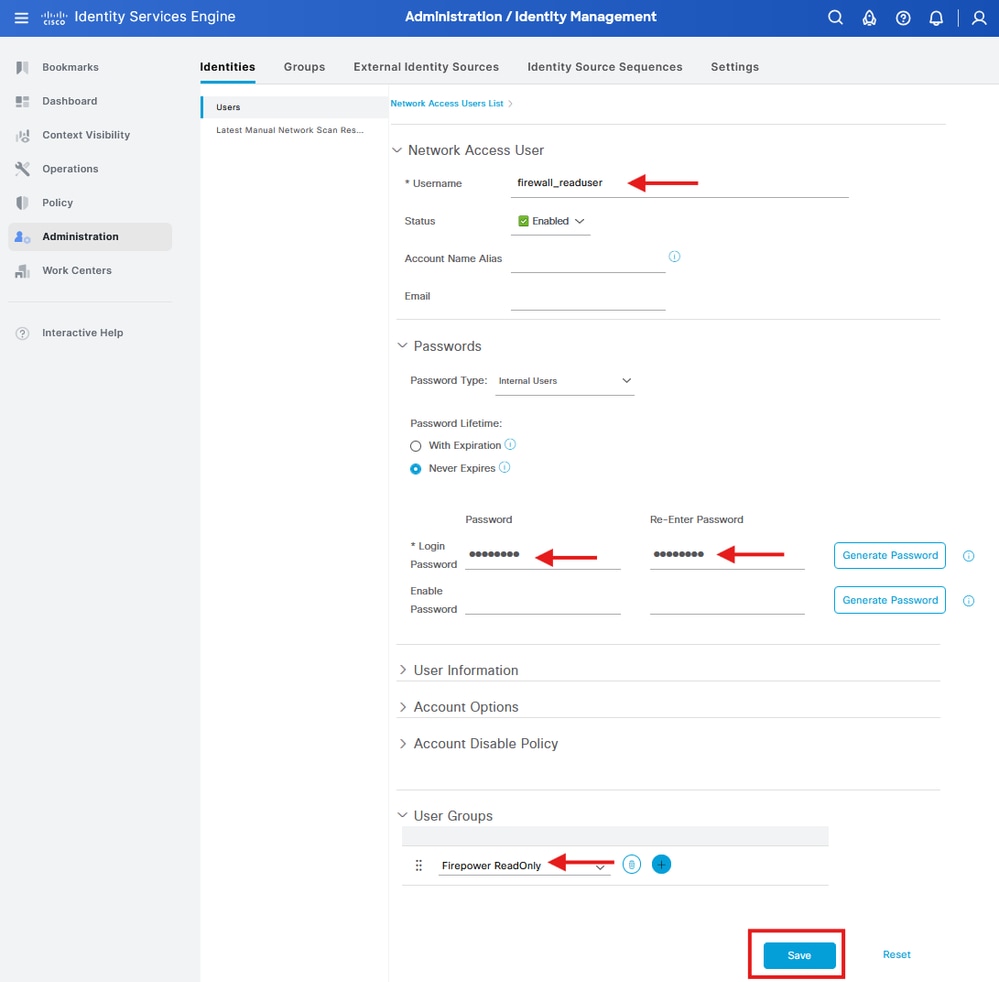
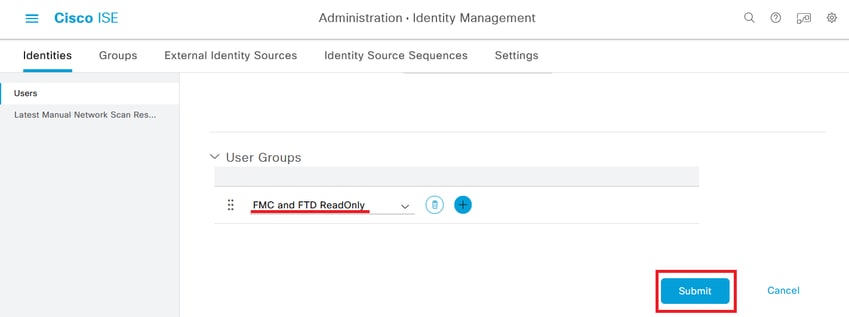
Step 5.2. Add the user with ReadOnly rights. Assign a name, password and the group Firepower ReadOnly.
Create the Authorization Profiles
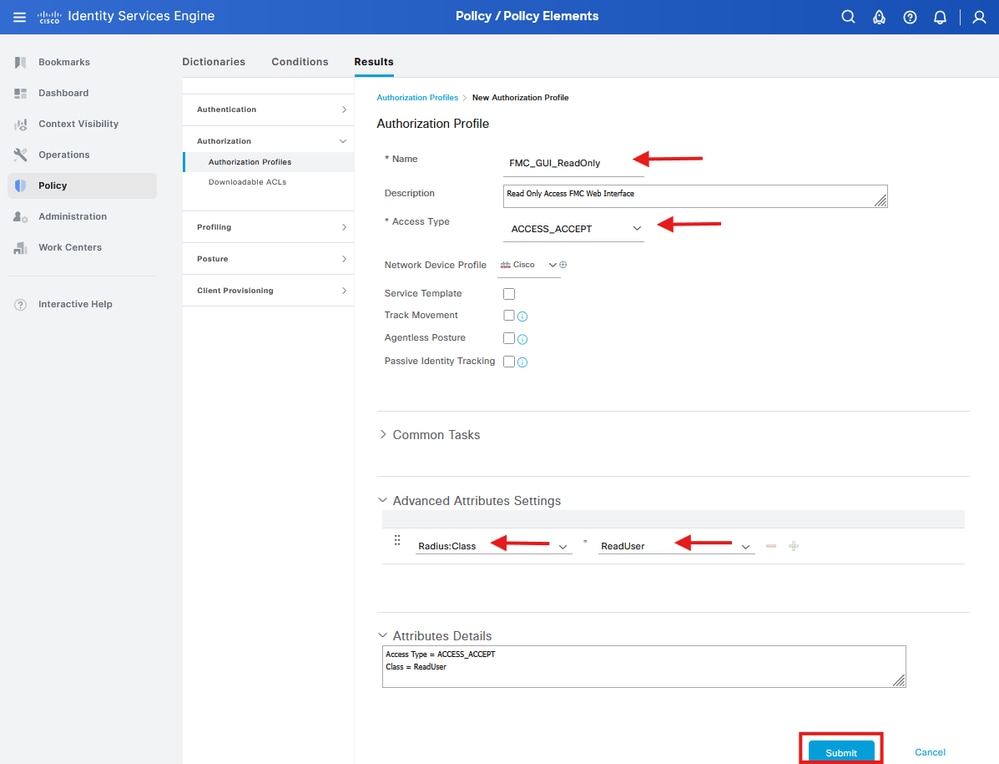
Step 6. Create the Authorization Profile for the FMC Web Interface Admin user.
Navigate to  > Policy > Policy Elements > Results > Authorization > Authorization Profiles > +Add.
Define a name for the Authorization Profile, leave Access Type as ACCESS_ACCEPT.
Under Advanced Attributes Settings add a Radius > Class--[25] with the value Administrator and click Submit.
Step 6.1. Repeat the previous step to create the Authorization Profile for the FMC Web Interface ReadOnly User. Create the Radius Class with the value ReadUser instead Administrator this time.
Note: For FMC (all versions) and FTD (6.2.3 and 6.3), you must define users for Command Line Interface (CLI) access in the FMC External Authentication Object, which I show in Step 4 under the FMC Configuration procedure. For FTD 6.4 and later, we recommend defining users on the RADIUS server as I show you in the next step.
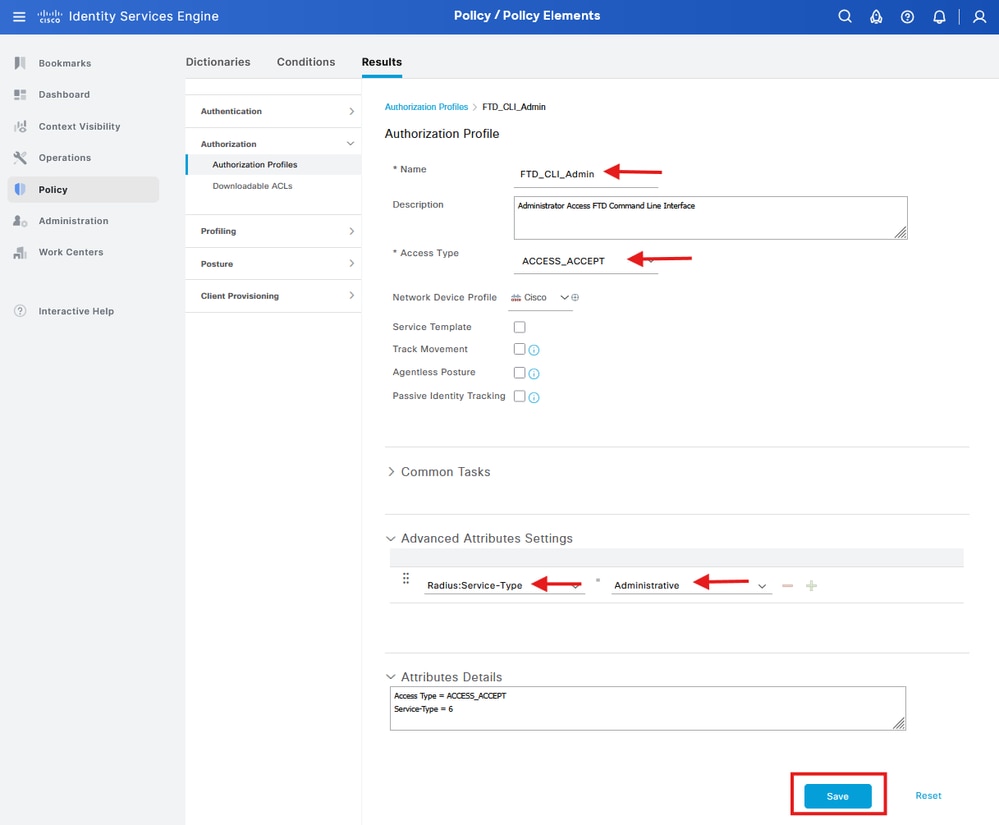
Step 7. Create the Authorization Profile for the FTD CLI user with Administrator rights.
Navigate to  > Policy > Policy Elements > Results > Authorization > Authorization Profiles > +Add.
Define a name for the Authorization Profile, leave Access Type as ACCESS_ACCEPT.
Under Advanced Attributes Settings add a Radius > Service-Type--[6] with the value Administrative and click Submit.
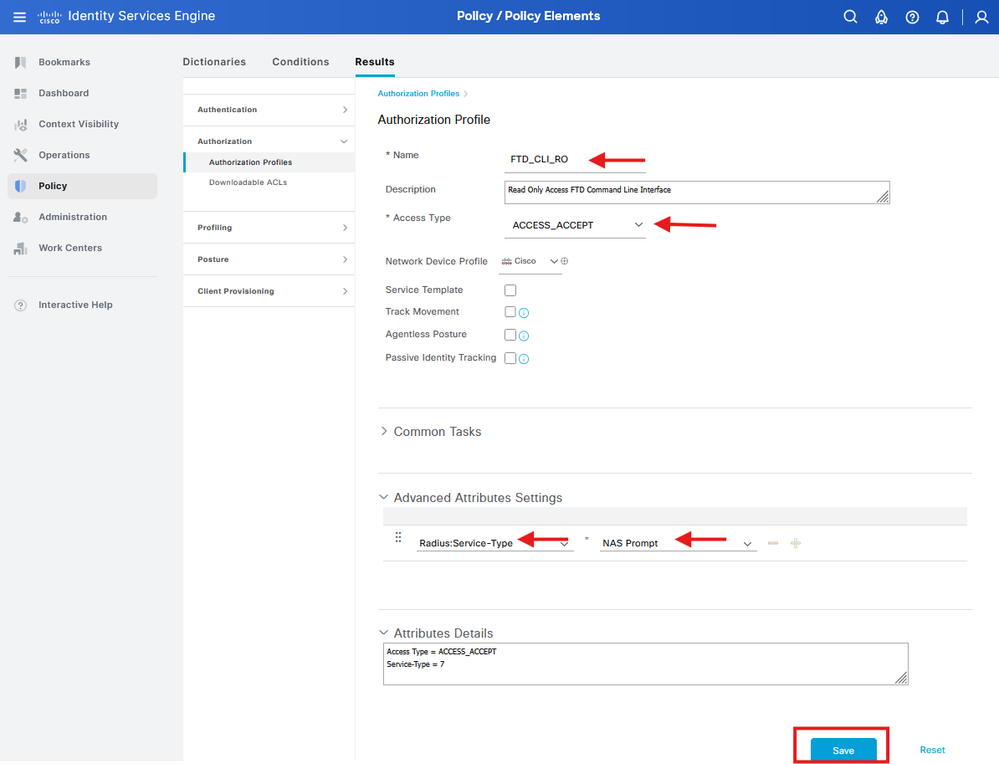
Step 7.1. Repeat the previous step to create the Authorization Profile for the FTD CLI ReadOnly User. This time create the Radius > Service-Type--[6] with the value NAS Prompt instead.
Add a New Policy Set
Step 8. Create a Policy Set matching the FMC IP address. This is to prevent other devices from granting access to the users.
Navigate to  > Policy > Policy Sets >
  icon placed at the upper left corner.
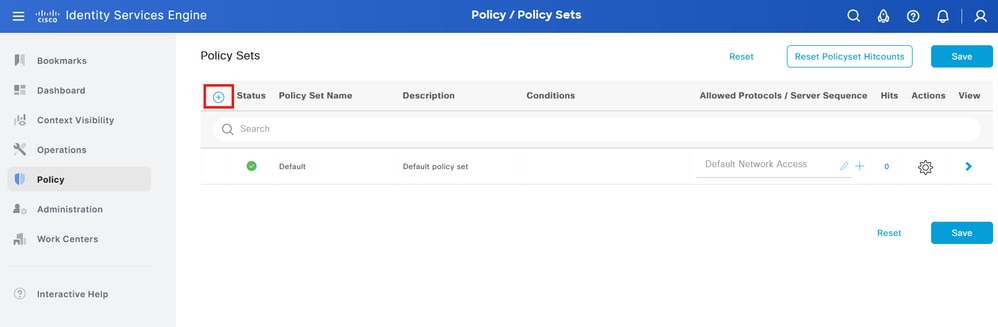
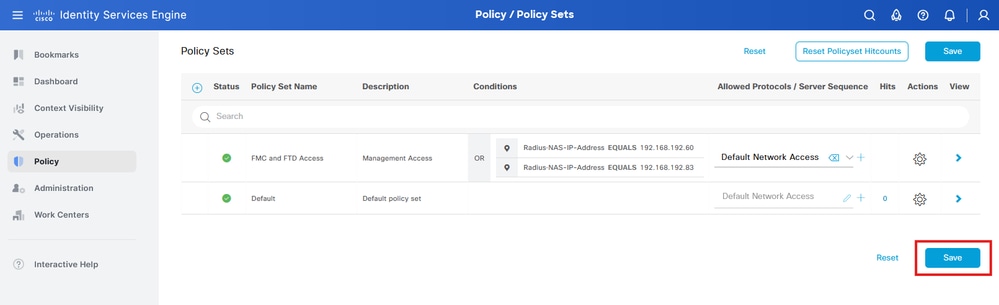
Step 8.1. A new line is placed at the top of your Policy Sets.
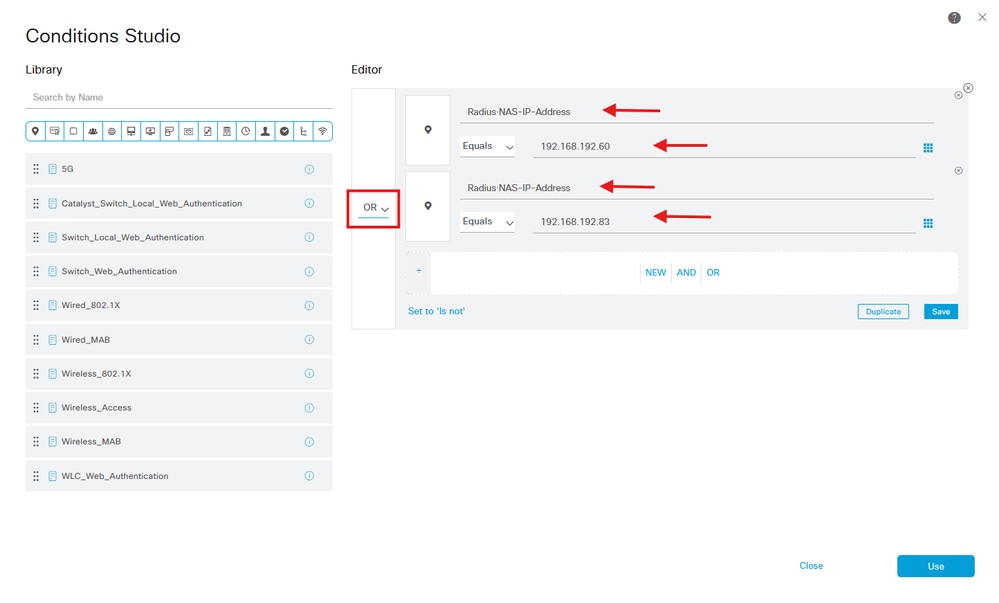
Name the new policy and add a top condition for RADIUS NAS-IP-Address attribute matching the FMC IP address.
Add a second condition with OR conjunction to include the IP address of the FTD.
Click Use to keep the changes and exit the editor.
Step 8.2. Once completed hit Save.

Tip: For this exercise we have allowed the Default Network Access Protocols list. You can create a new list and narrow it down as needed.
Step 9. View the new Policy Set by hitting the  icon placed at the end of the row.
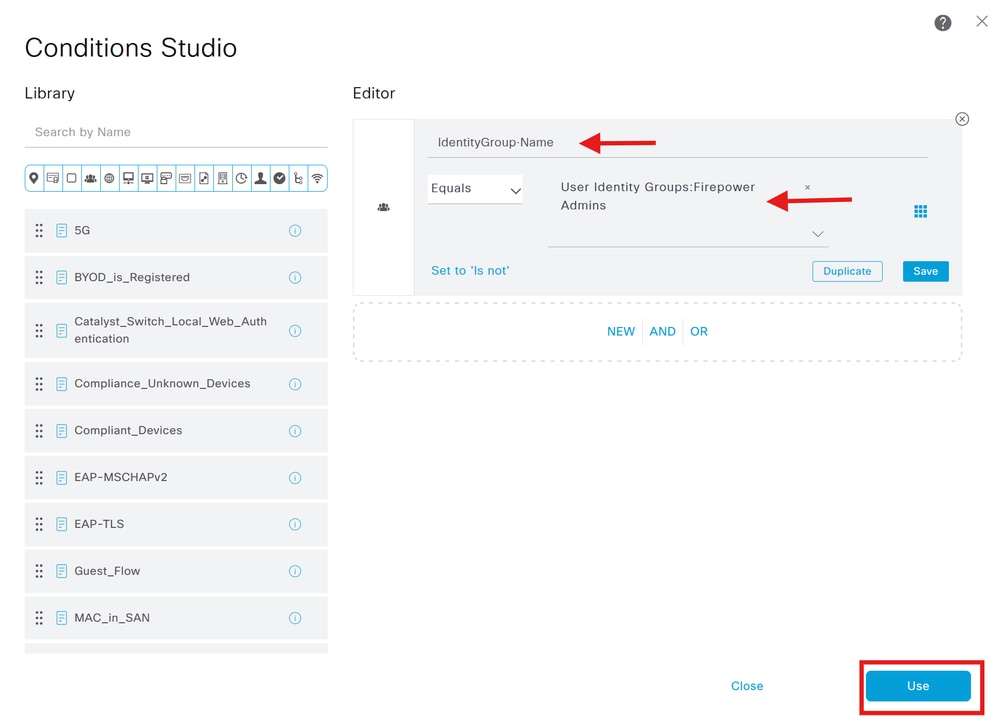
Expand the Authorization Policy menu and push the  icon to add a new rule to allow the access to the user with admin rights.
Give it a name.
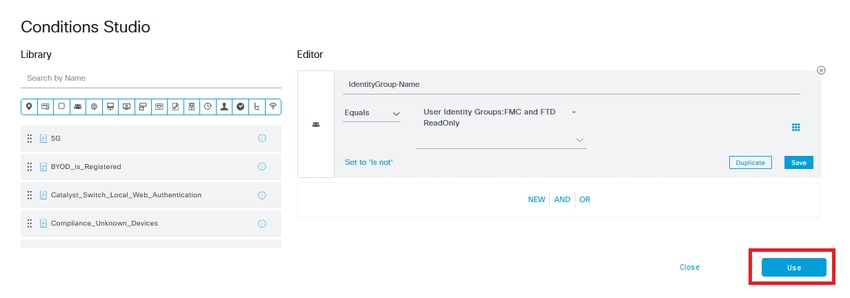
Set the conditions to match the Dictionary Identity Group with Attribute Name Equals and choose User Identity Groups: Firepower Admins (the group name created in Step 4) and click Use.
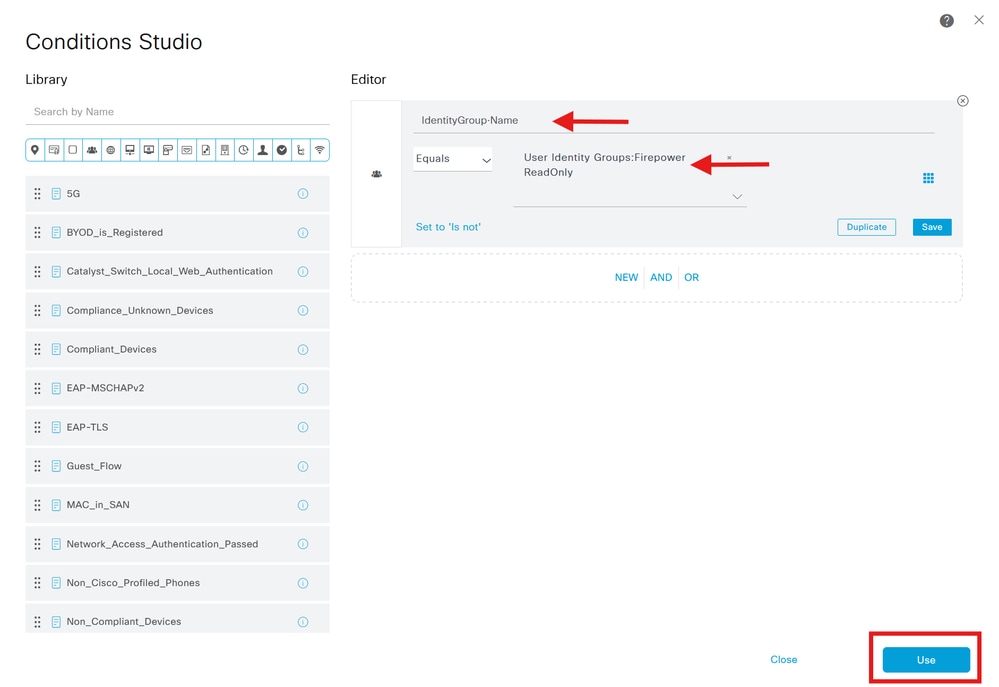
Step 10. Click the  icon to add a second rule to allow the access to the user with read-only rights.
Give it a name.
Set the conditions to match the Dictionary Identity Group with Attribute Name Equals User Identity Groups: Firepower ReadOnly (the group name created in Step 4.1) and click Use.
Step 11. Set the Authorization Profiles respectively for each rule and hit Save.
FMC Configuration
Add your ISE RADIUS Server for FMC Authentication
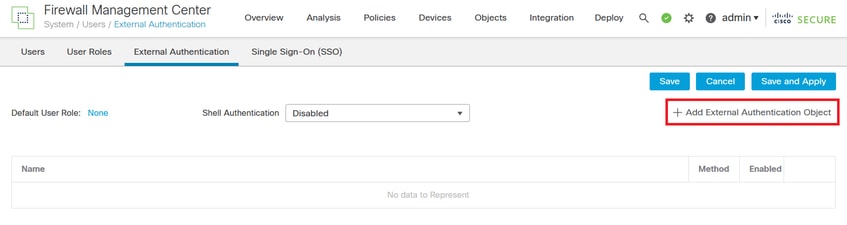
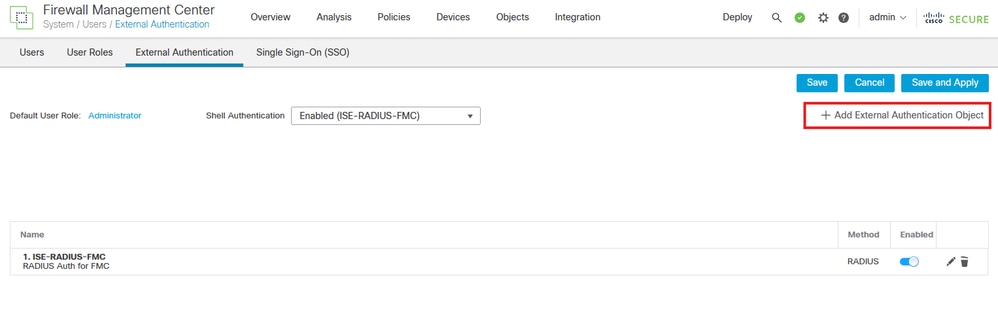
Step 1. Create the External Authentication Object under System > Users > External Authentication > + Add External Authentication Object.
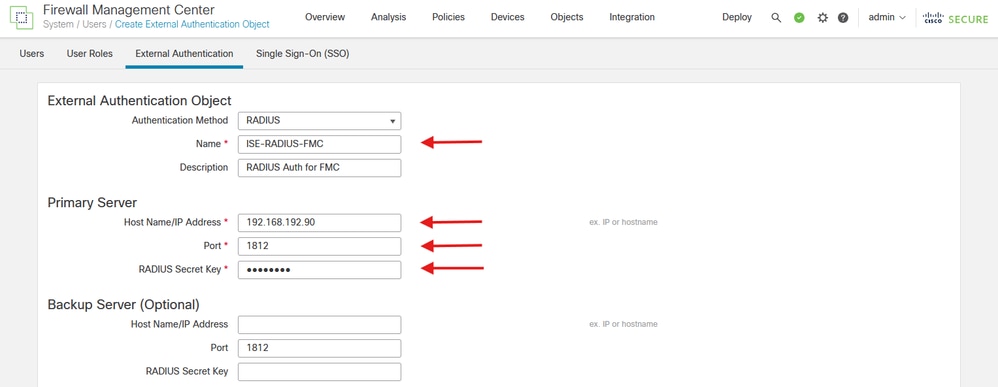
Step 2. Select RADIUS as Authentication Method.
Under External Authentication Object give a Name to the new object.
Next, in Primary Server setting insert the ISE IP address and the same RADIUS Secret Key you used on Step 2 of your ISE configuration.
Step 3. Insert the RADIUS Class attributes values that were configured on Steps 6 and 7 of ISE Configuration: Administrator and ReadUser for firewall_admin and firewall_readuser respectively.
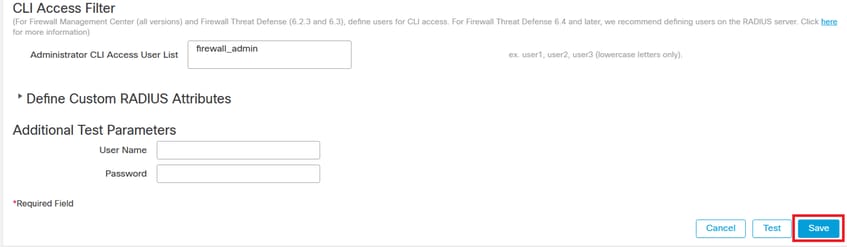
Step 4. Populate the Administrator CLI Access User List under CLI Access Filter with the user name that must have CLI access to the FMC.
Click Save once done.
Note: For FMC CLI access you must use this user list. To use the same RADIUS server for the FTD and FMC while using the Service-Type attribute method for the Firewall Threat Defense, you must create two external authentication objects that identify the same RADIUS server: one object includes the predefined CLI Access Filter users (for use with the FMC), and the other object leaves the CLI Access Filter empty (for use with FTD).

Caution: Any user with CLI access to the FMC can gain Linux shell access with the expert command. Linux shell users can obtain root privileges, which can present a security risk. Make sure that you restrict the list of users with CLI or Linux shell access.
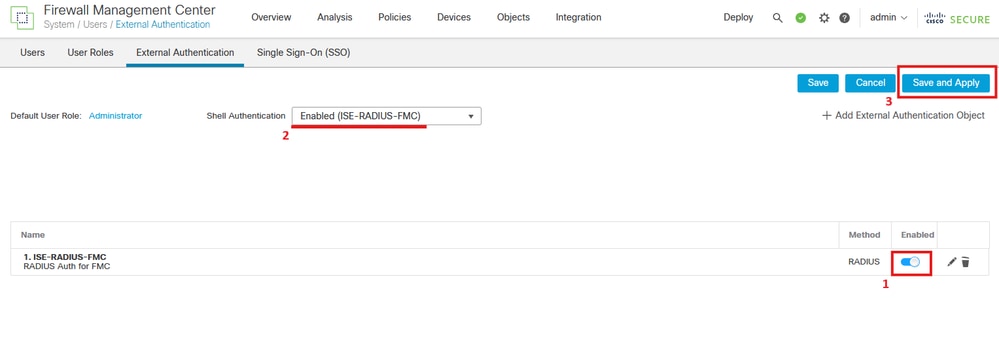
Step 5. Enable the new Object. Set it as the Shell Authentication method for FMC and click Save and Apply.
FTD Configuration
Add your ISE RADIUS Server for FTD Authentication
Note: You can share the same object between the management center and devices or create separate objects depending on where you want to define your users and the authorization level they must have. In this scenario we are defining our users on the RADIUS server, so we need to create separate objects for the threat defense and the management center.
Step 1. Same as you did for the FMC, create the External Authentication Object under System > Users > External Authentication > + Add External Authentication Object.
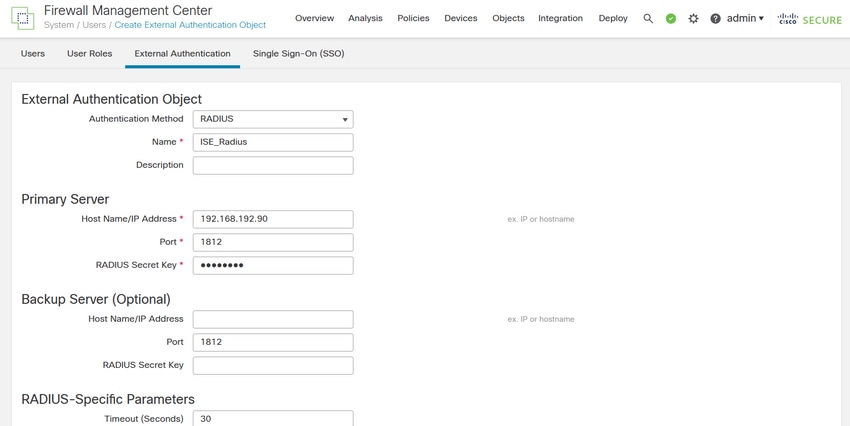
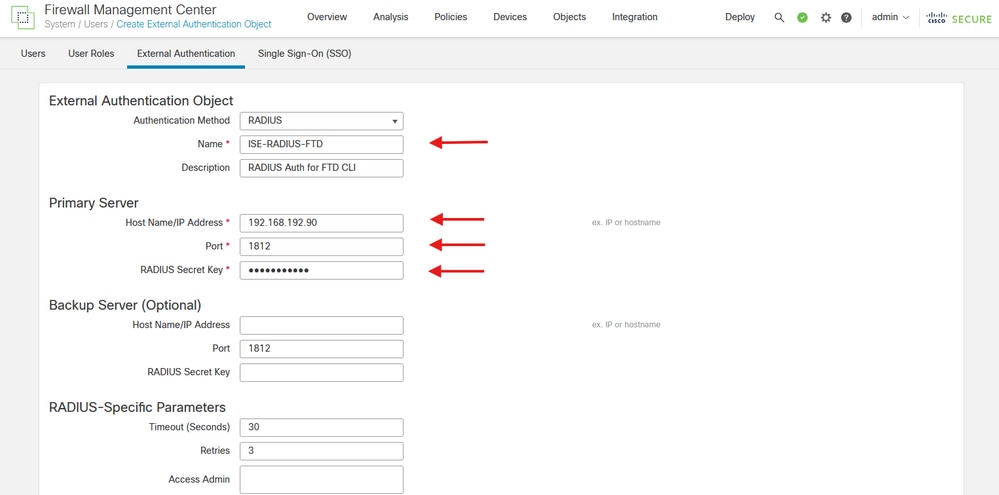
Step 2. Select RADIUS as Authentication Method.
Under External Authentication Object give a Name to the new object.
Next, in Primary Server setting insert the ISE IP address and the same RADIUS Secret Key you used on Step 2.1 of your ISE configuration. Click Save

Warning: The timeout range is different for the FTD and the FMC, so if you share an object and change de default value of 30 seconds, be sure not to exceed smaller timeout range (1-300 seconds) for FTD devices. If you set the timeout to a higher value, the threat defense RADIUS configuration does not work.
Enable the RADIUS Server
Step 1. In FMC GUI navigate to Devices > Platform Settings. Edit your current policy or create a new one if you do not have any assigned to the FTD you need access to. Enable the RADIUS server under External Authentication and click Save.
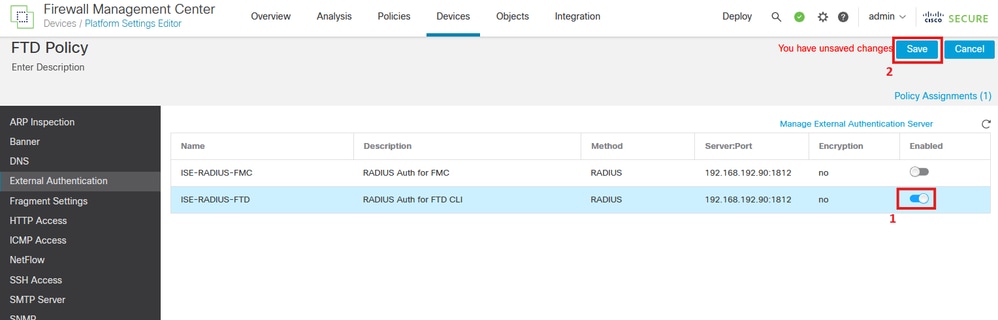
Step 2. Make sure the FTD you need to gain access to is listed under Policy Assignments as a Selected Device.

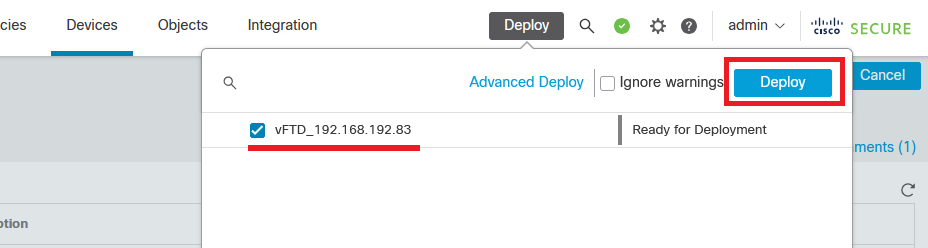
Step 3. Deploy the changes.
Note: If you previously configured an existent external username as an internal user using the configure user add command, the threat defense first checks the password against the internal user, and if that fails, it checks the RADIUS server. Note that you cannot later add an internal user with the same name as an external user as the deployment will fail; only pre-existing internal users are supported.
Verify
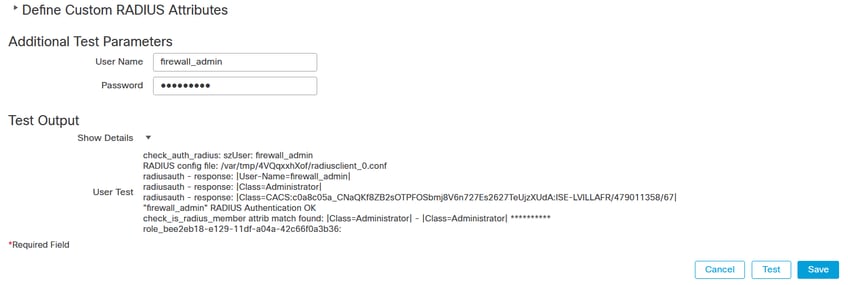
- Test that your new deployment is working properly.
- In the FMC GUI navigate to the RADIUS server settings and scroll down to the Additional Test Parameters section.
- Enter a username and password for the ISE user and click Test.
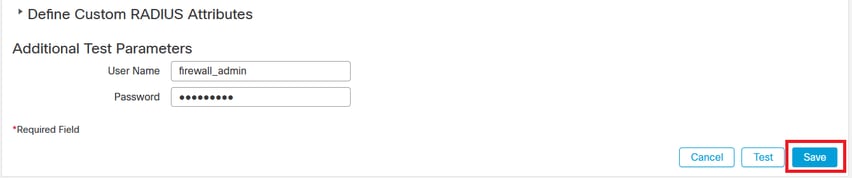
- A successful test shows a green Success Test Complete message at the top of the browser window.
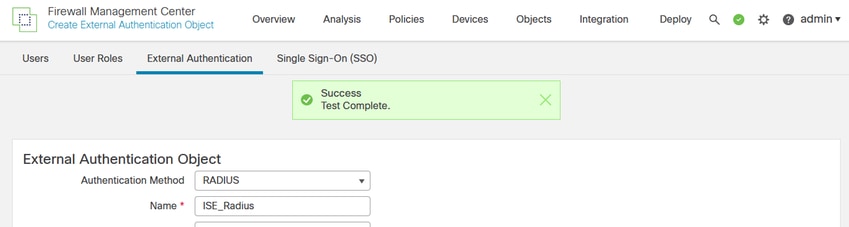
- You can expand the Details under the Test Output for more information.
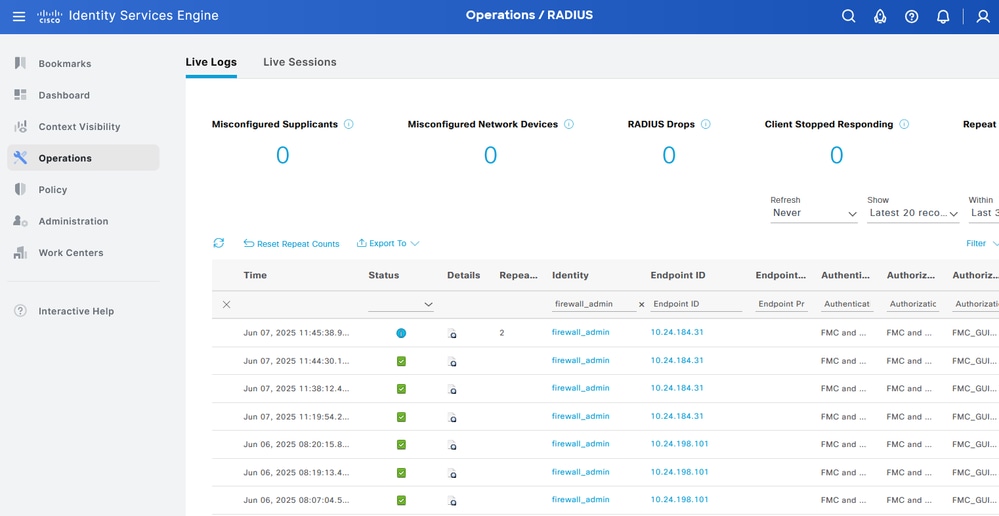
- Check the authentication request and response in your ISE RADIUS under Operations > RADIUS > Live Logs.
- For FTD authentication open an SSH session to the device and run the command 'show user'. After the first login attempt you wiill see the external users and their access level.

Revision History
| Revision | Publish Date | Comments |
|---|---|---|
1.0 |
02-Oct-2023
|
Initial Release |
 Feedback
Contact Cisco
- Open a Support Case

- (Requires a Cisco Service Contract)