Configure Zero Touch Deployment (ZTD) of VPN Remote Offices/Spokes
Available Languages
Download Options
Bias-Free Language
The documentation set for this product strives to use bias-free language. For the purposes of this documentation set, bias-free is defined as language that does not imply discrimination based on age, disability, gender, racial identity, ethnic identity, sexual orientation, socioeconomic status, and intersectionality. Exceptions may be present in the documentation due to language that is hardcoded in the user interfaces of the product software, language used based on RFP documentation, or language that is used by a referenced third-party product. Learn more about how Cisco is using Inclusive Language.
Contents
Introduction
This document describes how a Zero Touch Deployment (ZTD) option is a cost-efficient and scalable solution for deployments.
Secure and efficient deployment and the provision of Remote Office routers (sometimes called Spokes) can be a difficult task. Remote Offices might be in locations where it is a challenge to have a Field Engineer configure the router onsite, and most engineers choose not to send pre-configured Spoke routers due to the cost and potential security risk.
Prerequisites
Requirements
Cisco recommends that you have knowledge of these topics:
- Any Cisco IOS® router that has a USB port that supports USB Flash drives. For details, see USB eToken and USB Flash Features Support.
- This feature is confirmed to work on almost any Cisco 8xx platform. For details, see Default Configuration Files White Paper (Features Support on Cisco 800 Series ISR).
- Other platforms that have USB ports like Integrated Service Router (ISR) series G2 and 43xx/44xx.
Components Used
The information in this document is based on these software and hardware versions:
- Simple Certificate Enrollment Protocol (SCEP)
- Zero Touch Deployment via USB
- DMVPN/FlexVPN/Site-to-site VPNs
The information in this document was created from the devices in a specific lab environment. All of the devices used in this document started with a cleared (default) configuration. If your network is live, make sure that you understand the potential impact of any command.
Configure
Note: Use the Command Lookup Tool (registered customers only) in order to obtain more information on the commands used in this section.
Network Diagram
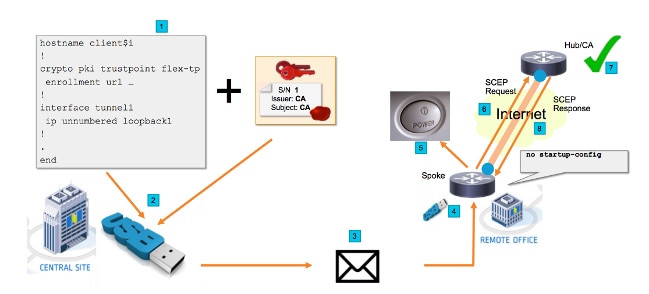
Network Flow
- In the Central Site (Company's Headquarter), a template of the Spoke configuration is created. The template contains the Certificate Authority (CA) certificate that signed the certificate of the VPN Hub router.
- The configuration template is instantiated on an USB Key in a file called ciscortr.cfg. This configuration file contains the Spoke specific configuration for the router to be deployed.
Note: Configuration on the USB does not contain any sensitive information other than IP addresses and the CA certificate. There is no private key of the Spoke or CA Server.
- The USB Flash drive is sent to the Remote Office via the mail or a package delivery company.
- The Spoke router is also sent to the Remote Office directly from Cisco Manufacturing.
- In the Remote Office, the router is connected to power and cabled to the network as explained in the instructions that are included with the USB flash drive. Next, the USB flash drive is inserted into the router.
Note: There is little to no technical skills involved in this step, so it can easily be performed by any office personnel.
- Once the router boots up, it reads the configuration from usbflash0:/ciscortr.cfg. As soon as the router has powered up, a Simple Certificate Enrollment Protocol (SCEP) request is sent to the CA Server.
- On the CA Server either Manual or Automatic Granting can be configured based on the company security policy. When configured for manual certificate granting, out-of-band verification of the SCEP Request must be performed (IP address validation check, credential validation for the personnel that performs the deployment, etc.). This step might differ based on the CA Server that is used.
- Once the SCEP Response is received by the Spoke router, which now has a valid Certificate, the Internet Key Exchange (IKE) session authenticates with the VPN Hub and the Tunnel successfully establishes.
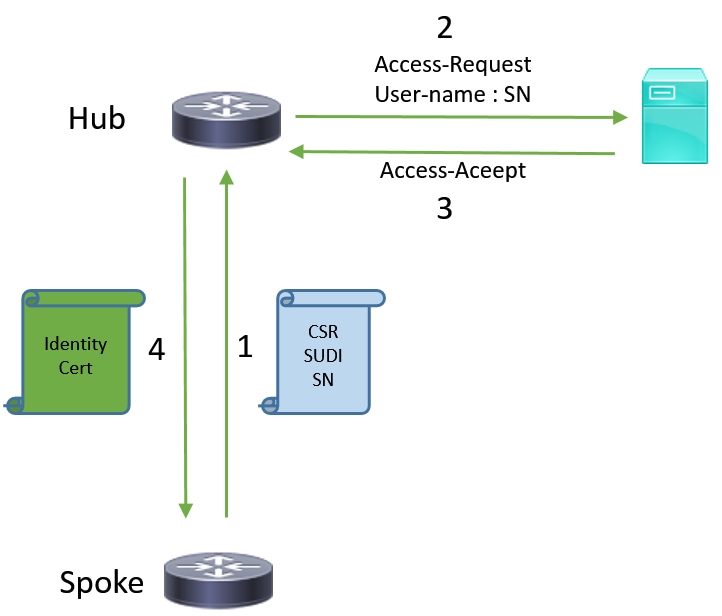
SUDI-Based Authorization
Step 7 involves manual verification of the certificate signing request sent via SCEP protocol, which might be cumbersome and difficult to perform for non-technical personnel. In order to increase security and automate the process, the Secure Unique Device Identification (SUDI) device certificates can be used. SUDI certificates are certificates built into the ISR 4K devices. These certificates are signed by Cisco CA. Each manufactured device has been issued with different certificate and the serial number of the device is contained within the common name of the certificate. The SUDI certificate, the associated key pair, and its entire certificate chain are stored in the tamper resistant Trust Anchor chip. Furthermore, the key pair is cryptographically bound to a specific Trust Anchor chip and the private key is never exported. This feature makes cloning or spoofing the identity information virtually impossible.
The SUDI private key can be used to sign the SCEP request generated by the router. The CA server is able to verify the signature and read the contents of the SUDI certificate of the device. CA server can extract the information from the SUDI certificate (like a serial number) and perform authorization based on that information. The RADIUS server can be used to respond to such an authorization request.
The administrator creates a list of the spokes routers and their associated serial numbers. The serial numbers can be read from the router's case by the non-technical personnel. These serial numbers are stored in the RADIUS server database and the server authorizes the SCEP requests based on that information which allows the certificate to be granted automatically. Note that the serial number is cryptographically tied to a specific device via the Cisco signed SUDI certificate, so it is impossible to be forged.
In summary, the CA server is configured to automatically grant requests that meet both these criteria:
- Are signed with private key associated with a certificate signed by Cisco SUDI CA
- Are authorized by the Radius server based on the serial number information taken from the SUDI certificate
Deployment Scenarios
The CA server might be exposed directly to the internet, thus allowing the clients to perform enrollment before the tunnel can be built. CA server can even be configured on the same router as VPN hub. The advantage of this topology is simplicity. The disadvantage is decreased security as the CA server is directly exposed for various forms of attack via the Internet.
Alternatively, the topology can be expanded by configuring Registration Authority server. Registration Authority server role is to assess and forward valid Certificate Signing Requests to the CA server. The RA server itself does not contain the private key of the CA and cannot generate certificates by itself. In such deployment, the CA server does not need to be exposed to the internet, which increases overall security.'
Network Flow
1. The Spoke router creates SCEP request, signs it with the private key of its SUDI certificate and sends it to the CA server.
2. If the request is properly signed, RADIUS request is generated. Serial number is used as a username parameter.
3. The RADIUS server either accepts or rejects the request.
4. If the request is accepted, the CA server grants the request. If it is rejected, the CA server replies with "Pending" status and the client retries the request after a fallback timer expires.
Configuration with CA Only
!CA server

radius server RADSRV
 address ipv4 10.10.20.30 auth-port 1812 acct-port 1813
 key cisco123

aaa group server radius RADSRV
 server name RADSRV

aaa authorization network SUDI group RADSRV

crypto pki server CA
 ! will grant certificate for requests signed by SUDI certificate automatically
 grant auto trustpoint SUDI
 issuer-name CN=ca.example.com
 hash sha256
 lifetime ca-certificate 7200
 lifetime certificate 3600

crypto pki trustpoint CA
 rsakeypair CA 2048

crypto pki trustpoint SUDI
 ! Need to import the SUDI CA certificate manually, for example with "crypto pki import" command
 enrollment terminal
 revocation-check none
 ! Authorize with Radius server
 authorization list SUDI
 ! SN extracted from cert will be used as username in access-request
 authorization username subjectname serialnumber
!CLIENT

crypto pki trustpoint FLEX
 enrollment profile PROF
 ! Serial-number, fqdn and ip-address fields need to be defined, otherwise the interactive prompt will prevent the process from starting automatically
 serial-number none
 fqdn none
 ip-address none
 ! Password needs to be specified to automate the process. However, it will not be used by CA server
 password 7 110A1016141D5A5E57
 subject-name CN=spoke.example.com
 revocation-check none
 rsakeypair FLEX 2048
 auto-enroll 85

crypto pki profile enrollment PROF
   ! CA server address
   enrollment url  http://192.0.2.1
   enrollment credential CISCO_IDEVID_SUDI

! By pre-importing CA cert you will avoid “crypto pki authenticate” step. If auto-enroll is configured, enrollment will also start automatically
crypto pki certificate chain FLEX
   certificate ca 01
  30820354 3082023C A0030201 02020101 300D0609 2A864886 F70D0101 04050030
  3B310E30 0C060355 040A1305 43697363 6F310C30 0A060355 040B1303 54414331
 ----- output truncated ----
  quit
RADIUS server:

The Radius needs to return Access-Accept with the following Cisco AV Pair to enable certificate enrollment:

pki:cert-application=all
Configuration with CA and RA
!CA server

crypto pki server CATEST
   issuer-name CN=CATEST.example.com,OU=TAC,O=Cisco
   ! will grant the requests coming from RA automatically
   grant ra-auto
crypto pki trustpoint CATEST
   revocation-check crl
   rsakeypair CATEST 2048
!RA server

radius server RADSRV
   address ipv4 10.10.20.30 auth-port 1812 acct-port 1813
   key cisco123

aaa group server radius RADSRV
   server name RADSRV

aaa authorization network SUDI group RADSRV

crypto pki server RA
   no database archive
   ! will forward certificate requests signed by SUDI certificate automatically
   grant auto trustpoint SUDI
   mode ra

crypto pki trustpoint RA
   ! CA server address
   enrollment url http://10.10.10.10
   serial-number none
   ip-address none
   subject-name CN=ra1.example.com, OU=ioscs RA, OU=TAC, O=Cisco
   revocation-check crl
   rsakeypair RA 2048

crypto pki trustpoint SUDI
   ! Need to import the SUDI CA certificate manually, for example with "crypto pki import" command
   enrollment terminal
   revocation-check none
   ! Authorize with Radius server
   authorization list SUDI
   ! SN extracted from cert will be used as username in access-request
   authorization username subjectname serialnumber
!CLIENT

crypto pki trustpoint FLEX
   enrollment profile PROF
   ! Serial-number, fqdn and ip-address fields need to be defined, otherwise the interactive prompt will prevent the process from starting automatically
   serial-number none
   fqdn none
   ip-address none
   ! Password needs to be specified to automate the process. However, it will not be used by CA server
   password 7 110A1016141D5A5E57
   subject-name CN=spoke.example.com
   revocation-check none
   rsakeypair FLEX 2048
   auto-enroll 85

crypto pki profile enrollment PROF
   ! RA server address
   enrollment url  http://192.0.2.1
   enrollment credential CISCO_IDEVID_SUDI


! By pre-importing CA cert you will avoid “crypto pki authenticate” step. If auto-enroll is configured, enrollment will also start automatically
crypto pki certificate chain FLEX
   certificate ca 01
  30820354 3082023C A0030201 02020101 300D0609 2A864886 F70D0101 04050030
  3B310E30 0C060355 040A1305 43697363 6F310C30 0A060355 040B1303 54414331
 ----- output truncated ----
  quit
RADIUS server:

The Radius needs to return Access-Accept with the following Cisco AV Pair to enable certificate enrollment:

pki:cert-application=all
Configurations/Template
This sample output shows an exemplary FlexVPN Remote Office configuration that is put on the flash drive in the usbflash0:/ciscortr.cfg file.
hostname client1
!
interface GigabitEthernet0
 ip address dhcp
!
crypto pki trustpoint client1
! CA Server's URL
 enrollment url http://10.122.162.242:80
! These fields needs to be filled, to avoid prompt while doing enroll
! This will differ if you use SUDI, please see above
serial-number none
 ip-address none
 password
 subject-name cn=client1.cisco.com ou=cisco ou
!
crypto pki certificate chain client1
 certificate ca 01
  ! CA Certificate here
        quit
!
crypto ikev2 profile default
 match identity remote any
 authentication remote rsa-sig
 authentication local rsa-sig
 pki trustpoint client1
 aaa authorization group cert list default default
!
interface Tunnel1
 ip unnumbered GigabitEthernet0
 tunnel source GigabitEthernet0
 tunnel mode ipsec ipv4
! Destination is Internet IP Address of VPN Hub
 tunnel destination 172.16.0.2
 tunnel protection ipsec profile default
!
event manager applet import-cert
! Start importing certificates only after 60s after bootup
! Just to give DHCP time to boot up
 event timer watchdog time 60
 action 1.0 cli command "enable"
 action 2.0 cli command "config terminal"
! Enroll spoke's certificate
 action 3.0 cli command "crypto pki enroll client1"
! After enrollement request is sent, remove that EEM script
 action 4.0 cli command "no event manager applet import-cert"
 action 5.0 cli command "exit"
event manager applet write-mem
 event syslog pattern "PKI-6-CERTRET"
 action 1.0 cli command "enable"
 action 2.0 cli command "write memory"
 action 3.0 syslog msg "Automatically saved configuration"
Verify
Use this section in order to confirm that your configuration works properly.
The Output Interpreter Tool (registered customers only) supports certain show commands. Use the Output Interpreter Tool in order to view an analysis of show command output.
You can verify on the Spoke if the tunnels went up:
client1#show crypto session
Crypto session current status

Interface: Tunnel1
Profile: default
Session status: UP-ACTIVE
Peer: 172.16.0.2 port 500
  Session ID: 1
  IKEv2 SA: local 172.16.0.1/500 remote 172.16.0.2/500 Active
  IPSEC FLOW: permit ip 0.0.0.0/0.0.0.0 0.0.0.0/0.0.0.0
        Active SAs: 2, origin: crypto map
You can also verify on the Spoke if the certificate was enrolled correctly:
client1#show crypto pki certificates
Certificate
  Status: Available
  Certificate Serial Number (hex): 06
  Certificate Usage: General Purpose
  Issuer:
    cn=CA
  Subject:
    Name: client1
    hostname=client1
    cn=client1.cisco.com ou=cisco ou
  Validity Date:
    start date: 01:34:34 PST Apr 26 2015
    end   date: 01:34:34 PST Apr 25 2016
  Associated Trustpoints: client1
  Storage: nvram:CA#6.cer

CA Certificate
  Status: Available
  Certificate Serial Number (hex): 01
  Certificate Usage: Signature
  Issuer:
    cn=CA
  Subject:
    cn=CA
  Validity Date:
    start date: 01:04:46 PST Apr 26 2015
    end   date: 01:04:46 PST Apr 25 2018
  Associated Trustpoints: client1
  Storage: nvram:CA#1CA.cer
Troubleshoot
There is currently no specific troubleshooting information available for this configuration.
Known Caveats and Issues
Cisco bug ID CSCuu93989 - Config Wizard Stops PnP flow on G2 platforms might cause the system not to load the configuration from the usbflash:/ciscortr.cfg. Instead the system might stop at the Config Wizard feature:
         --- System Configuration Dialog ---

Would you like to enter the initial configuration dialog? [yes/no]:
Note: Ensure that you use a version which contains a fix for this defect.
ZTD via USB vs Default Configuration Files
Note that the Default Configuration Files feature that this document uses is a different feature than Zero Touch Deployment via USB described in Overview of Cisco 800 Series ISR Deployment.
| - | Zero Touch Deployment via USB | Default Configuration Files |
| Supported Platforms |
Limited to only few 8xx routers. For details, see Overview of Cisco 800 Series ISR Deployment |
All ISRs G2, 43xx and 44xx. |
| Filename | *.cfg | ciscortr.cfg |
| Saves the configuration on local flash | Yes, automatically | No, Embedded Event Manager (EEM) required |
Because more platforms are supported by the Default Configuration Files feature, this technology was chosen for the solution presented in this article.
Summary
USB Default Configuration (with file name ciscortr.cfg from a USB flash drive) gives network administrators the ability to deploy Remote Office Spoke router VPNs (but not limited to just VPN) without the need to log into the device in the remote location.
Related Information
Contributed by Cisco Engineers
- Piotr KupisiewiczCisco TAC Engineer
 Feedback
Contact Cisco
- Open a Support Case

- (Requires a Cisco Service Contract)