Rebuild Your Catalyst SD-WAN Fabric
Available Languages
Download Options
Bias-Free Language
The documentation set for this product strives to use bias-free language. For the purposes of this documentation set, bias-free is defined as language that does not imply discrimination based on age, disability, gender, racial identity, ethnic identity, sexual orientation, socioeconomic status, and intersectionality. Exceptions may be present in the documentation due to language that is hardcoded in the user interfaces of the product software, language used based on RFP documentation, or language that is used by a referenced third-party product. Learn more about how Cisco is using Inclusive Language.
Contents
Introduction
This document describes how to rebuild a Cisco SD-WAN fabric, including backing up and restoring controller configurations for various deployments.
Prerequisites
Requirements
Cisco recommends that you have knowledge of these topics:
- Cisco Software-Defined Wide Area Network (SD-WAN)
- Cisco Software Central
- Download the Controllers software from software.cisco.com
Components Used
The information in this document was created from the devices in a specific lab environment. All of the devices used in this document started with a cleared (default) configuration. If your network is live, ensure that you understand the potential impact of any command.
Prerequisites Before Rebuilding the Fabric
- New set of system-ips,site-ids must be configured for the new fabric for the controllers
- Ensure firewall rules are in place to enable communication between the controllers and the Edges
- Note the neo4j(configuration-db) username and password (it must be the same on all vManage nodes in a cluster)
- Disable port-hop on all the edges
- Increase the graceful restart timers to 7 days
- Clear alarms in 3rdparty tools before migration
- Historical stats data (Alarms, Events, Device Stats, and so on) are lost unless there is a prior setup to export stats to an external server such asvAnalytics
- If Cloud OnRamp is configured, ensure you have reachability to the c8000v deployed in the cloud prior to the start of this activity
- If you have SDAVC enabled on old fabric ensure the new fabric has it enabled (for cluster, it needs to be enabled on a single node only)
- Configuration-db restoration is supported only on the same version as the orginal fabric
- Confirm the persona used for the controllers. We support on COMPUTE_DATA and DATA persona (details under each section)
- For Enterprise CA, need to use the root certificate issued by the Enterprise CA, which is used in existing overlay, and cert is signed using the enterprise CA server and installed for all controllers via UI
Deployment Options
vManage Deployment
- Standalone (1 node)
- Cluster (3-node or 6-node)
DR Options
- No DR
- Single Node DR
- Standby DR Cluster (Manual / Administer-triggered)

Note: For more details of type of disaster recovery refer to this link
Combinations:
| # | vManage Setup | DR Option |
|---|---|---|
| 1 | Standalone (1 node) | No DR |
| 2 | Standalone (1 node) | Single Node DR |
| 3 | Cluster (3-node or 6-node) | No DR |
| 4 | Cluster (3-node or 6-node) | Standby DR Cluster |
Common Steps Applicable to All Combinations
These steps are common to all deployment combinations. They cover the process of bringing up VM instances and applying basic CLI configuration. Each combination section tells you how many instances to deploy and which additional steps to complete.
Install and bring up SD-WAN Controllers (Manager, Validator, Controller)
Note: Cisco has rebranded certain terms, so these terms are interchangeable. Cisco vManage = Cisco Catalyst Manager, Cisco vBond = Cisco Catalyst Validator, Cisco vSmart = Cisco Catalyst Controller
Download the OVA files for SD-WAN controllers from the Cisco Software Download page here:
- Choose vEDGE Cloud and download the vBond OVA for the required software version.
- Choose vManage software and download the vManage OVA for the required software version.
- Choose vSmart software and download the vSmart OVA for the required software version.
Note: On the ESXi/cloud platforms, spin up vSmart, vBond and vManage Controllers using the OVA file. Refer to the linked document and make sure sufficient CPU, RAM and disks are allocated to all the controllers depending on the SD-WAN deployment type. Navigate here for additional information. Make sure to assign secondary disk to vManage node as mentioned in the column Storage Size* in the linked compute guide.
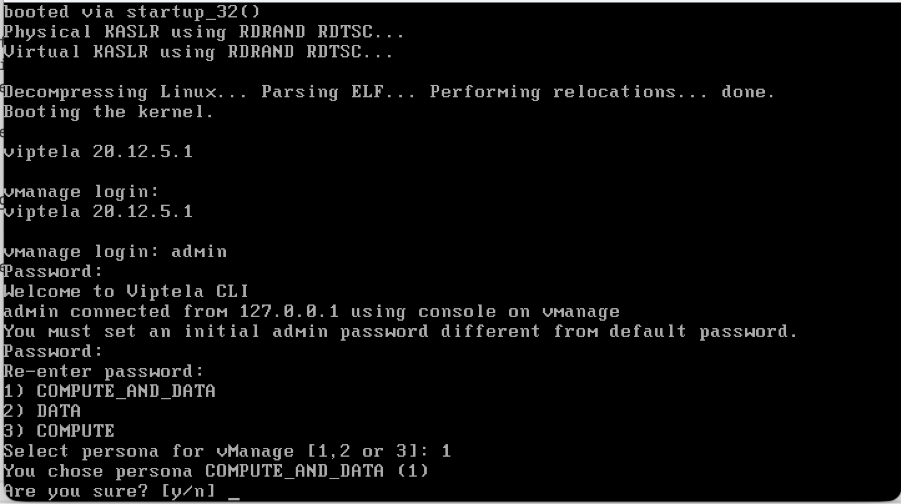
Bring up a Cisco Manager node
- Once the Cisco Manager or vManage VM is deployed and console of the manager is accessible, wait for the boot up to complete. One indication is we see a message system is ready and prompts for the username and password.
- Enter the default user credentials username as admin and password as admin. Post that it prompts the user to change the password, set the password that is needed for user admin as per your choice.
- It then prompts the user to select the persona. This is a critical step if the intention is to have a vManage cluster. Please choose the persona as per shown here scenarios:
For a standalone vManage, choose the persona as COMPUTE_AND_DATA.
For a 3 node cluster, on 3 vManage nodes, the persona is set to COMPUTE_AND_DATA.
For a 6 node cluster, on 3 vManage nodes the persona is COMPUTE_AND_DATA and on rest 3 vManage nodes persona DATA.
Example:Choose 1 for COMPUTE_AND_DATA
Choose the secondary disk as shown:
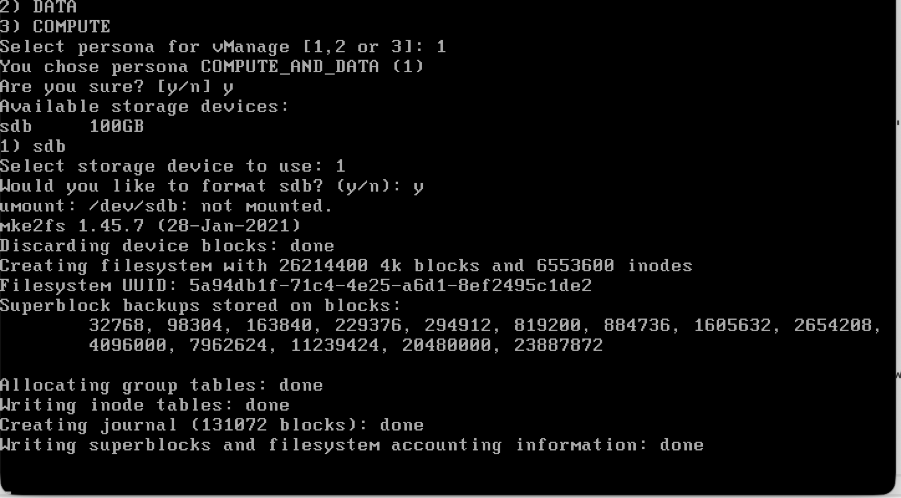
- Choose the secondary disk and type Y to confirm.
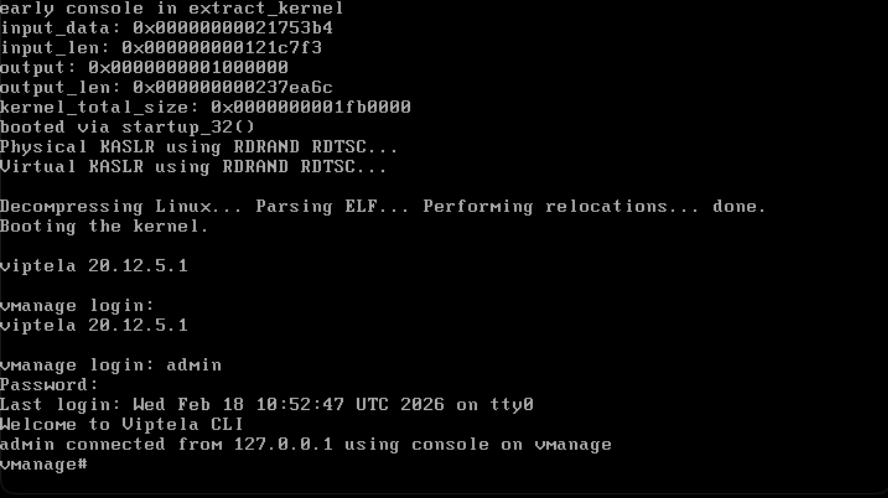
- Cisco Manager reloads. Once it boots up, enter the username and password with the new password that was newly configured.
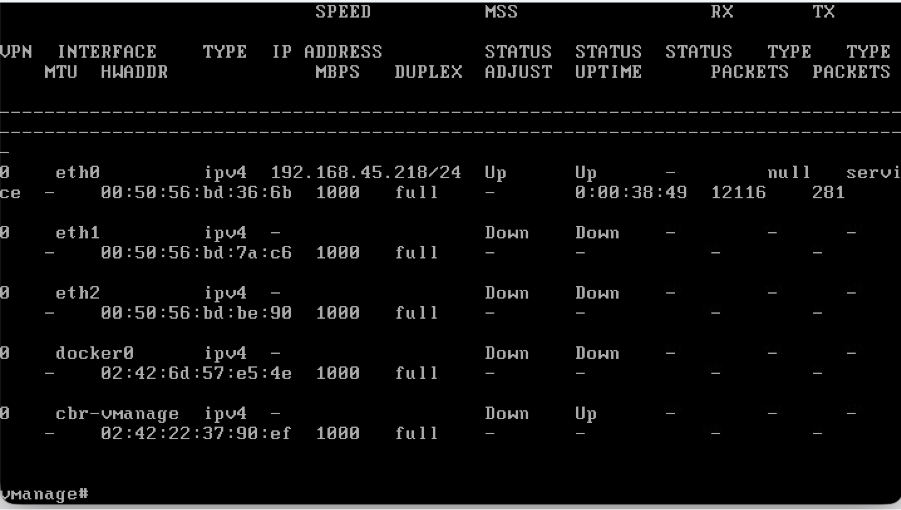
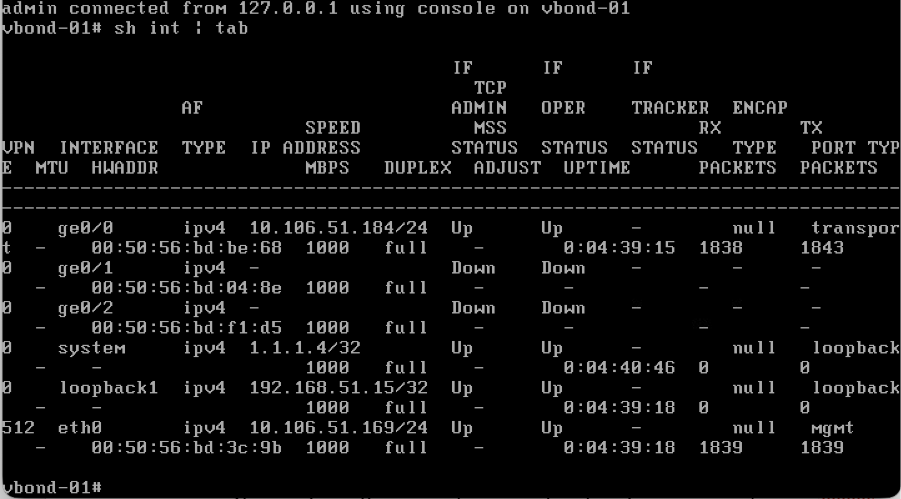
- You can configure VPN 512 management interface to enable out of band management access to the controller.
- Use the command show interface | tab to check the VPN’s to which interfaces are currently mapped to.
- configure the interfacesaccordingly.
Example
Note: You can refer to the configuration from the existing vManage and configure the same IP address scheme here.
Management Interface (VPN 512) configurations
- If an interface needs to be moved from VPN 0 to VPN 512, use these commands and then configure the IP address on the interface
Conf t
vpn 0
 no interface eth0
vpn 512
 interface eth0
  ip address <IP-address/mask>
  no shutdown
 !
 ip route 0.0.0.0/0 <default-gateway IP>
!
Bring up the Validator
- On the hypervisor, configure the required compute(CPU, RAM and disk) for the vBond node and power it on.
- Once the console is accessible, wait for the vBond to boot up fully. Wait for the message System Ready.
- The system then prompts for username and password. Enter the default user credentials username as admin and password as admin. After that it prompts the user to change the password, set the password that is needed for user admin as per your choice.
- You can configure VPN 512 management interface to enable out of band management access to the controller.
- Use the command show interface | tab to check the VPN’s to which interfaces are currently mapped to.
- Configure the interfaces accordingly.
Example:
Note: You can refer to the configuration from the existing vBond and configure the same configurations here.
Management Interface (VPN 512) configurations
- If an interface needs to be moved from VPN 0 to VPN 512, use these commands and then configure the IP address on the interface.
Conf t
vpn 0
 no interface eth0
vpn 512
 interface eth0
  ip address <IP-address/mask>
  no shutdown
 !
 ip route 0.0.0.0/0 <default-gateway IP>
!
commit
Bring up a Controller (vSmart) Node
- Perform the same steps as the Validator to bring up the vSmart node.
- Once VPN 512 IP address is configured on all the SD-WAN controllers, you can access them using SSH on the VPN 512 IP address.
Basic CLI Configuration on All Controllers
Once you have SSH access to all the controllers, configure these CLI configurations on each controller.
System Configuration
config t
system
 host-name             <hostname>
 system-ip             <unique system-IP>
 site-id               <site-id>
 organization-name     <organization name>
 vbond <IP address/URL of vBond>
commit
Note: If we are using URL as vBond address, make sure to configure DNS server IP addresses in VPN 0 configuration or ensure they can be resolved.
Transport Interface (VPN 0) Configuration
These configurations are needed on all the controllers to enable the transport interface used to establish control connections with the routers and the rest of the controllers.
config t
vpn 0
 dns <IP-address> primary
 dns <IP-address> secondary
 interface eth1
  ip address <IP-address/mask>
  tunnel-interface
   allow-service all
   allow-service dhcp
   allow-service dns
   allow-service icmp
   no allow-service sshd
   no allow-service netconf
   no allow-service ntp
   no allow-service stun
   allow-service https
  !
  no shutdown
 !
 ip route 0.0.0.0/0 <default-gateway IP>
commit
Note: You can refer to the configurations of your existing controller and if the config is present then you can add this configuration to the new controllers.
Configure the control protocol as TLS only if there is a requirement for routers to establish secure control connections with the vManage nodes using TLS. By default, all the controllers and routers establish control connection using DTLS. This is an optional config required only on vSmart and vManage nodes depending on you requirement.
Conf t
security
 control
  protocol tls
Commit
Combination 1: Standalone vManage + No DR
Instances needed:
- 1 vManage (COMPUTE_AND_DATA)
- 1 or more vBond
- 1 or more vSmart
Steps:
- Bring up all instances using the Common Steps
- Pre-Checks
- Configure vManage UI, Certificates, and Onboard Controllers
- Config-db backup/restore
- Post Checks
Step 1: Pre-Checks
-
Ensure that the number of the activeCisco SD-WAN Manager instances are identical to the number of the newly installedCisco SD-WAN Manager instances.
-
Ensure that all the active and new Cisco SD-WAN Manager instances run the same software version.
-
Ensure that all the active and new Cisco SD-WAN Manager instances are able to reach the management IP address of the Cisco SD-WAN Validator.
-
Ensure that certificates have been installed on the newly installed Cisco SD-WAN Manager instances.
-
Ensure that the clocks on all Cisco Catalyst SD-WAN devices, including the newly installed Cisco SD-WAN Manager instances, are synchronized.
-
Ensure that a new set of System IPs and Site IDs is configured on the newly installed Cisco SD-WAN Manager instances, along with the same basic configuration as the active cluster.
Step 2: Configure vManage UI, Certificates, and Onboard Controllers
Update the configurations on vManage UI
- Once the configurations in Step 1 are added on the CLI of all the controllers, we can access the webUI of vManage, using the URL https://<vmanage-ip> in your browser. Use the VPN 512 IP address of respective vManage nodes. You can log in with the admin username and password.
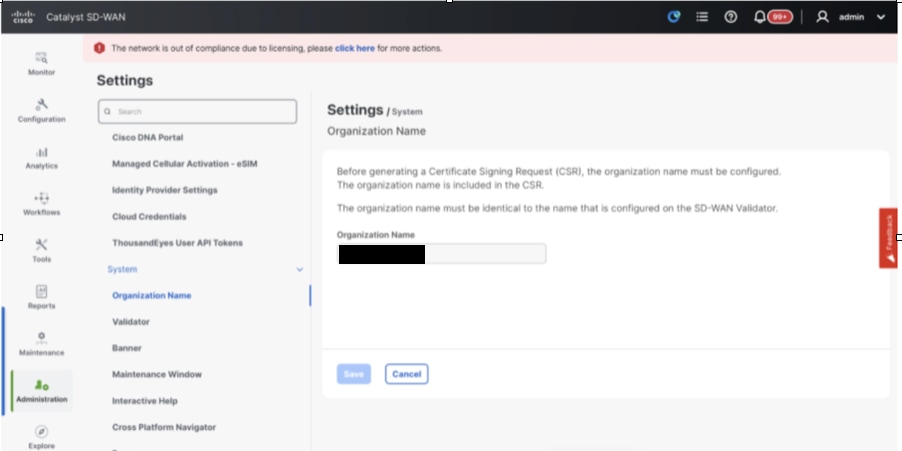
- Navigate to Administration > Settings and complete these steps.
- Configure Organization name and Validator/vBond URL/IP address. Configure the same value as in the CLI of the vManage node.
- In the vManage 20.15/20.18 these configurations are available under section System.


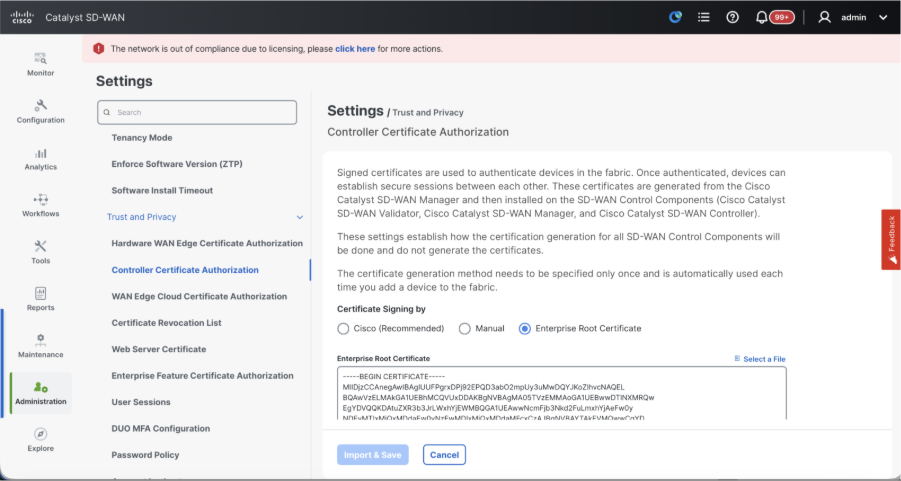
- Verify the configurations for Certificate Authorization(CA), which decides the Certificate Authority used for signing the certificates. We can see 3 options there:
- Hardware WAN Edge Certificate Authorization - Decides the CA for hardware SD-WAN Edge routers.
- On Box Certificate (TPM/SUDI Certificate) - With this option, the preinstalled certificate on the router hardware is used to establish the Control connections (TLS/DTLS connections)
- Enterprise Certificate (signed by Enterprise CA) - With this option, the routers use certificates signed by Enterprise certificate authority of your organization. While choosing this option, the root certificate of Enterprise CA must be updated here.

- Controller Certificate Authorization - Decides the CA for SD-WAN controllers.
- Cisco (Recommended) - Controllers use the certificates signed by Cisco PKI. vManage automatically contacts the PNP portal using the smart account credentials configured on the vManage and get the certificate signed and is installed on the controller.
- Manual - Controllers use the certificates signed by Cisco PKI. Manually sign the CSR using the Cisco PNP portal by navigating to smart account and virtual account of the respective SD-WAN overlay.
- Enterprise Root Certificate - With this option, the routers use certificates signed by Enterprise certificate authority of your organization. While choosing this option, the root certificate of Enterprise CA must be updated here.
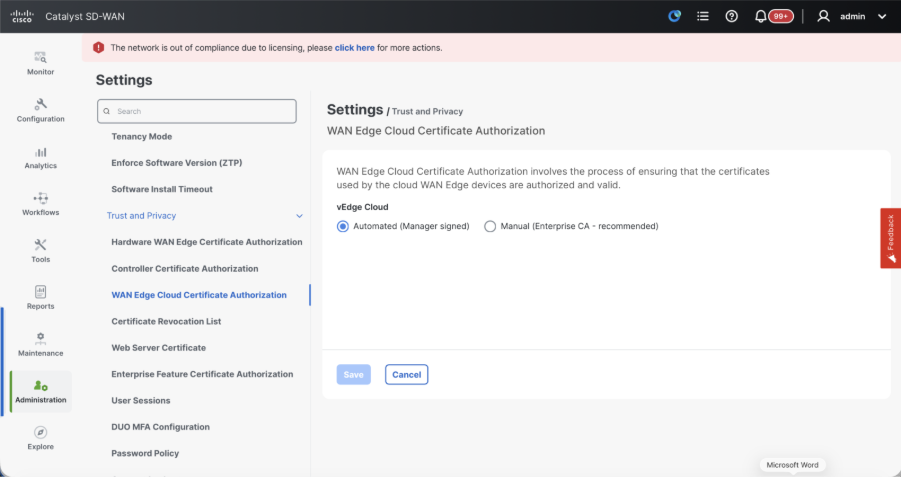
- WAN Edge Cloud Certificate Authorization - Decides the CA for virtual SD-WAN Edge routers (CSR1000v, C8000v, vEdge cloud)
- Automated (vManage signed) - vManage automatically signs the CSR for the virtual Edge routers and install the certificate on the router.
- Manual (Enterprise CA - recommended) - Virtual routers use certificates signed by Enterprise certificate authority of your organization. While choosing this option, the root certificate of Enterprise CA must be updated here.
In case, if we are using our own CA, Enterprise certificate authority, choose Enterprise.

- Navigate to Configuration > Certificates > Control Components in case of 20.15/20.18 vManage nodes. In case of 20.9/20.12 versions, Configuration > Devices > Controllers
- Click on ... for Manager/vManage and click on Generate CSR.

- Once the CSR is generated, you can download the CSR and get it signed based on the Certificate authority chosen for controllers. You can verify this configuration in Administration > Settings > Controller Certificate Authorization. If Cisco (Recommended) is chosen, then the CSR is automatically uploaded to the PNP portal by the vManage and once the certificate is signed, it is installed on the vManage automatically.
- If Manual is chosen, manually sign the CSR using the Cisco PNP portal by navigating to smart account and virtual account of the respective SD-WAN overlay. Once the certificate is available from PNP portal, click on install certificate on the same section of vManage and upload the certificate and install the certificate. Same procedure is applicable if we are using Digicert and Enterprise Root Certificate.
Onboarding vBond/Validator and vSmart/Controller to the vManage
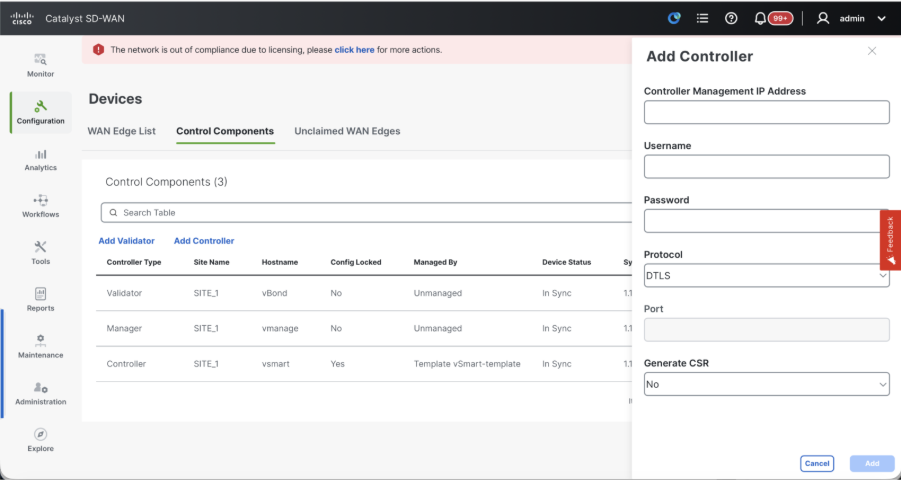
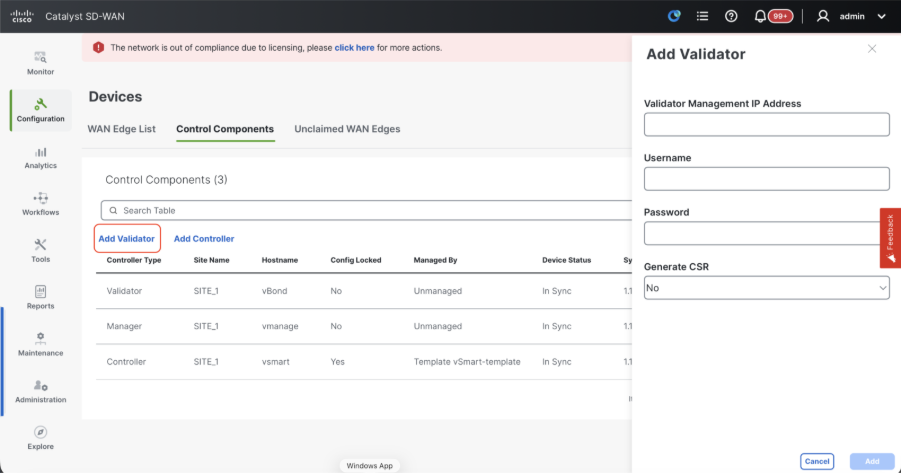
Navigate to Configuration > Devices > Control Components in case of 20.15/20.18 vManage nodes. In case of 20.9/20.12 versions, Configuration > Devices > Controllers
OnboardingvBond/Validator
- Click onAddvBondin caseof 20.12vManageorAdd Validatorin caseof 20.15/20.18vManage. A pop up opens, enter the VPN 0 transport IP of vBondwhich is reachable from thevManage.
- Check the reachability using ping if allowed from CLI of vManagetovBondIP.
- Enter the user credentials of vBond.
Note: We need to useadmin credentials ofvBondor a user part ofnetadmingroup. You can verify this in the CLI of thevBond. Choose Yes in the dropdown of“Generate CSR" if we need to install a new certificate forvBond.
Note: If the vBond is behind a NAT device/Firewall, check if the vBond VPN 0 interface IP is translated to a public IP. If VPN 0 interface IP is not reachable from vManage, use the public IP address of VPN 0 interface in this step.

- Once the CSR is generated, you can download the CSR and get it signed based on the Certificate authority chosen for controllers. You can verify this configuration in Administration > Settings > Controller Certificate Authorization. If Cisco (Recommended) is chosen, then the CSR is automatically uploaded to the PNP portal by the vManage and once the certificate is signed, it is installed on the vBond automatically.
- If Manual is chosen, manually sign the CSR using the Cisco PNP portal by navigating to smart account and virtual account of the respective SD-WAN overlay. Once the certificate is available from PNP portal, click on install certificate on the same section of vManage and upload the certificate and install the certificate. Same procedure is applicable if we are using Digicert and Enterprise Root Certificate.
- If there are multiple vBonds, repeat the same steps.
Onboarding vSmart/Controller
-
Click on Add vSmart in case of 20.12 vManage or Add Controller in case of 20.15/20.18 vManage.
-
A pop up opens, enter the VPN 0 transport IP of vSmart which is reachable from the vManage.
-
Check the reachability using ping if allowed from CLI of vManage to vSmart IP.
-
Enter the user credentials of vSmart Note that we need to use admin credentials of vSmart or a user part of netadmin group.
-
You can verify this in the CLI of the vSmart.
-
Set the protocol to TLS, if we intend to use TLS for routers to establish control connections with vSmart. This config needs to be configured on CLI of vSmarts and vManage nodes as well.
-
Choose Yes in the dropdown of "Generate CSR" if we need to install a new certificate for vSmart.
Note: If the vSmart is behind NAT device/Firewall, check if the vSmart VPN 0 interface IP is translated to a public IP, and if VPN 0 interface IP is not reachable from vManage, use public IP address of VPN 0 interface IP in this step.
- Once the CSR is generated, you can download the CSR and get it signed based on the Certificate authority chosen for controllers. You can verify this configuration in Administration > Settings > Controller Certificate Authorization. If Cisco (Recommended) is chosen, then the CSR is automatically uploaded to the PNP portal by the vManage and once the certificate is signed, it is installed on the vSmart automatically.
- If Manual is chosen, manually sign the CSR using the Cisco PNP portal by navigating to smart account and virtual account of the respective SD-WAN overlay. Same procedure is applicable if we are using Digicert and Enterprise Root Certificate.
- Once the certificate is available from PNP portal, click on install certificate on the same section of vManage and upload the certificate and install the certificate.
- If there are multiple vSmarts, repeat the same steps.
Verification
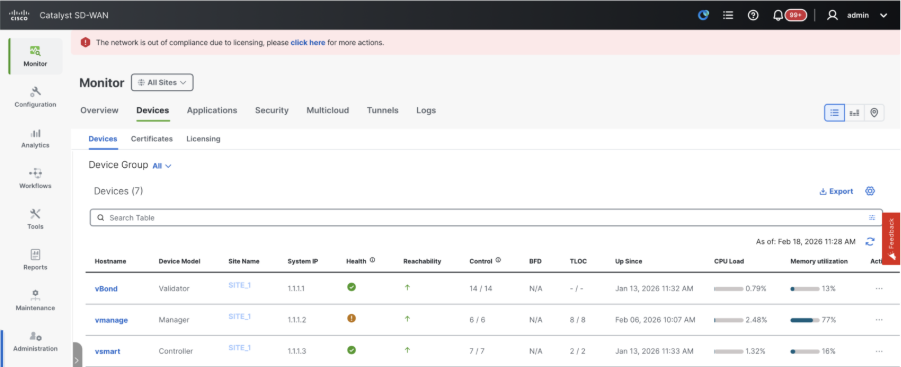
Once all the steps are completed, verify that all the control components are reachable in Monitor>Dashboard

- Click on the respective Control components and confirm that they are all reachable.
- Navigate to Monitor > Devices and confirm all the control components are reachable.

Step 3: Config-db Backup/Restore
Collect vManage configuration-db backup and restore on another vManage node
Collect Configuration-DB backup:
- In the SD-WAN fabric which is currently in use, you can generate configuration-db backup on both standalone vManage and vManage cluster setup’s.
- For standalone vManage, that vManage itself is the configuration-db leader.
Confirm the configuration-db is running on the vManage node.
You can verify the same using the command request nms configuration-db status onvManageCLI. The output is as shown
vmanage# request nms configuration-db status
NMS configuration database
        Enabled: true
        Status: running PID:32632 for 1066085s
        Native metrics status: ENABLED
        Server-load metrics status: ENABLED
vmanage#
Use this command to collect the configuration-db backup from the identified configuration-db leader vManage node.
request nms configuration-db backup path /opt/data/backup/<filename>
The expected output is as shown:
vmanage# request nms configuration-db backup path /opt/data/backup/june18th
Starting backup of configuration-db
config-db backup logs are available in /var/log/nms/neo4j-backup.log file
Successfully saved backup to /opt/data/backup/june18th.tar.gz
sha256sum: 8d0f5af8aee4e70f05e3858be6bdd5e6c136134ae47c383569ec883080f5d359
Removing the temp staging dir :/opt/data/backup/staging
vmanage#
- Make a note of the configuration-db credentials if it has been updated.
- If you are unaware of the configuration-db credentials, reach out to TAC to retrieve the configuration-db credentials from the existing vManage nodes.
- Default configuration-db credentials are username: neo4j and password: password
Restore Configuration-db Backup to another vManage node
Copy the configuration-db backup to /home/admin/ directory of vManage using SCP.
Sample scp command output:
XXXXXXXXX Downloads % scp june18th.tar.gz admin@10.66.62.27:/home/admin/
viptela 20.15.4.1

(admin@10.66.62.27) Password:
(admin@10.66.62.27) Password:
june18th.tar.gz                                                                                                                                                   0%  255KB  47.2KB/s - stalled -
To restore configuration-db backup, first we need to configure the configuration-db credentials. If your configuration-db credentials are default(neo4j/password), we can skip this step.
To configure configuration-db credentials, use the command request nms configuration-db update-admin-user. Use the username and password of your choice.
Kindly note that the Application server of vManage is restarted. Due to which vManage UI becomes inaccessible for a short time.
vmanage# request nms configuration-db update-admin-user
configuration-db
Enter current user name:neo4j
Enter current user password:password
Enter new user name:ciscoadmin
Enter new user password:ciscoadmin
WARNING: sun.reflect.Reflection.getCallerClass is not supported. This will impact performance.
Successfully updated configuration database admin user(this is service node, please repeat same operation on all service/data nodes)
Successfully restarted vManage Device Data Collector
Successfully restarted NMS application server
Successfully restarted NMS data collection agent
vmanage#
Post which we can proceed to retore the configuration-db backup:
We can use the command request nms configuration-db restore path /home/admin/< > to restore the configuration-db to the new vManage:
vmanage# request nms configuration-db restore path /home/admin/june18th.tar.gz
Starting backup of configuration-db
config-db backup logs are available in /var/log/nms/neo4j-backup.log file
Successfully saved database to /opt/data/backup/configdb-local-tmp-20230623-160954.tar.gz
Successfully backup database to /opt/data/backup/configdb-local-tmp-20230623-160954.tar.gz
Configuration database is running in a standalone mode
WARNING: sun.reflect.Reflection.getCallerClass is not supported. This will impact performance.
Successfully saved cluster configuration for localhost
Successfully saved vManage root CA information for device: "53f95156-f56b-472f-b713-d164561b25b7"
Stopping NMS application server on localhost
Stopping NMS configuration database on localhost
Reseting NMS configuration database on localhost
Loading NMS configuration database on localhost
Starting NMS configuration database on localhost
Waiting for 180s or the instance to start...
NMS configuration database on localhost has started.
Updating DB with the saved cluster configuration data
Successfully reinserted cluster meta information
Successfully reinserted vmanage root ca information
Starting NMS application server on localhost
Waiting for 180s for the instance to start...
Successfully restored database
Once the configuration-db is restored, make sure the vManage UI is accessible. Wait for around 5 minutes and then attempt to access the UI.
Once logged into UI successfully, ensure the Edge routers list, template, policies and all the rest of the configurations that were present on your previous or existing vManage UI is reflected on the new vManage UI.
Step 4: Reauthentication of Controllers and invalidation of old controllers
Once configuration-db is restored, we need to reauthenticate all the new controllers (vmanage/vsmart/vbond) in the fabric.
Note: In actual production if the interface IP used to re-authenticate is the tunnel interface IP, need to ensure NETCONF service is allowed on the tunnel interface of the vManage, vSmart and vBond and also on the firewalls along the path. The firewall port to open is TCP port 830 as bi-directional rule from DR cluster to all vBonds and vSmarts.
On vmanage UI, click on Configuration > Devices > Controllers
- Click the three dots near each controller and Click Edit

- Replace the ip-address (system-ip of the controller) with the transport vpn 0 (tunnel interface) ip address. Enter the username and password and click save
- Do the same for all the new controllers in the fabric
Sync the Root-cert-chain
Once all the controllers are onboarded, complete this step:
On any Cisco SD-WAN Manager server in the newly active cluster, perform these actions:
Enter this command to synchronize the root certificate with all Cisco Catalyst SD-WAN devices in the newly active cluster:
https://vmanage-url/dataservice/system/device/sync/rootcertchain
Enter this command to synchronize the Cisco SD-WAN Manager UUID with the Cisco SD-WAN Validator:
https://vmanage-url/dataservice/certificate/syncvbond
Once the fabric is restored and the control and bfd sessions are up for all edges and controlllers in the fabric,we need to invalidate the old controllers (vmanage/vsmart/vbond) from the UI
- On vmanage UI, click on Configuration > Certificates > Controllers
- Click on Controllers
- Click on the three dots in the right hand side of the controller(vmanage/vsmart/vbond) from the old fabric. Click invalidate
- Click send to vbond
- On vmanage UI, click on Configuration > Devices > Controllers
- Click on the three dotsin the right hand side of the controller(vmanage/vsmart/vbond) from the old fabric. Click Delete
Step 5: Post Checks
Note: Continue with the Post Checks section shown here, which is common to all deployment combinations.
Combination 2: Standalone vManage + Single Node DR
Instances needed:
- 1 vManage (primary, COMPUTE_AND_DATA)
- 1 vManage (DR standby, COMPUTE_AND_DATA)
- 1 or more vBond
- 1 or more vSmart
Steps:
- Bring up all instances using the Common Steps
- Pre-checks
- Configure vManage UI, Certificates, and Onboard Controllers
- Single Node DR Setup
- Config-db backup/restore
- Post Checks
Step 1: Pre-Checks
-
Ensure that the number of the active Cisco SD-WAN Managerinstances are identical to the number of the newly installed Cisco SD-WAN Managerinstances.
-
Ensure that all the active and new Cisco SD-WAN Manager instances run the same software version.
-
Ensure that all the active and new Cisco SD-WAN Manager instances are able to reach the management IP address of the Cisco SD-WAN Validator.
-
Ensure that certificates have been installed on the newly installed Cisco SD-WAN Manager instances.
-
Ensure that the clocks on all Cisco Catalyst SD-WAN devices, including the newly installed Cisco SD-WAN Manager instances, are synchronized.
-
Ensure that a new set of System IPs and Site IDs is configured on the newly installed Cisco SD-WAN Manager instances, along with the same basic configuration as the active cluster.
Step 2: Configure vManage UI, Certificates, and Onboard Controllers
Update the configurations on vManage UI
- Once the configurations in Step 1 are added on the CLI of all the controllers, we can access the webUI of vManage, using the URL https://<vmanage-ip> in your browser. Use the VPN 512 IP address of respective vManage nodes. You can log in with the admin username and password.
- Navigate to Administration > Settings and complete these steps.
- Configure Organization name and Validator/vBond URL/IP address. Configure the same value as in the CLI of the vManage node.
- In the vManage 20.15/20.18 these configurations are available under section System.

- Verify the configurations for Certificate Authorization(CA), which decides the Certificate Authority used for signing the certificates. We can see 3 options there:
- Hardware WAN Edge Certificate Authorization - Decides the CA for hardware SD-WAN Edge routers.
- On Box Certificate (TPM/SUDI Certificate) - With this option, the preinstalled certificate on the router hardware is used to establish the Control connections (TLS/DTLS connections)
- Enterprise Certificate (signed by Enterprise CA) - With this option, the routers use certificates signed by Enterprise certificate authority of your organization. While choosing this option, the root certificate of Enterprise CA must be updated here.

- Controller Certificate Authorization - Decides the CA for SD-WAN controllers.
- Cisco (Recommended) - Controllers use the certificates signed by Cisco PKI. vManage automatically contacts the PNP portal using the smart account credentials configured on the vManage and get the certificate signed and is installed on the controller.
- Manual - Controllers use the certificates signed by Cisco PKI. Manually sign the CSR using the Cisco PNP portal by navigating to smart account and virtual account of the respective SD-WAN overlay.
- Enterprise Root Certificate - With this option, the routers use certificates signed by Enterprise certificate authority of your organization. While choosing this option, the root certificate of Enterprise CA must be updated here.

- WAN Edge Cloud Certificate Authorization - Decides the CA for virtual SD-WAN Edge routers (CSR1000v, C8000v, vEdge cloud)
- Automated (vManage signed) - vManage automatically signs the CSR for the virtual Edge routers and install the certificate on the router.
- Manual (Enterprise CA - recommended) - Virtual routers use certificates signed by Enterprise certificate authority of your organization. While choosing this option, the root certificate of Enterprise CA must be updated here.
In case, if we are using our own CA, Enterprise certificate authority, choose Enterprise.
- Navigate to Configuration > Certificates > Control Components in case of 20.15/20.18 vManage nodes. In case of 20.9/20.12 versions, Configuration > Devices > Controllers
- Click on ... for Manager/vManage and click on Generate CSR.

- Once the CSR is generated, you can download the CSR and get it signed based on the Certificate authority chosen for controllers. You can verify this configuration in Administration > Settings > Controller Certificate Authorization. If Cisco (Recommended) is chosen, then the CSR is automatically uploaded to the PNP portal by the vManage and once the certificate is signed, it is installed on the vManage automatically.
- If Manual is chosen, manually sign the CSR using the Cisco PNP portal by navigating to smart account and virtual account of the respective SD-WAN overlay. Once the certificate is available from PNP portal, click on install certificate on the same section of vManage and upload the certificate and install the certificate. Same procedure is applicable if we are using Digicert and Enterprise Root Certificate.
Onboarding vBond/Validator and vSmart/Controller to the vManage
Navigate to Configuration > Devices > Control Components in case of 20.15/20.18 vManage nodes. In case of 20.9/20.12 versions, Configuration > Devices > Controllers
OnboardingvBond/Validator
- Click onAddvBondin caseof 20.12vManageorAdd Validatorin caseof 20.15/20.18vManage. A pop up opens, enter the VPN 0 transport IP of vBondwhich is reachable from the vManage.
- Check the reachability using ping if allowed from CLI of vManagetovBondIP.
- Enter the user credentials of vBond.
Note: We need to useadmin credentials ofvBondor a user part ofnetadmingroup. You can verify this in the CLI of thevBond. Choose Yes in the dropdown of“Generate CSR" if we need to install a new certificate forvBond
Note: If the vBond is behind a NAT device/Firewall, check if the vBond VPN 0 interface IP is translated to a public IP. If VPN 0 interface IP is not reachable from vManage, use the public IP address of VPN 0 interface in this step
- Once the CSR is generated, you can download the CSR and get it signed based on the Certificate authority chosen for controllers. You can verify this configuration in Administration > Settings > Controller Certificate Authorization. If Cisco (Recommended) is chosen, then the CSR is automatically uploaded to the PNP portal by the vManage and once the certificate is signed, it is installed on the vBond automatically.
- If Manual is chosen, manually sign the CSR using the Cisco PNP portal by navigating to smart account and virtual account of the respective SD-WAN overlay. Once the certificate is available from PNP portal, click on install certificate on the same section of vManage and upload the certificate and install the certificate. Same procedure is applicable if we are using Digicert and Enterprise Root Certificate.
- If there are multiple vBonds, repeat the same steps.
Onboarding vSmart/Controller
-
Click on Add vSmart in case of 20.12 vManage or Add Controller in case of 20.15/20.18 vManage.
-
A pop up opens, enter the VPN 0 transport IP of vSmart which is reachable from the vManage.
-
Check the reachability using ping if allowed from CLI of vManage to vSmart IP.
-
Enter the user credentials of vSmart Note that we need to use admin credentials of vSmart or a user part of netadmin group.
-
You can verify this in the CLI of the vSmart.
-
Set the protocol to TLS, if we intend to use TLS for routers to establish control connections with vSmart. This config needs to be configured on CLI of vSmarts and vManage nodes as well.
-
Choose Yes in the dropdown of "Generate CSR" if we need to install a new certificate for vSmart.
Note: If the vSmart is behind NAT device/Firewall, check if the vSmart VPN 0 interface IP is translated to a public IP, and if VPN 0 interface IP is not reachable from vManage, use public IP address of VPN 0 interface IP in this step.

- Once the CSR is generated, you can download the CSR and get it signed based on the Certificate authority chosen for controllers. You can verify this configuration in Administration > Settings > Controller Certificate Authorization. If Cisco (Recommended) is chosen, then the CSR is automatically uploaded to the PNP portal by the vManage and once the certificate is signed, it is installed on the vSmart automatically.
- If Manual is chosen, manually sign the CSR using the Cisco PNP portal by navigating to smart account and virtual account of the respective SD-WAN overlay. Same procedure is applicable if we are using Digicert and Enterprise Root Certificate.
- Once the certificate is available from PNP portal, click on install certificate on the same section of vManage and upload the certificate and install the certificate.
- If there are multiple vSmarts, repeat the same steps.
Verification
Once all the steps are completed, verify that all the control components are reachable in Monitor>Dashboard

- Click on the respective Control components and confirm that they are all reachable.
- Navigate to Monitor > Devices and confirm all the control components are reachable.
Step 3: Config-db Backup/Restore
Collect vManage configuration-db backup and restore on another vManage node
Note: While collecting configuration-database backup from the existing vManage node which has Disaster recovery enabled, make sure it is collected after the Disaster recovery on that node is paused and deleted.
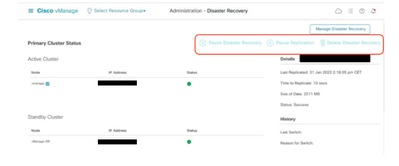
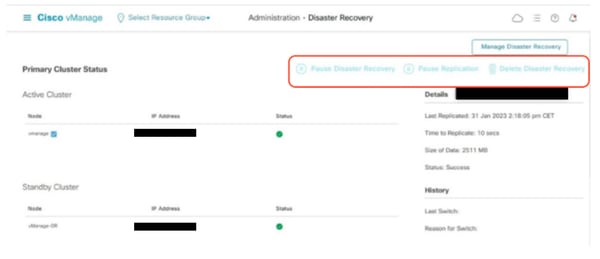
Confirm there is no ongoing Disaster recovery replication. Navigate to Administration > Disaster Recovery and make sure the status Success and not in a transient state such as Import Pending, Export Pending, or Download Pending. If the status is not success, reach out to Cisco TAC and make sure replication is successful before you proceed to pause the disaster recovery.
First Pause the disaster recovery and make sure the task is complete. And then Delete the Disaster recovery and confirm the task is completed.
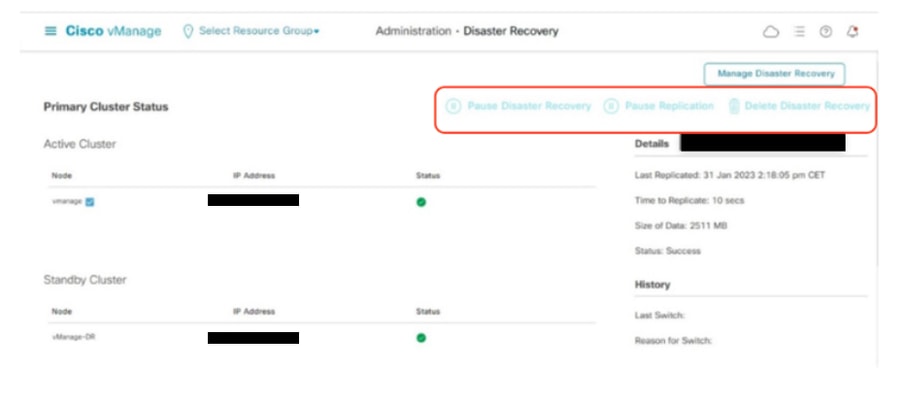
Reach out to Cisco TAC to ensure the Disaster Recovery is successfully cleaned up.
Collect Configuration-DB backup:
- In the SD-WAN fabric which is currently in use, you can generate configuration-db backup on both standalone vManage and vManage cluster setup’s.
- For standalone vManage, that vManage itself is the configuration-db leader.
Confirm the configuration-db is running on the vManage node.
You can verify the same using the commandrequest nms configuration-db statusonvManageCLI. The output is as shown
vmanage# request nms configuration-db status
NMS configuration database
        Enabled: true
        Status: running PID:32632 for 1066085s
        Native metrics status: ENABLED
        Server-load metrics status: ENABLED
vmanage#
Use this command to collect the configuration-db backup from the identified configuration-db leader vManage node.
request nms configuration-db backup path /opt/data/backup/<filename>
The expected output is as shown:
vmanage# request nms configuration-db backup path /opt/data/backup/june18th
Starting backup of configuration-db
config-db backup logs are available in /var/log/nms/neo4j-backup.log file
Successfully saved backup to /opt/data/backup/june18th.tar.gz
sha256sum: 8d0f5af8aee4e70f05e3858be6bdd5e6c136134ae47c383569ec883080f5d359
Removing the temp staging dir :/opt/data/backup/staging
vmanage#
- Make a note of the configuration-db credentials if it has been updated.
- If you are unaware of the configuration-db credentials, reach out to TAC to retrieve the configuration-db credentials from the existing vManage nodes.
- Default configuration-db credentials are username: neo4j and password: password
Restore Configuration-db Backup to another vManage node
Copy the configuration-db backup to /home/admin/ directory of vManage using SCP.
Sample scp command output:
XXXXXXXXX Downloads % scp june18th.tar.gz admin@10.66.62.27:/home/admin/
viptela 20.15.4.1

(admin@10.66.62.27) Password:
(admin@10.66.62.27) Password:
june18th.tar.gz                                                                                                                                                   0%  255KB  47.2KB/s - stalled -
To restore configuration-db backup, first we need to configure the configuration-db credentials. If your configuration-db credentials are default(neo4j/password), we can skip this step.
To configure configuration-db credentials, use the command request nms configuration-db update-admin-user.Use the username and password of your choice.
Kindly note that the Application server of vManage is restarted. Due to which vManage UI becomes inaccessible for a short time.
vmanage# request nms configuration-db update-admin-user
configuration-db
Enter current user name:neo4j
Enter current user password:password
Enter new user name:ciscoadmin
Enter new user password:ciscoadmin
WARNING: sun.reflect.Reflection.getCallerClass is not supported. This will impact performance.
Successfully updated configuration database admin user(this is service node, please repeat same operation on all service/data nodes)
Successfully restarted vManage Device Data Collector
Successfully restarted NMS application server
Successfully restarted NMS data collection agent
vmanage#
Post which we can proceed to retore the configuration-db backup:
We can use the command request nms configuration-db restore path /home/admin/< >to restore the configuration-db to the new vManage:
vmanage# request nms configuration-db restore path /home/admin/june18th.tar.gz
Starting backup of configuration-db
config-db backup logs are available in /var/log/nms/neo4j-backup.log file
Successfully saved database to /opt/data/backup/configdb-local-tmp-20230623-160954.tar.gz
Successfully backup database to /opt/data/backup/configdb-local-tmp-20230623-160954.tar.gz
Configuration database is running in a standalone mode
WARNING: sun.reflect.Reflection.getCallerClass is not supported. This will impact performance.
Successfully saved cluster configuration for localhost
Successfully saved vManage root CA information for device: "53f95156-f56b-472f-b713-d164561b25b7"
Stopping NMS application server on localhost
Stopping NMS configuration database on localhost
Reseting NMS configuration database on localhost
Loading NMS configuration database on localhost
Starting NMS configuration database on localhost
Waiting for 180s or the instance to start...
NMS configuration database on localhost has started.
Updating DB with the saved cluster configuration data
Successfully reinserted cluster meta information
Successfully reinserted vmanage root ca information
Starting NMS application server on localhost
Waiting for 180s for the instance to start...
Successfully restored database
Once the configuration-db is restored, make sure the vManage UI is accessible. Wait for around 5 minutes and then attempt to access the UI.
Once logged into UI successfully, ensure the Edge routers list, template, policies and all the rest of the configurations that were present on your previous or existing vManage UI is reflected on the new vManage UI.
Step 4: Single Node DR Setup
Refer to Step 2: Prechecks in Combination 2: Standalone vManage + Single Node DR and make sure we have completed all the requirements before we proceed to enable Disaster recovery.
Single Node DR
Prerequisites
- Ensure that the primary and the secondary node are reachable by HTTPS on a transport VPN (VPN 0).
- Ensure that the Cisco vManage primary node and secondary node are running the same Cisco vManage version.
Out-of-band cluster interface in VPN 0
- For each vManage instance within a cluster, a third interface (cluster link) is required besides the interfaces used for VPN 0 (transport) and VPN 512 (management).
- This interface is used for communication and syncing between the vManage servers within the cluster.
- This interface must be at least 1 Gbps and have a latency of 4ms or less. A 10 Gbps interface is recommended.
- Both vManage nodes must be able to reach each other through this interface: be it a layer 2 segment or through layer 3 routing.
- Ensure that all services (application-server, configuration-db, messaging server, coordination server, and statistics-db) are enabled on both Cisco vManage nodes.
- Distribute all controllers, including Cisco vBond Orchestrators, across both primary and secondary data centers. Ensure that these controllers are reachable by Cisco vManage nodes that are distributed across these data centers. The controllers connect only to the primary Cisco vManage node.
- Make sure that no other operations are in process in the active (primary) and the standby (secondary) Cisco vManage node. For example, make sure that no servers are in the process of upgrading or no templates are in the process of attaching templates to devices.
- Disable the Cisco vManage HTTP/HTTPS proxy server if it is enabled. If you do not disable the proxy server, Cisco vManage attempts to establish disaster recovery communication through the proxy IP address, even if Cisco vManage out-of-band cluster IP addresses are directly reachable. You can re-enable the Cisco vManage HTTP/HTTPS proxy server after disaster recovery registration completes.
- Before you start the disaster recovery registration process, go to the Tools → Rediscover Network window on the primary Cisco vManage node and rediscover the Cisco vBond Orchestrators.
Configuration
Configure the CLI configurations of all the vManage node which is acting as Disaster recovery node
The bare minimumconfiguration forvManageprior to the Disaster Recovery registration is as shown
config t
system
 host-name             <hostname>
 system-ip             <unique system-ip>
 site-id               <site-id>
 organization-name     <organization name>
 vbond <IP address/URL of vBond>
commit
Note: If we are using URL as vBond address, make sure to configure DNS server IP addresses in VPN 0 configuration or ensure they can be resolved.
These configurations are needed to enable transport interface used to establish control connections with the routers and rest of the controllers
config t
vpn 0
 dns <IP-address> primary
 dns <IP-address> secondary
 interface eth1
  ip address <IP-address/mask>
  tunnel-interface
   allow-service all
   allow-service dhcp
   allow-service dns
   allow-service icmp
   no allow-service sshd
   no allow-service netconf
   no allow-service ntp
   no allow-service stun
   allow-service https
  !
  no shutdown
 !
 ip route 0.0.0.0/0 <default-gateway IP>
commit
Also configure VPN 512management interfaceto enable out of band management access to the controller.
Conf t
vpn 512
 interface eth0
  ip address <IP-address/mask>
  no shutdown
 !
 ip route 0.0.0.0/0 <default-gateway IP>
!
commit
Configure service interface on the DR vManage
Configure service interface on the vManage node. This interface is used for DR communication,
conf t
 interface eth2
  ip address <IP-address/mask>
  no shutdown
commit
Make sure the same IP subnet is used for service interface on the Primary vManage and DR vManage
Update the configurations on vManage UI
- Once the configurations are added on the CLI of all the controllers, we can access the webUI of vManage, using the URL https://<vmanage-ip> in your browser. Use the VPN 512 IP address of respective vManage nodes. You can log in with the admin username and password.
- Navigate to Administration > Settings and complete these steps.
- Configure Organization name. Configure the same value as in the CLI of the vManage node.
- In the vManage 20.15/20.18 these configurations are available under section System.
Installing the Certificate on DR vManage
Proceed with the steps given under section Combination 2: Standalone vManage + Single Node DR Step 3: Configure vManage UI, Certificates, and Onboard Controllers to install the certificate on the Disaster recovery vManage.
Adding the Disaster Recovery Configuration
- For this, go to the primary vManage.
- Navigate to Administration → Cluster Management and indicate the IP address of the out-of-band interface after clicking on the three dots on the right side of the vManage entry and include username and password. It is recommended to create a separate local user for example dradmin on both primary and DR vmanage for this configuration.
- VManage reboots after this change.
- After the Primary vManage comes up, Navigate to Administration → Disaster Recovery. Click on ‘Manage Disaster Recovery’.
- In the pop-up window, fill the details for both primary and secondary vManage.
- The IP addresses to be indicated are the out-of-band cluster interfaces(eth2) IP addresses.
- The credentials must be those of a netadmin user (dradmin) and they must not be changed once the DR is configured. A separate vManage local user credential for Disaster recovery can be used. We need to make sure the vManage local user is part of netadmin group. Even admin credential can be used here.
-
Once filled, click ‘Next’.
-
Fill the vBond controllers’ details.
-
The vBond controllers must be reachable in the specified IP address via Netconf.
-
The credentials must be those of a netadmin user (dradmin) and they must not be changed once the DR is configured.
-
For this it is recommended that vBond have this dradmin user locally configured or you can use the admin user to add the vBond.
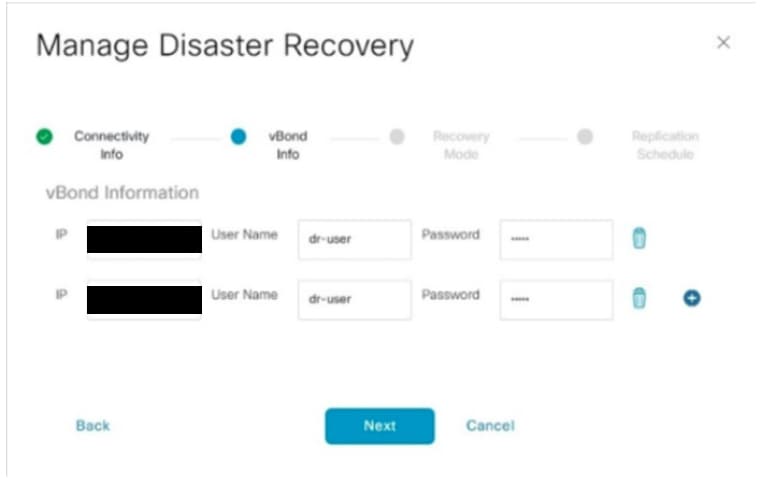
- Once filled, click ‘Next’.
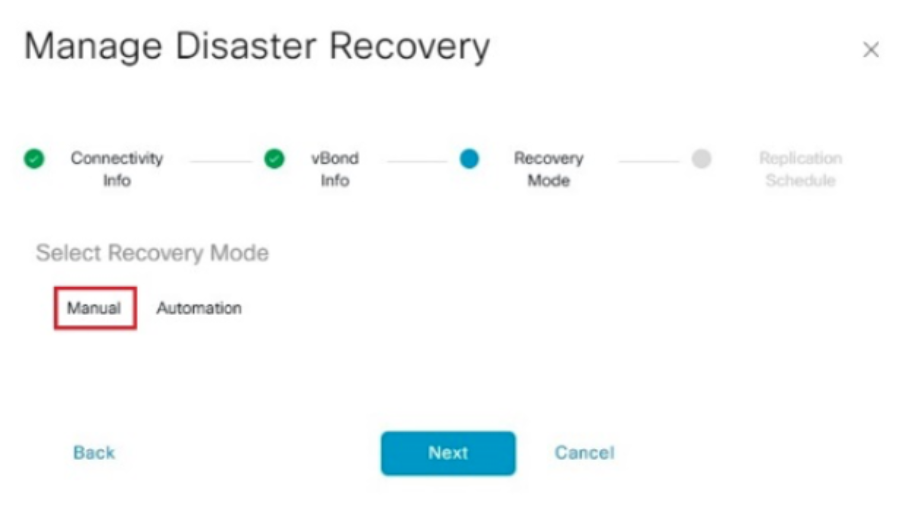
- In the Recovery Mode, choose ‘Manual’. Click ‘Next’.
In the Replication Schedule, set the ‘Replication Interval’.Every replication interval time, the data is replicated from primary vManageto secondary vManage. The minimum configurable value is 15 minutes.
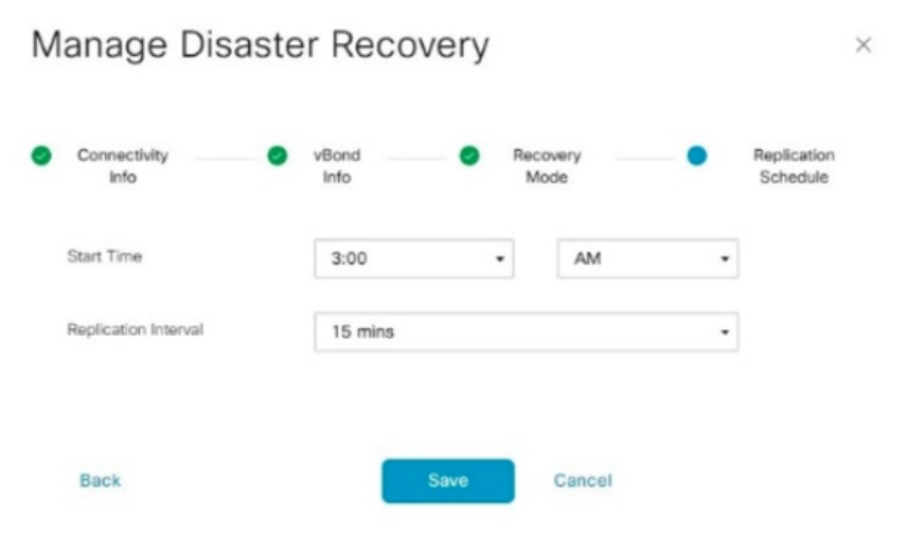
- Set the value and click ‘Save’.
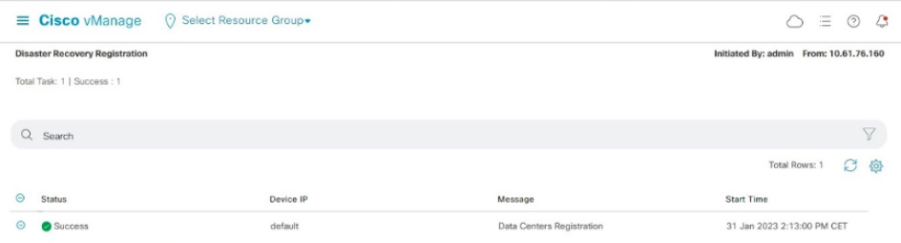
- The DR Registration starts now. Click on the refresh button to manually refresh the state and the progress logs. This process can take up to 20-30 minutes.
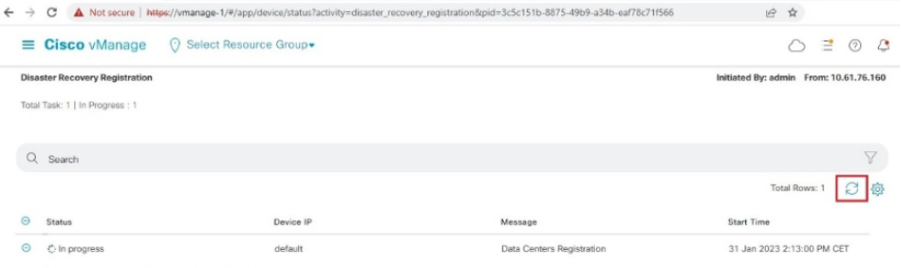
-
Note that the vManage GUI is restarted during this process.
-
Once finished, a status of Success must be seen.
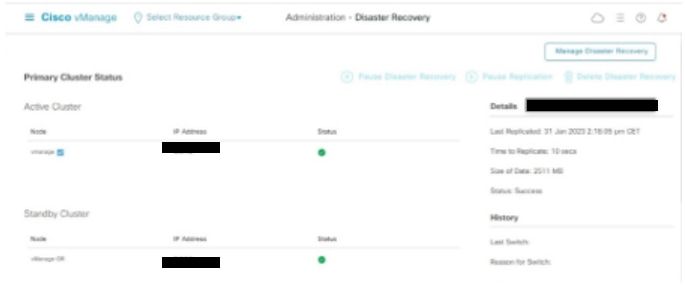
Verify
Navigate toAdministration → Disaster Recoveryto see the Disaster Recovery status and when the data was replicated last time.
Step 5: Reauthentication of Controllers and invalidation of old controllers
Once configuration-db is restored ,we need to reauthenticate all the new controllers (vmanage/vsmart/vbond) in the fabric
Note: In actual production if the interface IP used to re-authenticate is the tunnel interface IP, need to ensure NETCONF service is allowed on the tunnel interface of the vManage, vSmart and vBond and also on the firewalls along the path. The firewall port to open is TCP port 830 as bi-directional rule from DR cluster to all vBonds and vSmarts .
On vmanage UI,vclick on Configuration > Devices > Controllers
- Click the three dots near each controller and Click Edit

- Replace the ip-address (system-ip of the controller) with the transport vpn 0(tunnel interface) ip address .Enter the username and password and click save
- Do the same for all the new controllers in the fabric
Sync the Root-cert-chain
Once all the controllers are onboarded, complete this step:
On any Cisco SD-WAN Manager server in the newly active cluster, perform these actions:
Enter this command to synchronize the root certificate with all Cisco Catalyst SD-WAN devices in the newly active cluster:
https://vmanage-url/dataservice/system/device/sync/rootcertchain
Enter this command to synchronize the Cisco SD-WAN Manager UUID with the Cisco SD-WAN Validator:
https://vmanage-url/dataservice/certificate/syncvbond
Once the fabric is restored and the control and bfd sessions are up for all edges and controlllers in the fabric,we need to invalidate the old controllers (vmanage/vsmart/vbond) from the UI
- On vmanage UI, click on Configuration > Devices > Certificates
- Click on Controllers
- Click on the three dots near the controller(vmanage/vsmart/vbond) from the old fabric. Click invalidate
- Click send to vbond
- On vmanage UI, click on Configuration > Devices > Controllers
- Click on the three dots near the controller(vmanage/vsmart/vbond) from the old fabric. Click Delete
Step 6: Post Checks
Note: Continue with the Post Checks section shown here, which is common to all deployment combinations.
Combination 3: vManage Cluster + No DR
Instances needed:
- 3 vManage (3-node cluster, all COMPUTE_AND_DATA) or 6 vManage (3 COMPUTE_AND_DATA + 3 DATA)
- 1 or more vBond
- 1 or more vSmart
Steps:
- Bring up all instances using the Common Steps
- Pre-checks
- Configure vManage UI, Certificates, and Onboard Controllers
- Build vManage Cluster
- Config-db backup/restore
- Post Checks
Step 1: Pre-Checks
-
Ensure that the number of the active Cisco SD-WAN Managerinstances are identical to the number of the newly installed Cisco SD-WAN Managerinstances.
-
Ensure that all the active and new Cisco SD-WAN Manager instances run the same software version.
-
Ensure that all the active and new Cisco SD-WAN Manager instances are able to reach the management IP address of the Cisco SD-WAN Validator.
-
Ensure that certificates have been installed on the newly installed Cisco SD-WAN Manager instances.
-
Ensure that the clocks on all Cisco Catalyst SD-WAN devices, including the newly installed Cisco SD-WAN Manager instances, are synchronized.
-
Ensure that a new set of System IPs and Site IDs is configured on the newly installed Cisco SD-WAN Manager instances, along with the same basic configuration as the active cluster.
Step 2: Configure vManage UI, Certificates, and Onboard Controllers
Update the configurations on vManage UI
- Once the configurations in Step 1 are added on the CLI of all the controllers, we can access the webUI of vManage, using the URL https://<vmanage-ip> in your browser. Use the VPN 512 IP address of respective vManage nodes. You can log in with the admin username and password.
- Navigate to Administration > Settings and complete these steps.
- Configure Organization name and Validator/vBond URL/IP address. Configure the same value as in the CLI of the vManage node.
- In the vManage 20.15/20.18 these configurations are available under section System.


- Verify the configurations for Certificate Authorization(CA), which decides the Certificate Authority used for signing the certificates. We can see 3 options there:
- Hardware WAN Edge Certificate Authorization - Decides the CA for hardware SD-WAN Edge routers.
- On Box Certificate (TPM/SUDI Certificate) - With this option, the preinstalled certificate on the router hardware is used to establish the Control connections (TLS/DTLS connections)
- Enterprise Certificate (signed by Enterprise CA) - With this option, the routers use certificates signed by Enterprise certificate authority of your organization. While choosing this option, the root certificate of Enterprise CA must be updated here.

- Controller Certificate Authorization - Decides the CA for SD-WAN controllers.
- Cisco (Recommended) - Controllers use the certificates signed by Cisco PKI. vManage automatically contacts the PNP portal using the smart account credentials configured on the vManage and get the certificate signed and is installed on the controller.
- Manual - Controllers use the certificates signed by Cisco PKI. Manually sign the CSR using the Cisco PNP portal by navigating to smart account and virtual account of the respective SD-WAN overlay.
- Enterprise Root Certificate - With this option, the routers use certificates signed by Enterprise certificate authority of your organization. While choosing this option, the root certificate of Enterprise CA must be updated here.

- WAN Edge Cloud Certificate Authorization - Decides the CA for virtual SD-WAN Edge routers (CSR1000v, C8000v, vEdge cloud)
- Automated (vManage signed) - vManage automatically signs the CSR for the virtual Edge routers and install the certificate on the router.
- Manual (Enterprise CA - recommended) - Virtual routers use certificates signed by Enterprise certificate authority of your organization. While choosing this option, the root certificate of Enterprise CA must be updated here.
In case, if we are using our own CA, Enterprise certificate authority, choose Enterprise.

- Navigate to Configuration > Certificates > Control Components in case of 20.15/20.18 vManage nodes. In case of 20.9/20.12 versions, Configuration > Devices > Controllers
- Click on ... for Manager/vManage and click on Generate CSR.

- Once the CSR is generated, you can download the CSR and get it signed based on the Certificate authority chosen for controllers. You can verify this configuration in Administration > Settings > Controller Certificate Authorization. If Cisco (Recommended) is chosen, then the CSR is automatically uploaded to the PNP portal by the vManage and once the certificate is signed, it is installed on the vManage automatically.
- If Manual is chosen, manually sign the CSR using the Cisco PNP portal by navigating to smart account and virtual account of the respective SD-WAN overlay. Once the certificate is available from PNP portal, click on install certificate on the same section of vManage and upload the certificate and install the certificate. Same procedure is applicable if we are using Digicert and Enterprise Root Certificate.
Onboarding vBond/Validator and vSmart/Controller to the vManage
Navigate to Configuration > Devices > Control Components in case of 20.15/20.18 vManage nodes. In case of 20.9/20.12 versions, Configuration > Devices > Controllers
OnboardingvBond/Validator
- Click onAddvBondin caseof 20.12vManageorAdd Validatorin caseof 20.15/20.18vManage. A pop up opens, enter the VPN 0 transport IP of vBondwhich is reachable from the vManage.
- Check the reachability using ping if allowed from CLI of vManagetovBondIP.
- Enter the user credentials of vBond.
Note: We need to useadmin credentials ofvBondor a user part ofnetadmingroup. You can verify this in the CLI of thevBond. Choose Yes in the dropdown of“Generate CSR" if we need to install a new certificate forvBond
Note: If the vBond is behind a NAT device/Firewall, check if the vBond VPN 0 interface IP is translated to a public IP. If VPN 0 interface IP is not reachable from vManage, use the public IP address of VPN 0 interface in this step

- Once the CSR is generated, you can download the CSR and get it signed based on the Certificate authority chosen for controllers. You can verify this configuration in Administration > Settings > Controller Certificate Authorization. If Cisco (Recommended) is chosen, then the CSR is automatically uploaded to the PNP portal by the vManage and once the certificate is signed, it is installed on the vBond automatically.
- If Manual is chosen, manually sign the CSR using the Cisco PNP portal by navigating to smart account and virtual account of the respective SD-WAN overlay. Once the certificate is available from PNP portal, click on install certificate on the same section of vManage and upload the certificate and install the certificate. Same procedure is applicable if we are using Digicert and Enterprise Root Certificate.
- If there are multiple vBonds, repeat the same steps.
Onboarding vSmart/Controller
-
Click on Add vSmart in case of 20.12 vManage or Add Controller in case of 20.15/20.18 vManage.
-
A pop up opens, enter the VPN 0 transport IP of vSmart which is reachable from the vManage.
-
Check the reachability using ping if allowed from CLI of vManage to vSmart IP.
-
Enter the user credentials of vSmart Note that we need to use admin credentials of vSmart or a user part of netadmin group.
-
You can verify this in the CLI of the vSmart.
-
Set the protocol to TLS, if we intend to use TLS for routers to establish control connections with vSmart. This config needs to be configured on CLI of vSmarts and vManage nodes as well.
-
Choose Yes in the dropdown of "Generate CSR" if we need to install a new certificate for vSmart.
Note: If the vSmart is behind NAT device/Firewall, check if the vSmart VPN 0 interface IP is translated to a public IP, and if VPN 0 interface IP is not reachable from vManage, use public IP address of VPN 0 interface IP in this step.

- Once the CSR is generated, you can download the CSR and get it signed based on the Certificate authority chosen for controllers. You can verify this configuration in Administration > Settings > Controller Certificate Authorization. If Cisco (Recommended) is chosen, then the CSR is automatically uploaded to the PNP portal by the vManage and once the certificate is signed, it is installed on the vSmart automatically.
- If Manual is chosen, manually sign the CSR using the Cisco PNP portal by navigating to smart account and virtual account of the respective SD-WAN overlay.
- Once the certificate is available from PNP portal, click on install certificate on the same section of vManage and upload the certificate and install the certificate.
- Same procedure is applicable if we are using Digicert and Enterprise Root Certificate.
- If there are multiple vSmarts, repeat the same steps.
Verification
Once all the steps are completed, verify that all the control components are reachable in Monitor>Dashboard

- Click on the respective Control components and confirm that they are all reachable.
- Navigate to Monitor > Devices and confirm all the control components are reachable.

Step 3: Build vManage Cluster
Onboard SD-WAN Fabric with a vManage Cluster in the SD-WAN overlay
Note: vManage Cluster can be configured with 3 vManage nodes or 6 vManage nodes depending on the number of sites onboarded to SD-WAN fabric. Kindly refer to your existing vManage cluster and choose the number of nodes as per the same.
Configure the CLI configurations of all the vManage nodes which is part of the cluster
Configure System config on all vManage nodes
- Configure the rest of the vManage nodes. In case of 3 node cluster, you has remaining 2 nodes to configure, in case of 6 node cluster you has 5 nodes to configure.
- Configure System configurations as shown:
config t
system
 host-name             <hostname>
 system-ip             <unique system-ip>
 site-id               <site-id>
 organization-name     <organization name>
 vbond <IP address/URL of vBond>
commit
Note: If we are using URL as vBond address, make sure to configure DNS server IP addresses in VPN 0 configuration or ensure they can be resolved.
Configure Transport interface on all vManage nodes
These configurations are needed to enable the transport interface used to establish control connections with the routers and rest of the controllers.
config t
vpn 0
 dns <IP-address> primary
 dns <IP-address> secondary
 interface eth1
  ip address <IP-address/mask>
  tunnel-interface
   allow-service all
   allow-service dhcp
   allow-service dns
   allow-service icmp
   no allow-service sshd
   no allow-service netconf
   no allow-service ntp
   no allow-service stun
   allow-service https
  !
  no shutdown
 !
 ip route 0.0.0.0/0 <default-gateway IP>
commit
Configure Management interface on all vManage nodes
Also configure VPN 512management interfaceto enable out of band management access to the controller.
Conf t
vpn 512
 interface eth0
  ip address <IP-address/mask>
  no shutdown
 !
 ip route 0.0.0.0/0 <default-gateway IP>
!
Commit
Optional Config:
- You can refer to the configurations of your existing controller and if the config listed here is present, you can add this configuration to the new controllers.
- Configure the control protocol as TLS only if there is a requirement for routers to establish secure control connections with the vManage nodes using TLS. By default, all the controllers and routers establish control connection using DTLS. This is an optional config required only on vSmart and vManage nodes depending on you requirement.
Conf t
security
 control
  protocol tls
commit
Configure service interface on all vManage nodes
Configure service interface on all thevManagenodes including vManage-1 which has been onboarded already. This interface is used for cluster communication, meaning communication between thevManagenodes in the cluster.
conf t
 interface eth2
  ip address <IP-address/mask>
  no shutdown
commit
Make sure thesame IP subnet is used for service interface across all the nodesin thevManagecluster.
Configure cluster credentials
We can use the same admin credentials of thevManagenodes to configure thevManagecluster. Else we can configure a new user credential which is part ofnetadmingroup. The configurations to configure new user credential is as shown
conf t
system
 aaa
  user <username>
   password <password>
   group    netadmin
commit
Make sure toconfigure the same user credentials across all the vManagenodeswhich is part of the cluster.If we decide to use admin credentials, it must be the same username/password across all the vManagenodes.
Install device certificate on all vManage nodes
- Login tovManageUI of all thevManagenodes using the URL https://<vmanage-ip>in your browser. Use the VPN 512 IP address of respective vManagenodes. You can log in with the admin username and password.
-
Navigate to Configuration > Certificates > Control Components in case of 20.15/20.18 vManage nodes. In case of 20.9/20.12 versions, Configuration > Devices > Controllers
Click on ... for Manager/vManage and click on Generate CSR.

-
Once the CSR is generated, you can download the CSR and get it signed based on the Certificate authority chosen for controllers. You can verify this configuration in Administration > Settings > Controller Certificate Authorization. If Cisco (Recommended) is chosen, then the CSR is automatically uploaded to the PNP portal by the vManage and once the certificate is signed, it is installed on the vManage automatically.
-
If Manual is chosen, manually sign the CSR using the Cisco PNP portal by navigating to smart account and virtual account of the respective SD-WAN overlay. Same procedure is applicable if we are using Digicert and Enterprise Root Certificate.
-
Once the certificate is available from PNP portal, click on install certificate on the same section of vManage and upload the certificate and install the certificate.
-
Complete this step across all the vManage nodes which is part of the cluster.
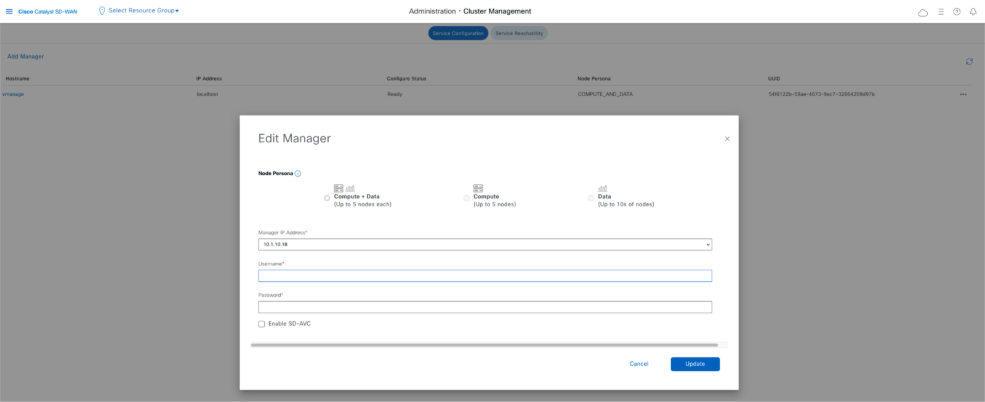
Prepare to build the vManage Cluster
- On the webUI of vManage-1, navigate to Administration > Cluster Management, click on ... under Actions for vManage-1, choose Edit.
- The node persona is chosen automatically based on the persona we chose while the VM was spun up.
Note: For a 3-node cluster, all 3 vManage nodes are brought up with compute+data as the persona.
- For a 6 node cluster, 3 vManage nodes are brought up with compute+data as the persona and 3 vManage nodes are brought up with data as the persona.
- From the dropdown for Manager IP address, make sure to choose service interface IP of the vManage.
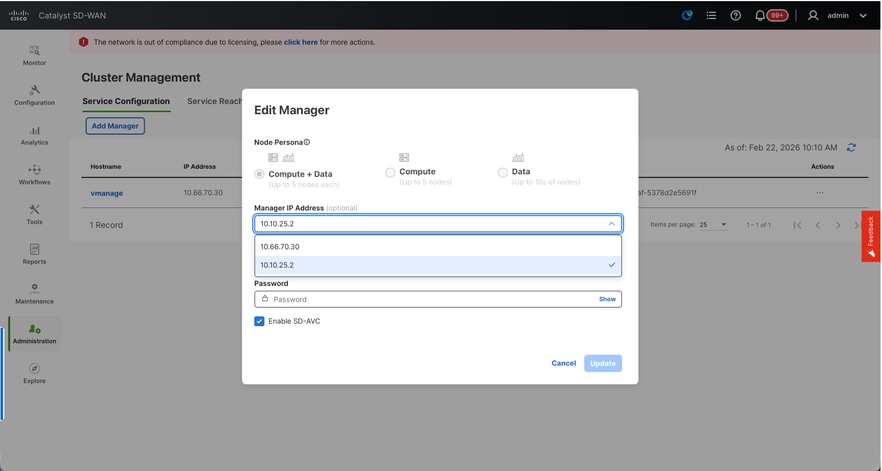
- Enter the username and password which we desire to use to enable vManage cluster which is referred as cluster credentials.
- As mentioned earlier, same credentials must be configured on all the vManage nodes and must be used while adding all the nodes to the cluster.
Note: Please refer to this configuration in your existing cluster to Enable SDAVC- Need to be checked only if it is required and is needed only on one vManage node of the cluster.
Click on Update.
- Post this, the vManage NMS services restarts in the background and the UI is not available for a few minutes of around 5 to 10 minutes. During this time, CLI access of vManage is available.
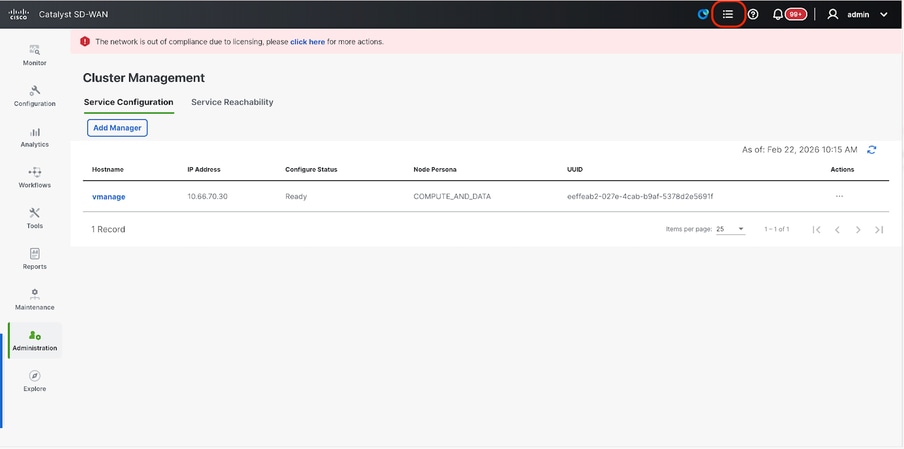
- Once the vManage-1 UI is accessible navigate to Administration > Cluster Management, make sure service interface IP of vManage is reflected under IP address,Configure Status is Ready and node persona is reflected correctly.
- Switch to Service reachability section in the same page and make sure all services are reachable.
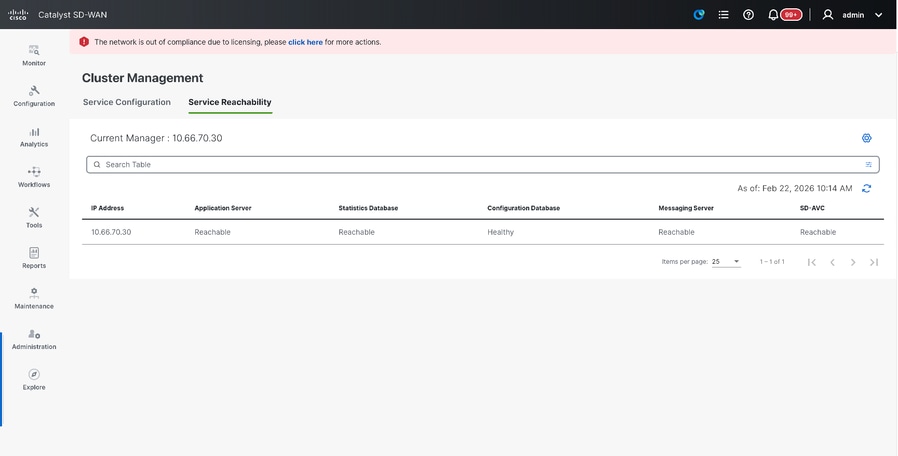
- If we see any of the services are not reachable yet, please wait. Usually takes around 20 to 30 minutes.
Build the vManage Cluster
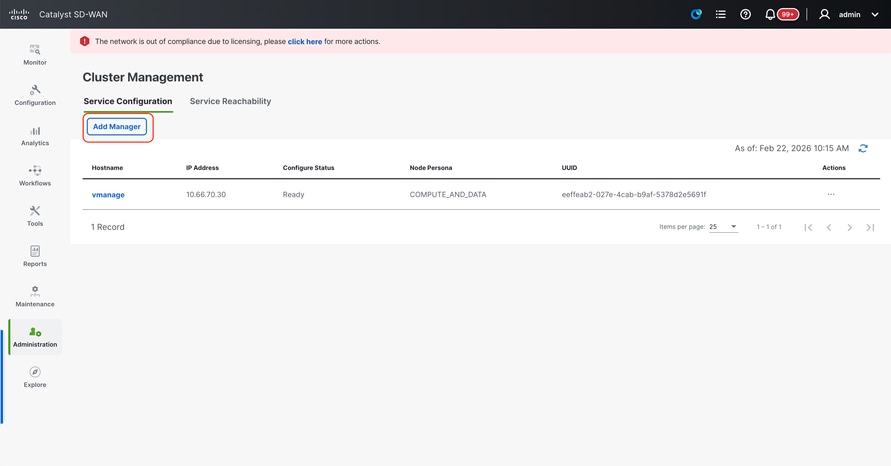
- On the webUI of vManage-1, navigate to Administration > Cluster Management, in the section Service Configuration,
- Click on Add Manager, a pop-up window appears:
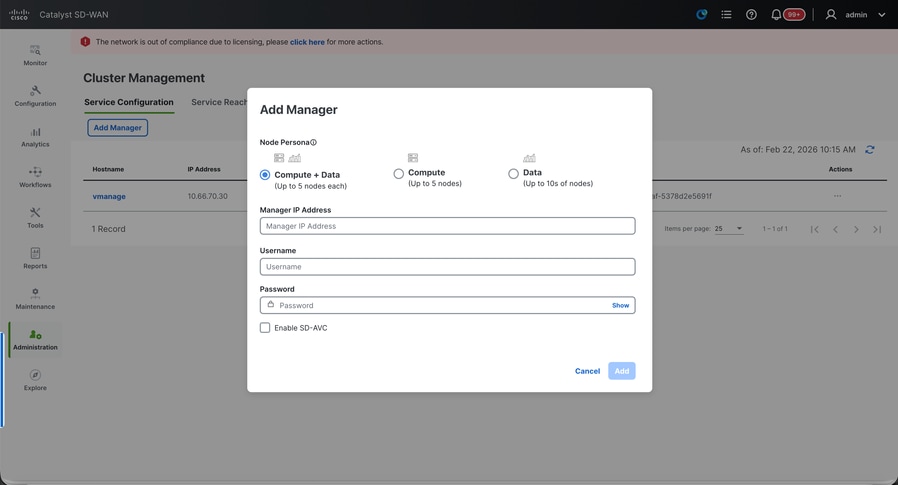
- Choose the Node persona based on the persona configurations done while the vManage – 2 node was spun up.
- Enter the service interface IP of vManage-2 under Manager IP address
- Enter the username and password, which is the same credentials as we used in Step 6.
- Enable SDAVC - To be left unchecked as we would have enabled it already on vManage-1
- Click on Add.
- Post this, the vManage NMS services restarts in the background for vManage 1 and 2 nodes. The UI is not available for a few minutes of around 5 to 10 minutes for vManage 1 and 2.
- During this time, CLI access of vManage 1 and 2 is available.
- Once the vManage-1 UI is accessible navigate to Administration > Cluster Management, make sure service interface IP of both the vManage is reflected under IP address, Configure Status is Ready and node persona is reflected correctly.
- Switch to Service reachability section in the same page and make sure all services are reachable for both the vManage nodes.
- If we see any of the services are not reachable yet, please wait. Usually takes around 5 to 10 minutes.
- You can check the status of cluster add process in the Task-list available on the top right corner of the vManage UI.
- You can look up for Active task list and if the task is still listed under Active task list, it indicates the task is not completed yet.
- You can click on the task to check the progress of the same. If the task is not listed under Active task list, switch to Completed and make sure the task is successfully completed.
- Only after these points are validated proceed to next step.
These points need to be taken into consideration before adding the next node to the cluster:
Please verify these points on all the UIs of the vManage nodes that are added to cluster so far:
- Navigate to Monitor > Overview of vManage UI and make sure the number of vManage nodes are reflected correctly and are seen reachable depending on the number of the nodes added to the cluster.
- Navigate to Administration > Cluster Management and make sure service interface IP of both the vManage is reflected under IP address, Configure Status is Ready and node persona is reflected correctly.
- Switch to Service reachability section in the same page and make sure all services are reachable for both the vManage nodes.
- Each time, a node is added to the cluster, the NMS services of all the nodes in the cluster is restarted hence the UI of all those nodes becomes unreachable for some time.
- Depending on the number of the nodes in the cluster, it can take a longer time for the UI to be back up and all the services to be reachable.
- You can monitor the task under Task-list available on the top right corner of the vManage UI.
- On the vManage UI of each of node added to the cluster, we need to see all the routers, templates and policies if they were available in vManage-1.
- If those configurations were not present on vManage-1, the vBonds and vSmarts that were added to vManage-1 and also Administration > Settings configurations for Organization-name, vBond, Certificate Authorization must be reflected on rest of the vManage nodes added to the cluster.
- Repeat the same steps for the rest of the vManage nodes.
Once all the controllers are onboarded, complete this step:
Step 4: Config-db Backup/Restore
Collect vManage configuration-db backup and restore on another vManage node
Note: While collecting configuration-database backup from the existing vManage cluster which has Disaster recovery enabled, make sure it is collected after the Disaster recovery on that node is paused and deleted.
Confirm there is no ongoing Disaster recovery replication. Navigate to Administration > Disaster Recovery and make sure the status Success and not in a transient state such as Import Pending, Export Pending, or Download Pending. If the status is not success, reach out to Cisco TAC and make sure replication is successful before you proceed to pause the disaster recovery.
First Pause the disaster recovery and make sure the task is complete. And then Delete the Disaster recovery and confirm the task is completed.
Reach out to Cisco TAC to ensure the Disaster Recovery is successfully cleaned up.
Collect Configuration-DB backup:
- In the SD-WAN fabric which is currently in use, you can generate configuration-db backup from vManage cluster.
- Kindly note that we must generate configuration-db backup only on one node of the vManage cluster which is the configuration-db leader.
- For standalone vManage, that vManage itself is the configuration-db leader.
- In vManage cluster, identify the configuration-db leader node using the command request nms configuration-db diagnostics.You can run this command on all the nodes of the 3 node vManage cluster.
- In a 6 node cluster, make sure to run this command on the vManage nodes where configuration-db is enabled to identify the leader node. Navigate to Administration > Cluster Management to verify the same:
- As we see in the screenshot, the nodes configured with persona COMPUTE_AND_DATA have configuration-db running.
You can verify the same using the command requestnmsconfiguration-dbstatus on vManageCLI. The output is as shown
vmanage# request nms configuration-db status
NMS configuration database
        Enabled: true
        Status: running PID:32632 for 1066085s
        Native metrics status: ENABLED
        Server-load metrics status: ENABLED
vmanage#
- Once you execute the commandrequest nms configuration-db diagnostics on these nodes, the output is as shown:
- Look for the highlighted field for “IsLeader”. If it is set to 1, it indicates that node is the leader node and we can collect configuration-db backup from it.
vManage-3# request nms configuration-db diagnostics
NMS configuration database
Checking cluster connectivity for ports 7687,7474 ...
Pinging vManage  node 0 on 169.254.1.5:7687,7474...
Starting Nping 0.7.80 ( https://nmap.org/nping ) at 2026-02-18 12:41 UTC
SENT (0.0013s) Starting TCP Handshake > 169.254.1.5:7474
RCVD (0.0022s) Handshake with 169.254.1.5:7474 completed
SENT (1.0024s) Starting TCP Handshake > 169.254.1.5:7687
RCVD (1.0028s) Handshake with 169.254.1.5:7687 completed
SENT (2.0044s) Starting TCP Handshake > 169.254.1.5:7474
RCVD (2.0050s) Handshake with 169.254.1.5:7474 completed
SENT (3.0064s) Starting TCP Handshake > 169.254.1.5:7687
RCVD (3.0072s) Handshake with 169.254.1.5:7687 completed
SENT (4.0083s) Starting TCP Handshake > 169.254.1.5:7474
RCVD (4.0091s) Handshake with 169.254.1.5:7474 completed
SENT (5.0106s) Starting TCP Handshake > 169.254.1.5:7687
RCVD (5.0115s) Handshake with 169.254.1.5:7687 completed
Max rtt: 0.906ms | Min rtt: 0.392ms | Avg rtt: 0.724ms
TCP connection attempts: 6 | Successful connections: 6 | Failed: 0 (0.00%)
Nping done: 1 IP address pinged in 5.01 seconds
Pinging vManage  node 1 on 169.254.2.5:7687,7474...
========== SNIP ==========
Connecting to 10.10.10.3...
+------------------------------------------------------------------------------------+
| type             | row                                  | attributes[row]["value"] |
+------------------------------------------------------------------------------------+
| "StoreSizes"     | "TotalStoreSize"                     | 85828934                 |
| "PageCache"      | "Flush"                              | 4268666                  |
| "PageCache"      | "EvictionExceptions"                 | 0                        |
| "PageCache"      | "UsageRatio"                         | 0.09724264705882353      |
| "PageCache"      | "Eviction"                           | 2068                     |
| "PageCache"      | "HitRatio"                           | 1.0                      |
| "ID Allocations" | "NumberOfRelationshipIdsInUse"       | 2068                     |
| "ID Allocations" | "NumberOfPropertyIdsInUse"           | 56151                    |
| "ID Allocations" | "NumberOfNodeIdsInUse"               | 7561                     |
| "ID Allocations" | "NumberOfRelationshipTypeIdsInUse"   | 31                       |
| "Transactions"   | "LastCommittedTxId"                  | 214273                   |
| "Transactions"   | "NumberOfOpenTransactions"           | 1                        |
| "Transactions"   | "NumberOfOpenedTransactions"         | 441742                   |
| "Transactions"   | "PeakNumberOfConcurrentTransactions" | 11                       |
| "Transactions"   | "NumberOfCommittedTransactions"      | 414568                   |
| "Causal Cluster" | "IsLeader"                           | 1         >>>>>>>>>               |
| "Causal Cluster" | "MsgProcessDelay"                    | 0                        |
| "Causal Cluster" | "InFlightCacheTotalBytes"            | 0                        |
+------------------------------------------------------------------------------------+
18 rows
ready to start consuming query after 388 ms, results consumed after another 13 ms
Completed
Connecting to 10.10.10.3...
Displaying the Neo4j Cluster Status
+---------------------------------------------------------------------------------------------------------------------------------+
| name     | aliases | access       | address            | role       | requestedStatus | currentStatus | error | default | home  |
+---------------------------------------------------------------------------------------------------------------------------------+
| "neo4j"  | []      | "read-write" | "169.254.3.5:7687" | "leader"   | "online"        | "online"      | ""    | TRUE    | TRUE  |
| "neo4j"  | []      | "read-write" | "169.254.2.5:7687" | "follower" | "online"        | "online"      | ""    | TRUE    | TRUE  |
| "neo4j"  | []      | "read-write" | "169.254.1.5:7687" | "follower" | "online"        | "online"      | ""    | TRUE    | TRUE  |
| "system" | []      | "read-write" | "169.254.3.5:7687" | "follower" | "online"        | "online"      | ""    | FALSE   | FALSE |
| "system" | []      | "read-write" | "169.254.2.5:7687" | "follower" | "online"        | "online"      | ""    | FALSE   | FALSE |
| "system" | []      | "read-write" | "169.254.1.5:7687" | "leader"   | "online"        | "online"      | ""    | FALSE   | FALSE |
+---------------------------------------------------------------------------------------------------------------------------------+
6 rows
ready to start consuming query after 256 ms, results consumed after another 3 ms
Completed
Total disk space used by configuration-db:
60M     .
Use this command to collect the configuration-db backup from the identified configuration-db leader vManage node.
request nms configuration-db backup path /opt/data/backup/<filename>
The expected output is as shown:
vmanage# request nms configuration-db backup path /opt/data/backup/june18th
Starting backup of configuration-db
config-db backup logs are available in /var/log/nms/neo4j-backup.log file
Successfully saved backup to /opt/data/backup/june18th.tar.gz
sha256sum: 8d0f5af8aee4e70f05e3858be6bdd5e6c136134ae47c383569ec883080f5d359
Removing the temp staging dir :/opt/data/backup/staging
vmanage#
- Make a note of the configuration-db credentials if it has been updated.
- If you are unaware of the configuration-db credentials, reach out to TAC to retrieve the configuration-db credentials from the existing vManage nodes.
- Default configuration-db credentials are username: neo4j and password: password
Restore Configuration-db Backup to another vManage node
Copy the configuration-db backup to /home/admin/ directory of vManage using SCP.
Sample scp command output:
XXXXXXXXX Downloads % scp june18th.tar.gz admin@10.66.62.27:/home/admin/
viptela 20.15.4.1

(admin@10.66.62.27) Password:
(admin@10.66.62.27) Password:
june18th.tar.gz                                                                                                                                                   0%  255KB  47.2KB/s - stalled -
To restore configuration-db backup, first we need to configure the configuration-db credentials. If your configuration-db credentials are default(neo4j/password), we can skip this step.
To configure configuration-db credentials, use the command request nms configuration-db update-admin-user.Use the username and password of your choice.
Kindly note that the Application server of vManage is restarted. Due to which vManage UI becomes inaccessible for a short time.
vmanage# request nms configuration-db update-admin-user
configuration-db
Enter current user name:neo4j
Enter current user password:password
Enter new user name:ciscoadmin
Enter new user password:ciscoadmin
WARNING: sun.reflect.Reflection.getCallerClass is not supported. This will impact performance.
Successfully updated configuration database admin user(this is service node, please repeat same operation on all service/data nodes)
Successfully restarted vManage Device Data Collector
Successfully restarted NMS application server
Successfully restarted NMS data collection agent
vmanage#
Post which we can proceed to retore the configuration-db backup:
We can use the command request nms configuration-db restore path /home/admin/< >to restore the configuration-db to the new vManage:
vmanage# request nms configuration-db restore path /home/admin/june18th.tar.gz
Starting backup of configuration-db
config-db backup logs are available in /var/log/nms/neo4j-backup.log file
Successfully saved database to /opt/data/backup/configdb-local-tmp-20230623-160954.tar.gz
Successfully backup database to /opt/data/backup/configdb-local-tmp-20230623-160954.tar.gz
Configuration database is running in a standalone mode
WARNING: sun.reflect.Reflection.getCallerClass is not supported. This will impact performance.
Successfully saved cluster configuration for localhost
Successfully saved vManage root CA information for device: "53f95156-f56b-472f-b713-d164561b25b7"
Stopping NMS application server on localhost
Stopping NMS configuration database on localhost
Reseting NMS configuration database on localhost
Loading NMS configuration database on localhost
Starting NMS configuration database on localhost
Waiting for 180s or the instance to start...
NMS configuration database on localhost has started.
Updating DB with the saved cluster configuration data
Successfully reinserted cluster meta information
Successfully reinserted vmanage root ca information
Starting NMS application server on localhost
Waiting for 180s for the instance to start...
Successfully restored database
Once the configuration-db is restored, make sure the vManage UI is accessible. Wait for around 5 minutes and then attempt to access the UI.
Once logged into UI successfully, ensure the Edge routers list, template, policies and all the rest of the configurations that were present on your previous or existing vManage UI is reflected on the new vManage UI.
Step 5: Reauthentication of Controllers and invalidation of old controllers
Once configuration-db is restored ,we need to reauthenticate all the new controllers (vmanage/vsmart/vbond) in the fabric
Note: In actual production if the interface IP used to re-authenticate is the tunnel interface IP, need to ensure NETCONF service is allowed on the tunnel interface of the vManage, vSmart and vBond and also on the firewalls along the path. The firewall port to open is TCP port 830 as bi-directional rule from DR cluster to all vBonds and vSmarts .
On vmanage UI, click on Configuration > Devices > Controllers
- Click the three dots near each controller and Click Edit

- Replace the ip-address (system-ip of the controller) with the transport vpn 0(tunnel interface) ip address .Enter the username and password and click save
- Do the same for all the new controllers in the fabric
Sync the Root-cert-chain
Once all the controllers are onboarded, complete this step:
On any Cisco SD-WAN Manager server in the newly active cluster, perform these actions:
Enter this command to synchronize the root certificate with all Cisco Catalyst SD-WAN devices in the newly active cluster:
https://vmanage-url/dataservice/system/device/sync/rootcertchain
Enter this command to synchronize the Cisco SD-WAN Manager UUID with the Cisco SD-WAN Validator:
https://vmanage-url/dataservice/certificate/syncvbond
Once the fabric is restored and the control and bfd sessions are up for all edges and controlllers in the fabric,we need to invalidate the old controllers (vmanage/vsmart/vbond) from the UI
- On vmanage UI, click on Configuration > Devices > Certificates
- Click on Controllers
- Click on the three dots near the controller(vmanage/vsmart/vbond) from the old fabric. Click invalidate
- Click send to vbond
- On vmanage UI, click on Configuration > Devices > Controllers
- Click on the three dots near the controller(vmanage/vsmart/vbond) from the old fabric. Click Delete.
Step 6: Post Checks
Note: Continue with the Post Checks section shown here, which is common to all deployment combinations.
Combination 4: vManage Cluster + Manual/Cold Standby DR
What is Manual/Cold Standby DR ? The backup SD-WAN Manager server or SD-WAN Manager cluster is kept shutdown in cold standby state.
Regular backups of the active database are taken, and if the primary SD-WAN Manager or SD-WAN Manager cluster goes down, the standby SD-WAN Manager or SD-WAN Manager cluster is brought up manually and the backup database restored on it.
Instances needed:
- 3 or 6 vManage (primary cluster)
- 3 or 6 vManage (DR standby cluster)
- 1 or more vBond (distributed across primary and DR data centers)
- 1 or more vSmart (distributed across primary and DR data centers)
Steps:
- Bring up all instances using the Common Steps
- Pre-checks
- Configure vManage UI, Certificates, and Onboard Controllers
- Build vManage Cluster
- Cold Standby DR Cluster Setup
- Config-db backup/restore
- Post Checks
Step 1: Pre-Checks
-
Ensure that the number of the activeCisco SD-WAN Managerinstances are identical to the number of the newly installedCisco SD-WAN Managerinstances.
-
Ensure that all the active and new Cisco SD-WAN Manager instances run the same software version.
-
Ensure that all the active and new Cisco SD-WAN Manager instances are able to reach the management IP address of the Cisco SD-WAN Validator.
-
Ensure that certificates have been installed on the newly installed Cisco SD-WAN Manager instances.
-
Ensure that the clocks on all Cisco Catalyst SD-WAN devices, including the newly installed Cisco SD-WAN Manager instances, are synchronized.
-
Ensure that a new set of System IPs and Site IDs is configured on the newly installed Cisco SD-WAN Manager instances, along with the same basic configuration as the active cluster.
Step 2: Configure vManage UI, Certificates, and Onboard Controllers
Update the configurations on vManage UI
- Once the configurations in Step 1 are added on the CLI of all the controllers, we can access the webUI of vManage, using the URL https://<vmanage-ip> in your browser. Use the VPN 512 IP address of respective vManage nodes. You can log in with the admin username and password.
- Navigate to Administration > Settings and complete these steps.
- Configure Organization name and Validator/vBond URL/IP address. Configure the same value as in the CLI of the vManage node.
- In the vManage 20.15/20.18 these configurations are available under section System.


- Verify the configurations for Certificate Authorization(CA), which decides the Certificate Authority used for signing the certificates. We can see 3 options there:
- Hardware WAN Edge Certificate Authorization - Decides the CA for hardware SD-WAN Edge routers.
- On Box Certificate (TPM/SUDI Certificate) - With this option, the preinstalled certificate on the router hardware is used to establish the Control connections (TLS/DTLS connections)
- Enterprise Certificate (signed by Enterprise CA) - With this option, the routers use certificates signed by Enterprise certificate authority of your organization. While choosing this option, the root certificate of Enterprise CA must be updated here.
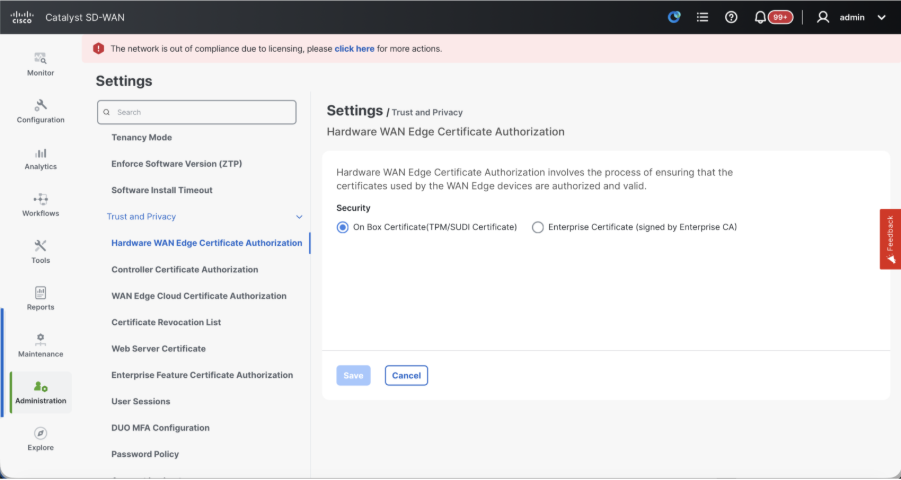
- Controller Certificate Authorization - Decides the CA for SD-WAN controllers.
- Cisco (Recommended) - Controllers use the certificates signed by Cisco PKI. vManage automatically contacts the PNP portal using the smart account credentials configured on the vManage and get the certificate signed and is installed on the controller.
- Manual - Controllers use the certificates signed by Cisco PKI. Manually sign the CSR using the Cisco PNP portal by navigating to smart account and virtual account of the respective SD-WAN overlay.
- Enterprise Root Certificate - With this option, the routers use certificates signed by Enterprise certificate authority of your organization. While choosing this option, the root certificate of Enterprise CA must be updated here.

- WAN Edge Cloud Certificate Authorization - Decides the CA for virtual SD-WAN Edge routers (CSR1000v, C8000v, vEdge cloud)
- Automated (vManage signed) - vManage automatically signs the CSR for the virtual Edge routers and install the certificate on the router.
- Manual (Enterprise CA - recommended) - Virtual routers use certificates signed by Enterprise certificate authority of your organization. While choosing this option, the root certificate of Enterprise CA must be updated here.
In case, if we are using our own CA, Enterprise certificate authority, choose Enterprise.

- Navigate to Configuration > Certificates > Control Components in case of 20.15/20.18 vManage nodes. In case of 20.9/20.12 versions, Configuration > Devices > Controllers
- Click on ... for Manager/vManage and click on Generate CSR.
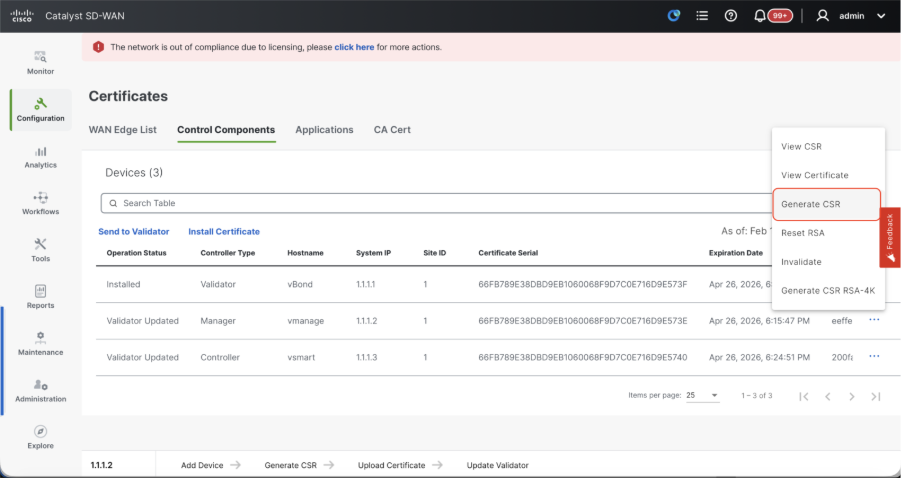
- Once the CSR is generated, you can download the CSR and get it signed based on the Certificate authority chosen for controllers. You can verify this configuration in Administration > Settings > Controller Certificate Authorization. If Cisco (Recommended) is chosen, then the CSR is automatically uploaded to the PNP portal by the vManage and once the certificate is signed, it is installed on the vManage automatically.
- If Manual is chosen, manually sign the CSR using the Cisco PNP portal by navigating to smart account and virtual account of the respective SD-WAN overlay. Once the certificate is available from PNP portal, click on install certificate on the same section of vManage and upload the certificate and install the certificate. Same procedure is applicable if we are using Digicert and Enterprise Root Certificate.
Onboarding vBond/Validator and vSmart/Controller to the vManage
Navigate to Configuration > Devices > Control Components in case of 20.15/20.18 vManage nodes. In case of 20.9/20.12 versions, Configuration > Devices > Controllers
OnboardingvBond/Validator
- Click onAddvBondin caseof 20.12vManageorAdd Validatorin caseof 20.15/20.18vManage. A pop up opens, enter the VPN 0 transport IP of vBondwhich is reachable from the vManage.
- Check the reachability using ping if allowed from CLI of vManagetovBondIP.
- Enter the user credentials of vBond.
Note: We need to useadmin credentials ofvBondor a user part ofnetadmingroup. You can verify this in the CLI of thevBond. Choose Yes in the dropdown of“Generate CSR" if we need to install a new certificate forvBond
Note: If the vBond is behind a NAT device/Firewall, check if the vBond VPN 0 interface IP is translated to a public IP. If VPN 0 interface IP is not reachable from vManage, use the public IP address of VPN 0 interface in this step

- Once the CSR is generated, you can download the CSR and get it signed based on the Certificate authority chosen for controllers. You can verify this configuration in Administration > Settings > Controller Certificate Authorization. If Cisco (Recommended) is chosen, then the CSR is automatically uploaded to the PNP portal by the vManage and once the certificate is signed, it is installed on the vBond automatically.
- If Manual is chosen, manually sign the CSR using the Cisco PNP portal by navigating to smart account and virtual account of the respective SD-WAN overlay. Once the certificate is available from PNP portal, click on install certificate on the same section of vManage and upload the certificate and install the certificate. Same procedure is applicable if we are using Digicert and Enterprise Root Certificate.
- If there are multiple vBonds, repeat the same steps.
Onboarding vSmart/Controller:
-
Click on Add vSmart in case of 20.12 vManage or Add Controller in case of 20.15/20.18 vManage.
-
A pop up opens, enter the VPN 0 transport IP of vSmart which is reachable from the vManage.
-
Check the reachability using ping if allowed from CLI of vManage to vSmart IP.
-
Enter the user credentials of vSmart Note that we need to use admin credentials of vSmart or a user part of netadmin group.
-
You can verify this in the CLI of the vSmart.
-
Set the protocol to TLS, if we intend to use TLS for routers to establish control connections with vSmart. This config needs to be configured on CLI of vSmarts and vManage nodes as well.
-
Choose Yes in the dropdown of "Generate CSR" if we need to install a new certificate for vSmart.
Note: If the vSmart is behind NAT device/Firewall, check if the vSmart VPN 0 interface IP is translated to a public IP, and if VPN 0 interface IP is not reachable from vManage, use public IP address of VPN 0 interface IP in this step.

- Once the CSR is generated, you can download the CSR and get it signed based on the Certificate authority chosen for controllers. You can verify this configuration in Administration > Settings > Controller Certificate Authorization. If Cisco (Recommended) is chosen, then the CSR is automatically uploaded to the PNP portal by the vManage and once the certificate is signed, it is installed on the vSmart automatically.
- If Manual is chosen, manually sign the CSR using the Cisco PNP portal by navigating to smart account and virtual account of the respective SD-WAN overlay.
- Once the certificate is available from PNP portal, click on install certificate on the same section of vManage and upload the certificate and install the certificate.
- Same procedure is applicable if we are using Digicert and Enterprise Root Certificate.
- If there are multiple vSmarts, repeat the same steps.
Verification
Once all the steps are completed, verify that all the control components are reachable in Monitor>Dashboard

- Click on the respective Control components and confirm that they are all reachable.
- Navigate to Monitor > Devices and confirm all the control components are reachable.

Step 3: Build vManage Cluster
Onboard SD-WAN Fabric with a vManage Cluster in the SD-WAN overlay
Note: vManage Cluster can be configured with 3 vManage nodes or 6 vManage nodes depending on the number of sites onboarded to SD-WAN fabric
Onboard all the SD-WAN controllers with single vManage node
Proceed with the steps shared in "Onboard SD-WAN controllers with a single node vManage in the SD-WAN overlay" to first bring up the SD-WAN fabric with one vManage node and onboard all the required Validators(vBond) and Controllers(vSmart).
Configure the CLI configurations of all the vManage nodes which is part of the cluster
- Configure the rest of the vManage nodes. In case of 3 node cluster, you has remaining 2 nodes to configure, in case of 6 node cluster you has 5 nodes to configure.
- Configure System configurations as shown:
config t
system
 host-name             <hostname>
 system-ip             <unique system-ip>
 site-id               <site-id>
 organization-name     <organization name>
 vbond <IP address/URL of vBond>
commit
Note: If we are using URL as vBond address, make sure to configure DNS server IP addresses in VPN 0 configuration or ensure they can be resolved.
These configurations are needed to enable the transport interface used to establish control connections with the routers and rest of the controllers.
config t
vpn 0
 dns <IP-address> primary
 dns <IP-address> secondary
 interface eth1
  ip address <IP-address/mask>
  tunnel-interface
   allow-service all
   allow-service dhcp
   allow-service dns
   allow-service icmp
   no allow-service sshd
   no allow-service netconf
   no allow-service ntp
   no allow-service stun
   allow-service https
  !
  no shutdown
 !
 ip route 0.0.0.0/0 <default-gateway IP>
commit
Also configure VPN 512management interfaceto enable out of band management access to the controller.
Conf t
vpn 512
 interface eth0
  ip address <IP-address/mask>
  no shutdown
 !
 ip route 0.0.0.0/0 <default-gateway IP>
!
Commit
Optional Config:
- You can refer to the configurations of your existing controller and if the config listed here is present, you can add this configuration to the new controllers.
- Configure the control protocol as TLS only if there is a requirement for routers to establish secure control connections with the vManage nodes using TLS. By default, all the controllers and routers establish control connection using DTLS. This is an optional config required only on vSmart and vManage nodes depending on you requirement.
Conf t
security
 control
  protocol tls
commit
Configure service interface on all vManage nodes
Configure service interface on all thevManagenodes including vManage-1 which has been onboarded already. This interface is used for cluster communication, meaning communication between thevManagenodes in the cluster.
conf t
 interface eth2
  ip address <IP-address/mask>
  no shutdown
commit
Make sure thesame IP subnet is used for service interface across all the nodesin thevManagecluster.
Configure cluster credentials
We can use the same admin credentials of thevManagenodes to configure thevManagecluster. Else we can configure a new user credential which is part ofnetadmingroup. The configurations to configure new user credential is as shown
conf t
system
 aaa
  user <username>
   password <password>
   group    netadmin
commit
Make sure toconfigure the same user credentials across all thevManagenodeswhich is part of the cluster.If we decide to use admin credentials, it must be same username/password across all thevManagenodes.
Install device certificate on all vManage nodes
- Login tovManageUI of all thevManagenodes using the URL https://<vmanage-ip>in your browser. Use the VPN 512 IP address of respective vManagenodes. You can log in with the admin username and password.
-
Navigate to Configuration > Certificates > Control Components in case of 20.15/20.18 vManage nodes. In case of 20.9/20.12 versions, Configuration > Devices > Controllers
Click on ... for Manager/vManage and click on Generate CSR.
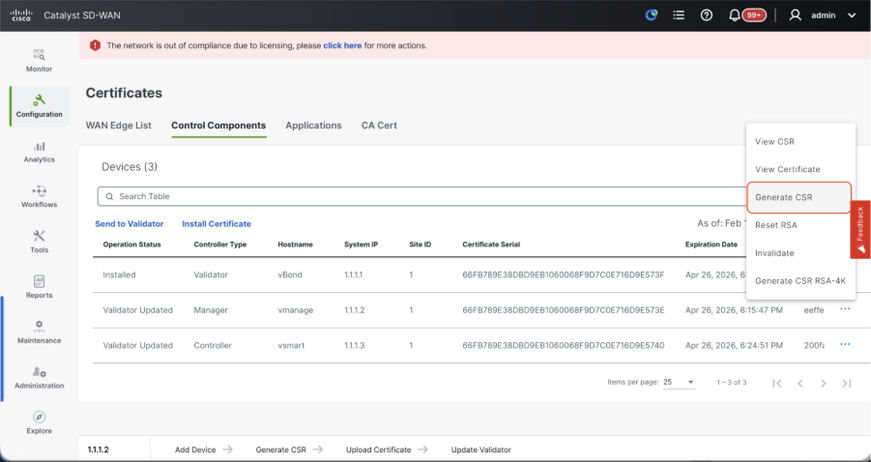
-
Once the CSR is generated, you can download the CSR and get it signed based on the Certificate authority chosen for controllers. You can verify this configuration in Administration > Settings > Controller Certificate Authorization. If Cisco (Recommended) is chosen, then the CSR is automatically uploaded to the PNP portal by the vManage and once the certificate is signed, it is installed on the vManage automatically.
-
If Manual is chosen, manually sign the CSR using the Cisco PNP portal by navigating to smart account and virtual account of the respective SD-WAN overlay.
-
Once the certificate is available from PNP portal, click on install certificate on the same section of vManage and upload the certificate and install the certificate.
-
Same procedure is applicable if we are using Digicert and Enterprise Root Certificate.
-
Complete this step across all the vManage nodes which is part of the cluster.
Prepare to build the vManage Cluster
- On the webUI of vManage-1, navigate to Administration > Cluster Management, click on ... under Actions for vManage-1, choose Edit.
- The node persona is chosen automatically based on the persona we chose while the VM was spun up.
Note: For a 3-node cluster, all 3 vManage nodes are brought up with compute+data as the persona.
- For a 6 node cluster, 3 vManage nodes are brought up with compute+data as the persona and 3 vManage nodes are brought up with data as the persona.
- From the dropdown for Manager IP address, make sure to choose service interface IP of the vManage.
- Enter the username and password which we desire to use to enable vManage cluster which is referred as cluster credentials.
- As mentioned earlier, same credentials must be configured on all the vManage nodes and must be used while adding all the nodes to the cluster.
Optional Config:
Please refer to this configuration in your existing cluster to Enable SDAVC - Need to be checked only if it is required and is needed only on one vManage node of the cluster.
Click on Update.
- Post this, the vManage NMS services restarts in the background and the UI is not available for a few minutes of around 5 to 10 minutes. During this time, CLI access of vManage is available.
- Once the vManage-1 UI is accessible navigate to Administration > Cluster Management, make sure service interface IP of vManage is reflected under IP address,Configure Status is Ready and node persona is reflected correctly. Switch to Service reachability section in the same page and make sure all services are reachable.
- If we see any of the services are not reachable yet, please wait. Usually takes around 20 to 30 minutes.
Build the vManage Cluster
- On the webUI of vManage-1, navigate to Administration > Cluster Management, in the section Service Configuration,
- Click on Add Manager, a pop-up window appears:


- Choose the Node persona based on the persona configurations done while the vManage – 2 node was spun up.
- Enter the service interface IP of vManage-2 under Manager IP address
- Enter the username and password, which is the same credentials as we used in Step 6.
- Enable SDAVC - To be left unchecked as we would have enabled it already on vManage-1
- Click on Add.
- Post this, the vManage NMS services restarts in the background for vManage 1 and 2 nodes. The UI is not available for a few minutes of around 5 to 10 minutes for vManage 1 and 2.
- During this time, CLI access of vManage 1 and 2 is available.
- Once the vManage-1 UI is accessible navigate to Administration > Cluster Management, make sure service interface IP of both the vManage is reflected under IP address, Configure Status is Ready and node persona is reflected correctly.
- Switch to Service reachability section in the same page and make sure all services are reachable for both the vManage nodes.
- If we see any of the services are not reachable yet, please wait. Usually takes around 5 to 10 minutes.
- You can check the status of cluster add process in the Task-list available on the top right corner of the vManage UI.
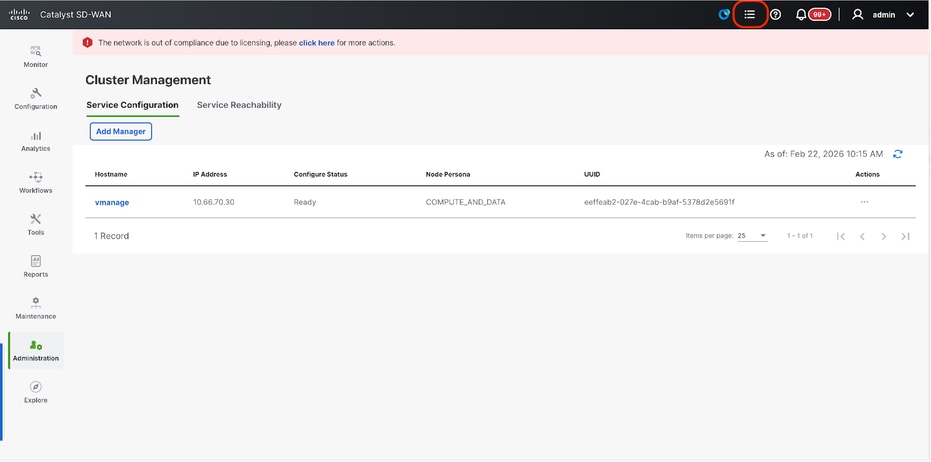
- You can look up for Active task list and if the task is still listed under Active task list, it indicates the task is not completed yet.
- You can click on the task to check the progress of the same. If the task is not listed under Active task list, switch to Completed and make sure the task is successfully completed.
- Only after these points are validated proceed to next step.
These points need to be taken into consideration before adding the next node to the cluster:
Please verify these points on all the UIs of the vManage nodes that are added to cluster so far:
- Navigate to Monitor > Overview of vManage UI and make sure the number of vManage nodes are reflected correctly and are seen reachable depending on the number of the nodes added to the cluster.
- Navigate to Administration > Cluster Management and make sure service interface IP of both the vManage is reflected under IP address, Configure Status is Ready and node persona is reflected correctly.
- Switch to Service reachability section in the same page and make sure all services are reachable for both the vManage nodes.
- Each time, a node is added to the cluster, the NMS services of all the nodes in the cluster is restarted hence the UI of all those nodes becomes unreachable for some time.
- Depending on the number of the nodes in the cluster, it can take a longer time for the UI to be back up and all the services to be reachable.
- You can monitor the task under Task-list available on the top right corner of the vManage UI.
- On the vManage UI of each of node added to the cluster, we need to see all the routers, templates and policies if they were available in vManage-1.
- If those configurations were not present on vManage-1, the vBonds and vSmarts that were added to vManage-1 and also Administration > Settings configurations for Organization-name, vBond, Certificate Authorization must be reflected on rest of the vManage nodes added to the cluster.
- Repeat the same steps for the rest of the vManage nodes.
Step 4: Cold Standby DR Cluster Setup
Cold Standby DR Cluster Setup
You can bring up one more vManage cluster using steps described in Step 4: Build vManage Cluster. Post that complete the steps described in Step 6: Config-db Backup/Restore to restore the config-db backup in the Standby cluster.
Step 5: Config-db Backup/Restore
Collect vManage configuration-db backup and restore on another vManage node
Collect Configuration-DB backup:
- In the SD-WAN fabric which is currently in use, you can generate configuration-db backup from vManage cluster.
- Kindly note that we must generate configuration-db backup only on one node of the vManage cluster which is the configuration-db leader.
- For standalone vManage, that vManage itself is the configuration-db leader.
- In vManage cluster, identify the configuration-db leader node using the command request nms configuration-db diagnostics.You can run this command on all the nodes of the 3 node vManage cluster.
- In a 6 node cluster, make sure to run this command on the vManage nodes where configuration-db is enabled to identify the leader node. Navigate to Administration > Cluster Management to verify the same:
- As we see in the screenshot, the nodes configured with persona COMPUTE_AND_DATA have configuration-db running.
You can verify the same using the command requestnmsconfiguration-dbstatus on vManageCLI. The output is as shown
vmanage# request nms configuration-db status
NMS configuration database
        Enabled: true
        Status: running PID:32632 for 1066085s
        Native metrics status: ENABLED
        Server-load metrics status: ENABLED
vmanage#
- Once you execute the commandrequest nms configuration-db diagnostics on these nodes, the output is as shown:
- Look for the highlighted field for “IsLeader”. If it is set to 1, it indicates that node is the leader node and we can collect configuration-db backup from it.
vManage-3# request nms configuration-db diagnostics
NMS configuration database
Checking cluster connectivity for ports 7687,7474 ...
Pinging vManage  node 0 on 169.254.1.5:7687,7474...
Starting Nping 0.7.80 ( https://nmap.org/nping ) at 2026-02-18 12:41 UTC
SENT (0.0013s) Starting TCP Handshake > 169.254.1.5:7474
RCVD (0.0022s) Handshake with 169.254.1.5:7474 completed
SENT (1.0024s) Starting TCP Handshake > 169.254.1.5:7687
RCVD (1.0028s) Handshake with 169.254.1.5:7687 completed
SENT (2.0044s) Starting TCP Handshake > 169.254.1.5:7474
RCVD (2.0050s) Handshake with 169.254.1.5:7474 completed
SENT (3.0064s) Starting TCP Handshake > 169.254.1.5:7687
RCVD (3.0072s) Handshake with 169.254.1.5:7687 completed
SENT (4.0083s) Starting TCP Handshake > 169.254.1.5:7474
RCVD (4.0091s) Handshake with 169.254.1.5:7474 completed
SENT (5.0106s) Starting TCP Handshake > 169.254.1.5:7687
RCVD (5.0115s) Handshake with 169.254.1.5:7687 completed
Max rtt: 0.906ms | Min rtt: 0.392ms | Avg rtt: 0.724ms
TCP connection attempts: 6 | Successful connections: 6 | Failed: 0 (0.00%)
Nping done: 1 IP address pinged in 5.01 seconds
Pinging vManage  node 1 on 169.254.2.5:7687,7474...
========== SNIP ==========
Connecting to 10.10.10.3...
+------------------------------------------------------------------------------------+
| type             | row                                  | attributes[row]["value"] |
+------------------------------------------------------------------------------------+
| "StoreSizes"     | "TotalStoreSize"                     | 85828934                 |
| "PageCache"      | "Flush"                              | 4268666                  |
| "PageCache"      | "EvictionExceptions"                 | 0                        |
| "PageCache"      | "UsageRatio"                         | 0.09724264705882353      |
| "PageCache"      | "Eviction"                           | 2068                     |
| "PageCache"      | "HitRatio"                           | 1.0                      |
| "ID Allocations" | "NumberOfRelationshipIdsInUse"       | 2068                     |
| "ID Allocations" | "NumberOfPropertyIdsInUse"           | 56151                    |
| "ID Allocations" | "NumberOfNodeIdsInUse"               | 7561                     |
| "ID Allocations" | "NumberOfRelationshipTypeIdsInUse"   | 31                       |
| "Transactions"   | "LastCommittedTxId"                  | 214273                   |
| "Transactions"   | "NumberOfOpenTransactions"           | 1                        |
| "Transactions"   | "NumberOfOpenedTransactions"         | 441742                   |
| "Transactions"   | "PeakNumberOfConcurrentTransactions" | 11                       |
| "Transactions"   | "NumberOfCommittedTransactions"      | 414568                   |
| "Causal Cluster" | "IsLeader"                           | 1         >>>>>>>>>               |
| "Causal Cluster" | "MsgProcessDelay"                    | 0                        |
| "Causal Cluster" | "InFlightCacheTotalBytes"            | 0                        |
+------------------------------------------------------------------------------------+
18 rows
ready to start consuming query after 388 ms, results consumed after another 13 ms
Completed
Connecting to 10.10.10.3...
Displaying the Neo4j Cluster Status
+---------------------------------------------------------------------------------------------------------------------------------+
| name     | aliases | access       | address            | role       | requestedStatus | currentStatus | error | default | home  |
+---------------------------------------------------------------------------------------------------------------------------------+
| "neo4j"  | []      | "read-write" | "169.254.3.5:7687" | "leader"   | "online"        | "online"      | ""    | TRUE    | TRUE  |
| "neo4j"  | []      | "read-write" | "169.254.2.5:7687" | "follower" | "online"        | "online"      | ""    | TRUE    | TRUE  |
| "neo4j"  | []      | "read-write" | "169.254.1.5:7687" | "follower" | "online"        | "online"      | ""    | TRUE    | TRUE  |
| "system" | []      | "read-write" | "169.254.3.5:7687" | "follower" | "online"        | "online"      | ""    | FALSE   | FALSE |
| "system" | []      | "read-write" | "169.254.2.5:7687" | "follower" | "online"        | "online"      | ""    | FALSE   | FALSE |
| "system" | []      | "read-write" | "169.254.1.5:7687" | "leader"   | "online"        | "online"      | ""    | FALSE   | FALSE |
+---------------------------------------------------------------------------------------------------------------------------------+
6 rows
ready to start consuming query after 256 ms, results consumed after another 3 ms
Completed
Total disk space used by configuration-db:
60M     .
Use this command to collect the configuration-db backup from the identified configuration-db leader vManage node.
request nms configuration-db backup path /opt/data/backup/<filename>
The expected output is as shown:
vmanage# request nms configuration-db backup path /opt/data/backup/june18th
Starting backup of configuration-db
config-db backup logs are available in /var/log/nms/neo4j-backup.log file
Successfully saved backup to /opt/data/backup/june18th.tar.gz
sha256sum: 8d0f5af8aee4e70f05e3858be6bdd5e6c136134ae47c383569ec883080f5d359
Removing the temp staging dir :/opt/data/backup/staging
vmanage#
- Make a note of the configuration-db credentials if it has been updated.
- If you are unaware of the configuration-db credentials, reach out to TAC to retrieve the configuration-db credentials from the existing vManage nodes.
- Default configuration-db credentials are username: neo4j and password: password
-
Restore Configuration-db Backup to another vManage node
Copy the configuration-db backup to /home/admin/ directory of vManage using SCP.
Sample scp command output:
XXXXXXXXX Downloads % scp june18th.tar.gz admin@10.66.62.27:/home/admin/
viptela 20.15.4.1

(admin@10.66.62.27) Password:
(admin@10.66.62.27) Password:
june18th.tar.gz                                                                                                                                                   0%  255KB  47.2KB/s - stalled -
To restore configuration-db backup, first we need to configure the configuration-db credentials. If your configuration-db credentials are default(neo4j/password), we can skip this step.
To configure configuration-db credentials, use the command request nms configuration-db update-admin-user.Use the username and password of your choice.
Kindly note that the Application server of vManage is restarted. Due to which vManage UI becomes inaccessible for a short time.
vmanage# request nms configuration-db update-admin-user
configuration-db
Enter current user name:neo4j
Enter current user password:password
Enter new user name:ciscoadmin
Enter new user password:ciscoadmin
WARNING: sun.reflect.Reflection.getCallerClass is not supported. This will impact performance.
Successfully updated configuration database admin user(this is service node, please repeat same operation on all service/data nodes)
Successfully restarted vManage Device Data Collector
Successfully restarted NMS application server
Successfully restarted NMS data collection agent
vmanage#
Post which we can proceed to retore the configuration-db backup:
We can use the command request nms configuration-db restore path /home/admin/< >to restore the configuration-db to the new vManage:
vmanage# request nms configuration-db restore path /home/admin/june18th.tar.gz
Starting backup of configuration-db
config-db backup logs are available in /var/log/nms/neo4j-backup.log file
Successfully saved database to /opt/data/backup/configdb-local-tmp-20230623-160954.tar.gz
Successfully backup database to /opt/data/backup/configdb-local-tmp-20230623-160954.tar.gz
Configuration database is running in a standalone mode
WARNING: sun.reflect.Reflection.getCallerClass is not supported. This will impact performance.
Successfully saved cluster configuration for localhost
Successfully saved vManage root CA information for device: "53f95156-f56b-472f-b713-d164561b25b7"
Stopping NMS application server on localhost
Stopping NMS configuration database on localhost
Reseting NMS configuration database on localhost
Loading NMS configuration database on localhost
Starting NMS configuration database on localhost
Waiting for 180s or the instance to start...
NMS configuration database on localhost has started.
Updating DB with the saved cluster configuration data
Successfully reinserted cluster meta information
Successfully reinserted vmanage root ca information
Starting NMS application server on localhost
Waiting for 180s for the instance to start...
Successfully restored database
Once the configuration-db is restored, make sure the vManage UI is accessible. Wait for around 5 minutes and then attempt to access the UI.
Once logged into UI successfully, ensure the Edge routers list, template, policies and all the rest of the configurations that were present on your previous or existing vManage UI is reflected on the new vManage UI.
Step 6: Reauthentication of Controllers and invalidation of old controllers
Once configuration-db is restored ,we need to reauthenticate all the new controllers (vmanage/vsmart/vbond) in the fabric
Note: In actual production if the interface IP used to re-authenticate is the tunnel interface IP, need to ensure NETCONF service is allowed on the tunnel interface of the vManage, vSmart and vBond and also on the firewalls along the path. The firewall port to open is TCP port 830 as bi-directional rule from DR cluster to all vBonds and vSmarts .
On vmanage UI, click on Configuration > Devices > Controllers
- Click the three dots near each controller and Click Edit

- Replace the ip-address (system-ip of the controller) with the transport vpn 0(tunnel interface) ip address .Enter the username and password and click save
- Do the same for all the new controllers in the fabric
Sync the Root-cert-chain
Once all the controllers are onboarded, complete this step:
On any Cisco SD-WAN Manager server in the newly active cluster, perform these actions:
Enter this command to synchronize the root certificate with all Cisco Catalyst SD-WAN devices in the newly active cluster:
https://vmanage-url/dataservice/system/device/sync/rootcertchain
Enter this command to synchronize the Cisco SD-WAN Manager UUID with the Cisco SD-WAN Validator:
https://vmanage-url/dataservice/certificate/syncvbond
Once the fabric is restored and the control and bfd sessions are up for all edges and controlllers in the fabric,we need to invalidate the old controllers (vmanage/vsmart/vbond) from the UI
- On vmanage UI, click on Configuration > Devices > Certificates
- Click on Controllers
- Click on the three dots near the controller(vmanage/vsmart/vbond) from the old fabric. Click invalidate
- Click send to vbond
- On vmanage UI, click on Configuration > Devices > Controllers
- Click on the three dots near the controller(vmanage/vsmart/vbond) from the old fabric. Click Delete
Step 7: Post Checks
Note: Continue with the Post Checks section shown here, which is common to all deployment combinations.
Combination 5: vManage Cluster + DR Enabled
Instances needed:
- 3 or 6 vManage (primary cluster)
- 3 or 6 vManage (DR standby cluster)
- 1 or more vBond (distributed across primary and DR data centers)
- 1 or more vSmart (distributed across primary and DR data centers)
Steps:
- Bring up all instances using the Common Steps
- Pre-checks
- Configure vManage UI, Certificates, and Onboard Controllers
- Build vManage Cluster
- Cold Standby DR Cluster Setup
- Config-db backup/restore
- Post Checks
Step 1: Pre-Checks
-
Ensure that the number of the activeCisco SD-WAN Managerinstances are identical to the number of the newly installedCisco SD-WAN Managerinstances.
-
Ensure that all the active and new Cisco SD-WAN Manager instances run the same software version.
-
Ensure that all the active and new Cisco SD-WAN Manager instances are able to reach the management IP address of the Cisco SD-WAN Validator.
-
Ensure that certificates have been installed on the newly installed Cisco SD-WAN Manager instances.
-
Ensure that the clocks on all Cisco Catalyst SD-WAN devices, including the newly installed Cisco SD-WAN Manager instances, are synchronized.
-
Ensure that a new set of System IPs and Site IDs is configured on the newly installed Cisco SD-WAN Manager instances, along with the same basic configuration as the active cluster.
Step 2: Configure vManage UI, Certificates, and Onboard Controllers
Update the configurations on vManage UI
- Once the configurations in Step 1 are added on the CLI of all the controllers, we can access the webUI of vManage, using the URL https://<vmanage-ip> in your browser. Use the VPN 512 IP address of respective vManage nodes. You can log in with the admin username and password.
- Navigate to Administration > Settings and complete these steps.
- Configure Organization name and Validator/vBond URL/IP address. Configure the same value as in the CLI of the vManage node.
- In the vManage 20.15/20.18 these configurations are available under section System.


- Verify the configurations for Certificate Authorization(CA), which decides the Certificate Authority used for signing the certificates. We can see 3 options there:
- Hardware WAN Edge Certificate Authorization - Decides the CA for hardware SD-WAN Edge routers.
- On Box Certificate (TPM/SUDI Certificate) - With this option, the preinstalled certificate on the router hardware is used to establish the Control connections (TLS/DTLS connections)
- Enterprise Certificate (signed by Enterprise CA) - With this option, the routers use certificates signed by Enterprise certificate authority of your organization. While choosing this option, the root certificate of Enterprise CA must be updated here.

- Controller Certificate Authorization - Decides the CA for SD-WAN controllers.
- Cisco (Recommended) - Controllers use the certificates signed by Cisco PKI. vManage automatically contacts the PNP portal using the smart account credentials configured on the vManage and get the certificate signed and is installed on the controller.
- Manual - Controllers use the certificates signed by Cisco PKI. Manually sign the CSR using the Cisco PNP portal by navigating to smart account and virtual account of the respective SD-WAN overlay.
- Enterprise Root Certificate - With this option, the routers use certificates signed by Enterprise certificate authority of your organization. While choosing this option, the root certificate of Enterprise CA must be updated here.

- WAN Edge Cloud Certificate Authorization - Decides the CA for virtual SD-WAN Edge routers (CSR1000v, C8000v, vEdge cloud)
- Automated (vManage signed) - vManage automatically signs the CSR for the virtual Edge routers and install the certificate on the router.
- Manual (Enterprise CA - recommended) - Virtual routers use certificates signed by Enterprise certificate authority of your organization. While choosing this option, the root certificate of Enterprise CA must be updated here.
In case, if we are using our own CA, Enterprise certificate authority, choose Enterprise.

- Navigate to Configuration > Certificates > Control Components in case of 20.15/20.18 vManage nodes. In case of 20.9/20.12 versions, Configuration > Devices > Controllers
- Click on ... for Manager/vManage and click on Generate CSR.

- Once the CSR is generated, you can download the CSR and get it signed based on the Certificate authority chosen for controllers. You can verify this configuration in Administration > Settings > Controller Certificate Authorization. If Cisco (Recommended) is chosen, then the CSR is automatically uploaded to the PNP portal by the vManage and once the certificate is signed, it is installed on the vManage automatically.
- If Manual is chosen, manually sign the CSR using the Cisco PNP portal by navigating to smart account and virtual account of the respective SD-WAN overlay. Once the certificate is available from PNP portal, click on install certificate on the same section of vManage and upload the certificate and install the certificate. Same procedure is applicable if we are using Digicert and Enterprise Root Certificate.
Onboarding vBond/Validator and vSmart/Controller to the vManage
Navigate to Configuration > Devices > Control Components in case of 20.15/20.18 vManage nodes. In case of 20.9/20.12 versions, Configuration > Devices > Controllers
OnboardingvBond/Validator
- Click onAddvBondin caseof 20.12vManageorAdd Validatorin caseof 20.15/20.18vManage. A pop up opens, enter the VPN 0 transport IP of vBondwhich is reachable from the vManage.
- Check the reachability using ping if allowed from CLI of vManagetovBondIP.
- Enter the user credentials of vBond.
Note: We need to useadmin credentials ofvBondor a user part ofnetadmingroup. You can verify this in the CLI of thevBond. Choose Yes in the dropdown of“Generate CSR" if we need to install a new certificate forvBond
Note: If the vBond is behind a NAT device/Firewall, check if the vBond VPN 0 interface IP is translated to a public IP. If VPN 0 interface IP is not reachable from vManage, use the public IP address of VPN 0 interface in this step

- Once the CSR is generated, you can download the CSR and get it signed based on the Certificate authority chosen for controllers. You can verify this configuration in Administration > Settings > Controller Certificate Authorization. If Cisco (Recommended) is chosen, then the CSR is automatically uploaded to the PNP portal by the vManage and once the certificate is signed, it is installed on the vBond automatically.
- If Manual is chosen, manually sign the CSR using the Cisco PNP portal by navigating to smart account and virtual account of the respective SD-WAN overlay. Once the certificate is available from PNP portal, click on install certificate on the same section of vManage and upload the certificate and install the certificate. Same procedure is applicable if we are using Digicert and Enterprise Root Certificate.
- If there are multiple vBonds, repeat the same steps.
Onboarding vSmart/Controller:
-
Click on Add vSmart in case of 20.12 vManage or Add Controller in case of 20.15/20.18 vManage.
-
A pop up opens, enter the VPN 0 transport IP of vSmart which is reachable from the vManage.
-
Check the reachability using ping if allowed from CLI of vManage to vSmart IP.
-
Enter the user credentials of vSmart Note that we need to use admin credentials of vSmart or a user part of netadmin group.
-
You can verify this in the CLI of the vSmart.
-
Set the protocol to TLS, if we intend to use TLS for routers to establish control connections with vSmart. This config needs to be configured on CLI of vSmarts and vManage nodes as well.
-
Choose Yes in the dropdown of "Generate CSR" if we need to install a new certificate for vSmart.
Note: If the vSmart is behind NAT device/Firewall, check if the vSmart VPN 0 interface IP is translated to a public IP, and if VPN 0 interface IP is not reachable from vManage, use public IP address of VPN 0 interface IP in this step.

- Once the CSR is generated, you can download the CSR and get it signed based on the Certificate authority chosen for controllers. You can verify this configuration in Administration > Settings > Controller Certificate Authorization. If Cisco (Recommended) is chosen, then the CSR is automatically uploaded to the PNP portal by the vManage and once the certificate is signed, it is installed on the vSmart automatically.
- If Manual is chosen, manually sign the CSR using the Cisco PNP portal by navigating to smart account and virtual account of the respective SD-WAN overlay.
- Once the certificate is available from PNP portal, click on install certificate on the same section of vManage and upload the certificate and install the certificate.
- Same procedure is applicable if we are using Digicert and Enterprise Root Certificate.
- If there are multiple vSmarts, repeat the same steps.
Verification
Once all the steps are completed, verify that all the control components are reachable in Monitor>Dashboard

- Click on the respective Control components and confirm that they are all reachable.
- Navigate to Monitor > Devices and confirm all the control components are reachable.

Step 3: Build vManage Cluster
Onboard SD-WAN Fabric with a vManage Cluster in the SD-WAN overlay
Note: vManage Cluster can be configured with 3 vManage nodes or 6 vManage nodes depending on the number of sites onboarded to SD-WAN fabric
Onboard all the SD-WAN controllers with single vManage node
Proceed with the steps shared in "Onboard SD-WAN controllers with a single node vManage in the SD-WAN overlay" to first bring up the SD-WAN fabric with one vManage node and onboard all the required Validators(vBond) and Controllers(vSmart).
Configure the CLI configurations of all the vManage nodes which is part of the cluster
- Configure the rest of the vManage nodes. In case of 3 node cluster, you has remaining 2 nodes to configure, in case of 6 node cluster you has 5 nodes to configure.
- Configure System configurations as shown:
config t
system
 host-name             <hostname>
 system-ip             <unique system-ip>
 site-id               <site-id>
 organization-name     <organization name>
 vbond <IP address/URL of vBond>
commit
Note: If we are using URL as vBond address, make sure to configure DNS server IP addresses in VPN 0 configuration or ensure they can be resolved.
These configurations are needed to enable the transport interface used to establish control connections with the routers and rest of the controllers.
config t
vpn 0
 dns <IP-address> primary
 dns <IP-address> secondary
 interface eth1
  ip address <IP-address/mask>
  tunnel-interface
   allow-service all
   allow-service dhcp
   allow-service dns
   allow-service icmp
   no allow-service sshd
   no allow-service netconf
   no allow-service ntp
   no allow-service stun
   allow-service https
  !
  no shutdown
 !
 ip route 0.0.0.0/0 <default-gateway IP>
commit
Also configure VPN 512management interfaceto enable out of band management access to the controller.
Conf t
vpn 512
 interface eth0
  ip address <IP-address/mask>
  no shutdown
 !
 ip route 0.0.0.0/0 <default-gateway IP>
!
Commit
Optional Config:
- You can refer to the configurations of your existing controller and if the config listed here is present, you can add this configuration to the new controllers.
- Configure the control protocol as TLS only if there is a requirement for routers to establish secure control connections with the vManage nodes using TLS. By default, all the controllers and routers establish control connection using DTLS. This is an optional config required only on vSmart and vManage nodes depending on you requirement.
Conf t
security
 control
  protocol tls
commit
Configure service interface on all vManage nodes
Configure service interface on all thevManagenodes including vManage-1 which has been onboarded already. This interface is used for cluster communication, meaning communication between thevManagenodes in the cluster.
conf t
 interface eth2
  ip address <IP-address/mask>
  no shutdown
commit
Make sure thesame IP subnet is used for service interface across all the nodesin thevManagecluster.
Configure cluster credentials
We can use the same admin credentials of thevManagenodes to configure thevManagecluster. Else we can configure a new user credential which is part ofnetadmingroup. The configurations to configure new user credential is as shown
conf t
system
 aaa
  user <username>
   password <password>
   group    netadmin
commit
Make sure toconfigure the same user credentials across all thevManagenodeswhich is part of the cluster.If we decide to use admin credentials, it must be same username/password across all thevManagenodes.
Install device certificate on all vManage nodes
- Login tovManageUI of all thevManagenodes using the URL https://<vmanage-ip>in your browser. Use the VPN 512 IP address of respective vManagenodes. You can log in with the admin username and password.
-
Navigate to Configuration > Certificates > Control Components in case of 20.15/20.18 vManage nodes. In case of 20.9/20.12 versions, Configuration > Devices > Controllers
Click on ... for Manager/vManage and click on Generate CSR.

-
Once the CSR is generated, you can download the CSR and get it signed based on the Certificate authority chosen for controllers. You can verify this configuration in Administration > Settings > Controller Certificate Authorization. If Cisco (Recommended) is chosen, then the CSR is automatically uploaded to the PNP portal by the vManage and once the certificate is signed, it is installed on the vManage automatically.
-
If Manual is chosen, manually sign the CSR using the Cisco PNP portal by navigating to smart account and virtual account of the respective SD-WAN overlay.
-
Once the certificate is available from PNP portal, click on install certificate on the same section of vManage and upload the certificate and install the certificate.
-
Same procedure is applicable if we are using Digicert and Enterprise Root Certificate.
-
Complete this step across all the vManage nodes which is part of the cluster.
Prepare to build the vManage Cluster
- On the webUI of vManage-1, navigate to Administration > Cluster Management, click on ... under Actions for vManage-1, choose Edit.
- The node persona is chosen automatically based on the persona we chose while the VM was spun up.
Note: For a 3-node cluster, all 3 vManage nodes are brought up with compute+data as the persona. For a 6-node cluster, 3 vManage nodes are brought up with compute+data as the persona and 3 vManage nodes are brought up with data as the persona.
- From the dropdown for Manager IP address, make sure to choose service interface IP of the vManage.
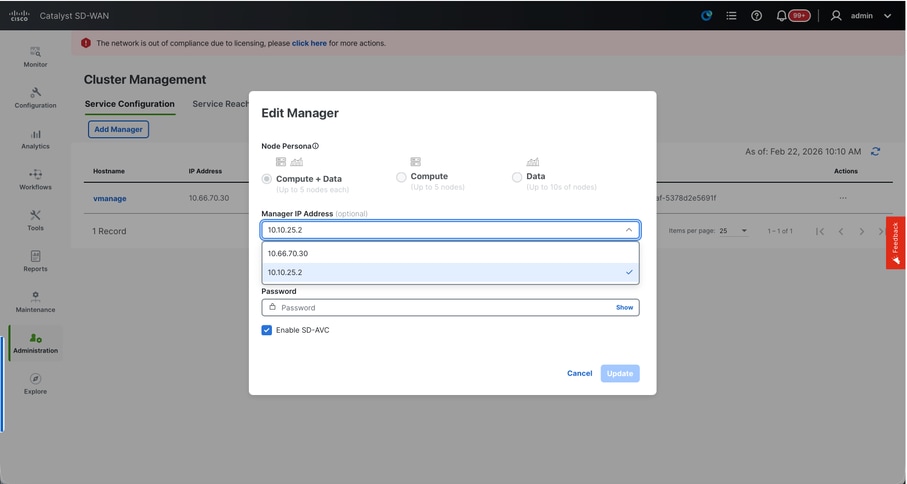
- Enter the username and password which we desire to use to enable vManage cluster which is referred as cluster credentials.
- As mentioned earlier, same credentials must be configured on all the vManage nodes and must be used while adding all the nodes to the cluster.
Optional Config:
Please refer to this configuration in your existing cluster to Enable SDAVC - Need to be checked only if it is required and is needed only on one vManage node of the cluster.
Click on Update.
- Post this, the vManage NMS services restarts in the background and the UI is not available for a few minutes of around 5 to 10 minutes. During this time, CLI access of vManage is available.
- Once the vManage-1 UI is accessible navigate to Administration > Cluster Management, make sure service interface IP of vManage is reflected under IP address,Configure Status is Ready and node persona is reflected correctly. Switch to Service reachability section in the same page and make sure all services are reachable.
- If we see any of the services are not reachable yet, please wait. Usually takes around 20 to 30 minutes.
Build the vManage Cluster
- On the webUI of vManage-1, navigate to Administration > Cluster Management, in the section Service Configuration,
- Click on Add Manager, a pop-up window appears:
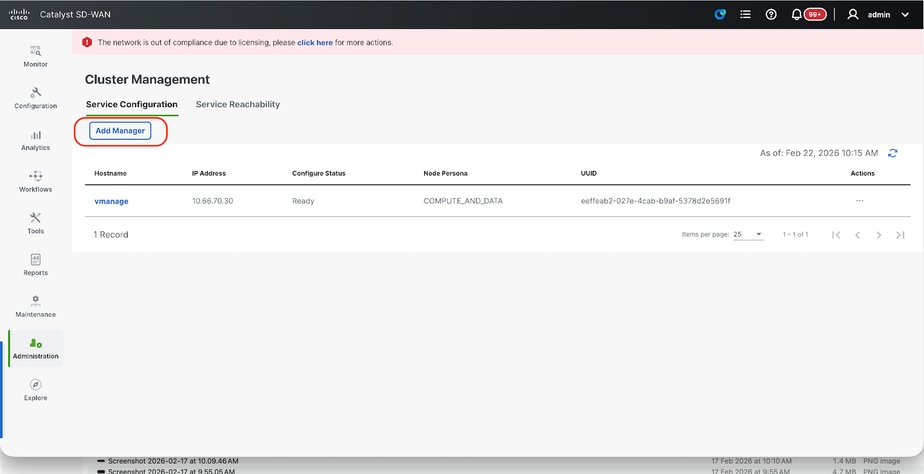
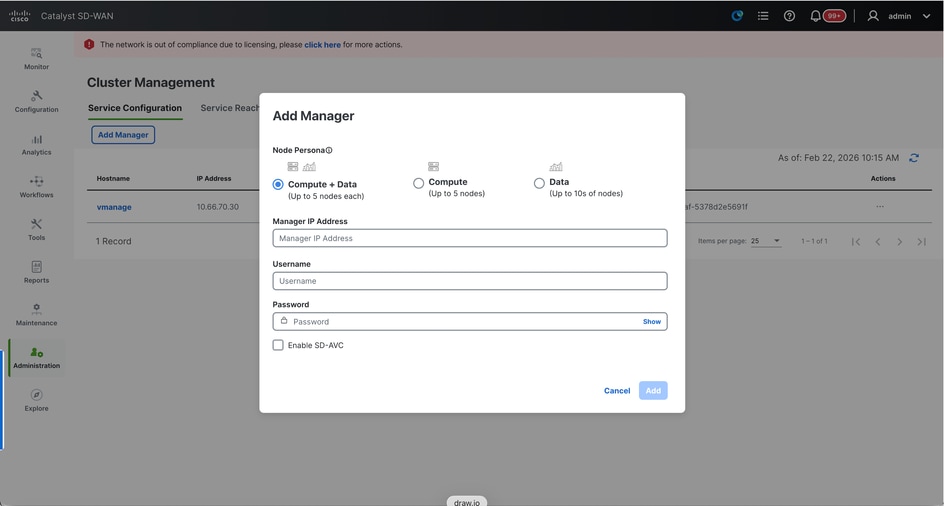
- Choose the Node persona based on the persona configurations done while the vManage – 2 node was spun up.
- Enter the service interface IP of vManage-2 under Manager IP address
- Enter the username and password, which is the same credentials as we used in Step 6.
- Enable SDAVC - To be left unchecked as we would have enabled it already on vManage-1
- Click on Add.
- Post this, the vManage NMS services restarts in the background for vManage 1 and 2 nodes. The UI is not available for a few minutes of around 5 to 10 minutes for vManage 1 and 2.
- During this time, CLI access of vManage 1 and 2 is available.
- Once the vManage-1 UI is accessible navigate to Administration > Cluster Management, make sure service interface IP of both the vManage is reflected under IP address, Configure Status is Ready and node persona is reflected correctly.
- Switch to Service reachability section in the same page and make sure all services are reachable for both the vManage nodes.
- If we see any of the services are not reachable yet, please wait. Usually takes around 5 to 10 minutes.
- You can check the status of cluster add process in the Task-list available on the top right corner of the vManage UI.

- You can look up for Active task list and if the task is still listed under Active task list, it indicates the task is not completed yet.
- You can click on the task to check the progress of the same. If the task is not listed under Active task list, switch to Completed and make sure the task is successfully completed.
- Only after these points are validated proceed to next step.
These points need to be taken into consideration before adding the next node to the cluster:
Please verify these points on all the UIs of the vManage nodes that are added to cluster so far:
- Navigate to Monitor > Overview of vManage UI and make sure the number of vManage nodes are reflected correctly and are seen reachable depending on the number of the nodes added to the cluster.
- Navigate to Administration > Cluster Management and make sure service interface IP of both the vManage is reflected under IP address, Configure Status is Ready and node persona is reflected correctly.
- Switch to Service reachability section in the same page and make sure all services are reachable for both the vManage nodes.
- Each time, a node is added to the cluster, the NMS services of all the nodes in the cluster is restarted hence the UI of all those nodes becomes unreachable for some time.
- Depending on the number of the nodes in the cluster, it can take a longer time for the UI to be back up and all the services to be reachable.
- You can monitor the task under Task-list available on the top right corner of the vManage UI.
- On the vManage UI of each of node added to the cluster, we need to see all the routers, templates and policies if they were available in vManage-1.
- If those configurations were not present on vManage-1, the vBonds and vSmarts that were added to vManage-1 and also Administration > Settings configurations for Organization-name, vBond, Certificate Authorization must be reflected on rest of the vManage nodes added to the cluster.
- Repeat the same steps for the rest of the vManage nodes.
Step 4: Config-db Backup/Restore
Collect vManage configuration-db backup and restore on another vManage node
Note: While collecting configuration-database backup from the existing vManage cluster which has Disaster recovery enabled, make sure it is collected after the Disaster recovery on that node is paused and deleted.
Confirm there is no ongoing Disaster recovery replication. Navigate to Administration > Disaster Recovery and make sure the status Success and not in a transient state such as Import Pending, Export Pending, or Download Pending. If the status is not success, reach out to Cisco TAC and make sure replication is successful before you proceed to pause the disaster recovery.
First Pause the disaster recovery and make sure the task is complete. And then Delete the Disaster recovery and confirm the task is completed.
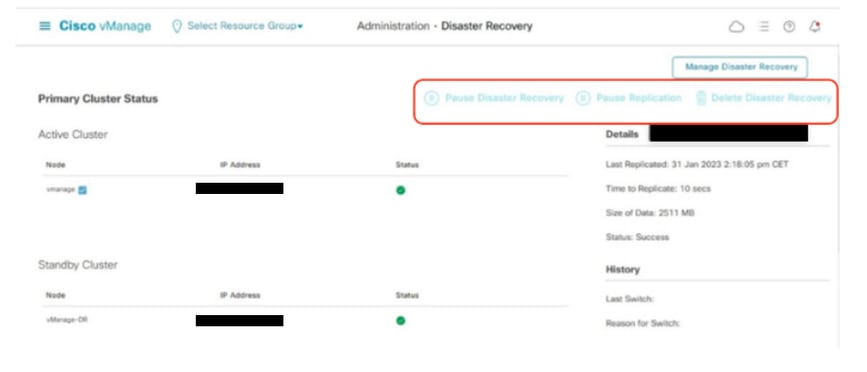
Reach out to Cisco TAC to ensure the Disaster Recovery is successfully cleaned up.
Collect Configuration-DB backup:
- In the SD-WAN fabric which is currently in use, you can generate configuration-db backup from vManage cluster.
- Kindly note that we must generate configuration-db backup only on one node of the vManage cluster which is the configuration-db leader.
- For standalone vManage, that vManage itself is the configuration-db leader.
- In vManage cluster, identify the configuration-db leader node using the command request nms configuration-db diagnostics.You can run this command on all the nodes of the 3 node vManage cluster.
- In a 6 node cluster, make sure to run this command on the vManage nodes where configuration-db is enabled to identify the leader node. Navigate to Administration > Cluster Management to verify the same:
- As we see in the screenshot, the nodes configured with persona COMPUTE_AND_DATA have configuration-db running.
You can verify the same using the command requestnmsconfiguration-dbstatus on vManageCLI. The output is as shown
vmanage# request nms configuration-db status
NMS configuration database
        Enabled: true
        Status: running PID:32632 for 1066085s
        Native metrics status: ENABLED
        Server-load metrics status: ENABLED
vmanage#
- Once you execute the commandrequest nms configuration-db diagnostics on these nodes, the output is as shown:
- Look for the highlighted field for “IsLeader”. If it is set to 1, it indicates that node is the leader node and we can collect configuration-db backup from it.
vManage-3# request nms configuration-db diagnostics
NMS configuration database
Checking cluster connectivity for ports 7687,7474 ...
Pinging vManage  node 0 on 169.254.1.5:7687,7474...
Starting Nping 0.7.80 ( https://nmap.org/nping ) at 2026-02-18 12:41 UTC
SENT (0.0013s) Starting TCP Handshake > 169.254.1.5:7474
RCVD (0.0022s) Handshake with 169.254.1.5:7474 completed
SENT (1.0024s) Starting TCP Handshake > 169.254.1.5:7687
RCVD (1.0028s) Handshake with 169.254.1.5:7687 completed
SENT (2.0044s) Starting TCP Handshake > 169.254.1.5:7474
RCVD (2.0050s) Handshake with 169.254.1.5:7474 completed
SENT (3.0064s) Starting TCP Handshake > 169.254.1.5:7687
RCVD (3.0072s) Handshake with 169.254.1.5:7687 completed
SENT (4.0083s) Starting TCP Handshake > 169.254.1.5:7474
RCVD (4.0091s) Handshake with 169.254.1.5:7474 completed
SENT (5.0106s) Starting TCP Handshake > 169.254.1.5:7687
RCVD (5.0115s) Handshake with 169.254.1.5:7687 completed
Max rtt: 0.906ms | Min rtt: 0.392ms | Avg rtt: 0.724ms
TCP connection attempts: 6 | Successful connections: 6 | Failed: 0 (0.00%)
Nping done: 1 IP address pinged in 5.01 seconds
Pinging vManage  node 1 on 169.254.2.5:7687,7474...
========== SNIP ==========
Connecting to 10.10.10.3...
+------------------------------------------------------------------------------------+
| type             | row                                  | attributes[row]["value"] |
+------------------------------------------------------------------------------------+
| "StoreSizes"     | "TotalStoreSize"                     | 85828934                 |
| "PageCache"      | "Flush"                              | 4268666                  |
| "PageCache"      | "EvictionExceptions"                 | 0                        |
| "PageCache"      | "UsageRatio"                         | 0.09724264705882353      |
| "PageCache"      | "Eviction"                           | 2068                     |
| "PageCache"      | "HitRatio"                           | 1.0                      |
| "ID Allocations" | "NumberOfRelationshipIdsInUse"       | 2068                     |
| "ID Allocations" | "NumberOfPropertyIdsInUse"           | 56151                    |
| "ID Allocations" | "NumberOfNodeIdsInUse"               | 7561                     |
| "ID Allocations" | "NumberOfRelationshipTypeIdsInUse"   | 31                       |
| "Transactions"   | "LastCommittedTxId"                  | 214273                   |
| "Transactions"   | "NumberOfOpenTransactions"           | 1                        |
| "Transactions"   | "NumberOfOpenedTransactions"         | 441742                   |
| "Transactions"   | "PeakNumberOfConcurrentTransactions" | 11                       |
| "Transactions"   | "NumberOfCommittedTransactions"      | 414568                   |
| "Causal Cluster" | "IsLeader"                           | 1         >>>>>>>>>               |
| "Causal Cluster" | "MsgProcessDelay"                    | 0                        |
| "Causal Cluster" | "InFlightCacheTotalBytes"            | 0                        |
+------------------------------------------------------------------------------------+
18 rows
ready to start consuming query after 388 ms, results consumed after another 13 ms
Completed
Connecting to 10.10.10.3...
Displaying the Neo4j Cluster Status
+---------------------------------------------------------------------------------------------------------------------------------+
| name     | aliases | access       | address            | role       | requestedStatus | currentStatus | error | default | home  |
+---------------------------------------------------------------------------------------------------------------------------------+
| "neo4j"  | []      | "read-write" | "169.254.3.5:7687" | "leader"   | "online"        | "online"      | ""    | TRUE    | TRUE  |
| "neo4j"  | []      | "read-write" | "169.254.2.5:7687" | "follower" | "online"        | "online"      | ""    | TRUE    | TRUE  |
| "neo4j"  | []      | "read-write" | "169.254.1.5:7687" | "follower" | "online"        | "online"      | ""    | TRUE    | TRUE  |
| "system" | []      | "read-write" | "169.254.3.5:7687" | "follower" | "online"        | "online"      | ""    | FALSE   | FALSE |
| "system" | []      | "read-write" | "169.254.2.5:7687" | "follower" | "online"        | "online"      | ""    | FALSE   | FALSE |
| "system" | []      | "read-write" | "169.254.1.5:7687" | "leader"   | "online"        | "online"      | ""    | FALSE   | FALSE |
+---------------------------------------------------------------------------------------------------------------------------------+
6 rows
ready to start consuming query after 256 ms, results consumed after another 3 ms
Completed
Total disk space used by configuration-db:
60M     .
Use this command to collect the configuration-db backup from the identified configuration-db leader vManage node.
request nms configuration-db backup path /opt/data/backup/<filename>
The expected output is as shown:
vmanage# request nms configuration-db backup path /opt/data/backup/june18th
Starting backup of configuration-db
config-db backup logs are available in /var/log/nms/neo4j-backup.log file
Successfully saved backup to /opt/data/backup/june18th.tar.gz
sha256sum: 8d0f5af8aee4e70f05e3858be6bdd5e6c136134ae47c383569ec883080f5d359
Removing the temp staging dir :/opt/data/backup/staging
vmanage#
- Make a note of the configuration-db credentials if it has been updated.
- If you are unaware of the configuration-db credentials, reach out to TAC to retrieve the configuration-db credentials from the existing vManage nodes.
- Default configuration-db credentials are username: neo4j and password: password
Restore Configuration-db Backup to another vManage node
Copy the configuration-db backup to /home/admin/ directory of vManage using SCP.
Sample scp command output:
XXXXXXXXX Downloads % scp june18th.tar.gz admin@10.66.62.27:/home/admin/
viptela 20.15.4.1

(admin@10.66.62.27) Password:
(admin@10.66.62.27) Password:
june18th.tar.gz                                                                                                                                                   0%  255KB  47.2KB/s - stalled -
To restore configuration-db backup, first we need to configure the configuration-db credentials. If your configuration-db credentials are default(neo4j/password), we can skip this step.
To configure configuration-db credentials, use the command request nms configuration-db update-admin-user.Use the username and password of your choice.
Kindly note that the Application server of vManage is restarted. Due to which vManage UI becomes inaccessible for a short time.
vmanage# request nms configuration-db update-admin-user
configuration-db
Enter current user name:neo4j
Enter current user password:password
Enter new user name:ciscoadmin
Enter new user password:ciscoadmin
WARNING: sun.reflect.Reflection.getCallerClass is not supported. This will impact performance.
Successfully updated configuration database admin user(this is service node, please repeat same operation on all service/data nodes)
Successfully restarted vManage Device Data Collector
Successfully restarted NMS application server
Successfully restarted NMS data collection agent
vmanage#
Post which we can proceed to retore the configuration-db backup:
We can use the command request nms configuration-db restore path /home/admin/< >to restore the configuration-db to the new vManage:
vmanage# request nms configuration-db restore path /home/admin/june18th.tar.gz
Starting backup of configuration-db
config-db backup logs are available in /var/log/nms/neo4j-backup.log file
Successfully saved database to /opt/data/backup/configdb-local-tmp-20230623-160954.tar.gz
Successfully backup database to /opt/data/backup/configdb-local-tmp-20230623-160954.tar.gz
Configuration database is running in a standalone mode
WARNING: sun.reflect.Reflection.getCallerClass is not supported. This will impact performance.
Successfully saved cluster configuration for localhost
Successfully saved vManage root CA information for device: "53f95156-f56b-472f-b713-d164561b25b7"
Stopping NMS application server on localhost
Stopping NMS configuration database on localhost
Reseting NMS configuration database on localhost
Loading NMS configuration database on localhost
Starting NMS configuration database on localhost
Waiting for 180s or the instance to start...
NMS configuration database on localhost has started.
Updating DB with the saved cluster configuration data
Successfully reinserted cluster meta information
Successfully reinserted vmanage root ca information
Starting NMS application server on localhost
Waiting for 180s for the instance to start...
Successfully restored database
Once the configuration-db is restored, make sure the vManage UI is accessible. Wait for around 5 minutes and then attempt to access the UI.
Once logged into UI successfully, ensure the Edge routers list, template, policies and all the rest of the configurations that were present on your previous or existing vManage UI is reflected on the new vManage UI.
Step 5: Enable Disaster Recovery on a vManage Cluster
Important Prechecks
Two separate vManage 3-node clusters must be configured and operational in order to proceed with disaster recovery. On the active cluster you must have validators and controllers onboarded. In case you have validator and controllers on the DR site, they must also be onboarded on the active cluster and not on the DR vManage cluster.
Cisco recommends that before registering disaster recovery, these requirements must be met:
- Ensure that the primary and the secondary node are reachable by HTTPS on a transport VPN (VPN 0).
- Ensure that Cisco vSmart Controllers and Cisco vBond Orchestrators on the secondary setup are connected to the primary setup.
- Ensure that the Cisco vManage primary node and secondary node are running the same Cisco vManage version.
- Out-of-band cluster interface(service interface) in VPN 0.
- For each vManage instance within a cluster, a third interface (cluster link) is required besides the interfaces used for VPN 0 (transport) and VPN 512 (management).
- This interface is used for communication and syncing between the vManage servers within the cluster.
- This interface must be at least 1 Gbps and have a latency of 4ms or less. A 10 Gbps interface is recommended.
- Both vManage nodes must be able to reach each other through this interface: be it a layer 2 segment or through layer 3 routing.
- In each vManage, this interface must be configured in the GUI as a cluster interface (Administration > Cluster Management– indicate own out-of-band cluster interface IP address, user and password).
- In order to allow Cisco vManage nodes to communicate with each other across data centers, enable TCP ports 8443 and 830 on your data center firewalls.
- Ensure that all services (application-server, configuration-db, messaging server, coordination server, and statistics-db) are enabled on both Cisco vManage nodes.
- Distribute all controllers, including Cisco vBond Orchestrators, across both primary and secondary data centers. Ensure that these controllers are reachable by Cisco vManage nodes that are distributed across these data centers. The controllers connect only to the primary Cisco vManage node.
- Ensure that no other operations are in process in the active (primary) and the standby (secondary) Cisco vManage node. For example, ensure that no servers are in the process of upgrading or attaching templates to devices.
- Disable the Cisco vManage HTTP/HTTPS proxy server if it is enabled. See HTTP/HTTPS Proxy Server for Cisco vManage Communication with External Servers. If you do not disable the proxy server, Cisco vManage attempts to establish disaster recovery communication through the proxy IP address, even if Cisco vManage out-of-band cluster IP addresses are directly reachable. You can re-enable the Cisco vManage HTTP/HTTPS proxy server after disaster recovery registration completes.
- Before you start the disaster recovery registration process, navigate to the Tools > Rediscover Network window on the primary Cisco vManage node and rediscover the Cisco vBond Orchestrators.
Configurations
For more information on vManage Disaster Recovery, refer to this link.
The two separate 3-node-clusters are already created, assuming each SD-WAN manager has bare minimum configuration and certification part is completed.
Navigate to Administration > Cluster Management on both clusters and verify all nodes are in ready state.
DC vManage
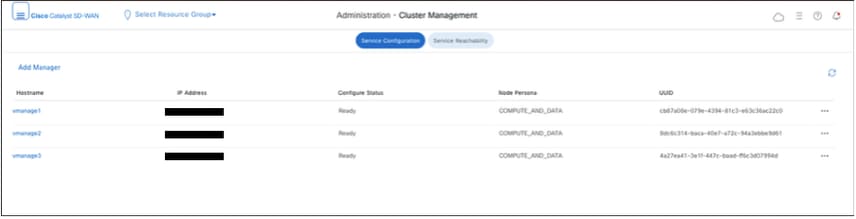
DR vmanage
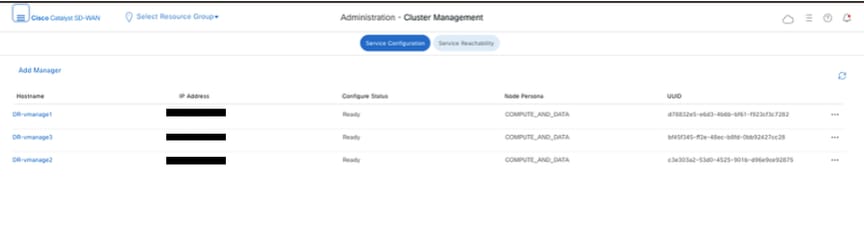
Navigate to Administration>Disaster Recovery of Primary vManage Cluster. Click Manage Disaster Recovery.
In the pop-up window, fill the details for both primary and secondary vManage.
The IP addresses to be indicated are the out-of-band cluster interfaces IP addresses. Preferrably use the IP address of VPN 0 service interface of vManage-1 in each of the cluster.
The credentials must be those of a netadmin user and they must not be changed once the DR is configured, unless it is deleted. A separate vManage local user credential for Disaster recovery can be used. We need to make sure the vManage local user is part of netadmin group. Even admin credential can be used here.
Once filled, click Next.
- Fill the vBond controllers’ details.
The vBond controllers must be reachable in the specified IP address via Netconf.
Once filled, click Next.
- In the Recovery Mode, choose Manual. The Automation mode is deprecated. Click Next.
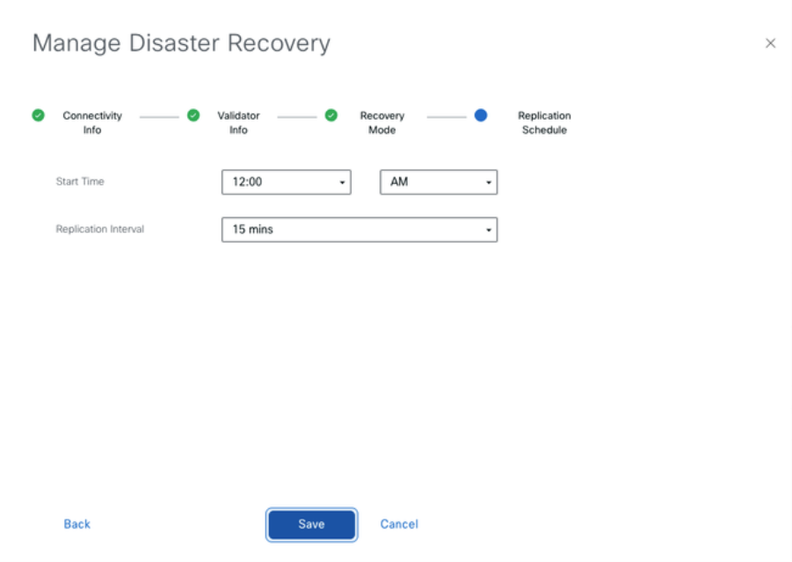
Set the value and click Save.
- The DR Registration starts now. Click the refresh button to manually refresh the state and the progress logs. This process can take up to 20-30 minutes.
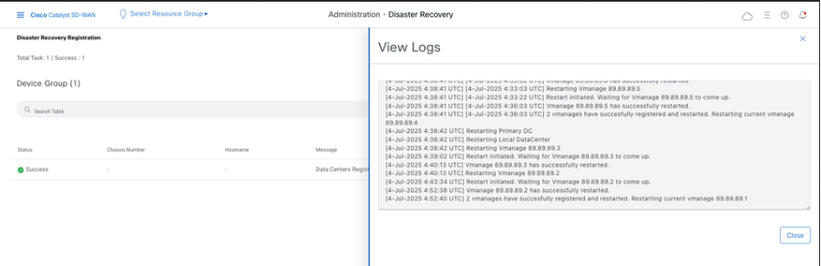
Verification
Navigate to Administration>Disaster Recovery in order to see the Disaster Recovery status and when the data was replicated last time.
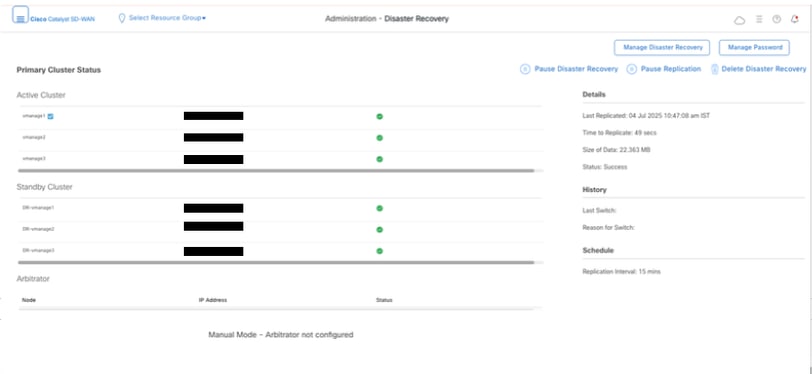
Note: Replication can take several hours depending on the database size. Additionally, it can require a few cycles to achieve successful replication.
Step 6: Reauthentication of Controllers and invalidation of old controllers
Once configuration-db is restored ,we need to reauthenticate all the new controllers (vmanage/vsmart/vbond) in the fabric
Note: In actual production if the interface IP used to re-authenticate is the tunnel interface IP, need to ensure NETCONF service is allowed on the tunnel interface of the vManage, vSmart and vBond and also on the firewalls along the path. The firewall port to open is TCP port 830 as bi-directional rule from DR cluster to all vBonds and vSmarts .
On vmanage UI, click on Configuration > Devices > Controllers
- Click the three dots near each controller and Click Edit

- Replace the ip-address (system-ip of the controller) with the transport vpn 0(tunnel interface) ip address .Enter the username and password and click save
- Do the same for all the new controllers in the fabric
Sync the Root-cert-chain
Once all the controllers are onboarded, complete this step:
On any Cisco SD-WAN Manager server in the newly active cluster, perform these actions:
Enter this command to synchronize the root certificate with all Cisco Catalyst SD-WAN devices in the newly active cluster:
https://vmanage-url/dataservice/system/device/sync/rootcertchain
Enter this command to synchronize the Cisco SD-WAN Manager UUID with the Cisco SD-WAN Validator:
https://vmanage-url/dataservice/certificate/syncvbond
Once the fabric is restored and the control and bfd sessions are up for all edges and controlllers in the fabric,we need to invalidate the old controllers (vmanage/vsmart/vbond) from the UI
- On vmanage UI, click on Configuration > Devices > Certificates
- Click on Controllers
- Click on the three dots near the controller(vmanage/vsmart/vbond) from the old fabric. Click invalidate
- Click send to vbond
- On vmanage UI, click on Configuration > Devices > Controllers
- Click on the three dots near the controller(vmanage/vsmart/vbond) from the old fabric. Click Delete
Post Checks
These post checks apply to all deployment combinations.
Reactivate cloud Edge routers:
- If C8000v are part of the overlay and vmanaged signed, they need to be re-authenticated, that is:
request platform software sdwan vedge_cloud activate chassis-number <chassis-number > token <token number>
- Confirm Control connections and BFD sessions are up
- Confirm application traffic is flowing end to end
- If changes were made to the port-hop prior to the fabric rebuild on the edges, they must be reverted
-
Verify that the items appear as expected:
-
Templates
-
Policies
-
Device page (both tabs)WAN vEdge ListandControllers
vManage post checks
-
-
Applicable for vManage nodes:
Configuration-DB(Neo4j) Checks:
Execute the command "request nms configuration-db diagnostics" on all the vManage nodes:
1. Check for Node online and Leadership status:(not available for all versions)

“Neo4j” must show 3 nodes online and 1 leader and 2 followers. “system” must also show 3 nodes online and 1 leader and 2 followers, however as this is not the default Db the default flag is false. If there are less than 3 entries in each neo4j and system means node fallen off from cluster. Please contact Cisco TAC to troubleshoot the same.
2. Check if any node is "quarantine".
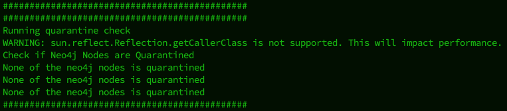
None of the nodes must be in quarantine state.
3. Schema validation must be "successful".
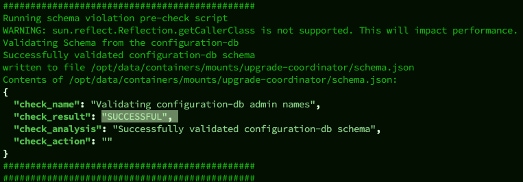
4. Collect a configuration-db backup using the command "request nms configuration-db diagnostics" and make sure it is successful.

If there are any inconsistency or errors seen, reach out to Cisco TAC for troubleshooting.
Alternatively we can run these API calls to confirm the vmanage node status for a cluster ( for all COMPUTE+DATA nodes) - works on version 20.12 and later only
go to vshell of the vmanage node ( to be done on all vmanages)
===============================================================
curl -u <config-db username>:<config-db password>  -H "Content-Type: application/json"   -d '{"statements":[{"statement":"call dbms.cluster.overview"}]}'   http://<cluster OOB ip>:7474/db/neo4j/tx/commit | jq -r

curl -u <config-db username>:<config-db password>  -H "Content-Type: application/json"   -d '{"statements":[{"statement":"show databases"}]}'   http://<cluster OOB ip>:7474/db/neo4j/tx/commit | jq -r
Ensure in a cluster has only one leader for both neo4j and system and rest as followers .Ensure all the nodes are online .If you have 3 node cluster ( all three are COMPUTE+DATA),there must be only one leader for both neo4j and system .Any deviation ,you must contact TAC
5. Check in /var/log/kern.log for any Disk, Mem , IO errors. This needs to be checked on all the vManage nodes.
6.Check the step when you form a fresh cluster for vmanage which dont have CC between each node
Perform ssh as vmanage-admin from node 1 to other nodes cluster ip and vise versa, to check if public key is exchanged and password less ssh is working [Consent token is required for shown here steps]
DR-vManage-1:~# ssh -i /etc/viptela/.ssh/id_dsa -p 830 vmanage-admin@<ClusterIP>
The authenticity of host '[192.168.50.5]:830 ([192.168.50.5]:830)' can't be established.
ECDSA key fingerprint is SHA256:rSpscoYCVC+yifUMHVTlxtjqmyrZSFg93msFdoSUieQ.
Are you sure you want to continue connecting (yes/no/[fingerprint])? yes
Warning: Permanently added '[192.168.50.5]:830' (ECDSA) to the list of known hosts.
viptela 20.9.3.0.31

Password:
In case the output is asking to enter the password ,Contact TAC
Controller Post checks:
Applicable for all the SD-WAN controllers (vBond, vManage, vSmart):
Execute the commands on all the controllers in the overlay and confirm the vManage UUID and serial numbers seen are valid for the currently fabric:
vBond commands:
show orchestrator valid-vsmarts
show orchestrator valid-vmanage-id
vManage/vSmart commands:
show control valid-vsmarts
show control valid-vmanage-id
Please note the output of show control valid-vsmarts includes the serial numbers of both vSmarts and vManage nodes.
Compare it with the ones seen in vManage UI. Navigate to section Configuration > Certificates > Controllers.
If any additional entries are seen for the UUID/serial number which are currently not onboarded to the fabric, we must delete them. You can contact Cisco TAC for the same.
Revision History
| Revision | Publish Date | Comments |
|---|---|---|
1.0 |
25-Feb-2026
|
Initial Release |
Contributed by Cisco Engineers
- Afroz DalalCisco TAC
- Accamma MuddappaCisco TAC
- Nathan PanCisco TAC
 Feedback
Contact Cisco
- Open a Support Case

- (Requires a Cisco Service Contract)