Collect an Admin-Tech in SD-WAN Environment and Upload to TAC Case
Available Languages
Contents
Introduction
This document describes how to initiate an admin-tech in an Software Defined Wide Area Network (SD-WAN) environment.
Prerequisites
Requirements
Cisco recommends that you have knowledge of Cisco SD-WAN.
Components Used
The information in this document is based on Cisco vManage.
The information in this document was created from the devices in a specific lab environment. All of the devices used in this document started with a cleared (default) configuration. If your network is live, ensure that you understand the potential impact of any command.
Background Information
When you initiate an admin-tech in an Software Defined Wide Area Network (SD-WAN) environment, this is intended to help capture information for the Technical Assistance Center (TAC) in order to assist it to troubleshoot an issue. It helps to capture the admin-tech in the problem state. It covers the usage of the vManage GUI and CLI, Edge device CLI, and the upload of the admin-tech directly into the Cisco TAC case with the use of the token mechanism.
Generate Admin-Tech
Scenario 1. From vManage for Device Online
Step 1. Log in to vManage.
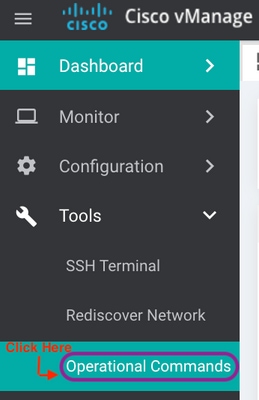
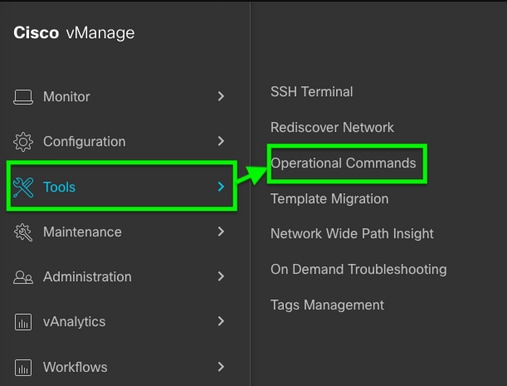
Step 2. Navigate to Tools > Operational Commands.
 vManage 20.7 x and Later
 vManage 20.14 x and Later
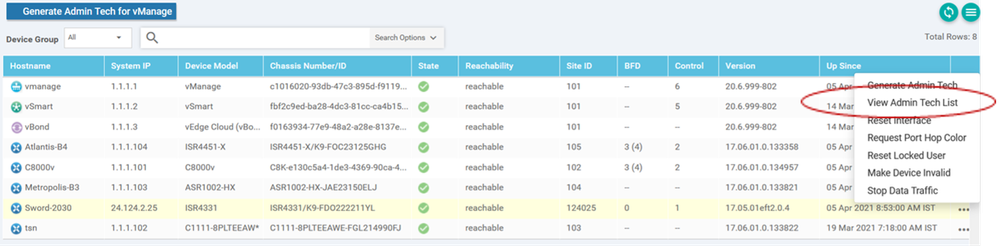
Step 3. Click the ... (three dots) for the device for which admin-tech needs to be generated (Step A).
Step 4. Click Admin Tech (Step B) as shown in the image.
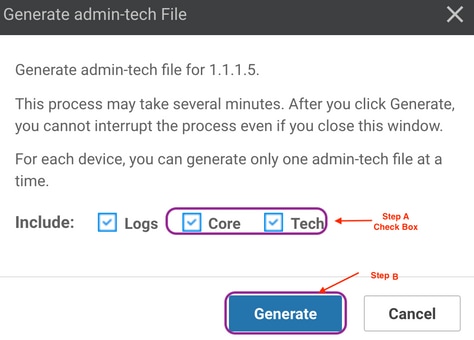
Step 5. Check the relevant check boxes, as shown in the image. Select applicable Tech Features as needed (if unsure, select All).
Step 6. Click Generate.

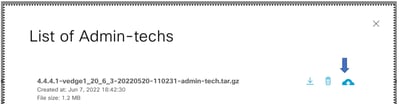
Step 7. Click Show Admin Tech List as shown in the image.

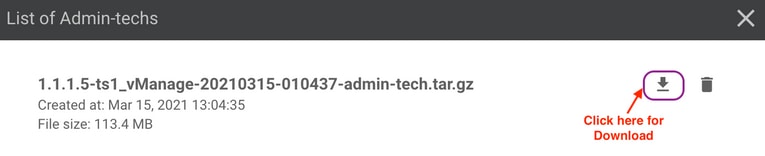
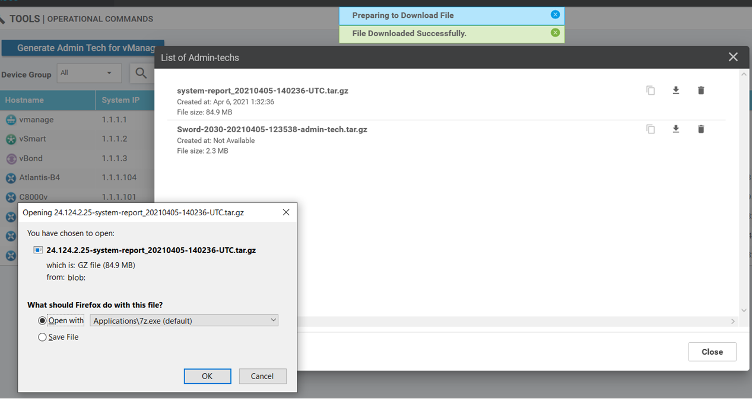
Step 8. Click the Download icon.
Download it from the local system and upload it to a Service Request (SR).
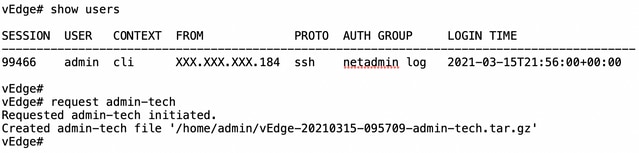
Scenario 2. From the CLI for Device Unreachable from vManage
Step 1. Log in to vEdge via Secure Shell (SSH).
ssh -l <username> <IP-Address>
Step 2. Enter the request admin-tech command as shown in this image.

Step 3. Copy the admin-tech from the /home/admin/<dated-time-admin-tech.tar.gz> directory.
For example, if the local user is johndoe, admin-tech is placed in the /home/johndoe/ directory. If the netadmin user is authenticated against the RADIUS or TACACS central authentication server, admin-tech is found in the strong>/home/basic/ directory by default.
Scenario 3. From the CLI for Cisco Edge Router
Step 1. Log in to Cisco Edge Router via SSH.
ssh -l <username> <IP-Address>
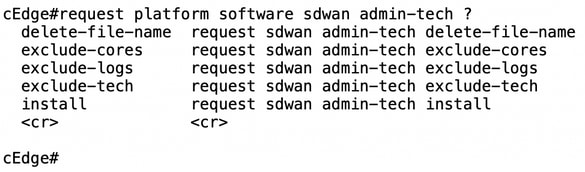
Step 2. Enter the request platform software sdwan admin-tech command.

Step 3. Copy the admin-tech to TFTP, FTP, SCP to the external server.
An example of SCP from the local system is shown here.
Scenario 4. Upload admin-tech Generated on Cisco Edge Router to vManage
When the device becomes reachable, vManage has an option named Retrieve Admin Tech from Device (View Admin Tech List in older releases). This shows a list of admin-techs available on the Edge Router which can be uploaded to the vManage so same steps mentioned later in this document can be used to upload the admin-tech to a Service Request (SR).
These are the steps to do this.
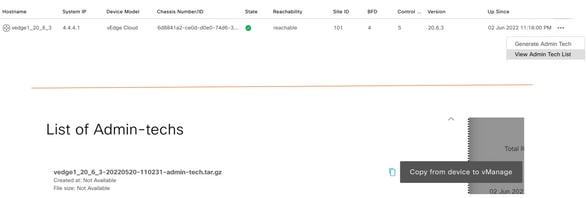
Step 1: Navigate to Tools > Operational Commands and select a specific device by clicking ... (three dots). You see a new option View Admin Tech List.
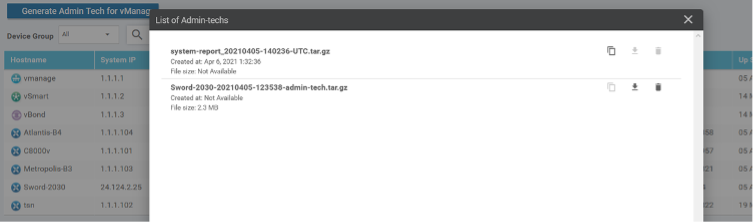
Step 2: Click it and now you see list of admin-tech available for uploading to vManage.
 Upload and Opening File Now Stored on vManage
You see a Copy icon. Click it.
Step 3: Wait for the file to get copied to vManage storage.
Step 4: Now you can download the file like any other admin-tech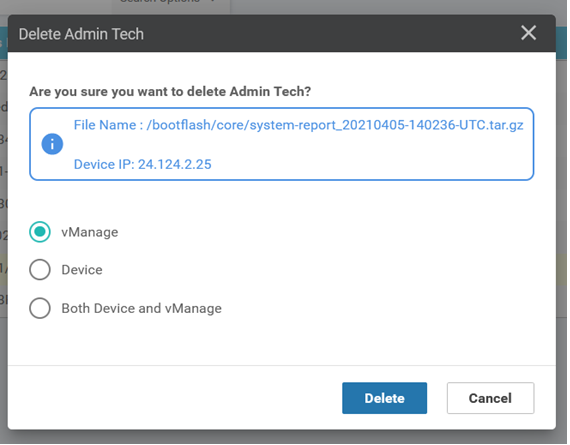 Upload and Opening File Now Stored on vManage
Step 5: When you select delete, you see additional options. This allows you to free up space on bootflash: from UI itself. User can Delete Files from vManage, Device or Both
Additional Notes
vEdge:

Transfer Admin-Tech Directly into a Cisco SR
In order to troubleshoot SD-WAN related issues, upload the admin-tech directly from vManage to a Cisco SR. You can find it hard to download the rather bulky file to your own workstation when you are remote from the controller. After the slow download, you then need to upload the file to the SR, which is again a slow process. This procedure describes how to achieve it via the GUI and CLI on vManage.
Prerequisites
For the upload to work, the vManage requires connectivity to the public Internet. Cisco cloud-hosted vManage controllers have such capability. The user needs to have netadmin privileges to be able to request an admin-tech. You can only transfer one admin-tech into the SR at a time. For the upload to the SR, you need the SR number and an upload token. More information on different ways to upload is explained in Customer File Uploads to Cisco Technical Assistance Center. The Customer eXperience Drive (CXD) procedure is used in the example.
Retrieve the Upload Token for an SR
Use SCM to Get the Token
When an SR is opened, CXD automatically generates an upload token and inserts a note in the SR which contains the token and some details on how to use the service.
In order to retrieve the upload token, complete these steps:
Step 1. Log in to SCM.
Step 2. Open the desired case to get the upload token for.
Step 3. Click the Attachments tab.
Step 4. Click Generate Token. Once the token is generated, it is displayed to the right of the Generate Token button.
Upload Admin-Tech to an SR
vManage GUI
For vManage 20.7.x and later, perform steps 1-7 in Scenario 1. From vManage for Device Online or steps 1-3 in Scenario 4. Upload admin-tech generated on Cisco Edge Router to vManage
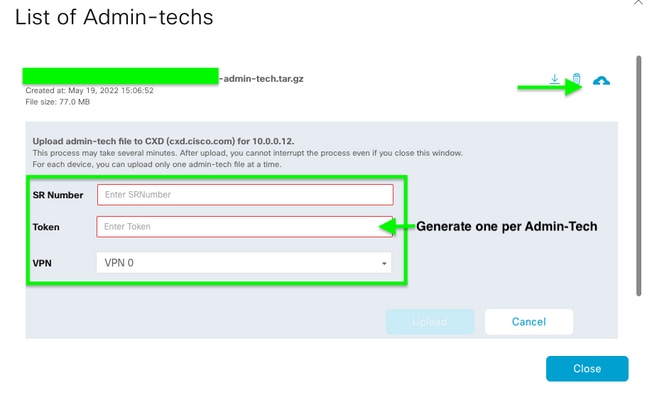
Once last step is complete, and the admin-tech has been generated, click the cloud icon from the admin-tech liste, fill in the information (SR Number, Token, and VPN 0 or 512) and click Upload.

After you click Upload, the Upload successful message is displayed to let you know that the admin-tech was successfully uploaded to the SR.
In Release 20.6.x and later, if the vManage is in a Cluster mode, you can generate admin-tech across all the vManage nodes with the Generate Admin Tech for vManage option under Tools > Operational Commands.
Once generated, you can use the previous steps to upload the admin-techs directly to the TAC Case.
vManage CLI
Specific to vManage only, once request admin-tech is used via the CLI to generate the admin-tech and it is completed, you can enter the request upload command. Use this syntax in this example. Once prompted for the password, enter the token you retrieved earlier.

Verify the Case Attachment
Verify the admin-tech has been uploaded to the case with the use of SCM.
Revision History
| Revision | Publish Date | Comments |
|---|---|---|
6.0 |
07-May-2026
|
Updated Alt Text, Branding Requirements, Image Captions, and Formatting. |
5.0 |
22-Apr-2024
|
Scenario 4 added |
4.0 |
12-Jan-2023
|
Updated the Upload Admin-Tech to an SR section.
Updated Title, Introduction, Style Requirements and Alt Text. |
3.0 |
13-Jun-2022
|
Updated the Upload Admin-Tech to an SR section. |
2.0 |
07-Jun-2022
|
Addditional Information |
1.0 |
24-Mar-2021
|
Initial Release |
 Feedback
Contact Cisco
- Open a Support Case

- (Requires a Cisco Service Contract)