Generate Self-Signed Web Certificate for vManage
Available Languages
Introduction
This document describes how to generate and install a self-signed web certificate when the existing one is expired on an on-prem vManage.
Background Information
Cisco does not sign web certificates for such deployments. Customers have to sign it by their own Certificate Authority (CA) or some 3rd party CA.
Problem
vManage web certificate is going to expire or has already expired. Access to the Graphical User Interface (GUI) can be lost or you can see permanent alarm in GUI about certificate expired.
Solution
If you are not concerned about the security aspect of self-signed certificate usage and just want to avoid alarm message and possible problems with vManage GUI access due to expired certificate, then you can use this solution with self-signed web certificate on a vManage.
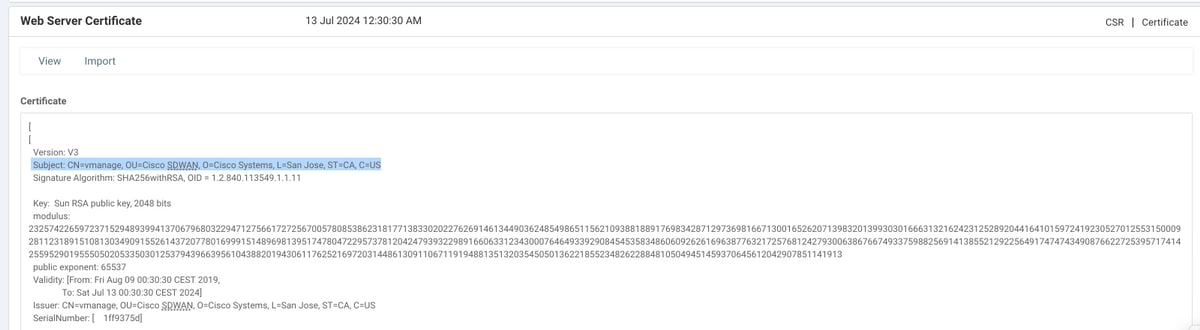
1. In the vManage GUI, navigate to Administration >Settings > Web Server Certificate > Certificate and then save this information somewhere about certificate subject, for example, Subject: CN=vmanage, OU=Cisco SDWAN, O=Cisco Systems, L=San Jose, ST=CA, C=US.
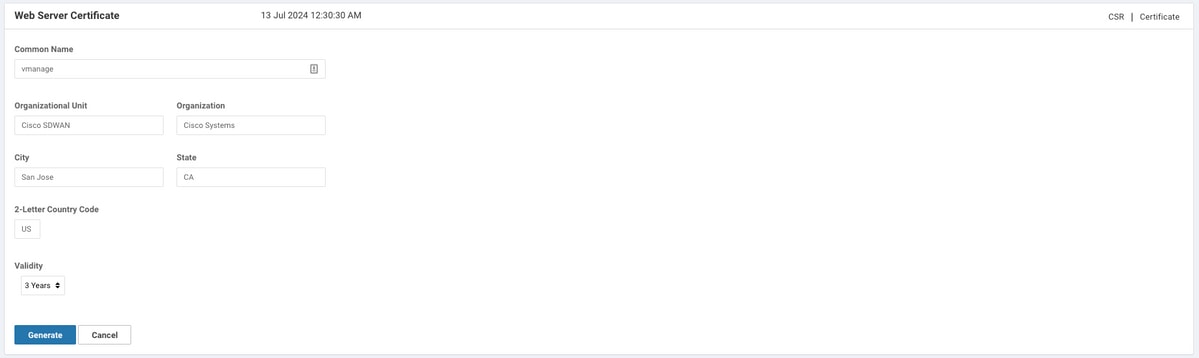
2. In the vManage GUI, navigate to Administration >Settings > Web Server Certificate > CSR and select Generate in order to generate a new Certificate Signing Request (CSR). Ensure you enter the values from the Subject that you captured on the previous step.
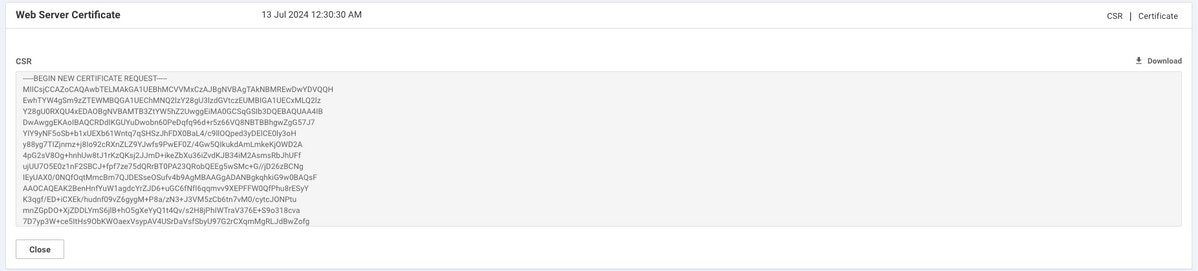
3. Copy newly generated CSR to the copy-paste buffer as shown in the image.
4. Then enter a vshell and paste buffer content with CSR into the file on the vManage with help of echo command.
vmanage#
vmanage# vshell
vmanage:~$ mkdir web
vmanage:~$ cd web
vmanage:~/web$ echo "-----BEGIN NEW CERTIFICATE REQUEST-----
> MIICsjCCAZoCAQAwbTELMAkGA1UEBhMCVVMxCzAJBgNVBAgTAkNBMREwDwYDVQQH
> EwhTYW4gSm9zZTEWMBQGA1UEChMNQ2lzY28gU3lzdGVtczEUMBIGA1UECxMLQ2lz
> Y28gU0RXQU4xEDAOBgNVBAMTB3ZtYW5hZ2UwggEiMA0GCSqGSIb3DQEBAQUAA4IB
> DwAwggEKAoIBAQCRDdIKGUYuDwobn60PeDqfq96d+r5z66VQ8NBTBBhgwZgG57J7
> YIY9yNF5oSb+b1xUEXb61Wntq7qSHSzJhFDX0BaL4/c9llOQped3yDElCE0ly3oH
> y88yg7TIZjnmz+j8Io92cRXnZLZ9YJwfs9PwEF0Z/4Gw5QIkukdAmLmkeKjOWD2A
> 4pG2sV8Og+hnhUw8tJ1rKzQKsj2JJmD+ikeZbXu36iZvdKJB34iM2AsmsRbJhUFf
> ujUU7O5E0z1nF2SBCJ+fpf7ze75dQRrBT0PA23QRobQEEg5wSMc+G//jD26zBCNg
> IEyUAX0/0NQfOqtMmcBm7QJDESseOSufv4b9AgMBAAGgADANBgkqhkiG9w0BAQsF
> AAOCAQEAK2BenHnfYuW1agdcYrZJD6+uGC6fNfI6qqmvv9XEPFFW0QfPhu8rESyY
> K3qgf/ED+iCXEk/hudnf09vZ6gygM+P8a/zN3+J3VM5zCb6tn7vM0/cytcJONPtu
> mnZGpDO+XjZDDLYmS6jlB+hO5gXeYyQ1t4Qv/s2H8jPhIWTraV376E+S9o318cva
> 7D7yp3W+ce5ItHs9ObKWOaexVsypAV4USrDaVsfSbyU97G2rCXqmMgRLJdBwZofg
> 04qsgrC8qG28aue1Q88XPa/HQtp0WB/Pxg7oe91s59Je/ETsMkR3vt7aglemyXAJ
> nal67+T/QWgLSJB2pQuPHo51MbA55w==
> -----END NEW CERTIFICATE REQUEST-----" > web_cert.csr
5. Ensure that CSR is saved correctly with the help of cat command.
vmanage:~/web$ cat web_cert.csr
-----BEGIN NEW CERTIFICATE REQUEST-----
MIICsjCCAZoCAQAwbTELMAkGA1UEBhMCVVMxCzAJBgNVBAgTAkNBMREwDwYDVQQH
EwhTYW4gSm9zZTEWMBQGA1UEChMNQ2lzY28gU3lzdGVtczEUMBIGA1UECxMLQ2lz
Y28gU0RXQU4xEDAOBgNVBAMTB3ZtYW5hZ2UwggEiMA0GCSqGSIb3DQEBAQUAA4IB
DwAwggEKAoIBAQCRDdIKGUYuDwobn60PeDqfq96d+r5z66VQ8NBTBBhgwZgG57J7
YIY9yNF5oSb+b1xUEXb61Wntq7qSHSzJhFDX0BaL4/c9llOQped3yDElCE0ly3oH
y88yg7TIZjnmz+j8Io92cRXnZLZ9YJwfs9PwEF0Z/4Gw5QIkukdAmLmkeKjOWD2A
4pG2sV8Og+hnhUw8tJ1rKzQKsj2JJmD+ikeZbXu36iZvdKJB34iM2AsmsRbJhUFf
ujUU7O5E0z1nF2SBCJ+fpf7ze75dQRrBT0PA23QRobQEEg5wSMc+G//jD26zBCNg
IEyUAX0/0NQfOqtMmcBm7QJDESseOSufv4b9AgMBAAGgADANBgkqhkiG9w0BAQsF
AAOCAQEAK2BenHnfYuW1agdcYrZJD6+uGC6fNfI6qqmvv9XEPFFW0QfPhu8rESyY
K3qgf/ED+iCXEk/hudnf09vZ6gygM+P8a/zN3+J3VM5zCb6tn7vM0/cytcJONPtu
mnZGpDO+XjZDDLYmS6jlB+hO5gXeYyQ1t4Qv/s2H8jPhIWTraV376E+S9o318cva
7D7yp3W+ce5ItHs9ObKWOaexVsypAV4USrDaVsfSbyU97G2rCXqmMgRLJdBwZofg
04qsgrC8qG28aue1Q88XPa/HQtp0WB/Pxg7oe91s59Je/ETsMkR3vt7aglemyXAJ
nal67+T/QWgLSJB2pQuPHo51MbA55w==
-----END NEW CERTIFICATE REQUEST-----

vmanage:~/web$
6. With the help of openssl, generate a key for Root Certificate named rootca.key.
vmanage:~/web$ openssl genrsa -out rootca.key 2048
Generating RSA private key, 2048 bit long modulus
..
..........
e is 65537 (0x10001)
vmanage:~/web$ ls
rootca.key  web_cert.csr
vmanage:~/web$
7. Generate Root CA certificate named rootca.pem and sign it with rootca.key that was generated on the previous step.
vmanage:~/web$ openssl req -x509 -new -nodes -key rootca.key -sha256 -days 4000 -out rootca.pem
You are about to be asked to enter information that will be incorporated
into your certificate request.
What you are about to enter is what is called a Distinguished Name or a DN.
There are quite a few fields but you can leave some blank
For some fields there will be a default value,
If you enter '.', the field will be left blank.
-----
Country Name (2 letter code) [AU]:US
State or Province Name (full name) [Some-State]:CA
Locality Name (eg, city) []:San Jose
Organization Name (eg, company) [Internet Widgits Pty Ltd]:Cisco Systems
Organizational Unit Name (eg, section) []:Cisco SDWAN
Common Name (e.g. server FQDN or YOUR name) []:vmanage
Email Address []:
vmanage:~/web$ ls
rootca.key  rootca.pem	web_cert.csr
vmanage:~/web$
8. Sign your CSR with Root CA certificate and key.
vmanage:~/web$ openssl x509 -req -in web_cert.csr -CA rootca.pem -CAkey rootca.key -CAcreateserial -out web_cert.crt -days 4000 -sha256
Signature ok
subject=/C=US/ST=CA/L=San Jose/O=Cisco Systems/OU=Cisco SDWAN/CN=vmanage
Getting CA Private Key
vmanage:~/web$ ls
rootca.key  rootca.pem	rootca.srl  web_cert.crt  web_cert.csr
vmanage:~/web$
9. Copy a new signed certificate to the copy-paste buffer. You can use cat in order to view the signed certificate.
vmanage:~/web$ cat web_cert.crt
-----BEGIN CERTIFICATE-----
MIIDVjCCAj4CCQDXH8GlDhvL4DANBgkqhkiG9w0BAQsFADBtMQswCQYDVQQGEwJV
UzELMAkGA1UECAwCQ0ExETAPBgNVBAcMCFNhbiBKb3NlMRYwFAYDVQQKDA1DaXNj
byBTeXN0ZW1zMRQwEgYDVQQLDAtDaXNjbyBTRFdBTjEQMA4GA1UEAwwHdm1hbmFn
ZTAeFw0xOTEwMjIwODU0MzdaFw0zMDEwMDQwODU0MzdaMG0xCzAJBgNVBAYTAlVT
MQswCQYDVQQIEwJDQTERMA8GA1UEBxMIU2FuIEpvc2UxFjAUBgNVBAoTDUNpc2Nv
IFN5c3RlbXMxFDASBgNVBAsTC0Npc2NvIFNEV0FOMRAwDgYDVQQDEwd2bWFuYWdl
MIIBIjANBgkqhkiG9w0BAQEFAAOCAQ8AMIIBCgKCAQEAkQ3SChlGLg8KG5+tD3g6
n6venfq+c+ulUPDQUwQYYMGYBueye2CGPcjReaEm/m9cVBF2+tVp7au6kh0syYRQ
19AWi+P3PZZTkKXnd8gxJQhNJct6B8vPMoO0yGY55s/o/CKPdnEV52S2fWCcH7PT
8BBdGf+BsOUCJLpHQJi5pHiozlg9gOKRtrFfDoPoZ4VMPLSdays0CrI9iSZg/opH
mW17t+omb3SiQd+IjNgLJrEWyYVBX7o1FOzuRNM9ZxdkgQifn6X+83u+XUEawU9D
wNt0EaG0BBIOcEjHPhv/4w9uswQjYCBMlAF9P9DUHzqrTJnAZu0CQxErHjkrn7+G
/QIDAQABMA0GCSqGSIb3DQEBCwUAA4IBAQBZAIxV/GI/AP0aw54PA//+QMUs9t+b
i6lhATUuTdyQwOuQSSfGjhWypDsqm3oh86GXmgoxIF1D/UmcOXHKVeK/MZrhZ/P9
USAAnPGyqOha/TqQvPbSMKALHj9cGc9389io2AAeDQqneEcDqie5uOs0M0vBth3V
DXpq8mYgTjhqIUyab4txWZwXvQmZj+Hu2h2S4wj//us92KgE+XcljNeaky/GEZqZ
jWNoWDgWeJdsm8hx2QteHHbDTahuArVJf1p45eLIcJR1k0lRL8TTroWaST1bZCJz
20aYK4S0K0nTkpscuVIrXHkwNN6Ka4q9/rVxnLzAflJ4E9DXojpD3qNH
-----END CERTIFICATE-----
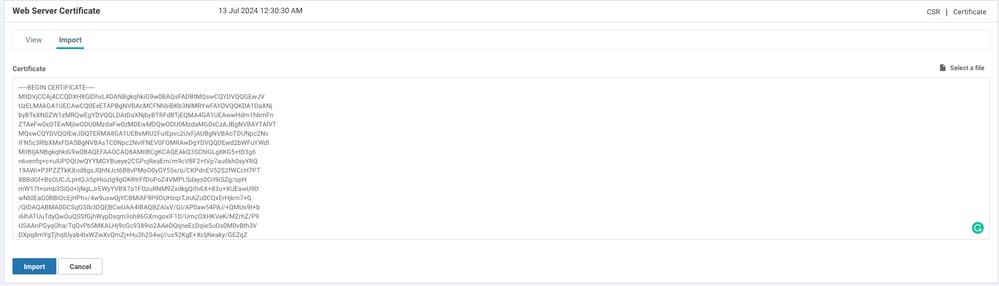
10. Import the certificate into the vManage. In order to do so, navigate to Administration >Settings > Web Server Certificate > Import and paste the content of your copy-paste buffer as shown in the image.
11. If you did everything right, vManage shows Certificate Installed Successfully as shown in the image.

12. Finally, check the result and ensure the certificate validity date updated successfully as shown in the image.

Related Information
Revision History
| Revision | Publish Date | Comments |
|---|---|---|
3.0 |
01-May-2026
|
Updated SEO, and Title. |
2.0 |
09-Sep-2024
|
Added Alt Text.
Updated Title, Introduction, and Formatting. |
1.0 |
24-Dec-2019
|
Initial Release |
 Feedback
Contact Cisco
- Open a Support Case

- (Requires a Cisco Service Contract)