How to Create a Pinpoint DNS Entry
Available Languages
Download Options
Bias-Free Language
The documentation set for this product strives to use bias-free language. For the purposes of this documentation set, bias-free is defined as language that does not imply discrimination based on age, disability, gender, racial identity, ethnic identity, sexual orientation, socioeconomic status, and intersectionality. Exceptions may be present in the documentation due to language that is hardcoded in the user interfaces of the product software, language used based on RFP documentation, or language that is used by a referenced third-party product. Learn more about how Cisco is using Inclusive Language.
Contents
Introduction
This document describes how to create pinpoint entries for service records (SRV) on the internal Name Server (NS) in order to work around the lack of split Domain Name System (DNS) setups.
Contributed by Zoltan Kelemen, Edited by Joshua Alero and Lidiya Bogdanova, Cisco TAC Engineers.
Prerequisites
Requirements
Cisco recommends that you have knowledge of these topics:
- Basic understanding of DNS
- A domain which is correctly configured on the public authoritative NS
Components Used
The information in this document is based on these software and hardware versions:
- Microsoft Windows Server 2012
- Video Communication System (VCS) / Expressway
Note: The information in this document can be used either with Microsoft DNS server, or BIND. You only need to use the steps appropriate for your particular DNS server. Instructions for other types of DNS servers are not provided, but the concept can be used with any other DNS server if the server supports this configuration.
Note: The internal NS is used by internal users, as well as Video Communication System (VCS) / Cisco Expressway-C.
The information in this document was created from the devices in a specific lab environment. All of the devices used in this document started with a cleared (default) configuration. If your network is live, ensure that you understand the potential impact of any command.
Pinpoint DNS overview
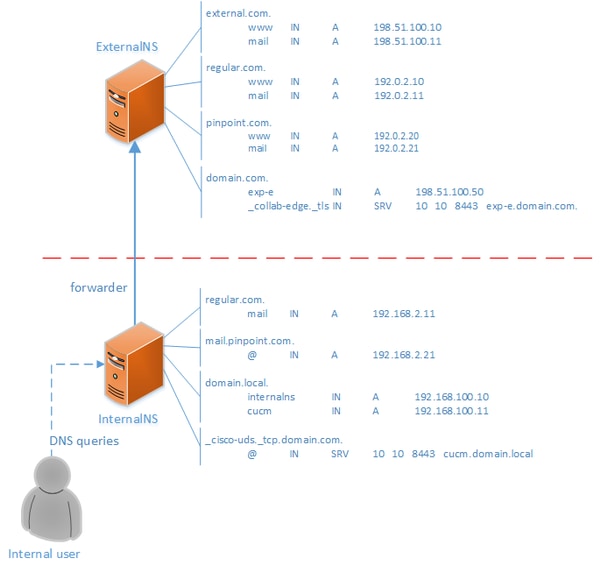
The pinpoint DNS entry is a zone created for a single host only. This entry can be defined as authoritative on a Name Server, which is not authoritative for the parent domain. This allows other DNS queries for this domain to be forwarded to the authoritative sever.
The pinpoint zone usually contains a single record besides the required Start of Authority (SOA) and Name Server records. This record is a self-reference, identical to the name of the zone and show up as same as parent folder in Microsoft DNS, or is referred to by an @ symbol in the BIND zone file. The record can be of any type supported by the DNS. The @ symbol is also used in Windows Command Line Interface (CLI) tools, and works the same way as in BIND.
The following image provides an example of these records:

This is a feature of the DNS system and does not rely on any mechanism in the Cisco Jabber or Cisco Expressway applications. It is also a supported solution for Cisco Jabber deployment if split DNS is not available.
If a Name Server is configured as authoritative or master for a domain, then queries are not forwarded for names within that domain to its forwarders, even if it can be unable to resolve a specific name. Thus, in order to provide different name resolution within the same domain to internal and external users of the domain normally, a split DNS would be used. In a split DNS configuration, an internal DNS server maintains a copy of the zone with internal-specific entries and an external DNS server maintains a copy of the zone with external-specific entries. Entries present in the external zone, but not in the internal zone must fail to resolve for internal queries.
Since this can lead to management overhead, some network administrators prefer to avoid split DNS configurations. Pinpoint DNS entries offer an alternative in these cases.
Configure
Create DNS SRV records
For Cisco Jabber auto-provisioning, as well as Mobile and Remote Access (MRA) service, two SRV records are involved for each domain (using domain.com as an example):
- _collab-edge._tls.domain.com
- _cisco-uds._tcp.domain.com
You can have multiple entries for these records if the Expressway and/or the Cisco Unified Communications Manager (CUCM) is clustered.
When the authorative zone file for domain.com only exists on the external NS, a pinpoint DNS entry for _cisco-uds._tcp is required on the internal NS. First the pinpoint DNS zone needs to be created, then the SRV within the zone.
The _cisco-uds._tcp SRV record must be only resolvable on the internal network, not from the external, and must resolve to the fully qualified domain name (FQDN) of the CUCM node(s) with User Data Services (UDS).
The _collab-edge._tls SRV record must be resolvable from the external network, and resolves to the Fully Qualified Domain Name (FQDN) of the Expressway-E server.
Configure Windows DNS server
The pinpoint DNS entry is created as any other zone, and its name must contain the entire SRV name (for example, _cisco-uds._tcp.domain.com). This step can be performed through the Graphical User Interface (GUI) as well, although the example below assumes that the pinpoint DNS entry has not already been created.
In order to add the SRV record itself, a CLI tool must be used. You must not add an SRV record to a pinpoint DNS entry through the GUI, as this does not work. Once added via CLI, these SRV records are manageable with the regular tools just as any other entry. Windows CLI presents two methods - either dnscmd or PowerShell commands. Both of the examples that follow create the two pinpoint DNS entries and add one SRV record for _cisco-uds._tcp
Only one of these two methods at a time can be used:
- example 1 - using dnscmd
dnscmd . /zoneadd _cisco-uds._tcp.domain.com. /dsprimary
dnscmd . /recordadd _cisco-uds._tcp.domain.com. "@" SRV 10 10 8443 cucm.domain.local
- example 2 - using PowerShell commands (as dnscmd is to be deprecated in future versions of Microsoft Windows Server, PowerShell can be used for the same purpose). Replication Scope options are Domain, Forest, or you can set up a file with the -ZoneFile parameter, if the zone is not Active Directory (AD) integrated
Import-Module DnsServer
Add-DnsServerPrimaryZone -Name "_cisco-uds._tcp.domain.com" -ReplicationScope "Domain"
Add-DnsServerResourceRecord -Srv -ZoneName "_cisco-uds._tcp.domain.com" -Name "@" –Priority 10 -Weight 10 -Port 8443 -DomainName "cucm.domain.local"
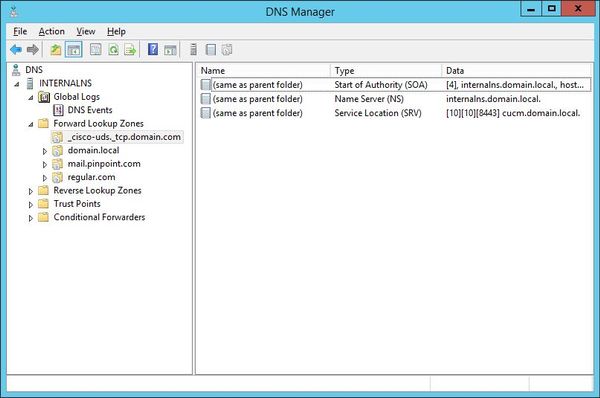
The following image provides an example of how the pinpoint DNS entry with SRV record looks like in the GUI:

Configure BIND DNS server
With BIND DNS server, the pinpoint DNS entry is created the same way as a regular zone file.
The $ORIGIN entry must point to the FQDN of the SRV record (for example, _cisco-uds._tcp.domain.com) and SOA and NS records are added as usual. The SRV is optional (whether the pinpoint DNS entry defines or overrides the SRV record) and the name used is @ which is equivalent to the name / ORIGIN of the zone.
Here is an example of a _cisco-uds._tcp.domain.com.zone file content:
$TTL 1h
$ORIGIN _cisco-uds._tcp.domain.com.
@       IN      SOA     internalns.domain.local. hostmaster.domain.local. (
                2016033000;
                12h;
                15m;
                3w;
                3h;
        )
        IN      NS      internalns.domain.local.
@       IN      SRV     10  10  8443  cucm.domain.local.
Here is an example of how toAdd the zone definition to named.conf:
zone "_cisco-uds._tcp.domain.com" IN {
        type master;
        file "_cisco-uds._tcp.domain.com.zone";
};
Verify
Use this section to confirm that your configuration works properly.
- Use the command nslookup with server set to the internal NS, in order to verify pinpoint DNS entries.
Here is an example of how to look up one hostname from the parent domain and how to look up the SRV record created on the internal NS:
C:\>nslookup exp-e.domain.com internalNS.domain.local

Non-authorative answer:
Name:    exp-e.domain.com
Address:  198.51.100.50

C:\>nslookup -type=srv _cisco-uds._tcp.domain.com internalNS.domain.local

_cisco-uds._tcp.domain.com      SRV service location:
          priority       = 10
          weight         = 10
          port           = 8443
          svr hostname   = cucm.domain.local
cucm.domain.local       internet address = 192.168.100.11
Here is an example of how to look up one hostname which is not configured on the internal NS, in order to verify that the requests are forwarded as expected.
C:\>nslookup www.example.com internalNS.domain.local

Non-authoritative answer:
Name:    www.example.com
Addresses:  203.0.113.42
- Set server to a public NS, or to the external NS, and repeat the same steps. The SRV lookup for _cisco-uds._tcp SRV record fails.
Troubleshoot
This section provides information you can use in order to troubleshoot your configuration.
If nslookup verification returns a hostname with duplicate parts (for example, cucm.domain.local.domain.local), then the DNS entries must be verified to be terminated by a full stop sign, otherwise the origin of the zone would be added to the resolved hostname.
If there are concerns with the created entries, they can be simply deleted from the DNS server. Although CLI is required to add the entries to Microsoft DNS, entries can be safely and simply deleted in the GUI.
Related Information
For a multi-domain deployment (different internal and external domain names) of MRA consult this document:
Configuration Example: Mobile and Remote Access through Expressway/VCS in a multi-domain deployment
Contributed by Cisco Engineers
- Zoltan KelemenCisco TAC Engineer
- Edited by Joshua AleroCisco TAC Engineer
- Edited by Lidiya BogdanovaCisco TAC Engineer
Contact Cisco
- Open a Support Case

- (Requires a Cisco Service Contract)
 Feedback