Upgrade Nexus 3524 and 3548 NX-OS Software
Available Languages
Contents
Introduction
This document describes disruptive NX-OS software upgrade processes for Cisco Nexus 3524 and 3548 Series switches between major software releases.
Prerequisites
Requirements
Cisco recommends that you understand the basics of copying files in Cisco NX-OS. For more information about this feature, refer to one of the applicable documents:
- Cisco Nexus 3548 Switch NX-OS Fundamentals Configuration Guide, Release 9.3 (x)
- Cisco Nexus 3548 Switch NX-OS Fundamentals Configuration Guide, Release 9.2(x)
- Cisco Nexus 3548 Switch NX-OS Fundamentals Configuration Guide, Release 7.x
- Cisco Nexus 3548 Switch NX-OS Fundamentals Configuration Guide, Release 6.x
Cisco recommends that you understand the basics of upgrading NX-OS software on Cisco Nexus 3524 and 3548 Series switches. For more information about this procedure, refer to one of the applicable documents:
- Cisco Nexus 3500 Series NX-OS Software Upgrade and Downgrade Guide, Release 9.3(x)
- Cisco Nexus 3500 Series NX-OS Software Upgrade and Downgrade Guide, Release 9.2(x)
- Cisco Nexus 3500 Series NX-OS Software Upgrade and Downgrade Guide, Release 7.x
- Cisco Nexus 3500 Series NX-OS Software Upgrade and Downgrade Guide, Release 6.x
Components Used
The information in this document is based on the Cisco Nexus 3524 and 3548 Series switches listed in the Applicable Hardware section of this document. The device output in this document was taken from a Nexus 3548 (model number N3K-C3548-10G) running various NX-OS software releases.
The information in this document was created from the devices in a specific lab environment. All of the devices used in this document started with a cleared (default) configuration. If your network is live, ensure that you understand the potential impact of any command.
Background Information
This document describes the steps used to upgrade Cisco NX-OS software on Cisco Nexus 3524 and 3548 Series switches from and to a variety of NX-OS software releases using supported disruptive upgrade paths. The intent of this document is to provide step-by-step instructions to perform supported NX-OS software upgrades between common minor and major NX-OS software releases.
This document does not describe steps used to perform any non-disruptive upgrades to Cisco NX-OS software on Cisco Nexus 3524 and 3548 Series switches. ISSU software upgrades are outside the scope of this document.
NX-OS Software Release Version Taxonomy
Cisco NX-OS software release names contain a number of components that are regularly referenced in this document. The names of these components are defined in the Cisco NX-OS Software Release Naming Section of the Cisco IOS® and Cisco NX-OS Software Release Reference Guide. Specifically, be aware of these terms:
- Major Release Number
- Minor Release Number
- Maintenance Release Number
- Platform Designator
- Platform Minor Release Number
- Platform Maintenance Release Number
- Platform Rebuild Identifier
The NX-OS software release 7.0(3)I7(5a) has these components:
| Component Name | Component Value |
|---|---|
| Major Release Number | 7 |
| Minor Release Number | 0 |
| Maintenance Release Number | 3 |
| Platform Designator | I |
| Platform Minor Release Number | 7 |
| Platform Maintenance Release Number | 5 |
| Platform Rebuild Identifier | a |
As another example, NX-OS software release 9.3(5) has these components:
| Component Name | Component Value |
|---|---|
| Major Release Number | 9 |
| Minor Release Number | 3 |
| Maintenance Release Number | 5 |
Cisco Nexus configuration guides are typically grouped by NX-OS major release numbers. Within the title of these configuration guides, NX-OS major release numbers are typically displayed by the major release number and have a variable x appended, which refers to the minor release (such as 6.x, 7.x, and so on). For example, the Cisco Nexus 9000 Series NX-OS Fundamentals Configuration Guide, Release 7.x is applicable to all NX-OS 7 major releases (although specific caveats, limitations, and configuration examples can be specific to certain minor or maintenance release numbers).
The exception to this rule is the NX-OS 9 major release. For the NX-OS 9 major release, Cisco Nexus configuration guides are grouped by the NX-OS minor and major release numbers, with a variable x appended referring to the maintenance release (such as 9.2(x) and 9.3(x)).
This document uses formatting by the titles of the Cisco Nexus configuration guides (6.x, 7.x, 9.2(x), 9.3(x), and so on) to describe standard disruptive NX-OS software upgrades between two NX-OS software releases.
NX-OS Software Upgrade Terminology
Source Releases, Target Releases, and Intermediate Releases
NX-OS software upgrades are typically performed between two releases, a source release (which is the NX-OS software release you are upgrading from) and a target release (which is the NX-OS software release you are upgrading to). For example, if you upgrade a Nexus 3548 switch from a NX-OS software release 7.0(3)I7(8) to NX-OS software release 9.3(5), 7.0(3)I7(8) would be your source release while 9.3(5) would be your target release.
To upgrade from a specific source release to a specific target release, your upgrade path can require an upgrade to one or more intermediate releases. For example, if you upgrade a Nexus 3548 switch from NX-OS software release 7.0(3)I7(5a) to NX-OS software release 9.3(5), you must upgrade to an intermediate release of 7.0(3)I7(8) or 9.2(4) before you can successfully upgrade to NX-OS software release 9.3(5).
Types of NX-OS Software Upgrades
NX-OS software upgrades can be divided into two categories:
- Disruptive Upgrades - A disruptive upgrade between a source release and a target release where the Nexus switch reloads at the end of the upgrade process. The reload causes the data plane, control plane, and management plane of the Nexus switch to go offline in a short period of time.
- In-Service Software Upgrade (ISSU) - A non-disruptive upgrade between a source release and a target release where the data plane of the Nexus switch remains online and forwards traffic as a result of Non-Stop Forwarding (NSF).
The procedure for non-disruptive ISSU NX-OS software upgrades is outside the scope of this document. This document only covers the standard disruptive NX-OS software upgrades.
Applicable Hardware
The procedures in this document apply to the hardware in this list:
- N3K-C3524P-10G
- N3K-C3524P-10GX
- N3K-C3524P-XL
- N3K-C3548P-10G
- N3K-C3548P-10GX
- N3K-C3548P-XL
NX-OS Software Upgrade Procedures
This section describes how to perform standard disruptive NX-OS software upgrades from a variety of source releases to a variety of target releases.
Upgrade from NX-OS 6.x to NX-OS 6.x
This section describes how to perform a standard disruptive NX-OS software upgrade from a source release in the NX-OS 6.x major release to a target release in the NX-OS 6.x major release.
An example of a standard disruptive NX-OS software upgrade is performed on a Cisco Nexus 3548 switch from a source release of 6.0(2)A4(5) to a target release of 6.0(2)A8(11b):
N3K-C3548# show module
Mod Ports Module-Type                         Model                  Status
--- ----- ----------------------------------- ---------------------- ------------
1   48    48x10GE Supervisor                  N3K-C3548P-10G-SUP     active *

Mod  Sw              Hw      World-Wide-Name(s) (WWN)
---  --------------  ------  ----------------------------------------------------
1    6.0(2)A4(5)     1.0     --
Upgrade Path Summary
A summary of the upgrade path from a source release in the NX-OS 6.x major release to a target release in the NX-OS 6.x major release:
6.x -> 6.x
Step 1. Download Target Release from Cisco Software Download
NX-OS 6.x software requires a total of two NX-OS binary image files: a system image and a kickstart image. You must download these images from Cisco Software Download Website to your local computer. The specific steps you must take to download software from Cisco Software Download Website are outside the scope of this document.
Step 2. Copy Target Release to Cisco Nexus Switch
Copy the NX-OS 6.x kickstart and system binary image files to the Nexus 3524 or 3548 Series switch you want to disruptively upgrade to using your file transfer protocol of choice. This example demonstrates how to copy the kickstart and system binary image files for the NX-OS 6.0(2)A8(11b) software release via File Transfer Protocol (FTP) from FTP server 192.0.2.100 reachable via the management VRF.
N3K-C3548# dir | include bin
   36742656    Nov 19 14:24:14 2020  n3500-uk9-kickstart.6.0.2.A4.5.bin
  166878338    Nov 19 14:22:40 2020  n3500-uk9.6.0.2.A4.5.bin
N3K-C3548# copy ftp://username@192.0.2.100/n3500-uk9-kickstart.6.0.2.A8.11b.bin bootflash: vrf management
Password:
Copy complete, now saving to disk (wait)...
Copy complete.
N3K-C3548# copy ftp://username@192.0.2.100/n3500-uk9.6.0.2.A8.11b.bin bootflash: vrf management
Password:
Copy complete, now saving to disk (wait)...
Copy complete.
N3K-C3548# dir | include bin
   36742656    Nov 19 14:24:14 2020  n3500-uk9-kickstart.6.0.2.A4.5.bin
   37739008    Nov 19 18:13:12 2020  n3500-uk9-kickstart.6.0.2.A8.11b.bin
  166878338    Nov 19 14:22:40 2020  n3500-uk9.6.0.2.A4.5.bin
  197055713    Nov 19 18:14:46 2020  n3500-uk9.6.0.2.A8.11b.bin
Step 3. Verify MD5 or SHA512 Checksum of Target Release
After the NX-OS 6.x kickstart and system binary image files are copied to the Nexus 3524 or 3548 Series switch, you want to disruptively upgrade using your file transfer protocol of choice, verify the binary image files were not corrupted in transport by ensuring the MD5 or SHA512 checksums match what is published on Cisco Software Download Website.
You can identify the MD5 and SHA512 checksum of NX-OS binary image files through Cisco Software Download Website by hovering your cursor over the image on the website. Refer to the example:
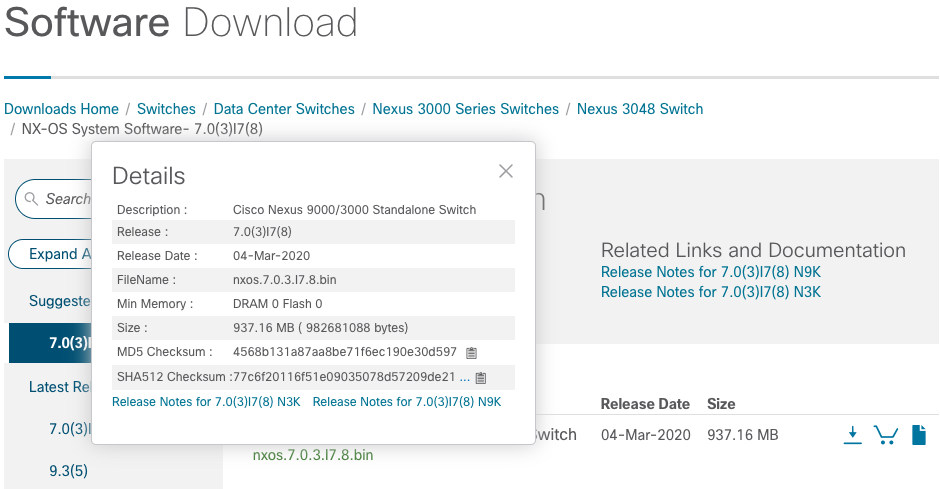
This example demonstrates how to verify the MD5 checksum of the kickstart and system binary image files for the NX-OS 6.0(2)A8(11b) software release through the show file bootflash:{filename} md5sum command. The expected MD5 checksum for the NX-OS6.0(2)A8(11b) kickstart binary image file is 1b025734ed34aeb7a0ea48f55897b09a, while the expected MD5 checksum for the NX-OS 6.0(2)A8(11b) system binary image file is 1f8bfb0b3d59049d5bf385ed7866ee25.
N3K-C3548# show file bootflash:n3500-uk9-kickstart.6.0.2.A8.11b.bin md5sum
1b025734ed34aeb7a0ea48f55897b09a
N3K-C3548# show file bootflash:n3500-uk9.6.0.2.A8.11b.bin md5sum
1f8bfb0b3d59049d5bf385ed7866ee25
Step 4. Upgrade NX-OS Software via Install All Command
Begin a standard disruptive NX-OS software upgrade through the install all command. This command requires both the kickstart and system parameters to be passed in with the absolute file path of the NX-OS kickstart and system binary image files corresponding with the target release.
This example shows the install all command where the kickstart parameter points to the absolute file path of the NX-OS kickstart binary image file (bootflash:n3500-uk9-kickstart.6.0.2.A8.11b.bin) and the system parameter points to the absolute filepath of the NX-OS system binary image file (bootflash:n3500-uk9.6.0.2.A8.11b.bin).
N3K-C3548# install all kickstart bootflash:n3500-uk9-kickstart.6.0.2.A8.11b.bin system bootflash:n3500-uk9.6.0.2.A8.11b.bin
Installer is forced disruptive

Verifying image bootflash:/n3500-uk9-kickstart.6.0.2.A8.11b.bin for boot variable "kickstart".
[########################################] 100% -- SUCCESS

Verifying image bootflash:/n3500-uk9.6.0.2.A8.11b.bin for boot variable "system".
[########################################] 100% -- SUCCESS

Verifying image type.
[########################################] 100% -- SUCCESS

Extracting "system" version from image bootflash:/n3500-uk9.6.0.2.A8.11b.bin.
[########################################] 100% -- SUCCESS

Extracting "kickstart" version from image bootflash:/n3500-uk9-kickstart.6.0.2.A8.11b.bin.
[########################################] 100% -- SUCCESS

Extracting "bios" version from image bootflash:/n3500-uk9.6.0.2.A8.11b.bin.
[########################################] 100% -- SUCCESS

Performing module support checks.
[########################################] 100% -- SUCCESS

Notifying services about system upgrade.
[########################################] 100% -- SUCCESS


Compatibility check is done:
Module  bootable          Impact  Install-type  Reason
------  --------  --------------  ------------  ------
     1       yes      disruptive         reset  Forced by the user


Images will be upgraded according to this table:
Module             Image         Running-Version             New-Version  Upg-Required
------  ----------------  ----------------------  ----------------------  ------------
     1            system             6.0(2)A4(5)           6.0(2)A8(11b)           yes
     1         kickstart             6.0(2)A4(5)           6.0(2)A8(11b)           yes
     1              bios      v1.9.0(10/13/2012)      v1.9.0(10/13/2012)            no
     1         power-seq                    v2.1                    v2.1            no


Switch will be reloaded for disruptive upgrade.
Do you want to continue with the installation (y/n)?  [n] y
Time Stamp: Thu Nov 19 18:32:15 2020


Install is in progress, please wait.

Performing runtime checks.
[########################################] 100% -- SUCCESS

Setting boot variables.
[########################################] 100% -- SUCCESS

Performing configuration copy.
[########################################] 100% -- SUCCESS
Time Stamp: Thu Nov 19 18:32:39 2020


Finishing the upgrade, switch will reboot in 10 seconds.
Step 5. Verify Successful NX-OS Software Upgrade
After the Nexus 3524 or 3548 switch is reloaded, verify the upgrade was successful through the show module command. The output of this command shows the desired target release. Refer to this example where the switch was successfully upgraded to NX-OS software release 6.0(2)A8(11b).
N3K-C3548# show module
Mod Ports Module-Type                         Model                  Status
--- ----- ----------------------------------- ---------------------- ------------
1   48    48x10GE Supervisor                  N3K-C3548P-10G-SUP     active *

Mod  Sw              Hw      World-Wide-Name(s) (WWN)
---  --------------  ------  ----------------------------------------------------
1    6.0(2)A8(11b)   1.0     --
Step 6. Delete Source Release Binary Image Files from Cisco Nexus Switch
After you verify the NX-OS software upgrade from the source release to the target release was successful, preserve free space on the bootflash switch by deleting the kickstart and system binary image files of the source release from the bootflash of the device. This can be completed with the delete bootflash:{filename} command.
Refer to this example where the NX-OS 6.0(2)A4(5) kickstart and system binary image files are deleted from the bootflash switch.
N3K-C3548# dir | include bin
   36742656    Nov 19 14:24:14 2020  n3500-uk9-kickstart.6.0.2.A4.5.bin
   37739008    Nov 19 18:13:12 2020  n3500-uk9-kickstart.6.0.2.A8.11b.bin
  166878338    Nov 19 14:22:40 2020  n3500-uk9.6.0.2.A4.5.bin
  197055713    Nov 19 18:14:46 2020  n3500-uk9.6.0.2.A8.11b.bin
N3K-C3548# delete bootflash:n3500-uk9-kickstart.6.0.2.A4.5.bin
N3K-C3548# delete bootflash:n3500-uk9.6.0.2.A4.5.bin
N3K-C3548# dir | include bin
   37739008    Nov 19 18:13:12 2020  n3500-uk9-kickstart.6.0.2.A8.11b.bin
  197055713    Nov 19 18:14:46 2020  n3500-uk9.6.0.2.A8.11b.bin
Step 7. Run Initial Setup Script to Re-Apply CoPP Policies
Run the initial setup script with the setup command. Enter the basic configuration dialog by entering yes, then accept all default options by repeatedly pressing the Enter key until the NX-OS CLI prompt is returned.
Refer to this example:
N3K-C3548# setup


         ---- Basic System Configuration Dialog ----

This setup utility will guide you through the basic configuration of
the system. Setup configures only enough connectivity for management
of the system.

*Note: setup is mainly used for configuring the system initially,
when no configuration is present. So setup always assumes system
defaults and not the current system configuration values.

Press Enter at anytime to skip a dialog. Use ctrl-c at anytime
to skip the remaining dialogs.

Would you like to enter the basic configuration dialog (yes/no): yes


  Create another login account (yes/no) [n]:

  Configure read-only SNMP community string (yes/no) [n]:

  Configure read-write SNMP community string (yes/no) [n]:

  Enter the switch name :

  Continue with Out-of-band (mgmt0) management configuration? (yes/no) [y]:

    Mgmt0 IPv4 address :

  Configure the default gateway? (yes/no) [y]:

    IPv4 address of the default gateway :

  Enable the telnet service? (yes/no) [n]:

  Enable the ssh service? (yes/no) [y]:

    Type of ssh key you would like to generate (dsa/rsa) :

  Configure the ntp server? (yes/no) [n]:

  Configure default interface layer (L3/L2) [L2]:

  Configure default switchport interface state (shut/noshut) [noshut]:

  Configure CoPP System Policy Profile ( default / l2 / l3 ) [default]:

This configuration will be applied:
  no telnet server enable
  system default switchport
  no system default switchport shutdown
  policy-map type control-plane copp-system-policy ( default )

Would you like to edit the configuration? (yes/no) [n]:

Use this configuration and save it? (yes/no) [y]:

[########################################] 100%
Copy complete, now saving to disk (wait)...
Copy complete.
Upgrade from NX-OS 6.x to NX-OS 7.x
This section describes how to perform a standard disruptive NX-OS software upgrade from a source release in the NX-OS 6.x major release to a target release in the NX-OS 7.x major release.
An example of a standard disruptive NX-OS software upgrade is performed on a Cisco Nexus 3548 switch from a source release of 6.0(2)A4(5) to a target release of 7.0(3)I7(9):
N3K-C3548# show module
Mod Ports Module-Type                         Model                  Status
--- ----- ----------------------------------- ---------------------- ------------
1   48    48x10GE Supervisor                  N3K-C3548P-10G-SUP     active *

Mod  Sw              Hw      World-Wide-Name(s) (WWN)
---  --------------  ------  ----------------------------------------------------
1    6.0(2)A4(5)     1.0     --
Upgrade Path Summary
A summary of the upgrade path from a source release in the NX-OS 6.x major release to a target release in the NX-OS 7.x major release through an intermediate release of 6.0(2)A8(11b):
6.x -> 6.0(2)A8(11b) -> 7.x
Step 1. Upgrade from NX-OS 6.x to NX-OS 6.0(2)A8(11b)
Use the Upgrade from NX-OS 6.x to NX-OS 6.x section of this document to perform a standard disruptive NX-OS software upgrade from your source release to an intermediate release of NX-OS software release 6.0(2)A8(11b). This is required for an upgrade to a target release in the NX-OS 7.x major release to be successful.
Step 2. Download Target Release from Cisco Software Download
NX-OS 7.x software uses a single NX-OS binary image file (sometimes referred to as a unified image file). You must download this image from Cisco Software Download Website to your local computer. The specific steps you must take to download software from Cisco Software Download Website are outside the scope of this document.
Step 3. Copy Target Release to Cisco Nexus Switch through Compact Image Procedure via SCP
Copy the target release unified binary image file to the Nexus 3524 or 3548 Series switch you want to disruptively upgrade by executing the NX-OS Compact Image Procedure via SCP.
For more information on this procedure, refer to Nexus 3000, 3100, and 3500 NX-OS Compact Image Procedure Document.
This example demonstrates how to copy the NX-OS 7.0(3)I7(9) software release unified binary image file through the Compact Image Procedure (denoted by the compact keyword) via SCP from SCP server 192.0.2.100 reachable via the management VRF.
N3K-C3548# dir | include bin
   37739008    Nov 19 18:13:12 2020  n3500-uk9-kickstart.6.0.2.A8.11b.bin
  197055713    Nov 19 18:14:46 2020  n3500-uk9.6.0.2.A8.11b.bin
N3K-C3548# copy scp://username@192.0.2.100/nxos.7.0.3.I7.9.bin bootflash: compact vrf management
The authenticity of host '192.0.2.100 (192.0.2.100)' can't be established.
ECDSA key fingerprint is SHA1:00:11:06:bf:16:10:7b:e4:95:41:f3:75:4d:cb:41:d7:c7:8a:63:d1.
Are you sure you want to continue connecting (yes/no)? yes
Warning: Permanently added '192.0.2.100' (ECDSA) to the list of known hosts.
username@192.0.2.100's password:
nxos.7.0.3.I7.9.bin                                100%  937MB   2.6MB/s   06:06
Copy complete, now saving to disk (wait)...
Copy complete.
N3K-C3548# dir | include bin
   37739008    Nov 19 18:13:12 2020  n3500-uk9-kickstart.6.0.2.A8.11b.bin
  197055713    Nov 19 18:14:46 2020  n3500-uk9.6.0.2.A8.11b.bin
  459209441    Nov 19 20:28:50 2020  nxos.7.0.3.I7.9.bin
Step 3a. Verify the Compatibility of the Target Release (Optional)
While performing an upgrade, check to determine the impact running this command:
nexus-3500# show install all impact kickstart bootflash:<kickstart image file> system bootflash:<system image file>
This command does not apply to the unified images in the 7.x release train as there is only one file. If you try to modify the previous command to only include the system image, it can fail with this message:
nexus-3500# show install all impact system bootflash:nxos.7.0.3.I7.8.bin
Installer is forced disruptive

Verifying image bootflash:/n3500-uk9-kickstart.6.0.2.A8.11b.bin for boot variable "kickstart".
[########################################] 100% -- SUCCESS

Verifying image bootflash:/nxos.7.0.3.I7.8.bin for boot variable "system".
[########################################] 100% -- SUCCESS

Verifying image type.
[########################################] 100% -- SUCCESS

Extracting "system" version from image bootflash:/nxos.7.0.3.I7.8.bin.
[# ] 0% -- FAIL. Return code 0x404F0003 (SRG file not present/cannot be opened).
Pre-upgrade check failed. Return code 0x40930012 (SRG extraction failed).
To successfully run an upgrade compatibility check on a Nexus 3500 switch, you must run the command with only the kickstart portion of the command and the compact image. Failure to use the compact image while running the kickstart version of the command can also generate an error:
nexus-3500# show install all impact kickstart bootflash:nxos.7.0.3.I7.8.bin
Verifying image bootflash:/nxos.7.0.3.I7.8.bin for boot variable "kickstart".
[# ] 2% -- FAIL. Return code 0x40930084 (Upgrade cannot be continued with non-compact image!. Please use scp compacting for a compact image and retry ISSU.).
Pre-upgrade check failed. Return code 0x40930011 (Image verification failed).

nexus-3500#
nexus-3500# show install all impact kickstart bootflash:n3500-compact.7.0.3.I7.8.bin
Installer is forced disruptive

Verifying image bootflash:/nxos.7.0.3.I7.8.bin for boot variable "kickstart".
[########################################] 100% -- SUCCESS

Verifying image bootflash:/n3500-uk9-kickstart.6.0.2.A8.11b.bin for boot variable "system".
[########################################] 100% -- SUCCESS

Verifying image type.
[########################################] 100% -- SUCCESS

Extracting "system" version from image bootflash:/n3500-uk9-kickstart.6.0.2.A8.11b.bin
[########################################] 100% -- SUCCESS

Extracting "kickstart" version from image bootflash:/nxos.7.0.3.I7.8.bin.
[########################################] 100% -- SUCCESS

Extracting "bios" version from image bootflash:/n3500-uk9-kickstart.6.0.2.A8.11b.bin
[########################################] 100% -- SUCCESS

Collecting "running" plugin(s) information.
[########################################] 100% -- SUCCESS

Collecting plugin(s) information from "new" image.
[########################################] 100% -- SUCCESS

Performing runtime checks.
[########################################] 100% -- SUCCESS

Performing module support checks.
[########################################] 100% -- SUCCESS

Notifying services about system upgrade.
[########################################] 100% -- SUCCESS


Compatibility check is done:
Module bootable Impact Install-type Reason
------ -------- -------------- ------------ ------
1 no n/a n/a Wrong image


Module Image Running-Version New-Version Upg-Required
------ ---------------- ---------------------- ---------------------- ------------
1 system 6.0(2)A8(11b) 6.0(2)A8(11b) no
1 kickstart 6.0(2)A8(11b) 7.0(3)I5(2) no
1 bios v4.0.0(12/05/2016) v2.8.0(12/22/2015) no
1 SFP-uC v2.12 v2.12 no


Additional info for this installation:
--------------------------------------

Service "stp" : Port: Ethernet1/1 in VLAN0001 is Designated. Topology change could occur during upgrade.
Upgrade will be disruptive!!!
Step 4. Upgrade NX-OS Software via Install All Command
Begin a standard disruptive NX-OS software upgrade through the install all command. This command requires the nxos parameter to be passed in with the absolute file path of the NX-OS unified binary image file corresponding with the target release.
This example shows the install all command where the nxos parameter points to the absolute file path of the NX-OS 7.0(3)I7(9) unified binary image file (bootflash:nxos.7.0.3.I7.9.bin).
N3K-C3548# install all nxos bootflash:nxos.7.0.3.I7.9.bin
Installer is forced disruptive

Verifying image bootflash:/nxos.7.0.3.I7.9.bin for boot variable "nxos".
[########################################] 100% -- SUCCESS

Verifying image type.
[########################################] 100% -- SUCCESS

Extracting "nxos" version from image bootflash:/nxos.7.0.3.I7.9.bin.
[########################################] 100% -- SUCCESS

Extracting "bios" version from image bootflash:/nxos.7.0.3.I7.9.bin.
[########################################] 100% -- SUCCESS

Performing runtime checks.
[########################################] 100% -- SUCCESS

Performing module support checks.
[########################################] 100% -- SUCCESS

Notifying services about system upgrade.
[########################################] 100% -- SUCCESS


Compatibility check is done:
Module  bootable          Impact  Install-type  Reason
------  --------  --------------  ------------  ------
     1       yes      disruptive         reset  Unsupported in new image, module needs to be powered off


Images will be upgraded according to this table:
Module             Image         Running-Version             New-Version  Upg-Required
------  ----------------  ----------------------  ----------------------  ------------
     1         kickstart           6.0(2)A8(11b)             7.0(3)I7(9)           yes
     1              bios      v1.9.0(10/13/2012)      v5.4.0(10/23/2019)           yes
     1         power-seq                    v2.1                    v2.1            no


Switch will be reloaded for disruptive upgrade.
Do you want to continue with the installation (y/n)?  [n] y

Time Stamp: Thu Nov 19 21:41:54 2020


Install is in progress, please wait.

Performing runtime checks.
[########################################] 100% -- SUCCESS

Setting boot variables.
[########################################] 100% -- SUCCESS

Performing configuration copy.
[########################################] 100% -- SUCCESS

Module 1: Refreshing compact flash and upgrading bios/loader/bootrom/power-seq.
Warning: please do not remove or power off the module at this time.
Note: Power-seq upgrade needs a power-cycle to take into effect.
On success of power-seq upgrade, SWITCH OFF THE POWER to the system and then, power it up.
[#                                       ]   0%
Time Stamp: Thu Nov 19 21:46:02 2020


Finishing the upgrade, switch will reboot in 10 seconds.
Step 5. Verify Successful NX-OS Software Upgrade
After the Nexus 3524 or 3548 switch is reloaded, verify the upgrade was successful through the show module command. The output of this command shows the desired target release. Refer to this example where the switch was successfully upgraded to NX-OS software release 7.0(3)I7(9).
N3K-C3548# show module
Mod Ports             Module-Type                       Model          Status
--- ----- ------------------------------------- --------------------- ---------
1    48   48x10GE Supervisor                    N3K-C3548P-10G        active *

Mod  Sw                Hw     Slot
---  ----------------  ------ ----
1    7.0(3)I7(9)       1.0    NA
Step 6. Delete Intermediate Release Binary Image Files from Cisco Nexus Switch
After you verify the NX-OS software upgrade from the intermediate release to the target release was successful, preserve free space on the bootflash switch by deleting the kickstart and system binary image files of the intermediate release from the bootflash of the device. This can be done with the delete bootflash:{filename} command.
Refer to this example where the NX-OS 6.0(2)A8(11b) kickstart and system binary image files are deleted from the bootflash switch.
N3K-C3548# dir | include bin
   37739008    Nov 19 18:13:12 2020  n3500-uk9-kickstart.6.0.2.A8.11b.bin
  197055713    Nov 19 18:14:46 2020  n3500-uk9.6.0.2.A8.11b.bin
  459209441    Nov 19 20:28:50 2020  nxos.7.0.3.I7.9.bin
N3K-C3548# delete bootflash:n3500-uk9-kickstart.6.0.2.A8.11b.bin
Do you want to delete "/n3500-uk9-kickstart.6.0.2.A8.11b.bin" ? (yes/no/abort)   [y]
N3K-C3548# delete bootflash:n3500-uk9.6.0.2.A8.11b.bin
Do you want to delete "/n3500-uk9.6.0.2.A8.11b.bin" ? (yes/no/abort)   [y]
N3K-C3548# dir | include bin
  459209441    Nov 19 20:28:50 2020  nxos.7.0.3.I7.9.bin
Step 7. Run Initial Setup Script to Re-Apply CoPP Policies
Run the initial setup script with the setup command. Enter the basic configuration dialog by entering yes, then accept all default options by repeatedly pressing the Enter key until the NX-OS CLI prompt is returned.
Refer to this example:
N3K-C3548# setup


         ---- Basic System Configuration Dialog ----

This setup utility will guide you through the basic configuration of
the system. Setup configures only enough connectivity for management
of the system.

*Note: setup is mainly used for configuring the system initially,
when no configuration is present. So setup always assumes system
defaults and not the current system configuration values.

Press Enter at anytime to skip a dialog. Use ctrl-c at anytime
to skip the remaining dialogs.

Would you like to enter the basic configuration dialog (yes/no): yes


  Create another login account (yes/no) [n]:

  Configure read-only SNMP community string (yes/no) [n]:

  Configure read-write SNMP community string (yes/no) [n]:

  Enter the switch name :

  Continue with Out-of-band (mgmt0) management configuration? (yes/no) [y]:

    Mgmt0 IPv4 address :

  Configure the default gateway? (yes/no) [y]:

    IPv4 address of the default gateway :

  Enable the telnet service? (yes/no) [n]:


  Enable the ssh service? (yes/no) [y]:


    Type of ssh key you would like to generate (dsa/rsa) :

  Configure the ntp server? (yes/no) [n]:

  Configure default interface layer (L3/L2) [L2]:


  Configure default switchport interface state (shut/noshut) [noshut]:

  Configure CoPP System Policy Profile ( default / l2 / l3 ) [default]:

This configuration will be applied:
  no telnet server enable
  system default switchport
  no system default switchport shutdown
  policy-map type control-plane copp-system-policy ( default )

Would you like to edit the configuration? (yes/no) [n]:


Use this configuration and save it? (yes/no) [y]:

MTC:Executing copp config


[########################################] 100%
Copy complete, now saving to disk (wait)...
Copy complete.
Upgrade from NX-OS 6.x to NX-OS 9.2(x)
This section describes how to perform a standard disruptive NX-OS software upgrade from a source release in the NX-OS 6.x major release to a target release in the NX-OS 9.2(x) minor release.
An example standard disruptive NX-OS software upgrade is performed on a Cisco Nexus 3548 switch from a source release of 6.0(2)A4(5) to a target release of 9.2(4):
N3K-C3548# show module
Mod Ports Module-Type                         Model                  Status
--- ----- ----------------------------------- ---------------------- ------------
1   48    48x10GE Supervisor                  N3K-C3548P-10G-SUP     active *

Mod  Sw              Hw      World-Wide-Name(s) (WWN)
---  --------------  ------  ----------------------------------------------------
1    6.0(2)A4(5)     1.0     --
Upgrade Path Summary
A summary of the upgrade path from a source release in the NX-OS 6.x major release to a target release in the NX-OS 9.2(x) minor release through an intermediate release of 6.0(2)A8(11b):
6.x -> 6.0(2)A8(11b) -> 9.2(x)
Step 1. Upgrade from NX-OS 6.x to NX-OS 6.0(2)A8(11b)
Use the Upgrade from NX-OS 6.x to NX-OS 6.x section of this document to perform a standard disruptive NX-OS software upgrade from your source release to an intermediate release of NX-OS software release 6.0(2)A8(11b). This is required for an upgrade to a target release in the NX-OS 9.2(x) minor release to be successful.
Step 2. Download Target Release from Cisco Software Download
NX-OS 9.2(x) software uses a single NX-OS binary image file (sometimes referred to as a unified image file). You must download this image from Cisco Software Download Website to your local computer. The specific steps you must take to download software from Cisco Software Download Website are outside the scope of this document.
Step 3. Copy Target Release to Cisco Nexus Switch through Compact Image Procedure via SCP
Copy the target release unified binary image file to the Nexus 3524 or 3548 Series switch you want to disruptively upgrade by executing the NX-OS Compact Image Procedure via SCP.
For more information on this procedure, refer to Nexus 3000, 3100, and 3500 NX-OS Compact Image Procedure Document
This example demonstrates how to copy the NX-OS 9.2(4) software release unified binary image file through the Compact Image Procedure (denoted by the compact keyword) via SCP from SCP server 192.0.2.100 reachable via the management VRF.
N3K-C3548# dir | include bin
   37739008    Nov 19 22:06:28 2020  n3500-uk9-kickstart.6.0.2.A8.11b.bin
  197055713    Nov 19 22:15:20 2020  n3500-uk9.6.0.2.A8.11b.bin
N3K-C3548# copy scp://username@192.0.2.100/nxos.9.2.4.bin bootflash: compact vrf management
The authenticity of host '192.0.2.100 (192.0.2.100)' can't be established.
ECDSA key fingerprint is SHA1:00:11:06:bf:16:10:7b:e4:95:41:f3:75:4d:cb:41:d7:c7:8a:63:d1.
Are you sure you want to continue connecting (yes/no)? yes
Warning: Permanently added '192.0.2.100' (ECDSA) to the list of known hosts.
username@192.0.2.100's password:
nxos.9.2.4.bin                                100% 1278MB   2.4MB/s   08:45
Copy complete, now saving to disk (wait)...
Copy complete.
N3K-C3548# dir | include bin
   37739008    Nov 19 22:06:28 2020  n3500-uk9-kickstart.6.0.2.A8.11b.bin
  197055713    Nov 19 22:15:20 2020  n3500-uk9.6.0.2.A8.11b.bin
  530509806    Nov 19 22:41:28 2020  nxos.9.2.4.bin
Step 4. Upgrade NX-OS Software via Install All Command
Begin a standard disruptive NX-OS software upgrade through the install all command. This command requires the nxos parameter to be passed in with the absolute file path of the NX-OS unified binary image file corresponding with the target release.
This example shows the install all command where the nxos parameter points to the absolute file path of the NX-OS 9.2(4) unified binary image file (bootflash:nxos.9.2.4.bin).
N3K-C3548# install all nxos bootflash:nxos.9.2.4.bin
Installer is forced disruptive

Verifying image bootflash:/nxos.9.2.4.bin for boot variable "nxos".
[########################################] 100% -- SUCCESS

Verifying image type.
[########################################] 100% -- SUCCESS

Extracting "nxos" version from image bootflash:/nxos.9.2.4.bin.
[########################################] 100% -- SUCCESS

Extracting "bios" version from image bootflash:/nxos.9.2.4.bin.
[########################################] 100% -- SUCCESS

Performing runtime checks.
[########################################] 100% -- SUCCESS

Performing module support checks.
[########################################] 100% -- SUCCESS

Notifying services about system upgrade.
[########################################] 100% -- SUCCESS


Compatibility check is done:
Module  bootable          Impact  Install-type  Reason
------  --------  --------------  ------------  ------
     1       yes      disruptive         reset  Unsupported in new image, module needs to be powered off


Images will be upgraded according to this table:
Module             Image         Running-Version             New-Version  Upg-Required
------  ----------------  ----------------------  ----------------------  ------------
     1         kickstart           6.0(2)A8(11b)             9.2(4)I9(1)           yes
     1              bios      v1.9.0(10/13/2012)      v5.3.0(06/08/2019)           yes
     1         power-seq                    v2.1                    v2.1            no


Switch will be reloaded for disruptive upgrade.
Do you want to continue with the installation (y/n)?  [n] y

Time Stamp: Thu Nov 19 22:56:09 2020


Install is in progress, please wait.

Performing runtime checks.
[########################################] 100% -- SUCCESS

Setting boot variables.
[########################################] 100% -- SUCCESS

Performing configuration copy.
[########################################] 100% -- SUCCESS

Module 1: Refreshing compact flash and upgrading bios/loader/bootrom/power-seq.
Warning: please do not remove or power off the module at this time.
Note: Power-seq upgrade needs a power-cycle to take into effect.
On success of power-seq upgrade, SWITCH OFF THE POWER to the system and then, power it up.
[#                                       ]   0%
Time Stamp: Thu Nov 19 23:00:22 2020


Finishing the upgrade, switch will reboot in 10 seconds.
Step 5. Verify Successful NX-OS Software Upgrade
After the Nexus 3524 or 3548 switch is reloaded, verify the upgrade was successful through the show module command. The output of this command shows the desired target release. Refer to this example where the switch was successfully upgraded to NX-OS software release 9.2(4).
N3K-C3548# show module
Mod Ports             Module-Type                       Model          Status
--- ----- ------------------------------------- --------------------- ---------
1    48   48x10GE Supervisor                    N3K-C3548P-10G        active *

Mod  Sw                       Hw    Slot
---  ----------------------- ------ ----
1    9.2(4)                   1.0    NA
Step 6. Delete Intermediate Release Binary Image Files from Cisco Nexus Switch
After you verify the NX-OS software upgrade from the intermediate release to the target release was successful, preserve free space on the bootflash switch by deleting the kickstart and system binary image files of the intermediate release from the bootflash of the device. This can be done with the delete bootflash:{filename} command. Refer to this example where the NX-OS 6.0(2)A8(11b) kickstart and system binary image files are deleted from the bootflash switch.
N3K-C3548# dir | include bin
   37739008    Nov 19 22:06:28 2020  n3500-uk9-kickstart.6.0.2.A8.11b.bin
  197055713    Nov 19 22:15:20 2020  n3500-uk9.6.0.2.A8.11b.bin
  530509806    Nov 19 22:41:28 2020  nxos.9.2.4.bin
N3K-C3548# delete bootflash:n3500-uk9-kickstart.6.0.2.A8.11b.bin
Do you want to delete "/n3500-uk9-kickstart.6.0.2.A8.11b.bin" ? (yes/no/abort)   [y]
N3K-C3548# delete bootflash:n3500-uk9.6.0.2.A8.11b.bin
Do you want to delete "/n3500-uk9.6.0.2.A8.11b.bin" ? (yes/no/abort)   [y]
N3K-C3548# dir | include bin
  530509806    Nov 19 22:41:28 2020  nxos.9.2.4.bin
Step 7. Run Initial Setup Script to Re-Apply CoPP Policies
Run the initial setup script with the setup command. Enter the basic configuration dialog by entering yes, then accept all default options by repeatedly pressing the Enter key until the NX-OS CLI prompt is returned.
Refer to this example:
N3K-C3548# setup


         ---- Basic System Configuration Dialog ----

This setup utility will guide you through the basic configuration of
the system. Setup configures only enough connectivity for management
of the system.

*Note: setup is mainly used for configuring the system initially,
when no configuration is present. So setup always assumes system
defaults and not the current system configuration values.

Press Enter at anytime to skip a dialog. Use ctrl-c at anytime
to skip the remaining dialogs.

Would you like to enter the basic configuration dialog (yes/no): yes


  Create another login account (yes/no) [n]:

  Configure read-only SNMP community string (yes/no) [n]:

  Configure read-write SNMP community string (yes/no) [n]:

  Enter the switch name :

  Continue with Out-of-band (mgmt0) management configuration? (yes/no) [y]:

    Mgmt0 IPv4 address :

  Configure the default gateway? (yes/no) [y]:

    IPv4 address of the default gateway :

  Enable the telnet service? (yes/no) [n]:

  Enable the ssh service? (yes/no) [y]:

    Type of ssh key you would like to generate (dsa/rsa) :

  Configure the ntp server? (yes/no) [n]:

  Configure default interface layer (L3/L2) [L2]:

  Configure default switchport interface state (shut/noshut) [noshut]:

  Configure CoPP System Policy Profile ( default / l2 / l3 ) [default]:

This configuration will be applied:
  no telnet server enable
  system default switchport
  no system default switchport shutdown
  policy-map type control-plane copp-system-policy ( default )

Would you like to edit the configuration? (yes/no) [n]:

Use this configuration and save it? (yes/no) [y]:
MTC:Executing copp config

[########################################] 100%
Copy complete, now saving to disk (wait)...
Copy complete.
Upgrade from NX-OS 6.x to NX-OS 9.3(x)
This section describes how to perform a standard disruptive NX-OS software upgrade from a source release in the NX-OS 6.x major release to a target release in the NX-OS 9.3(x) minor release.
An example of a standard disruptive NX-OS software upgrade is performed on a Cisco Nexus 3548 switch from a source release of 6.0(2)A4(5) to a target release of 9.3(6):
N3K-C3548# show module
Mod Ports Module-Type                         Model                  Status
--- ----- ----------------------------------- ---------------------- ------------
1   48    48x10GE Supervisor                  N3K-C3548P-10G-SUP     active *

Mod  Sw              Hw      World-Wide-Name(s) (WWN)
---  --------------  ------  ----------------------------------------------------
1    6.0(2)A4(5)     1.0     --
Upgrade Path Summary
A summary of the upgrade path from a source release in the NX-OS 6.x major release to a target release in the NX-OS 9.3(x) minor release through intermediate releases of 6.0(2)A8(11b) and 7.0(3)I7(9):
6.x -> 6.0(2)A8(11b) -> 7.0(3)I7(9) -> 9.3(x)
Step 1. Upgrade from NX-OS 6.x to NX-OS 6.0(2)A8(11b)
Use the Upgrade from NX-OS 6.x to NX-OS 6.x section of this document to perform a standard disruptive NX-OS software upgrade from your source release to an intermediate release of NX-OS software release 6.0(2)A8(11b). This is required for an upgrade to an intermediate release of 7.0(3)I7(9) to be successful.
Step 2. Upgrade from NX-OS 6.0(2)A8(11b) to NX-OS 7.0(3)I7(9)
Use the Upgrade from NX-OS 6.x to NX-OS 7.x section of this document to perform a standard disruptive NX-OS software upgrade from an intermediate release of 6.0(2)A8(11b) to an intermediate release of 7.0(3)I7(9). This is required for an upgrade to a target release in the NX-OS 9.2(x) minor release to be successful.
Step 3. Upgrade from NX-OS 7.0(3)I7(9) to NX-OS 9.3(x)
Use the Upgrade from NX-OS 7.x to NX-OS 9.3(x) section of this document to perform a standard disruptive NX-OS software upgrade from an intermediate release of 7.0(3)I7(9) to the desired target release in the NX-OS 9.3(x) minor release.
Upgrade from NX-OS 7.x to NX-OS 7.x
This section of the document describes how to perform a standard disruptive NX-OS software upgrade from a source release in the NX-OS 7.x major release to a target release in the NX-OS 7.x major release.
An example standard disruptive NX-OS software upgrade is performed on a Cisco Nexus 3548 switch from a source release of 7.0(3)I7(2) to a target release of 7.0(3)I7(9):
N3K-C3548# show module
Mod Ports             Module-Type                       Model          Status
--- ----- ------------------------------------- --------------------- ---------
1    48   48x10GE Supervisor                    N3K-C3548P-10G        active *

Mod  Sw                Hw     Slot
---  ----------------  ------ ----
1    7.0(3)I7(2)       1.0    NA
Upgrade Path Summary
A summary of the upgrade path from a source release in the NX-OS 7.x major release to a target release in the NX-OS 7.x major release:
7.x -> 7.x
Step 1. Download Target Release from Cisco Software Download
NX-OS 7.x software uses a single NX-OS binary image file (sometimes referred to as a unified image file). You must download this image from Cisco Software Download Website to your local computer. The specific steps you must take to download software from Cisco Software Download Website are outside the scope of this document.
Step 2. Copy Target Release to Cisco Nexus Switch through Compact Image Procedure via SCP
Copy the target release unified binary image file to the Nexus 3524 or 3548 Series switch you want to disruptively upgrade by executing the NX-OS Compact Image Procedure via SCP.
For more information on this procedure, refer to Nexus 3000, 3100, and 3500 NX-OS Compact Image Procedure Document
This example demonstrates how to copy the NX-OS 7.0(3)I7(9) software release unified binary image file through the Compact Image Procedure (denoted by the compact keyword) via SCP from SCP server 192.0.2.100 reachable via the management VRF.
N3K-C3548# dir | include bin
  416939523    Nov 20 03:26:37 2020  nxos.7.0.3.I7.2.bin
N3K-C3548# copy scp://username@192.0.2.100/nxos.7.0.3.I7.9.bin bootflash: compact vrf management
The authenticity of host '192.0.2.100 (192.0.2.100)' can't be established.
ECDSA key fingerprint is SHA256:TwkQiylhtFDFPPwqh3U2Oq9ugrDuTQ50bB3boV5DkXM.
Are you sure you want to continue connecting (yes/no)? yes
Warning: Permanently added '192.0.2.100' (ECDSA) to the list of known hosts.
username@192.0.2.100's password:
nxos.7.0.3.I7.9.bin                                100%  937MB   3.6MB/s   04:24
Copy complete, now saving to disk (wait)...
Copy complete.
N3K-C3548# dir | include bin
  416939523    Nov 20 03:26:37 2020  nxos.7.0.3.I7.2.bin
  459209441    Nov 20 03:43:38 2020  nxos.7.0.3.I7.9.bin
Step 3. Upgrade NX-OS Software via Install All Command
Begin a standard disruptive NX-OS software upgrade through the install all command. This command requires the nxos parameter to be passed in with the absolute file path of the NX-OS unified binary image file corresponding with the target release.
This example shows the install all command where the nxos parameter points to the absolute file path of the NX-OS 7.0(3)I7(9) unified binary image file (bootflash:nxos.7.0.3.I7.9.bin).
N3K-C3548# install all nxos bootflash:nxos.7.0.3.I7.9.bin
Installer will perform compatibility check first. Please wait.
Installer is forced disruptive

Verifying image bootflash:/nxos.7.0.3.I7.9.bin for boot variable "nxos".
[####################] 100% -- SUCCESS

Verifying image type.
[####################] 100% -- SUCCESS

Preparing "nxos" version info using image bootflash:/nxos.7.0.3.I7.9.bin.
[####################] 100% -- SUCCESS

Preparing "bios" version info using image bootflash:/nxos.7.0.3.I7.9.bin.
[####################] 100% -- SUCCESS

Collecting "running" plugin(s) information.
[####################] 100% -- SUCCESS

Collecting plugin(s) information from "new" image.
[####################] 100% -- SUCCESS
[####################] 100% -- SUCCESS

Performing module support checks.
[####################] 100% -- SUCCESS

Notifying services about system upgrade.
[####################] 100% -- SUCCESS


Compatibility check is done:
Module  bootable          Impact  Install-type  Reason
------  --------  --------------  ------------  ------
     1       yes      disruptive         reset  default upgrade is not hitless


Images will be upgraded according to this table:
Module       Image                  Running-Version(pri:alt)           New-Version  Upg-Required
------  ----------  ----------------------------------------  --------------------  ------------
     1        nxos                               7.0(3)I7(2)           7.0(3)I7(9)           yes
     1        bios                        v5.4.0(10/23/2019)    v5.4.0(10/23/2019)            no


Switch will be reloaded for disruptive upgrade.
Do you want to continue with the installation (y/n)?  [n] y


Install is in progress, please wait.

Performing runtime checks.
[####################] 100% -- SUCCESS

Setting boot variables.
[####################] 100% -- SUCCESS

Performing configuration copy.
[####################] 100% -- SUCCESS

Module 1: Refreshing compact flash and upgrading bios/loader/bootrom.
Warning: please do not remove or power off the module at this time.
[####################] 100% -- SUCCESS


Finishing the upgrade, switch will reboot in 10 seconds.
Step 4. Verify Successful NX-OS Software Upgrade
After the Nexus 3524 or 3548 switch is reloaded, verify that the upgrade was successful through the show module command. The output of this command shows the desired target release. Refer to this example where the switch was successfully upgraded to NX-OS software release 7.0(3)I7(9).
N3K-C3548# show module
Mod Ports             Module-Type                       Model          Status
--- ----- ------------------------------------- --------------------- ---------
1    48   48x10GE Supervisor                    N3K-C3548P-10G        active *

Mod  Sw                Hw     Slot
---  ----------------  ------ ----
1    7.0(3)I7(9)       1.0    NA
Step 5. Delete Source Release Binary Image Files from Cisco Nexus Switch
After you verify the NX-OS software upgrade from the source release to the target release was successful, preserve free space on the bootflash switch by deleting the unified binary image file of the source release from the bootflash of the device. This can be done with the delete bootflash:{filename} command. Refer to this example where the NX-OS 7.0(3)I7(2) unified binary image file is deleted from the bootflash switch.
N3K-C3548# dir | include bin
  416939523    Nov 20 03:26:37 2020  nxos.7.0.3.I7.2.bin
  459209441    Nov 20 03:43:38 2020  nxos.7.0.3.I7.9.bin
N3K-C3548# delete bootflash:nxos.7.0.3.I7.2.bin
Do you want to delete "/nxos.7.0.3.I7.2.bin" ? (yes/no/abort)   [y]
N3K-C3548# dir | include bin
  459209441    Nov 20 03:43:38 2020  nxos.7.0.3.I7.9.bin
Step 6. Run Initial Setup Script to Re-Apply CoPP Policies
Run the initial setup script with the setup command. Enter the basic configuration dialog by entering yes, then accept all default options by repeatedly pressing the Enter key until the NX-OS CLI prompt is returned.
Refer to this example:
N3K-C3548# setup


         ---- Basic System Configuration Dialog ----

This setup utility will guide you through the basic configuration of
the system. Setup configures only enough connectivity for management
of the system.

*Note: setup is mainly used for configuring the system initially,
when no configuration is present. So setup always assumes system
defaults and not the current system configuration values.

Press Enter at anytime to skip a dialog. Use ctrl-c at anytime
to skip the remaining dialogs.

Would you like to enter the basic configuration dialog (yes/no): yes


  Create another login account (yes/no) [n]:

  Configure read-only SNMP community string (yes/no) [n]:

  Configure read-write SNMP community string (yes/no) [n]:

  Enter the switch name :

  Continue with Out-of-band (mgmt0) management configuration? (yes/no) [y]:

    Mgmt0 IPv4 address :

  Configure the default gateway? (yes/no) [y]:

    IPv4 address of the default gateway :

  Enable the telnet service? (yes/no) [n]:

  Enable the ssh service? (yes/no) [y]:

    Type of ssh key you would like to generate (dsa/rsa) :

  Configure the ntp server? (yes/no) [n]:

  Configure default interface layer (L3/L2) [L2]:

  Configure default switchport interface state (shut/noshut) [noshut]:

  Configure CoPP System Policy Profile ( default / l2 / l3 ) [default]:

This configuration will be applied:
  no telnet server enable
  system default switchport
  no system default switchport shutdown
  policy-map type control-plane copp-system-policy ( default )

Would you like to edit the configuration? (yes/no) [n]:

Use this configuration and save it? (yes/no) [y]:
MTC:Executing copp config

[########################################] 100%
Copy complete, now saving to disk (please wait)...
Copy complete.
Upgrade from NX-OS 7.x to NX-OS 9.2(x)
This section of the document describes how to perform a standard disruptive NX-OS software upgrade from a source release in the NX-OS 7.x major release to a target release in the NX-OS 9.2(x) minor release.
An example standard disruptive NX-OS software upgrade is performed on a Cisco Nexus 3548 switch from a source release of 7.0(3)I7(2) to a target release of 9.2(4):
N3K-C3548# show module
Mod Ports             Module-Type                       Model          Status
--- ----- ------------------------------------- --------------------- ---------
1    48   48x10GE Supervisor                    N3K-C3548P-10G        active *

Mod  Sw                Hw     Slot
---  ----------------  ------ ----
1    7.0(3)I7(2)       1.0    NA
Upgrade Path Summary
A summary of the upgrade path from a source release in the NX-OS 7.x major release to a target release in the NX-OS 9.2(x) minor release through an intermediate release of 7.0(3)I7(9) is shown here:
7.x -> 7.0(3)I7(9) -> 9.2(x)
Step 1. Upgrade from NX-OS 7.x to NX-OS 7.0(3)I7(9)
Use the Upgrade from NX-OS 7.x to NX-OS 7.x section of this document to perform a standard disruptive NX-OS software upgrade from your source release to an intermediate release of NX-OS software release 7.0(3)I7(9). This is required in order for an upgrade to a target release in the NX-OS 9.2(x) minor release to be successful.
Step 2. Download Target Release from Cisco Software Download
NX-OS 9.2(x) software uses a single NX-OS binary image file (sometimes referred to as a unified image file). You must download this image from Cisco Software Download Website to your local computer. The specific steps you must take to download software from Cisco Software Download Website are outside the scope of this document.
Step 3. Copy Target Release to Cisco Nexus Switch through Compact Image Procedure via SCP
Copy the target release unified binary image file to the Nexus 3524 or 3548 Series switch you want to disruptively upgrade by executing the NX-OS Compact Image Procedure via SCP.
For more information on this procedure, refer to Nexus 3000, 3100, and 3500 NX-OS Compact Image Procedure Document
This example demonstrates how to copy the NX-OS 9.2(4) software release unified binary image file through the Compact Image Procedure (denoted by the compact keyword) via SCP from SCP server 192.0.2.100 reachable via the management VRF.
N3K-C3548# dir | include bin
  459209441    Nov 20 03:43:38 2020  nxos.7.0.3.I7.9.bin
N3K-C3548# copy scp://username@192.0.2.100/nxos.9.2.4.bin bootflash: compact vrf management
The authenticity of host '192.0.2.100 (192.0.2.100)' can't be established.
ECDSA key fingerprint is SHA256:TwkQiylhtFDFPPwqh3U2Oq9ugrDuTQ50bB3boV5DkXM.
Are you sure you want to continue connecting (yes/no)? yes
Warning: Permanently added '192.0.2.100' (ECDSA) to the list of known hosts.
username@192.0.2.100's password:
nxos.9.2.4.bin                                100% 1278MB   3.0MB/s   07:09
Copy complete, now saving to disk (please wait)...
Copy complete.
N3K-C3548# dir | include bin
  459209441    Nov 20 03:43:38 2020  nxos.7.0.3.I7.9.bin
  530509806    Nov 20 04:30:47 2020  nxos.9.2.4.bin
Step 4. Upgrade NX-OS Software via Install All Command
Begin a standard disruptive NX-OS software upgrade through the install all command. This command requires the nxos parameter to be passed in with the absolute file path of the NX-OS unified binary image file corresponding with the target release.
This example shows the install all command where the nxos parameter points to the absolute file path of the NX-OS 9.2(4) unified binary image file (bootflash:nxos.9.2.4.bin).
N3K-C3548# install all nxos bootflash:nxos.9.2.4.bin
Installer will perform compatibility check first. Please wait.
Installer is forced disruptive

Verifying image bootflash:/nxos.9.2.4.bin for boot variable "nxos".
[####################] 100% -- SUCCESS

Verifying image type.
[####################] 100% -- SUCCESS
[##                  ]   5% -- SUCCESS

Preparing "nxos" version info using image bootflash:/nxos.9.2.4.bin.
[####################] 100% -- SUCCESS

Preparing "bios" version info using image bootflash:/nxos.9.2.4.bin.
[####################] 100% -- SUCCESS

Collecting "running" plugin(s) information.
[####################] 100% -- SUCCESS

Collecting plugin(s) information from "new" image.
[####################] 100% -- SUCCESS
[####################] 100% -- SUCCESS

Performing module support checks.
[####################] 100% -- SUCCESS

Notifying services about system upgrade.
[####################] 100% -- SUCCESS


Compatibility check is done:
Module  bootable          Impact  Install-type  Reason
------  --------  --------------  ------------  ------
     1       yes      disruptive         reset  default upgrade is not hitless


Images will be upgraded according to this table:
Module       Image                  Running-Version(pri:alt)           New-Version  Upg-Required
------  ----------  ----------------------------------------  --------------------  ------------
     1        nxos                               7.0(3)I7(9)                9.2(4)           yes
     1        bios                        v5.4.0(10/23/2019)    v5.3.0(06/08/2019)            no


Switch will be reloaded for disruptive upgrade.
Do you want to continue with the installation (y/n)?  [n] y


Install is in progress, please wait.

Performing runtime checks.
[####################] 100% -- SUCCESS

Setting boot variables.
[####################] 100% -- SUCCESS

Performing configuration copy.
[####################] 100% -- SUCCESS

Module 1: Refreshing compact flash and upgrading bios/loader/bootrom.
Warning: please do not remove or power off the module at this time.
[####################] 100% -- SUCCESS


Finishing the upgrade, switch will reboot in 10 seconds.
Step 5. Verify Successful NX-OS Software Upgrade
After the Nexus 3524 or 3548 switch is reloaded, verify the upgrade was successful through the show module command. The output of this command shows the desired target release. Refer to this example where the switch was successfully upgraded to NX-OS software release 9.2(4).
N3K-C3548# show module
Mod Ports             Module-Type                       Model          Status
--- ----- ------------------------------------- --------------------- ---------
1    48   48x10GE Supervisor                    N3K-C3548P-10G        active *

Mod  Sw                       Hw    Slot
---  ----------------------- ------ ----
1    9.2(4)                   1.0    NA
Step 6. Delete Intermediate Release Binary Image Files from Cisco Nexus Switch
After you verify the NX-OS software upgrade from the intermediate release to the target release was successful, preserve free space on the bootflash switch by deleting the unified image file of the intermediate release from the bootflash of the device. This can be done with the delete bootflash:{filename} command. Refer to this example where the NX-OS 7.0(3)I7(9) unified binary image file is deleted from the bootflash switch.
N3K-C3548# dir | include bin
  459209441    Nov 20 03:43:38 2020  nxos.7.0.3.I7.9.bin
  530509806    Nov 20 04:30:47 2020  nxos.9.2.4.bin
N3K-C3548# delete bootflash:nxos.7.0.3.I7.9.bin
Do you want to delete "/nxos.7.0.3.I7.9.bin" ? (yes/no/abort)   [y]
N3K-C3548# dir | include bin
  530509806    Nov 20 04:30:47 2020  nxos.9.2.4.bin
Step 7. Run Initial Setup Script to Re-Apply CoPP Policies
Run the initial setup script with the setup command. Enter the basic configuration dialog by entering yes, then accept all default options by repeatedly pressing the Enter key until the NX-OS CLI prompt is returned.
Refer to this example:
N3K-C3548# setup


         ---- Basic System Configuration Dialog ----

This setup utility will guide you through the basic configuration of
the system. Setup configures only enough connectivity for management
of the system.

*Note: setup is mainly used for configuring the system initially,
when no configuration is present. So setup always assumes system
defaults and not the current system configuration values.

Press Enter at anytime to skip a dialog. Use ctrl-c at anytime
to skip the remaining dialogs.

Would you like to enter the basic configuration dialog (yes/no): yes


  Create another login account (yes/no) [n]:

  Configure read-only SNMP community string (yes/no) [n]:

  Configure read-write SNMP community string (yes/no) [n]:

  Enter the switch name :

  Continue with Out-of-band (mgmt0) management configuration? (yes/no) [y]:

    Mgmt0 IPv4 address :

  Configure the default gateway? (yes/no) [y]:

    IPv4 address of the default gateway :

  Enable the telnet service? (yes/no) [n]:

  Enable the ssh service? (yes/no) [y]:

    Type of ssh key you would like to generate (dsa/rsa) :

  Configure the ntp server? (yes/no) [n]:

  Configure default interface layer (L3/L2) [L2]:

  Configure default switchport interface state (shut/noshut) [noshut]:

  Configure CoPP System Policy Profile ( default / l2 / l3 ) [default]:

This configuration will be applied:
  no telnet server enable
  system default switchport
  no system default switchport shutdown
  policy-map type control-plane copp-system-policy ( default )

Would you like to edit the configuration? (yes/no) [n]:

Use this configuration and save it? (yes/no) [y]:
MTC:Executing copp config

[########################################] 100%
Copy complete, now saving to disk (wait)...
Copy complete.
Upgrade from NX-OS 7.x to NX-OS 9.3(x)
This section describes how to perform a standard disruptive NX-OS software upgrade from a source release in the NX-OS 7.x major release to a target release in the NX-OS 9.3(x) minor release.
An example standard disruptive NX-OS software upgrade is performed on a Cisco Nexus 3548 switch from a source release of 7.0(3)I7(2) to a target release of 9.3(6):
N3K-C3548# show module
Mod Ports             Module-Type                       Model          Status
--- ----- ------------------------------------- --------------------- ---------
1    48   48x10GE Supervisor                    N3K-C3548P-10G        active *

Mod  Sw                Hw     Slot
---  ----------------  ------ ----
1    7.0(3)I7(2)       1.0    NA
Upgrade Path Summary
A summary of the upgrade path from a source release in the NX-OS 7.x major release to a target release in the NX-OS 9.3(x) minor release through an intermediate release of 7.0(3)I7(9):
7.x -> 7.0(3)I7(9) -> 9.3(x)
Step 1. Upgrade from NX-OS 7.x to NX-OS 7.0(3)I7(9)
Use the Upgrade from NX-OS 7.x to NX-OS 7.x section of this document to perform a standard disruptive NX-OS software upgrade from your source release to an intermediate release of NX-OS software release 7.0(3)I7(9). This is required for an upgrade to a target release in the NX-OS 9.3(x) minor release to be successful.
Step 2. Download Target Release from Cisco Software Download
NX-OS 9.3(x) software uses a single NX-OS binary image file (sometimes referred to as a unified image file). You must download this image from Cisco Software Download Website to your local computer. The specific steps you must take to download software from Cisco Software Download Website are outside the scope of this document.
Step 3. Copy Target Release to Cisco Nexus Switch through Compact Image Procedure via SCP
Copy the target release unified binary image file to the Nexus 3524 or 3548 Series switch you want to disruptively upgrade by executing the NX-OS Compact Image Procedure via SCP.
For more information on this procedure, refer to Nexus 3000, 3100, and 3500 NX-OS Compact Image Procedure Document
This example demonstrates how to copy the NX-OS 9.3(6) software release unified binary image file through the Compact Image Procedure (denoted by the compact keyword) via SCP from SCP server 192.0.2.100 reachable via the management VRF.
N3K-C3548# dir | include bin
  459209441    Nov 19 23:44:19 2020  nxos.7.0.3.I7.9.bin
N3K-C3548# copy scp://username@192.0.2.100/nxos.9.3.6.bin bootflash: compact vrf management
The authenticity of host '192.0.2.100 (192.0.2.100)' can't be established.
ECDSA key fingerprint is SHA256:TwkQiylhtFDFPPwqh3U2Oq9ugrDuTQ50bB3boV5DkXM.
Are you sure you want to continue connecting (yes/no)? yes
Warning: Permanently added '192.0.2.100' (ECDSA) to the list of known hosts.
username@192.0.2.100's password:
nxos.9.3.6.bin                                100% 1882MB   3.1MB/s   10:09
Copy complete, now saving to disk (wait)...
Copy complete.
N3K-C3548# dir | include bin
  459209441    Nov 19 23:44:19 2020  nxos.7.0.3.I7.9.bin
  671643688    Nov 20 00:47:00 2020  nxos.9.3.6.bin
Step 4. Upgrade NX-OS Software via Install All Command
Begin a standard disruptive NX-OS software upgrade through the install all command. This command requires the nxos parameter to be passed in with the absolute file path of the NX-OS unified binary image file corresponding with the target release.
This example shows the install all command where the nxos parameter points to the absolute file path of the NX-OS 9.3(6) unified binary image file (bootflash:nxos.9.3.6.bin).
N3K-C3548# install all nxos bootflash:nxos.9.3.6.bin
Installer will perform compatibility check first. Please wait.
Installer is forced disruptive

Verifying image bootflash:/nxos.9.3.6.bin for boot variable "nxos".
[####################] 100% -- SUCCESS

Verifying image type.
[####################] 100% -- SUCCESS

Preparing "nxos" version info using image bootflash:/nxos.9.3.6.bin.
[####################] 100% -- SUCCESS

Preparing "bios" version info using image bootflash:/nxos.9.3.6.bin.
[####################] 100% -- SUCCESS

Collecting "running" plugin(s) information.
[####################] 100% -- SUCCESS

Collecting plugin(s) information from "new" image.
[####################] 100% -- SUCCESS

Performing module support checks.
[####################] 100% -- SUCCESS

Notifying services about system upgrade.
[####################] 100% -- SUCCESS


Compatibility check is done:
Module  bootable          Impact  Install-type  Reason
------  --------  --------------  ------------  ------
     1       yes      disruptive         reset  default upgrade is not hitless


Images will be upgraded according to this table:
Module       Image                  Running-Version(pri:alt)           New-Version  Upg-Required
------  ----------  ----------------------------------------  --------------------  ------------
     1        nxos                               7.0(3)I7(9)                9.3(6)           yes
     1        bios                        v5.4.0(10/23/2019)    v5.4.0(10/23/2019)            no


Switch will be reloaded for disruptive upgrade.
Do you want to continue with the installation (y/n)?  [n] y


Install is in progress, please wait.

Performing runtime checks.
[####################] 100% -- SUCCESS

Setting boot variables.
[####################] 100% -- SUCCESS

Performing configuration copy.
[####################] 100% -- SUCCESS

Module 1: Refreshing compact flash and upgrading bios/loader/bootrom.
Warning: please do not remove or power off the module at this time.
[####################] 100% -- SUCCESS


Finishing the upgrade, switch will reboot in 10 seconds.
Step 5. Verify Successful NX-OS Software Upgrade
After the Nexus 3524 or 3548 switch is reloaded, verify the upgrade was successful through the show module command. The output of this command shows the desired target release. Refer to this example where the switch was successfully upgraded to NX-OS software release 9.3(6).
N3K-C3548# show module
Mod Ports             Module-Type                      Model           Status
--- ----- ------------------------------------- --------------------- ---------
1    48   48x10GE Supervisor                    N3K-C3548P-10G        active *

Mod  Sw                       Hw    Slot
---  ----------------------- ------ ----
1    9.3(6)                   1.0    NA
Step 6. Delete Intermediate Release Binary Image Files from Cisco Nexus Switch
After you verify the NX-OS software upgrade from the intermediate release to the target release was successful, preserve free space on the bootflash switch by deleting the unified binary image file of the intermediate release from the bootflash of the device. This can be done with the delete bootflash:{filename} command. Refer to this example where the NX-OS 7.0(3)I7(9) unified binary image file is deleted from the bootflash switch.
N3K-C3548# dir | include bin
  459209441    Nov 19 23:44:19 2020  nxos.7.0.3.I7.9.bin
  671643688    Nov 20 00:47:00 2020  nxos.9.3.6.bin
N3K-C3548# delete bootflash:nxos.7.0.3.I7.9.bin
Do you want to delete "/nxos.7.0.3.I7.9.bin" ? (yes/no/abort)   [y]
N3K-C3548# dir | include bin
  671643688    Nov 20 00:47:00 2020  nxos.9.3.6.bin
Step 7. Run Initial Setup Script to Re-Apply CoPP Policies
Run the initial setup script with the setup command. Enter the basic configuration dialog by entering yes, then accept all default options by repeatedly pressing the Enter key until the NX-OS CLI prompt is returned.
Refer to this example:
N3K-C3548# setup


         ---- Basic System Configuration Dialog ----

This setup utility will guide you through the basic configuration of
the system. Setup configures only enough connectivity for management
of the system.

*Note: setup is mainly used for configuring the system initially,
when no configuration is present. So setup always assumes system
defaults and not the current system configuration values.

Press Enter at anytime to skip a dialog. Use ctrl-c at anytime
to skip the remaining dialogs.

Would you like to enter the basic configuration dialog (yes/no): yes


  Create another login account (yes/no) [n]:

  Configure read-only SNMP community string (yes/no) [n]:

  Configure read-write SNMP community string (yes/no) [n]:

  Enter the switch name :

  Continue with Out-of-band (mgmt0) management configuration? (yes/no) [y]:

    Mgmt0 IPv4 address :

  Configure the default gateway? (yes/no) [y]:

    IPv4 address of the default gateway :

  Enable the telnet service? (yes/no) [n]:

  Enable the ssh service? (yes/no) [y]:

    Type of ssh key you would like to generate (dsa/rsa) :

  Configure the ntp server? (yes/no) [n]:

  Configure default interface layer (L3/L2) [L2]:

  Configure default switchport interface state (shut/noshut) [noshut]:

  Configure CoPP System Policy Profile ( default / l2 / l3 ) [default]:

This configuration will be applied:
  no telnet server enable
  system default switchport
  no system default switchport shutdown
  policy-map type control-plane copp-system-policy ( default )

Would you like to edit the configuration? (yes/no) [n]:

Use this configuration and save it? (yes/no) [y]:
MTC:Executing copp config

[########################################] 100%
Copy complete, now saving to disk (please wait)...
Copy complete.
Upgrade from NX-OS 9.2(x) to NX-OS 9.2(x)
This section describes how to perform a standard disruptive NX-OS software upgrade from a source release in the NX-OS 9.2(x) minor release to a target release in the NX-OS 9.2(x) minor release.
An example standard disruptive NX-OS software upgrade is performed on a Cisco Nexus 3548 switch from a source release of 9.2(1) to a target release of 9.2(4):
N3K-C3548# show module
Mod Ports             Module-Type                       Model          Status
--- ----- ------------------------------------- --------------------- ---------
1    48   48x10GE Supervisor                    N3K-C3548P-10G        active *

Mod  Sw                       Hw    Slot
---  ----------------------- ------ ----
1    9.2(1)                   1.0    NA
Upgrade Path Summary
A summary of the upgrade path from a source release in the NX-OS 9.2(x) minor release to a target release in the NX-OS 9.2(x):
9.2(x) -> 9.2(x)
Step 1. Download Target Release from Cisco Software Download
NX-OS 9.2(x) software uses a single NX-OS binary image file (sometimes referred to as a unified image file). You must download this image from Cisco Software Download Website to your local computer. The specific steps you must take to download software from Cisco Software Download Website are outside the scope of this document.
Step 2. Copy Target Release to Cisco Nexus Switch through Compact Image Procedure via SCP
Copy the target release unified binary image file to the Nexus 3524 or 3548 Series switch you want to disruptively upgrade by executing the NX-OS Compact Image Procedure via SCP.
For more information on this procedure, refer to Nexus 3000, 3100, and 3500 NX-OS Compact Image Procedure Document
This example demonstrates how to copy the NX-OS 9.2(4) software release unified binary image file through the Compact Image Procedure (denoted by the compact keyword) via SCP (Secure Copy Protocol) from SCP server 192.0.2.100 reachable via the management VRF.
N3K-C3548# dir | include bin
  512339094    Nov 20 16:58:21 2020  nxos.9.2.1.bin
N3K-C3548# copy scp://username@192.0.2.100/nxos.9.2.4.bin bootflash: compact vrf management
The authenticity of host '192.0.2.100 (192.0.2.100)' can't be established.
ECDSA key fingerprint is SHA256:TwkQiylhtFDFPPwqh3U2Oq9ugrDuTQ50bB3boV5DkXM.
Are you sure you want to continue connecting (yes/no)? yes
Warning: Permanently added '192.0.2.100' (ECDSA) to the list of known hosts.
username@192.0.2.100's password:
nxos.9.2.4.bin                                100% 1278MB   3.9MB/s   05:31
Copy complete, now saving to disk (please wait)...
Copy complete.
N3K-C3548# dir | include bin
  512339094    Nov 20 16:58:21 2020  nxos.9.2.1.bin
  530509806    Nov 23 18:58:45 2020  nxos.9.2.4.bin
Step 3. Upgrade NX-OS Software via Install All Command
Begin a standard disruptive NX-OS software upgrade through the install all command. This command requires the nxos parameter to be passed in with the absolute file path of the NX-OS unified binary image file corresponding with the target release.
This example shows the install all command where the nxos parameter points to the absolute file path of the NX-OS 9.2(4) unified binary image file (bootflash:nxos.9.2.4.bin).
N3K-C3548# install all nxos bootflash:nxos.9.2.4.bin
Installer will perform compatibility check first. Please wait.
Installer is forced disruptive

Verifying image bootflash:/nxos.9.2.4.bin for boot variable "nxos".
[####################] 100% -- SUCCESS

Verifying image type.
[####################] 100% -- SUCCESS

Preparing "nxos" version info using image bootflash:/nxos.9.2.4.bin.
[####################] 100% -- SUCCESS

Preparing "bios" version info using image bootflash:/nxos.9.2.4.bin.
[####################] 100% -- SUCCESS

Collecting "running" plugin(s) information.
[####################] 100% -- SUCCESS

Collecting plugin(s) information from "new" image.
[####################] 100% -- SUCCESS
[####################] 100% -- SUCCESS

Performing module support checks.
[####################] 100% -- SUCCESS

Notifying services about system upgrade.
[####################] 100% -- SUCCESS


Compatibility check is done:
Module  bootable          Impact  Install-type  Reason
------  --------  --------------  ------------  ------
     1       yes      disruptive         reset  default upgrade is not hitless


Images will be upgraded according to this table:
Module       Image                  Running-Version(pri:alt)           New-Version  Upg-Required
------  ----------  ----------------------------------------  --------------------  ------------
     1        nxos                                    9.2(1)                9.2(4)           yes
     1        bios                        v5.4.0(10/23/2019)    v5.3.0(06/08/2019)            no


Switch will be reloaded for disruptive upgrade.
Do you want to continue with the installation (y/n)?  [n] y


Install is in progress, please wait.

Performing runtime checks.
[####################] 100% -- SUCCESS

Setting boot variables.
[####################] 100% -- SUCCESS

Performing configuration copy.
[####################] 100% -- SUCCESS

Module 1: Refreshing compact flash and upgrading bios/loader/bootrom.
Warning: please do not remove or power off the module at this time.
[####################] 100% -- SUCCESS


Finishing the upgrade, switch will reboot in 10 seconds.
Step 4. Verify Successful NX-OS Software Upgrade
After the Nexus 3524 or 3548 switch is reloaded, verify the upgrade was successful through the show module command. The output of this command shows the desired target release. Refer to this example where the switch was successfully upgraded to NX-OS software release 9.2(4).
N3K-C3548# show module
Mod Ports             Module-Type                       Model          Status
--- ----- ------------------------------------- --------------------- ---------
1    48   48x10GE Supervisor                    N3K-C3548P-10G        active *

Mod  Sw                       Hw    Slot
---  ----------------------- ------ ----
1    9.2(4)                   1.0    NA
Step 5. Delete Source Release Binary Image Files from Cisco Nexus Switch
After you verify the NX-OS software upgrade from the source release to the target release was successful, preserve free space on the bootflash switch by deleting the unified binary image file of the source release from the bootflash of the device. This can be done with the delete bootflash:{filename} command. Refer to this example where the NX-OS 9.2(1) unified binary image file is deleted from the bootflash switch.
N3K-C3548# dir | include bin
  512339094    Nov 20 16:58:21 2020  nxos.9.2.1.bin
  530509806    Nov 23 18:58:45 2020  nxos.9.2.4.bin
N3K-C3548# delete bootflash:nxos.9.2.1.bin
Do you want to delete "/nxos.9.2.1.bin" ? (yes/no/abort)   [y]
N3K-C3548# dir | include bin
  530509806    Nov 23 18:58:45 2020  nxos.9.2.4.bin
Step 6. Run Initial Setup Script to Re-Apply CoPP Policies
Run the initial setup script with the setup command. Enter the basic configuration dialog by entering yes, then accept all default options by repeatedly pressing the Enter key until the NX-OS CLI prompt is returned.
Refer to this example:
N3K-C3548# setup


         ---- Basic System Configuration Dialog ----

This setup utility will guide you through the basic configuration of
the system. Setup configures only enough connectivity for management
of the system.

*Note: setup is mainly used for configuring the system initially,
when no configuration is present. So setup always assumes system
defaults and not the current system configuration values.

Press Enter at anytime to skip a dialog. Use ctrl-c at anytime
to skip the remaining dialogs.

Would you like to enter the basic configuration dialog (yes/no): yes


  Create another login account (yes/no) [n]:

  Configure read-only SNMP community string (yes/no) [n]:

  Configure read-write SNMP community string (yes/no) [n]:

  Enter the switch name :

  Continue with Out-of-band (mgmt0) management configuration? (yes/no) [y]:

    Mgmt0 IPv4 address :

  Configure the default gateway? (yes/no) [y]:

    IPv4 address of the default gateway :

  Enable the telnet service? (yes/no) [n]:

  Enable the ssh service? (yes/no) [y]:

    Type of ssh key you would like to generate (dsa/rsa) :

  Configure the ntp server? (yes/no) [n]:

  Configure default interface layer (L3/L2) [L2]:

  Configure default switchport interface state (shut/noshut) [noshut]:

  Configure CoPP System Policy Profile ( default / l2 / l3 ) [default]:

This configuration will be applied:
  no telnet server enable
  system default switchport
  no system default switchport shutdown
  policy-map type control-plane copp-system-policy ( default )

Would you like to edit the configuration? (yes/no) [n]:

Use this configuration and save it? (yes/no) [y]:
MTC:Executing copp config

[########################################] 100%
Copy complete, now saving to disk (please wait)...
Copy complete.
Upgrade from NX-OS 9.2(x) to NX-OS 9.3(x)
This section describes how to perform a standard disruptive NX-OS software upgrade from a source release in the NX-OS 9.2(x) minor release to a target release in the NX-OS 9.3(x) minor release.
An example standard disruptive NX-OS software upgrade is performed on a Cisco Nexus 3548 switch from a source release of 9.2(1) to a target release of 9.3(6):
N3K-C3548# show module
Mod Ports             Module-Type                       Model          Status
--- ----- ------------------------------------- --------------------- ---------
1    48   48x10GE Supervisor                    N3K-C3548P-10G        active *

Mod  Sw                       Hw    Slot
---  ----------------------- ------ ----
1    9.2(1)                   1.0    NA
Upgrade Path Summary
A summary of the upgrade path from a source release in the NX-OS 9.2(x) minor release to a target release in the NX-OS 9.3(x) minor release:
9.2(x) -> 9.2(4) -> 9.3(x)
Step 1. Upgrade from NX-OS 9.2(x) to NX-OS 9.2(4)
Use the Upgrade from NX-OS 9.2(x) to NX-OS 9.2(x) section of this document to perform a standard disruptive NX-OS software upgrade from your source release to an intermediate release of NX-OS software release 9.2(4). This is required for an upgrade to a target release in the NX-OS 9.3(x) minor release to be successful.
Step 2. Download Target Release from Cisco Software Download
NX-OS 9.3(x) software uses a single NX-OS binary image file (sometimes referred to as a unified image file). You must download this image from Cisco Software Download Website to your local computer. The specific steps you must take to download software from Cisco Software Download Website are outside the scope of this document.
Step 3. Copy Target Release to Cisco Nexus Switch through Compact Image Procedure via SCP
Copy the target release unified binary image file to the Nexus 3524 or 3548 Series switch you want to disruptively upgrade by executing the NX-OS Compact Image Procedure via SCP.
For more information on this procedure, refer to Nexus 3000, 3100, and 3500 NX-OS Compact Image Procedure Document
This example demonstrates how to copy the NX-OS 9.3(6) software release unified binary image file through the Compact Image Procedure (denoted by the compact keyword) via SCP from SCP server 192.0.2.100 reachable via the management VRF.
N3K-C3548# dir | include bin
  530509806    Nov 23 18:58:45 2020  nxos.9.2.4.bin
N3K-C3548# copy scp://username@192.0.2.100/nxos.9.3.6.bin bootflash: compact vrf management
The authenticity of host '192.0.2.100 (192.0.2.100)' can't be established.
ECDSA key fingerprint is SHA256:TwkQiylhtFDFPPwqh3U2Oq9ugrDuTQ50bB3boV5DkXM.
Are you sure you want to continue connecting (yes/no)? yes
Warning: Permanently added '192.0.2.100' (ECDSA) to the list of known hosts.
username@192.0.2.100's password:
nxos.9.3.6.bin                                100% 1882MB   3.9MB/s   08:09
Copy complete, now saving to disk (please wait)...
Copy complete.
N3K-C3548# dir | include bin
  530509806    Nov 23 18:58:45 2020  nxos.9.2.4.bin
  671643688    Nov 23 19:51:21 2020  nxos.9.3.6.bin
Step 4. Upgrade NX-OS Software via Install All Command.
Begin a standard disruptive NX-OS software upgrade through the install all command. This command requires the nxos parameter to be passed in with the absolute file path of the NX-OS unified binary image file corresponding with the target release.
This example shows the install all command where the nxos parameter points to the absolute file path of the NX-OS 9.3(6) unified binary image file (bootflash:nxos.9.3.6.bin).
N3K-C3548# install all nxos bootflash:nxos.9.3.6.bin
Installer will perform compatibility check first. Please wait.
Installer is forced disruptive

Verifying image bootflash:/nxos.9.3.6.bin for boot variable "nxos".
[####################] 100% -- SUCCESS

Verifying image type.
[####################] 100% -- SUCCESS
[##                  ]   5% -- SUCCESS

Preparing "nxos" version info using image bootflash:/nxos.9.3.6.bin.
[####################] 100% -- SUCCESS

Preparing "bios" version info using image bootflash:/nxos.9.3.6.bin.
[####################] 100% -- SUCCESS

Collecting "running" plugin(s) information.
[####################] 100% -- SUCCESS

Collecting plugin(s) information from "new" image.
[####################] 100% -- SUCCESS
[####################] 100% -- SUCCESS

Performing module support checks.
[####################] 100% -- SUCCESS

Notifying services about system upgrade.
[####################] 100% -- SUCCESS


Compatibility check is done:
Module  bootable          Impact  Install-type  Reason
------  --------  --------------  ------------  ------
     1       yes      disruptive         reset  default upgrade is not hitless


Images will be upgraded according to this table:
Module       Image                  Running-Version(pri:alt)           New-Version  Upg-Required
------  ----------  ----------------------------------------  --------------------  ------------
     1        nxos                                    9.2(4)                9.3(6)           yes
     1        bios                        v5.4.0(10/23/2019)    v5.4.0(10/23/2019)            no


Switch will be reloaded for disruptive upgrade.
Do you want to continue with the installation (y/n)?  [n] y


Install is in progress, please wait.

Performing runtime checks.
[####################] 100% -- SUCCESS

Setting boot variables.
[####################] 100% -- SUCCESS

Performing configuration copy.
[####################] 100% -- SUCCESS

Module 1: Refreshing compact flash and upgrading bios/loader/bootrom.
Warning: please do not remove or power off the module at this time.
[####################] 100% -- SUCCESS


Finishing the upgrade, switch will reboot in 10 seconds.
Step 5. Verify Successful NX-OS Software Upgrade
After the Nexus 3524 or 3548 switch is reloaded, verify that the upgrade was successful through the show module command. The output of this command shows the desired target release. Refer to this example where the switch was successfully upgraded to NX-OS software release 9.3(6).
N3K-C3548# show module
Mod Ports             Module-Type                      Model           Status
--- ----- ------------------------------------- --------------------- ---------
1    48   48x10GE Supervisor                    N3K-C3548P-10G        active *

Mod  Sw                       Hw    Slot
---  ----------------------- ------ ----
1    9.3(6)                   1.0    NA
Step 6. Delete Intermediate Release Binary Image Files from Cisco Nexus Switch
After you verify the NX-OS software upgrade from the source release to the target release was successful, preserve free space on the bootflash switch by deleting the unified binary image file of the source release from the bootflash of the device. This can be done with the delete bootflash:{filename} command. Refer to this example where the NX-OS 9.2(4) unified binary image file is deleted from the bootflash switch.
N3K-C3548# dir | include bin
  530509806    Nov 23 18:58:45 2020  nxos.9.2.4.bin
  671643688    Nov 23 19:51:21 2020  nxos.9.3.6.bin
N3K-C3548# delete bootflash:nxos.9.2.4.bin
Do you want to delete "/nxos.9.2.4.bin" ? (yes/no/abort)   [y]
N3K-C3548# dir | include bin
  671643688    Nov 23 19:51:21 2020  nxos.9.3.6.bin
Step 7. Run Initial Setup Script to Re-Apply CoPP Policies
Run the initial setup script with the setup command. Enter the basic configuration dialog by entering yes, then accept all default options by repeatedly pressing the Enter key until the NX-OS CLI prompt is returned.
Refer to this example:
N3K-C3548# setup


         ---- Basic System Configuration Dialog ----

This setup utility will guide you through the basic configuration of
the system. Setup configures only enough connectivity for management
of the system.

*Note: setup is mainly used for configuring the system initially,
when no configuration is present. So setup always assumes system
defaults and not the current system configuration values.

Press Enter at anytime to skip a dialog. Use ctrl-c at anytime
to skip the remaining dialogs.

Would you like to enter the basic configuration dialog (yes/no): yes


  Create another login account (yes/no) [n]:

  Configure read-only SNMP community string (yes/no) [n]:

  Configure read-write SNMP community string (yes/no) [n]:

  Enter the switch name :

  Continue with Out-of-band (mgmt0) management configuration? (yes/no) [y]:

    Mgmt0 IPv4 address :

  Configure the default gateway? (yes/no) [y]:

    IPv4 address of the default gateway :

  Enable the telnet service? (yes/no) [n]:

  Enable the ssh service? (yes/no) [y]:


    Type of ssh key you would like to generate (dsa/rsa) :

  Configure the ntp server? (yes/no) [n]:

  Configure default interface layer (L3/L2) [L2]:

  Configure default switchport interface state (shut/noshut) [noshut]:

  Configure CoPP System Policy Profile ( default / l2 / l3 ) [default]:

This configuration will be applied:
  no telnet server enable
  system default switchport
  no system default switchport shutdown
  policy-map type control-plane copp-system-policy ( default )

Would you like to edit the configuration? (yes/no) [n]:

Use this configuration and save it? (yes/no) [y]:
MTC:Executing copp config

[########################################] 100%
Copy complete, now saving to disk (please wait)...
Copy complete.
Upgrade from NX-OS 9.3(x) to NX-OS 9.3(x)
This section describes how to perform a standard disruptive NX-OS software upgrade from a source release in the NX-OS 9.3(x) minor release to a target release in the NX-OS 9.3(x) minor release.
An example standard disruptive NX-OS software upgrade is performed on a Cisco Nexus 3548 switch from a source release of 9.3(1) to a target release of 9.3(6):
N3K-C3548# show module
Mod Ports             Module-Type                       Model          Status
--- ----- ------------------------------------- --------------------- ---------
1    48   48x10GE Supervisor                    N3K-C3548P-10G        active *

Mod  Sw                       Hw    Slot
---  ----------------------- ------ ----
1    9.3(1)                   1.0    NA
Upgrade Path Summary
A summary of the upgrade path from a source release in the NX-OS 9.3(x) minor release to a target release in the NX-OS 9.3(x) minor release:
9.3(x) -> 9.3(x)
Step 1. Download Target Release from Cisco Software Download
NX-OS 9.3(x) software uses a single NX-OS binary image file (sometimes referred to as a unified image file). You must download this image from Cisco Software Download Website to your local computer. The specific steps you must take to download software from Cisco Software Download website are outside the scope of this document.
Step 2. Copy Target Release to Cisco Nexus Switch through Compact Image Procedure via SCP
Copy the target release unified binary image file to the Nexus 3524 or 3548 Series switch you want to disruptively upgrade by executing the NX-OS Compact Image Procedure via SCP.
For more information on this procedure, refer to Nexus 3000, 3100, and 3500 NX-OS Compact Image Procedure document
This example demonstrates how to copy the NX-OS 9.3(6) software release unified binary image file through the Compact Image Procedure (denoted by the compact keyword) via SCP from SCP server 192.0.2.100 reachable via the management VRF.
N3K-C3548# dir | include bin
  511694599    Nov 23 20:34:22 2020  nxos.9.3.1.bin
N3K-C3548# copy scp://username@192.0.2.100/nxos.9.3.6.bin bootflash: compact vrf management
The authenticity of host '192.0.2.100 (192.0.2.100)' can't be established.
ECDSA key fingerprint is SHA256:TwkQiylhtFDFPPwqh3U2Oq9ugrDuTQ50bB3boV5DkXM.
Are you sure you want to continue connecting (yes/no)? yes
Warning: Permanently added '192.0.2.100' (ECDSA) to the list of known hosts.
username@192.0.2.100's password:
nxos.9.3.6.bin                                100% 1882MB   4.4MB/s   07:09
Copy complete, now saving to disk (please wait)...
Copy complete.
N3K-C3548# dir | include bin
  511694599    Nov 23 20:34:22 2020  nxos.9.3.1.bin
  671643688    Nov 23 20:52:16 2020  nxos.9.3.6.bin
Step 3. Upgrade NX-OS Software via Install All Command
Begin a standard disruptive NX-OS software upgrade through the install all command. This command requires the nxos parameter to be passed in with the absolute file path of the NX-OS unified binary image file corresponding with the target release.
This example shows the install all command where the nxos parameter points to the absolute file path of the NX-OS 9.3(6) unified binary image file (bootflash:nxos.9.3.6.bin).
N3K-C3548# install all nxos bootflash:nxos.9.3.6.bin
Installer will perform compatibility check first. Please wait.
Installer is forced disruptive

Verifying image bootflash:/nxos.9.3.6.bin for boot variable "nxos".
[####################] 100% -- SUCCESS

Verifying image type.
[####################] 100% -- SUCCESS

Preparing "nxos" version info using image bootflash:/nxos.9.3.6.bin.
[####################] 100% -- SUCCESS

Preparing "bios" version info using image bootflash:/nxos.9.3.6.bin.
[####################] 100% -- SUCCESS

Collecting "running" plugin(s) information.
[####################] 100% -- SUCCESS

Collecting plugin(s) information from "new" image.
[####################] 100% -- SUCCESS
[####################] 100% -- SUCCESS

Performing module support checks.
[####################] 100% -- SUCCESS

Notifying services about system upgrade.
[####################] 100% -- SUCCESS


Compatibility check is done:
Module  bootable          Impact  Install-type  Reason
------  --------  --------------  ------------  ------
     1       yes      disruptive         reset  default upgrade is not hitless


Images will be upgraded according to this table:
Module       Image                  Running-Version(pri:alt)           New-Version  Upg-Required
------  ----------  ----------------------------------------  --------------------  ------------
     1        nxos                                    9.3(1)                9.3(6)           yes
     1        bios                        v5.4.0(10/23/2019)    v5.4.0(10/23/2019)            no


Switch will be reloaded for disruptive upgrade.
Do you want to continue with the installation (y/n)?  [n] y


Install is in progress, please wait.

Performing runtime checks.
[####################] 100% -- SUCCESS

Setting boot variables.
[####################] 100% -- SUCCESS

Performing configuration copy.
[####################] 100% -- SUCCESS

Module 1: Refreshing compact flash and upgrading bios/loader/bootrom.
Warning: please do not remove or power off the module at this time.
[####################] 100% -- SUCCESS


Finishing the upgrade, switch will reboot in 10 seconds.
Step 4. Verify Successful NX-OS Software Upgrade
After the Nexus 3524 or 3548 switch is reloaded, verify the upgrade was successful through the show module command. The output of this command shows the desired target release. Refer to this example where the switch was successfully upgraded to NX-OS software release 9.3(6).
N3K-C3548# show module
Mod Ports             Module-Type                      Model           Status
--- ----- ------------------------------------- --------------------- ---------
1    48   48x10GE Supervisor                    N3K-C3548P-10G        active *

Mod  Sw                       Hw    Slot
---  ----------------------- ------ ----
1    9.3(6)                   1.0    NA
Step 5. Delete Source Release Binary Image Files from Cisco Nexus Switch
After you verify the NX-OS software upgrade from the source release to the target release was successful, preserve free space on the bootflash switch by deleting the unified binary image file of the source release from the bootflash of the device. This can be done with the delete bootflash:{filename} command. Refer to this example where the NX-OS 9.3(1) unified binary image file is deleted from the bootflash switch.
N3K-C3548# dir | include bin
  511694599    Nov 23 20:34:22 2020  nxos.9.3.1.bin
  671643688    Nov 23 20:52:16 2020  nxos.9.3.6.bin
N3K-C3548# delete bootflash:nxos.9.3.1.bin
Do you want to delete "/nxos.9.3.1.bin" ? (yes/no/abort)   [y]
N3K-C3548# dir | include bin
  671643688    Nov 23 20:52:16 2020  nxos.9.3.6.bin
Step 6. Run Initial Setup Script to Re-Apply CoPP Policies
Run the initial setup script with the setup command. Enter the basic configuration dialog by entering yes, then accept all default options by repeatedly pressing the Enter key until the NX-OS CLI prompt is returned.
Refer to this example:
N3K-C3548# setup


         ---- Basic System Configuration Dialog ----

This setup utility will guide you through the basic configuration of
the system. Setup configures only enough connectivity for management
of the system.

*Note: setup is mainly used for configuring the system initially,
when no configuration is present. So setup always assumes system
defaults and not the current system configuration values.

Press Enter at anytime to skip a dialog. Use ctrl-c at anytime
to skip the remaining dialogs.

Would you like to enter the basic configuration dialog (yes/no): yes


  Create another login account (yes/no) [n]:

  Configure read-only SNMP community string (yes/no) [n]:

  Configure read-write SNMP community string (yes/no) [n]:

  Enter the switch name :

  Continue with Out-of-band (mgmt0) management configuration? (yes/no) [y]:

    Mgmt0 IPv4 address :

  Configure the default gateway? (yes/no) [y]:

    IPv4 address of the default gateway :

  Enable the telnet service? (yes/no) [n]:

  Enable the ssh service? (yes/no) [y]:

    Type of ssh key you would like to generate (dsa/rsa) :

  Configure the ntp server? (yes/no) [n]:

  Configure default interface layer (L3/L2) [L2]:

  Configure default switchport interface state (shut/noshut) [noshut]:

  Configure CoPP System Policy Profile ( default / l2 / l3 ) [default]:

This configuration will be applied:
  no telnet server enable
  system default switchport
  no system default switchport shutdown
  policy-map type control-plane copp-system-policy ( default )

Would you like to edit the configuration? (yes/no) [n]:

Use this configuration and save it? (yes/no) [y]:
MTC:Executing copp config

[########################################] 100%
Copy complete, now saving to disk (please wait)...
Copy complete.
Related Information
- Documentation to Review Before a NX-OS Software Upgrade
- NX-OS Software Upgrade from NX-OS 7.x to NX-OS 7.x Example
- NX-OS Software Upgrade from NX-OS 6.x to NX-OS 7.x Example
- Cisco Nexus 3000 Series Switches Install and Upgrade Guides
- Cisco Nexus 3500 Series NX-OS Software Upgrade and Downgrade Guide, Release 9.3(x)
- Cisco Nexus 3500 Series NX-OS Software Upgrade and Downgrade Guide, Release 9.2(x)
- Cisco Nexus 3500 Series NX-OS Software Upgrade and Downgrade Guide, Release 7.x
- Cisco Nexus 3500 Series NX-OS Software Upgrade and Downgrade Guide, Release 6.x
- Cisco Nexus 3000 Series Switches Release Notes
- Nexus 3000, 3100, and 3500 NX-OS Compact Image Procedure
- Technical Support & Documentation - Cisco Systems
Revision History
| Revision | Publish Date | Comments |
|---|---|---|
4.0 |
12-Jun-2026
|
Updated spelling, spacing, grammar, sentence structure, and all CCW recommendations. |
3.0 |
06-Jan-2025
|
Formatting, style and machine translation changes. |
2.0 |
25-Jul-2023
|
Technical update.
Updated PII, Branding Requirements, Machine Translation, Style Requirements, Grammar and Formatting. |
1.0 |
26-Nov-2020
|
Initial Release |

 Feedback
Contact Cisco
- Open a Support Case

- (Requires a Cisco Service Contract)